- New and Changed Information
- Preface
- Overview
- Tools
- Installation
- Licenses
- Upgrade
- High Availability
- VSM and VEM Modules
- Ports
- Port Profiles
- Port Channels and Trunking
- Layer 2 Switching
- VLAN
- Private VLAN
- NetFlow
- ACL
- Quality of Service
- SPAN
- Multicast IGMP
- DHCP, DAI, and IPSG
- Virtual Service Domain
- System
- Before Contacting Technical Support
- Index
Upgrade
This chapter describes how to identify and resolve problems related to upgrading the VSM software, and includes the following sections:
Information about Upgrades
The upgrade for the Cisco Nexus 1000V involves upgrading software on both the VSM and the VEM.
An in service software upgrade (ISSU) is available for a stateful upgrade of the Cisco Nexus 1000V image(s) running on the VSM. A stateful upgrade is one without noticeable interruption of data plane services provided by the switch.
Problems with the In Service Software Upgrade
The following are symptoms, possible causes, and solutions for problems with software upgrade using the manual in service software upgrade (ISSU).
|
Return code 0x40930062 (free space in the filesystem is below threshold). |
This error indicates that there is not enough space in the /var/sysmgr partition. |
|
|
Pre-Upgrade check failed. Return code 0x4093000A (SRG collection failed) |
1.
2. |
|
|
Pre-Upgrade check failed. Return code 0x40930076 (Standby sup is offline. ISSU will not proceed) |
The standby VSM is not present or is not synchronized with the active VSM, and the VSMs do not form a stable HA pair. |
1. The output of the show command must indicate the following: Active VSM: Active with HA standby
2.
3. |
|
Pre-Upgrade check failed. Return code 0x4093000F (Failed to copy image) |
The software image files required for the upgrade are not present or were not copied to the bootflash: repository. There may not be enough room in bootflash: for the files to be copied. |
1.
– 
Caution Do not delete kickstart or system image files from bootflash. If there are no image files in bootflash, the system cannot reboot if required.
–
3.
4.
5. |
The install command fails with the following error: Pre-Upgrade check failed. Return code 0x40930011 (Image verification failed) |
The software image file(s) required for the upgrade do not pass the MD5 checksum verification, indicating that the correct file(s) are not present in bootflash: for the upgrade to proceed. |
1. show file bootflash: filename md5sum
2.
3. show file bootflash: filename md5sum
4. |
|
Install has failed. Return code 0x40970001 (Incompatible image) |
You may have used an incorrect filename when entering the install all command. |
Restart the software upgrade using the correct filenames for the new software images. |
After upgrading, the VSMs are not running the new software version. |
1.
2.
3.
4.
5. |
|
Performing the configuration copy process fails and stops the upgrade. |
1. copy running-config startup-config
– show system internal log install details
– |
|
Another upgrade session is in progress from a VSM console or SSH/Telnet. |
||
Install command fails with following error message: Install has failed. Return code 0x4093001E (Standby failed to come online) |
||
The standby VSM takes more than 10 minutes to come up and form a stable HA pair with the active VSM. |
1. boot kickstart filename [sup-1] [sup-2]
2. The standby synchronizes with the active, so that both are running the original software version. |
|
A failure at the standby VSM caused it to reload again after the Continuing with installation, please wait message and before the switchover. |
2. If a process crash is observed, collect details of the upgrade and open a support case. show system internal log install details
3. |
|
|
Return code 0x40930062 (free space in the filesystem is below threshold). |
Problems with the VEM Upgrade
The following are symptoms, possible causes, and solutions for problems with VEM software upgrade.
Problems with the GUI Upgrade
The following are symptoms, possible causes, and solutions for problems with software upgrade using the GUI upgrade application.

Note If you are upgrading directly from SV1(4) to SV1(4a) the GUI is not used and this section does not apply. This section is only applicable if you use the GUI for an intermediate upgrade from a SV1(3x) release to SV1(4), prior to upgrading to SV1(4a).
The upgrade GUI stops and times out after 10 minutes and displays the following message: Error: Could not contact the upgraded VSM at n.n.n.n. Please check the connection. |
During the upgrade, you configured an unreachable IP address for the mgmt0 interface. In this case, one VSM in the redundant pair has new software installed and is unreachable; while the other VSM has the original pre-upgrade original pre-upgrade software version installed and is reachable. |
1.
–
–
2. |
The upgrade GUI stops and times out after 10 minutes and displays the following message: Error: Could not contact the upgraded VSM at 10.104.244.150. Please check the connection. |
You have selected incompatible or incorrect VSM software images for the upgrade. The software images you selected from the GUI selection list included a system image for one software version and a kickstart image for another software version. These images must be for the same software version. For an example of how software images are selected during the upgrade, see Example 5-1. |
1.
–
–
2. |
Example 5-1 Upgrade: Enter Upgrade Information
This example shows how you specify system and kickstart images during the upgrade process. In this example, the images specified are from the same release, SV1.4. If you specify a kickstart image from one release, and a system image from another, then the upgrade cannot proceed.

Recovering a Secondary VSM with Active Primary
You can use the following process to recover a secondary VSM when the primary VSM is active.
Note The information in this section does not apply when upgrading from Release 4.2(1)SV1(4) to
Release 4.2(1)SV1(4a).
Step 1![]() Stop the upgrade on the VSM, using the Stopping a VSM Upgrade
Stop the upgrade on the VSM, using the Stopping a VSM Upgrade
Step 2![]() Change the boot variables back to the previous version using the Changing Boot Variables
Change the boot variables back to the previous version using the Changing Boot Variables
Step 3![]() From the vCenter Server left-hand panel, right-click the secondary VSM and then choose Delete from Disk.
From the vCenter Server left-hand panel, right-click the secondary VSM and then choose Delete from Disk.
Step 4![]() Create a new VSM by reinstalling the software using the vSphere client Deploy OVF Template wizard, specifying the following:
Create a new VSM by reinstalling the software using the vSphere client Deploy OVF Template wizard, specifying the following:
-
Nexus 1000V Secondary configuration method
(Configures the secondary VSM in an HA pair using a GUI setup dialog.) - The host or cluster of the primary VSM
- The same domain ID and password as that of the primary VSM.
For a detailed procedure, see the Cisco Nexus 1000V Software Installation Guide, Release 4.2(1)SV1(4a) .
The VSM comes up and forms an HA pair with the newly-created standalone VSM. The VSMs have the previous version of the software installed.
BEFORE YOU BEGIN
Note The information in this section does not apply when upgrading from Release 4.2(1)SV1(4) to
Release 4.2(1)SV1(4a).
DETAILED STEPS
Step 1![]() Display upgrade status.
Display upgrade status.
Step 3![]() Display upgrade status.
Display upgrade status.
Step 4![]() You have completed this procedure. Return to the process that pointed you here:
You have completed this procedure. Return to the process that pointed you here:
- “Recovering a Secondary VSM with Active Primary” section
- “Recovering a Primary VSM with Active Secondary” section
Changing Boot Variables
You can use this procedure to replace the software images used to boot the VSM.
DETAILED STEPS
Step 1![]() Display the current boot variables.
Display the current boot variables.
Step 2![]() Remove the current system
Remove the current system![]() and kickstart boot variables.
and kickstart boot variables.
Step 3![]() Restore the system and kickstart boot variables to the original pre-upgrade filenames.
Restore the system and kickstart boot variables to the original pre-upgrade filenames.
boot system bootflash: system-boot-variable-name
boot system bootflash: kickstart-boot-variable-name
Step 4![]() Copy the running configuration to the startup configuration.
Copy the running configuration to the startup configuration.
Step 5![]() Verify the change in the system and kickstart boot variables.
Verify the change in the system and kickstart boot variables.
Step 6![]() You have completed this procedure. Return to the process that pointed you here:
You have completed this procedure. Return to the process that pointed you here:
- “Recovering a Secondary VSM with Active Primary” section
- “Recovering a Primary VSM with Active Secondary” section
Powering On the VSM
Use this procedure to power on the newly-created VSM.
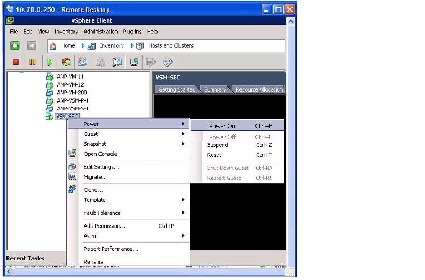
Step 1![]() From the vCenter Server left-hand panel, right-click the VSM and then choose Power > Power On.
From the vCenter Server left-hand panel, right-click the VSM and then choose Power > Power On.
Step 2![]() You have completed this procedure. Return to the “Recovering a Primary VSM with Active Secondary” section.
You have completed this procedure. Return to the “Recovering a Primary VSM with Active Secondary” section.
DETAILED STEPS
Step 1![]() Go to the domain of the existing VSM.
Go to the domain of the existing VSM.
system redundancy role [primary | secondary | standalone]
Step 3![]() Copy the running configuration to the startup configuration.
Copy the running configuration to the startup configuration.
Step 4![]() You have completed this procedure. Return to the “Recovering a Primary VSM with Active Secondary” section.
You have completed this procedure. Return to the “Recovering a Primary VSM with Active Secondary” section.
Recovering a Primary VSM with Active Secondary
You can use the following process to recover a primary VSM when the secondary VSM is active.
Step 2![]() Change the boot variables back to the previous version using the Changing Boot Variables
Change the boot variables back to the previous version using the Changing Boot Variables
Step 3![]() From the vCenter Server left-hand panel, right-click the primary VSM and then choose Delete from Disk.
From the vCenter Server left-hand panel, right-click the primary VSM and then choose Delete from Disk.
Step 4![]() Create a new VSM by reinstalling the software from the OVA and specifying the following:
Create a new VSM by reinstalling the software from the OVA and specifying the following:
For a detailed installation procedure, see the Cisco Nexus 1000V Software Installation Guide, Release 4.2(1)SV1(4a) .
Step 5![]() Make sure the port groups between the host server and VSM are not connected when the new VSM is powered on, using the Disconnecting the Port Groups.
Make sure the port groups between the host server and VSM are not connected when the new VSM is powered on, using the Disconnecting the Port Groups.
Step 6![]() Power on the newly-created VSM using the Powering On the VSM.
Power on the newly-created VSM using the Powering On the VSM.
The VSM comes up with the standalone HA role.
Step 7![]() Change the HA role of the newly-created standalone VSM to primary and save the configuration, using the Changing the HA Role.
Change the HA role of the newly-created standalone VSM to primary and save the configuration, using the Changing the HA Role.
Step 8![]() Power off the newly-created VSM, using the Powering Off the VSM.
Power off the newly-created VSM, using the Powering Off the VSM.
Step 9![]() Make sure the port groups between the host server and VSM are connected when the new VSM is powered on, using the Connecting the Port Groups.
Make sure the port groups between the host server and VSM are connected when the new VSM is powered on, using the Connecting the Port Groups.
Step 10![]() Power on the newly-created VSM using the Powering On the VSM.
Power on the newly-created VSM using the Powering On the VSM.
The VSM comes up, connects with the host server, and forms an HA pair with the existing primary VSM.
Disconnecting the Port Groups
Use this procedure to disconnect and prevent port groups to the VSM from connecting to the host server.
Step 1![]() In vCenter Server, select the VSM and then choose Edit > Settings.
In vCenter Server, select the VSM and then choose Edit > Settings.
The Virtual Machine Properties dialog box opens.
Step 2![]() Select the Control port group and uncheck the following Device Settings:
Select the Control port group and uncheck the following Device Settings:
The connection from the VSM to the host server through the control port is dropped and is not restored when you power on the VSM.

Step 3![]() Select the Management port group and uncheck the following Device Settings:
Select the Management port group and uncheck the following Device Settings:
The connection from the VSM to the host server through the management port is dropped and is not restored when you power on the VSM.

Step 4![]() You have completed this procedure. Return to the “Recovering a Primary VSM with Active Secondary” section.
You have completed this procedure. Return to the “Recovering a Primary VSM with Active Secondary” section.
Powering Off the VSM
Use this procedure to power off the newly-created VSM.
Step 1![]() From the vCenter Server left-hand panel, right-click the VSM and then choose Power > Power Off.
From the vCenter Server left-hand panel, right-click the VSM and then choose Power > Power Off.

Step 2![]() You have completed this procedure. Return to the “Recovering a Primary VSM with Active Secondary” section.
You have completed this procedure. Return to the “Recovering a Primary VSM with Active Secondary” section.
Connecting the Port Groups
Use this procedure to make sure the port groups to the host connect when you power on the VSM.
Step 1![]() In vCenter Server, select the VSM and then choose Edit > Settings.
In vCenter Server, select the VSM and then choose Edit > Settings.
The Virtual Machine Properties dialog box opens.
Step 2![]() Select the Control port group and check the following Device Settings:
Select the Control port group and check the following Device Settings:
When you power on the VSM, it will connect to the host server through the control port.

Step 3![]() Select the Management port group and check the following Device Setting:
Select the Management port group and check the following Device Setting:
When you power on the VSM, it will connect to the host server through the management port.

Step 4![]() You have completed this procedure. Return to the “Recovering a Primary VSM with Active Secondary” section.
You have completed this procedure. Return to the “Recovering a Primary VSM with Active Secondary” section.
Upgrade Troubleshooting Commands
Should all examples comply w/issu upgrade? At least for this release, there is still gui upgrade to 4a from pre-sv1(4) releases, correct? Troubleshooting guide needn’t only address sv1(4) upgrade to sv1(4a), correct?
You can use the commands in this section to troubleshoot problems related to upgrade.
Displays boot variable definitions, showing the names of software images used to boot the VSM. See Example 5-2 on page 5-17 . |
|
Displays module status for active and standby VSMs. See Example 5-4 on page 5-18 (ISSU). |
|
Displays the boot variables currently in the running configuration. See Example 5-5 on page 5-18 . |
|
Displays the boot variables currently in the startup configuration. See Example 5-6 on page 5-19 . |
|
Displays the current connections between the VSM and the VMware host server. See Example 5-7 on page 5-19 . |
|
|
See Example 5-8 on page 5-19 . |
|
Displays the current redundancy status for the VSM. See Example 5-9 on page 5-19 . |
|
Example 5-3 show module (VSM upgraded first with ISSU, VEM upgrade pending)
Example 5-4 show module (VEM and VSM upgraded)
Example 5-5 show running-config | include boot
Example 5-6 show startup-config | include boot
Example 5-7 show svs connections
Example 5-8 show svs upgrade status
Example 5-9 show system redundancy status
switch# show system redundancy status
 Feedback