Performing Software Maintenance Upgrades

This chapter describes how to perform software maintenance upgrades (SMUs) on Cisco NX-OS devices.

This chapter includes the following sections:

About SMUs

A software maintenance upgrade (SMU) is a package file that contains fixes for a specific defect. SMUs are created to respond to immediate issues and do not include new features. Typically, SMUs do not have a large impact on device operations. SMU versions are synchronized to the package major, minor, and maintenance versions they upgrade.

The effect of an SMU depends on its type:

  • Process restart SMU-Causes a process or group of processes to restart on activation.

  • Reload SMU-Causes a parallel reload of supervisors and line cards.

SMUs are not an alternative to maintenance releases. They provide a quick resolution of immediate issues. All defects fixed by SMUs are integrated into the maintenance releases.

For information on upgrading your device to a new feature or maintenance release, see the "Upgrading and Downgrading the Cisco Nexus 3400-S Series NX-OS Software" chapter in the Cisco Nexus 3400-S Series NX-OS Software Upgrade and Downgrade Guide.

For information on Cisco NX-OS optionality feature, see the "Optionality in Cisco NX-OS Software" chapter in the Cisco Nexus 3400-S Series NX-OS Software Upgrade and Downgrade Guide.


Note

Activating an SMU does not cause any earlier SMUs, or the package to which the SMU applies, to be automatically deactivated.

Package Management

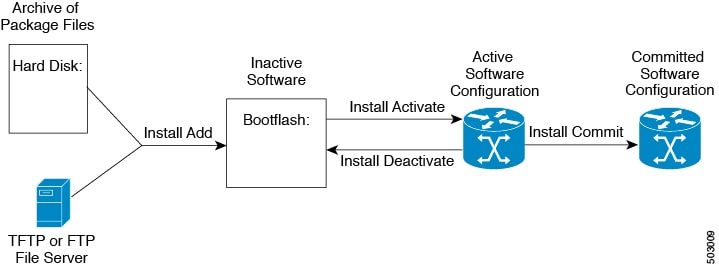
The general procedure for adding and activating SMU packages on the device is as follows:

  1. Copy the package file or files to a local storage device or file server.

  2. Add the package or packages on the device using the install add command.

  3. Activate the package or packages on the device using the install activate command.

  4. Commit the current set of packages using the install commit command.

  5. (Optional) Deactivate and remove the package.

The following figure illustrates the key steps in the package management process.

Figure 1. Process to Add, Activate, and Commit SMU Packages

Impact of Package Activation and Deactivation

The activation or deactivation of an SMU package can have an immediate impact on the system. The system can be affected in the following ways:

  • New processes might be started.

  • Running processes might be stopped or restarted.

  • All processes in the line cards might be restarted. Restarting processes in the line cards is equivalent to a soft reset.

  • The line cards might reload.

  • No processes in the line cards might be affected.


Note

You must address any issues that result from the revised configuration and reapply the configuration, if necessary.

Tip

After the activation process completes, enter the show install log command to display the process results.

Prerequisites for SMUs

These prerequisites must be met for a package to be activated or deactivated:

  • You must be in a user group associated with a task group that includes the proper task IDs. If you suspect a user group assignment is preventing you from using a command, contact your AAA administrator for assistance.

  • Verify that all line cards are installed and operating properly. For example, do not activate or deactivate packages while line cards are booting, while line cards are being upgraded or replaced, or when you anticipate an automatic switchover activity.

Guidelines and Limitations for SMUs

SMUs have the following guidelines and limitations:

  • Some packages require the activation or deactivation of other packages. If the SMUs have dependencies on each other, you cannot activate them without first activating the previous ones.

  • The package being activated must be compatible with the current active software set.

  • Activation is performed only after the package compatibility checks have been passed. If a conflict is found, an error message displays.

  • You can activate or deactivate multiple SMUs with a tarball SMU.

  • While a software package is being activated, other requests are not allowed to run on any of the impacted nodes. Package activation is completed when a message similar to this one appears:

    Install operation 1 completed successfully at Thu Jan 9 01:19:24 2014
  • Each CLI install request is assigned a request ID, which can be used later to review the events.

  • If you perform a software maintenance upgrade and later upgrade your device to a new Cisco NX-OS software release, the new image will overwrite both the previous Cisco NX-OS release and the SMU package file.

  • The SMU package file is named nxos.CSCab00001-n9k_ALL-1.0.0-7.0.3.I5.1.lib32_n9000.rpm, which support both n9k_EOR and n9k_TOR platforms.

Performing a Software Maintenance Upgrade for Cisco NX-OS

Preparing for Package Installation

You should use several show commands to gather information in preparation for the SMU package installation.

Before you begin

Determine if a software change is required.

Verify that the new package is supported on your system. Some software packages require that other packages or package versions be activated, and some packages support only specific line cards.

Review the release notes for important information related to that release and to help determine the package compatibility with your device configuration.

Verify that the system is up, stable, and prepared for the software changes.

SUMMARY STEPS

  1. show logging logfile | grep -i "System ready"
  2. show install active
  3. show module
  4. show clock

DETAILED STEPS

  Command or Action Purpose
Step 1

show logging logfile | grep -i "System ready"

Example:

switch# show logging logfile | grep -i "System ready"

Displays if your system is up. Use this command to verify that the system is ready for SMU package installation. Configuring install commands before the system is ready, may result with an "Install operation 11 failed because cannot lock config" error message.

Step 2

show install active

Example:

switch# show install active

Displays the active software on the device. Use this command to determine what software should be added on the device and to compare to the active software report after installation operations are complete.

Step 3

show module

Example:

switch# show module

Confirms that all modules are in the stable state.

Step 4

show clock

Example:

switch# show clock

Verifies that the system clock is correct. Software operations use certificates based on device clock times.

Example

This example shows how to verify that the system is up. A "System ready" response indicates that the system is ready for SMU package installation.
switch# show logging logfile | grep -i "System ready"
2018 Feb 19 11:13:04 switch %ASCII-CFG-2-CONF_CONTROL: System ready

This example shows how to display the active packages for the entire system. Use this information to determine if a software change is required.

switch# show install active
Boot Image:
        NXOS Image: bootflash:///nxos.7.0.3.I7.3.1.bin

Active Packages:

switch#

This example shows how to display the current system clock setting:

switch# show clock
02:14:51.474 PST Wed Jan 04 2014

Downloading the SMU Package File from Cisco.com

Follow these steps to download the SMU package file:

SUMMARY STEPS

  1. Log in to Cisco.com.
  2. Go to the Download Software page at this URL: http://software.cisco.com/download/navigator.html
  3. In the Select a Product list, choose Switches > Data Center Switches > Cisco Nexus 9000 Series Switches > model.
  4. Choose the appropriate SMU file for your device and click Download.

DETAILED STEPS


Step 1

Log in to Cisco.com.

Step 2

Go to the Download Software page at this URL: http://software.cisco.com/download/navigator.html

Step 3

In the Select a Product list, choose Switches > Data Center Switches > Cisco Nexus 9000 Series Switches > model.

Step 4

Choose the appropriate SMU file for your device and click Download.


Copying the Package File to a Local Storage Device or Network Server

You must copy the SMU package file to a local storage device or a network file server to which the device has access. After this task is done, the package can be added and activated on the device.

If you need to store package files on the device, we recommend that you store the files on the hard disk. The boot device is the local disk from which the package is added and activated. The default boot device is bootflash:.


Tip

Before you copy package files to a local storage device, use the dir command to determine if the required package files are already on the device.

If the SMU package files are located on a remote TFTP, FTP, or SFTP server, you can copy the files to a local storage device. After the files are located on the local storage device, the package can be added and activated on the device from that storage device. The following server protocols are supported:

  • Trivial File Transfer Protocol—TFTP allows files to be transferred from one computer to another over a network, usually without the use of client authentication (for example, username and password). It is a simplified version of FTP.


    Note

    Some package files might be larger than 32 MB, and the TFTP services provided by some vendors might not support a file this large. If you do not have access to a TFTP server that supports files larger than 32 MB, download the file using FTP.
  • File Transfer Protocol—FTP is part of the TCP/IP protocol stack and requires a username and password.

  • SSH File Transfer Protocol—SFTP is part of the SSHv2 feature in the security package and provides for secure file transfers. For more information, see the "Configuring SSH and Telnet" chapter in the Cisco Nexus 3400-S Series NX-OS Security Configuration Guide.


Note

Consult your system administrator for the location and availability of your network server.

Use the commands in the following table to copy the SMU package file from the server to your device using the file transfer protocols.

Table 1. Commands for Copying SMU Package Files to the Device

Command

Purpose

copy tftp://hostname-or-ipaddress/directory-path/filename bootflash:

switch# copy tftp://10.1.1.1/images/
nxos.CSCab00001-n9k_ALL-1.0.0-7.0.3.I5.1.lib32_n9000.rpm bootflash:

Copies the package file from the TFTP server to the bootflash:.

  • hostname-or-ipaddress—The hostname or IP address of the network file server.

  • directory-path—The network file server path that leads to the package file to be added.

  • filename—The name of the package file that you want to add.

copy ftp://username:password@hostname-or-ipaddress/directory-path/filename bootflash:

switch# copy ftp://john:secret@10.1.1.1/images/
nxos.CSCab00001-n9k_ALL-1.0.0-7.0.3.I5.1.lib32_n9000.rpm bootflash:

Copies the package file from the FTP server to the bootflash:.

  • username—The username of the user who has access privileges to the directory in which the package file is stored.

  • password—The password associated with the username of the user who has access privileges to the directory in which the package file is stored. If a password is not provided, the networking device accepts anonymous FTP.

  • hostname-or-ipaddress—The hostname or IP address of the network file server.

  • directory-path—The network file server path that leads to the package file to be added. The specified directory should be a directory under the home directory of the user. In this example, the file being downloaded is in a subdirectory called "images" in the home directory of the user "john."

    Note 

    For FTP services, directory-path is the directory relative to the username home directory. If you want to specify an absolute path for the directory, you must add a “/” following the server address.

  • filename—The name of the package file that you want to add.

copy sftp://hostname-or-ipaddress/directory-path/filename bootflash:

switch# copy
sftp://10.1.1.1/images/nxos.CSCab00001-n9k_ALL-
1.0.0-7.0.3.I5.1.lib32_n9000.rpm bootflash:

Copies the package file from the SFTP server to the bootflash:.

  • hostname-or-ipaddress—The hostname or IP address of the network file server.

  • directory-path—The network file server path that leads to the package file to be added.

  • filename—The name of the package file that you want to add.

After the SMU package file has been transferred to a network file server or the local storage device, you are ready to add and activate the file.

Adding and Activating Packages

You can add SMU package files that are stored on a local storage device or on a remote TFTP, FTP, or SFTP server to your device.

Note

This procedure uses Cisco NX-OS CLI commands to add and activate RPM package files. If you would prefer to use YUM commands, follow the instructions in the "Installing RPMs from Bash" section of the Cisco Nexus 9000 Series NX-OS Programmability Guide.


Note

The SMU package being activated must be compatible with the currently active software to operate. When an activation is attempted, the system runs an automatic compatibility check to ensure that the package is compatible with the other active software on the device. If a conflict is found, an error message displays. The activation is performed only after all compatibility checks have been passed.

Note

Activating an SMU does not cause any earlier SMUs or the package to which the SMU applies to be automatically deactivated.

Before you begin

Make sure that all packages to be added are present on a local storage device or a network file server.

Make sure that you meet all of the prerequisites for the activation of packages.

Complete the procedure described in Copying the Package File to a Local Storage Device or Network Server.

SUMMARY STEPS

  1. Connect to the console port and log in.
  2. (Optional) dir bootflash:
  3. install add filename [activate]
  4. (Optional) show install inactive
  5. install activate filename
  6. Repeat Step 5 until all packages are activated.
  7. (Optional) show install active

DETAILED STEPS

  Command or Action Purpose
Step 1

Connect to the console port and log in.

Establishes a CLI management session to the console port.

Step 2

(Optional) dir bootflash:

(Optional)

Displays the package files that are available to be added.

Note 
Only SMU package files can be added and activated using this procedure.
Step 3

install add filename [activate]

Example:

switch# install add bootflash:
nxos.CSCab00001-n9k_ALL-1.0.0-7.0.3.I5.1.
lib32_n9000.rpm

Unpacks the package software files from the local storage device or network server and adds them to the bootflash: and all active and standby supervisors installed on the device.

The filename argument can take any of these formats:

  • bootflash:filename
  • tftp://hostname-or-ipaddress/directory-path/filename
  • ftp://username:password@ hostname-or-ipaddress/directory-path/filename
  • usb1:filename
  • usb2:filename

For all SMU packages except the CSCur02700 SMU package, you can use the optional activate keyword to automatically activate the package after it is added successfully.

Note 

For the CSCur02700 SMU package, use the install activate command in Step 5 to activate the package. Do not use the optional activate keyword with the install add command as the package might fail and require a reboot.

Multiple versions of an SMU package can be added to the storage device without impacting the running configuration, but only one version of a package can be activated for a line card.

Note 

Press ? after a partial package name to display all possible matches available for activation. If there is only one match, press the Tab key to fill in the rest of the package name.

You can use the install add command with a tarball SMU to install multiple SMUs at the same time.

Step 4

(Optional) show install inactive

Example:

switch# show install inactive
(Optional)

Displays the inactive packages on the device. Verify that the package added in the previous step appears in the display.

Step 5

install activate filename

Example:

switch# install activate
nxos.CSCab00001-n9k_ALL-1.0.0-7.0.3.I5.1.
lib32_n9000.rpm

Example:

switch# install activate
nxos.CSCab00001-n9k_ALL-1.0.0-7.0.3.I5.1.
lib32_n9000.rpm
Install operation 18 !!WARNING!! This patch
will get activated only after a reload of
the switch.
at Wed Jun 22 00:42:12 2016

Activates a package that was added to the device. SMU packages remain inactive until activated. (Skip this step if the package was activated earlier with the install add activate command.)

Tip 

After the activation process finishes, enter the show install log command to display the process results.

Step 6

Repeat Step 5 until all packages are activated.

Activates additional packages as required.

Step 7

(Optional) show install active

Example:

switch# show install active
(Optional)

Displays all active packages. Use this command to determine if the correct packages are active.

Example

This example shows how to add multiple SMU package files with a tarball and then verify the added package files.
switch# install add bootflash:nxos.CSC123456-n9k_ALL-1.0.0-7.0.3.I7.3.
lib32_n9000.tar
[####################] 100%
Install operation 882 completed successfully at Tue Mar  6 17:30:31 2018
 
switch# 
switch# show install inactive 
Boot Image:
        NXOS Image: bootflash:////nxos.7.0.3.I7.3.bin-219-CCO
 
Inactive Packages:
        nxos.CSC123456_core-n9k_ALL-1.0.0-7.0.3.I7.3.lib32_n9000
        nxos.CSC123456_eth-n9k_ALL-1.0.0-7.0.3.I7.3.lib32_n9000
        
 
Inactive Base Packages:
        
switch# 

Committing the Active Package Set

When an SMU package is activated on the device, it becomes part of the current running configuration. To make the package activation persistent across system-wide reloads, you must commit the package on the device.


Note

On startup, the device loads the committed package set. If the system is reloaded before the current active package is committed, the previously committed package set is used.


Before you begin

Before you commit a package set, verify that the device is operating correctly and is forwarding packets as expected.

Complete the procedure described in Adding and Activating Packages.

SUMMARY STEPS

  1. install commit filename
  2. (Optional) show install committed

DETAILED STEPS

  Command or Action Purpose
Step 1

install commit filename

Example:

switch# install commit nxos.CSCab00001-n9k_ALL-1.0.0-7.0.3.I5.1.lib32_n9000.rpm

Commits the current set of packages so that these packages are used if the device is restarted.

Step 2

(Optional) show install committed

Example:

switch# show install committed
(Optional)

Displays which packages are committed.

Example

This example shows how to commit active SMU packages on the device and then verify the committed packages:

switch# install commit nxos.CSCab00001-n9k_ALL-1.0.0-7.0.3.I5.1.lib32_n9000.rpm
Install operation 2 completed successfully at Wed Jun 22 01:20:46 2016

switch# show install committed
Committed Packages:
nxos.CSCab00001-n9k_ALL-1.0.0-7.0.3.I5.1.lib32_n9000.rpm

Deactivating and Removing Packages

When a package is deactivated, it is no longer active on the device, but the package files remain on the boot disk. The package files can be reactivated later, or they can be removed from the disk.

The Cisco NX-OS software also provides the flexibility to roll back the selected package set to a previously saved package set. If you find that you prefer a previous package set over the currently active package set, you can use the install deactivate and install commit commands to make a previously active package set active again.


Note

This procedure uses Cisco NX-OS CLI commands to deactivate and remove RPM package files. If you would prefer to use YUM commands, follow the instructions in the "Erasing an RPM" section of the Cisco Nexus 9000 Series NX-OS Programmability Guide.


Before you begin

You cannot deactivate a package if it is required by another active package. When you attempt to deactivate a package, the system runs an automatic check to ensure that the package is not required by other active packages. The deactivation is performed only after all compatibility checks have been passed.

You cannot delete a package if it is part of the running or committed software of the device.

SUMMARY STEPS

  1. Connect to the console port and log in.
  2. install deactivate filename
  3. (Optional) show install inactive
  4. (Optional) install commit
  5. (Optional) install remove {filename | inactive}

DETAILED STEPS

  Command or Action Purpose
Step 1

Connect to the console port and log in.

Establishes a CLI management session to the console port.

Step 2

install deactivate filename

Example:

switch# install deactivate nxos.CSCab00001-n9k_ALL-1.0.0-7.0.3.I5.1.lib32_n9000.rpm

Deactivates a package that was added to the device and turns off the package features for the line card.

Step 3

(Optional) show install inactive

Example:

switch# show install inactive
(Optional)

Displays the inactive packages on the device.

Step 4

(Optional) install commit

Example:

switch# install commit
(Optional)

Commits the current set of packages so that these packages are used if the device is restarted.

Note 

Packages can be removed only if the deactivation operation is committed.

Step 5

(Optional) install remove {filename | inactive}

Example:

switch# install remove nxos.CSCab00001-n9k_ALL-1.0.0-7.0.3.I5.1.lib32_n9000.rpm
Proceed with removing nxos.CSCab00001-n9k_ALL-1.0.0-7.0.3.I5.1.lib32_n9000.rpm? (y/n)? [n] y

Example:

switch# install remove inactive
Proceed with removing? (y/n)? [n] y
(Optional)

Removes the inactive package.

  • Only inactive packages can be removed.
  • Packages can be removed only if they are deactivated from all line cards in the device.
  • The package deactivation must be committed.
  • To remove a specific inactive package from a storage device, use the install remove command with the filename argument.
  • To remove all inactive packages from all nodes in the system, use the install remove command with the inactive keyword.

Example

This example shows how to deactivate a package, commit the changes, and remove the inactive package from the device:

switch# install deactivate nxos.CSCab00001-n9k_ALL-1.0.0-7.0.3.I5.1.lib32_n9000.rpm
Install operation 3 completed successfully at Wed Jun 22 01:20:36 2016

switch# show install inactive
Inactive Packages:
nxos.CSCab00001-n9k_ALL-1.0.0-7.0.3.I5.1.lib32_n9000.rpm

switch# install commit
Install operation 4 completed successfully at Wed Jun 22 01:20:46 2016

switch# install remove nxos.CSCab00001-n9k_ALL-1.0.0-7.0.3.I5.1.lib32_n9000.rpm
Proceed with removing nxos.CSCab00001-n9k_ALL-1.0.0-7.0.3.I5.1.lib32_n9000.rpm? (y/n)? [n] y
Install operation 5 completed successfully at Wed Jun 22 01:20:57 2016

This example shows how to deactivate multiple packages with one command, remove the inactive packages from the device, and verify the package removal:

switch# install deactivate nxos.CSC123456_core-n9k_ALL-1.0.0-7.0.3.I7.3.
lib32_n9000 nxos.CSC123456_eth-n9k_ALL-1.0.0-7.0.3.I7.3.lib32_n9000
[####################] 100%
Install operation 884 completed successfully at Tue Mar  6 17:34:02 2018
 
switch# 
switch# show install inactive 
Boot Image:
        NXOS Image: bootflash:////nxos.7.0.3.I7.3.bin-219-CCO
 
Inactive Packages:
        nxos.CSC123456_core-n9k_ALL-1.0.0-7.0.3.I7.3.lib32_n9000
        nxos.CSC123456_eth-n9k_ALL-1.0.0-7.0.3.I7.3.lib32_n9000
        
 
Inactive Base Packages:
        
switch#
switch# install remove nxos.CSC123456_core-n9k_ALL-1.0.0-7.0.3.I7.3.lib32_n9000
Proceed with removing nxos.CSC123456_core-n9k_ALL-1.0.0-7.0.3.I7.3.lib32_n9000? (y/n)?  [n] y
[####################] 100%
Install operation 885 completed successfully at Tue Mar  6 17:34:56 2018
 
switch# install remove nxos.CSC123456_eth-n9k_ALL-1.0.0-7.0.3.I7.3.lib32_n9000
Proceed with removing nxos.CSC123456_eth-n9k_ALL-1.0.0-7.0.3.I7.3.lib32_n9000? (y/n)?  [n] y
[####################] 100%
Install operation 886 completed successfully at Tue Mar  6 17:35:14 2018
 
switch#
switch# show install inactive 
Boot Image:
        NXOS Image: bootflash:////nxos.7.0.3.I7.3.bin-219-CCO
 
Inactive Packages:
        
 
Inactive Base Packages:
        
switch# 

Downgrading Feature RPMs

Follow this procedure to downgrade an installed feature RPM to the base feature RPM.


Note

This procedure uses Cisco NX-OS CLI commands to downgrade feature RPMs. If you would prefer to use YUM commands, follow the instructions in the "Downgrading an RPM" section of the Cisco Nexus 9000 Series NX-OS Programmability Guide.


SUMMARY STEPS

  1. (Optional) show install packages
  2. run bash
  3. cd /rpms
  4. ls *feature*
  5. cp filename /bootflash
  6. exit
  7. install add bootflash:filename activate downgrade
  8. (Optional) show install packages | i feature

DETAILED STEPS

  Command or Action Purpose
Step 1

(Optional) show install packages

Example:

switch# show install packages
ntp.lib32_n9000     1.0.1-7.0.3.I2.2e      installed  
(Optional)

Displays the feature RPM packages on the device.

Step 2

run bash

Example:

switch# run bash
bash-4.2$

Loads Bash.

Step 3

cd /rpms

Example:

bash-4.2$ cd /rpms

Changes to the RPMs folder in Bash.

Step 4

ls *feature*

Example:

bash-4.2$ ls *ntp*
ntp-1.0.0-7.0.3.I2.2e.lib32_n9000.rpm

Lists the RPM for the specified feature.

Step 5

cp filename /bootflash

Example:

bash-4.2$ cp ntp-1.0.0-7.0.3.I2.2e.lib32_n9000.rpm /bootflash

Copies the base feature RPM to the bootflash.

Step 6

exit

Example:

bash-4.2$ exit

Exits Bash.

Step 7

install add bootflash:filename activate downgrade

Example:

switch# install add bootflash:ntp-1.0.0-7.0.3.I2.2e.lib32_n9000.rpm activate downgrade
Adding the patch (/ntp-1.0.0-7.0.3.I2.2e.lib32_n9000.rpm)
[#############       ]  60%
Adding the patch (/ntp-1.0.0-7.0.3.I2.2e.lib32_n9000.rpm)
[####################] 100%
Install operation 11 completed successfully at Thu Sep  8 15:35:35 2015

Activating the patch (/ntp-1.0.0-7.0.3.I2.2e.lib32_n9000.rpm)
This install operation requires system reload. Do you wish to continue (y/n)?: [n] y
[  217.975959] [1473348971]  writing reset reason 132, System reset due to reload patch(es) activation
[  217.991166] [1473348971]\ufffd\ufffd
CISCO SWITCH Ver7.51
Device detected on 0:6:0 after 0 msecs 
Device detected on 0:1:1 after 0 msecs 
Device detected on 0:1:0 after 0 msecs 
MCFrequency 1333Mhz
Relocated to memory

Downgrades the feature RPM.

Note 

If you are prompted to reload the device, enter Y. A reload is required only when downgrading the NTP and SNMP feature RPMs.

Step 8

(Optional) show install packages | i feature

Example:

switch# show install packages | i ntp
ntp.lib32_n9000    1.0.0-7.0.3.I2.2e   installed
  
(Optional)

Displays the base feature RPM on the device.

Displaying Installation Log Information

The installation log provides information on the history of the installation operations. Each time an installation operation is run, a number is assigned to that operation.

  • Use the show install log command to display information about both successful and failed installation operations.

  • Use the show install log command with no arguments to display a summary of all installation operations. Specify the request-id argument to display information specific to an operation. Use the detail keyword to display details for a specific operation, including file changes, nodes that could not be reloaded, and any impact to processes.

This example shows how to display information for all installation requests:

switch# show install log
Wed Jun 22 01:26:09 2016
Install operation 1 by user 'admin' at Wed Jun 22 01:19:19 2016
Install add bootflash:nxos.CSCab00001-n9k_ALL-1.0.0-7.0.3.I5.1.lib32_n9000.rpm
Install operation 1 completed successfully at Wed Jun 22 01:19:24 2016
----------------------------------------
Install operation 2 by user 'admin' at Wed Jun 22 01:19:29 2016
Install activate nxos.CSCab00001-n9k_ALL-1.0.0-7.0.3.I5.1.lib32_n9000.rpm
Install operation 2 completed successfully at Wed Jun 22 01:19:45 2016
----------------------------------------
Install operation 3 by user 'admin' at Wed Jun 22 01:20:05 2016
Install commit nxos.CSCab00001-n9k_ALL-1.0.0-7.0.3.I5.1.lib32_n9000.rpm
Install operation 3 completed successfully at Wed Jun 22 01:20:08 2016
----------------------------------------
Install operation 4 by user 'admin' at Wed Jun 22 01:20:21 2016
Install deactivate nxos.CSCab00001-n9k_ALL-1.0.0-7.0.3.I5.1.lib32_n9000.rpm
Install operation 4 completed successfully at Wed Jun 22 01:20:36 2016
----------------------------------------
Install operation 5 by user 'admin' at Wed Jun 22 01:20:43 2016
Install commit nxos.CSCab00001-n9k_ALL-1.0.0-7.0.3.I5.1.lib32_n9000.rpm
Install operation 5 completed successfully at Wed Jun 22 01:20:46 2016
----------------------------------------
Install operation 6 by user 'admin' at Wed Jun 22 01:20:55 2016
Install remove nxos.CSCab00001-n9k_ALL-1.0.0-7.0.3.I5.1.lib32_n9000.rpm
Install operation 6 completed successfully at Wed Jun 22 01:20:57 2016
----------------------------------------
Install operation 7 by user 'admin' at Wed Jun 22 01:21:07 2016
Install remove
Install operation 7 completed successfully at Wed Jun 22 01:21:10 2016

This example shows how to display additional information, including any impact to nodes and processes:

switch# show install log detail
Wed Jun 22 01:24:03 2016
Install operation 1 by user 'admin' at Wed Jun 22 01:19:19 2016
Installer started downloading the package: /nxos.CSCab00001-n9k_ALL-1.0.0-7.0.3.I5.1.lib32_n9000.rpm
via bootflash
Install add bootflash:nxos.CSCab00001-n9k_ALL-1.0.0-7.0.3.I5.1.lib32_n9000.rpm
Copying file at Wed Jun 22 01:19:20 2016
Download success, 238545 bytes received
Verifying package
Checking MD5 at Wed Jun 22 01:19:21 2016
MD5 checksum OK
Checking HW platform at Wed Jun 22 01:19:22 2016
Checking SW platform at Wed Jun 22 01:19:23 2016
Package verified successfully
Sending patch file to plugin manager at Wed Jun 22 01:19:23 2016
The following package is now available to be activated: nxos.CSCab00001-n9k_ALL-
1.0.0-7.0.3.I5.1.lib32_n9000.rpm
Install operation 1 completed successfully at Wed Jun 22 01:19:24 2016
----------------------------------------
Install operation 2 by user 'admin' at Wed Jun 22 01:19:29 2016
Install activate nxos.CSCab00001-n9k_ALL-1.0.0-7.0.3.I5.1.lib32_n9000.rpm
Install activate action started
The software will be activated with process restart
2 processes affected
sysinfo (modified)
vman (modified)
Install operation 2 completed successfully at Wed Jun 22 01:19:45 2016
----------------------------------------
Install operation 3 by user 'admin' at Wed Jun 22 01:20:05 2016
Install commit nxos.CSCab00001-n9k_ALL-1.0.0-7.0.3.I5.1.lib32_n9000.rpm
MD5 checksum OK for patch: nxos.CSCab00001-n9k_ALL-1.0.0-7.0.3.I5.1.lib32_n9000.rpm
Install operation 3 completed successfully at Wed Jun 22 01:20:08 2016
----------------------------------------
Install operation 4 by user 'admin' at Wed Jun 22 01:20:21 2016
Install deactivate nxos.CSCab00001-n9k_ALL-1.0.0-7.0.3.I5.1.lib32_n9000.rpm
Install deactivate action started
The software will be deactivated with process restart
2 processes affected
sysinfo (modified)
vman (modified)
Install operation 4 completed successfully at Wed Jun 22 01:20:36 2016
----------------------------------------
Install operation 5 by user 'admin' at Wed Jun 22 01:20:43 2016
Install commit nxos.CSCab00001-n9k_ALL-1.0.0-7.0.3.I5.1.lib32_n9000.rpm
MD5 checksum OK for patch: nxos.CSCab00001-n9k_ALL-1.0.0-7.0.3.I5.1.lib32_n9000.rpm
Install operation 5 completed successfully at Wed Jun 22 01:20:46 2016
----------------------------------------
Install operation 6 by user 'admin' at Wed Jun 22 01:20:55 2016
Install remove nxos.CSCab00001-n9k_ALL-1.0.0-7.0.3.I5.1.lib32_n9000.rpm
Install operation 6 completed successfully at Wed Jun 22 01:20:57 2016
----------------------------------------
Install operation 7 by user 'admin' at Wed Jun 22 01:21:07 2016
Install remove
Install operation 7 completed successfully at Wed Jun 22 01:21:10 2016

This example shows the output after an SMU package has been activated but before the switch has been reloaded:

switch# show install log detail
Install operation 18 by user 'admin' at Wed Jun 22 00:42:10 2016
Install activate nxos.CSCab00001-n9k_ALL-1.0.0-7.0.3.I5.1.lib32_n9000.rpm
Install activate action started
The software will be activated with system reload
Install operation 18 !!WARNING!! This patch will get activated only after
a reload of the switch. at Wed Jun 22 00:42:12 2016

Performing a Software Maintenance Upgrade for Guest Shell Bash

You can perform a software maintenance upgrade for Bash in the Guest Shell.

SUMMARY STEPS

  1. Download the SMU package file for Guest Shell Bash from Cisco.com.
  2. Copy the SMU package file to the bootflash: of the switch.
  3. guestshell
  4. sudo rpm -Uvh /bootflash/filename
  5. rpm -qa | grep bash
  6. guestshell sync

DETAILED STEPS

  Command or Action Purpose
Step 1

Download the SMU package file for Guest Shell Bash from Cisco.com.

Obtains the package file from Cisco.com. For instructions, see Downloading the SMU Package File from Cisco.com.

Step 2

Copy the SMU package file to the bootflash: of the switch.

Copies the package file to the device. For instructions, see Copying the Package File to a Local Storage Device or Network Server.

Step 3

guestshell

Example:

switch# guestshell
guestshell:~$

Accesses the Guest Shell.

Step 4

sudo rpm -Uvh /bootflash/filename

Example:

guestshell:~$ sudo rpm -Uvh /bootflash/bash-4.2-r8.x86_64.rpm
Preparing...                ########################################### [100%]
   1:bash                   ########################################### [100%]
update-alternatives: Linking //bin/sh to /bin/bash

Upgrades the existing Bash file in the Guest Shell.

Step 5

rpm -qa | grep bash

Example:

guestshell:~$ rpm -qa | grep bash
bash-4.2-r8.x86_64

Verifies that the new version of the Bash file was installed successfully.

Step 6

guestshell sync

Example:

switch# guestshell sync
Access to the guest shell will be temporarily disabled while it synchronizes contents to standby.
Are you sure you want to continue? (y/n) [n] y
dt-n9k3-1# 2014 Oct  7 05:00:01 dt-n9k3-1 %$ VDC-1 %$ %VMAN-2-INSTALL_STATE: Deactivating virtual service 'guestshell+'
dt-n9k3-1# 2014 Oct  7 05:00:06 dt-n9k3-1 %$ VDC-1 %$ %VMAN-2-ACTIVATION_STATE: Successfully deactivated virtual
service 'guestshell+' 
2014 Oct  7 05:00:12 dt-n9k3-1 %$ VDC-1 %$ %VMAN-2-ACTIVATION_STATE: Successfully deactivated virtual service
'guestshell+' ; Starting sync to standby sup
2014 Oct  7 05:00:32 dt-n9k3-1 %$ VDC-1 %$ %VMAN-2-MOVE_STATE: Successfully synced virtual service 'guestshell+' ;
Activating
2014 Oct  7 05:00:32 dt-n9k3-1 %$ VDC-1 %$ %VMAN-2-ACTIVATION_STATE: Activating virtual service 'guestshell+' 
2014 Oct  7 05:00:56 dt-n9k3-1 %$ VDC-1 %$ %VMAN-2-ACTIVATION_STATE: Successfully activated virtual service
'guestshell+'

On a dual-supervisor system, synchronizes the rootfs with the Bash SMU version to the standby supervisor before doing a switchover. If you do not run this command, you will need to repeat this procedure after a supervisor switchover.

Note 

The new Bash file is preserved after a Guest Shell reboot or Guest Shell disable+enable. However, you need to reinstall the Guest Shell Bash SMU package file after a Guest Shell destroy+enable.

Additional References

Related Documents

Related Topic Document Title
Software upgrades Cisco Nexus 9000 Series NX-OS Software Upgrade and Downgrade Guide