Configuring SPAN

This chapter describes how to configure an Ethernet switched port analyzer (SPAN) to analyze traffic between ports on Cisco NX-OS devices.

About SPAN

SPAN analyzes all traffic between source ports by directing the SPAN session traffic to a destination port with an external analyzer attached to it.

You can define the sources and destinations to monitor in a SPAN session on the local device.

SPAN Sources

The interfaces from which traffic can be monitored are called SPAN sources. Sources designate the traffic to monitor and whether to copy ingress (Rx), egress (Tx), or both directions of traffic. SPAN sources include the following:

  • Ethernet ports (but not subinterfaces)

  • The inband interface to the control plane CPU


    Note


    When you specify the supervisor inband interface as a SPAN source, the device monitors all packets that are sent by the Supervisor CPU.


  • VLANs

    • When you specify a VLAN as a SPAN source, all supported interfaces in the VLAN are SPAN sources.

    • VLANs can be SPAN sources only in the ingress direction.


      Note


      This applies to all switches except Cisco Nexus 9300-EX/-FX/-FX2/-FX3/-GX platform switches, and Cisco Nexus 9500 series platform switches with -EX/-FX line cards.


  • Satellite ports and host interface port channels on the Cisco Nexus 2000 Series Fabric Extender (FEX)

    • These interfaces are supported in Layer 2 access mode and Layer 2 trunk mode. They are not supported in Layer 3 mode, and Layer 3 subinterfaces are not supported.

    • Cisco Nexus 9300 and 9500 platform switches support FEX ports as SPAN sources in the ingress direction for all traffic and in the egress direction only for known Layer 2 unicast traffic flows through the switch and FEX. Routed traffic might not be seen on FEX HIF egress SPAN.


Note


A single SPAN session can include mixed sources in any combination of the above.


Characteristics of Source Ports

SPAN source ports have the following characteristics:

  • A port configured as a source port cannot also be configured as a destination port.

  • If you use the supervisor inband interface as a SPAN source, all packets generated by the supervisor hardware (egress) are monitored.


    Note


    Rx is from the perspective of the ASIC (traffic egresses from the supervisor over the inband and is received by the ASIC/SPAN).


SPAN Destinations

SPAN destinations refer to the interfaces that monitor source ports. Destination ports receive the copied traffic from SPAN sources. SPAN destinations include the following:

  • Ethernet ports in either access or trunk mode

  • Port channels in either access or trunk mode

  • CPU as destination port

  • Uplink ports on Cisco Nexus 9300 Series switches


Note


FEX ports are not supported as SPAN destination ports.


Characteristics of Destination Ports

SPAN destination ports have the following characteristics:

  • A port configured as a destination port cannot also be configured as a source port.

  • The same destination interface cannot be used for multiple SPAN sessions. However, an interface can act as a destination for a SPAN and an ERSPAN session.

  • Destination ports do not participate in any spanning tree instance. SPAN output includes bridge protocol data unit (BPDU) Spanning Tree Protocol hello packets.

SPAN Sessions

You can create SPAN sessions to designate sources and destinations to monitor.

See the Cisco Nexus 9000 Series NX-OS Verified Scalability Guide for information on the number of supported SPAN sessions.

This figure shows a SPAN configuration. Packets on three Ethernet ports are copied to destination port Ethernet 2/5. Only traffic in the direction specified is copied.
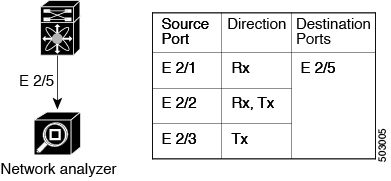
Figure 1. SPAN Configuration

Localized SPAN Sessions

A SPAN session is localized when all of the source interfaces are on the same line card. A session destination interface can be on any line card.


Note


A SPAN session with a VLAN source is not localized.


SPAN Truncation

Beginning with Cisco NX-OS Release 7.0(3)I7(1), you can configure the truncation of source packets for each SPAN session based on the size of the MTU. Truncation helps to decrease SPAN bandwidth by reducing the size of monitored packets. Any SPAN packet that is larger than the configured MTU size is truncated to the given size. For example, if you configure the MTU as 300 bytes, the packets with greater than 300 bytes are truncated to 300 bytes.

SPAN truncation is disabled by default. To use truncation, you must enable it for each SPAN session.

ACL TCAM Regions

You can change the size of the ACL ternary content addressable memory (TCAM) regions in the hardware. For information on the TCAM regions used by SPAN sessions, see the Configuring IP ACLs chapter of the Cisco Nexus 9000 Series NX-OS Security Configuration Guide.

Prerequisites for SPAN

SPAN has the following prerequisites:

  • You must first configure the ports on each device to support the desired SPAN configuration. For more information, see the Cisco Nexus 9000 Series NX-OS Interfaces Configuration Guide.

Guidelines and Limitations for SPAN


Note


For scale information, see the release-specific Cisco Nexus 9000 Series NX-OS Verified Scalability Guide.


SPAN has the following configuration guidelines and limitations:

  • A maximum of 48 source interfaces are supported per SPAN session (Rx and Tx, Rx, or Tx).

  • Traffic that is denied by an ACL may still reach the SPAN destination port because SPAN replication is performed on the ingress side prior to the ACL enforcement (ACL dropping traffic).

  • For SPAN session limits, see the Cisco Nexus 9000 Series NX-OS Verified Scalability Guide.

  • You can configure maximum of 32 source VLANs while configuring SPAN session.

  • All SPAN replication is performed in the hardware. The supervisor CPU is not involved.

  • You can configure a SPAN session on the local device only.

  • Configuring two SPAN or ERSPAN sessions on the same source interface with only one filter is not supported. If the same source is used in multiple SPAN or ERSPAN sessions, either all the sessions must have different filters or no sessions should have filters.

  • Packets with FCS errors are not mirrored in a SPAN session.

  • The following guidelines apply to SPAN copies of access port dot1q headers:

    • When traffic ingresses from a trunk port or a routed port and egresses to an access port, an egress SPAN copy of an access port on a switch interface always has a dot1q header.

    • When traffic ingresses from an access port and egresses to a trunk port or a routed port, an ingress SPAN copy of an access port on a switch interface does not have a dot1q header.

    • When traffic ingresses from an access port and egresses to an access port, an ingress/egress SPAN copy of an access port on a switch interface does not have a dot1q header.

    • This behavior is applicable to Cisco Nexus 9300-EX, 9300-FX, 9300-FX2, 9300-FX3, 9300-GX, 9300-GX2, 9500 platform switches with 9700-EX, 9700-FX, and 9700-GX line cards.

  • You can configure only one destination port in a SPAN session.

  • SPAN mirroring is not supported for PBR traffic.

  • You cannot configure a port as both a source and destination port.

  • Enabling UniDirectional Link Detection (UDLD) on the SPAN source and destination ports simultaneously is not supported. If UDLD frames are expected to be captured on the source port of such SPAN session, disable UDLD on the destination port of the SPAN session.

  • SPAN is not supported for management ports.

  • Statistics are not support for the filter access group.

  • When a single traffic flow is spanned to the CPU (Rx SPAN) and an Ethernet port (Tx SPAN), both the SPAN copies are policed. Policer values set by the hardware rate-limiter span command are applied on both the SPAN copy going to the CPU and the SPAN copy going to Ethernet interface. This limitation applies to the following switches:

    • Cisco Nexus 92348GC-X, Cisco Nexus 9332C, and Cisco Nexus 9364C switches

    • Cisco Nexus 9300-EX, FX, FX2, FX3, GX platform switches

    • Cisco Nexus 9504, 9508, and 9516 platform switches with EX and FX line cards

  • SPAN is supported in Layer 3 mode; however, SPAN is not supported on Layer 3 subinterfaces or Layer 3 port-channel subinterfaces.

  • When a SPAN session contains source ports that are monitored in the transmit or transmit and receive direction, packets that these ports receive can be replicated to the SPAN destination port although the packets are not actually transmitted on the source ports. Some examples of this behavior on source ports are as follows:

    • Traffic that results from flooding

    • Broadcast and multicast traffic

  • SPAN sessions cannot capture packets with broadcast or multicast MAC addresses that reach the supervisor, such as ARP requests and Open Shortest Path First (OSPF) protocol hello packets, if the source of the session is the supervisor Ethernet in-band interface. To capture these packets, you must use the physical interface as the source in the SPAN sessions.

  • VLAN SPAN monitors only the traffic that enters Layer 2 ports in the VLAN.

  • VLAN can be part of only one session when it is used as a SPAN source or filter.

  • VLAN ACL redirects to SPAN destination ports are not supported.

  • When using a VLAN ACL to filter a SPAN, only action forward is supported; action drop and action redirect are not supported.

  • The combination of VLAN source session and port source session is not supported. If the traffic stream matches the VLAN source session and port source session, two copies are needed at two destination ports. Due to the hardware limitation, only the VLAN source SPAN and the specific destination port receive the SPAN packets. This limitation applies only to the following Cisco devices:

    Table 1. Cisco Nexus 9000 Series Switches

    Cisco Nexus 93120TX

    Cisco Nexus 93128TX

    Cisco Nexus 9332PQ

    Cisco Nexus 9372PX

    Cisco Nexus 9372PX-E

    Cisco Nexus 9372TX

    Cisco Nexus 9396PX

    Cisco Nexus 9372TX-E

    Cisco Nexus 9396TX

    Table 2. Cisco Nexus 9000 Series Line Cards, Fabric Modules, and GEM Modules

    N9K-X9408PC-CFP2

    N9K-X9536PQ

    N9K-C9504-FM

    N9K-X9432PQ

    N9K-X9464TX

    —

  • When you filter a monitor session, make sure that the access-group specified must be a VACL, or VLAN access-map and not a regular ACL for filtering purpose. This guidelines is not applicable for Cisco Nexus 9508 switches with 9636C-R and 9636Q-R line cards.

  • An access-group filter in a SPAN session must be configured as vlan-accessmap. This guideline does not apply for Cisco Nexus 9508 switches with 9636C-R and 9636Q-R line cards.

  • Supervisor-generated stream of bytes module header (SOBMH) packets have all the information to go out on an interface and can bypass all forwarding lookups in the hardware, including SPAN and ERSPAN. CPU-generated frames for Layer 3 interfaces and the Bridge Protocol Data Unit (BPDU) class of packets are sent using SOBMH. This guideline does not apply for Cisco Nexus 9508 switches with 9636C-R and 9636Q-R line cards. The Cisco Nexus 9636C-R and 9636Q-R both support inband SPAN and local SPAN.

  • Cisco NX-OS does not span Link Layer Discovery Protocol (LLDP) or Link Aggregation Control Protocol (LACP) packets when the source interface is not a host interface port channel.

  • SPAN copies for multicast packets are made before rewrite. Therefore, the TTL, VLAN ID, any remarking due to an egress policy, and so on, are not captured in the SPAN copy.

  • If SPAN is mirroring the traffic which ingresses on an interface in an ASIC instance and egresses on a Layer 3 interface (SPAN Source) on a different ASIC instance, then a Tx mirrored packet has a VLAN ID of 4095 on Cisco Nexus 9300 platform switches (except EX, FX, or FX2) and Cisco Nexus 9500 platform modular switches.

  • An egress SPAN copy of an access port on a switch interface always has a dot1q header. This guideline does not apply for Cisco Nexus 9508 platform switches with 9636C-R and 9636Q-R line cards.

  • The flows for post-routed unknown unicast flooded packets are in the SPAN session, even if the SPAN session is configured not to monitor the ports on which this flow is forwarded. This limitation applies to Network Forwarding Engine (NFE) and NFE2-enabled EOR switches and SPAN sessions that have Tx port sources.

  • VLAN sources are spanned only in the Rx direction. This limitation does not apply to the following switch platforms which support VLAN spanning in both directions:

    • Cisco Nexus 9300-EX platform switches

    • Cisco Nexus 9300-FX platform switches

    • Cisco Nexus 9300-FX2 platform switches

    • Cisco Nexus 9300-FX3 platform switches

    • Cisco Nexus 9300-GX platform switches

    • Cisco Nexus 9504, 9508, and 9516 switches with the 97160YC-EX line card.

    • Cisco Nexus 9508 switches with 9636C-R and 9636Q-R line cards.

  • If a VLAN source is configured as both directions in one session and the physical interface source is configured in two other sessions, Rx SPAN is not supported for the physical interface source session. This limitation applies to the Cisco Nexus 97160YC-EX line card.

  • With regard to session filtering functionality, ACL filter is supported only in Rx source, and VLAN filter is supported in both Tx and Rx sources. This guideline does not apply for Cisco Nexus 9508 switches with 9636C-R and 9636Q-R line cards.

  • Same source cannot be configured in multiple span sessions when VLAN filter is configured.

  • The FEX NIF interfaces or port-channels cannot be used as a SPAN source or SPAN destination. If the FEX NIF interfaces or port-channels are specified as a SPAN source or SPAN destination, the software displays an unsupported error.

  • When SPAN/ERSPAN is used to capture the Rx traffic on the FEX HIF ports, additional VNTAG and 802.1Q tags are present in the captured traffic.

  • VLAN and ACL filters are not supported for FEX ports.

  • If the sources used in bidirectional SPAN sessions are from the same FEX, the hardware resources are limited to two SPAN sessions.

  • Truncation is supported only for local and ERSPAN source sessions. It is not supported for ERSPAN destination sessions.

  • When sFlow is configured on N9K-C9508-FM-G with the N9K-X9716D-GX line card, disable sFlow before configuring SPAN sessions.

  • Configuring MTU on a SPAN session truncates all packets egressing on the SPAN destination (for that session) to the MTU value specified.

    • The cyclic redundancy check (CRC) is recalculated for the truncated packet.

    • The bytes specified are retained starting from the header of the packets. The rest are truncated if the packet is longer than the MTU.

  • Beginning with Cisco NX-OS Release 10.1(2), SPAN is supported on the Cisco Nexus N9K-X9624D-R2 line card.

  • Beginning with Cisco NX-OS Release 10.2(1q)F, SPAN is supported on the N9K-C9332D-GX2B platform switches.

  • MTU truncation is not supported on Cisco Nexus 9504/9508 modular chassis with the N9K-X9636C-R, N9K-X9636Q-R, N9K-X9636C-RX, and N9K-X96136YC-R line cards.

  • Beginning with Cisco NX-OS Release 10.2(2)F, Multicast SPAN Tx is supported on Cisco Nexus 9300-GX, 9300-GX2, and 9300-FX3 platform switches.

  • Beginning with Cisco NX-OS Release 10.3(1)F, SPAN is supported on Cisco Nexus 9808 platform switches.

  • Beginning with Cisco NX-OS Release 10.4(1)F, SPAN is supported on the following switches and line cards:

    • Cisco Nexus 9804 switch

    • Cisco Nexus 9332D-H2R switch

    • Cisco Nexus X98900CD-A and X9836DM-A line cards with Cisco Nexus 9808 and 9804 switches

  • Beginning with Cisco NX-OS Release 10.4(2)F, Layer 3 port-channel interface as SPAN source is supported on 9808 and 9804 platform switches

  • Beginning with Cisco NX-OS Release 10.4(2)F, SPAN is supported on Cisco Nexus 93400LD-H1 platform switch.

  • Beginning with Cisco NX-OS Release 10.4(3)F, SPAN is supported on Cisco Nexus 9364C-H1 platform switch.

SPAN Limitations for the Cisco Nexus 3000 Platform Switches

The following guidelines and limitations apply only the Nexus 3000 Series switches running Cisco Nexus 9000 code:

  • The Cisco Nexus 3232C and 3264Q switches do not support SPAN on CPU as destination.

SPAN Limitations for the Cisco Nexus 9200 Platform Switches


Note


For scale information, see the release-specific Cisco Nexus 9000 Series NX-OS Verified Scalability Guide.


The following guidelines and limitations apply only the Cisco Nexus 9200 platform switches:

  • For Cisco Nexus 9200 platform switches, Rx SPAN is not supported for multicast without a forwarding interface on the same slice as the SPAN destination port.

  • Tx SPAN for multicast, unknown multicast, and broadcast traffic are not supported on the Cisco Nexus 9200 platform switches.

  • Tx SPAN of CPU-generated packets is not supported on Cisco Nexus 9200 platform switches.

  • UDF-based SPAN is supported on the Cisco Nexus 9200 platform switches.

  • The Cisco Nexus 9200 platform switches do not support Multiple ACL filters on the same source.

  • VLAN Tx SPAN is supported on the Cisco Nexus 9200 platform switches.

  • When multiple egress ports on the same slice are congested by egressing SPAN traffic, those egress ports will not get the line rate on the Cisco Nexus 9200 platform switches.

  • Using the ACL filter to span subinterface traffic on the parent interface is not supported on the Cisco Nexus 9200 platform switches.

  • On the Cisco Nexus 9200 platform switches, the CPU SPAN source can be added only for the Rx direction (SPAN packets coming from the CPU).

  • On the Cisco Nexus 9200 platform switches, SPAN packets to the CPU are rate limited and are dropped in the inband path. You can change the rate limit using the hardware rate-limiter span command. You can analyze SPAN copies on the supervisor using the ethanalyzer local interface inband mirror detail command.

SPAN Limitations for the Cisco Nexus 9300 Platform Switches


Note


For scale information, see the release-specific Cisco Nexus 9000 Series NX-OS Verified Scalability Guide.


The following guidelines and limitations apply only the Cisco Nexus 9300 platform switches:

  • SPAN does not support ECMP hashing/load balancing at the source on Cisco Nexus 9300-GX platform switches.

  • The following filtering limitations apply to egress (Tx) SPAN on all Cisco Nexus 9300-EX/FX/FX2/FX3/GX platform switches:

    • ACL filtering is not supported (applies to both unicast and Broadcast, Unknown Unicast and Multicast (BUM) traffic)

    • VLAN filtering is supported, but only for unicast traffic

    • VLAN filtering is not supported for BUM traffic

  • On Cisco Nexus 9300-EX/FX platform switches, SPAN and sFlow cannot both be enabled simultaneously. If one is active, the other cannot be enabled. However, on Cisco Nexus 9300-EX/FX/FX2 platform switches, both NetFlow and SPAN can be enabled simultaneously, providing a viable alternative to using sFlow and SPAN.


    Note


    Cisco Nexus 9300-FX2 switches support sFlow and SPAN co-existence.


  • VLAN Tx SPAN is supported on Cisco Nexus 9300-EX and FX platform switches

  • Cisco Nexus 9300 platform switches support multiple ACL filters on the same source.

  • A single forwarding engine instance supports four SPAN sessions. For Cisco Nexus 9300 platform switches, if the first three sessions have bidirectional sources, the fourth session has hardware resources only for Rx sources.

  • Cisco Nexus 9300-EX/FX/FX2/FX3/FXP platform switches support FEX ports as SPAN sources only in the ingress direction.

  • Cisco Nexus 9300 platform switches (excluding Cisco Nexus 9300-EX/FX/FX2/FX3/FXP switches) support FEX ports as SPAN sources in the ingress direction for all traffic and in the egress direction only for known Layer 2 unicast traffic flows through the switch and FEX. Routed traffic might not be seen on FEX HIF egress SPAN.

  • Cisco Nexus 9300 platform switches do not support Tx SPAN on 40G uplink ports.


    Note


    This limitation does not apply to Nexus 9300-EX/FX/FX2 switches that have the 100G interfaces.


  • Tx SPAN of CPU-generated packets is not supported on Cisco Nexus 9200, 9300-EX/FX/FXP/FX2/FX3/GX/GX2, 9300C, C9516-FM-E2, and C9508-FM-E2 switches.

  • Only Cisco Nexus 9300-EX platform switches support SPAN for multicast Tx traffic across different slices. The slices must be on the same leaf spine engine (LSE).

  • For Tx interface SPAN with Layer 2 switch port and port-channel sources on Cisco Nexus 9300-EX/FX/FX2/FX3/GX platform switches, only one copy is made per receiver unit regardless of how many Layer 2 members are receiving the stream in the same VLAN. For example, if e1/1-8 are all Tx direction SPAN sources and all are joined to the same group, the SPAN destination port sees one pre-rewrite copy of the stream, not eight copies. In addition, if for any reason one or more of those ports drops the packets on egress (for example, due to congestion), the packets may still reach the SPAN destination port. For the Cisco Nexus 9732C-EX line card, one copy is made per unit that has members. For port-channel sources, the Layer 2 member that will SPAN is the first port-channel member.

  • SPAN Tx broadcast and SPAN Tx multicast are supported for Layer 2 port and port-channel sources across slices on Cisco Nexus 9300-EX/FX/FX2/FX3/GX platform switches, and the Cisco Nexus 9732C-EX line card, but only when IGMP snooping is disabled. (Otherwise, the slice limitation still applies.) These features are not supported for Layer 3 port sources, FEX ports (with unicast or multicast traffic), and VLAN sources.

  • For SPAN Tx multicast for Layer 2, SPAN copies are created independent of multicast replication. Due to this, multicast and SPAN packet have different values for VLAN tag, which is the ingress interface VLAN ID.

  • A SPAN copy of Cisco Nexus 9300 platform switch 40G uplink interfaces will miss the dot1q information when spanned in the Rx direction.


    Note


    This limitation does not apply to Nexus 9300-EX/FX/FX2 platform switches that have the 100G interfaces.


  • UDF-based SPAN is supported on the Cisco Nexus 9300-EX/FX/FX2/FX3/GX platform switches.

  • UDF-SPAN acl-filtering only supports source interface rx. This limitation applies to the following switches:

    • Cisco Nexus 9332PQ

    • Cisco Nexus 9372PX

    • Cisco Nexus 9372PX-E

    • Cisco Nexus 9372TX

    • Cisco Nexus 9372TX-E

    • Cisco Nexus 93120TX

  • The Cisco Nexus 9300-EX/FX/FX2/FX3/GX platform switches do not support Multiple ACL filters on the same source.

  • When multiple egress ports on the same slice are congested by egressing SPAN traffic, those egress ports will not get the line rate on the Cisco Nexus 9300-EX/FX/FX2/FX3/GX platform switches.

  • Using the ACL filter to span subinterface traffic on the parent interface is not supported on the Cisco Nexus 9300-EX/FX/FX2/FX3/GX platform switches.

  • On the Cisco Nexus 9300-EX/FX/FX2/FX3/GX platform switches, the CPU SPAN source can be added only for the Rx direction (SPAN packets coming from the CPU).

  • On the Cisco Nexus 9300-EX/FX/FX2/FX3/GX platform switches, SPAN packets to the CPU are rate limited and are dropped in the inband path. You can change the rate limit using the hardware rate-limiter span command. You can analyze SPAN copies on the supervisor using the ethanalyzer local interface inband mirror detail command.

  • The following Cisco Nexus switches support sFlow and SPAN together:

    • Cisco Nexus 9336C-FX2

    • Cisco Nexus 93240YC-FX2

    • Cisco Nexus 93360YC-FX2

  • Beginning with Cisco NX-OS Release 9.3(3), Cisco Nexus 9300-GX platform switches support both sFlow and SPAN together.

  • Beginning with Cisco NX-OS Release 9.3(5), Cisco Nexus 9300-GX platform switches support SPAN truncation.

  • Beginning from Cisco NX-OS Release 10.2(3)F, the FC span feature provides packet capture support for FC ports, SAN port channels, and VSANs for both NPV and SAN switching modes on Cisco Nexus C93180YC-FX, C9336C-FX2-E, and C93360YC-FX2 platform switches.

  • FC ports, SAN Port channel, and VSANs as source are not supported in ERSPAN.

  • FC ports, SAN Port channel, and VSANs cannot be added as source in more than one span sessions.

  • The guideline—A single forwarding engine instance supports four active SPAN sessions—is also applicable to the FC span feature.

  • SNMP support for FC span feature is not available in Cisco NX-OS Release 10.2(3)F.

SPAN Limitations for the Cisco Nexus 9500 Platform Switches


Note


For scale information, see the release-specific Cisco Nexus 9000 Series NX-OS Verified Scalability Guide.


The following guidelines and limitations apply only the Cisco Nexus 9500 platform switches:

  • The following filtering limitations apply to egress (Tx) SPAN on 9500 platform switches with EX or FX line cards:

    • ACL filtering is not supported (applies to both unicast and Broadcast, Unknown Unicast and Multicast (BUM) traffic)

    • VLAN filtering is supported, but only for unicast traffic

    • VLAN filtering is not supported for BUM traffic

  • FEX and SPAN port-channel destinations are not supported on the Cisco Nexus 9500 platform switches with EX or FX line cards.

  • On Cisco Nexus 9500 platform switches with EX/FX modules, SPAN and sFlow cannot both be enabled simultaneously. If one is active, the other cannot be enabled. However, on the Cisco Nexus 9500 platform switches with EX or FX line cards, NetFlow and SPAN can both be enabled simultaneously, providing a viable alternative to using sFlow and SPAN.

  • Cisco Nexus 9500 platform switches support VLAN Tx SPAN with the following line cards:

    • Cisco Nexus 97160YC-EX

    • Cisco Nexus 9732C-EX

    • Cisco Nexus 9732C-FX

    • Cisco Nexus 9736C-EX

    • Cisco Nexus 9736C-FX

    • Cisco Nexus 9736Q-FX

    • Cisco Nexus 9788TC-FX

  • Cisco Nexus 9500 platform switches support multiple ACL filters on the same source.

  • Tx SPAN of CPU-generated packets is not supported on Cisco Nexus 9500 platform switches with EX-based line cards.

  • TCAM carving is not required for SPAN/ERSPAN on the following line cards:

    • Cisco Nexus 9636C-R

    • Cisco Nexus 9636Q-R

    • Cisco Nexus 9636C-RX

    • Cisco Nexus 96136YC-R

    • Cisco Nexus 9624D-R2


    Note


    All other switches supporting SPAN/ERSPAN must use TCAM carving.


  • On the Cisco Nexus 9500 platform switches, depending on the SPAN source's forwarding engine instance mappings, a single forwarding engine instance may support four SPAN sessions. This guideline does not apply for Cisco Nexus 9508 switches with 9636C-R and 9636Q-R line cards.

  • Same source interface cannot be configured in multiple SPAN sessions on N9K-X96136YC-R line card.

  • Multiple ACL filters are not supported on the same source.

  • Cisco Nexus 9500 platform switches support FEX ports as SPAN sources in the ingress direction for all traffic and in the egress direction only for known Layer 2 unicast traffic flows through the switch and FEX. Routed traffic might not be seen on FEX HIF egress SPAN.

  • SPAN does not support destinations on Cisco Nexus 9408PC-CFP2 line card ports.

  • Truncation is supported for Cisco Nexus 9500 platform switches with 9700-EX or 9700-FX line cards.

  • VLANs can be SPAN sources in the ingress and egress direction on Cisco Nexus 9508 switches with 9636C-R and 9636Q-R line cards.

  • UDF-SPAN acl-filtering only supports source interface rx. This limitation applies to the following line cards:

    • Cisco Nexus 9564PX

    • Cisco Nexus 9464TX2

    • Cisco Nexus 9464TX

    • Cisco Nexus 9464TX2

    • Cisco Nexus 9564TX

    • Cisco Nexus 9464PX

    • Cisco Nexus 9536PQ

    • Cisco Nexus 9636PQ

    • Cisco Nexus 9432PQ

SPAN Guidelines and Limitations for Cisco Nexus 9800 Platform Switches


Note


For scale information, see the release-specific Cisco Nexus 9000 Series NX-OS Verified Scalability Guide on Cisco.com.


The following guidelines and limitations apply only the Cisco Nexus 9800 platform switches:

  • Only RX is supported on SPAN to CPU.

  • Sharing of the same source port or interface across sessions is not supported.

  • A maximum of 10 monitor sessions are supported at a time.

  • 10 active SPAN sessions are supported at a time.

  • Monitor stats are not displayed for SPAN to CPU.

  • SPAN not supported on L2 port and tunnel ports.

  • Span on VLAN source is not supported.

  • MTU truncation is only supported for 343 bytes on 9804 and 9808 switches excluding FCS.

  • MTU truncation is supported only on RX and not on TX.

  • UDF is not supported.

  • SPAN is not supported on subinterfaces.

  • Port-channel interface as SPAN destination is not supported on 9804 and 9808 switches.

  • SPAN mirrored packets do not have separate SPAN egress queue, they take the default queue.

  • Due to SDK limitations, mirrored multicast traffic is processed as unicast traffic instead of multicast traffic.

  • When port-channel interface (with more than one member port) is configured as SPAN destination, only one member interface is used for sending out mirrored traffic.

  • The member selection is done in software, so there will be packet loss when membership changes.

Default Settings for SPAN

The following table lists the default settings for SPAN parameters.

Parameters Default
SPAN sessions Created in the shut state

Configuring SPAN


Note


Cisco NX-OS commands for this feature may differ from those in Cisco IOS.

Configuring a SPAN Session

You can configure a SPAN session on the local device only. By default, SPAN sessions are created in the shut state.


Note


For bidirectional traditional sessions, you can configure the sessions without specifying the direction of the traffic.

Before you begin

You must configure the destination ports in access or trunk mode. For more information, see the Cisco Nexus 9000 Series NX-OS Interfaces Configuration Guide.

SUMMARY STEPS

  1. configure terminal
  2. interface ethernet slot/port
  3. switchport
  4. switchport monitor
  5. (Optional) Repeat Steps 2 through 4 to configure monitoring on additional SPAN destinations.
  6. no monitor session session-number
  7. monitor session session-number[rx | tx] [shut]
  8. description description
  9. source {interface type [rx | tx | both] | [vlan {number | range}[rx]} | [vsan {number | range}[rx]}
  10. (Optional) Repeat Step 9 to configure all SPAN sources.
  11. filter vlan {number | range}
  12. (Optional) Repeat Step 11 to configure all source VLANs to filter.
  13. (Optional) filter access-group acl-filter
  14. destination interface type slot/port
  15. no shut
  16. (Optional) show monitor session {all | session-number | range session-range} [brief]
  17. (Optional) copy running-config startup-config

DETAILED STEPS

  Command or Action Purpose

Step 1

configure terminal

Example:

switch# configure terminal
switch(config)#

Enters global configuration mode.

Step 2

interface ethernet slot/port

Example:

switch(config)# interface ethernet 2/5
switch(config-if)#

Enters interface configuration mode on the selected slot and port.

Step 3

switchport

Example:

switch(config-if)# switchport

Configures switchport parameters for the selected slot and port or range of ports.

Step 4

switchport monitor

Example:

switch(config-if)# switchport monitor

Configures the switchport interface as a SPAN destination.

Step 5

(Optional) Repeat Steps 2 through 4 to configure monitoring on additional SPAN destinations.

(Optional)

—

Step 6

no monitor session session-number

Example:

switch(config)# no monitor session 3

Clears the configuration of the specified SPAN session. The new session configuration is added to the existing session configuration.

Step 7

monitor session session-number[rx | tx] [shut]

Example:

switch(config)# monitor session 3 rx
switch(config-monitor)#

Example:

switch(config)# monitor session 3 tx
switch(config-monitor)#

Example:

switch(config)# monitor session 3 shut
switch(config-monitor)#

Enters the monitor configuration mode. The new session configuration is added to the existing session configuration. By default, the session is created in the shut state, and the session is a local SPAN session. The optional keyword shut specifies a shut state for the selected session.

Step 8

description description

Example:

switch(config-monitor)# description my_span_session_3

Configures a description for the session. By default, no description is defined. The description can be up to 32 alphanumeric characters.

Step 9

source {interface type [rx | tx | both] | [vlan {number | range}[rx]} | [vsan {number | range}[rx]}

Example:

switch(config-monitor)# source interface ethernet 2/1-3, ethernet 3/1 rx

Example:

switch(config-monitor)# source interface fc1/1 both

Example:

switch(config-monitor)# source interface port-channel 2

Example:

switch(config-monitor)# source interface san-port-channel201 both

Example:

switch(config-monitor)# source interface sup-eth
0 rx

Example:

switch(config-monitor)# source vlan 3, 6-8 rx

Example:

switch(config-monitor)# source vsan 500 rx

Example:

switch(config-monitor)# source interface ethernet 101/1/1-3

Configures sources and the traffic direction in which to copy packets. You can enter a range of Ethernet ports, FC ports, a port channel, SAN port channels, an inband interface, a range of VLANs, a range of VSANs, or a satellite port or host interface port channel on the Cisco Nexus 2000 Series Fabric Extender (FEX).

You can configure one or more sources, as either a series of comma-separated entries or a range of numbers.

You can specify the traffic direction to copy as ingress (rx), egress (tx), or both.

Note


Source VLANs are supported only in the ingress direction. Source FEX ports are supported in the ingress direction for all traffic and in the egress direction only for known Layer 2 unicast traffic.

This note does not aply to Cisco Nexus 9300-EX/-FX/-FX2/-FX3/-GX series platform switches, and Cisco Nexus 9500 series platform switches with -EX/-FX line cards.

Supervisor as a source is only supported in the Rx direction.

For a unidirectional session, the direction of the source must match the direction specified in the session.

Note


Source VSANs are also supported only in the ingress direction.

Step 10

(Optional) Repeat Step 9 to configure all SPAN sources.

(Optional)

Step 11

filter vlan {number | range}

Example:

switch(config-monitor)# filter vlan 3-5, 7

Configures which VLANs to select from the configured sources. You can configure one or more VLANs, as either a series of comma-separated entries or a range of numbers

Note


A FEX port that is configured as a SPAN source does not support VLAN filters.

Note


Filters are not supported when the source is either FC interface or VSAN.

Step 12

(Optional) Repeat Step 11 to configure all source VLANs to filter.

(Optional)

Step 13

(Optional) filter access-group acl-filter

Example:

switch(config-monitor)# filter access-group ACL1
(Optional)

Associates an ACL with the SPAN session.

Note


Filters are not supported when the source is either FC interface or VSAN.

Step 14

destination interface type slot/port

Example:

switch(config-monitor)# destination interface ethernet 2/5

Configures a destination for copied source packets.

Note


FC ports are not supported as a destination interface.

Note

 
The SPAN destination port must be either an access port or a trunk port.

Note

 
You must enable monitor mode on the destination port.

You can configure the CPU as the SPAN destination for the following platform switches:

  • Cisco Nexus 9200 Series switches (beginning with Cisco NX-OS Release 7.0(3)I4(1))

  • Cisco Nexus 9300-EX Series switches (beginning with Cisco NX-OS Release 7.0(3)I4(2))

  • Cisco Nexus 9300-FX Series switches (beginning with Cisco NX-OS Release 7.0(3)I7(1))

  • Cisco Nexus 9300-FX2 Series switches (beginning with Cisco NX-OS Release 7.0(3)I7(3))

  • Cisco Nexus 9300-FX3Series switches (beginning with Cisco NX-OS Release 9.3(5))

  • Cisco Nexus 9300-GX Series switches (beginning with Cisco NX-OS Release 9.3(3))

  • Cisco Nexus 9500-EX Series switches with -EX/-FX line cards

To do so, enter sup-eth 0 for the interface type.

Step 15

no shut

Example:

switch(config-monitor)# no shut

Enables the SPAN session. By default, the session is created in the shut state.

Step 16

(Optional) show monitor session {all | session-number | range session-range} [brief]

Example:

switch(config-monitor)# show monitor session 3
(Optional)

Displays the SPAN configuration.

Step 17

(Optional) copy running-config startup-config

Example:

switch(config)# copy running-config startup-config
(Optional)

Copies the running configuration to the startup configuration.

Configuring UDF-Based SPAN

You can configure the device to match on user-defined fields (UDFs) of the outer or inner packet fields (header or payload) and to send the matching packets to the SPAN destination. Doing so can help you to analyze and isolate packet drops in the network.

Before you begin

Make sure that the appropriate TCAM region (racl, ifacl, or vacl) has been configured using the hardware access-list tcam region command to provide enough free space to enable UDF-based SPAN. For more information, see the "Configuring ACL TCAM Region Sizes" section in the Cisco Nexus 9000 Series NX-OS Security Configuration Guide.

SUMMARY STEPS

  1. configure terminal
  2. udf udf-name offset-base offset length
  3. hardware access-list tcam region {racl | ifacl | vacl } qualify qualifier-name
  4. copy running-config startup-config
  5. reload
  6. ip access-list span-acl
  7. Enter one of the following commands:
    • permit udf udf-name value mask
    • permit ip source destination udf udf-name value mask
  8. (Optional) copy running-config startup-config

DETAILED STEPS

  Command or Action Purpose

Step 1

configure terminal

Example:

switch# configure terminal
switch(config)#

Enters global configuration mode.

Step 2

udf udf-name offset-base offset length

Example:

switch(config)# udf udf-x packet-start 12 1
switch(config)# udf udf-y header outer l3 20 2

Defines the UDF as follows:

  • udf-name—Specifies the name of the UDF. You can enter up to 16 alphanumeric characters for the name.

  • offset-base—Specifies the UDF offset base as follows, where header is the packet header to consider for the offset: packet-start | header {outer | inner {l3 | l4}} .

  • offset—Specifies the number of bytes offset from the offset base. To match the first byte from the offset base (Layer 3/Layer 4 header), configure the offset as 0.

  • length—Specifies the number of bytes from the offset. Only 1 or 2 bytes are supported. To match additional bytes, you must define multiple UDFs.

You can define multiple UDFs, but Cisco recommends defining only required UDFs.

Step 3

hardware access-list tcam region {racl | ifacl | vacl } qualify qualifier-name

Example:

switch(config)# hardware access-list tcam region
racl qualify ing-l3-span-filter

Attaches the UDFs to one of the following TCAM regions:

  • racl—Applies to Layer 3 ports.

  • ifacl—Applies to Layer 2 ports

  • vacl—Applies to source VLANs.

You can attach up to 8 UDFs to a TCAM region.

Note


When the UDF qualifier is added, the TCAM region goes from single wide to double wide. Make sure enough free space is available; otherwise, this command will be rejected. If necessary, you can reduce the TCAM space from unused regions and then re-enter this command. For more information,see the "Configuring ACL TCAM Region Sizes" section in the Cisco Nexus 9000 Series NX-OS Security Configuration Guide.

Note


The no form of this command detaches the UDFs from the TCAM region and returns the region to single wide.

Step 4

copy running-config startup-config

Example:

switch(config)# copy running-config startup-config

Saves the change persistently through reboots and restarts by copying the running configuration to the startup configuration.

Step 5

reload

Example:

switch(config)# reload

Reloads the device.

Note


Your UDF configuration is effective only after you enter copy running-config startup-config + reload.

Step 6

ip access-list span-acl

Example:

switch(config)# ip access-list span-acl-udf-only
switch(config-acl)#

Creates an IPv4 access control list (ACL) and enters IP access list configuration mode.

Step 7

Enter one of the following commands:

  • permit udf udf-name value mask
  • permit ip source destination udf udf-name value mask

Example:

switch(config-acl)# permit udf udf-x 0x40 0xF0 udf-y 0x1001 0xF00F 

Example:

switch(config-acl)# permit ip 10.0.0./24 any udf udf-x 0x02 0x0F udf-y 0x1001 0xF00F 

Configures the ACL to match only on UDFs (example 1) or to match on UDFs along with the current access control entries (ACEs) for the outer packet fields (example 2).

A single ACL can have ACEs with and without UDFs together. Each ACE can have different UDF fields to match, or all ACEs can match for the same list of UDFs.

Step 8

(Optional) copy running-config startup-config

Example:

switch(config)# copy running-config startup-config
(Optional)

Copies the running configuration to the startup configuration.

Configuring SPAN Truncation

You can configure truncation for local and SPAN source sessions only.

SUMMARY STEPS

  1. configure terminal
  2. monitor session session number
  3. source interface type slot/port [rx | tx | both]
  4. mtu size
  5. destination interface type slot/port
  6. no shut
  7. (Optional) show monitor session session
  8. copy running-config startup-config

DETAILED STEPS

  Command or Action Purpose

Step 1

configure terminal

Example:

switch# configure terminal
switch(config)#

Enters global configuration mode.

Step 2

monitor session session number

Example:

switch(config)# monitor session 5
switch(config-monitor)#

Enters monitor configuration mode for the specified SPAN session.

Step 3

source interface type slot/port [rx | tx | both]

Example:

switch(config-monitor)# source interface ethernet 1/5 both

Configures the source interface.

Step 4

mtu size

Example:

switch(config-monitor)# mtu 320

Example:

switch(config-monitor)# mtu ?
<320-1518> Enter the value of MTU truncation size for SPAN packets

Configures the MTU size for truncation. Any SPAN packet that is larger than the configured MTU size is truncated to the configured size. The MTU ranges for SPAN packet truncation are:

  • The MTU size range is 320 to 1518 bytes for Cisco Nexus 9300-EX platform switches.

  • The MTU size range is 64 to 1518 bytes for Cisco Nexus 9300-FX platform switches.

  • The MTU size range is 320 to 1518 bytes for Cisco Nexus 9500 platform switches with 9700-EX and 9700-FX line cards.

  • The MTU size is 343 bytes (excluding FCS) for Cisco Nexus 9808 and 9804 platform switches.

Step 5

destination interface type slot/port

Example:

switch(config-monitor)# destination interface Ethernet 1/39

Configures the Ethernet SPAN destination port.

Step 6

no shut

Example:

switch(config-monitor)# no shut

Enables the SPAN session. By default, the session is created in the shut state.

Step 7

(Optional) show monitor session session

Example:

switch(config-monitor)# show monitor session 5
(Optional)

Displays the SPAN configuration.

Step 8

copy running-config startup-config

Example:

switch(config-monitor)# copy running-config startup-config

Copies the running configuration to the startup configuration.

Configuring SPAN for Multicast Tx Traffic Across Different LSE Slices

Beginning with Cisco NX-OS Release 7.0(3)I7(1), you can configure SPAN for multicast Tx traffic across different leaf spine engine (LSE) slices on Cisco Nexus 9300-EX platform switches.

SUMMARY STEPS

  1. configure terminal
  2. [no] hardware multicast global-tx-span
  3. copy running-config startup-config
  4. reload

DETAILED STEPS

  Command or Action Purpose

Step 1

configure terminal

Example:

switch# configure terminal
switch(config)#

Enters global configuration mode.

Step 2

[no] hardware multicast global-tx-span

Example:

switch(config)# hardware multicast global-tx-span

Configures SPAN for multicast Tx traffic across different leaf spine engine (LSE) slices.

Note


Beginning from Cisco NX-OS Release 10.2(2)F, if source and destination are on different slices, use this command for multicast SPAN Tx.

Step 3

copy running-config startup-config

Example:

switch(config)# copy running-config startup-config

Copies the running configuration to the startup configuration.

Step 4

reload

Example:

switch(config)# reload

Reloads the device.

Configuring SPAN to CPU

Introduction

A SPAN-to-CPU is for troubleshooting packet flow through Cisco Nexus 9000 Series switches. Similarly, to a normal SPAN or Encapsulated Remote SPAN (ERSPAN) session, a SPAN-to-CPU monitor session involves the definition of one or more source interfaces and traffic directions. Any traffic that matches the direction (TX, RX, or both) defined on a source interface is replicated to the supervisor CPU. This traffic is filtered and analyzed with the use of ethanalyzer or saved to a local storage device for reviewing the results.

To verify whether packets generated by the CPU of a Cisco Nexus 9000 Series Switches are transmitted out of a specific interface, Cisco recommends using a packet capture utility on the remote device connected to the interface.

  1. Configuring SPAN as CPU destination

    You must be able to configure CPU as monitor session destination and same must be configured on hardware. On Tahoe platforms, this configuration is supported for local span only as there is no customer requirement to support it for ERSPAN termination session. The same will be supported for N9K-C9508-FM-R2.

  2. Analyzing SPAN Traffic

    When SPAN traffic reaches mentioned supervisor CPU. The modules identify as SPAN packets and takes necessary actions and ethanalyzer displays these packets. The Ethanalyzer control plane packet capture utility can be used to view traffic replicated to the CPU. The mirror keyword in the Ethanalyzer command filters traffic such that only traffic replicated by a SPAN-to-CPU monitor session is shown. Ethanalyzer capture and display filters can be used to further limit the traffic displayed.

  3. Limiting SPAN traffic rate

    Spanned traffic for CPU must be rate limited to avoid control plane disruption. Ethanalyzer uses libpcap module for processing, stripping, and decoding packet headers. Ethanalyzer uses mirror option to display the span traffic reaching supervisor CPU. To match SPAN to CPU a separate span class is created. All the traffic will be created as SPAN class and separate rate is created for this class as Control Plane Policing (COPP). The COPP traffic rate limit will be 50 kbps.

  4. Filtering ACL

    This will give customers the ability to choose the traffic which they want to monitor. This feature will be supported on all kind of monitor session. For span to cpu this particularly important as traffic will be rate limited and so, it becomes important to categorize the traffic which is intended to be spanned.

Guidelines and Limitations

SPAN-to-CPU has the following configuration guidelines and limitations:

  • No ACL Filtering is supported on inband sources.

  • Sources such as Physical Interfaces (L2 and L3), port channels, and L3 subinterface are supported with ACL filter.

  • ACL Filter is supported for Rx sources only.

  • No ACL filtering supported on VLAN sources.

  • Configuring multiple span sessions for the same source is not supported.

  • MTU truncation is not supported on N9K-X9636C-R, N9K-X9636Q-R, N9K-X9636C-RX, N9K-X96136YC-R, N9K-X9624D-R2, N9K-C9508-FM-R, N9K-C9504-FM-R, N9K-C9508-FM-R2, N9K-C9504-FM-R2, N3K-C36180YC-R, N3K-C3636C-R, and N3K-C36480LD-R2.

  • ACL filters are not supported on N9K-X9624D-R2 Line card until Cisco NX-OS release 10.2(2)F .

  • Beginning with Cisco NX-OS Release 10.2(3)F, ACL filters is supported on N9K-X9624D-R2 Line card.

Configuring SPAN to CPU

You can configure SPAN to CPU.

Procedure
  Command or Action Purpose

Step 1

configure terminal

Example:
switch# configure terminal
switch(config)#

Enters global configuration mode.

Step 2

configure CPU as SPAN

Example:
switch(config-monitor)# destination interface sup-eth0

Configures the CPU as the SPAN destination.

Step 3

configure ACL Filter

Example:
switch(config-monitor)# filter access-group <acl_filter_name>

Configures the access list which will be honored for filtering.

Step 4

configure ethanalyzer

Example:
switch# ethanalyzer local interface inband mirror

Displays spanned packets.

Example

This example shows the output of monitor session.

show monitor session 1 session 1
type : local
state : up
acl-name : acl-name not specified
source intf :
rx : Eth3/44
tx : Eth3/44
both : Eth3/44
source VLANs :
rx :
tx :
both :
filter VLANs : filter not specified
source fwd drops :
destination ports : sup-eth0
PFC On Interfaces :
source VSANs :
rx :

This example shows the output of copp.

# show policy-map interface control-plane | begin span
class-map copp-system-p-class-span (match-any)
match exception span
set cos 0
police cir 50 pps , bc 256 packets
module 1 : <Designated Module>
conformed 910228778 bytes;
7217965 packets;
violated 7217965 bytes;
0 packets;
module 3 :
conformed 0 bytes;
0 packets;
violated 0 bytes;
0 packets;
0 packets;

Shutting Down or Resuming a SPAN Session

You can shut down SPAN sessions to discontinue the copying of packets from sources to destinations. You can shut down one session in order to free hardware resources to enable another session. By default, SPAN sessions are created in the shut state.

You can resume (enable) SPAN sessions to resume the copying of packets from sources to destinations. In order to enable a SPAN session that is already enabled but operationally down, you must first shut it down and then enable it.

You can configure the shut and enabled SPAN session states with either a global or monitor configuration mode command.

SUMMARY STEPS

  1. configure terminal
  2. [no] monitor session {session-range | all} shut
  3. monitor session session-number
  4. [no] shut
  5. (Optional) show monitor
  6. (Optional) copy running-config startup-config

DETAILED STEPS

  Command or Action Purpose

Step 1

configure terminal

Example:

switch# configure terminal
switch(config)#

Enters global configuration mode.

Step 2

[no] monitor session {session-range | all} shut

Example:

switch(config)# monitor session 3 shut

Shuts down the specified SPAN sessions. By default, sessions are created in the shut state.

The no form of the command resumes (enables) the specified SPAN sessions. By default, sessions are created in the shut state.

Note

 
If a monitor session is enabled but its operational status is down, to enable the session, you must first specify the monitor session shut command followed by the no monitor session shut command.

Step 3

monitor session session-number

Example:

switch(config)# monitor session 3
switch(config-monitor)#

Enters the monitor configuration mode. The new session configuration is added to the existing session configuration.

Step 4

[no] shut

Example:

switch(config-monitor)# shut

Shuts down the SPAN session. By default, the session is created in the shut state.

The no form of the command enables the SPAN session. By default, the session is created in the shut state.

Step 5

(Optional) show monitor

Example:

switch(config-monitor)# show monitor
(Optional)

Displays the status of SPAN sessions.

Step 6

(Optional) copy running-config startup-config

Example:

switch(config)# copy running-config startup-config
(Optional)

Copies the running configuration to the startup configuration.

Verifying the SPAN Configuration

To display the SPAN configuration, perform one of the following tasks:

Command Purpose
show monitor session {all | session-number | range session-range} [brief] Displays the SPAN session configuration.
show monitor session [session-id | all] stats Displays the SPAN session stats for Cisco Nexus 9808 and 9804 platform switches.
clear monitor session [session-id | all] stats [both | rx | tx] Clears the SPAN session stats for Cisco Nexus 9808 and 9804 platform switches.

Configuration Examples for SPAN

Configuration Example for a SPAN Session

To configure a SPAN session, follow these steps:

SUMMARY STEPS

  1. Configure destination ports in access mode and enable SPAN monitoring.
  2. Configure a SPAN session.

DETAILED STEPS


Step 1

Configure destination ports in access mode and enable SPAN monitoring.

Example:

switch# configure terminal
switch(config)# interface ethernet 2/5
switch(config-if)# switchport
switch(config-if)# switchport monitor
switch(config-if)# no shut
switch(config-if)# exit
switch(config)# 
			  

Step 2

Configure a SPAN session.

Example:

switch(config)# no monitor session 3
switch(config)# monitor session 3
switch(config-monitor)# source interface ethernet 2/1-3, ethernet 3/1 rx
switch(config-monitor)# source interface port-channel 2
switch(config-monitor)# source interface sup-eth 0 both
switch(config-monitor)# source vlan 3, 6-8 rx
switch(config-monitor)# source interface ethernet 101/1/1-3
switch(config-monitor)# filter vlan 3-5, 7
switch(config-monitor)# destination interface ethernet 2/5
switch(config-monitor)# no shut
switch(config-monitor)# exit
switch(config)# show monitor session 3
switch(config)# copy running-config startup-config

Example:

switch(config)# monitor session 1
switch(config-monitor)# source interface fc 1/9/1
switch(config-monitor)# source interface san-port-channel 171
switch(config-monitor)# source vsan 3701
switch(config-monitor)# destination interface ethernet 1/8
switch(config-monitor)# no shutdown
switch(config-monitor)# exit
switch(config)# show monitor session 1
switch(config)# copy running-config startup-config

Configuration Example for a Unidirectional SPAN Session

To configure a unidirectional SPAN session, follow these steps:

SUMMARY STEPS

  1. Configure destination ports in access mode and enable SPAN monitoring.
  2. Configure a SPAN session.

DETAILED STEPS


Step 1

Configure destination ports in access mode and enable SPAN monitoring.

Example:

switch# configure terminal
switch(config)# interface ethernet 2/5
switch(config-if)# switchport
switch(config-if)# switchport monitor
switch(config-if)# no shut
switch(config-if)# exit
switch(config)# 

Step 2

Configure a SPAN session.

Example:

switch(config)# no monitor session 3
switch(config)# monitor session 3 rx
switch(config-monitor)# source interface ethernet 2/1-3, ethernet 3/1 rx
switch(config-monitor)# filter vlan 3-5, 7
switch(config-monitor)# destination interface ethernet 2/5
switch(config-monitor)# no shut
switch(config-monitor)# exit
switch(config)# show monitor session 3
switch(config)# copy running-config startup-config

Configuration Example for a SPAN ACL

This example shows how to configure a SPAN ACL:

switch# configure terminal
switch(config)# ip access-list match_11_pkts
switch(config-acl)# permit ip 11.0.0.0 0.255.255.255 any
switch(config-acl)# exit
switch(config)# ip access-list match_12_pkts
switch(config-acl)# permit ip 12.0.0.0 0.255.255.255 any
switch(config-acl)# exit
switch(config)# vlan access-map span_filter 5
switch(config-access-map)# match ip address match_11_pkts
switch(config-access-map)# action forward
switch(config-access-map)# exit
switch(config)# vlan access-map span_filter 10
switch(config-access-map)# match ip address match_12_pkts
switch(config-access-map)# action forward
switch(config-access-map)# exit
switch(config)# monitor session 1
switch(config-erspan-src)# filter access_group span_filter

Configuration Examples for UDF-Based SPAN

This example shows how to configure UDF-based SPAN to match on the inner TCP flags of an encapsulated IP-in-IP packet using the following match criteria:

  • Outer source IP address: 10.0.0.2

  • Inner TCP flags: Urgent TCP flag is set

  • Bytes: Eth Hdr (14) + Outer IP (20) + Inner IP (20) + Inner TCP (20, but TCP flags at 13th byte)

  • Offset from packet-start: 14 + 20 + 20 + 13 = 67

  • UDF match value: 0x20

  • UDF mask: 0xFF

udf udf_tcpflags packet-start 67 1
hardware access-list tcam region racl qualify ing-l3-span-filter
copy running-config startup-config
reload
ip access-list acl-udf
permit ip 10.0.0.2/32 any udf udf_tcpflags 0x20 0xff
monitor session 1
source interface Ethernet 1/1
filter access-group acl-udf

This example shows how to configure UDF-based SPAN to match regular IP packets with a packet signature (DEADBEEF) at 6 bytes after a Layer 4 header start using the following match criteria:

  • Outer source IP address: 10.0.0.2

  • Inner TCP flags: Urgent TCP flag is set

  • Bytes: Eth Hdr (14) + IP (20) + TCP (20) + Payload: 112233445566DEADBEEF7788

  • Offset from Layer 4 header start: 20 + 6 = 26

  • UDF match value: 0xDEADBEEF (split into two-byte chunks and two UDFs)

  • UDF mask: 0xFFFFFFFF

udf udf_pktsig_msb header outer l4 26 2
udf udf_pktsig_lsb header outer l4 28 2
hardware access-list tcam region racl qualify ing-l3-span-filter
copy running-config startup-config
reload
ip access-list acl-udf-pktsig
permit udf udf_pktsig_msb 0xDEAD 0xFFFF udf udf_pktsig_lsb 0xBEEF 0xFFFF
monitor session 1
source interface Ethernet 1/1
filter access-group acl-udf-pktsig

Configuration Example for SPAN Truncation

This example shows how to configure SPAN truncation for use with MPLS stripping:

mpls strip
ip access-list mpls
statistics per-entry
20 permit ip any any redirect Ethernet1/5
interface Ethernet1/5
switchport
switchport mode trunk
mtu 9216
no shutdown
monitor session 1
source interface Ethernet1/5 tx
mtu 64
destination interface Ethernet1/6
  no shut

Configuration Examples for Multicast Tx SPAN Across LSE Slices

This example shows how to configure multicast Tx SPAN across LSE slices for Cisco Nexus 9300-EX platform switches. It also shows sample output before and after multicast Tx SPAN is configured.

Before Multicast Tx SPAN Is Configured

switch# show interface eth1/15-16, ethernet 1/27 counters

-----------------------------------------
Port           InOctets    InUcastPkts
-----------------------------------------
Eth1/15          580928              0
Eth1/16             239              0
Eth1/27               0              0

-----------------------------------------
Port        InMcastPkts    InBcastPkts
-----------------------------------------
Eth1/15            9077              0
Eth1/16               1              0
Eth1/27               0              0

-----------------------------------------
Port          OutOctets   OutUcastPkts
-----------------------------------------
Eth1/15             453              0
Eth1/16          581317              0
Eth1/27               0              0

-----------------------------------------
Port       OutMcastPkts   OutBcastPkts
-----------------------------------------
Eth1/15               4              0
Eth1/16            9080              0
Eth1/27               0              0

Configuring Multicast Tx SPAN

switch(config)# hardware multicast global-tx-span
Warning: Global Tx SPAN setting changed, please save config and reload
switch(config)# copy running-config start-up config
[########################################] 100%
Copy complete.
switch(config)# reload
This command will reboot the system. (y/n)?  [n] y

After Multicast Tx SPAN Is Configured

switch# show interface eth1/15-16, eth1/27 counters

-----------------------------------------
Port           InOctets    InUcastPkts
-----------------------------------------
Eth1/15          392576              0
Eth1/16               0              0
Eth1/27               0              0
-----------------------------------------
Port        InMcastPkts    InBcastPkts
-----------------------------------------
Eth1/15            6134              0
Eth1/16               0              0
Eth1/27               0              0

-----------------------------------------
Port          OutOctets   OutUcastPkts
-----------------------------------------
Eth1/15               0              0
Eth1/16          392644              0
Eth1/27          417112              0

-----------------------------------------
Port       OutMcastPkts   OutBcastPkts
-----------------------------------------
Eth1/15               0              0
Eth1/16            6135              0
Eth1/27            6134              0

Additional References

Related Documents

Related Topic Document Title
FEX Cisco Nexus 2000 Series NX-OS Fabric Extender Software Configuration Guide for Cisco Nexus 9000 Series Switches