Configuring VXLAN

This chapter contains the following sections:

Information About VXLAN

Guidelines and Limitations for VXLAN

VXLAN has the following guidelines and limitations:

Table 1. ACL Options That can be used for VXLAN Traffic, on Platforms That Include, Cisco Nexus 92300YC, 92160YC-X, 93120TX, 9332PQ, and 9348GC-FXP Switches

ACL Direction

ACL Type

VTEP Type

Port Type

Flow Direction

Traffic Type

Supported

Ingress

PACL

Ingress VTEP

L2 port

Access to Network [GROUP:encap direction]

Native L2 traffic [GROUP:inner]

YES

VACL

Ingress VTEP

VLAN

Access to Network [GROUP:encap direction]

Native L2 traffic [GROUP:inner]

YES

Ingress

RACL

Ingress VTEP

Tenant L3 SVI

Access to Network [GROUP:encap direction]

Native L3 traffic [GROUP:inner]

YES

Egress

RACL

Ingress VTEP

Uplink L3/L3-PO/SVI

Access to Network [GROUP:encap direction]

VXLAN encap [GROUP:outer]

NO

Ingress

RACL

Egress VTEP

Uplink L3/L3-PO/SVI

Network to Access [GROUP:decap direction]

VXLAN encap [GROUP:outer]

NO

Egress

PACL

Egress VTEP

L2 port

Network to Access [GROUP:decap direction]

Native L2 traffic [GROUP:inner]

NO

VACL

Egress VTEP

VLAN

Network to Access [GROUP:decap direction]

Native L2 traffic [GROUP:inner]

NO

Egress

RACL

Egress VTEP

Tenant L3 SVI

Network to Access [GROUP:decap direction]

Post-decap L3 traffic [GROUP:inner]

YES

Table 2. ACL Options That can be used for VXLAN Traffic, on Platforms that Include, Cisco Nexus 92160YC-X, 93108TC-EX, 93180LC-EX, and 93180YC-EX Switches, Release 7.0(3)I6(1)

ACL Direction

ACL Type

VTEP Type

Port Type

Flow Direction

Traffic Type

Supported

Ingress

PACL

Ingress VTEP

L2 port

Access to Network [GROUP:encap direction]

Native L2 traffic [GROUP:inner]

YES (works only for base port PO)

Egress

PACL

Egress VTEP

L2 port

Network to Access[GROUP:decap direction]

Native L2 traffic [GROUP:inner]

NO

Ingress

VACL

Ingress VTEP

VLAN

Access to Network [GROUP:encap direction]

Native L2 traffic [GROUP:inner]

YES

Egress

VACL

Egress VTEP

VLAN

Network to Access [GROUP:decap direction]

Native L2 traffic [GROUP:inner]

YES

Ingress

RACL

Ingress VTEP

Tenant L3 SVI

Access to Network [GROUP:encap direction]

Native L3 traffic [GROUP:inner]

YES

Egress

RACL

Egress VTEP

Tenant L3 SVI

Network to Access [GROUP:decap direction]

Post-decap L3 traffic [GROUP:inner]

YES

Ingress

RACL

Egress VTEP

Uplink L3/L3-PO/SVI

Network to Access [GROUP:decap direction]

VXLAN encap [GROUP:outer]

NO

Egress

RACL

Ingress VTEP

Uplink L3/L3-PO/SVI

Access to Network [GROUP:encap direction]

VXLAN encap [GROUP:outer]

NO

  • Non-blocking Multicast (NBM) running on a VXLAN enabled switch is not supported. Feature nbm may disrupt VXLAN underlay multicast forwarding.

  • The lacp vpc-convergence command can be configured in VXLAN and non-VXLAN environments that have vPC port channels to hosts that support LACP.

  • When entering the no feature pim command, NVE ownership on the route is not removed so the route stays and traffic continues to flow. Aging is done by PIM. PIM does not age out entries having a VXLAN encap flag.

  • Beginning with Cisco NX-OS Release 7.0(3)I7(3), Fibre Channel over Ethernet (FCoE) N-port virtualization (NPV) can co-exist with VXLAN on different fabric uplinks but on same or different front panel ports on the Cisco Nexus 93180YC-EX and 93180YC-FX switches.

    Fibre Channel N-port virtualization (NPV) can co-exist with VXLAN on different fabric uplinks but on same or different front panel ports on the Cisco Nexus 93180YC-FX switches. VXLAN can only exist on the Ethernet front panel ports, but not on the FC front panel ports.

  • Beginning with Cisco NX-OS Release 7.0(3)I7(3), VXLAN is supported on the Cisco Nexus 9348GC-FXP switch.

  • When SVI is enabled on a VTEP (flood and learn, or EVPN) regardless of ARP suppression, make sure that ARP-ETHER TCAM is carved using the hardware access-list tcam region arp-ether 256 double-wide command. This is not applicable to the Cisco Nexus 9200 and 9300-EX platform switches and Cisco Nexus 9500 platform switches with 9700-EX line cards.

  • IP Unnumbered for VXLAN underlay is supported starting with Cisco NX-OS Release 7.0(3)I7(2). Only single unnumbered link between same devices (for example, spine - leaf) is supported. If multiple physical links are connecting the same leaf and spine, you must use the single L3 port-channel with unnumbered link.

  • For information about the load-share keyword usage for the PBR with VXLAN feature, see the Guidelines and Limitations section of the Configuring Policy-Based Routing chapter of the Cisco Nexus 9000 Series NX-OS Unicast Routing Configuration Guide, Release 7.x.

  • For Cisco NX-OS Release 7.0(3)F3(3) the following features are not supported:

    • VXLAN with vPC is not supported.

    • DHCP snooping, ACL, and QoS policies are not supported on VXLAN VLANs.

    • IGMP snooping is not supported on VXLAN enabled VLANs.

  • Beginning with Cisco NX-OS Release 7.0(3)F3(3), VXLAN Layer 2 Gateway is supported on the 9636C-RX line card. VXLAN and MPLS cannot be enabled on the Cisco Nexus 9508 switch at the same time.

  • Beginning with Cisco NX-OS Release 7.0(3)F3(3), if VXLAN is enabled, the Layer 2 Gateway cannot be enabled when there is any line card other than the 9636C-RX.

  • Beginning with Cisco NX-OS Release 7.0(3)F3(3), PIM/ASM is supported in the underlay ports. PIM-BiDir is not supported. For more information, see the Cisco Nexus 9000 Series NX_OS Multicast Routing Configuration Guide, Release 7.x.

  • Beginning with Cisco NX-OS Release 7.0(3)F3(3), IPv6 hosts routing in the overlay is supported.

  • Beginning with Cisco NX-OS Release 7.0(3)F3(3), ARP suppression is supported.

  • Beginning with Cisco NX-OS Release 7.0(3)I7(1), the keyword has been added to the Configuring a Route Policy procedure for the PBR over VXLAN feature.

    For more information, see the Cisco Nexus 9000 Series NX_OS Unicast Routing Configuration Guide, Release 7.x.

  • Beginning with Cisco NX-OS Release 7.0(3)I6(1), a new CLI command lacp vpc-convergence is added for better convergence of Layer 2 EVPN VXLAN:

    interface port-channel10
      switchport
      switchport mode trunk
      switchport trunk allowed vlan 1001-1200
      spanning-tree port type edge trunk
      spanning-tree bpdufilter enable
      lacp vpc-convergence  
      vpc 10
     
    interface Ethernet1/34  <- The port-channel member-port is configured with LACP-active mode (for example, no changes are done at the member-port level.)
      switchport
      switchport mode trunk
      switchport trunk allowed vlan 1001-1200
      channel-group 10 mode active
      no shutdown
  • Beginning with Cisco NX-OS Release 7.0(3)I6(1), port-VLAN with VXLAN is supported on Cisco Nexus 9300-EX and 9500 Series switches with 9700-EX line cards with the following exceptions:

    • Only Layer 2 (no routing) is supported with port-VLAN with VXLAN on these switches.

    • No inner VLAN mapping is supported.

  • Beginning with Cisco NX-OS Release 7.0(3)I6(1), VXLAN is supported on Cisco Nexus 3232C and 3264Q switches. Cisco Nexus 3232C and 3264Q switches do not support inter-VNI routing.

    IGMP snooping on VXLAN enabled VLANs is not supported in Cisco Nexus 3232C and 3264Q switches. VXLAN with flood and learn and Layer 2 EVPN is supported in Cisco Nexus 3232C and 3264Q switches.

  • The system nve ipmc CLI command is not applicable to the Cisco 9200 and 9300-EX platform switches and Cisco 9500 platform switches with 9700-EX line cards.

  • Bind NVE to a loopback address that is separate from other loopback addresses that are required by Layer 3 protocols. A best practice is to use a dedicated loopback address for VXLAN. This best practice should be applied not only for the VPC VXLAN deployment, but for all VXLAN deployments.

  • To remove configurations from an NVE interface, we recommend manually removing each configuration rather than using the default interface nve command.

  • When SVI is enabled on a VTEP (flood and learn or EVPN), make sure that ARP-ETHER TCAM is carved using the hardware access-list tcam region arp-ether 256 CLI command. This is not applicable to Cisco 9200 and 9300-EX Series switches and Cisco 9500 Series switches with 9700-EX line cards.

  • show commands with the internal keyword are not supported.

  • FEX ports do not support IGMP snooping on VXLAN VLANs.

  • Beginning with Cisco NX-OS Release 7.0(3)I4(2), VXLAN is supported for the Cisco Nexus 93108TC-EX and 93180YC-EX switches and for Cisco Nexus 9500 Series switches with the X9732C-EX line card.

  • DHCP snooping (Dynamic Host Configuration Protocol snooping) is not supported on VXLAN VLANs.

  • RACLs are not supported on Layer 3 uplinks for VXLAN traffic. Egress VACLs support is not available for de-capsulated packets in the network to access direction on the inner payload.

    As a best practice, use PACLs/VACLs for the access to the network direction.

  • QoS classification is not supported for VXLAN traffic in the network to access direction on the Layer 3 uplink interface.

  • The QoS buffer-boost feature is not applicable for VXLAN traffic.

  • For 7.0(3)I1(2), Cisco Nexus 9500 platform switches do not support VXLAN tunnel endpoint functionality, however they can be used as spines.

  • SVI and subinterfaces as uplinks are not supported.

  • VTEPs do not support VXLAN encapsulated traffic over Parent-Interfaces if subinterfaces are configured. This is regardless of VRF participation.

  • VTEPs do not support VXLAN encapsulated traffic over subinterfaces. This is regardless of VRF participation or IEEE 802.1q encapsulation.

  • Mixing Sub-Interfaces for VXLAN and non-VXLAN enabled VLANs is not supported.

  • Point to multipoint Layer 3 and SVI uplinks are not supported.

  • For 7.0(3)I2(1) and later, a FEX HIF (FEX host interface port) is supported for a VLAN that is extended with VXLAN.

  • In an ingress replication VPC setup, Layer 3 connectivity is needed between vPC peer devices. This aids the traffic when the Layer 3 uplink (underlay) connectivity is lost for one of the vPC peers.

  • Rollback is not supported on VXLAN VLANs that are configured with the port VLAN mapping feature.

  • The VXLAN UDP port number is used for VXLAN encapsulation. For Cisco Nexus NX-OS, the UDP port number is 4789. It complies with IETF standards and is not configurable.

  • For 7.0(3)I2(1) and later, VXLAN is supported on Cisco Nexus 9500 Series switches with the following line cards:

    • 9500-R

    • 9564PX

    • 9564TX

    • 9536PQ

    • 9700-EX

    • 9700-FX

  • Cisco Nexus 9300 Series switches with 100G uplinks only support VXLAN switching/bridging. (7.0(3)I2(1) and later)

    Cisco Nexus 9200, Cisco Nexus 9300-EX, and Cisco Nexus 9300-FX platform switches do not have this restriction.


    Note


    For VXLAN routing support, a 40G uplink module is required.
  • For 7.0(3)I2(1) and later, MDP is not supported for VXLAN configurations.

  • For 7.0(3)I2(1) and later, bidirectional PIM is not supported for underlay multicast.

  • Consistency checkers are not supported for VXLAN tables.

  • ARP suppression is supported for a VNI only if the VTEP hosts the First-Hop Gateway (Distributed Anycast Gateway) for this VNI. The VTEP and SVI for this VLAN must be properly configured for the Distributed Anycast Gateway operation (for example, global anycast gateway MAC address configured and anycast gateway with the virtual IP address on the SVI).

  • ARP suppression is a per-L2VNI fabric-wide setting in the VXLAN fabric. Enable or disable this feature consistently across all VTEPs in the fabric. Inconsistent ARP suppression configuration across VTEPs is not supported.

  • For Cisco Nexus 9200 platform switches that have the Application Spine Engine (ASE2). There exists a Layer 3 VXLAN (SVI) throughput issue. There is a data loss for packets of sizes 99–122. (7.0(3)I3(1) and later).

  • For the NX-OS 7.0(3)I2(3) release, the VXLAN network identifier (VNID) 16777215 is reserved and should not be configured explicitly.

  • For 7.0(3)I4(1) and later, VXLAN supports In Service Software Upgrade (ISSU).

  • VXLAN does not support co-existence with the GRE tunnel feature or the MPLS (static or segment-routing) feature on Cisco Nexus 9000 Series switches with a Network Forwarding Engine (NFE).

  • VTEP connected to FEX host interface ports is not supported (7.0(3)I2(1) and later).

  • In Cisco NX-OS Release 7.0(3)I4(1), resilient hashing (port-channel load-balancing resiliency) and VXLAN configurations are not compatible with VTEPs using ALE uplink ports.


    Note


    Resilient hashing is disabled by default.


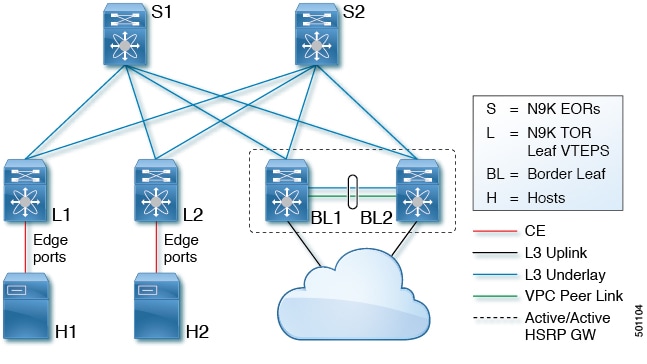
  • If multiple VTEPs use the same multicast group address for underlay multicast but have different VNIs, the VTEPs should have at least one VNI in common. Doing so ensures that NVE peer discovery occurs and underlay multicast traffic is forwarded correctly. For example, leafs L1 and L4 could have VNI 10 and leafs L2 and L3 could have VNI 20, and both VNIs could share the same group address. When leaf L1 sends traffic to leaf L4, the traffic could pass through leaf L2 or L3. Because NVE peer L1 is not learned on leaf L2 or L3, the traffic is dropped. Therefore, VTEPs that share a group address need to have at least one VNI in common so that peer learning occurs and traffic is not dropped. This requirement applies to VXLAN bud-node topologies.

  • NVE source interface loopback for VTEP should only be IPv4 address. Use of IPv6 address for NVE source interface is not supported.

  • Next hop address in overlay (in bgp l2vpn evpn address family updates) should be resolved in underlay URIB to the same address family. For example, the use of VTEP (NVE source loopback) IPv4 addresses in fabric should only have BGP l2vpn evpn peering over IPv4 addresses.

  • The following features are not supported:

    • Consistency checkers are not supported for VXLAN tables.

    • DHCP snooping and DAI features are not supported on VXLAN VLANs.

    • IPv6 for VXLAN EVPN ESI MH is not supported.

    • Native VLANs for VXLAN are not supported. All traffic on VXLAN Layer 2 trunks needs to be tagged. This limitation is applicable to Cisco Nexus 9300 and 9500 switches with 95xx line cards. This is not applicable to Cisco Nexus 9200, 9300-EX, 9300-FX, and 9500 platform switches with -EX or -FX line cards.

    • QoS buffer-boost is not applicable for VXLAN traffic.

    • QoS classification is not supported for VXLAN traffic in the network-to-host direction as ingress policy on uplink interface.

    • Static MAC pointing to remote VTEP (VXLAN Tunnel End Point) is not supported with BGP EVPN (Ethernet VPN).

    • TX SPAN (Switched Port Analyzer) for VXLAN traffic is not supported for the access-to-network direction.

    • VXLAN routing and VXLAN Bud Nodes features on the 3164Q platform are not supported.

  • The following ACL related features are not supported:

    • Egress RACL that is applied on an uplink Layer 3 interface that matches on the inner or outer payload in the access-to-network direction (encapsulated path).

    • Ingress RACL that is applied on an uplink Layer 3 interface that matches on the inner or outer payload in the network-to-access direction (decapsulated path).

Considerations for VXLAN Deployment

  • When configuring VXLAN BGP EVPN, only the "System Routing Mode: Default" is applicable for the following hardware platforms:

    • Cisco Nexus 9200/9300-EX/FX/FX2

    • Cisco Nexus 9300 platform switches

    • Cisco Nexus 9500 platform switches with X9500 line cards

    • Cisco Nexus 9500 platform switches with X9700-EX/FX/FX2 line cards

  • The “System Routing Mode: template-vxlan-scale” is not applicable to Cisco NX-OS Release 7.0(3)I5(2) and later.

  • When using VXLAN BGP EVPN in combination with Cisco NX-OS Release 7.0(3)I4(x) or NX-OS Release 7.0(3)I5(1), the “System Routing Mode: template-vxlan-scale” is required on the following hardware platforms:

    • Cisco Nexus 9300-EX Switches

    • Cisco Nexus 9500 Switches with X9700-EX line cards

  • Changing the “System Routing Mode” requires a reload of the switch.

  • A loopback address is required when using the source-interface config command. The loopback address represents the local VTEP IP.

  • During boot-up of a switch (7.0(3)I2(2) and later), you can use the source-interface hold-down-time hold-down-time command to suppress advertisement of the NVE loopback address until the overlay has converged. The range for the hold-down-time is 0 - 2147483647 seconds. The default is 300 seconds.

  • To establish IP multicast routing in the core, IP multicast configuration, PIM configuration, and RP configuration is required.

  • VTEP to VTEP unicast reachability can be configured through any IGP protocol.

  • In VXLAN flood and learn mode (7.0(3)I1(2) and earlier), the default gateway for VXLAN VLANs should be provisioned on external routing devices.

    In VXLAN flood and learn mode (7.0(3)I2(1) and later), the default gateway for VXLAN VLAN is recommended to be a centralized gateway on a pair of VPC devices with FHRP (First Hop Redundancy Protocol) running between them.

    In BGP EVPN, it is recommended to use the anycast gateway feature on all VTEPs.

  • For flood and learn mode (7.0(3)I2(1) and later), only a centralized Layer 3 gateway is supported. Anycast gateway is not supported. The recommended Layer 3 gateway design would be a pair of switches in VPC to be the Layer 3 centralized gateway with FHRP protocol running on the SVIs. The same SVI's cannot span across multiple VTEPs even with different IP addresses used in the same subnet.


    Note


    When configuring SVI with flood and learn mode on the central gateway leaf, it is mandatory to configure hardware access-list tcam region arp-ether size double-wide . (You must decrease the size of an existing TCAM region before using this command.)

    For example:

    hardware access-list tcam region arp-ether 256 double-wide 


    Note


    Configuring the hardware access-list tcam region arp-ether size double-wide is not required on Cisco Nexus 9200 Series switches.


  • When configuring ARP suppression with BGP-EVPN, use the hardware access-list tcam region arp-ether size double-wide command to accommodate ARP in this region. (You must decrease the size of an existing TCAM region before using this command.)


    Note


    This step is required for Cisco Nexus 9300 switches (NFE/ALE) and Cisco Nexus 9500 switches with N9K-X9564PX, N9K-X9564TX, and N9K-X9536PQ line cards. This step is not needed with Cisco Nexus 9200 switches, Cisco Nexus 9300-EX switches, or Cisco Nexus 9500 switches with N9K-X9732C-EX line cards.


  • VXLAN tunnels cannot have more than one underlay next hop on a given underlay port. For example, on a given output underlay port, only one destination MAC address can be derived as the outer MAC on a given output port.

    This is a per-port limitation, not a per-tunnel limitation. This means that two tunnels that are reachable through the same underlay port cannot drive two different outer MAC addresses.

  • When changing the IP address of a VTEP device, you must shut the NVE interface before changing the IP address.

  • As a best practice, the RP for the multicast group should be configured only on the spine layer. Use the anycast RP for RP load balancing and redundancy.

    The following is an example of an anycast RP configuration on spines:
    
    ip pim rp-address 1.1.1.10 group-list 224.0.0.0/4   
    ip pim anycast-rp 1.1.1.10 1.1.1.1
    ip pim anycast-rp 1.1.1.10 1.1.1.2 


    Note


    • 1.1.1.10 is the anycast RP IP address that is configured on all RPs participating in the anycast RP set.

    • 1.1.1.1 is the local RP IP.

    • 1.1.1.2 is the peer RP IP.


  • Static ingress replication and BGP EVPN ingress replication do not require any IP Multicast routing in the underlay.

vPC Considerations for VXLAN Deployment

  • As a best practice, when feature vpc is enabled or disabled on a VTEP, the NVE interfaces on both the vPC primary and the vPC secondary must be shut down before the change is made. Enabling feature vpc without the vPC domain being properly configured will result in the NVE loopback being held administratively down until the configuration is completed and the vPC peer-link is brought up.

  • Bind NVE to a loopback address that is separate from other loopback addresses that are required by Layer 3 protocols. A best practice is to use a dedicated loopback address for VXLAN.

  • On vPC VXLAN, it is recommended to increase the delay restore interface-vlan timer under the vPC configuration, if the number of SVIs are scaled up. For example, if there are 1000 VNIs with 1000 SVIs, it is recommended to increase the delay restore interface-vlan timer to 45 Seconds.

  • If a ping is initiated to the attached hosts on VXLAN VLAN from a vPC VTEP node, the source IP address used by default is the anycast IP that is configured on the SVI. This ping can fail to get a response from the host in case the response is hashed to the vPC peer node. This issue can happen when a ping is initiated from a VXLAN vPC node to the attached hosts without using a unique source IP address. As a workaround for this situation, use VXLAN OAM or create a unique loopback on each vPC VTEP and route the unique address via a backdoor path.

  • The loopback address used by NVE needs to be configured to have a primary IP address and a secondary IP address.

    The secondary IP address is used for all VxLAN traffic that includes multicast and unicast encapsulated traffic.

  • vPC peers must have identical configurations.

    • Consistent VLAN to VN-segment mapping.

    • Consistent NVE1 binding to the same loopback interface

      • Using the same secondary IP address.

      • Using different primary IP addresses.

    • Consistent VNI to group mapping.

  • For multicast, the vPC node that receives the (S, G) join from the RP (rendezvous point) becomes the DF (designated forwarder). On the DF node, encap routes are installed for multicast.

    Decap routes are installed based on the election of a decapper from between the vPC primary node and the vPC secondary node. The winner of the decap election is the node with the least cost to the RP. However, if the cost to the RP is the same for both nodes, the vPC primary node is elected.

    The winner of the decap election has the decap mroute installed. The other node does not have a decap route installed.

  • On a vPC device, BUM traffic (broadcast, unknown-unicast, and multicast traffic) from hosts is replicated on the peer-link. A copy is made of every native packet and each native packet is sent across the peer-link to service orphan-ports connected to the peer vPC switch.

    To prevent traffic loops in VXLAN networks, native packets ingressing the peer-link cannot be sent to an uplink. However, if the peer switch is the encapper, the copied packet traverses the peer-link and is sent to the uplink.


    Note


    Each copied packet is sent on a special internal VLAN (VLAN 4041).


  • When peer-link is shut, the loopback interface used by NVE on the vPC secondary is brought down and the status is Admin Shut. This is done so that the route to the loopback is withdrawn on the upstream and that the upstream can divert all traffic to the vPC primary.


    Note


    Orphans connected to the vPC secondary will experience loss of traffic for the period that the peer-link is shut. This is similar to Layer 2 orphans in a vPC secondary of a traditional vPC setup.


  • When the vPC domain is shut, the loopback interface used by NVE on the VTEP with shutdown vPC domain is brought down and the status is Admin Shut. This is done so that the route to the loopback is withdrawn on the upstream and that the upstream can divert all traffic to the other vPC VTEP.

  • When peer-link is no-shut, the NVE loopback address is brought up again and the route is advertised upstream, attracting traffic.

  • For vPC, the loopback interface has 2 IP addresses: the primary IP address and the secondary IP address.

    The primary IP address is unique and is used by Layer 3 protocols.

    The secondary IP address on loopback is necessary because the interface NVE uses it for the VTEP IP address. The secondary IP address must be same on both vPC peers.

  • The vPC peer-gateway feature must be enabled on both peers.

    As a best practice, use peer-switch, peer gateway, ip arp sync, ipv6 nd sync configurations for improved convergence in vPC topologies.

    In addition, increase the STP hello timer to 4 seconds to avoid unnecessary TCN generations when vPC role changes occur.

    The following is an example (best practice) of a vPC configuration:

    
    switch# sh ru vpc
    
    version 6.1(2)I3(1)
    feature vpc
    vpc domain 2
      peer-switch
      peer-keepalive destination 172.29.206.65 source 172.29.206.64
      peer-gateway
      ipv6 nd synchronize
      ip arp synchronize
    
    
  • When the NVE or loopback is shut in vPC configurations:

    • If the NVE or loopback is shut only on the primary vPC switch, the global VxLAN vPC consistency checker fails. Then the NVE, loopback, and vPCs are taken down on the secondary vPC switch.

    • If the NVE or loopback is shut only on the secondary vPC switch, the global VXLAN vPC consistency checker fails. Then the NVE, loopback, and secondary vPC are brought down on the secondary. Traffic continues to flow through the primary vPC switch.

    As a best practice, you should keep both the NVE and loopback up on both the primary and secondary vPC switches.

  • Redundant anycast RPs configured in the network for multicast load-balancing and RP redundancy are supported on vPC VTEP topologies.
  • Enabling vpc peer-gateway configuration is mandatory. For peer-gateway functionality, at least one backup routing SVI is required to be enabled across peer-link and also configured with PIM. This provides a backup routing path in the case when VTEP loses complete connectivity to the spine. Remote peer reachability is re-routed over peer-link in his case. In BUD node topologies, the backup SVI needs to be added as a static OIF for each underlay multicast group.

    The following is an example of backup SVI with PIM enabled:

    
    swithch# sh ru int vlan 2
    
    interface Vlan2
      description backupl_svi_over_peer-link
      no shutdown
      ip address 30.2.1.1/30
      ip router ospf 1 area 0.0.0.0
      ip pim sparse-mode
      ip igmp static-oif route-map match-mcast-groups
    
    route-map match-mcast-groups permit 1
      match ip multicast group 225.1.1.1/32


    Note


    In BUD node topologies, the backup SVI needs to be added as a static OIF for each underlay multicast group.


    Note


    The SVI must be configured on both vPC peers and requires PIM to be enabled.


  • As a best practice when changing the secondary IP address of an anycast vPC VTEP, the NVE interfaces on both the vPC primary and the vPC secondary should be shut before the IP changes are made.

  • Using the ip forward command enables the VTEP to forward the VXLAN de-capsulated packet destined to its router IP to the SUP/CPU.

  • Before configuring it as an SVI, the backup VLAN needs to be configured on Cisco Nexus 9200, 9300-EX, 9300-FX, and 9300-FX2 platform switches as an infra-VLAN with the system nve infra-vlans command.

  • When ARP suppression is enabled or disabled in a vPC setup, a down time is required because the global VXLAN vPC consistency checker will fail and the VLANs will be suspended if ARP suppression is disabled or enabled on only one side.

Network Considerations for VXLAN Deployments

  • MTU Size in the Transport Network

    Due to the MAC-to-UDP encapsulation, VXLAN introduces 50-byte overhead to the original frames. Therefore, the maximum transmission unit (MTU) in the transport network must be increased by 50 bytes. If the overlays use a 1500-byte MTU, the transport network must be configured to accommodate 1550-byte packets at a minimum. Jumbo-frame support in the transport network is required if the overlay applications tend to use larger frame sizes than 1500 bytes.

  • ECMP and LACP Hashing Algorithms in the Transport Network

    As described in a previous section, Cisco Nexus 9000 Series Switches introduce a level of entropy in the source UDP port for ECMP and LACP hashing in the transport network. As a way to augment this implementation, the transport network uses an ECMP or LACP hashing algorithm that takes the UDP source port as input for hashing, which achieves the best load-sharing results for VXLAN encapsulated traffic.

  • Multicast Group Scaling

    The VXLAN implementation on Cisco Nexus 9000 Series Switches uses multicast tunnels for broadcast, unknown unicast, and multicast traffic forwarding. Ideally, one VXLAN segment mapping to one IP multicast group is the way to provide the optimal multicast forwarding. It is possible, however, to have multiple VXLAN segments share a single IP multicast group in the core network. VXLAN can support up to 16 million logical Layer 2 segments, using the 24-bit VNID field in the header. With one-to-one mapping between VXLAN segments and IP multicast groups, an increase in the number of VXLAN segments causes a parallel increase in the required multicast address space and the number of forwarding states on the core network devices. At some point, multicast scalability in the transport network can become a concern. In this case, mapping multiple VXLAN segments to a single multicast group can help conserve multicast control plane resources on the core devices and achieve the desired VXLAN scalability. However, this mapping comes at the cost of suboptimal multicast forwarding. Packets forwarded to the multicast group for one tenant are now sent to the VTEPs of other tenants that are sharing the same multicast group. This causes inefficient utilization of multicast data plane resources. Therefore, this solution is a trade-off between control plane scalability and data plane efficiency.

    Despite the suboptimal multicast replication and forwarding, having multitenant VXLAN networks to share a multicast group does not bring any implications to the Layer 2 isolation between the tenant networks. After receiving an encapsulated packet from the multicast group, a VTEP checks and validates the VNID in the VXLAN header of the packet. The VTEP discards the packet if the VNID is unknown to it. Only when the VNID matches one of the VTEP’s local VXLAN VNIDs, does it forward the packet to that VXLAN segment. Other tenant networks will not receive the packet. Thus, the segregation between VXLAN segments is not compromised.

Considerations for the Transport Network

The following are considerations for the configuration of the transport network:

  • On the VTEP device:

    • Enable and configure IP multicast.*

    • Create and configure a loopback interface with a /32 IP address.

      (For vPC VTEPs, you must configure primary and secondary /32 IP addresses.)

    • Enable UP multicast on the loopback interface. *

    • Advertise the loopback interface /32 addresses through the routing protocol (static route) that runs in the transport network.

    • Enable IP multicast on the uplink outgoing physical interface. *

  • Throughout the transport network:

    • Enable and configure IP multicast.*

With the Cisco Nexus 9200, 9300-EX, 9300-FX, and 9300-FX2, the use of the system nve infra-vlans command is required, as otherwise VXLAN traffic (IP/UDP 4789) is actively treated by the switch. The following scenarios are a non-exhaustive list but most commonly seen, where the need for a system nve infra-vlans definition is required.

Every VLAN that is not associated with a VNI (vn-segment) is required to be configured as system nve infra-vlans in the following cases:

In the case of VXLAN flood and learn as well as VXLAN EVPN, the presence of non-VXLAN VLANs could be related to:

  • An SVI related to a non-VXLAN VLAN is used for backup underlay routing between vPC peers via a vPC peer-link (backup routing).

  • An SVI related to a non-VXLAN VLAN is required for connecting downstream routers (external connectivity, dynamic routing over vPC).

  • An SVI related to a non-VXLAN VLAN is required for per Tenant-VRF peering (L3 route sync and traffic between vPC VTEPs in a Tenant VRF).

  • An SVI related to a non-VXLAN VLAN is used for first-hop routing toward endpoints (Bud-Node).

In the case of VXLAN flood and learn, the presence of non-VXLAN VLANs could be related to:

  • An SVI related to a non-VXLAN VLAN is used for an underlay uplink toward the spine (Core port).

The rule of defining VLANs as system nve infra-vlans can be relaxed for special cases such as:

  • An SVI related to a non-VXLAN VLAN that does not transport VXLAN traffic (IP/UDP 4789).

  • Non-VXLAN VLANs that are not associated with an SVI or not transporting VXLAN traffic (IP/UDP 4789).


Note


You must not configure certain combinations of infra-VLANS, for example, 2 and 514, 10 and 522, which are 512 apart. This is specifically but not exclusive to the "Core port" scenario that is described for VXLAN flood and learn.


Note


* Not required for static ingress replication or BGP EVPN ingress replication.


Considerations for Tunneling VXLAN

DC Fabrics with VXLAN BGP EVPN are becoming the transport infrastructure for overlays. These overlays, often originated on the server (Host Overlay), require integration or transport over the top of the existing transport infrastructure (Network Overlay).

Nested VXLAN (Host Overlay over Network Overlay) support has been added starting with Cisco NX-OS Release 7.0(3)I7(4) on the Cisco Nexus 9200, 9300-EX, 9300-FX, 9300-FX2, 9500-EX, and 9500-FX platform switches.

Figure 1. Host Overlay

To provide Nested VXLAN support, the switch hardware and software must differentiate between two different VXLAN profiles:

  • VXLAN originated behind the Hardware VTEP for transport over VXLAN BGP EVPN (nested VXLAN)

  • VXLAN originated behind the Hardware VTEP to integrated with VXLAN BGP EVPN (BUD Node)

The detection of the two different VXLAN profiles is automatic and no specific configuration is needed for nested VXLAN. As soon as VXLAN encapsulated traffic arrives in a VXLAN enabled VLAN, the traffic is transported over the VXLAN BGP EVPN enabled DC Fabric.

The following attachment modes are supported for Nested VXLAN:

  • Untagged traffic (in native VLAN on a trunk port or on an access port)

  • Tagged traffic (tagged VLAN on a IEEE 802.1Q trunk port)

  • Untagged and tagged traffic that is attached to a vPC domain

  • Untagged traffic on a Layer 3 interface of a Layer 3 port-channel interface

Configuring VXLAN

Enabling VXLANs

Procedure

  Command or Action Purpose

Step 1

configure terminal

Enters global configuration mode.

Step 2

[no] feature nv overlay

Enables the VXLAN feature.

Step 3

[no] feature vn-segment-vlan-based

Configures the global mode for all VXLAN bridge domains.

Step 4

(Optional) copy running-config startup-config

(Optional)

Saves the change persistently through reboots and restarts by copying the running configuration to the startup configuration.

Mapping VLAN to VXLAN VNI

Procedure

  Command or Action Purpose

Step 1

configure terminal

Enters global configuration mode.

Step 2

vlan vlan-id

Specifies VLAN.

Step 3

vn-segment vnid

Specifies VXLAN VNID (Virtual Network Identifier)

Step 4

exit

Exit configuration mode.

Guidelines and Limitations for Port VLAN Mapping

Port VLAN mapping has the following guidelines and limitations:

  • Before removing a port-channel which has VLAN mapping configured, VLAN mappings on the interface must be removed.

  • CoS (QoS) marking is not applicable for the VLANs which are translated on a port.

  • Do not configure translation on the native VLAN.

  • When SPAN / Ethanalyzer is used to capture the traffic on PV enabled ports, only the incoming 802.1q tag is seen in the captured traffic.

  • On a port VLAN translation enabled port, traffic should not be received in translated VLAN. If traffic is received on a translated VLAN on a port VLAN translation-enabled port, traffic will fail.

  • Overlapping VLAN mapping is supported. For example, switchport vlan mapping 10 20, switchport vlan mapping 20 30. Traffic can hit the port with VLAN 10 and VLAN 20, but not with VLAN 30 as it is a translated VLAN.

  • Port VLAN mapping is not supported on FEX ports.

  • Control packets support for translation are ARP, IPv6 neighbor discovery, IPv6 neighbor solicitation.

Configuring Port VLAN Mapping on a Trunk Port

You can configure VLAN translation between the ingress (incoming) VLAN and a local (translated) VLAN on a port. For the traffic arriving on the interface where VLAN translation is enabled, the incoming VLAN is mapped to a translated VLAN that is VXLAN enabled.

On the underlay, this is mapped to a VNI, the inner dot1q is deleted, and switched over to the VXLAN network. On the egress switch, the VNI is mapped to a translated VLAN. On the outgoing interface, where VLAN translation is configured, the traffic is converted to the original VLAN and egress out. Refer to the VLAN counters on the translated VLAN for the traffic counters and not on the ingress VLAN. Port VLAN (PV) mapping is an access side feature and is supported with both multicast and ingress replication for flood and learn and BGP EVPN mode for VXLAN.

VLAN mapping helps with VLAN localization to a port, scoping the VLANs per port. A typical use case is in the service provider environment where the service provider leaf switch has different customers with overlapping VLANs that come in on different ports. For example, customer A has VLAN 10 coming in on Eth 1/1 and customer B has VLAN 10 coming in on Eth 2/2.

In this scenario, you can map the customer VLAN to a provider VLAN and map that to an L2 VNI. There is an operational benefit of terminating different customer VLANs and mapping them to the fabric-managed-VLANs, L2 VNIs.

Notes for Port VLAN Mapping:

  • Beginning with Cisco NX-OS Release 7.0(3)I7(5), routing is supported on translated VLANs with port VLAN mapping configured on trunk ports. This is supported on Cisco Nexus 9300-EX, 9300-EX, and 9300-FX2 platform switches.

  • Port VLAN mapping is supported on Cisco Nexus 9300 platform switches. Beginning with Cisco NX-OS Release 7.0(3)I6(1), port VLAN mapping is supported on Cisco Nexus 9300-EX and 9500 platform switches with 9700-EX line cards with the following exceptions:

    • Only Layer 2 (no routing) is supported with port VLAN on these switches.

    • No inner VLAN mapping is supported.

  • Beginning with Release 7.0(3)I7(4), Cisco Nexus 9300, and 9500 switches support switching on overlapped VLAN interfaces; only VLAN-mapping switching is applicable for Cisco Nexus 9500 with EX/FX line cards.

  • Beginning with Cisco NX-OS 7.0(3)I7(3), port VLAN switching is supported on 9300-FX2 platform switches.

  • Beginning with Cisco NX-OS 7.0(3)I7(1), port VLAN switching is supported on 9300-FX platform switches.

  • Beginning with Cisco NX-OS Release 7.0(3)I2(1), Cisco Nexus 9300 platform switches with NFE ASIC Port VLAN switching is supported.

  • Beginning with Cisco NX-OS Release 7.0(3)I1(2), Cisco Nexus 9300 platform switches with NFRE ASIC Port VLAN routing is supported.

  • The ingress (incoming) VLAN does not need to be configured on the switch as a VLAN. The translated VLAN needs to be configured and a vn-segment mapping given to it. An NVE interface with VNI mapping is essential for the same.

  • All Layer 2 source address learning and Layer 2 MAC destination lookup occurs on the translated VLAN. Refer to the VLAN counters on the translated VLAN and not on the ingress (incoming) VLAN.

  • On Cisco Nexus 9300 Series switches with NFE ASIC, PV routing is not supported on 40 G ALE ports.

  • PV routing supports configuring an SVI on the translated VLAN for flood and learn and BGP EVPN mode for VXLAN.

  • VLAN translation (mapping) is supported on Cisco Nexus 9000 Series switches with a Network Forwarding Engine (NFE).

  • When changing a property on a translated VLAN, the port that has mapping configuration with that VLAN as the translated VLAN, should be flapped to ensure correct behavior.

    For example:

    
    Int eth 1/1
    switchport vlan mapping 101 10
    .
    .
    .
    
    /***Deleting vn-segment from vlan 10.***/
    /***Adding vn-segment back.***/
    /***Flap Eth 1/1 to ensure correct behavior.***/
    
  • The following is an example of overlapping VLAN for PV translation. In the first statement, VLAN-102 is a translated VLAN with VNI mapping. In the second statement, VLAN-102 the VLAN where it is translated to VLAN-103 with VNI mapping.

    
    interface ethernet1/1
    switchport vlan mapping 101 102
    switchport vlan mapping 102 103/


    When adding a member to an existing port channel using the force command, the "mapping enable" configuration must be consistent.

    For example:

    
    Int po 101
    switchport vlan mapping enable
    switchport vlan mapping 101 10
    switchport trunk allowed vlan 10
    
    int eth 1/8
    /***No configuration***/


    Now int po 101 has the "switchport vlan mapping enable" configuration, while eth 1/8 does not. If you want to add eth 1/8 to port channel 101, you first need to apply the "switchport vlan mapping enable" configuration on eth 1/8, and then use the force command.

    
    int eth 1/8
    switchport vlan mapping enable
    channel-group 101 force
    
  • Port VLAN mapping is not supported on Cisco Nexus 9200 Series switches.

Before you begin

  • Ensure that the physical or port channel on which you want to implement VLAN translation is configured as a Layer 2 trunk port.

  • Ensure that the translated VLANs are created on the switch and are also added to the Layer 2 trunk ports trunk-allowed VLAN vlan-list.


    Note


    As a best practice, do not add the ingress VLAN ID to the switchport allowed vlan-list under the interface.


  • Ensure that all translated VLANs are VXLAN enabled.

Procedure

  Command or Action Purpose

Step 1

configure terminal

Enters global configuration mode.

Step 2

interface type port

Enters interface configuration mode.

Step 3

[no] switchport vlan mapping enable

Enables VLAN translation on the switch port. VLAN translation is disabled by default.

Note


Use the no form of this command to disable VLAN translation.

Step 4

[no] switchport vlan mapping vlan-id translated-vlan-id

Translates a VLAN to another VLAN.

  • The range for both the vlan-id and translated-vlan-id arguments is from 1 to 4094.

  • You can configure VLAN translation between the ingress (incoming) VLAN and a local (translated) VLAN on a port. For the traffic arriving on the interface where VLAN translation is enabled, the incoming VLAN is mapped to a translated VLAN that is VXLAN enabled.

    On the underlay, this is mapped to a VNI, the inner dot1q is deleted, and switched over to the VXLAN network. On the egress switch, the VNI is mapped to a translated VLAN. On the outgoing interface, where VLAN translation is configured, the traffic is converted to the original VLAN and egress out.

Note

 
Use the no form of this command to clear the mappings between a pair of VLANs.

Step 5

[no] switchport vlan mapping all

Removes all VLAN mappings configured on the interface.

Step 6

(Optional) copy running-config startup-config

(Optional)

Copies the running configuration to the startup configuration.

Note


The VLAN translation configuration does not become effective until the switch port becomes an operational trunk port

Step 7

(Optional) show interface [if-identifier] vlan mapping

(Optional)

Displays VLAN mapping information for a range of interfaces or for a specific interface.

Example

This example shows how to configure VLAN translation between (the ingress) VLAN 10 and (the local) VLAN 100. The show vlan counters command output shows the statistic counters as translated VLAN instead of customer VLAN.


switch# config t
switch(config)# interface ethernet1/1  
switch(config-if)# switchport vlan mapping enable
switch(config-if)# switchport vlan mapping 10 100 
switch(config-if)# switchport trunk allowed vlan 100
switch(config-if)# show interface ethernet1/1 vlan mapping
Interface eth1/1:
Original VLAN          Translated VLAN
------------------     ---------------
10                          100 

switch(config-if)# show vlan counters

Vlan Id                            :100
Unicast Octets In                  :292442462 
Unicast Packets In                 :1950525 
Multicast Octets In                :14619624 
Multicast Packets In               :91088 
Broadcast Octets In                :14619624 
Broadcast Packets In               :91088 
Unicast Octets Out                 :304012656 
Unicast Packets Out                :2061976 
L3 Unicast Octets In               :0 
L3 Unicast Packets In              :0 

Configuring Inner VLAN and Outer VLAN Mapping on a Trunk Port

You can configure VLAN translation from an inner VLAN and an outer VLAN to a local (translated) VLAN on a port. For the double tag VLAN traffic arriving on the interfaces where VLAN translation is enabled, the inner VLAN and outer VLAN are mapped to a translated VLAN that is VXLAN enabled.

Notes for configuring inner VLAN and outer VLAN mapping:

  • Inner and outer VLAN cannot be on the trunk allowed list on a port where inner VLAN and outer VLAN is configured.

    For example:


    switchport vlan mapping 11 inner 12 111
    switchport trunk allowed vlan 11-12,111 /***Not valid because 11 is outer VLAN and 12 is inner VLAN.***/ 
    
    
  • On the same port, no two mapping (translation) configurations can have the same outer (or original) or translated VLAN. Multiple inner VLAN and outer VLAN mapping configurations can have the same inner VLAN.

    For example:

     
    switchport vlan mapping 101 inner 102 1001
    switchport vlan mapping 101 inner 103 1002  /***Not valid because 101 is already used as an original VLAN.***/
    switchport vlan mapping 111 inner 104 1001  /***Not valid because 1001 is already used as a translated VLAN.***/
    switchport vlan mapping 106 inner 102 1003  /***Valid because inner vlan can be the same.***/ 
    
  • When a packet comes double-tagged on a port which is enabled with the inner option, only bridging is supported.

  • VXLAN PV routing is not supported for double-tagged frames.

Procedure

  Command or Action Purpose

Step 1

configure terminal

Enters global configuration mode.

Step 2

interface type port

Enters interface configuration mode.

Step 3

[no] switchport mode trunk

Enters trunk configuration mode.

Step 4

switchport vlan mapping enable

Enables VLAN translation on the switch port. VLAN translation is disabled by default.

Note


Use the no form of this command to disable VLAN translation.

Step 5

switchport vlan mapping outer-vlan-id inner inner-vlan-id translated-vlan-id

Translates inner VLAN and outer VLAN to another VLAN.

Step 6

(Optional) copy running-config startup-config

(Optional)

Copies the running configuration to the startup configuration.

Note


The VLAN translation configuration does not become effective until the switch port becomes an operational trunk port

Step 7

(Optional) show interface [if-identifier] vlan mapping

(Optional)

Displays VLAN mapping information for a range of interfaces or for a specific interface.

Example

This example shows how to configure translation of double tag VLAN traffic (inner VLAN 12; outer VLAN 11) to VLAN 111.


switch# config t
switch(config)# interface ethernet1/1
switch(config-if)# switchport mode trunk
switch(config-if)# switchport vlan mapping enable 
switch(config-if)# switchport vlan mapping 11 inner 12 111  
switch(config-if)# switchport trunk allowed vlan 101-170
switch(config-if)# no shutdown

switch(config-if)# show mac address-table dynamic vlan 111

Legend: 
        * - primary entry, G - Gateway MAC, (R) - Routed MAC, O - Overlay MAC
        age - seconds since last seen,+ - primary entry using vPC Peer-Link,
        (T) - True, (F) - False
   VLAN     MAC Address      Type      age     Secure NTFY Ports
---------+-----------------+--------+---------+------+----+------------------
*  111     0000.0092.0001   dynamic  0         F      F    nve1(100.100.100.254)
*  111     0000.0940.0001   dynamic  0         F      F    Eth1/1

Creating and Configuring an NVE Interface and Associate VNIs

An NVE interface is the overlay interface that terminates VXLAN tunnels.

You can create and configure an NVE (overlay) interface with the following:

Procedure

  Command or Action Purpose

Step 1

configure terminal

Enters global configuration mode.

Step 2

interface nve x

Creates a VXLAN overlay interface that terminates VXLAN tunnels.

Note


Only 1 NVE interface is allowed on the switch.

Step 3

source-interface src-if

The source interface must be a loopback interface that is configured on the switch with a valid /32 IP address. This /32 IP address must be known by the transient devices in the transport network and the remote VTEPs. This is accomplished by advertising it through a dynamic routing protocol in the transport network.

Step 4

member vni vni

Associate VXLAN VNIs (Virtual Network Identifiers) with the NVE interface.

Step 5

mcast-group start-address [end-address]

Assign a multicast group to the VNIs.

Note


used only for BUM traffic

Configuring Static MAC for VXLAN VTEP

Static MAC for VXLAN VTEP is supported on Cisco Nexus 9300 Series switches with flood and learn. This feature enables the configuration of static MAC addresses behind a peer VTEP.


Note


Static MAC cannot be configured for a control plane with a BGP EVPN-enabled VNI.


Procedure

  Command or Action Purpose

Step 1

configure terminal

Enters global configuration mode.

Step 2

mac address-table static mac-address vni vni-id interface nve x peer-ip ip-address

Specifies the MAC address pointing to the remote VTEP.

Step 3

exit

Exits global configuration mode.

Step 4

(Optional) copy running-config startup-config

(Optional)

Saves the change persistently through reboots and restarts by copying the running configuration to the startup configuration.

Step 5

(Optional) show mac address-table static interface nve x

(Optional)

Displays the static MAC addresses pointing to the remote VTEP.

Example

The following example shows the output for a static MAC address configured for VXLAN VTEP:

switch# show mac address-table static interface nve 1
 
Legend: 
        * - primary entry, G - Gateway MAC, (R) - Routed MAC, O - Overlay MAC
        age - seconds since last seen,+ - primary entry using vPC Peer-Link,
        (T) - True, (F) - False
   VLAN     MAC Address      Type      age     Secure NTFY Ports
---------+-----------------+--------+---------+------+----+------------------
*  501     0047.1200.0000   static   -         F      F    nve1(33.1.1.3)
*  601     0049.1200.0000   static   -         F      F    nve1(33.1.1.4)

Disabling VXLANs

Procedure

  Command or Action Purpose

Step 1

configure terminal

Enters global configuration mode.

Step 2

no feature vn-segment-vlan-based

Disables the global mode for all VXLAN bridge domains

Step 3

no feature nv overlay

Disables the VXLAN feature.

Step 4

(Optional) copy running-config startup-config

(Optional)

Saves the change persistently through reboots and restarts by copying the running configuration to the startup configuration.

Configuring BGP EVPN Ingress Replication

The following enables BGP EVPN with ingress replication for peers.

Procedure

  Command or Action Purpose

Step 1

configure terminal

Enters global configuration mode.

Step 2

interface nve x

Creates a VXLAN overlay interface that terminates VXLAN tunnels.

Note


Only 1 NVE interface is allowed on the switch.

Step 3

source-interface src-if

The source interface must be a loopback interface that is configured on the switch with a valid /32 IP address. This /32 IP address must be known by the transient devices in the transport network and the remote VTEPs. This is accomplished by advertising it through a dynamic routing protocol in the transport network.

Step 4

member vni vni

Associate VXLAN VNIs (Virtual Network Identifiers) with the NVE interface.

Step 5

ingress-replication protocol bgp

Enables BGP EVPN with ingress replication for the VNI.

Configuring Static Ingress Replication

The following enables static ingress replication for peers.

Procedure

  Command or Action Purpose

Step 1

configuration terminal

Enters global configuration mode.

Step 2

interface nve x

Creates a VXLAN overlay interface that terminates VXLAN tunnels.

Note


Only 1 NVE interface is allowed on the switch.

Step 3

member vni [vni-id | vni-range]

Maps VXLAN VNIs to the NVE interface.

Step 4

ingress-replication protocol static

Enables static ingress replication for the VNI.

Step 5

peer-ip n.n.n.n

Enables peer IP.

Guidelines and Limitations for Q-in-VNI

Q-in-VNI has the following limitations:

  • Q-in-VNI and Selective Q-in-VNI are supported only with VXLAN Flood and Learn.

  • Q-in-VNI, Selective Q-in-VNI, and QinQ-QinVNI features are not supported with Multicast underlay on Nexus 9000 EX platforms.

  • It is recommended that you enter the system dot1q tunnel transit when running these features on vPC VTEPs.

  • For proper operation during L3 uplink failure scenarios on vPC VTEPs configure backup SVI and enter the system nve infra-vlans backup SVI vlan command. On Cisco Nexus 9000-EX platform switches, the backup SVI VLAN needs to be the native VLAN on the Peer-link.

  • Single tag is supported on Cisco Nexus 9300 platform switches. It can be enabled by unconfiguring the overlay-encapsulation vxlan-with-tag command from an interface NVE:

    switch(config)# int nve 1
    switch (config-if-nve)# no overlay-encapsulation vxlan-with-tag
    switch # sh run int nve 1
     		
    !Command: show running-config interface nve1
    !Time: Wed Jul 20 23:26:25 2016
     
    version 7.0(3u)I4(2u)
     
    interface nve1
      no shutdown
      source-interface loopback0
      host-reachability protocol bgp
      member vni 900001 associate-vrf
      member vni 2000980
        mcast-group 225.4.0.1
    
  • Single tag is not supported on Cisco Nexus 9500 platform switches; only double tag is supported.

  • Double tag is not supported on Cisco Nexus 9300-EX platform switches, only single tag is supported.

  • When upgrading from Cisco NX-OS Release 7.0(3)I3(1) or 7.0(3)I4(1) to Cisco NX-OS Release 7.0(3)I7(5) with Cisco Nexus 9300 platform switches without the overlay-encapsulation vxlan-with-tag command under interface NVE, you should add overlay-encapsulation vxlan-with-tag under the NVE interface in the older release before starting the ISSU upgrade. We were only supporting double tag in Cisco NX-OS Release 7.0(3)I3(1) and 7.0(3)I4(1). We now support single tag also in Cisco NX-OS Release 7.0(3)I7(5).

  • We do not support traffic between ports that are configured for Q-in-VNI and ports that are configured for trunk on Cisco Nexus 9300-EX platform switches.

  • Q-in-VNI is supported only with both flood and learn.

  • The Q-in-VNI feature cannot coexist with a VTEP which has Layer 3 subinterfaces configured.

  • The Q-in-VNI or selective Q-in-VNI feature is not supported with VXLAN or VXLAN EVPN on Cisco Nexus 9000-EX platform switches when Multicast is used for BUM replication (L2VNI).

Configuring Q-in-VNI

Using Q-in-VNI provides a way for you to segregate traffic by mapping to a specific port. In a multi-tenant environment, you can specify a port to a tenant and send/receive packets over the VXLAN overlay.

Notes about configuring a Q-in-VNI:

  • Q-in-VNI only supports VXLAN bridging. It does not support VXLAN routing.

  • Q-in-VNI does not support FEX.

  • When configuring access ports and trunk ports:

    • For NX-OS 7.0(3)I2(2) and earlier releases, when a switch is in dot1q mode, you cannot have access ports or trunk ports configured on any other interface on the switch.

    • For NX-OS 7.0(3)I3(1) and later releases running on a Network Forwarding Engine (NFE), you can have access ports, trunk ports and dot1q ports on different interfaces on the same switch.

    • For NX-OS 7.0(3)I5(1) and later releases running on a Leaf Spine Engine (LSE), you can have access ports, trunk ports and dot1q ports on different interfaces on the same switch.

  • For NX-OS 7.0(3)I3(1) and later releases, you cannot have the same VLAN configured for both dot1q and trunk ports/access ports.

Before you begin

Configuring the Q-in-VNI feature requires:

  • The base port mode must be a dot1q tunnel port with an access VLAN configured.

  • VNI mapping is required for the access VLAN on the port.

  • If you have Q-in-VNI on one Cisco Nexus 9300-EX Series switch VTEP and trunk on another Cisco Nexus 9300-EX Series switch VTEP, the bidirectional traffic will not be sent between the two ports.

  • Cisco Nexus 9300-EX Series of switches performing VXLAN and Q-in-Q, a mix of provider interface and VXLAN uplinks is not considered. The VXLAN uplinks have to be separated from the Q-in-Q provider or customer interface.

    For VPC use cases, the following considerations must be made when VXLAN and Q-in-Q are used on the same switch.

    • The VPC peer-link has to be specifically configured as a provider interface to ensure orphan-to-orphan port communication. In these cases, the traffic is sent with two IEEE 802.1q tags (double dot1q tagging). The inner dot1q is the customer VLAN ID while the outer dot1q is the provider VLAN ID (access VLAN).

    • The VPC peer-link is used as backup path for the VXLAN encapsulated traffic in the case of an uplink failure. In Q-in-Q, the VPC peer-link also acts as the provider interface (orphan-to-orphan port communication). In this combination, use the native VLAN as the backup VLAN for traffic to handle uplink failure scenarios. Also make sure the backup VLAN is configured as a system infra VLAN (system nve infra-vlans).

Procedure

  Command or Action Purpose

Step 1

configure terminal

Enters global configuration mode.

Step 2

interface type port

Enters interface configuration mode.

Step 3

switchport mode dot1q-tunnel

Creates a 802.1Q tunnel on the port.

Step 4

switchport access vlan vlan-id

Specifies the port assigned to a VLAN.

Step 5

spanning-tree bpdufilter enable

Enables BPDU Filtering for the specified spanning tree edge interface. By default, BPDU Filtering is disabled.

Step 6

interface nve x

Creates a VXLAN overlay interface that terminates VXLAN tunnels.

Note


This step is required for NX-OS 7.0(3)I2(2) and earlier releases.

This step is not required for NX-OS 7.0(3)I3(1) and later releases.

Step 7

overlay-encapsulation vxlan-with-tag

Enables Q-in-VNI.

Note


This step is required for NX-OS 7.0(3)I2(2) and earlier releases:

This step is not required for NX-OS 7.0(3)I3(1) and later releases.

Note


Starting with Release 7.0(3)I5(1), this step is not required for Cisco Nexus 9000 Series switches with Application Spine Engine (ASE). Also, provider tagging (double tagging) is not applicable for Cisco Nexus 9000 Series switches with Application Spine Engine (ASE).

Example

  • The following is an example of configuring a Q-in-VNI (NX-OS 7.0(3)I2(2) and earlier releases):

    
    switch# config terminal
    switch(config)# interface ethernet 1/4
    switch(config-if)# switchport mode dot1q-tunnel
    switch(config-if)# switchport access vlan 10
    switch(config-if)# spanning-tree bpdufilter enable
    switch(config-if)# interface nve1
    switch(config-if)# overlay-encapsulation vxlan-with-tag
    
  • The following is an example of configuring a Q-in-VNI (NX-OS 7.0(3)I3(1) and later releases):

    
    switch# config terminal
    switch(config)# interface ethernet 1/4
    switch(config-if)# switchport mode dot1q-tunnel
    switch(config-if)# switchport access vlan 10
    switch(config-if)# spanning-tree bpdufilter enable
    switch(config-if)# 
    

Configuring Selective Q-in-VNI

Selective Q-in-VNI is a VXLAN tunneling feature that allows a user specific range of customer VLANs on a port to be associated with one specific provider VLAN. Packets that come in with a VLAN tag that matches any of the configured customer VLANs on the port are tunneled across the VXLAN fabric using the properties of the service provider VNI. The VXLAN encapsulated packet carries the customer VLAN tag as part of the L2 header of the inner packet.

The packets that come in with a VLAN tag that is not present in the range of the configured customer VLANs on a selective Q-in-VNI configured port are dropped. This includes the packets that come in with a VLAN tag that matches the native VLAN on the port. Packets coming untagged or with a native VLAN tag are L3 routed using the native VLAN’s SVI that is configured on the selective Q-in-VNI port (no VXLAN).

Beginning with Cisco NX-OS Release 7.0(3)I5(2), selective Q-in-VNI is supported on both vPC and non-vPC ports on Cisco Nexus 9300-EX Series switches. This feature is not supported on Cisco Nexus 9300 Series and 9200 Series switches.

This feature is also supported with flood and learn in IR mode.

See the following guidelines for selective Q-in-VNI:

  • Beginning with Cisco NX-OS Release 7.0(3)I5(2), configuring selective Q-in-VNI on one VXLAN and configuring plain Q-in-VNI on the VXLAN peer is supported. Configuring one port with selective Q-in-VNI and the other port with plain Q-in-VNI on the same switch is supported.

  • Selective Q-in-VNI is an ingress VLAN tag-policing feature. Only ingress VLAN tag policing is performed with respect to the selective Q-in-VNI configured range.

    For example, selective Q-in-VNI customer VLAN range of 100-200 is configured on VTEP1 and customer VLAN range of 200-300 is configured on VTEP2. When traffic with VLAN tag of 175 is sent from VTEP1 to VTEP2, the traffic is accepted on VTEP1, since the VLAN is in the configured range and it is forwarded to the VTEP2. On VTEP2, even though VLAN tag 175 is not part of the configured range, the packet egresses out of the selective Q-in-VNI port. 
If a packet is sent with VLAN tag 300 from VTEP1, it is dropped because 300 is not in VTEP1’s selective Q-in-VNI configured range.

  • Configure the system dot1q-tunnel transit CLI on the vPC switches with selective Q-in-VNI configurations. This CLI configuration is required to retain the inner Q-tag as the packet goes over the vPC peer link when one of the vPC peers has an orphan port. With this CLI configuration, the vlan dot1Q tag native functionality does not work.

  • The native VLAN configured on the selective Q-in-VNI port cannot be a part of the customer VLAN range. If the native VLAN is part of the customer VLAN range, the configuration is rejected.

    The provider VLAN can overlap with the customer VLAN range. For example, switchport vlan mapping 100-1000 dot1q-tunnel 200

  • By default, the native VLAN on any port is VLAN 1. If VLAN 1 is configured as part of the customer VLAN range using the switchport vlan mapping <range>dot1q-tunnel <sp-vlan> CLI command, the traffic with customer VLAN 1 is not carried over as VLAN 1 is the native VLAN on the port. 
If customer wants VLAN 1 traffic to be carried over the VXLAN cloud, they should configure a dummy native VLAN on the port whose value is outside the customer VLAN range.

  • To remove some VLANs or a range of VLANs from the configured switchport VLAN mapping range on the selective Q-in-VNI port, use the no form of the switchport vlan mapping <range>dot1q-tunnel <sp-vlan> CLI command.

    For example, VLAN 100-1000 is configured on the port. To remove VLAN 200-300 from the configured range, use the no switchport vlan mapping <200-300> dot1q-tunnel <sp-vlan> CLI command.


    interface Ethernet1/32
      switchport
      switchport mode trunk
      switchport trunk native vlan 4049
      switchport vlan mapping 100-1000 dot1q-tunnel 21 
      switchport trunk allowed vlan 21,4049
      spanning-tree bpdufilter enable
      no shutdown
    
    switch(config-if)# no sw vlan mapp 200-300 dot1q-tunnel 21
    switch(config-if)# sh run int e 1/32
    
    version 7.0(3)I5(2)
    
    interface Ethernet1/32
      switchport
      switchport mode trunk
      switchport trunk native vlan 4049
      switchport vlan mapping 100-199,301-1000 dot1q-tunnel 21 
      switchport trunk allowed vlan 21,4049
      no shutdown
    
    
  • Only the native VLANs and the service provider VLANs are allowed on the selective Q-in-VNI port. No other VLANs are allowed on the selective Q-in-VNI port and even if they are allowed, the packets for those VLANs are not forwarded.

See the following configuration examples.

  • See the following example for the provider VLAN configuration:

    
    vlan 50  
    	vn-segment 10050
    
    
  • See the following example for configuring VXLAN Flood and Learn with Ingress Replication:

    
    member vni 10050
        ingress-replication protocol static
          peer-ip 100.1.1.3
          peer-ip 100.1.1.5
          peer-ip 100.1.1.10
    
    
  • See the following example for the interface nve configuration:

    
    interface nve1  
    	no shutdown  
    	source-interface loopback0  member vni 10050 
    mcast-group 230.1.1.1
    
    
  • See the following example for the native VLAN configuration:

    
    vlan 150
    interface vlan150  
    	no shutdown  
    	ip address 150.1.150.6/24 
    	ip pim sparse-mode
    
    
  • See the following example for configuring selective Q-in-VNI on a port. In this example, native VLAN 150 is used for routing the untagged packets. Customer VLANs 200-700 are carried across the dot1q tunnel. The native VLAN 150 and the provider VLAN 50 are the only VLANs allowed.

    
    switch# config terminal
    switch(config)#interface Ethernet 1/31  
    switch(config-if)#switchport
    switch(config-if)#switchport mode trunk  
    switch(config-if)#switchport trunk native vlan 150                         
    switch(config-if)#switchport vlan mapping 200-700 dot1q-tunnel 50     
    switch(config-if)#switchport trunk allowed vlan 50,150    
    switch(config-if)#no shutdown
    

Configuring Q-in-VNI with LACP Tunneling

Q-in-VNI can be configured to tunnel LACP packets.

Procedure

  Command or Action Purpose

Step 1

configure terminal

Enters global configuration mode.

Step 2

interface type port

Enters interface configuration mode.

Step 3

switchport mode dot1q-tunnel

Enables dot1q-tunnel mode.

Step 4

switchport access vlan vlan-id

Specifies the port assigned to a VLAN.

Step 5

interface nve x

Creates a VXLAN overlay interface that terminates VXLAN tunnels.

Step 6

overlay-encapsulation vxlan-with-tag tunnel-control-frames lacp

Enables Q-in-VNI for LACP tunneling.

Note


Use this form of the command for NX-OS 7.0(3)I3(1) and later releases.

For NX-OS 7.0(3)I2(2) and earlier releases, use the overlay-encapsulation vxlan-with-tag tunnel-control-frames command.

Example

  • The following is an example of configuring a Q-in-VNI for LACP tunneling (NX-OS 7.0(3)I2(2) and earlier releases):

    
    switch# config terminal
    switch(config)# interface ethernet 1/4
    switch(config-if)# switchport mode dot1q-tunnel
    switch(config-if)# switchport access vlan 10
    switch(config-if)# spanning-tree bpdufilter enable
    switch(config-if)# interface nve1
    switch(config-if)# overlay-encapsulation vxlan-with-tag tunnel-control-frames


    Note


    • STP is disabled on VNI mapped VLANs.

    • No spanning-tree VLAN <> on the VTEP.

    • No MAC address-table notification for mac-move.

    • As a best practice, configure a fast LACP rate on the interface where the LACP port is configured. Otherwise the convergence time is approximately 90 seconds.


  • The following is an example of configuring a Q-in-VNI for LACP tunneling (NX-OS 7.0(3)I3(1) and later releases):

    
    switch# config terminal
    switch(config)# interface ethernet 1/4
    switch(config-if)# switchport mode dot1q-tunnel
    switch(config-if)# switchport access vlan 10
    switch(config-if)# spanning-tree bpdufilter enable
    switch(config-if)# interface nve1
    switch(config-if)# overlay-encapsulation vxlan-with-tag tunnel-control-frames lacp


    Note


    • STP is disabled on VNI mapped VLANs.

    • No spanning-tree VLAN <> on the VTEP.

    • No MAC address-table notification for mac-move.

    • As a best practice, configure a fast LACP rate on the interface where the LACP port is configured. Otherwise the convergence time is approximately 90 seconds.


  • The following is an example topology that pins each port of a port-channel pair to a unique VM. The port-channel is stretched from the CE perspective. There is no port-channel on VTEP. The traffic on P1 of CE1 transits to P1 of CE2 using Q-in-VNI.

    Figure 2. LACP Tunneling Over VXLAN P2P Tunnels


Note


  • Q-in-VNI can be configured to tunnel LACP packets. (Able to provide port-channel connectivity across data-centers.)

    • Gives impression of L1 connectivity and co-location across data-centers.

    • Exactly two sites. Traffic coming from P1 of CE1 goes out of P1 of CE2. If P1 of CE1 goes down, LACP provides coverage (over time) to redirect traffic to P2.

  • Uses static ingress replication with VXLAN with flood and learn. Each port of the port channel is configured with Q-in-VNI. There are multiple VNIs for each member of a port-channel and each port is pinned to specific VNI.

    • To avoid saturating the MAC, you should turn off/disable learning of VLANS.

  • Configuring Q-in-VNI to tunnel LACP packets is not supported for VXLAN EVPN.

  • The number of port-channel members supported is the number of ports supported by the VTEP.


Configuring QinQ-QinVNI

Overview for QinQ-QinVNI

  • QinQ-QinVNI is a VXLAN tunneling feature that allows you to configure a trunk port as a multi-tag port to preserve the customer VLANs that are carried across the network.

  • On a port that is configured as multi-tag, packets are expected with multiple-tags or at least one tag. When multi-tag packets ingress on this port, the outer-most or first tag is treated as provider-tag or provider-vlan. The remaining tags are treated as customer-tag or customer-vlan.

  • This feature is supported on both vPC and non-vPC ports.

  • Ensure that the switchport trunk allow-multi-tag command is configured on both of the vPC-peers. It is a type 1 consistency check.

  • This feature is supported with VXLAN Flood and Learn and VXLAN EVPN.

  • This feature is supported on the Cisco Nexus 9300-FX and Cisco Nexus 9300-FX2 switches.

Guidelines and Limitations for QinQ-QinVNI

QinQ-QinVNI has the following guidelines and limitations:

  • On a multi-tag port, provider VLANs must be a part of the port. They are used to derive the VNI for that packet.

  • Untagged packets are associated with the native VLAN. If the native VLAN is not configured, the packet is associated with the default VLAN (VLAN 1).

  • Packets coming in with an outermost VLAN tag (provider-vlan), not present in the range of allowed VLANs on a multi-tag port, are dropped.

  • Packets coming in with an outermost VLAN tag (provider-vlan) tag matching the native VLAN are routed or bridged in the native VLAN's domain.

  • This feature is supported with VXLAN bridging. It does not support VXLAN routing.

  • Multicast data traffic with more than two Q-Tags in not supported when snooping in enabled on the VXLAN VLAN.

  • You need at least one multi-tag trunk port allowing the provider VLANs in up state on both the vPC peers. Otherwise, traffic traversing via the peer-link for these provider VLANs will not carry all inner C-Tags.

Configuring QinQ-QinVNI


Note


You can also carry native VLAN (untagged traffic) on the same multi-tag trunk port.

The native VLAN on a multi-tag port cannot be configured as a provider VLAN on another multi-tag port or a dot1q enabled port on the same switch.

The allow-multi-tag command is allowed only on a trunk port. It is not available on access or dot1q ports.

The allow-multi-tag command is not allowed on Peer Link ports. Port channel with multi-tag enabled must not be configured as a vPC peer-link.


Procedure

  Command or Action Purpose

Step 1

configure terminal

Example:

switch# configure terminal

Enters global configuration mode.

Step 2

interface ethernet slot/port

Example:

switch(config)# interface ethernet1/7

Specifies the interface that you are configuring.

Step 3

switchport

Example:

switch(config-inf)# switchport 

Configures it as a Layer 2 port.

Step 4

switchport mode trunk

Example:

switch(config-inf)# switchport mode trunk

Sets the interface as a Layer 2 trunk port.

Step 5

switchport trunk native vlan vlan-id

Example:

switch(config-inf)# switchport trunk native vlan 30

Sets the native VLAN for the 802.1Q trunk. Valid values are from 1 to 4094. The default value is VLAN1.

Step 6

switchport trunk allowed vlan vlan-list

Example:

switch(config-inf)# switchport trunk allowed vlan 10,20,30

Sets the allowed VLANs for the trunk interface. The default is to allow all VLANs on the trunk interface: 1 to 3967 and 4048 to 4094. VLANs 3968 to 4047 are the default VLANs reserved for internal use by default.

Step 7

switchport trunk allow-multi-tag

Example:

switch(config-inf)# switchport trunk allow-multi-tag

Sets the allowed VLANs as the provider VLANs excluding the native VLAN. In the following example, VLANs 10 and 20 are provider VLANs and can carry multiple Inner Q-tags. Native VLAN 30 will not carry inner Q-tags.

Example

interface Ethernet1/7
switchport
switchport mode trunk
switchport trunk native vlan 30
switchport trunk allow-multi-tag
switchport trunk allowed vlan 10,20,30
no shutdown

Removing a VNI

Use this procedure to remove a VNI.

Procedure


Step 1

Remove the VNI under NVE.

Step 2

Remove the VRF from BGP (applicable when decommissioning for Layer 3 VNI).

Step 3

Delete the SVI.

Step 4

Delete the VLAN and VNI.


Configuring FHRP Over VXLAN

Overview for FHRP Over VXLAN

Overview of FHRP

Starting with Release 7.0(3)I5(1), you can configure First Hop Redundancy Protocol (FHRP) over VXLAN on Cisco Nexus 9000 Series switches. The FHRP provides a redundant Layer 3 traffic path. It provides fast failure detection and transparent switching of the traffic flow. The FHRP avoids the use of the routing protocols on all the devices. It also avoids the traffic loss that is associated with the routing or the discovery protocol convergence. It provides an election mechanism to determine the next best gateway. Current FHRP supports HSRPv1, HSRPv2, VRRPv2, and VRRPv3.

FHRP over VXLAN

The FHRP serves at the Layer 3 VXLAN redundant gateway for the hosts in the VXLAN. The Layer 3 VXLAN gateway provides routing between the VXLAN segments and routing between the VXLAN to the VLAN segments. Layer 3 VXLAN gateway also serves as a gateway for the external connectivity of the hosts.

Guidelines and Limitations for FHRP Over VXLAN

See the following guidelines and limitations for configuring FHRP over VXLAN:

  • Configuring FHRP over VXLAN allows the FHRP protocols to peer using the hello packets that are flooded on the VXLAN overlay. The ACLs have been programmed into the Cisco Nexus 9500 Series switches that allow the HSRP packets that are flooded on the overlay to be punted to the supervisor module.

  • When using FHRP with VXLAN, ARP-ETHER TCAM must be carved using the hardware access-list tcam region arp-ether 256 CLI command.

  • Configuring FHRP over VXLAN is supported for both IR and multicast flooding of the FHRP packets. The FHRP protocol working does not change for configuring FHRP over VXLAN.

  • The FHRP over VXLAN feature is supported for flood and learn only.

  • For Layer 3 VTEPs in BGP EVPN, only anycast GW is supported.

  • Beginning with Cisco NX-OS Release 7.0(3)I5(2), configuring FHRP over VXLAN is supported on the Cisco Nexus 9200, 9300, and 9300-EX Series switches.

Only Supported Deployments for FHRP Over VXLAN

See the following illustrations for only supported deployments for FHRP over VXLAN protocols.

Figure 3. FHRP over VXLAN Leafs as Layer 3 Gateway
Figure 4. FHRP over VXLAN Spine as Layer 3 Gateway

See the following configuration example for FHRP over VXLAN Leafs as Layer 3 Gateway (Figure 2) and FHRP over VXLAN Spine as Layer 3 Gateway (Figure 3):


BL1 / S1 FHRP configuration with HSRP
# VLAN with VNI
vlan 10
  vn-segment 10000

# Layer-3 Interface with FHRP (HSRP)
interface vlan 10
 ip address 192.168.1.2
  hsrp 10
  ip 192.168.1.1

BL2 / S2 FHRP configuration with HSRP
# VLAN with VNI
vlan 10
  vn-segment 10000

# Layer-3 Interface with FHRP (HSRP)
interface vlan 10
 ip address 192.168.1.3
  hsrp 10
  ip 192.168.1.1

Note


The FHRP configuration can leverage HSRP or VRRP. The VLAN for FHRP has to be allowed on the vPC peer-link and as vPC is used, FHRP operates in active/active. The VNI mapped to the VLAN must be configured on the NVE interface and it is associated with the used BUM replication mode (Multicast or Ingress Replication).


New Supported Topology for Configuring FHRP Over VXLAN

Configuring FHRP over VXLAN is supported on the following Cisco Nexus 9000 Series switches and line cards:

  • Cisco Nexus 9300 Series switches

  • N9K-X9536PQ line cards

  • N9k-X9564TX line cards

  • N9K-X9564PX line cards


Note


In the new topology for configuring FHRP over VXLAN, Bi-Directional Forwarding (BFD) is not supported with HSRP.


See the following new supported topology for configuring FHRP over VXLAN:

Figure 5. Configuring FHRP Over VXLAN on the Spine Layer

In the above topology, FHRP can be configured on the Spine Layer. The FHRP protocols synchronize its state with the hellos that get flooded on the Overlay without having a dedicated Layer 2 link in between the peers. The FHRP operates in an active/standby state as no vPC is being deployed.

See the following configuration example for the topology:

S1 FHRP configuration with HSRP
# VLAN with VNI
vlan 10
  vn-segment 10000

# Layer-3 Interface with FHRP (HSRP)
interface vlan 10
 ip address 192.168.1.2
  hsrp 10
  ip 192.168.1.1

S2 FHRP configuration with HSRP
# VLAN with VNI
vlan 10
  vn-segment 10000

# Layer-3 Interface with FHRP (HSRP)
interface vlan 10
 ip address 192.168.1.3
  hsrp 10
  ip 192.168.1.1

Note


The FHRP configuration can leverage HSRP or VRRP. No vPC peer-link is necessary and therefore no VLAN is allowed on the vPC peer-link. The VNI mapped to the VLAN must be configured on the NVE interface and it is associated with the used BUM replication mode (Multicast or Ingress Replication).


Configuring IGMP Snooping Over VXLAN

Overview of IGMP Snooping Over VXLAN

Starting with Cisco NX-OS Release 7.0(3)F3(4), you can configure IGMP snooping over VXLAN. This feature is available on the Cisco Nexus 9508 switch with 9636-RX line cards.

Starting with Cisco NX-OS Release 7.0(3)I5(1), you can configure IGMP snooping over VXLAN. The configuration of IGMP snooping is same in VXLAN as in configuration of IGMP snooping in regular VLAN domain. For more information on IGMP snooping, see the Configuring IGMP Snooping section in Cisco Nexus 9000 Series NX-OS Multicast Routing Configuration Guide, Release 7.x.

Guidelines and Limitations for IGMP Snooping Over VXLAN

See the following guidelines and limitations for IGMP snooping over VXLAN:

  • For IGMP snooping over VXLAN, all the guidelines and limitations of VXLAN apply.

  • Beginning with Cisco NX-OS Release 7.0(3)I7(6), IGMP snooping on VXLAN VLANs is supported on N9K-C9364C, N9K-C93180-FX, and N9K-C9336C-FX2 platform switches.

  • Beginning with Cisco NX-OS Release 7.0(3)I6(1), IGMP snooping on VXLAN VLANs is supported for Cisco Nexus 9300 and 9300-EX platform switches with multicast overlay networks and ingress replication underlay networks.

  • Beginning with Cisco NX-OS Release 7.0(3)I5(1), IGMP snooping on VXLAN VLANs is supported for Cisco Nexus 9300 and 9300-EX platform switches and only with multicast underlay networks (not with ingress replication underlay networks).

  • Beginning with Cisco NX-OS Release 7.0(3)I5(2), VXLAN IGMP snooping is supported on Cisco Nexus 9300 platform switches and Cisco Nexus 9500 platform switches with N9K-X9732C-EX line cards.

  • By default, unknown multicast traffic gets flooded to the VLAN domains on Cisco Nexus 9300 platform switches.

  • IGMP snooping over VXLAN is not supported on any FEX enabled platforms and FEX ports.

Configuring IGMP Snooping Over VXLAN

Before you begin

For VXLAN IGMP snooping functionality, the ARP-ETHER TCAM must be configured in the double-wide mode using the hardware access-list tcam region arp-ether 256 double wide command for Cisco Nexus 9300 switches. This command is not required for Cisco Nexus 9300-EX switches. .

Procedure

  Command or Action Purpose

Step 1

switch(config)#ip igmp snooping vxlan

Enables IGMP snooping for VXLAN VLANs. You have to explicitly configure this command to enable snooping for VXLAN VLANs.

Step 2

switch(config)#ip igmp snooping disable-nve-static-router-port

Configures IGMP snooping over VXLAN to not include NVE as static mrouter port using this global CLI command. IGMP snooping over VXLAN has the NVE interface as mrouter port by default.

Step 3

switch(config)#system nve ipmc global index-size ?

Example:

 
switch(config)# system nve ipmc global index-size ?
<1000-7000> Ipmc allowed size

Configures the VXLAN global IPMC index size. IGMP snooping over VXLAN uses the IPMC indexes from the NVE global range on the Cisco Nexus 9000 Series switches with Network Forwarding Engine (NFE). You need to reconfigure the VXLAN global IPMC index size according to the scale using this command. Cisco recommends to reserve 6000 IPMC indexes using this CLI command. The default IPMC index size is 3000.

Note


This command is not available on the Cisco Nexus 9508 platform switch.

Step 4

switch(config)# ip igmp snooping vxlan-umc drop vlan ?

Example:


switch(config)# ip igmp snooping vxlan-umc drop vlan ?
<1-3863>  VLAN IDs for which unknown multicast traffic is dropped

Configures IGMP snooping over VXLAN to drop all the unknown multicast traffic on per VLAN basis using this global CLI command. On Cisco Nexus 9000 Series switches with Network Forwarding Engine (NFE), the default behavior of all unknown multicast traffic is to flood to the bridge domain.

Note


This command is not available on the Cisco Nexus 9508 platform switch.

Configuring Line Cards for VXLAN

This procedure applies only to the Cisco Nexus 9508 switch.

This procedure configures lines cards for either VXLAN or MPLS. All line cards in the chassis must be either VXLAN or MLPS. They cannot be mixed.

Procedure

  Command or Action Purpose

Step 1

configure terminal

Example:

switch# configure terminal

Enters global configuration mode.

Step 2

hardware profile [vxlan | mpls] module {module | all}

Example:

switch(config)# hardware profile vxlan module all

Configures VXLAN on all line cards.

Note


All line cards must be either VXLAN or MLPS. They cannot be mixed.

Step 3

switch(config)# reload

Example:

switch(config)# reload

Reloads the Cisco NX-OS software.

Step 4

switch(config)# show hardware profile module [module | all]

Example:

switch(config)# show hardware profile module all

Displays the line cards that are configured with VXLAN.

Centralized VRF Route Leaking using Default-Routes and Aggregates

Overview

Centralizing VRF route leaks using default-routes facilitates installation and configuration of new hardware or software that must coexist with legacy systems, without any additional configuration overheads on the legacy nodes. However, enabling shared services and default-VRF access scenarios may require one additional configuration on a per-VRF-AF level in the Border Leaf (BL). Though the leaf nodes may not require configuration changes, the BLs must have the knowledge of all VRFs, as well as the fabric entry and exit points. EVPN enables multi-tenancy support by segregating traffic among the tenants. While segregation among different tenants is maintained in most cases, supporting the capability of cross-tenant traffic is also equally important for tenants to access common services. In order to achieve traffic segregation, the tenant’s routes are typically placed in different VRFs in an EVPN deployment case.

Deploying EVPN

When an EVPN solution is deployed in an existing datacenter, the legacy switches, that do not have EVPN support, co-exists with EVPN-capable VTEPs. The VTEPs supports tenant traffic segregation. Tenant routes are placed in the VRF while the legacy switches are typically placed in the global VRF. Existing servers remains connected to legacy switches. The hosts in the tenant’s VRF must have access to servers placed under the legacy switches in the global VRF. Access to the default-VRF is enabled by allowing routes, that are imported already, in a non-default-VRF, to be re-imported into the default-VRF. That in turn advertises the VPN learnt prefixes outside of the fabric. Because there is no support in EVPN similar to VPNv4 for advertising the default-routes directly via the VPN session, the default-route must be originated from the VRF AF. You must preferably use route-maps to control prefix leaking from the VRFs into the default-VRF.

Figure 6. EVPN Brown-field Deployment
Figure 7. Border Leaf Connection to Core / Internet via Default-VRF
Figure 8. Common Services
Common Services

Reachability between Leaves

EVPN Cross-VRF Connectivity between leaves is achieved by packet re-encapsulation on the BL, which will be the VTEP for all VNIs requiring cross-VRF reachability. Default routes provides cross-VRF reachability to the legacy nodes.

VPN to Default-VRF Reachability

Routes are not imported directly from VPN into the default-VRF. You must configure a VRF to import and hold those routes, which will then be evaluated for importing into the default-VRF after configuring the knob. Because all VRFs may be importing the other VRFs’ routes, only one VRF may be needed to leak its routes to the default-VRF for providing full VPN to default-VRF Reachability.

Guidelines and Limitations

  • Centralized VRF Route Leaking is supported only on Cisco Nexus 9200 and 9300-EX platform switches

  • Each prefix needs to be imported into each VRF for full EVPN Cross-VRF Reachability.

  • Memory complexity of the deployment can be described by a O(NxM ) formula, where N is the number of prefixes, M is the number of EVPN VRFs.

  • You must configure “feature bgp” to have access to “export vrf default” command. In order to achieve the full Centralized Route Leaking on EVPN, you must support downstream VNI assignment.


    Note


    Downstream VNI is not supported in the Release 7.0(3)I7(1)


  • Centralized route leaking applies the longest prefix matching. A leaf with a less specific local route, may not be able to reach a more specific address of that route’s subnet from another VNI, unless you manually configure the border leaf switch to generate those advertisements.

  • Hardware support for VXLAN packet re-encapsulation at BL is required for this functionality to work in EVPN.

Configuration Examples for Centralized VRF Route Leak

The following example shows how to leak routes from tenant VRF to default VRF.


vrf context vrf120
  vni 300120
  ip route 0.0.0.0/0 Null0            					// static default route 
  ipv6 route ::/0 Null0							// static default route
  
rd auto
  address-family ipv4 unicast
    route-target import 65535:120
    route-target import 65535:120 evpn
    route-target export 65535:120
    route-target export 65535:120 evpn
    import vrf default map permitall			// Imports from default VRF to tenant VRF
    export vrf default 100 map block_default allow-vpn
  address-family ipv6 unicast
    route-target import 65535:120
    route-target import 65535:120 evpn
    route-target export 65535:120
    route-target export 65535:120 evpn
    import vrf default map permitall
    export vrf default 100 map block_default_v6 allow-vpn

The following example shows how to leak routes from default VRF to tenant VRF.


router bgp 1001
  vrf vrf120
    address-family ipv4 unicast
      network 0.0.0.0/0				// advertises default route to host leaf VTEPs
      advertise l2vpn evpn
      redistribute hmm route-map permitall
      maximum-paths 64
      maximum-paths ibgp 64
    address-family ipv6 unicast
      network 0::/0				// advertises default route to host leaf VTEPs
      advertise l2vpn evpn
      redistribute hmm route-map permitall
      maximum-paths 64
      maximum-paths ibgp 64

The following is an example configuration on a border-leaf switch to route leaks from one tenant VRF (VRF150) to another tenant VRF (VRF250). In these examples, BL-11 is used as the border-leaf switch. The aggregate-address is used for BL switches to advertise VRF250’s address to leaf switches so that leaf switch can send the routes destined to VRF250 to BL.

.


switch# sh run vrf vrf150
!Command: show running-config vrf vrf150
!Time: Thu Aug  3 16:54:57 2017
version 7.0(3)I7(1)
interface Vlan150
  vrf member vrf150

vrf context vrf150
  vni 300150
  rd auto
  address-family ipv4 unicast
    route-target import 65535:150
    route-target import 65535:150 evpn
    route-target import 65535:250                //import VRF250 routes 
    route-target import 65535:250 evpn       //import VRF250 routes
    route-target export 65535:150
    route-target export 65535:150 evpn
  address-family ipv6 unicast
    route-target import 65535:150
    route-target import 65535:150 evpn
    route-target import 65535:250               //import VRF250 routes
    route-target import 65535:250 evpn      //import VRF250 routes
    route-target export 65535:150
    route-target export 65535:150 evpn
router bgp 1001
  vrf vrf150
    address-family ipv4 unicast
      advertise l2vpn evpn
      redistribute hmm route-map permitall
      aggregate-address 12.50.0.0/15             //VRF250 has network 12.50.0.0/16
      aggregate-address 22.50.0.0/15             //VRF250 has network 22.50.0.0/16
      maximum-paths 64
      maximum-paths ibgp 64
    address-family ipv6 unicast
      advertise l2vpn evpn
      redistribute hmm route-map permitall
      aggregate-address 2001:0:12:50::/63      //VRF250 has network 2001:0:12:50::/64
      aggregate-address 2001:0:22:50::/63      //VRF250 has network 2001:0:12:50::/64
      maximum-paths 64
      maximum-paths ibgp 64


switch# sh run vrf vrf250
!Command: show running-config vrf vrf250
!Time: Thu Aug  3 17:21:22 2017
version 7.0(3)I7(1)
interface Vlan250
  vrf member vrf250
vrf context vrf250
  vni 300250
  rd auto
  address-family ipv4 unicast
    route-target import 65535:150
    route-target import 65535:150 evpn
    route-target import 65535:250
    route-target import 65535:250 evpn
    route-target export 65535:250
    route-target export 65535:250 evpn
  address-family ipv6 unicast
    route-target import 65535:150
    route-target import 65535:150 evpn
    route-target import 65535:250
    route-target import 65535:250 evpn
    route-target export 65535:250
    route-target export 65535:250 evpn
router bgp 1001
  vrf vrf250
    address-family ipv4 unicast
      advertise l2vpn evpn
      redistribute hmm route-map permitall
      aggregate-address 11.50.0.0/15
      aggregate-address 21.50.0.0/15
      maximum-paths 64
      maximum-paths ibgp 64
    address-family ipv6 unicast
      advertise l2vpn evpn
      redistribute hmm route-map permitall
      aggregate-address 2001:0:11:50::/63
      aggregate-address 2001:0:21:50::/63
      maximum-paths 64
      maximum-paths ibgp 64

VXLAN Tunnel Egress QoS Policy

About VXLAN Tunnel Egress QoS Policy

This feature applies the QoS policy for VXLAN tunnel terminated packets coming to this site. This configuration can be applied to the NVE interface. You can apply all input policies such as policing , scheduling, and marking for decapsulated packets coming from the VXLAN tunnel.

  • The QoS policy is applied end-to-end. That is, the ingress QoS policy on access ports, as well as, the ingress NVE interface on the remote side.

  • The uniform mode is the default. You have the ability to change the QoS mode by entering the qos-mode pipe command.

Figure 9. An Example VXLAN Fabric
An Example VXLAN Fabric

Guidelines and Limitations for VXLAN Tunnel Egress QoS Policy

VXLAN Tunnel Egress QoS Policy has the following guidelines and limitations:

  • Beginning with Cisco NX-OS Release 7.0(3)I7(5), support is added for this feature.

  • This feature is supported only on Cisco Nexus 9300-EX, 9300-FX, and 9300-FX2 platform switches.

  • This feature is supported only in the EVPN fabric.

Configuring VXLAN Tunnel Egress QoS Policy

This procedure configures the VXLAN Tunnel Egress QoS Policy.

Before you begin

VXLAN configuration must be present.

Enter the show running-config command to determine the current state.

Procedure

  Command or Action Purpose

Step 1

configure terminal

Example:

switch# configure terminal 

Enters global configuration mode.

Step 2

interface nve1

Example:

switch(config)# interface nve1

Creates a VXLAN overlay interface that terminates VXLAN tunnels.

Note


Only 1 NVE interface is allowed on the switch.

Step 3

service-policy type qos input policy-map-name

Example:

switch(config-if)# service-policy type qos input cos-decap-vlan

Input the service policy. Uniform mode is the default.

Step 4

(Optional) qos-mode pipe

Example:

switch(config-if)# qos-mode pipe
(Optional)

Defines the QoS mode as uniform or pipe. Default mode is uniform.

Step 5

no shutdown

Example:

switch(config-if)# no shutdown

Negate shutdown command.

Step 6

host-reachability protocol bgp

Example:

switch(config-if)# host-reachability protocol bgp

Defines BGP as the mechanism for host reachability advertisement.

Step 7

source-interface loopback1

Example:

switch(config-if)# source-interface loopback1

The source interface must be a loopback interface that is configured on the switch with a valid /32 IP address. This /32 IP address must be known by the transient devices in the transport network and the remote VTEPs. This is accomplished by advertising it through a dynamic routing protocol in the transport network.

Step 8

member vni vni

Example:

switch(config-if)# member vni 10101-10102 

Associate VXLAN VNIs (Virtual Network Identifiers) with the NVE interface.

Step 9

suppress-arp

Example:

switch(config-if)# suppress-arp

Configure to suppress ARP under Layer 2 VNI.

Verifying the VXLAN Configuration

To display the VXLAN configuration information, enter one of the following commands:

Table 3. Display VXLAN configuration information (Release 7.0(3)I1(1))

Command

Purpose

show tech-support vxlan [platform]

Displays related VXLAN tech-support information.

show logging level nve

Displays logging level.

show tech-support nve

Displays related NVE tech-support information.

show run interface nve x

Displays NVE overlay interface configuration.

show nve interface

Displays NVE overlay interface status.

show nve peers

Displays NVE peer status.

show nve peers peer_IP_address interface interface_ID counters

Displays per NVE peer statistics.

clear nve peers peer_IP_address interface interface_ID counters

Clears per NVE peer statistics.

clear nve peer-ip peer-ip-address

Clears stale NVE peers.

Stale NVE peers are peers that do not have MAC addresses learnt behind them.

show nve vni

Displays VXLAN VNI status.

show nve vni ingress-replication

Displays the mapping of VNI to ingress-replication peer list and uptime for each peer.

show nve vni vni_number counters

Displays per VNI statistics.

clear nve vni vni_number counters

Clears per VNI statistics.

show nve vxlan-params

Displays VXLAN parameters, such as VXLAN destination or UDP port.

Table 4. Display VXLAN configuration information (Release 7.0(3)I1(2) and later)

Command

Purpose

show tech-support vxlan [platform]

Displays related VXLAN tech-support information.

show interface {ethernet slot/port | port-channel port} vlan mapping

Displays VLAN mapping information for a specific interface or port channel.

show logging level nve

Displays logging level.

show tech-support nve

Displays related NVE tech-support information.

show run interface nve x

Displays NVE overlay interface configuration.

show nve interface

Displays NVE overlay interface status.

show nve peers

Displays NVE peer status.

show nve peers peer_IP_address interface interface_ID counters

Displays per NVE peer statistics.

clear nve peers peer_IP_address interface interface_ID counters

Clears per NVE peer statistics.

clear nve peer-ip peer-ip-address

Clears stale NVE peers.

Stale NVE peers are peers that do not have MAC addresses learnt behind them.

show nve vni

Displays VXLAN VNI status.

show nve vni ingress-replication

Displays the mapping of VNI to ingress-replication peer list and uptime for each peer.

show nve vni vni_number counters

Displays per VNI statistics.

clear nve vni vni_number counters

Clears per VNI statistics.

show nve vxlan-params

Displays VXLAN parameters, such as VXLAN destination or UDP port.

show mac address-table static interface nve 1

Displays static MAC information.

show vxlan interface

Displays VXLAN interface status for 9200 platform switches. .

show vxlan interface | count

Displays VXLAN VLAN logical port VP count.

Note


A VP is allocated on a per-port per-VLAN basis. The sum of all VPs across all VXLAN-enabled Layer 2 ports gives the total logical port VP count. For example, if there are 10 Layer 2 trunk interfaces, each with 10 VXLAN VLANs, then the total VXLAN VLAN logical port VP count is 10*10 = 100.

Table 5. Display VXLAN configuration information (Release 7.0(3)I2(2) and later)

Command

Purpose

show run track

Displays tracking information for running-config.

show track

Displays tracking information for IP prefix for an endpoint.

Note


Assists tracking IPv4 routes with route-type HMM information.

Example of VXLAN Bridging Configuration

  • An example of a loopback interface configuration and routing protocol configuration:

    Figure 10. VXLAN topology for VTEP


    • Nexus 9000 VTEP-1 configuration:

      switch-vtep-1(config)# feature ospf 
      switch-vtep-1(config)# feature pim 
      switch-vtep-1(config)# router ospf 1 
      switch-vtep-1(config-router)# router-id 100.100.100.1 
      switch-vtep-1(config)# ip pim rp-address 10.1.1.1 group-list 224.0.0.0/4 
      switch-vtep-1(config)# interface loopback0 
      switch-vtep-1(config-if)# ip address 100.100.100.1/32 
      switch-vtep-1(config-if)# ip router ospf 1 area 0.0.0.0 
      switch-vtep-1(config-if)# ip pim sparse-mode 
      switch-vtep-1(config)# interface e2/1 
      switch-vtep-1(config-if)# ip address 20.1.1.1/30 
      switch-vtep-1(config-if)# ip router ospf 1 area 0.0.0.0 
      switch-vtep-1(config-if)# ip pim sparse-mode 
      
      switch-vtep-1(config)# feature nv overlay
      switch-vtep-1(config)# feature vn-segment-vlan-based 
      switch-vtep-1(config)# interface e1/1
      switch-vtep-1(config-if)# switchport
      switch-vtep-1(config-if)# switchport access vlan 10
      switch-vtep-1(config-if)# no shutdown
      switch-vtep-1(config)# interface nve1
      switch-vtep-1(config-if)# no shutdown
      switch-vtep-1(config-if)# source-interface loopback0 
       
      switch-vtep-1(config-if)# member vni 10000 mcast-group 230.1.1.1 
      switch-vtep-1(config)# vlan 10
      switch-vtep-1(config-vlan)# vn-segment 10000 
      switch-vtep-1(config-vlan)# exit
      
    • Nexus 9000 VTEP-2 configuration:

      switch-vtep-2(config)# feature ospf 
      switch-vtep-2(config)# feature pim 
      switch-vtep-2(config)# router ospf 1 
      switch-vtep-2(config-router)# router-id 100.100.100.2
      switch-vtep-2(config)# ip pim rp-address 10.1.1.1 group-list 224.0.0.0/4 
      switch-vtep-2(config)# interface loopback0 
      switch-vtep-2(config-if)# ip address 100.100.100.2/32 
      switch-vtep-2(config-if)# ip router ospf 1 area 0.0.0.0 
      switch-vtep-2(config-if)# ip pim sparse-mode 
      switch-vtep-2(config)# interface e2/1 
      switch-vtep-2(config-if)# ip address 30.1.1.1/30 
      switch-vtep-2(config-if)# ip router ospf 1 area 0.0.0.0 
      switch-vtep-2(config-if)# ip pim sparse-mode 
      
      switch-vtep-2(config)# feature nv overlay
      switch-vtep-2(config)# feature vn-segment-vlan-based 
      switch-vtep-2(config)# interface e1/1
      switch-vtep-2(config-if)# switchport
      switch-vtep-2(config-if)# switchport access vlan 10
      switch-vtep-2(config-if)# no shutdown
      switch-vtep-2(config)# interface nve1
      switch-vtep-2(config-if)# no shutdown
      switch-vtep-2(config-if)# source-interface loopback0 
       
      switch-vtep-2(config-if)# member vni 10000 mcast-group 230.1.1.1 
      switch-vtep-2(config)# vlan 10
      switch-vtep-2(config-vlan)# vn-segment 10000 
      switch-vtep-2(config-vlan)# exit
  • An example of an ingress replication topology:

    Figure 11. Ingress Replication topology


    • Nexus 9000 VTEP-1 configuration:

       
      switch-vtep-1(config)# feature ospf
      switch-vtep-1(config)# router ospf 1
      switch-vtep-1(config-router)# router-id 200.200.8.8
      switch-vtep-1(config)# interface loopback0
      switch-vtep-1(config-if)# ip address 200.200.8.8/32
      switch-vtep-1(config-if)# ip router ospf 1 area 0.0.0.0
      switch-vtep-1(config)# interface e2/1
      switch-vtep-1(config-if)# ip address 20.1.1.1/30
      switch-vtep-1(config-if)# ip router ospf 1 area 0.0.0.0
      switch-vtep-1(config-if)# ip pim sparse-mode
      switch-vtep-1(config)# feature nv overlay
      switch-vtep-1(config)# feature vn-segment-vlan-based
      switch-vtep-1(config)# interface e1/1
      switch-vtep-1(config-if)# switchport
      switch-vtep-1(config-if)# switch port mode trunk
      switch-vtep-1(config-if)# switch port allowed vlan 11-12
      switch-vtep-1(config-if)# no shutdown
      switch-vtep-1(config)# vlan 11
      switch-vtep-1(config-vlan)# vn-segment 10011
      switch-vtep-1(config)# vlan 12
      switch-vtep-1(config-vlan)# vn-segment 10012
      switch-vtep-1(config)# interface nve1
      switch-vtep-1(config-if)# no shutdown
      switch-vtep-1(config-if)# source-interface loopback0
      switch-vtep-1(config-if)# member vni 10011
      switch-vtep-1(config-if)# ingress-replication protocol static
      switch-vtep-1(config-if)# peer_ip 200.200.9.9
      switch-vtep-1(config-if)# member vni 10012
      switch-vtep-1(config-if)# ingress-replication protocol static
      switch-vtep-1(config-if)# peer_ip 200.200.9.9
      switch-vtep-1(config-vlan)# exit


      switch-vtep-1# show nve vni ingress-replication 
      Interface VNI     show nve vni ingress-replication 
      Interface VNI      Replication List  Up Time 
      --------- -------- ----------------- ------- 
      
      nve1      10011    200.200.9.9       07:39:51
      
      nve1      10012    200.200.9.9       07:39:40
      
      
    • Nexus 9000 VTEP-2 configuration:

      
      switch-vtep-2(config)# feature ospf
      switch-vtep-2(config)# router ospf 1
      switch-vtep-2(config-router)# router-id 200.200.9.9
      switch-vtep-2(config)# interface loopback0
      switch-vtep-2(config-if)# ip address 200.200.9.9/32
      switch-vtep-2(config-if)# ip router ospf 1 area 0.0.0.0
      switch-vtep-2(config)# interface e2/1
      switch-vtep-2(config-if)# ip address 30.1.1.1/30
      switch-vtep-2(config-if)# ip router ospf 1 area 0.0.0.0
      switch-vtep-2(config-if)# ip pim sparse-mode
      switch-vtep-2(config)# feature nv overlay
      switch-vtep-2(config)# feature vn-segment-vlan-based
      switch-vtep-2(config)# interface e1/1
      switch-vtep-2(config-if)# switchport
      switch-vtep-2(config-if)# switch port mode trunk
      switch-vtep-2(config-if)# switch port allowed vlan 11-12
      switch-vtep-2(config-if)# no shutdown
      switch-vtep-2(config)# vlan 11
      switch-vtep-2(config-vlan)# vn-segment 10011
      switch-vtep-2(config)# vlan 12
      switch-vtep-2(config-vlan)# vn-segment 10012
      switch-vtep-2(config)# interface nve1
      switch-vtep-2(config-if)# no shutdown
      switch-vtep-2(config-if)# source-interface loopback0
      switch-vtep-2(config-if)# member vni 10011
      switch-vtep-2(config-if)# ingress-replication protocol static
      switch-vtep-2(config-if)# peer_ip 200.200.8.8
      
      switch-vtep-2(config-if)# member vni 10012
      switch-vtep-2(config-if)# ingress-replication protocol static
      switch-vtep-2(config-if)# peer_ip 200.200.8.8
      switch-vtep-2(config-vlan)# exit


      switch-vtep-2# show nve vni ingress-replication 
      Interface VNI      Replication List  Up Time 
      --------- -------- ----------------- ------- 
      
      nve1      10011    200.200.8.8       07:42:23
                         200.200.10.10     07:42:23
      
      nve1      10012    200.200.8.8       07:42:23
      
      
  • For a vPC VTEP configuration, the loopback address requires a secondary IP.

    An example of a vPC VTEP configuration:

    Figure 12. VXLAN topology for vPC VTEP


    • Nexus 9000 VTEP-1 configuration:

      switch-vtep-1(config)# feature nv overlay
      switch-vtep-1(config)# feature vn-segment-vlan-based 
      
      switch-vtep-1(config)# feature ospf 
      switch-vtep-1(config)# feature pim 
      switch-vtep-1(config)# router ospf 1 
      switch-vtep-1(config-router)# router-id 200.200.200.1
      switch-vtep-1(config)# ip pim rp-address 10.1.1.1 group-list 224.0.0.0/4 
      switch-vtep-1(config)# interface loopback0 
      switch-vtep-1(config-if)# ip address 200.200.200.1/32
      switch-vtep-1(config-if)# ip address 100.100.100.1/32 secondary
      switch-vtep-1(config-if)# ip router ospf 1 area 0.0.0.0 
      switch-vtep-1(config-if)# ip pim sparse-mode 
      switch-vtep-1(config)# interface e2/1 
      switch-vtep-1(config-if)# ip address 20.1.1.1/30 
      switch-vtep-1(config-if)# ip router ospf 1 area 0.0.0.0 
      switch-vtep-1(config-if)# ip pim sparse-mode 
      
      switch-vtep-1(config)# interface port-channel 10
      switch-vtep-1(config-if)# vpc 10
      switch-vtep-1(config-if)# switchport
      switch-vtep-1(config-if)# switchport mode access
      switch-vtep-1(config-if)# switchport access vlan 10
      switch-vtep-1(config-if)# no shutdown
      switch-vtep-1(config)# interface e1/1
      switch-vtep-1(config-if)# channel-group 10 mode active
      switch-vtep-1(config-if)# no shutdown
      
      switch-vtep-1(config)# interface nve1
      switch-vtep-1(config-if)# no shutdown
      switch-vtep-1(config-if)# source-interface loopback0 
       
      switch-vtep-1(config-if)# member vni 10000 mcast-group 230.1.1.1 
      switch-vtep-1(config)# vlan 10
      switch-vtep-1(config-vlan)# vn-segment 10000
      switch-vtep-1(config-vlan)# exit 
    • Nexus 9000 VTEP-2 configuration:

      switch-vtep-2(config)# feature nv overlay
      switch-vtep-2(config)# feature vn-segment-vlan-based 
      
      switch-vtep-2(config)# feature ospf 
      switch-vtep-2(config)# feature pim 
      switch-vtep-2(config)# router ospf 1 
      switch-vtep-2(config-router)# router-id 200.200.200.2 
      switch-vtep-2(config)# ip pim rp-address 10.1.1.1 group-list 224.0.0.0/4 
      switch-vtep-2(config)# interface loopback0 
      switch-vtep-2(config-if)# ip address 200.200.200.2/32
      switch-vtep-2(config-if)# ip address 100.100.100.1/32 secondary
      switch-vtep-2(config-if)# ip router ospf 1 area 0.0.0.0 
      switch-vtep-2(config-if)# ip pim sparse-mode 
      switch-vtep-2(config)# interface e2/1 
      switch-vtep-2(config-if)# ip address 20.1.1.5/30 
      switch-vtep-2(config-if)# ip router ospf 1 area 0.0.0.0 
      switch-vtep-2(config-if)# ip pim sparse-mode 
      
      switch-vtep-2(config)# interface port-channel 10
      switch-vtep-2(config-if)# vpc 10
      switch-vtep-2(config-if)# switchport
      switch-vtep-2(config-if)# switchport mode access
      switch-vtep-2(config-if)# switchport access vlan 10
      switch-vtep-2(config-if)# no shutdown
      switch-vtep-2(config)# interface e1/1
      switch-vtep-2(config-if)# channel-group 10 mode active
      switch-vtep-2(config-if)# no shutdown
      switch-vtep-2(config)# interface nve1
      switch-vtep-2(config-if)# no shutdown
      switch-vtep-2(config-if)# source-interface loopback0 
       
      switch-vtep-2(config-if)# member vni 10000 mcast-group 230.1.1.1 
      switch-vtep-2(config)# vlan 10
      switch-vtep-2(config-vlan)# vn-segment 10000
      switch-vtep-2(config-vlan)# exit 
    • Nexus 9000 VTEP-3 configuration:

      switch-vtep-3(config)# feature nv overlay
      switch-vtep-3(config)# feature vn-segment-vlan-based 
      
      switch-vtep-3(config)# feature ospf 
      switch-vtep-3(config)# feature pim 
      switch-vtep-3(config)# router ospf 1 
      switch-vtep-3(config-router)# router-id 100.100.100.2 
      switch-vtep-3(config)# ip pim rp-address 10.1.1.1 group-list 224.0.0.0/4 
      switch-vtep-3(config)# interface loopback0 
      switch-vtep-3(config-if)# ip address 100.100.100.2/32
      switch-vtep-3(config-if)# ip router ospf 1 area 0.0.0.0 
      switch-vtep-3(config-if)# ip pim sparse-mode 
      switch-vtep-3(config)# interface e2/1 
      switch-vtep-3(config-if)# ip address 30.1.1.1/30 
      switch-vtep-3(config-if)# ip router ospf 1 area 0.0.0.0 
      switch-vtep-3(config-if)# ip pim sparse-mode 
      
       
      switch-vtep-3(config)# interface e1/1
      switch-vtep-3(config-if)# switchport
      switch-vtep-3(config-if)# switchport access vlan 10
      switch-vtep-3(config-if)# no shutdown
      switch-vtep-3(config)# interface nve1
      switch-vtep-3(config-if)# no shutdown
      switch-vtep-3(config-if)# source-interface loopback0 
       
      switch-vtep-3(config-if)# member vni 10000 mcast-group 230.1.1.1 
      switch-vtep-3(config)# vlan 10
      switch-vtep-3(config-vlan)# vn-segment 10000
      switch-vtep-3(config-vlan)# exit 

    Note


    The secondary IP is used by the emulated VTEP for VXLAN.


    Note


    Ensure that all configurations are identical between the VPC primary and VPC secondary.