- Information About Installing Licenses
- Prerequisites for Installing and Configuring Licenses
- Guidelines and Limitations
- Default Settings
- Obtaining and Installing a License
Installing and Configuring Licenses
This chapter describes how to install and configure licenses.
This chapter includes the following sections:
•![]() Information About Installing Licenses
Information About Installing Licenses
•![]() Prerequisites for Installing and Configuring Licenses
Prerequisites for Installing and Configuring Licenses
•![]() Obtaining and Installing a License
Obtaining and Installing a License
•![]() Configuring Nonvolatile Licenses
Configuring Nonvolatile Licenses
•![]() Verifying the License Configuration
Verifying the License Configuration
•![]() Changing the Serial Number in a License
Changing the Serial Number in a License
Information About Installing Licenses
The Cisco VSG software is available for download at the following URL:
http://www.cisco.com/en/US/products/ps13095/tsd_products_support_series_home.html
When you download the software from the above location, you are prompted to fill in the online form. When the form has been completed appropriately, you will receive an email that contains the software license claim certificate. The number of licenses you receive depends on how many VEMs you indicate you have and how many CPU sockets you indicate are available on those VEMs.
For detailed information about licenses, see Chapter 1 "Overview."
Prerequisites for Installing and Configuring Licenses
License installation and configuration has the following prerequisites:
•![]() You have a copy of your existing license file(s) with the host ID of the existing VSM.
You have a copy of your existing license file(s) with the host ID of the existing VSM.
•![]() A license file is tied to each VSM by the host ID, or the serial number, that is associated with the VSM device.
A license file is tied to each VSM by the host ID, or the serial number, that is associated with the VSM device.
•![]() A license file contains the number of licenses that you ordered for your VSM. One license is required for each CPU on each VEM.
A license file contains the number of licenses that you ordered for your VSM. One license is required for each CPU on each VEM.
•![]() A VSM can have more than one license file depending on the number of installed VEM CPUs.
A VSM can have more than one license file depending on the number of installed VEM CPUs.
•![]() If you have multiple license files stacked on your VSM, repeat the configuration procedures for each license file.
If you have multiple license files stacked on your VSM, repeat the configuration procedures for each license file.
Guidelines and Limitations
Permanent licenses have the following guidelines and limitations:
•![]() If you modify a permanent license key file, the license key file is invalidated.
If you modify a permanent license key file, the license key file is invalidated.
•![]() When you purchase permanent licenses, the license key file is sent to you in an e-mail. The license key authorizes use on only the host ID device. You must obtain a separate license key file for each of your VSMs.
When you purchase permanent licenses, the license key file is sent to you in an e-mail. The license key authorizes use on only the host ID device. You must obtain a separate license key file for each of your VSMs.
•![]() A license file contains the number of licenses that you ordered for your VSM. One license is required for each CPU on each VEM.
A license file contains the number of licenses that you ordered for your VSM. One license is required for each CPU on each VEM.
•![]() A VSM can have more than one license file depending on the number of installed VEM CPUs.
A VSM can have more than one license file depending on the number of installed VEM CPUs.
•![]() You must have a role equivalent to that of network-admin to install, uninstall, or copy a permanent license file. For information about user accounts and roles, see the Cisco Nexus 1000V Security Configuration Guide, Release 4.2(1)SV1(4a).
You must have a role equivalent to that of network-admin to install, uninstall, or copy a permanent license file. For information about user accounts and roles, see the Cisco Nexus 1000V Security Configuration Guide, Release 4.2(1)SV1(4a).
•![]() If you are installing multiple permanent licenses for the same VSM, also called license stacking, each permanent license key filename must be unique.
If you are installing multiple permanent licenses for the same VSM, also called license stacking, each permanent license key filename must be unique.
•![]() Licenses cannot be applied to a VEM unless there are enough licenses in the pool to cover all of its CPUs.
Licenses cannot be applied to a VEM unless there are enough licenses in the pool to cover all of its CPUs.
•![]() If a license is in use, you cannot delete its license file. You must first transfer all licenses from the VEMs to the VSM license pool before uninstalling the license file.
If a license is in use, you cannot delete its license file. You must first transfer all licenses from the VEMs to the VSM license pool before uninstalling the license file.
•![]() When you install a permanent license file, all default licenses are invalidated. Installing a permanent license file has no effect on evaluation licenses. For more detailed information on licenses, see the "Information About Licenses" section.
When you install a permanent license file, all default licenses are invalidated. Installing a permanent license file has no effect on evaluation licenses. For more detailed information on licenses, see the "Information About Licenses" section.
Default Settings
Table 2-1 lists the default settings for the Cisco Virtual Security Gateway license configuration.
Obtaining and Installing a License
This section describes how to obtain the license file that is required for each VSM and then install it.
This section includes the following topics:
•![]() Flow Chart: Obtaining and Installing a License
Flow Chart: Obtaining and Installing a License
•![]() Installing the License File on the VSM
Installing the License File on the VSM
•![]() Verifying the License Configuration
Verifying the License Configuration
Flow Chart: Obtaining and Installing a License
Use the flow chart in Figure 1 to guide you through the process of installing a license on a VSM. After completing a procedure, return to the flow chart to make sure that you complete all procedures in the correct sequence.
Figure 1 Flow Chart: Obtaining and Installing a License

Obtaining the License File
Use the following procedure to obtain a license file for a VSM.
BEFORE YOU BEGIN
Before beginning this procedure, you must know or do the following:
•![]() A license file is tied to each VSM by the host ID or the serial number that is associated with the VSM device.
A license file is tied to each VSM by the host ID or the serial number that is associated with the VSM device.
•![]() Make sure that you have your product authorization key (PAK). The PAK is found in your software license claim certificate.
Make sure that you have your product authorization key (PAK). The PAK is found in your software license claim certificate.
If you cannot locate your software license claim certificate, contact Cisco Technical Support.
•![]() You are logged in to the CLI in EXEC mode.
You are logged in to the CLI in EXEC mode.
•![]() In this procedure, you must copy a license file, which means that your username must have a role that is equivalent to that of the network-admin role that allows you to copy files. For information about user accounts and roles, see the Cisco Nexus 1000V Security Configuration Guide, Release 4.2(1)SV1(4a).
In this procedure, you must copy a license file, which means that your username must have a role that is equivalent to that of the network-admin role that allows you to copy files. For information about user accounts and roles, see the Cisco Nexus 1000V Security Configuration Guide, Release 4.2(1)SV1(4a).
PROCEDURE
Step 1 ![]() Obtain the serial number, also called the host ID, for your VSM.
Obtain the serial number, also called the host ID, for your VSM.
n1000v# show license host-id
License hostid: VDH=1280389551234985805

Note ![]() The host ID includes everything that appears after the equal sign (=). In this example, the host ID is 1280389551234985805. You will need the host ID in Step 5.
The host ID includes everything that appears after the equal sign (=). In this example, the host ID is 1280389551234985805. You will need the host ID in Step 5.
Step 2 ![]() From your software license claim certificate, locate the product authorization key (PAK).
From your software license claim certificate, locate the product authorization key (PAK).
You will need the PAK in Step 5.
Step 3 ![]() Go to the Software Download site.
Go to the Software Download site.
Step 4 ![]() From the Software Download site, go to the Product License Registration site.
From the Software Download site, go to the Product License Registration site.
Step 5 ![]() From the Product License Registration site, follow the instructions for registering your VSM license.
From the Product License Registration site, follow the instructions for registering your VSM license.
The license key file is sent to you in an e-mail. The license key authorizes use on only the host ID device. You must obtain separate license key file(s) for each of your VSMs.

Step 6 ![]() Save your license to a TFTP server.
Save your license to a TFTP server.
Step 7 ![]() Copy your license to bootflash on the VSM.
Copy your license to bootflash on the VSM.
n1000v@ copy scp://user@linux-box.cisco.com/home/user/n1kv_license.lic bootflash:
Enter vrf (If no input, current vrf 'default' is considered):
user@linux-box.cisco.com's password:
n1kv_license.lic 100% 252 0.3KB/s 00:00
n1000v@
Installing the License File on the VSM
Use the following procedure to install the license file(s) on a VSM. Installing multiple licenses is called stacking.
BEFORE YOU BEGIN
Before beginning this procedure, you must know or do the following:
•![]() Default licenses are invalidated when a permanent license file is installed. Make sure that the license file you are installing contains the number of licenses needed to cover all VEMs. For more information on default licenses, see the "Default Licenses" section.
Default licenses are invalidated when a permanent license file is installed. Make sure that the license file you are installing contains the number of licenses needed to cover all VEMs. For more information on default licenses, see the "Default Licenses" section.
•![]() This procedure installs the license file using the name, license_file.lic. You can specify a different name if needed.
This procedure installs the license file using the name, license_file.lic. You can specify a different name if needed.
•![]() If you are installing multiple licenses for the same VSM, also called license stacking, make sure that each license key filename is unique.
If you are installing multiple licenses for the same VSM, also called license stacking, make sure that each license key filename is unique.
•![]() Repeat this procedure for each additional license file you are installing, or stacking, on the VSM.
Repeat this procedure for each additional license file you are installing, or stacking, on the VSM.
•![]() You are logged in to the CLI in EXEC mode.
You are logged in to the CLI in EXEC mode.
•![]() You must have a role with privileges equivalent to that of the network-admin role to install a license. For information about user accounts and roles, see the Cisco Nexus 1000V Security Configuration Guide, Release 4.2(1)SV1(4a).
You must have a role with privileges equivalent to that of the network-admin role to install a license. For information about user accounts and roles, see the Cisco Nexus 1000V Security Configuration Guide, Release 4.2(1)SV1(4a).
SUMMARY STEPS
1. ![]() install license bootflash: filename
install license bootflash: filename
2. ![]() show license file filename
show license file filename
3. ![]() show license usage package_name
show license usage package_name
4. ![]() copy running-config startup-config
copy running-config startup-config
DETAILED STEPS
Examples
This example shows how to install a license file and then display its contents and usage:
n1000v# install license
bootflash:license_file.lic
Installing license ..done
n1000v# show license file
license_file.lic
SERVER this_host ANY
VENDOR cisco
INCREMENT NEXUS_VSG_SERVICES_PKG cisco 1.0 permanent 10 \
HOSTID=VDH=1575337335122974806 \
NOTICE="<LicFileID>license_file.lic</LicFileID><LicLineID>0</LicLineID> \
<PAK>PAK12345678</PAK>" SIGN=3AF5C2D26E1A
n1000v# show license usage NEXUS_VSG_SERVICES_PKG
--------------------------------------
Feature Usage Info
--------------------------------------
Installed Licenses : 10
Default Eval Licenses : 0
Max Overdraft Licenses : 16
Installed Licenses in Use : 2
Overdraft Licenses in Use : 0
Default Eval Lic in Use : 0
Licenses Available : 24
Shortest Expiry : Never
--------------------------------------
Application
--------------------------------------
VEM 3 - Socket 1
VEM 3 - Socket 2
--------------------------------------
Transferring Licenses
You can use the following procedures in this section to transfer licenses between VEMs and uninstall a license by transferring it from a VEM to the VSM license pool:
•![]() Transferring Licenses Between VEMs
Transferring Licenses Between VEMs
•![]() Transferring Licenses to the License Pool
Transferring Licenses to the License Pool
Transferring Licenses Between VEMs
Use the following procedure to transfer licenses from one VEM to another. For example, you might transfer licenses between VEMs after moving a VM from one host to another.
BEFORE YOU BEGIN
Before beginning this procedure, you must know or do the following:
•![]() You are logged in to the CLI in EXEC mode.
You are logged in to the CLI in EXEC mode.
•![]() You know the VEM that you want to transfer licenses from and the number of licenses it has.
You know the VEM that you want to transfer licenses from and the number of licenses it has.
•![]() You know the VEM that you are transferring licenses to and the number of licenses required.
You know the VEM that you are transferring licenses to and the number of licenses required.
•![]() You know the number of CPUs installed on the destination VEM.
You know the number of CPUs installed on the destination VEM.
•![]() Licenses cannot be transferred to a VEM unless there are enough licenses in the pool to cover all of its CPUs.
Licenses cannot be transferred to a VEM unless there are enough licenses in the pool to cover all of its CPUs.
•![]() Licenses cannot be transferred to a VEM that does not have a VSG service configured.
Licenses cannot be transferred to a VEM that does not have a VSG service configured.
•![]() When licenses are successfully transferred from one VEM to another, the virtual machines on the source VEM can no longer use Cisco VSG services and the virtual machines on the destination VEM can now use Cisco VSG services.
When licenses are successfully transferred from one VEM to another, the virtual machines on the source VEM can no longer use Cisco VSG services and the virtual machines on the destination VEM can now use Cisco VSG services.
•![]() For detailed information about the fields in the output of these commands, see the Cisco Nexus 1000V Command Reference, Release 4.2(1)SV1(4a).
For detailed information about the fields in the output of these commands, see the Cisco Nexus 1000V Command Reference, Release 4.2(1)SV1(4a).
SUMMARY STEPS
1. ![]() vsg license transfer src-vem vem_no dst-vem vem_no
vsg license transfer src-vem vem_no dst-vem vem_no
2. ![]() show license usage package_name
show license usage package_name
DETAILED STEPS
EXAMPLES
This example shows how to transfer a license from VEM 3 to VEM 5 and verify the transfer in the license usage:
n1000v# vsg license transfer src-vem 3 dst-vem 5
n1000v(config)#
n1000v# show license usage NEXUS_VSG_SERVICES_PKG
--------------------------------------
Feature Usage Info
--------------------------------------
Installed Licenses : 10
Eval Licenses : 0
Max Overdraft Licenses : 16
Installed Licenses in Use : 4
Overdraft Licenses in Use : 0
Eval Licenses in Use : 0
Licenses Available : 22
--------------------------------------
Application
--------------------------------------
VEM 4 - Socket 1
VEM 4 - Socket 2
VEM 5 - Socket 1
VEM 5 - Socket 2
--------------------------------------
Transferring Licenses to the License Pool
Use the following procedure to transfer licenses from a VEM to the VSM license pool. For example, you might remove a license from a VEM and transfer it to the VSM license pool.
BEFORE YOU BEGIN
Before beginning this procedure, you must know or do the following:
•![]() You are logged in to the CLI in EXEC mode.
You are logged in to the CLI in EXEC mode.
•![]() When you transfer its licenses to the VSM license pool, all VMs on the VEM can no longer use the Cisco VSG service.
When you transfer its licenses to the VSM license pool, all VMs on the VEM can no longer use the Cisco VSG service.
•![]() For detailed information about the fields in the output of these commands, see the Cisco Nexus 1000V Command Reference, Release 4.2(1)SV1(4a).
For detailed information about the fields in the output of these commands, see the Cisco Nexus 1000V Command Reference, Release 4.2(1)SV1(4a).
SUMMARY STEPS
1. ![]() vsg license transfer src-vem vem no license_pool
vsg license transfer src-vem vem no license_pool
2. ![]() show license usage package_name
show license usage package_name
DETAILED STEPS
EXAMPLES
This example shows how to display the licenses in use on each VEM. Notice that the licenses on VEM 3 are no longer in use.
n1000v# show license usage NEXUS_VSG_SERVICES_PKG
--------------------------------------
Feature Usage Info
--------------------------------------
Installed Licenses : 10
Eval Licenses : 0
Max Overdraft Licenses : 16
Installed Licenses in Use : 2
Overdraft Licenses in Use : 0
Eval Licenses in Use : 0
Licenses Available : 24
--------------------------------------
Application
--------------------------------------
VEM 4 - Socket 1
VEM 4 - Socket 2
--------------------------------------
Uninstalling a License
Use the following procedure to uninstall a license that is not in use.
BEFORE YOU BEGIN
Before beginning this procedure, you must know or do the following:
•![]() You are logged in to the CLI in EXEC mode.
You are logged in to the CLI in EXEC mode.
•![]() If a license is in use, you cannot delete it. This procedure includes instructions for transferring all licenses from the VEMs to the VSM license pool before uninstalling the license file.
If a license is in use, you cannot delete it. This procedure includes instructions for transferring all licenses from the VEMs to the VSM license pool before uninstalling the license file.
•![]() Only users with the network-admin role can uninstall licenses. For information on user accounts and roles, see the Cisco Nexus 1000V Security Configuration Guide, Release 4.2(1)SV1(4a).
Only users with the network-admin role can uninstall licenses. For information on user accounts and roles, see the Cisco Nexus 1000V Security Configuration Guide, Release 4.2(1)SV1(4a).
•![]() For detailed information about the fields in the output of these commands, see the Cisco Nexus 1000V Command Reference, Release 4.2(1)SV1(4a).
For detailed information about the fields in the output of these commands, see the Cisco Nexus 1000V Command Reference, Release 4.2(1)SV1(4a).
SUMMARY STEPS
1. ![]() copy running-configure terminalftp://server/path/filename
copy running-configure terminalftp://server/path/filename
2. ![]() show license brief
show license brief
3. ![]() show license usage package_name
show license usage package_name
4. ![]() vsg license transfer src-vem vem no license_pool
vsg license transfer src-vem vem no license_pool
5. ![]() Repeat Step 4 for each VEM.
Repeat Step 4 for each VEM.
6. ![]() clear license license_name
clear license license_name
7. ![]() copy running-config startup-config
copy running-config startup-config
DETAILED STEPS
|
|
|
|
|---|---|---|
Step 1 |
copy running-configure terminalftp://server/path/filename
Example: n1000v# copy running-configure terminalftp: n1000v(config)# |
Copies the VSM running configuration to a remote server. |
Step 2 |
show license brief
Example: n1000v# show license brief Enterprise.lic n1000v# |
Identifies the name of the license file to uninstall. |
Step 3 |
show license usage package_name
Example: n1000v# show license usage NEXUS_VSG_SERVICES_PKG -------------------------------------- Feature Usage Info -------------------------------------- Installed Licenses : 10 Eval Licenses : 0 Max Overdraft Licenses : 16 Installed Licenses in Use : 4 Overdraft Licenses in Use : 0 Eval Licenses in Use : 0 Licenses Available : 22 -------------------------------------- Application -------------------------------------- VEM 3 - Socket 1 VEM 3 - Socket 2 VEM 4 - Socket 1 VEM 4 - Socket 2 -------------------------------------- n1000v# |
Displays the licenses in use on each VEM so that you can transfer them back to the VSM license pool before uninstalling the license file. |
Step 4 |
vsg license transfer src-vem vem_no license_pool
Example: n1000v# vsg license transfer src-vem 3 license_pool n1000v# |
Transfers the licenses from the VEM back to the VSM license pool. As the licenses are transferred from a VEM, the VMs on the VEM can no longer use the Cisco VSG service. |
Step 5 |
Repeat Step 4 for each VEM until all licenses in use have been transferred back to the VSM license pool. |
|
Step 6 |
clear license license_name
Example: n1000v# clear license Enterprise.lic Clearing license Enterprise.lic: SERVER this_host ANY VENDOR cisco Do you want to continue? (y/n) y Clearing license ..done |
Begins the uninstall of the named license file. In this example, the Enterprise.lic file is uninstalled. |
Step 7 |
copy running-config startup-config
Example: n1000v(config)# copy running-config startup-config |
(Optional) Saves the running configuration persistently through reboots and restarts by copying it to the startup configuration. |
EXAMPLES
This example shows how to uninstall a license that is no longer in use. In this example, the file to uninstall is the Enterprise.lic file.
n1000v# show license brief
Enterprise.lic
n1000v#
n1000v# show license usage NEXUS_VSG_SERVICES_PKG
--------------------------------------
Feature Usage Info
--------------------------------------
Installed Licenses : 10
Eval Licenses : 0
Max Overdraft Licenses : 16
Installed Licenses in Use : 4
Overdraft Licenses in Use : 0
Eval Licenses in Use : 0
Licenses Available : 22
--------------------------------------
Application
--------------------------------------
VEM 3 - Socket 1
VEM 3 - Socket 2
VEM 4 - Socket 1
VEM 4 - Socket 2
--------------------------------------
n1000v# vsg license transfer src-vem 3
license_pool
n1000v# clear license Enterprise.lic
Clearing license Enterprise.lic:
SERVER this_host ANY
VENDOR cisco
Do you want to continue? (y/n) y
Clearing license ..done
n1000v(config)# copy running-config startup-config
Configuring Nonvolatile Licenses
This section provides information about enabling and disabling the nonvolatile license feature and includes the following topics:
•![]() Enabling Nonvolatile Licenses
Enabling Nonvolatile Licenses
•![]() Disabling Nonvolatile Licenses
Disabling Nonvolatile Licenses
Enabling Nonvolatile Licenses
Use the following procedure to enable nonvolatile licenses so that whenever a VEM is taken out of service, it keeps its license and does not return the license to the VSM pool of available licenses.
BEFORE YOU BEGIN
Before beginning this procedure, you must know or do the following:
•![]() You are logged in to the CLI in EXEC mode.
You are logged in to the CLI in EXEC mode.
•![]() A nonvolatile license is disabled by default. The licenses are returned to the VSM pool when a VEM is removed from service or no VMs use Cisco VSG service on the VEM.
A nonvolatile license is disabled by default. The licenses are returned to the VSM pool when a VEM is removed from service or no VMs use Cisco VSG service on the VEM.
SUMMARY STEPS
1. ![]() configure terminal
configure terminal
2. ![]() no vsg license volatile
no vsg license volatile
3. ![]() copy running-config startup-config
copy running-config startup-config
DETAILED STEPS
Disabling Nonvolatile Licenses
Use the following procedure to disable nonvolatile licenses so that when a VEM is taken out of service, its licenses are returned to the VSM pool of available licenses.
BEFORE YOU BEGIN
Before beginning this procedure, you must know or do the following:
•![]() You are logged in to the CLI in EXEC mode.
You are logged in to the CLI in EXEC mode.
•![]() Your license must be in nonvolatile mode to configure for volatile mode.
Your license must be in nonvolatile mode to configure for volatile mode.
•![]() For detailed information about the fields in the output of these commands, see the Cisco Nexus 1000V Command Reference, Release 4.2(1)SV1(4a).
For detailed information about the fields in the output of these commands, see the Cisco Nexus 1000V Command Reference, Release 4.2(1)SV1(4a).
Note ![]() For the Cisco VSG, the licenses are by default volatile. We recommend that you leave the Cisco VSG license configuration to be volatile by default.
For the Cisco VSG, the licenses are by default volatile. We recommend that you leave the Cisco VSG license configuration to be volatile by default.
Note ![]() The volatile licenses feature is disabled by default for the Cisco Nexus 1000V Series Switch. That is, the licenses in VEMs are nonvolatile and are not released when a VEM is removed from service.
The volatile licenses feature is disabled by default for the Cisco Nexus 1000V Series Switch. That is, the licenses in VEMs are nonvolatile and are not released when a VEM is removed from service.
Note ![]() If you configure the license from nonvolatile to volatile, if the VEM does not use the Cisco VSG services, the license possessed by the VEM is returned to the license pool.
If you configure the license from nonvolatile to volatile, if the VEM does not use the Cisco VSG services, the license possessed by the VEM is returned to the license pool.
SUMMARY STEPS
1. ![]() configure terminal
configure terminal
2. ![]() vsg license volatile
vsg license volatile
3. ![]() copy running-config startup-config
copy running-config startup-config
DETAILED STEPS
Verifying the License Configuration
To display the license configuration, do one of the following tasks:
Examples for the Show Commands
The following example shows how to use the show license usage command to display the license usage:
n1000v# show license usage NEXUS_VSG_SERVICES_PKG
--------------------------------------
Feature Usage Info
--------------------------------------
Installed Licenses : 10
Default Eval Licenses : 0
Max Overdraft Licenses : 16
Installed Licenses in Use : 2
Overdraft Licenses in Use : 0
Default Eval Lic in Use : 0
Licenses Available : 24
Shortest Expiry : 25 May 2010
--------------------------------------
Application
--------------------------------------
VEM 3 - Socket 1
VEM 4 - Socket 1
--------------------------------------
The following example shows how to use the show license brief command to display the license name:
n1000v# show license brief
Enterprise.lic
n1000v#
The following example shows how to use the show license file command to display the evaluation license parameters:
n1000v# show license file eval.lic
SERVER this_host ANY
VENDOR cisco
INCREMENT NEXUS1_VSG_SERVICES_PKG cisco 1.0 1-dec-2010 16 \
HOSTID=VDH=0871396331270074457 \
NOTICE="<LicFileID>eval.lic</LicFileID><LicLineID>0</LicLineID> \
<PAK>dummyPak</PAK>" SIGN=E08A38544DBE
The following example shows how to use the show license file command to display the evaluation license parameters:
n1000v# show license file Enterprise.lic
SERVER this_host ANY
VENDOR cisco
INCREMENT NEXUS_VSG_SERVICES_PKG cisco 1.0 permanent 16 \
HOSTID=VDH=0871396331270074457 \
NOTICE="<LicFileID>Enterprise.lic</LicFileID><LicLineID>0</LicLineID> \
<PAK>dummyPak</PAK>" SIGN=E08A38544DBE
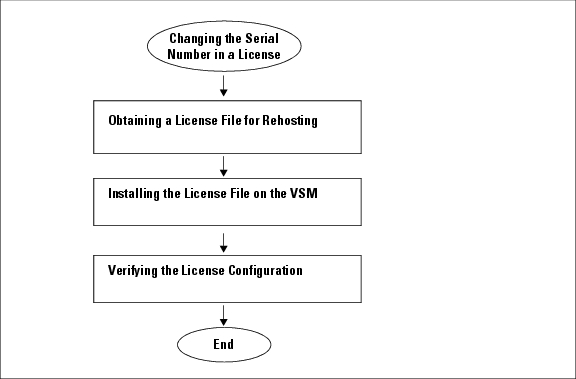
Changing the Serial Number in a License
Use the following procedure to change the serial number, or host ID, associated with a license. This process is also called rehosting and is required if you replace a VSM in your network with a new VSM.
This section includes the following topics:
•![]() Flow Chart: Changing the Serial Number in a License
Flow Chart: Changing the Serial Number in a License
•![]() Installing the License File on the VSM
Installing the License File on the VSM
•![]() Verifying the License Configuration
Verifying the License Configuration
Flow Chart: Changing the Serial Number in a License
Use the flow chart in Figure 2 to guide you through the process required to change the serial number, or host ID, in an existing license. After completing a procedure, return to the flow chart to make sure you complete all procedures in the correct sequence.
Figure 2 Flow Chart: Changing the Serial Number in a License
Obtaining a License File for Rehosting
Use the following procedure to obtain a license file for a new VSM host, if the old VSM host is lost or destroyed.
BEFORE YOU BEGIN
Before beginning this procedure, you must know or do the following:
•![]() A license file is tied to each VSM by the host ID, or the VSM serial number.
A license file is tied to each VSM by the host ID, or the VSM serial number.
•![]() You are logged in to the CLI in EXEC mode.
You are logged in to the CLI in EXEC mode.
•![]() You must copy a license file. Your username must have the network-admin role that allows you to copy files. For information about user accounts and roles, see the Cisco Nexus 1000V Security Configuration Guide, Release 4.2(1)SV1(4a).
You must copy a license file. Your username must have the network-admin role that allows you to copy files. For information about user accounts and roles, see the Cisco Nexus 1000V Security Configuration Guide, Release 4.2(1)SV1(4a).
PROCEDURE
Step 1 ![]() Obtain the serial number, also called the host ID, for your new VSM:
Obtain the serial number, also called the host ID, for your new VSM:
n1000v# show license host-id
License hostid: VDH=1280389551234985805
Note ![]() The host ID number appears after the equal sign (=). In this example, the host ID is 1280389551234985805. You will need the host ID in Step 5.
The host ID number appears after the equal sign (=). In this example, the host ID is 1280389551234985805. You will need the host ID in Step 5.
Step 2 ![]() E-mail the following information to licensing@cisco.com, requesting the license file be rehosted to the new host ID:
E-mail the following information to licensing@cisco.com, requesting the license file be rehosted to the new host ID:
•![]() The new host ID
The new host ID
•![]() A copy of the existing license file from the old VSM
A copy of the existing license file from the old VSM
A new license key file, with the host ID of the new VSM, is sent to you in an e-mail within 48 hours.
Note ![]() Do not modify the license key file. The license key file is invalidated if you modify it.
Do not modify the license key file. The license key file is invalidated if you modify it.
Step 3 ![]() Save your license to a TFTP server.
Save your license to a TFTP server.
Step 4 ![]() Copy your license to bootflash on the VSM.
Copy your license to bootflash on the VSM.
n1000v@ copy scp://user@linux-box.cisco.com/home/user/n1kv_license.lic bootflash:
Enter vrf (If no input, current vrf 'default' is considered):
user@linux-box.cisco.com's password:
n1kv_license.lic 100% 252 0.3KB/s 00:00
n1000v@
Feature History for Licenses
This section provides the release history for the license feature.
 Feedback