- Index
- Preface
- Overview
- Part 1
- Quick Start Guide for Cisco Virtual Security Gateway and Cisco Virtual Network Management Center
- Part 2
- Installing the Cisco Virtual Security Gateway
- Part 3
- Installing the Cisco Virtual Network Management Center
- Registering Devices with the Cisco VNMC
- Part 4
- Installing the Cisco Virtual Security Gateway on a Cisco Nexus 1010 Appliance
- Part 5
- Upgrading the Cisco Virtual Security Gateway and Cisco Virtual Network Management Center
- Examples of Cisco VNMC OVA Template Deployment and Cisco VNMC ISO Installations
- Information About Installing the Cisco VNMC
- Information About Deploying the OVF Template
- Installing the Cisco VNMC by Deploying the OVF Template
- Restoring the Cisco VNMC by Deploying the OVF Template
- Installing the Cisco VNMC Using an ISO Image
- Connecting to the Cisco VNMC
- Verifying Cisco VNMC Providers
Installing the Cisco Virtual Network Management Center
This chapter provides procedures for installing the Cisco Virtual Network Management Center (VNMC).
This chapter includes the following sections:
•![]() Information About Installing the Cisco VNMC
Information About Installing the Cisco VNMC
•![]() Information About Deploying the OVF Template
Information About Deploying the OVF Template
•![]() Installing the Cisco VNMC by Deploying the OVF Template
Installing the Cisco VNMC by Deploying the OVF Template
•![]() Restoring the Cisco VNMC by Deploying the OVF Template
Restoring the Cisco VNMC by Deploying the OVF Template
•![]() Installing the Cisco VNMC Using an ISO Image
Installing the Cisco VNMC Using an ISO Image
•![]() Verifying Cisco VNMC Providers
Verifying Cisco VNMC Providers
Information About Installing the Cisco VNMC
You can install the Cisco VNMC on a virtual machine by deploying the OVF template using a preexisting Open Virtual Appliance (OVA), or by creating a virtual machine and using the optical disk media (ISO) installer. Once installed, you register the Cisco VSG and the Cisco Nexus 1000V switch with the Cisco VNMC. When registration is complete, the Cisco VNMC can manage the Cisco VSG and the Cisco Nexus 1000V switch.
Information About Deploying the OVF Template
All the properties fields in the OVF template must have values. The selection you make on the Deployment Configuration page controls which fields are required and which fields are not. Optional and unused fields are automatically filled with null values. If you want to use an optional field, change the value. Password fields are not masked in the OVF Template wizard and can be viewed after deployment. Red error messages display under a field if an invalid value is entered. When a field changes validity, going from an invalid value to a valid value or valid value to an invalid value, the focus changes to the top of the window.
During initial power on, all input is validated. Once validated, the Cisco VNMC is installed, and the Virtual Machine (VM) is configured and then rebooted.
Figure 4-1 shows the first page of the OVF template.
Figure 4-1 Deploy OVF Template—Source

Installing the Cisco VNMC by Deploying the OVF Template
You can install the Cisco VNMC by deploying the OVF template.

Note ![]() During initial power on, extra validation is performed on user values. If any of the values are invalid, a console message appears warning that the values must be corrected. The installation does not start until all values are correct.
During initial power on, extra validation is performed on user values. If any of the values are invalid, a console message appears warning that the values must be corrected. The installation does not start until all values are correct.
BEFORE YOU BEGIN
Before starting the procedure, know or do the following:
•![]() Ensure that you have all the proper networking information available, including the IP address that you will use for the Cisco VNMC.
Ensure that you have all the proper networking information available, including the IP address that you will use for the Cisco VNMC.
•![]() If you are using the OVF template for deployment, see "Examples of Cisco VNMC OVA Template Deployment and Cisco VNMC ISO Installations."
If you are using the OVF template for deployment, see "Examples of Cisco VNMC OVA Template Deployment and Cisco VNMC ISO Installations."
PROCEDURE
Step 1 ![]() Open your VMware client.
Open your VMware client.
Step 2 ![]() Download the .ova file using one of the following methods:
Download the .ova file using one of the following methods:
a. ![]() Use a conventional download method to download the Cisco VNMC .ova file from http://www.cisco.com/en/US/products/ps11213/index.html, and then start the OVF template.
Use a conventional download method to download the Cisco VNMC .ova file from http://www.cisco.com/en/US/products/ps11213/index.html, and then start the OVF template.
b. ![]() Start the OVF template and download the Cisco VNMC .ova as follows:
Start the OVF template and download the Cisco VNMC .ova as follows:
–![]() Use your OVF template to select a file on your local machine.
Use your OVF template to select a file on your local machine.
–![]() Use your OVF template to download the file from cisco.com.
Use your OVF template to download the file from cisco.com.
Step 3 ![]() Follow the steps presented by the OVF template to install the Cisco VNMC:
Follow the steps presented by the OVF template to install the Cisco VNMC:
a. ![]() When you reach the Deployment Configuration page, from the Configuration drop-down list, choose VNM Installer.
When you reach the Deployment Configuration page, from the Configuration drop-down list, choose VNM Installer.
b. ![]() When you reach the Properties page, enter values in the appropriate fields:
When you reach the Properties page, enter values in the appropriate fields:
–![]() In the IP Address area, enter the IP address, the gateway, and the netmask of the virtual machine.
In the IP Address area, enter the IP address, the gateway, and the netmask of the virtual machine.
–![]() (Optional) In the VNM DNS area, enter an IP address that is the IP address of your DNS server.
(Optional) In the VNM DNS area, enter an IP address that is the IP address of your DNS server.
–![]() In the VNM DNS area, enter a hostname and a domain name.
In the VNM DNS area, enter a hostname and a domain name.
–![]() In the VNM Password area, enter the password for the admin account and the shared secret password.
In the VNM Password area, enter the password for the admin account and the shared secret password.
Note ![]() Before the VMware software release 5.0, passwords were not masked when you entered them.
Before the VMware software release 5.0, passwords were not masked when you entered them.
Note ![]() You do not need to enter any values in the Cisco VNMC Restore area.
You do not need to enter any values in the Cisco VNMC Restore area.
Step 4 ![]() When you reach the page that summarizes your template settings, verify them and click Finish.
When you reach the page that summarizes your template settings, verify them and click Finish.
A progress dialog box appears. When the progress dialog box reaches 100%, another dialog box appears to let you know the status of your installation.
Step 5 ![]() Click Close.
Click Close.
The Cisco VNMC is installed.
Step 6 ![]() Power on the virtual machine.
Power on the virtual machine.
Note ![]() Additional input validation is performed when you first boot up. You may have to reenter values during boot up.
Additional input validation is performed when you first boot up. You may have to reenter values during boot up.
When you open your console, the login prompt should appear.
Restoring the Cisco VNMC by Deploying the OVF Template
You can restore the Cisco VNMC by deploying the OVF template.
BEFORE YOU BEGIN
Before starting the procedure, know or do the following:
•![]() You must have a full-state backup to restore. Ensure that you have the location of your full-state backup, including the transfer protocol, the remote IP address, the credentials, and the filename.
You must have a full-state backup to restore. Ensure that you have the location of your full-state backup, including the transfer protocol, the remote IP address, the credentials, and the filename.
•![]() During the restore, the virtual machine must have initial network connectivity. Ensure that you have all the proper networking information available to retrieve the full-state backup, including the IP address of your Cisco VNMC.
During the restore, the virtual machine must have initial network connectivity. Ensure that you have all the proper networking information available to retrieve the full-state backup, including the IP address of your Cisco VNMC.
•![]() During the initial boot after completing the OVF template, the full-state backup is downloaded. If any issues with the restore occur, boot will stop and display an error message. The VM will also be rebooted on restore.
During the initial boot after completing the OVF template, the full-state backup is downloaded. If any issues with the restore occur, boot will stop and display an error message. The VM will also be rebooted on restore.
PROCEDURE
Step 1 ![]() Open your VMware client.
Open your VMware client.
Step 2 ![]() Download the .ova file using one of the following methods:
Download the .ova file using one of the following methods:
a. ![]() Use a conventional download method to download the Cisco VNMC .ova file from http://www.cisco.com/en/US/products/ps11213/index.html, and then start the OVF template.
Use a conventional download method to download the Cisco VNMC .ova file from http://www.cisco.com/en/US/products/ps11213/index.html, and then start the OVF template.
b. ![]() Start the OVF template and download the Cisco VNMC .ova as follows:
Start the OVF template and download the Cisco VNMC .ova as follows:
–![]() Use your OVF template to select a file on your local machine.
Use your OVF template to select a file on your local machine.
–![]() Use your OVF template to download the file from cisco.com.
Use your OVF template to download the file from cisco.com.
Step 3 ![]() Follow the steps presented by the OVF template to restore the Cisco VNMC:
Follow the steps presented by the OVF template to restore the Cisco VNMC:
a. ![]() When you reach the Deployment Configuration page, from the Configuration drop-down list, choose VNMC Restore.
When you reach the Deployment Configuration page, from the Configuration drop-down list, choose VNMC Restore.
b. ![]() When you reach the Properties page, enter values in the appropriate fields:
When you reach the Properties page, enter values in the appropriate fields:
–![]() In the IP Address area, enter the IP address, the gateway, and the netmask of the virtual machine.
In the IP Address area, enter the IP address, the gateway, and the netmask of the virtual machine.
–![]() In the VNMC Restore area, enter all restore information.
In the VNMC Restore area, enter all restore information.
Note ![]() Passwords are not masked when you enter them.
Passwords are not masked when you enter them.
Step 4 ![]() When you reach the page that summarizes your template settings, verify them and click Finish.
When you reach the page that summarizes your template settings, verify them and click Finish.
A progress dialog box appears. When the progress dialog box reaches 100%, another dialog box appears to let you know the status of your installation.
Step 5 ![]() Click Close.
Click Close.
The Cisco VNMC is restored.
Step 6 ![]() Power on the virtual machine.
Power on the virtual machine.
When you open your console, the login prompt should appear.
Installing the Cisco VNMC Using an ISO Image
You can install or restore an instance of Cisco VNMC using an ISO image.
BEFORE YOU BEGIN
Before starting the procedure, know or do the following:
•![]() Ensure that your hard drive size is at least 25 GB.
Ensure that your hard drive size is at least 25 GB.
•![]() See "Examples of Cisco VNMC OVA Template Deployment and Cisco VNMC ISO Installations," for a detailed example of an ISO installation.
See "Examples of Cisco VNMC OVA Template Deployment and Cisco VNMC ISO Installations," for a detailed example of an ISO installation.
PROCEDURE
Step 1 ![]() Open your client.
Open your client.
Step 2 ![]() Download an ISO image from the Cisco.com.
Download an ISO image from the Cisco.com.
Step 3 ![]() Create a virtual machine on the appropriate host as follows:
Create a virtual machine on the appropriate host as follows:
a. ![]() Ensure that your virtual machine size is 20 GB.
Ensure that your virtual machine size is 20 GB.
b. ![]() Ensure that your virtual machine has 3-GB RAM.
Ensure that your virtual machine has 3-GB RAM.
c. ![]() Choose Red Hat Enterprise Linux 5 64-bit as your operating system.
Choose Red Hat Enterprise Linux 5 64-bit as your operating system.
Step 4 ![]() Boot your virtual machine from the ISO image.
Boot your virtual machine from the ISO image.
The ISO installer appears.
Step 5 ![]() Enter the appropriate values in the ISO installer.
Enter the appropriate values in the ISO installer.
Step 6 ![]() Once the installation is completed, click Reboot.
Once the installation is completed, click Reboot.
The Cisco VNMC instance is created.
Connecting to the Cisco VNMC
You can use your browser to connect to the Cisco VNMC.
PROCEDURE
Step 1 ![]() Open a browser.
Open a browser.
Step 2 ![]() In the browser Address field, enter the IP address that you designated for your Cisco VNMC instance and click Go.
In the browser Address field, enter the IP address that you designated for your Cisco VNMC instance and click Go.
The login dialog box for Cisco VNMC appears.
Step 3 ![]() Using the appropriate username and password, log into the Cisco VNMC.
Using the appropriate username and password, log into the Cisco VNMC.
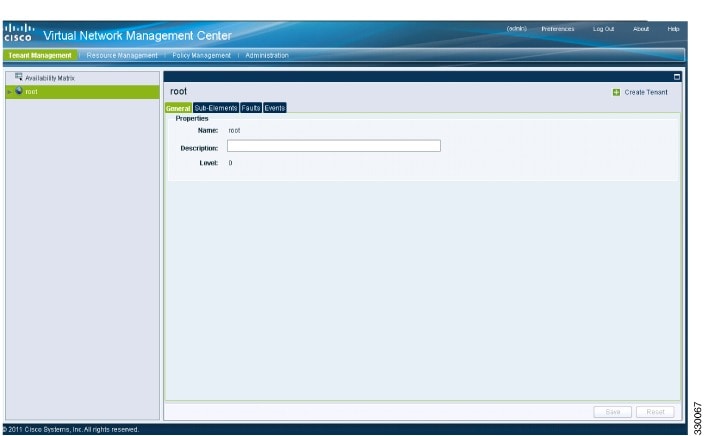
You are connected to the Cisco VNMC.
Figure 4-2 shows the main window of the Cisco VNMC.
Figure 4-2 Cisco Virtual Network Management Center, Main Window
Verifying Cisco VNMC Providers
You can verify the Cisco VNMC service providers as a way to ensure that the Cisco VNMC is running properly.
PROCEDURE
Step 1 ![]() In the CLI, enter the connect local-mgmt command.
In the CLI, enter the connect local-mgmt command.
VNMC# connect local-mgmt
Step 2 ![]() Enter the service status command.
Enter the service status command.
VNMC(local-mgmt)# service status
Step 3 ![]() Ensure that the following providers are listed as running:
Ensure that the following providers are listed as running:
•![]() policy-mgr-svc_pol_dme
policy-mgr-svc_pol_dme
•![]() resource-mgr-svc_res_dme
resource-mgr-svc_res_dme
•![]() vm-mgr-svc_vmm_dme
vm-mgr-svc_vmm_dme
You are ready to register the Cisco VSG and the Cisco Nexus 1000V.
 Feedback