- Auto Anchor SSID between Wireless LAN Controllers acting as MC
- Enabling Central Web Authentication on ISE
- Configuring Auto Anchor and Mobility Groups on Wireless Services
- Configuring Wireless Multicast on Wireless LAN Controllers
- Converged Access Consolidated Quick Reference Templates for Wireless LAN
- Converged Access Controller AP Join Issue Troubleshoot with Traces
- Converged Access Controllers MAC Address Entry for Network Mobility Service Protocol
- Configuration Example: Converged Access Management through Prime Infrastructure with SNMP v2 and v3
- Converged Access Path Maximum Transmission Unit Discovery
- Third-Party Certificate Installation on Converged Access Wireless LAN Controllers
- Configuration Example: Converged Access for WLC EAP-FAST with Internal RADIUS Server
- Converged Access and WLC Local EAP Authentication Configuration Example
- Configuration Example: Custom Web Authentication with Local Authentication
- Dynamic VLAN Assignment with Converged Access and ACS 5.2 Configuration Example
- Configuration Example: External RADIUS Server EAP Authentication
- External Web Authentication on Converged Access
- Installing Wireless Services
- Local Web Authentication with External RADIUS Authentication
- Local Web Authentication on Converged Access
- PEAP Authentication with Microsoft NPS Configuration
- QoS on Converged Access Controllers and Lightweight Access Points
- Configuration Example: TACACS Administrator Access to Converged Access Wireless LAN Controllers
- Configuration Example: Unified Access WLC Guest Anchor with Converged Access
- VideoStream Troubleshooting
- Custom Web Authentication Locally Hosted on WLC or an External Server
- Wireless Converged Access Chromecast Configuration Example
- Web Passthrough Configuration Example
- Configuration Examples: WPA2-PSK and Open Authentication
- Prerequisites for WLC PEAP Authentication with Microsoft NPS Configuration
- Background Information on PEAP
- Configuring PEAP with MS-CHAP v2
- Network Diagram of PEAP with MS-CHAP v2 authentication
- Configuring Converged Access WLCs (CLI)
- Configuring Converged Access WLCs (GUI)
- Configuring the Microsoft Windows Version 2008 Server
- Configuring the Microsoft Windows 2008 Server as a Domain Controller
- Installing and configuring the Microsoft server as a CA server
- Installing the NPS on the Microsoft Windows Version 2008 Server
- Installing a Certificate on NPS Server
- Configuring the NPS for PEAP-MS-CHAP v2 Authentication
- Adding Users to the Active Directory
- Verifying the PEAP Authentication with Microsoft NPS Configuration
- Troubleshooting WLC PEAP Authentication with Microsoft NPS Configuration Issues
PEAP Authentication with Microsoft NPS Configuration
This document describes how to configure Protected Extensible Authentication Protocol (PEAP) with Microsoft Challenge Handshake Authentication Protocol Version 2 (MS-CHAP v2) authentication on a Cisco Converged Access Wireless LAN (WLAN) deployment with the Microsoft Network Policy Server (NPS) as the RADIUS server.
- Prerequisites for WLC PEAP Authentication with Microsoft NPS Configuration
- Background Information on PEAP
- Configuring PEAP with MS-CHAP v2
- Troubleshooting WLC PEAP Authentication with Microsoft NPS Configuration Issues
Prerequisites for WLC PEAP Authentication with Microsoft NPS Configuration
You should have knowledge on the following topics before you configure PEAP as described in this document.
-
Basic Microsoft Windows Version 2008 installation.
-
Cisco Converged Access WLAN controller installation.
Ensure that following requirements are met before you start with the configuration:
Supported Platforms and Releases
-
Cisco Catalyst 3850 Series Switch.
-
Cisco 3602 Series LAP.
-
Microsoft Windows XP with Intel PROset Supplicant.
-
Microsoft Windows Version 2008 Server that runs NPS with Domain Controller Roles.
-
Cisco Catalyst 3500 Series Switches.
 Note | The information in this document was created from the devices in a specific lab environment. All of the devices used in this document started with a cleared (default) configuration. If your network is live, make sure that you understand the potential impact of any command. |
Background Information on PEAP
PEAP uses Transport Level Security (TLS) in order to create an encrypted channel between an authenticating PEAP client, such as a wireless laptop, and a PEAP authenticator, such as the Microsoft NPS or any RADIUS server. PEAP does not specify an authentication method but provides additional security for other Extensible Authentication Protocols (EAPs), such as EAP-MS-CHAP v2 that can operate through the TLS-encrypted channel that is provided by PEAP.
The PEAP authentication process divided into two main phases:
TLS-Encrypted Channel
The wireless client associates with the Access Point (AP) and an IEEE 802.11-based association provides an open system or shared key authentication before a secure association is created between the client and the AP. After the IEEE 802.11-based association is successfully established between the client and the AP, the TLS session is negotiated with the AP.
After authentication is successfully completed between the wireless client and the NPS, the TLS session is negotiated between the client and the NPS. The key that is derived within this negotiation is used in order to encrypt all subsequent communication.
EAP-Authenticated Communication
EAP communication, which includes EAP negotiation, occurs inside of the TLS channel that is created by PEAP within the first stage of the PEAP authentication process. The NPS authenticates the wireless client with EAP-MS-CHAP v2. The LAP and the controller only forward messages between the wireless client and the RADIUS server. Since WLC is not the TLS endpoint, the WLAN Controller (WLC) and the LAP cannot decrypt the messages.
The following steps shows the RADIUS message sequence for a successful authentication attempt, where the user supplies valid password-based credentials with PEAP-MS-CHAP v2:
-
The NPS sends an identity request message to the client:
EAP-Request/Identity
-
The client responds with an identity response message:
EAP-Response/Identity
-
The NPS sends an MS-CHAP v2 challenge message:
EAP-Request/EAP-Type=EAP MS-CHAP-V2 (Challenge)
-
The client responds with an MS-CHAP v2 challenge and response:
EAP-Response/EAP-Type=EAP-MS-CHAP-V2 (Response)
-
The NPS responds with an MS-CHAP v2 success packet when the server successfully authenticates the client:
EAP-Request/EAP-Type=EAP-MS-CHAP-V2 (Success)
-
The client responds with an MS-CHAP v2 success packet when the client successfully authenticates the server:
EAP-Response/EAP-Type=EAP-MS-CHAP-V2 (Success)
-
The NPS sends an EAP-type-length-value (TLV) that indicates successful authentication.
-
The client responds with an EAP-TLV status success message.
-
The server completes authentication and sends an EAP-Success message in plain text. If VLANs are deployed for client isolation, the VLAN attributes are included in this message.
Configuring PEAP with MS-CHAP v2
This section describes how to configure PEAP with MS-CHAP v2 authentication on a Cisco Converged Access WLC deployment with the Microsoft NPS as the RADIUS server.
The configuration is a two-step process which includes:
- Network Diagram of PEAP with MS-CHAP v2 authentication
- Configuring Converged Access WLCs (CLI)
- Configuring Converged Access WLCs (GUI)
- Configuring the Microsoft Windows Version 2008 Server
- Verifying the PEAP Authentication with Microsoft NPS Configuration
Network Diagram of PEAP with MS-CHAP v2 authentication
The following figure shows the network diagram of PEAP with MS-CHAP v2 authentication:

In the above figure, the Microsoft Windows Version 2008 server performs following roles:
-
Domain controller for the wireless.com domain
-
Domain Name System (DNS) server
-
Certificate Authority (CA) server
-
NPS in order to authenticate the wireless users
-
Active Directory (AD) in order to maintain the user database
The server connects to the wired network through a Layer 2 (L2) switch, as shown in above illustration. The WLC and the registered LAP also connect to the network through the L2 switch.
The wireless clients use Wi-Fi Protected Access 2 (WPA2) - PEAP-MS-CHAP v2 authentication in order to connect to the wireless network.
Configuring Converged Access WLCs (CLI)
Perform the following tasks to configure the WLAN for the required client VLAN and map it to the Authentication Method List using the CLI:
Note | Ensure that dot1x system auth control is enabled on the WLC, or the dot1X does not work. |
-
Enable the AAA new model feature.
-
Configure the RADIUS server.
-
Add the server into the Server Group.
-
Map the Server Group to the Method List.
-
Map the Method List to the WLAN.
aaa new-model
  !
  !
  aaa group server radius Microsoft_NPS
   server name Microsoft_NPS
  !
aaa authentication dot1x Microsoft_NPS group Microsoft_NPS
aaa authorization network Microsoft_NPS group Microsoft_NPS
  radius server Microsoft_NPS
   address ipv4 10.104.208.96 auth-port 1645 acct-port 1646
   timeout 10
   retransmit 10
 key Cisco123
wlan Microsoft_NPS 8 Microsoft_NPS
   client vlan VLAN0020
   no exclusionlist
   security dot1x authentication-list Microsoft_NPS
   session-timeout 1800
 no shutdown
Configuring Converged Access WLCs (GUI)
Perform the following tasks to configure the Converged Access WLCs using the GUI:

Configuring the Microsoft Windows Version 2008 Server
This section describes configuring Microsoft Windows Version 2008 server. The configuration is a six-step process as listed hereunder:
- Configuring the Microsoft Windows 2008 Server as a Domain Controller
- Installing and configuring the Microsoft server as a CA server
- Installing the NPS on the Microsoft Windows Version 2008 Server
- Installing a Certificate on NPS Server
- Configuring the NPS for PEAP-MS-CHAP v2 Authentication
- Adding Users to the Active Directory
Configuring the Microsoft Windows 2008 Server as a Domain Controller
Perform the following task and follow the instructions on the screen to configure the Microsoft Windows Version 2008 server as a domain controller.
| Step 1 |
To configure the Microsoft Windows Version 2008 server as a Domain Controller, navigate to Start > Server Manager > Roles > Add Roles and click Next on Before you Begin screen. |
| Step 2 | Check the Active Directory Domain Services check box on Select Server Roles screen and click Next.  |
| Step 3 |
Review the Introduction to Active Directory Domain Services on Active Directory Domain Services screen and click Next. |
| Step 4 |
Click Install on Confirm Installation Selections screen in order to begin the installation process. |
| Step 5 |
Click Close this wizard and launch the Active Directory Domain Services Installation Wizard (dcpromo.exe) on Installation Results screen in order to continue the installation and configuration of the AD. |
| Step 6 |
Click Next in order to run the Active Directory Domain Services Installation Wizard. |
| Step 7 |
Review the information about Operating System Compatibility and click Next on Active Directory Domain Services Installation Wizard screen. |
| Step 8 |
Choose the Create a new domain in a new forest radio button and click Next in order to create a new domain. 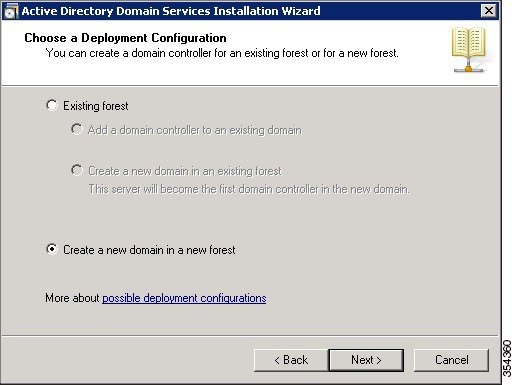 |
| Step 9 |
Enter the full DNS name for the new domain (wireless.com in this example) and click Next. 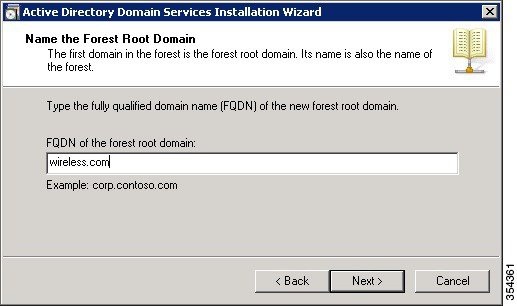 |
| Step 10 |
Choose the Forest functional level from the drop-down list on Set Forest Functional Level screen for your domain and click Next. |
| Step 11 |
Choose the Domain functional level from the drop-down list on Set Forest Functional Level screen for your domain and click Next. |
| Step 12 |
Check the DNS server check box on Additional Domain Controller Options screen and click Next. |
| Step 13 |
Click Yes when the Active Directory Domain Services Installation Wizard pop-up window appears in order to create a new zone in the DNS for the domain. |
| Step 14 |
Choose the folders that you want the AD to use for files and click Next. 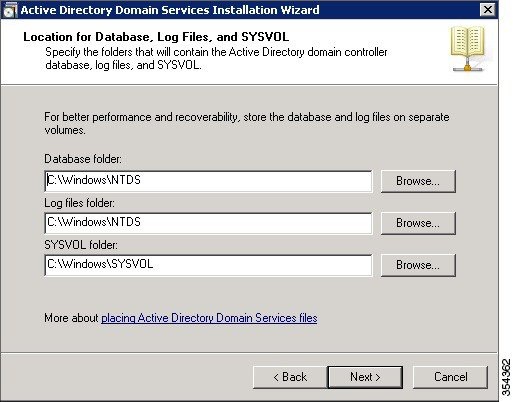 |
| Step 15 |
Enter the Administrator Password and confirm the same on Directory Services Restore Mode Administrator Password screen, and then, click Next. |
| Step 16 |
Review your selections on Summary screen and click Next. The installation proceeds. |
| Step 17 |
Click Finish in order to close the Active Directory Services Installation wizard. |
| Step 18 |
Restart the server in order for the changes to take effect. |
Installing and configuring the Microsoft server as a CA server
PEAP with EAP-MS-CHAP v2 validates the RADIUS server based upon the certificate that is present on the server. Additionally, the server certificate must be issued by a public CA that is trusted by the client computer. That is, the public CA certificate already exists in the Trusted Root Certification Authority folder on the client computer certificate store.
Perform the following task and follow the instructions on the screen to configure the Microsoft Windows Version 2008 server as a CA server that issues the certificate to the NPS.
| Step 1 |
To install and configure the Microsoft Windows Version 2008 server as a CA server, navigate to Start > Server Manager > Roles > Add Roles and click Next on Before You Begin screen. |
| Step 2 | Check the Active Directory Certificate Services check box on Select Server Roles screen and click Next. |
| Step 3 |
Review the Introduction to Active Directory Certificate Services on Add Roles Wizard screen and click Next. |
| Step 4 |
Check the Certificate Authority check box on Select Server Services screen and click Next. |
| Step 5 |
Choose the Enterprise radio button on Specify Setup Type screen and click Next. |
| Step 6 |
Choose the Root CA radio button on Specify CA Type screen and click Next. |
| Step 7 |
Choose the Create a new private key radio button on Set Up Private Key screen and click Next. |
| Step 8 |
Click Next in the Configuring Cryptography for CA window. |
| Step 9 |
To accept the default name of Common name for this CA field, click Next on Configure CA Name screen. |
| Step 10 |
Enter the validity period for the generated CA certificate on Set Validity Period screen and click Next. |
| Step 11 |
To accept the default location of Certificate database, click Next on Configure Certificate Database screen. |
| Step 12 |
Review the configuration and click Install in order to begin the installation of Active Directory Certificate Services. |
| Step 13 |
After the installation is completed, click Close. |
Installing the NPS on the Microsoft Windows Version 2008 Server
Perform the following task and follow the instructions on the screen to install and configure the NPS on the Microsoft Windows Version 2008 server.
Note | With the setup that is described in this section, the NPS is used as a RADIUS server in order to authenticate the wireless clients with PEAP authentication. |
| Step 1 |
To install and configure the NPS on the Microsoft Windows Version 2008 server, navigate to Start > Server Manager > Roles > Add Roles,and click Next on Before You Begin screen. |
| Step 2 | Check the Network Policy and Access Services check box on Select Server Roles screen and click Next. |
| Step 3 |
Review the Introduction to Network Policy and Access Services on Network Policy and Access Services screen and click Next. |
| Step 4 |
Check the Network Policy Server check box on Select Role Services screen and click Next. |
| Step 5 |
Review the confirmation on Confirm Installation Selections screen and click Install. |
| Step 6 |
After the installation is complete, close the Add Roles Wizard. |
Installing a Certificate on NPS Server
Perform the following task and follow the instructions on the screen to install the computer certificate for the NPS.
| Step 1 |
Click Start, enter the Microsoft Management Console (MMC), and press Enter. | ||
| Step 2 | Navigate to File > Add/Remove Snap-in. | ||
| Step 3 | Choose Certificates on Add or Remove Snap-in screen and click Add. 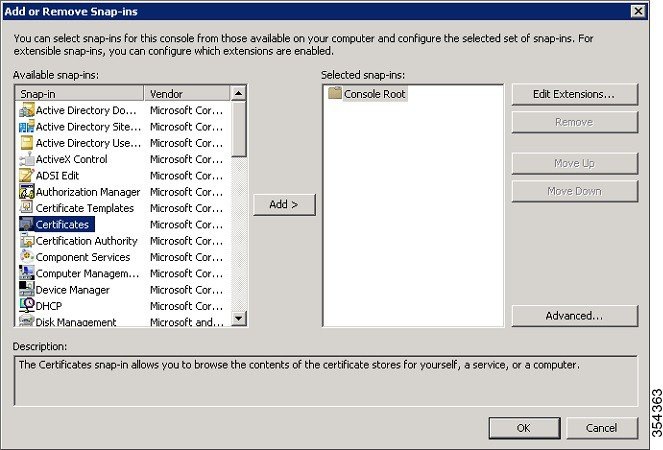 | ||
| Step 4 |
Choose the Computer account radio button on Certificate snap-in screen and click Next. | ||
| Step 5 |
Choose the Local Computer radio button on Select Computer screen and click Finish. | ||
| Step 6 |
Click OK on Add or Remove Snap-in screen in order to return to the MMC. | ||
| Step 7 |
Expand the Certificates (Local Computer) and Personal folders on MMC, and then click Certificates. | ||
| Step 8 |
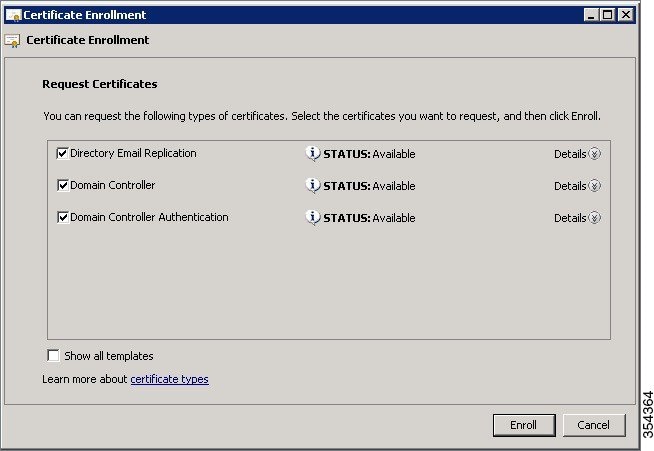
Right-click on the white space in the CA certificate on MMC, and choose All Tasks > Request New Certificate and click Next on Certificate Enrollment window. | ||
| Step 9 |
Click the Domain Controller check box on Certificate Enrollment window, and click Enroll.
 | ||
| Step 10 |
Click Finish on Certificate Enrollment window once the certificate is installed.
|
Configuring the NPS for PEAP-MS-CHAP v2 Authentication
Perform the following task and follow the instructions on the screen to configure the NPS for PEAP-MS-CHAP v2 authentication.
| Step 1 |
To configure the NPS for PEAP-MS-CHAP v2 authentication, navigate to Start > Administrative Tools > Network Policy Server. | ||||||||
| Step 2 | Right-click on NPS (Local) and choose Register server in Active Directory. | ||||||||
| Step 3 | Click OK and again OK on Network Policy Server pop-up. | ||||||||
| Step 4 |
Add the WLC as an Authentication, Authorization, and Accounting (AAA) client on the NPS. | ||||||||
| Step 5 |
Expand RADIUS Clients and Servers folder on Network Policy Server window. Right-click on RADIUS Clients and choose New RADIUS Client. | ||||||||
| Step 6 |
Enter a name, the management IP address and a shared secret of the WLC on the WLC Properties window. Click OK to go back to the Server Manager window.
| ||||||||
| Step 7 |
To create a new Network Policy for the wireless users, expand Policies folder, right-click on Network Policies, and choose New on Network Policy Server screen. | ||||||||
| Step 8 |
Enter a policy name on Specify Network Policy Name and Connection Type screen and click Next. | ||||||||
| Step 9 |
To allow only wireless domain users, configure the policy (PEAP in this example) by adding following three conditions and click Next.
 | ||||||||
| Step 10 |
Choose the Access granted radio button on Specify Access Permission screen in order to grant connection attempts that match this policy and click Next. | ||||||||
| Step 11 |
Disable all of the Less secure authentication methods by un checking all the check boxes in Configure Authentication Methods screen. | ||||||||
| Step 12 |
Click Add, then choose the Microsoft: Protected EAP (PEAP) as EAP Type on Configure Authentication Methods screen, and click OK to enable PEAP.  | ||||||||
| Step 13 |
Select Microsoft: Protected EAP (PEAP) and click Edit. | ||||||||
| Step 14 |
Ensure that the previously-created domain controller certificate is selected in the Certificate issued field and click OK on Edit Protected EAP Properties window. | ||||||||
| Step 15 |
Click Next on Configure Authentication Methods again click Next on Configure Constraints window. | ||||||||
| Step 16 |
Click Next on Configure Settings and then click Finish on Completing New Network Policy window.
|
Adding Users to the Active Directory
Perform the following task and follow the instructions on the screen to add users to the AD database.
| Step 1 |
Navigate to Start > Administrative Tools > Active Directory Users and Computers. |
| Step 2 | In the Active Directory Users and Computers console tree, expand the domain. |
| Step 3 | Right-click on Users and New, and then choose User. |
| Step 4 |
In the New Object - User dialog box, enter the name of the wireless user. Click Next. |
| Step 5 |
In the New Object - User dialog box, enter a password of your choice in the Password and Confirm password fields. |
| Step 6 |
Uncheck the User must change password at next logon check box on New Object - User dialog box and click Next. |
| Step 7 |
Click Finish on New Object - User dialog box. |
| Step 8 |
Repeat Steps 2 to 5 in order to create additional user accounts. |
Verifying the PEAP Authentication with Microsoft NPS Configuration
Perform the following task in order to verify your configuration:
Troubleshooting WLC PEAP Authentication with Microsoft NPS Configuration Issues
Note | Cisco recommends that you use traces in order to troubleshoot wireless issues. Traces are saved in the circular buffer and are not processor intensive. |
-
Enable these traces in order to obtain the L2 auth logs:
-
Enable these traces in order to obtain the dot1X AAA events:
-
Enable these traces in order to receive the DHCP events:
-
Enable these traces in order to disable the traces and clear the buffer:
To view the traces, enter the show trace sys-filtered-traces command:
[04/23/14 21:27:51.963 IST 1 8151] 0017.7c2f.b69a Adding mobile on LWAPP AP
 1caa.076f.9e10 (0)
[04/23/14 21:27:51.963 IST 2 8151] 0017.7c2f.b69a Local Policy:  Created MSCB
 Just AccessVLAN = 0 and SessionTimeout  is 0 and apfMsTimeout is 0

[04/23/14 21:27:51.963 IST 8 8151] 0017.7c2f.b69a Local Policy:Setting local
 bridging VLAN  name VLAN0020 and VLAN ID  20

[04/23/14 21:27:51.963 IST 9 8151] 0017.7c2f.b69a Applying WLAN ACL policies
 to client
[04/23/14 21:27:51.963 IST a 8151] 0017.7c2f.b69a No Interface ACL used for
 Wireless client in WCM(NGWC)
[04/23/14 21:27:51.963 IST b 8151] 0017.7c2f.b69a Applying site-specific IPv6
 override for station  0017.7c2f.b69a  - vapId 8, site 'test',
 interface 'VLAN0020'
[04/23/14 21:27:51.963 IST c 8151] 0017.7c2f.b69a Applying local bridging
 Interface Policy for station  0017.7c2f.b69a  - vlan 20,
 interface 'VLAN0020'
[04/23/14 21:27:51.963 IST d 8151] 0017.7c2f.b69a
 **** Inside applyLocalProfilingPolicyAction ****

04/23/14 21:27:51.963 IST f 8151] 0017.7c2f.b69a     Local Profiling Values :
 isValidVlan = 0, vlan = 0, isVlanRecdInDelete = 0, isValidSessionTimeout = 0,
 sessionTimeout=0, isSessionTORecdInDelete = 0  ProtocolMap = 0 ,
 applyPolicyAtRun= 0
[04/23/14 21:27:51.963 IST 10 8151] 0017.7c2f.b69a          ipv4ACL = [],
 ipv6ACL = [], inQoS = [unknown], outQoS = [unknown]
[04/23/14 21:27:51.963 IST 11 8151] 0017.7c2f.b69a STA - rates (4):
 130 132 139 150 0 0 0 0 0 0 0 0 0 0 0 0
[04/23/14 21:27:51.963 IST 12 8151] 0017.7c2f.b69a STA - rates (12):
 130 132 139 150 12 18 24 36 48 72 96 108 0 0 0 0
[04/23/14 21:27:51.963 IST 13 8151] 0017.7c2f.b69a Processing RSN IE type 48,
 length 20 for mobile  0017.7c2f.b69a
[04/23/14 21:27:51.963 IST 14 8151] 0017.7c2f.b69a Received RSN IE with 0
 PMKIDsfrom mobile  0017.7c2f.b69a


[04/23/14 21:27:51.964 IST 1b 8151] 0017.7c2f.b69a Change state to AUTHCHECK
 (2) last state START (0)

[04/23/14 21:27:51.964 IST 1c 8151] 0017.7c2f.b69a Change state to 8021X_REQD
 (3) last state AUTHCHECK (2)


[04/23/14 21:27:51.964 IST 25 8151] 0017.7c2f.b69a apfProcessAssocReq
 (apf_80211.c:6272) Changing state for mobile  0017.7c2f.b69a  on AP
 1caa.076f.9e10  from Associated to Associated

[04/23/14 21:27:51.971 IST 26 8151] 0017.7c2f.b69a 1XA: Initiating
 authentication
[04/23/14 21:27:51.971 IST 27 8151] 0017.7c2f.b69a 1XA: Setting reauth
 timeout to 1800 seconds
[04/23/14 21:27:51.971 IST 28 8151] 0017.7c2f.b69a 1XK: Set Link Secure: 0

[04/23/14 21:27:51.971 IST 29 8151] 0017.7c2f.b69a 1XA: Allocated uid 40
[04/23/14 21:27:51.971 IST 2a 8151] 0017.7c2f.b69a 1XA: Calling Auth Mgr
 to authenticate client 4975000000003e uid 40
[04/23/14 21:27:51.971 IST 2b 8151] 0017.7c2f.b69a 1XA: Session Start from
 wireless client

[04/23/14 21:27:51.971 IST 2c 8151] 0017.7c2f.b69a Session Manager Call Client
 4975000000003e, uid 40, capwap id 7ae8c000000013,Flag 0, Audit-Session ID
 0a6987b25357e2ff00000028, method list Microsoft_NPS, policy name (null)

[04/23/14 21:27:51.971 IST 2d 22] ACCESS-CORE-SM-CLIENT-SPI-NOTF:
 [0017.7c2f.b69a, Ca3] Session start request from Client[1] for 0017.7c2f.b69a
 (method: Dot1X, method list: Microsoft_NPS, aaa id: 0x00000028),  policy
[04/23/14 21:27:51.971 IST 2e 22] ACCESS-CORE-SM-CLIENT-SPI-NOTF:
 [0017.7c2f.b69a, Ca3]  - client iif_id: 4975000000003E, session ID:
 0a6987b25357e2ff00000028 for 0017.7c2f.b69a


[04/23/14 21:27:51.972 IST 43 284] ACCESS-METHOD-DOT1X-DEB:
 [0017.7c2f.b69a, Ca3] Posting !EAP_RESTART on Client 0x22000025
[04/23/14 21:27:51.972 IST 44 284] ACCESS-METHOD-DOT1X-DEB:
 [0017.7c2f.b69a, Ca3] 0x22000025:enter connecting state
[04/23/14 21:27:51.972 IST 45 284] ACCESS-METHOD-DOT1X-DEB:
 [0017.7c2f.b69a, Ca3] 0x22000025: restart connecting
[04/23/14 21:27:51.972 IST 46 284] ACCESS-METHOD-DOT1X-DEB:
 [0017.7c2f.b69a, Ca3] Posting RX_REQ on Client 0x22000025
[04/23/14 21:27:51.972 IST 47 284] ACCESS-METHOD-DOT1X-DEB:
 [0017.7c2f.b69a, Ca3] 0x22000025: authenticating state entered
[04/23/14 21:27:51.972 IST 48 284] ACCESS-METHOD-DOT1X-DEB:
 [0017.7c2f.b69a, Ca3] 0x22000025:connecting authenticating action
[04/23/14 21:27:51.972 IST 49 291] ACCESS-METHOD-DOT1X-DEB:
 [0017.7c2f.b69a, Ca3] Posting AUTH_START for 0x22000025
[04/23/14 21:27:51.972 IST 4a 291] ACCESS-METHOD-DOT1X-DEB:
 [0017.7c2f.b69a, Ca3] 0x22000025:entering request state
[04/23/14 21:27:51.972 IST 4b 291] ACCESS-METHOD-DOT1X-NOTF:
 [0017.7c2f.b69a, Ca3] Sending EAPOL packet
[04/23/14 21:27:51.972 IST 4c 291] ACCESS-METHOD-DOT1X-INFO:
 [0017.7c2f.b69a, Ca3] Platform changed src mac  of EAPOL packet
[04/23/14 21:27:51.972 IST 4d 291] ACCESS-METHOD-DOT1X-NOTF:
 [0017.7c2f.b69a, Ca3] Sending out EAPOL packet
[04/23/14 21:27:51.972 IST 4e 291] ACCESS-METHOD-DOT1X-INFO:
 [0017.7c2f.b69a, Ca3] EAPOL packet sent to client 0x22000025


[04/23/14 21:27:52.112 IST 7d 211] Parsed CLID MAC Address = 0:23:124:47:182:154
[04/23/14 21:27:52.112 IST 7e 211] AAA SRV(00000000): process authen req
[04/23/14 21:27:52.112 IST 7f 211] AAA SRV(00000000): Authen method=SERVER_GROUP
 Microsoft_NPS
[04/23/14 21:27:52.112 IST 80 211] AAA SRV(00000000): Selecting SG = DIAMETER
[04/23/14 21:27:52.113 IST 81 186] ACCESS-METHOD-DOT1X-INFO:
 [0017.7c2f.b69a, Ca3] Queuing an EAPOL pkt on Authenticator Q
[04/23/14 21:27:52.113 IST 82 291] ACCESS-METHOD-DOT1X-DEB:
 [0017.7c2f.b69a, Ca3] Posting EAPOL_EAP for 0x22000025
[04/23/14 21:27:52.278 IST 83 220] AAA SRV(00000000): protocol reply
 GET_CHALLENGE_RESPONSE for Authentication
[04/23/14 21:27:52.278 IST 84 220] AAA SRV(00000000): Return Authentication
 status=GET_CHALLENGE_RESPONSE
[04/23/14 21:27:52.278 IST 85 291] ACCESS-METHOD-DOT1X-DEB:[0017.7c2f.b69a,Ca3]
 Posting EAP_REQ for 0x22000025
The following codeblock shows the rest of the EAP output:
[04/23/14 21:27:54.690 IST 12b 211] AAA SRV(00000000): process authen req
[04/23/14 21:27:54.690 IST 12c 211] AAA SRV(00000000): Authen
 method=SERVER_GROUP Microsoft_NPS
[04/23/14 21:27:54.690 IST 12d 211] AAA SRV(00000000): Selecting SG =
 DIAMETER
[04/23/14 21:27:54.694 IST 12e 220] AAA SRV(00000000): protocol reply PASS
 for Authentication
[04/23/14 21:27:54.694 IST 12f 220] AAA SRV(00000000): Return Authentication
 status=PASS
[04/23/14 21:27:54.694 IST 130 189] ACCESS-METHOD-DOT1X-INFO:
 [0017.7c2f.b69a, Ca3] Received an EAP Success


[04/23/14 21:27:54.695 IST 186 8151] 0017.7c2f.b69a Starting key exchange with
 mobile - data forwarding is disabled
[04/23/14 21:27:54.695 IST 187 8151] 0017.7c2f.b69a 1XA: Sending EAPOL message
 to mobile, WLAN=8 AP WLAN=8
[04/23/14 21:27:54.706 IST 188 8151] 0017.7c2f.b69a 1XA: Received 802.11 EAPOL
 message (len 121) from mobile
[04/23/14 21:27:54.706 IST 189 8151] 0017.7c2f.b69a 1XA: Received EAPOL-Key
 from mobile
[04/23/14 21:27:54.706 IST 18a 8151] 0017.7c2f.b69a 1XK: Received EAPOL-key in
 PTK_START state (msg 2) from mobile
[04/23/14 21:27:54.706 IST 18b 8151] 0017.7c2f.b69a 1XK: Stopping retransmission
 timer
[04/23/14 21:27:54.706 IST 18c 8151] 0017.7c2f.b69a 1XA: Sending EAPOL message
 to mobile, WLAN=8 AP WLAN=8
[04/23/14 21:27:54.717 IST 18d 8151] 0017.7c2f.b69a 1XA: Received 802.11 EAPOL
 message (len 99) from mobile
[04/23/14 21:27:54.717 IST 18e 8151] 0017.7c2f.b69a 1XA: Received EAPOL-Key
 from mobile
[04/23/14 21:27:54.717 IST 18f 8151] 0017.7c2f.b69a 1XK: Received EAPOL-key in
 PTKINITNEGOTIATING state (msg 4) from mobile
[04/23/14 21:27:54.717 IST 190 8151] 0017.7c2f.b69a 1XK: Set Link Secure: 1

[04/23/14 21:27:54.717 IST 191 8151] 0017.7c2f.b69a 1XK: Key exchange complete
 - updating PEM
[04/23/14 21:27:54.717 IST 192 8151] 0017.7c2f.b69a apfMs1xStateInc
[04/23/14 21:27:54.717 IST 193 8151] 0017.7c2f.b69a Change state to
 L2AUTHCOMPLETE (4) last state 8021X_REQD (3)


[04/23/14 21:27:58.277 IST 1df 269] DHCPD: Sending notification of DISCOVER:
[04/23/14 21:27:58.277 IST 1e0 269] DHCPD: Sending notification of DISCOVER:
[04/23/14 21:28:05.279 IST 1e1 269] DHCPD: Adding binding to hash tree
[04/23/14 21:28:05.279 IST 1e2 269] DHCPD: DHCPOFFER notify setup address
 20.20.20.5 mask 255.255.255.0


[04/23/14 21:28:05.306 IST 1f4 8151] 0017.7c2f.b69a Change state to RUN (20)
 last state DHCP_REQD (7)
 Feedback