Quick Setup: Accessing the Configuration Setup Wizard
When you first set up the switch, use the Configuration Setup wizard to enter the initial IP information. This enables the switch to connect to local routers and the Internet. You can then access the switch through the IP address for further configuration.
 Note |
The switch also supports Bluetooth which can be enabled via WebUI or using the CLI command staging config bluetooth on . This command will enable Bluetooth and a default DHCP server pool for the Bluetooth interface. Connect your PC to the switch using Bluetooth. In your web browser, enter the IP address 172.16.0.1. The default Bluetooth pin is ‘9999’. Enter the following default credentials: username: smartm, password: c2960lsm and press Enter. |
|
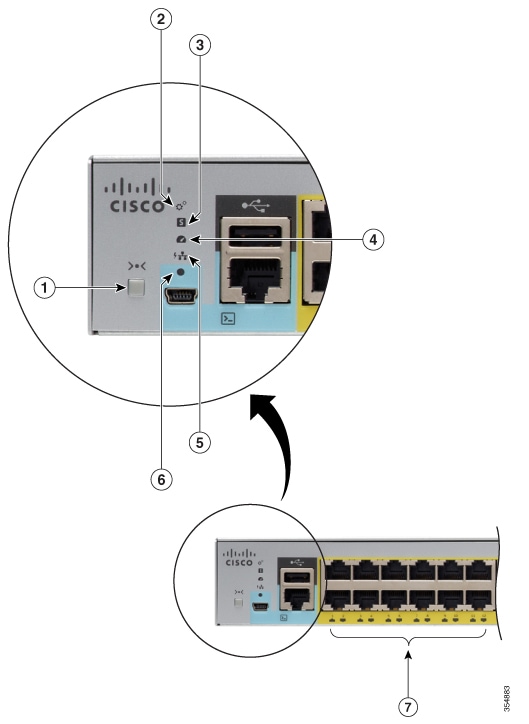
1 |
|
Mode button |
|
2 |
|
SYST LED (system) |
|
3 |
|
STAT LED (status) |
|
4 |
|
SPEED LED |
|
5 |
|
PoE LED 1 |
|
6 |
|
Console LED |
|
7 |
|
Port LEDs |
Before you Begin: If your PC has a static IP address, change your PC settings to temporarily use DHCP.
Procedure
| Step 1 |
Verify that no devices are connected to the switch. DHCP server is enabled by default. |
||
| Step 2 |
Insert the power cord into an AC power source outlet and turn on the power at the source. |
||
| Step 3 |
Connect an Ethernet cable to a 10/100/1000 Ethernet port on the switch front panel and to the Ethernet port on the PC. |
||
| Step 4 |
Wait until the switch assigns an IP address to the PC. |
||
| Step 5 |
To log on to the device using an Internet browser on your PC, type the IP address 192.168.1.1 in the address bar of your Internet browser and press Enter. |
||
| Step 6 |
Type the following default credentials: username: smartm, password: c2960lsm and press Enter. Configure your device using the Cisco Configuration Professional.
|
 Feedback