Configuring the Switch

This appendix contains these topics:

Configuring the Switch Using the Configuration Setup Wizard

Quick Setup: Accessing the Configuration Setup Wizard

When you first set up the switch, use the Configuration Setup wizard to enter the initial IP information. This enables the switch to connect to local routers and the Internet. You can then access the switch through the IP address for further configuration.


Note

If your device supports Bluetooth, it loads with the initial setup tasks preconfigured. Connect your PC to the device using Bluetooth. In your Web browser, enter the IP address 172.16.0.1. Enter the following default credentials: username: cisco, password: cisco and press Enter.
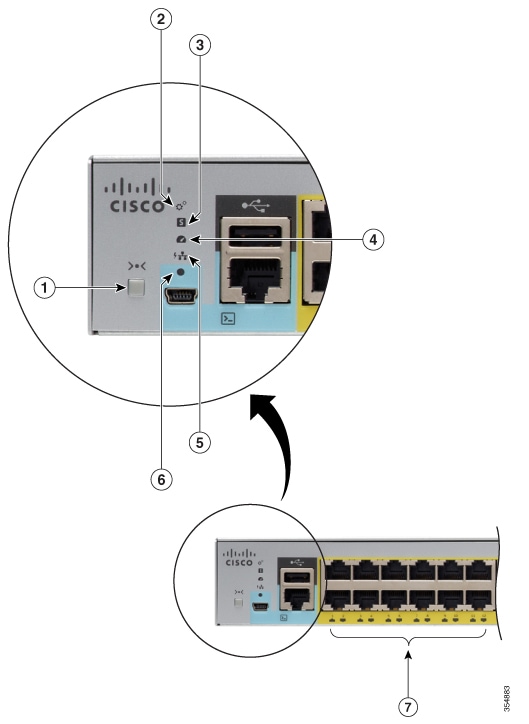

1

Mode button

2

SYST LED (system)

3

STAT LED (status)

4

SPEED LED

5

PoE LED 1

6

Console LED

7

Port LEDs

1 Only on switch models that support PoE.

Before you Begin: If your PC has a static IP address, change your PC settings to temporarily use DHCP.

Procedure


Step 1

Verify that no devices are connected to the switch. Initially, the switch acts as a DHCP server.

Step 2

Confirm that the STAT LED is solid green. This indicates that POST is complete. If the STAT LED turns amber, the device failed POST. Reconnect the AC power cord to the AC power connector of your device and to a grounded AC outlet. If the STAT LED still does not turn green, contact your Cisco representative or retailer.

Step 3

Press and hold the Mode button for 3 seconds. When all of the LEDs above the Mode button turn green, release the Mode button immediately.

Caution: If the LEDs next to the Mode button blink green, release the button. Blinking green LEDs indicate that the device is already in Setup mode. Continuing to hold the Mode button after the LEDs have turned green, exits the Setup mode.
Step 4

Connect a straight-through Category 5 Ethernet cable to a 10/100/1000 Ethernet port on the switch front panel and to the Ethernet port on the PC.

Step 5

Verify that the port LEDs on the PC and on your device are solid green or blinking green. This indicates a successful connection.

Step 6

Wait 30 seconds.

Step 7

To log on to the device using an Internet browser on your PC, type the IP address 10.0.0.1 or 10.0.0.3 in the address bar of your Internet browser and press Enter.

Step 8

Type the following default credentials: username: cisco, password: cisco and press Enter.

The Configuration Setup wizard is displayed. Click Go to Wizard.

Completing the Configuration Setup Wizard

Completing the Configuration Setup Wizard enables you to set up your device with the minimum configuration required to enable traffic to pass through the network. To achieve this, you must complete the following setup tasks as you proceed with the Configuration Setup Wizard.

  • Basic Device Settings

  • Interfaces

  • Layer 3 Settings

  • Advanced Device Settings

For more information on the configuration steps involved in completing the Configuration Setup Wizard, see User Guide for Cisco Configuration Professional for Catalyst .

Configuring the Switch Using the CLI

Accessing the CLI Through the Console Port

You can access the CLI on a configured or unconfigured switch by connecting the RJ-45 console port or USB console port of the switch to your PC or workstation and accessing the switch through a terminal emulation program.

Connecting the RJ45 Console Port

SUMMARY STEPS

  1. Connect the RJ45 port to the serial port on the terminal server or your PC using the optional RJ45-to-DB9 adapter cable. Connect the other end of the cable to the switch console port.
  2. Start the terminal-emulation program on the PC or the terminal. The program, frequently a PC application such as Putty or TeraTerm, makes communication between the switch and your PC or terminal possible.
  3. Configure the baud rate and character format of the PC or terminal to match the console port default characteristics:
  4. Power on the switch.
  5. The PC or terminal displays the bootloader sequence. Press Enter to display the setup prompt.

DETAILED STEPS


Step 1

Connect the RJ45 port to the serial port on the terminal server or your PC using the optional RJ45-to-DB9 adapter cable. Connect the other end of the cable to the switch console port.

Step 2

Start the terminal-emulation program on the PC or the terminal. The program, frequently a PC application such as Putty or TeraTerm, makes communication between the switch and your PC or terminal possible.

Step 3

Configure the baud rate and character format of the PC or terminal to match the console port default characteristics:

  • 9600 baud

  • 8 data bits

  • 1 stop bit

  • No parity

  • None (flow control)

Step 4

Power on the switch.

Step 5

The PC or terminal displays the bootloader sequence. Press Enter to display the setup prompt.


Connecting the USB Console Port

SUMMARY STEPS

  1. If you are connecting the switch USB console port to a Windows-based PC for the first time, install the USB driver. See Installing the Cisco Microsoft Windows USB Device Driver.
  2. Connect a USB cable to the PC USB port. Connect the other end of the cable to the switch mini-B (5-pin-connector) USB console port.
  3. Start the terminal-emulation program on the PC or the terminal. The program, frequently a PC application such as Putty or TeraTerm, makes communication between the switch and your PC or terminal possible.
  4. Configure the baud rate and character format of the PC or terminal to match the console port default characteristics:
  5. Power on the switch as described in the switch getting started guide.
  6. The PC or terminal displays the bootloader sequence. Press Enter to display the setup prompt. Follow the steps in the Setup program.

DETAILED STEPS


Step 1

If you are connecting the switch USB console port to a Windows-based PC for the first time, install the USB driver. See Installing the Cisco Microsoft Windows USB Device Driver.

Note 

USB Type A port on the switch provides file system support and is NOT a console port. See USB Type A Port section.

Step 2

Connect a USB cable to the PC USB port. Connect the other end of the cable to the switch mini-B (5-pin-connector) USB console port.

Step 3

Start the terminal-emulation program on the PC or the terminal. The program, frequently a PC application such as Putty or TeraTerm, makes communication between the switch and your PC or terminal possible.

Step 4

Configure the baud rate and character format of the PC or terminal to match the console port default characteristics:

  • 9600 baud

  • 8 data bits

  • 1 stop bit

  • No parity

  • None (flow control)

Step 5

Power on the switch as described in the switch getting started guide.

Step 6

The PC or terminal displays the bootloader sequence. Press Enter to display the setup prompt. Follow the steps in the Setup program.


Installing the Cisco Microsoft Windows USB Device Driver

A USB device driver must be installed the first time a Microsoft Windows-based PC is connected to the USB console port on the switch.

Installing the Cisco Microsoft Windows XP USB Driver

SUMMARY STEPS

  1. Obtain the Cisco USB console driver file from the Cisco.com web site and unzip it.
  2. If using 32-bit Windows XP, double-click the setup.exe file in the Windows_32 folder. If using 64-bit Windows XP, double-click the setup(x64).exe file in the Windows_64 folder.
  3. The Cisco Virtual Com InstallShield Wizard begins.
  4. The Ready to Install the Program window appears. Click Install.
  5. The InstallShield Wizard Completed window appears. Click Finish.
  6. Connect the USB cable to the PC and the switch console port. The USB console port LED turns green, and the Found New Hardware Wizard appears. Follow the instructions to complete the driver installation.

DETAILED STEPS


Step 1

Obtain the Cisco USB console driver file from the Cisco.com web site and unzip it.

Note 

You can download the driver file from the Cisco.com site for downloading the switch software.

Step 2

If using 32-bit Windows XP, double-click the setup.exe file in the Windows_32 folder. If using 64-bit Windows XP, double-click the setup(x64).exe file in the Windows_64 folder.

Step 3

The Cisco Virtual Com InstallShield Wizard begins.

Step 4

The Ready to Install the Program window appears. Click Install.

Step 5

The InstallShield Wizard Completed window appears. Click Finish.

Step 6

Connect the USB cable to the PC and the switch console port. The USB console port LED turns green, and the Found New Hardware Wizard appears. Follow the instructions to complete the driver installation.


Installing the Cisco Microsoft Windows 2000 USB Driver

SUMMARY STEPS

  1. Obtain the Cisco USB console driver file from the Cisco.com web site and unzip it.
  2. Double-click the setup.exe file.
  3. The Cisco Virtual Com InstallShield Wizard begins. Click Next.
  4. The Ready to Install the Program window appears. Click Install.
  5. The InstallShield Wizard Completed window appears. Click Finish.
  6. Connect the USB cable to the PC and the switch console port. The USB console port LED turns green, and the Found New Hardware Wizard appears. Follow the instructions to complete the driver installation.

DETAILED STEPS


Step 1

Obtain the Cisco USB console driver file from the Cisco.com web site and unzip it.

Note 

You can download the driver file from the Cisco.com site for downloading the switch software.

Step 2

Double-click the setup.exe file.

Step 3

The Cisco Virtual Com InstallShield Wizard begins. Click Next.

Step 4

The Ready to Install the Program window appears. Click Install.

Step 5

The InstallShield Wizard Completed window appears. Click Finish.

Step 6

Connect the USB cable to the PC and the switch console port. The USB console port LED turns green, and the Found New Hardware Wizard appears. Follow the instructions to complete the driver installation.


Installing the Cisco Microsoft Windows USB Driver

SUMMARY STEPS

  1. Obtain the Cisco USB console driver file from the Cisco.com web site and unzip it.
  2. If using 32-bit Windows, double-click the setup.exe file in the Windows_32 folder. If using 64-bit Windows, double-click the setup(x64).exe file in the Windows_64 folder.
  3. The Cisco Virtual Com InstallShield Wizard begins. Click Next.
  4. The Ready to Install the Program window appears. Click Install.
  5. The InstallShield Wizard Completed window appears. Click Finish.
  6. Connect the USB cable to the PC and the switch console port. The USB console port LED turns green, and the Found New Hardware Wizard appears. Follow the instructions to complete the driver installation.

DETAILED STEPS


Step 1

Obtain the Cisco USB console driver file from the Cisco.com web site and unzip it.

Note 

You can download the driver file from the Cisco.com site for downloading the switch software.

Windows 10 includes a USB to RS232 driver. However for added functionality, download the USB Console Software from the Software Download Center for Catalyst 3850 Series Switches at cisco.com.

Step 2

If using 32-bit Windows, double-click the setup.exe file in the Windows_32 folder. If using 64-bit Windows, double-click the setup(x64).exe file in the Windows_64 folder.

Step 3

The Cisco Virtual Com InstallShield Wizard begins. Click Next.

Step 4

The Ready to Install the Program window appears. Click Install.

Note 

If a User Account Control warning appears, click Allow - I trust this program to proceed.

Step 5

The InstallShield Wizard Completed window appears. Click Finish.

Step 6

Connect the USB cable to the PC and the switch console port. The USB console port LED turns green, and the Found New Hardware Wizard appears. Follow the instructions to complete the driver installation.


Uninstalling the Cisco Microsoft Windows USB Driver

Uninstalling the Cisco Microsoft Windows XP and 2000 USB Driver

Use the Windows Add or Remove Programs utility or the setup.exe file.

Using the Setup.exe Program

Before you begin

Disconnect the switch console terminal before uninstalling the driver.

SUMMARY STEPS

  1. Run setup.exe for Windows 32-bit or setup(x64).exe for Windows-64bit. Click Next.
  2. The InstallShield Wizard for Cisco Virtual Com appears. Click Next.
  3. When the Program Maintenance window appears, select the Remove radio button. Click Next.
  4. When the Remove the Program window appears, click Remove.
  5. When the InstallShield Wizard Completed window appears, click Finish.

DETAILED STEPS


Step 1

Run setup.exe for Windows 32-bit or setup(x64).exe for Windows-64bit. Click Next.

Step 2

The InstallShield Wizard for Cisco Virtual Com appears. Click Next.

Step 3

When the Program Maintenance window appears, select the Remove radio button. Click Next.

Step 4

When the Remove the Program window appears, click Remove.

Step 5

When the InstallShield Wizard Completed window appears, click Finish.


Using the Add or Remove Programs Utility

Before you begin

Disconnect the switch console terminal before uninstalling the driver.

SUMMARY STEPS

  1. Click Start > Control Panel > Add or Remove Programs.
  2. Scroll to Cisco Virtual Com and click Remove.
  3. When the Program Maintenance window appears, select the Remove radio button. Click Next.

DETAILED STEPS


Step 1

Click Start > Control Panel > Add or Remove Programs.

Step 2

Scroll to Cisco Virtual Com and click Remove.

Step 3

When the Program Maintenance window appears, select the Remove radio button. Click Next.


Uninstalling the Cisco Microsoft Windows USB Driver

Before you begin

Disconnect the switch console terminal before uninstalling the driver.

SUMMARY STEPS

  1. Run setup.exe for Windows 32-bit or setup(x64).exe for Windows-64bit. Click Next.
  2. The InstallShield Wizard for Cisco Virtual Com appears. Click Next.
  3. When the Program Maintenance window appears, select the Remove radio button. Click Next.
  4. When the Remove the Program window appears, click Remove.
  5. When the InstallShield Wizard Completed window appears, click Finish.

DETAILED STEPS


Step 1

Run setup.exe for Windows 32-bit or setup(x64).exe for Windows-64bit. Click Next.

Step 2

The InstallShield Wizard for Cisco Virtual Com appears. Click Next.

Step 3

When the Program Maintenance window appears, select the Remove radio button. Click Next.

Step 4

When the Remove the Program window appears, click Remove.

Note 

If a User Account Control warning appears, click Allow - I trust this program to proceed.

Step 5

When the InstallShield Wizard Completed window appears, click Finish.