Configuring the Switch Using the Web User Interface
For instructions on setting up the switch using the WebUI, refer to the required version of the . In the guide, go to Configuring the Switch Using the Web User Interface.
The documentation set for this product strives to use bias-free language. For the purposes of this documentation set, bias-free is defined as language that does not imply discrimination based on age, disability, gender, racial identity, ethnic identity, sexual orientation, socioeconomic status, and intersectionality. Exceptions may be present in the documentation due to language that is hardcoded in the user interfaces of the product software, language used based on RFP documentation, or language that is used by a referenced third-party product. Learn more about how Cisco is using Inclusive Language.
For instructions on setting up the switch using the WebUI, refer to the required version of the . In the guide, go to Configuring the Switch Using the Web User Interface.
Configuring the Switch Using the CLI
You can access the CLI on a configured or unconfigured switch by connecting the RJ-45 console port or USB console port of the switch to your PC or workstation and accessing the switch through a terminal emulation program.
 Note |
If you have stacked your switches, connect to the console port of one of the switches in the stack. You can initially configure the entire stack from any member switch. |
|
Step 1 |
Connect the RJ45 port adapter to the serial port on the terminal server or your PC using the optional RJ45-to-DB9 adapter cable. Connect the other end of the cable to the switch console port. |
|
Step 2 |
Start the terminal-emulation program on the PC or the terminal. The program, frequently a PC application such as Putty or TeraTerm, makes communication between the switch and your PC or terminal possible. |
|
Step 3 |
Configure the baud rate and character format of the PC or terminal to match the console port default characteristics:
|
|
Step 4 |
Power on the switch. |
|
Step 5 |
The PC or terminal displays the bootloader sequence. Press Enter to display the setup prompt. |
|
Step 1 |
If you are connecting the switch USB console port to a Windows-based PC for the first time, install the USB driver. See Installing the Cisco Microsoft Windows USB Device Driver. .


|
||||||||||
|
Step 2 |
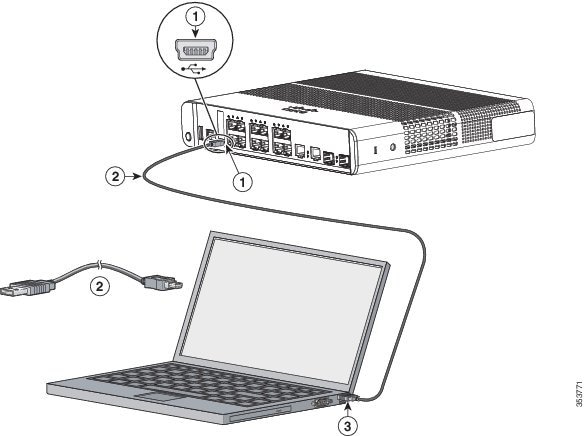
Connect a USB cable to the PC USB port. Connect the other end of the cable to the switch mini-B (5-pin-connector) USB console port. |
||||||||||
|
Step 3 |
Start the terminal-emulation program on the PC or the terminal. The program, frequently a PC application such as Putty or TeraTerm, makes communication between the switch and your PC or terminal possible. |
||||||||||
|
Step 4 |
Configure the baud rate and character format of the PC or terminal to match the console port default characteristics:
|
||||||||||
|
Step 5 |
Power on the switch as described in the switch getting started guide. |
||||||||||
|
Step 6 |
The PC or terminal displays the bootloader sequence. Press Enter to display the setup prompt. Follow the steps in the Setup program. |
A USB device driver must be installed the first time a Microsoft Windows-based PC is connected to the USB console port on the switch.
|
Step 1 |
Obtain the Cisco USB console driver file from the Cisco.com web site and unzip it.
Windows 10 includes a USB to RS232 driver. However for added functionality, download the USB Console Software from the Software Download Center for Catalyst 3850 Series Switches at cisco.com. |
||
|
Step 2 |
If using 32-bit Windows, double-click the setup.exe file in the Windows_32 folder. If using 64-bit Windows, double-click the setup(x64).exe file in the Windows_64 folder. |
||
|
Step 3 |
The Cisco Virtual Com InstallShield Wizard begins. Click Next. |
||
|
Step 4 |
The Ready to Install the Program window appears. Click Install.
|
||
|
Step 5 |
The InstallShield Wizard Completed window appears. Click Finish. |
||
|
Step 6 |
Connect the USB cable to the PC and the switch console port. The USB console port LED turns green, and the Found New Hardware Wizard appears. Follow the instructions to complete the driver installation. |
Disconnect the switch console terminal before uninstalling the driver.
|
Step 1 |
Run setup.exe for Windows 32-bit or setup(x64).exe for Windows-64bit. Click Next. |
||
|
Step 2 |
The InstallShield Wizard for Cisco Virtual Com appears. Click Next. |
||
|
Step 3 |
When the Program Maintenance window appears, select the Remove radio button. Click Next. |
||
|
Step 4 |
When the Remove the Program window appears, click Remove.
|
||
|
Step 5 |
When the InstallShield Wizard Completed window appears, click Finish. |
 Feedback