Configuring Identity Control Policies
Identity control policies define the actions that Cisco Identity Based Networking Services (IBNS) takes in response to specified conditions and subscriber events. A variety of system actions, conditions, and events can be combined using a consistent policy language. This module provides information about how to configure identity control policies for Cisco IBNS.
Information About Identity Control Policies
Cisco Identity Based Networking Services Configuration
To convert all relevant authentication commands to their Class-Based Policy Language(CPL) control policy equivalents, use the authentication convert-to new-style command. This command permanently converts the legacy configuration on the switch to identity-based networking services.
 Note |
This configuration is irreversible. It disables the conversion command – authentication display [legacy | new-style] . |
Use the authentication display config-mode command in EXEC mode to display the current configuration mode; legacy if it is legacy mode and new-style if it is Identity-Based Networking Services configuration mode.
(Device)# authentication display config-mode
Current configuration mode is legacy

Device)# authentication display config-mode
Current configuration mode is new-style
Concurrent Authentication Methods
Cisco IBNS allows the concurrent operation of IEEE 802.1x (dot1x), MAC authentication bypass (MAB), and web authentication methods, making it possible to invoke multiple authentication methods in parallel on a single subscriber session. This allows the client-supported method to complete at the earliest opportunity without the delays associated with serialization.
Typically, the access control method that is used to authorize a host is left up to the endpoint. For example, a printer without an 802.1x supplicant would be authorized through MAB only, an employee desktop through 802.1x only, and a guest through web authentication only. The default priority order is 802.1x, followed by MAB, then web authentication. When method priorities are the same, the first method that successfully authenticates the session prevails.
An example in which more than one method may succeed during the lifetime of a session is when MAB is used to provide interim access pending success of 802.1x. A host could be also be given interim access to a web server to allow credentials to be updated so that 802.1x can succeed after an authentication failure.
Configuration Display Mode
Identity-Based Networking Services introduces new Cisco IOS commands that replace many of the previously supported authentication and policy commands. These commands are available only after enabling the Cisco common classification policy language (C3PL) display mode that supports Identity-Based Networking Services. Identity-Based Networking Services features such as concurrent authentication and web authentication with IPv6 are not supported in legacy mode.
The device defaults to the legacy configuration mode until you do one of the following:
-
Enter the authentication display new-style command—This command switches to C3PL display mode, temporarily converting your legacy configuration to a Identity-Based Networking Services configuration so you can see how it looks before you make the conversion permanent. You can switch back to legacy mode by using the authentication display legacy command. See the Enabling the Display Mode for Cisco Identity Based Networking Services section.
-
Enter a Identity-Based Networking Services configuration command—After you enter the first explicit Identity-Based Networking Services command, the configuration converts to C3PL display mode permanently and legacy commands are suppressed. The authentication display command is disabled and you can no longer revert to the legacy configuration mode.
Control Policies for Cisco Identity Based Networking Services
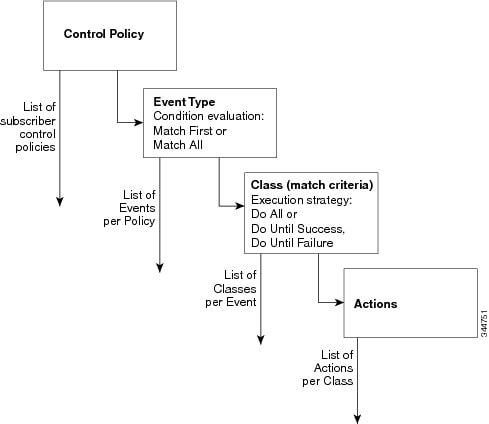
A control policy defines the handling of different subscriber life-cycle events. For various events, such as session start or session failure, you can specify actions in the control policy. These actions can be executed conditionally for different subscribers based on various match criteria. Control policies are activated on interfaces and typically control the authentication of subscriber identity and the activation of services on sessions. For example, you can configure a control policy to authenticate specific subscribers and then provide them with access to specific services.
A control policy consists of one or more control policy rules and a decision strategy that governs how the policy rules are evaluated. A control policy rule consists of a control class (a flexible condition clause), an event for which the condition is evaluated, and one or more actions. Actions are general system functions, such as authenticate or activate. You define the specific actions that an event will trigger and some events have default actions.
The figure below illustrates how each control policy contains a list of events that are considered applicable to the subscriber life cycle. Within each event type is a list of control classes with different match criteria for subscriber identity, and under each class is a list of actions to be executed.
Control Policy Configuration Overview
Control policies express system functionality in terms of an event, a condition, and an action. There are three steps in defining a control policy:
-
Create one or more control classes—A control class specifies the conditions that must be met for a control policy to be activated. A control class can contain multiple conditions, each of which will evaluate as either true or false. Match directives specify whether all, any, or none of the individual conditions must evaluate true for the class to evaluate true. Or, you can specify the default control class which does not contain any conditions and always evaluates true.
-
Create a control policy—A control policy contains one or more control policy rules. A control policy rule consists of a control class, an event that causes the class to be evaluated, and one or more actions. Actions are numbered and executed sequentially.
-
Apply the control policy—A control policy is activated by applying it to an interface.
Parameter Maps for Cisco Identity Based Networking Services
A parameter map allows you to specify parameters that control the behavior of actions specified under a control policy. For Cisco IBNS, an authentication parameter map defines parameters used for the action specified with the authenticate using webauth command. You can configure the following types of parameter maps:
-
Authentication bypass (This is also called nonresponsive host [NRH] authentication.)
-
Consent
-
Web authentication
-
Web authentication with consent
Parameter maps are optional. If you do not configure a named parameter map, the software uses the default parameters that are specified in the global parameter map.
Per User Inactivity Handling Across Methods
A common inactivity aging feature extends support for RADIUS attributes 28 (Idle-Timeout) and attribute 29 (Termination-Action) to web authenticated sessions, providing consistent inactivity handling across all authentication methods, including 802.1x, MAC authentication bypass (MAB), and web authentication. The AAA server sends these attributes as part of the user authorization. After a session has been idle for the amount of time specified in attribute 28, or has reached the timeout configured with attribute 29, the session is terminated.
You can also apply the inactivity timeout and absolute timeout to sessions through a locally defined service template. When enabling the inactivity timeout, you can also enable address resolution protocol (ARP) probes that are sent before the session is terminated. For configuration information, see the Configuring Identity Service Templates module.
How to Configure Identity Control Policies
Enabling the Display Mode for Cisco Identity Based Networking Services
Cisco IBNS features are configured in the Cisco common classification policy language (C3PL) display mode. The legacy authentication manager mode is enabled by default. You can use the following procedure to switch to C3PL display mode and temporarily convert any legacy configuration commands to their C3PL equivalents. This allows you to preview your legacy configuration as a Identity-Based Networking Services configuration before making the conversion permanent. After you enter an explicit Cisco IBNS command, the conversion becomes permanent and you can no longer revert to legacy mode.
Procedure
| Command or Action | Purpose | |||
|---|---|---|---|---|
|
Step 1 |
enable Example: |
Enables privileged EXEC mode.
|
||
|
Step 2 |
authentication display {legacy | new-style} Example: |
Sets the display mode for authentication and policy configuration.
|
Configuring a Control Class
A control class defines the conditions under which the actions of a control policy are executed. You define whether all, any, or none of the conditions must evaluate true to execute the actions of the control policy. Control classes are evaluated based on the event specified in the control policy.
Note |
This procedure shows all of the match conditions that you can configure in a control class. You must specify at least one condition in a control class to make it valid. All other conditions, and their corresponding steps, are optional (steps 4 through 18 below). |
Procedure
| Command or Action | Purpose | |
|---|---|---|
|
Step 1 |
enable Example: |
Enables privileged EXEC mode.
|
|
Step 2 |
configure terminal Example: |
Enters global configuration mode. |
|
Step 3 |
class-map type control subscriber {match-all | match-any | match-none} control-class-name Example: |
Creates a control class and enters control class-map filter mode.
|
|
Step 4 |
{match | no-match} activated-service-template template-name Example: |
(Optional) Creates a condition that evaluates true based on the service template activated on a session. |
|
Step 5 |
{match | no-match} authorization-status {authorized | unauthorized} Example: |
(Optional) Creates a condition that evaluates true based on a session's authorization status. |
|
Step 6 |
{match | no-match} authorizing-method-priority {eq | gt | lt} priority-value Example: |
(Optional) Creates a condition that evaluates true based on the priority of the authorization method.
|
|
Step 7 |
{match | no-match} client-type {data | switch | video | voice} Example: |
(Optional) Creates a condition that evaluates true based on an event’s device type. |
|
Step 8 |
{match | no-match} current-method-priority {eq | gt | lt} priority-value Example: |
(Optional) Creates a condition that evaluates true based on the priority of the current authentication method. |
|
Step 9 |
{match | no-match} ip-address ip-address Example: |
(Optional) Creates a condition that evaluates true based on an event’s source IPv4 address. |
|
Step 10 |
{match | no-match} ipv6-address ipv6-address Example: |
(Optional) Creates a condition that evaluates true based on an event’s source IPv6 address. |
|
Step 11 |
{match | no-match} mac-address mac-address Example: |
(Optional) Creates a condition that evaluates true based on an event’s MAC address. |
|
Step 12 |
{match | no-match} method {dot1x | mab | webauth} Example: |
(Optional) Creates a condition that evaluates true based on an event’s authentication method. |
|
Step 13 |
{match | no-match} port-type {l2-port | l3-port | dot11-port} Example: |
(Optional) Creates a condition that evaluates true based on an event’s interface type. |
|
Step 14 |
{match | no-match} result-type [method {dot1x | mab | webauth}] result-type Example: |
(Optional) Creates a condition that evaluates true based on the specified authentication result.
|
|
Step 15 |
{match | no-match} service-template template-name Example: |
(Optional) Creates a condition that evaluates true based on an event’s service template. |
|
Step 16 |
{match | no-match} tag tag-name Example: |
(Optional) Creates a condition that evaluates true based on the tag associated with an event. |
|
Step 17 |
{match | no-match} timer timer-name Example: |
(Optional) Creates a condition that evaluates true based on an event’s timer. |
|
Step 18 |
{match | no-match} username username Example: |
(Optional) Creates a condition that evaluates true based on an event’s username. |
|
Step 19 |
end Example: |
(Optional) Exits control class-map filter configuration mode and returns to privileged EXEC mode. |
|
Step 20 |
show class-map type control subscriber {all | name control-class-name} Example: |
(Optional) Displays information about Identity-Based Networking Services control classes. |
Example: Control Class
The following example shows a control class that is configured with two match conditions:
class-map type control subscriber match-all DOT1X_NO_AGENT
 match method dot1x
 match result-type agent-not-found
Configuring a Control Policy
Control policies determine the actions that the system takes in response to specified events and conditions. The control policy contains one or more control policy rules that associate a control class with one or more actions. The actions that you can configure in a policy rule depend on the type of event that you specify.
Note |
This task includes all of the actions that you can configure in a control policy regardless of the event. All of these actions, and their corresponding steps, are optional (steps 6 through 21 below). To display the supported actions for a particular event, use the question mark (?) online help function. |
Procedure
| Command or Action | Purpose | |
|---|---|---|
|
Step 1 |
enable Example: |
Enables privileged EXEC mode.
|
|
Step 2 |
configure terminal Example: |
Enters global configuration mode. |
|
Step 3 |
policy-map type control subscriber control-policy-name Example: |
Defines a control policy for subscriber sessions. |
|
Step 4 |
event event-name [match-all | match-first] Example: |
Specifies the type of event that triggers actions in a control policy if conditions are met.
|
|
Step 5 |
priority-number class {control-class-name | always} [do-all | do-until-failure | do-until-success] Example: |
Associates a control class with one or more actions in a control policy.
|
|
Step 6 |
action-number activate {policy type control subscriber control-policy-name [child [no-propagation | concurrent] | service-template template-name [aaa-list list-name] [precedence number] [replace-all]} Example: |
(Optional) Activates a control policy or service template on a subscriber session. |
|
Step 7 |
action-number authenticate using {dot1x | mab | webauth} [aaa {authc-list authc-list-name | authz-list authz-list-name]} [merge] [parameter-map map-name] [priority priority-number] [replace | replace-all] [retries number {retry-time seconds}] Example: |
(Optional) Initiates the authentication of a subscriber session using the specified method. |
|
Step 8 |
action-number authentication-restart seconds Example: |
(Optional) Sets a timer to restart the authentication process after an authentication or authorization failure. |
|
Step 9 |
action-number authorize Example: |
(Optional) Initiates the authorization of a subscriber session. |
|
Step 10 |
action-number clear-authenticated-data-hosts-on-port Example: |
(Optional) Clears authenticated data hosts on a port after an authentication failure. |
|
Step 11 |
action-number clear-session Example: |
(Optional) Clears an active subscriber session. |
|
Step 12 |
action-number deactivate {policy type control subscriber control-policy-name | service-template template-name} Example: |
(Optional) Deactivates a control policy or service template on a subscriber session. |
|
Step 13 |
action-number err-disable Example: |
(Optional)Temporarily disables a port after a session violation event. |
|
Step 14 |
action-number pause reauthentication Example: |
(Optional) Pauses reauthentication after an authentication failure. |
|
Step 15 |
action-number protect Example: |
(Optional) Silently drops violating packets after a session violation event. |
|
Step 16 |
action-number replace Example: |
(Optional) Clears the existing session and creates a new session after a violation event. |
|
Step 17 |
action-number restrict Example: |
(Optional) Drops violating packets and generates a syslog entry after a session violation event. |
|
Step 18 |
action-number resume reauthentication Example: |
(Optional) Resumes the reauthentication process after an authentication failure. |
|
Step 19 |
action-number set-timer timer-name seconds Example: |
(Optional) Starts a named policy timer. |
|
Step 20 |
action-number terminate {dot1x | mab | webauth} Example: |
(Optional) Terminates an authentication method on a subscriber session. |
|
Step 21 |
action-number unauthorize Example: |
(Optional) Removes all authorization data from a subscriber session. |
|
Step 22 |
end Example: |
(Optional) Exits control policy-map action configuration mode and returns to privileged EXEC mode. |
|
Step 23 |
show policy-map type control subscriber {all | name control-policy-name} Example: |
(Optional) Displays information about identity control policies. |
Example: Control Policy
The following example shows a simple control policy with the minimum configuration necessary for initiating authentication:
policy-map type control subscriber POLICY_1
 event session-started match-all
  10 class always do-until-failure
   10 authenticate using dot1x
For detailed examples of control policies for concurrent and sequential authentication, see the Configuration Examples for Cisco Identity-Based Control Policies section.
Applying a Control Policy to an Interface
Control policies typically control the authentication of subscriber identity and the activation of services on sessions. Perform this task to apply a control policy to an interface.
Procedure
| Command or Action | Purpose | |
|---|---|---|
|
Step 1 |
enable Example: |
Enables privileged EXEC mode.
|
|
Step 2 |
configure terminal Example: |
Enters global configuration mode. |
|
Step 3 |
interface type number Example: |
Specifies an interface and enters interface configuration mode. |
|
Step 4 |
service-policy type control subscriber control-policy-name Example: |
Applies a previously configured control policy.
|
|
Step 5 |
subscriber aging {inactivity-timer seconds [probe] | probe} Example: |
Enables an inactivity timer for subscriber sessions. Starting with Cisco IOS XE Everest 16.5.1a if you configure this command, you must also configure the device-tracking binding reachable-lifetime command in global configuration mode, for probes to work as expected. Configure a reachable lifetime with the same value as the inactivity timer probe. This way, when the reachable lifetime expires, the state of the entry changes based on the reachability of the host. For more information, see the device-tracking binding command in the command reference of the corresponding release. |
Example: Applying a Control Policy to an Interface
interface GigabitEthernet 1/0/2
 subscriber aging inactivity-timer 60 probe
 device-tracking binding reachable-lifetime 60
 service-policy type control subscriber POLICY_1
Configuring Authentication Features on Ports
Perform this task to control access to a port, including the port authorization state, host access mode, preauthentication access, and the authentication direction.
Procedure
| Command or Action | Purpose | |
|---|---|---|
|
Step 1 |
enable Example: |
Enables privileged EXEC mode.
|
|
Step 2 |
configure terminal Example: |
Enters global configuration mode. |
|
Step 3 |
interface type number Example: |
Enters interface configuration mode for the selected interface. |
|
Step 4 |
access-session port-control {auto | force-authorized | force-unauthorized} Example: |
Sets the authorization state of a port.
|
|
Step 5 |
access-session host-mode {multi-auth | multi-domain | multi-host | single-host} Example: |
Allows hosts to gain access to a controlled port.
|
|
Step 6 |
access-session closed Example: |
Prevents preauthentication access on this port.
|
|
Step 7 |
access-session control-direction {both | in} Example: |
Sets the direction of authentication control on a port.
|
|
Step 8 |
end Example: |
Exits interface configuration mode and returns to privileged EXEC mode. |
|
Step 9 |
show access-session interface interface-type interface-number [details] Example: |
Displays information about subscriber sessions that match the specified client interface. |
Example: Port Authentication
interface GigabitEthernet 1/0/2
 access-session host-mode single-host
 access-session closed
 access-session port-control auto
 access-session control-direction in
Configuring a Parameter Map for Web-Based Authentication
A parameter map allows you to modify parameters that control the behavior of actions configured under a control policy. A parameter map for web-based authentication sets parameters that can be applied to subscriber sessions during authentication. If you do not create a parameter map, the policy uses default parameters.
Perform the following steps to define either a global or named parameter map for web-based authentication.
Note |
The configuration commands available in the global parameter map differ from the commands available in a named parameter map. |
Procedure
| Command or Action | Purpose | |
|---|---|---|
|
Step 1 |
enable Example: |
Enables privileged EXEC mode.
|
|
Step 2 |
configure terminal Example: |
Enters global configuration mode. |
|
Step 3 |
parameter-map type webauth {parameter-map-name | global} Example: |
Creates a parameter map and enters parameter-map webauth configuration mode.
|
|
Step 4 |
banner {file location:filename | text banner-text} Example: |
(Optional) Displays a banner on the web-authentication login web page. |
|
Step 5 |
consent Example: |
(Optional) Defines the methods supported by a web-based authentication parameter map.
|
|
Step 6 |
consent email Example: |
(Optional) Requests a user’s e-mail address on the web-authentication login web page.
|
|
Step 7 |
custom-page {failure | login [expired] | success} device location:filename Example: |
(Optional) Displays custom authentication proxy web pages during web-based authentication.
|
|
Step 8 |
max-http-conns number Example: |
(Optional) Limits the number of HTTP connections for each web authentication client. |
|
Step 9 |
redirect {{for-login | on-failure | on-success} url | portal {ipv4 ipv4-address | ipv6 ipv6-address}} Example: |
(Optional) Redirects users to a particular URL during web-based authentication. |
|
Step 10 |
timeout init-state sec seconds Example: |
(Optional) Sets the Init state timeout for web-based authentication sessions.
|
|
Step 11 |
type {authbypass | consent | webauth | webconsent} Example: |
(Optional) Defines the methods supported by a web-based authentication parameter map.
|
|
Step 12 |
virtual-ip {ipv4 ipv4-address | ipv6 ipv6-address} Example: |
(Optional) Specifies a virtual IP address for web-based authentication clients.
|
|
Step 13 |
watch-list {add-item {ipv4 ipv4-address | ipv6 ipv6-address} | dynamic-expiry-timeout minutes | enabled} Example: |
(Optional) Enables a watch list of web-based authentication clients.
|
|
Step 14 |
end Example: |
(Optional) Exits parameter-map configuration mode and returns to privileged EXEC mode. |
|
Step 15 |
show ip admission status [banners | custom-pages | parameter-map [parameter-map]] Example: |
(Optional) Displays information about configured banners and custom pages. |
Example: Parameter Map for Web-Based Authentication
parameter-map type webauth PMAP_2
 type webconsent
 timeout init-state sec 60
 max-http-conns 5
 type consent
 consent email
 custom-page login device flash:webauth_login.html
 custom-page success device flash:webauth_success.html
 custom-page failure device flash:webauth_fail.html
 custom-page login expired device flash:webauth_expire.html
What to do next
Apply the parameter map to sessions by specifying it in the authenticate using command when configuring a Control Policy. See the Configuring a Control Policy section.
Configuration Examples for Cisco Identity-Based Control Policies
Example: Configuring Control Policy for Concurrent Authentication Methods
The following example shows a control policy that is configured to allow concurrent authentication. All three methods (dot1x, MAB, and web authentication) are run simultaneously when a session is started. The dot1x method is set to the highest priority and web authentication has the lowest priority, which means that if multiple methods succeed, the highest priority method is honored.
If authentication fails, the session manager checks whether all methods have failed, and if so, it sets the restart timer to 60 seconds, after which it attempts to start all three methods again. On authentication success, the session manager terminates any lower priority methods; for dot1x, this is MAB and webauth; for MAB it is webauth. Lastly, if session manager detects a dot1x client (agent-found) it triggers only dot1x to run.
The class map named ALL-FAILED checks that all three methods have run to completion (result type is none until then) and that none of them was successful. In other words, all three methods have completed and failed.
Note |
When configuring a control policy for concurrent authentication, you must include a policy rule that explicitly terminates one method after another method of a higher priority succeeds. |
class-map type control subscriber match-all ALL_FAILED
 no-match result-type method dot1x none
 no-match result-type method dot1x success
 no-match result-type method mab none
 no-match result-type method mab success
 no-match result-type method webauth none
 no-match result-type method webauth success
!
class-map type control subscriber match-all DOT1X
 match method dot1x
!
class-map type control subscriber match-all MAB
 match method mab
!
policy-map type control subscriber CONCURRENT_DOT1X_MAB_WEBAUTH
	event session-started match-all
	 10 class always do-until-failure
	  10 authenticate using mab priority 20
	  20 authenticate using dot1x priority 10
	  30 authenticate using webauth parameter-map WEBAUTH_DEFAULT priority 30
	event authentication-failure match-first
	 10 class ALL_FAILED
   10 authentication-restart 60
 event authentication-success match-all
  10 class DOT1X
   10 terminate MAB
   20 terminate webauth
  20 class MAB
   10 terminate webauth
 event agent-found match-all
  10 class always do-until-failure
   10 authenticate using dot1x priority 10
Example: Configuring Control Policy for Sequential Authentication Methods
The following example shows a control policy that is configured to allow sequential authentication methods using 802.1X (dot1x), MAB, and web authentication.
parameter-map type webauth WEBAUTH_FALLBACK
	type webauth
!
class-map type control subscriber match-all DOT1X_NO_RESP
 match method dot1x
 match result-type method dot1x agent-not-found
!
class-map type control subscriber match-all MAB_FAILED
 match method mab
 match result-type method mab authoritative
!
policy-map type control subscriber POLICY_Gi3/0/10
	event session-started match-all
	 10 class always do-until-failure
	  10 authenticate using dot1x priority 10
	event authentication-failure match-first
	 10 class DOT1X_NO_RESP do-until-failure
	  10 terminate dot1x
	  20 authenticate using mab priority 20
	 20 class MAB_FAILED do-until-failure
	  10 terminate mab
	  20 authenticate using webauth parameter-map WEBAUTH_FALLBACK priority 30
	 30 class always do-until-failure
	  10 terminate dot1x
	  20 terminate mab
	  30 terminate webauth
	  40 authentication-restart 60
	event agent-found match-all
	 10 class always do-until-failure
	  10 terminate mab
	  20 terminate webauth
	  30 authenticate using dot1x priority 10
The following example shows a control policy that is configured to allow sequential authentication methods using 802.1X and MAB. If authentication fails, a service template for VLAN is activated.
service-template VLAN210
	vlan 210
!
class-map type control subscriber match-all DOT1X_FAILED
 match method dot1x
 match result-type method dot1x authoritative
!
class-map type control subscriber match-all DOT1X_NO_RESP
 match method dot1x
 match result-type method dot1x agent-not-found
!
class-map type control subscriber match-all MAB_FAILED
 match method mab
 match result-type method mab authoritative
!
policy-map type control subscriber POLICY_Gi3/0/14
	event session-started match-all
	 10 class always do-until-failure
	  10 authenticate using dot1x retries 2 retry-time 0 priority 10
	event authentication-failure match-first
	 10 class DOT1X_NO_RESP do-until-failure
	  10 terminate dot1x
	  20 authenticate using mab priority 20
	 20 class MAB_FAILED do-until-failure
	  10 terminate mab
	  20 activate service-template VLAN210
	  30 authorize
	 30 class DOT1X_FAILED do-until-failure
	  10 terminate dot1x
	  20 authenticate using mab priority 20
	 40 class always do-until-failure
	  10 terminate dot1x
	  20 terminate mab
	  30 authentication-restart 60
	event agent-found match-all
	 10 class always do-until-failure
	  10 terminate mab
	  20 authenticate using dot1x retries 2 retry-time 0 priority 10
Example: Configuring Parameter Maps
Global Parameter Map
The following example shows the configuration of a global parameter map:
parameter-map type webauth global
 timeout init-state sec 15
 watch-list enabled
 virtual-ip ipv6 FE80::1
 redirect on-failure http://10.10.3.34/~sample/failure.html
 max-http-conns 100
 watch-list dynamic-expiry-timeout 5000
 banner file flash:webauth_banner.html
Named Parameter Maps for Web Authentication and Authentication Bypass (nonresponsive host [NRH])
The following example shows the configuration of two named parameter maps; one for web authentication and one for authentication bypass. This example also shows the corresponding control policy configuration.
parameter-map type webauth WEBAUTH_BANNER
 type webauth
 banner
!
parameter-map type webauth WEBAUTH_NRH
 type authbypass
!
class-map type control subscriber match-all NRH_FAIL
 match method webauth
 match current-method-priority eq 254
!
policy-map type control subscriber WEBAUTH_NRH
 event session-started match-all
  10 class always do-until-failure
   10 authenticate using webauth parameter-map WEBAUTH_NRH priority 254
 event authentication-failure match-all
  10 class NRH_FAIL do-until-failure
   10 terminate webauth
   20 authenticate using webauth parameter-map WEBAUTH_BANNER priority 30
Named Parameter Map for Web Authentication Using Custom Pages
The following example shows the configuration of a named parameter map for web authentication that defines custom pages for the login process, along with a control policy that uses the parameter map.
parameter-map type webauth CUSTOM_WEBAUTH
 type webauth
 custom-page login device flash:login_page.htm
 custom-page success device flash:success_page.htm
 custom-page failure device flash:fail_page.htm
 custom-page login expired device flash:expire_page.htm
!
policy-map type control subscriber CUSTOM_WEBAUTH
 event session-started match-all
  10 class always do-until-failure
   10 authenticate using webauth parameter-map CUSTOM_WEB retries 2 retry-time 0
Named Parameter Map for Consent
The following example shows the configuration of a named parameter map for consent, along with the corresponding control policy that uses the parameter map:
parameter-map type webauth CONSENT
 type consent
!
ip access-list extended GUEST_ACL
 permit ip any 172.30.30.0 0.0.0.255
 permit ip any host 172.20.249.252
!
service-template GUEST_POLICY
 access-group GUEST_ACL
!
policy-map type control subscriber CONSENT
 event session-started match-all
  10 class always do-until-failure
   10 authenticate using webauth parameter-map CONSENT
 event authentication-success match-all
  10 class always do-until-failure
   10 activate service-template GUEST_POLICY
Named Parameter Map for Web Authentication with Consent
The following example shows the configuration of a named parameter map for web authentication with consent, along with the corresponding control policy that uses the parameter map:
parameter-map type webauth WEBAUTH_CONSENT
 type webconsent
!
ip access-list extended GUEST_ACL
 permit ip any 172.30.30.0 0.0.0.255
 permit ip any host 172.20.249.252
!
service-template GUEST_POLICY
 access-group GUEST_ACL
!
policy-map type control subscriber WEBAUTH_CONSENT
 event session-started match-all
  10 class always do-until-failure
   10 authenticate using webauth parameter-map CONSENT
 event authentication-success match-all
  10 class always do-until-failure
10 activate service-template GUEST_POLICY Feedback