The documentation set for this product strives to use bias-free language. For the purposes of this documentation set, bias-free is defined as language that does not imply discrimination based on age, disability, gender, racial identity, ethnic identity, sexual orientation, socioeconomic status, and intersectionality. Exceptions may be present in the documentation due to language that is hardcoded in the user interfaces of the product software, language used based on RFP documentation, or language that is used by a referenced third-party product. Learn more about how Cisco is using Inclusive Language.
Network Address Translation (NAT) is designed for IP address conservation. It enables private IP networks that use unregistered
IP addresses to connect to the Internet. NAT operates on a device, usually connecting two networks together, and translates
the private (not globally unique) addresses in the internal network into global routable addresses, before packets are forwarded
onto another network.
NAT can be configured to advertise only one address for the entire network to the outside world. This ability provides additional
security by effectively hiding the entire internal network behind that one address. NAT offers the dual functions of security
and address conservation and is typically implemented in remote-access environments.
NAT is also used at the enterprise edge to allow internal users access to the Internet and to allow Internet access to internal
devices such as mail servers.
Cisco Catalyst 9300 Series Switch supports Stacking and NAT is supported on a stack set-up.
Benefits of Configuring NAT
Resolves the problem of IP depletion.
NAT allows organizations to resolve the problem of IP address depletion when they have existing networks and need to access
the Internet. Sites that do not yet possess Network Information Center (NIC)-registered IP addresses must acquire IP addresses,
and if more than 254 clients are present or are planned, the scarcity of Class B addresses becomes a serious issue. NAT addresses
these issues by mapping thousands of hidden internal addresses to a range of easy-to-get Class C addresses.
Provides a layer of security by preventing the client IP address from being exposed to the outside network.
Sites that already have registered IP addresses for clients on an internal network may want to hide those addresses from the
Internet so that hackers cannot directly attack clients. With client addresses hidden, a degree of security is established.
NAT gives LAN administrators complete freedom to expand Class A addressing, which is drawn from the reserve pool of the Internet
Assigned Numbers Authority. The expansion of Class A addresses occurs within the organization without a concern for addressing
changes at the LAN or the Internet interface.
Cisco software can selectively or dynamically perform NAT. This flexibility allows network administrator to use RFC 1918 addresses
or registered addresses.
NAT is designed for use on a variety of devices for IP address simplification and conservation. In addition, NAT allows the
selection of internal hosts that are available for translation.
A significant advantage of NAT is that it can be configured without requiring any changes to devices other than to those few
devices on which NAT will be configured.
How NAT Works
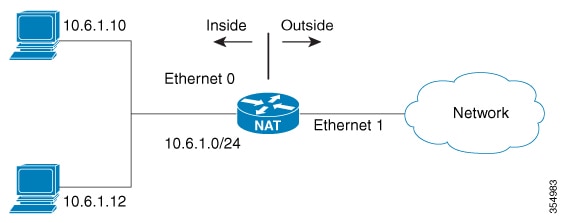
A device that is configured with NAT will have at least one interface to the inside network and one to the outside network.
In a typical environment, NAT is configured at the exit device between a stub domain and the backbone. When a packet leaves
the domain, NAT translates the locally significant source address into a globally unique address. When a packet enters the
domain, NAT translates the globally unique destination address into a local address. Multiple inside networks could be connected
to the device and similarly there might exist multiple exit points from the device towards outside networks. If NAT cannot
allocate an address because it has run out of addresses, it drops the packet and sends an Internet Control Message Protocol
(ICMP) host unreachable packet to the destination.
Translation and forwarding are performed in the hardware switching plane, thereby improving the overall throughput performance.
For more details on performance, refer the section on Performance and Scale Numbers for NAT.
Figure 1. NAT
Uses of NAT
NAT can be used for the following scenarios:
To connect to the Internet when only a few of your hosts have globally unique IP address.
NAT is configured on a device at the border of a stub domain (referred to as the inside network) and a public network such
as the Internet (referred to as the outside network). NAT translates internal local addresses to globally unique IP addresses
before sending packets to the outside network. As a solution to the connectivity problem, NAT is practical only when relatively
few hosts in a stub domain communicate outside of the domain at the same time. When this is the case, only a small subset
of the IP addresses in the domain must be translated into globally unique IP addresses when outside communication is necessary,
and these addresses can be reused
Renumbering:
Instead of changing the internal addresses, which can be a considerable amount of work, you can translate them by using NAT.
NAT Inside and Outside Addresses
The term inside in a NAT context refers to networks owned by an organization that must be translated. When NAT is configured, hosts within
this network will have addresses in one space (known as the local address space) that will appear to those outside the network
as being in another space (known as the global address space).
Similarly, the term outside refers to those networks to which the stub network connects, and which are generally not under
the control of an organization. Hosts in outside networks can also be subject to translation, and can thus have local and
global addresses.
NAT uses the following definitions:
Inside local address—an IP address that is assigned to a host on the inside network. The address is probably not a routable
IP address assigned by NIC or service provider.
Inside global address—a global routable IP address (assigned by the NIC or service provider) that represents one or more inside
local IP addresses to the outside world.
Outside local address—the IP address of an outside host as it appears to the inside network. Not necessarily a routable IP
address, it is allocated from the address space that is routable on the inside.
Outside global address—the IP address assigned to a host on the outside network by the owner of the host. The address is allocated
from a globally routable address or network space.
Inside Source Address Translation—translates an inside local address to inside global address.
Outside Source Address Translation—translates the outside global address to outside local address.
Static Port Translation—translates the IP address and port number of an inside/outside local address to the IP address and
port number of the corresponding inside/outside global address.
Static Translation of a given subnet—translates a specified range of subnets of an inside/outside local address to the corresponding
inside/outside global address.
Half Entry—represents a mapping between the local and global address/ports and is maintained in the translation database of
NAT module. A half entry may be created statically or dynamically based on the configured NAT rule.
Full Entry/Flow entry—represents a unique flow corresponding to a given session. In addition to the local to global mapping,
it also maintains the destination information which fully qualifies the given flow. A Full entry is always created dynamically
and maintained in the translation database of NAT module.
Types of NAT
You can configure NAT such that it will advertise only a single address for your entire network to the outside world. Doing
this effectively hides the internal network from the world, giving you some additional security.
The types of NAT include:
Static address translation (static NAT)—Allows one-to-one mapping between local and global addresses.
Dynamic address translation (dynamic NAT)—Maps unregistered IP addresses to registered IP addresses from a pool of registered
IP addresses.
Overloading / PAT—Maps multiple unregistered IP addresses to a single registered IP address (many to one) using different
Layer 4 ports. This method is also known as Port Address Translation (PAT). By using overloading, thousands of users can be
connected to the Internet by using only one real global IP address.
Using NAT to Route Packets to the Outside Network (Inside Source Address Translation)
You can translate unregistered IP addresses into globally unique IP addresses when communicating outside your network.
You can configure static or dynamic inside source address translation as follows:
Static translation establishes a one-to-one mapping between the inside local address and an inside global address. Static
translation is useful when a host on the inside must be accessible by a fixed address from the outside. Static translation
can be enabled by configuring a static NAT rule as explained in the Configuring Static Translation of Inside Source Addresses section.
Dynamic translation establishes a mapping between an inside local address and a pool of global addresses dynamically. Dynamic
translation can be enabled by configuring a dynamic NAT rule and the mapping is established based on the result of the evaluation
of the configured rule at run-time. You can employ an Access Control List (ACL), both Standarad and Extended ACLs, to specify
the inside local address. The inside global address can be specified through an address pool or an interface. Dynamic translation
is enabled by configuring a dynamic rule as explained in the Configuring Dynamic Translation of Inside Source Addresses section.
The following figure illustrates a device that is translating a source address inside a network to a source address outside
the network.
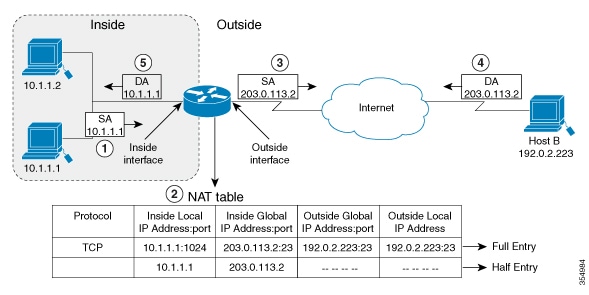
Figure 2. NAT Inside Source Translation
The following process describes the inside source address translation, as shown in the figure above:
The user at host 10.1.1.1 opens a connection to Host B in the outside network.
NAT module intercepts the corresponding packet and attempts to translate the packet.
The following scenarios are possible based on the presence or absence of a matching NAT rule:
If a matching static translation rule exists, the packet gets translated to the corresponding inside global address. Otherwise,
the packet is matched against the dynamic translation rule and in the event of a successful match, it gets translated to the
corresponding inside global address. The NAT module inserts a fully qualified flow entry corresponding to the translated packet,
into its translation database. This facilitates fast translation and forwarding of the packets corresponding to this flow,
in either direction.
The packet gets forwarded without any address translation in the absence of a successful rule match.
The packet gets dropped in the event of failure to obtain a valid inside global address even-though we have a successful rule
match.
Note
If an ACL is employed for dynamic translation, NAT evaluates the ACL and ensures that only the packets that are permitted
by the given ACL are considered for translation.
The device replaces the inside local source address of host 10.1.1.1 with the inside global address of the translation, 203.0.113.2,
(only the packet-relevant checksums get updated and all other fields in the packet remain unchanged) and forwards the packet.
The NAT module inserts a fully qualified flow entry corresponding to the translated packet flow, into its translation database.
This facilitates fast translation and forwarding of packets corresponding to the flow in either direction.
Host B receives the packet and responds to host 10.1.1.1 by using the inside global IP destination address (DA) 203.0.113.2
The response packet from host B would be destined to the inside global address and the NAT module intercepts this packet and
translates it back to the corresponding inside local address with the help of the flow entry that has been setup in the translation
database.
Host 10.1.1.1 receives the packet and continues the conversation. The device performs Steps 2 to 5 for each packet that it
receives.
Outside Source Address Translation
You can translate the source address of the IP packets that travel from outside of the network to inside the network. This
type of translation is usually employed in conjunction with inside source address translation to interconnect overlapping
networks.
You can conserve addresses in the inside global address pool by allowing a device to use one global address for many local
addresses and this type of NAT configuration is called overloading or port address translation. When overloading is configured,
the device maintains enough information from higher-level protocols (for example, TCP or UDP port numbers) to translate the
global address back to the correct local address. When multiple local addresses map to one global address, the TCP or UDP
port numbers of each inside host distinguish between the local addresses.
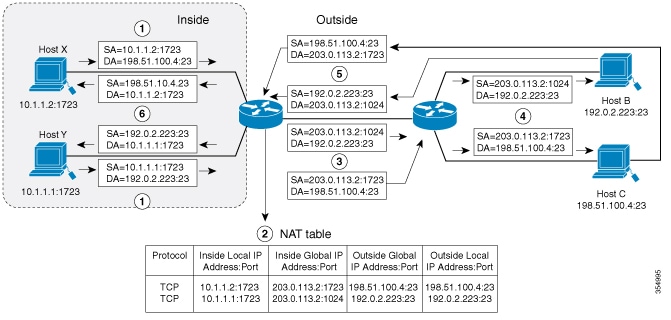
The figure below illustrates a NAT operation when an inside global address represents multiple inside local addresses. The
TCP port numbers act as differentiators.
Figure 3. PAT / NAT Overloading Inside Global Addresses
The device performs the following process in the overloading of inside global addresses, as shown in the figure above. Both
Host B and Host C believe that they are communicating with a single host at address 203.0.113.2. Whereas, they are actually
communicating with different hosts; the port number is the differentiator. In fact, many inside hosts can share the inside
global IP address by using many port numbers.
The user at Host Y opens a connection to Host B and the user at Host X opens a connection to Host C.
NAT module intercepts the corresponding packets and attempts to translate the packets.
Based on the presence or absence of a matching NAT rule the following scenarios are possible:
If a matching static translation rule exists, then it takes precedence and the packets are translated to the corresponding
global address. Otherwise, the packets are matched against dynamic translation rule and in the event of a successful match,
they are translated to the corresponding global address. NAT module inserts a fully qualified flow entry corresponding to
the translated packets, into its translation database, to facilitate fast translation and forwarding of the packets corresponding
to this flow, in either direction.
The packets get forwarded without any address translation in the absence of a successful rule match.
The packets get dropped in the event of failure to obtain a valid inside global address even though we have a successful rule
match.
As this is a PAT configuration, transport ports help translate multiple flows to a single global address. (In addition to
source address, the source port is also subjected to translation and the associated flow entry maintains the corresponding
translation mappings.)
The device replaces inside local source address/port 10.1.1.1/1723 and 10.1.1.2/1723 with the corresponding selected global
address/port 203.0.113.2/1024 and 203.0.113.2/1723 respectively and forwards the packets.
Host B receives the packet and responds to Host Y by using the inside global IP address 203.0.113.2, on port 1024. Host C
receives the packet and responds to Host X using the inside global IP adress 203.0.113.2, on port 1723.
When the device receives the packets with the inside global IP address, it performs a NAT table lookup; the inside global
address and port, and the outside address and port as keys; translates the addresses to the inside local addresses 10.1.1.1:1723
/ 10.1.1.2:1723 and forwards the packets to Host Y and Host X respectively.
Host Y and Host X receive the packet and continue the conversation. The device performs Steps 2 to 5 for each packet it receives.
Overlapping Networks
Use NAT to translate IP addresses if the IP addresses that you use are neither legal nor officially assigned. Overlapping
networks result when you assign an IP address to a device on your network that is already legally owned and assigned to a
different device on the Internet or outside the network.
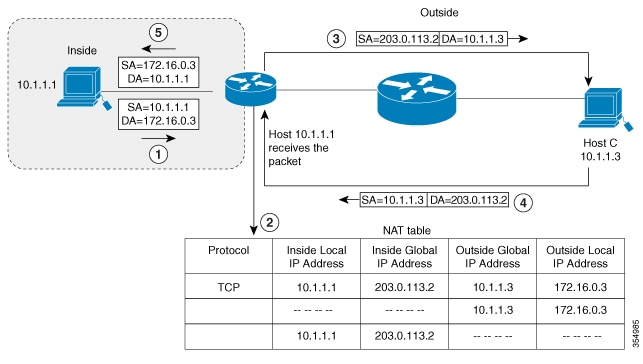
The following figure depicts overlapping networks: the inside network and outside network both have the same local IP addresses
(10.1.1.x). You need network connectivity between such overlapping address spaces with one NAT device to translate the address
of a remote peer (10.1.1.3) to a different address from the perspective of the inside.
Figure 4. NAT Translating Overlapping Addresses
Notice that the inside local address (10.1.1.1) and the outside global address ( 10.1.1.3) are in the same subnet. To translate
the overlapping address, first, the inside source address translation happens with the inside local address getting translated
to 203.0.113.2 and a half entry is created in the NAT table. On the Receiving side, the outside source address is translated
to 172.16.0.3 and another half entry is created. The NAT table is then updated with a full entry of the complete translation.
The following steps describe how a device translates overlapping addresses:
Host 10.1.1.1 opens a connection to 172.16.0.3.
The NAT module sets up the translation mapping of the inside local and global addresses to each other and the outside global
and local addresses to each other
The Source Address (SA) is replaced with inside global address and the Destination Address (DA) is replaced with outside global
address.
Host C receives the packet and continues the conversation.
The device does a NAT table lookup, replaces the DA with inside local address, and replaces the SA with outside local address.
Host 10.1.1.1 receives the packet and the conversation continues using this translation process.
Limitations of NAT
There are certain NAT operations that are currently not supported in the hardware data plane. The following are such operations
that are carried out in the relatively slower Software data plane:
Translation of Internet Control Message Protocol (ICMP) packets.
Translation of packets that require application layer gateway (ALG) processing.
Packets that require both inside and outside translation.
The maximum number of sessions that can be translated and forwarded in the hardware in an ideal setting is limited to 2500. Additional flows that require translation are handled in the software data plane at a reduced throughput.
Note
Each translation consumes two entries in TCAM.
A configured NAT rule might fail to get programmed into the hardware owing to resource constraint. This could result in packets
that correspond to the given rule to get forwarded without translation.
ALG support is currently limited to FTP, TFTP and ICMP protocols. Also, although TCP SYN, TCP FIN, and TCP RST are not part
of ALG traffic, they are processed as part of ALG traffic.
Dynamically created NAT flows age out after a period of inactivity.
Policy Based Routing (PBR) and NAT are not supported on the same interface. PBR and NAT work together only if they are configured
on different interfaces.
Port Channel is not supported in NAT configuration.
NAT does not support translation of fragmented packets.
Bidirectional Forwarding Detection (BFD) sessions may fail if they are configured to operate using the same address that is
used for dynamic NAT. To avoid a conflict that arises when both BFD and Dynamic NAT are configured on the device, use an address
that does not overlap with NAT. If you must configure BFD and dynamic NAT overloading on the same interface, deploy a pool-based
dynamic NAT overload configuration. Ensure that you do not use the chosen NAT pool address for BFD even in this scenario.
NAT does not support Stateful Switchover (SSO). Dynamically created NAT states are not synchronized between the active and
standby devices.
Equal-cost multi-path routing (ECMP) is not supported with NAT.
NAT configuration must be done without using route-maps, as route-mapped NAT is not supported.
Explicit deny access control entry (ACE) in NAT ACL is not supported. Only explicit permit ACE is supported.
Performance and Scale Numbers for NAT
NAT module is capable of performing translation and forwarding in the hardware at line-rate, by programming the relevant hardware
tables with the forwarding and rewrite information. You can configure a NAT-focused resource allocation scheme to obtain increased
NAT throughput.
The maximum number of TCAM flows that are available in the hardware is 5000.
Note
Using Address Only Translation optimizes the handling of flows and enhances the scale of the NAT feature.
Address Only Translation
Address only Translation (AOT) functionality can be employed in situations that require only the address fields to be translated
and not the transport ports. In such settings, enabling AOT functionality significantly increases the number of flows that
can be translated and forwarded in the hardware at line-rate. This improvement is brought about by optimizing the usage of
various hardware resources associated with translation and forwarding. A typical NAT focused resource allocation scheme sets
aside 5000 TCAM entries for performing hardware translation. This places a strict upper limit on the number of flows that can be translated
and forwarded at line-rate. Under AOT scheme, the usage of TCAM resource is highly optimized thereby enabling the accommodation
of more number of flows in the TCAM tables and this provides a significant improvement in the hardware translation and forwarding
scale. AOT can be very effective in situations where majority of the flows are destined to a single or a small set of destinations.
Under such favourable conditions, AOT can potentially enable line-rate translation and forwarding of all the flows originating
from the given end-point(s). AOT functionality is disabled by default. It can be enabled using the no ip nat create flow-entries command. The existing dynamic flow can be cleared using the clear ip nat translation command. The AOT feature can be disabled using the ip nat create flow-entries command.
Restrictions for Address Only Translation
AOT feature is expected to function correctly only in translation scenarios corresponding to simple inside static and inside
dynamic rules. The simple static rule must be of the type ip nat inside source staticlocal-ipglobal-ip, and the dynamic rule must be of the type ip nat inside source listaccess-listpoolname.
When AOT is enabled, the show ip nat translation command will not give visibility into all the NAT flows being translated and forwarded.
Configuring NAT
The tasks described in this section will help you configure NAT. Based on the desired configuration, you may need to configure
more than one task.
Configuring Static Translation of Inside Source Addresses
Configure static translation of inside source address to allow one-to-one mapping between an inside local address and an inside
global address. Static translation is useful when a host on the inside must be accessible by a fixed address from the outside.
Procedure
Command or Action
Purpose
Step 1
enable
Example:
Switch> enable
Enables privileged EXEC mode.
Enter your password if prompted.
Step 2
configure terminal
Example:
Switch# configure terminal
Enters global configuration mode.
Step 3
Use any of the following three commands depending on the requirement:
ip nat inside source static local-ip global-ip
Switch(config)# ip nat inside source static 10.10.10.1 172.16.131.
ip nat inside source static protocol local-ip port global-ip port
Establishes static translation between an inside local address and an inside global address.
Establishes a static port translation between an inside local address and an inside global address.
Allows a static translation mapping for an entire subnet without the need for specifying multiple individual translation rules.
You can specify the translation mapping for the desired subnet. The actual translation is performed by translating the network
portion of the address with the host the portion remaining unchanged.
Step 4
interface type number
Example:
Switch(config)# interface ethernet 1
Specifies an interface and enters interface configuration mode.
Step 5
ip addressip-address mask[secondary]
Example:
Switch(config-if)# ip address 10.114.11.39 255.255.255.0
Sets a primary IP address for an interface.
Step 6
ip nat inside
Example:
Switch(config-if)# ip nat inside
Connects the interface to the inside network, which is subject to NAT.
Step 7
exit
Example:
Switch(config-if)# exit
Exits interface configuration mode and returns to global configuration mode.
Step 8
interface type number
Example:
Switch(config)# interface gigabitethernet 0/0/0
Specifies a different interface and enters interface configuration mode.
Step 9
ip addressip-address mask[secondary]
Example:
Switch(config-if)# ip address 172.31.232.182 255.255.255.240
Sets a primary IP address for an interface.
Step 10
ip nat outside
Example:
Switch(config-if)# ip nat outside
Connects the interface to the outside network.
Step 11
end
Example:
Switch(config-if)# end
Exits interface configuration mode and returns to privileged EXEC mode.
Configuring Dynamic Translation of Inside Source Addresses
Dynamic translation establishes a mapping between an inside local address and a pool of global addresses dynamically. Dynamic
translation can be enabled by configuring a dynamic NAT rule and the mapping is established based on the result of the evaluation
of the configured rule at run-time. You can employ an ACL to specify the inside local address and the inside global address
can be specified through an address pool or an interface.
Dynamic translation is useful when multiple users on a private network need to access the Internet. The dynamically configured
pool IP address may be used as needed and is released for use by other users when access to the internet is no longer required.
Procedure
Command or Action
Purpose
Step 1
enable
Example:
Switch> enable
Enables privileged EXEC mode.
Enter your password if prompted.
Step 2
configure terminal
Example:
Switch# configure terminal
Enters global configuration mode.
Step 3
ip nat poolname start-ip end-ip netmasknetmask | prefix-length prefix-length
Example:
Switch(config)# ip nat pool net-208 172.16.233.208 172.16.233.223 prefix-length 28
Defines a pool of global addresses to be allocated as needed.
Defines a standard access list permitting those addresses that are to be translated.
Step 5
ip nat inside source listaccess-list-numberpoolname
Example:
Switch(config)# ip nat inside source list 1 pool net-208
Establishes dynamic source translation, specifying the access list defined in Step 4.
Step 6
interface type number
Example:
Switch(config)# interface ethernet 1
Specifies an interface and enters interface configuration mode.
Step 7
ip addressip-address mask
Example:
Switch(config-if)# ip address 10.114.11.39 255.255.255.0
Sets a primary IP address for the interface.
Step 8
ip nat inside
Example:
Switch(config-if)# ip nat inside
Connects the interface to the inside network, which is subject to NAT.
Step 9
exit
Example:
Switch(config-if)#exit
Exits the interface configuration mode and returns to global configuration mode.
Step 10
interface type number
Example:
Switch(config)# interface ethernet 0
Specifies an interface and enters interface configuration mode.
Step 11
ip addressip-address mask
Example:
Switch(config-if)# ip address 172.16.232.182 255.255.255.240
Sets a primary IP address for the interface.
Step 12
ip nat outside
Example:
Switch(config-if)# ip nat outside
Connects the interface to the outside network.
Step 13
end
Example:
Switch(config-if)# end
Exits interface configuration mode and returns to privileged EXEC mode.
Configuring Dynamic PAT
NAT module supports dynamic PAT configurations through address pools and interface, as described in the following tasks.
Perform the following task to allow your internal users access to the Internet and conserve addresses in the inside global
address pool using overloading of global addresses.
Procedure
Command or Action
Purpose
Step 1
enable
Example:
Switch> enable
Enables privileged EXEC mode.
Enter your password if prompted.
Step 2
configure terminal
Example:
Switch# configure terminal
Enters global configuration mode.
Step 3
ip nat poolname start-ip end-ip netmasknetmask | prefix-length prefix-length
Example:
Switch(config)# ip nat pool net-208 192.168.202.129 192.168.202.158 netmask 255.255.255.224
Defines a pool of global addresses to be allocated as needed.
Defines a standard access list permitting those addresses that are to be translated.
The access list must permit only those addresses that are to be translated. (Remember that there is an implicit “deny all”
at the end of each access list.) Use of an access list that is too permissive can lead to unpredictable results.
Step 5
ip nat inside source listaccess-list-numberpool name overload
Example:
Switch(config)# ip nat inside source list 1 pool net-208 overload
Establishes dynamic source translation with overloading, specifying the access list defined in Step 4.
Step 6
interface type number
Example:
Switch(config)# interface ethernet 1
Specifies an interface and enters interface configuration mode.
Step 7
ip addressip-address mask[secondary]
Example:
Switch(config-if)# ip address 192.168.201.1 255.255.255.240
Sets a primary IP address for an interface.
Step 8
ip nat inside
Example:
Switch(config-if)# ip nat inside
Connects the interface to the inside network, which is subject to NAT.
Step 9
exit
Example:
Switch(config-if)# exit
Exits interface configuration mode and returns to global configuration mode.
Step 10
interface type number
Example:
Switch(config)# interface ethernet 0
Specifies a different interface and enters interface configuration mode.
Step 11
ip addressip-address mask[secondary]
Example:
Switch(config-if)# ip address 192.168.201.29 255.255.255.240
Sets a primary IP address for an interface.
Step 12
ip nat outside
Example:
Switch(config-if)# ip nat outside
Connects the interface to the outside network.
Step 13
end
Example:
Switch(config-if)# end
Exits interface configuration mode and returns to privileged EXEC mode.
Perform the following task to allow your internal users access to the Internet and conserve addresses in the inside global
address pool by overloading an interface.
Defines a standard access list permitting those addresses that are to be translated.
The access list must permit only those addresses that are to be translated. (Note that there is an implicit “deny all” at
the end of each access list.) Use of an access list that is too permissive can lead to unpredictable results.
Step 4
ip nat inside source listaccess-list-numberinterface name overload
Example:
Switch(config)# ip nat inside source list 1 interface gigabitethernet0/0/2 overload
Establishes dynamic source translation with overloading, specifying the access list defined in Step 3.
Note
For overloading, you can choose any Layer 3 interface that has a valid IP address and is in operational state.
Step 5
interface type number
Example:
Switch(config)# interface gigabitethernet0/0/1
Specifies an interface and enters interface configuration mode.
Step 6
ip addressip-address mask[secondary]
Example:
Switch(config-if)# ip address 192.168.201.1 255.255.255.240
Sets a primary IP address for an interface.
Step 7
ip nat inside
Example:
Switch(config-if)# ip nat inside
Connects the interface to the inside network, which is subject to NAT.
Step 8
exit
Example:
Switch(config-if)# exit
Exits interface configuration mode and returns to global configuration mode.
Step 9
interface type number
Example:
Switch(config)# interface gigabitethernet0/0/2
Specifies a different interface and enters interface configuration mode.
Step 10
ip addressip-address mask[secondary]
Example:
Switch(config-if)# ip address 192.168.201.29 255.255.255.240
Sets a primary IP address for an interface.
Step 11
ip nat outside
Example:
Switch(config-if)# ip nat outside
Connects the interface to the outside network.
Step 12
end
Example:
Switch(config-if)# end
Exits interface configuration mode and returns to privileged EXEC mode.
Configuring NAT of External IP Addresses Only
By default, NAT translates the addresses embedded in the packet pay-load as explained in Using Application-Level Gateways with NAT section. There might be situations where the translation of the embedded address is not desirable and in such cases, NAT
can be configured to translate the external IP address only.
Device(config)# ip nat outside source static network 10.1.1.1 192.168.251.0/24 no-payload
Disables network packet translation on the outside host device.
Step 9
exit
Example:
Device(config)# exit
Exits global configuration mode and returns to privileged EXEC mode.
Step 10
showipnattranslations [verbose]
Example:
Device# show ip nat translations
Displays active NAT.
Configuring Translation of Overlapping Networks
Configure static translation of overlapping networks if your IP addresses in the stub network are legitimate IP addresses
belonging to another network and you want to communicate with those hosts or routers using static translation.
Note
For a successful NAT outside translation, the device should be configured with a route for the outside local address. You
can configure the route either manually or using the add-route option associated with ip nat outside source {static | list} command. We recommend that you use the add-route option to enable automatic creation of the route.
Procedure
Command or Action
Purpose
Step 1
enable
Example:
Switch> enable
Enables privileged EXEC mode.
Enter your password if prompted.
Step 2
configure terminal
Example:
Switch# configure terminal
Step 3
ip nat inside source static local-ip global-ip
Example:
Switch(config)# ip nat inside source static 10.1.1.1 203.0.113.2
Establishes static translation between an inside local address and an inside global address.
Step 4
ip nat outside source static local-ip global-ip
Example:
Switch(config)# ip nat outside source static 172.16.0.3 10.1.1.3
Establishes static translation between an outside local address and an outside global address.
Step 5
interface type number
Example:
Switch(config)# interface ethernet 1
Specifies an interface and enters interface configuration mode.
Step 6
ip addressip-address mask
Example:
Switch(config-if)# ip address 10.114.11.39 255.255.255.0
Sets a primary IP address for an interface.
Step 7
ip nat inside
Example:
Switch(config-if)# ip nat inside
Marks the interface as connected to the inside.
Step 8
exit
Example:
Switch(config-if)# exit
Exits interface configuration mode and returns to global configuration mode.
Step 9
interface type number
Example:
Switch(config)# interface ethernet 0
Specifies a different interface and enters interface configuration mode.
Step 10
ip addressip-address mask
Example:
Switch(config-if)# ip address 172.16.232.182 255.255.255.240
Sets a primary IP address for an interface.
Step 11
ip nat outside
Example:
Switch(config-if)# ip nat outside
Marks the interface as connected to the outside.
Step 12
end
Example:
Switch(config-if)# end
Exits interface configuration mode and returns to privileged EXEC mode.
Configuring Address Translation Timeouts
You can configure address translation timeouts based on your NAT configuration.
By default, dynamically created translation entries time-out after a period of inactivity to enable the efficient use of various
resources. You can change the default values on timeouts, if necessary. The following are the default time-out configurations
associated with major translation types :
Established TCP sessions: 24 hours
UDP flow: 5 minutes
ICMP flow: 1 minute
The default timeout values are adequate to address the timeout requirements in most of the deployment scenarios. However,
these values can be adjusted/fine-tuned as appropriate. It is recommended not to configure very small timeout values (less
than 60 seconds) as it could result in high CPU usage. Refer the Best Practices for NAT Configuration section for more information.
Based on your configuration, you can change the timeouts described in this section.
If you need to quickly free your global IP address for a dynamic configuration, configure a shorter timeout than the default
timeout, by using the ip nat translation timeout command. However, the configured timeout should be longer than the other timeouts configured using commands specified in
the following steps.
If a TCP session is not properly closed by a finish (FIN) packet from both sides or during a reset, change the default TCP
timeout by using the ip nat translation tcp-timeout command.
Procedure
Command or Action
Purpose
Step 1
enable
Example:
Switch> enable
Enables privileged EXEC mode.
Enter your password if prompted.
Step 2
configure terminal
Example:
Switch# configure terminal
Enters global configuration mode.
Step 3
ip nat translationseconds
Example:
Switch(config)# ip nat translation 300
(Optional) Changes the amount of time after which NAT translations time out.
The default timeout is 24 hours, and it applies to the aging time for half-entries.
Step 4
ip nat translation udp-timeout seconds
Example:
Switch(config)# ip nat translation udp-timeout 300
(Optional) Changes the UDP timeout value.
Step 5
ip nat translation tcp-timeoutseconds
Example:
Switch(config)# ip nat translation tcp-timeout 2500
(Optional) Changes the TCP timeout value.
The default is 24 hours.
Step 6
ip nat translation finrst-timeoutseconds
Example:
Switch(config)# ip nat translation finrst-timeout 45
(Optional) Changes the finish and reset timeout value.
finrst-timeout—The aging time after a TCP session receives both finish-in (FIN-IN) and finish-out (FIN-OUT) requests or after
the reset of a TCP session.
Step 7
ip nat translation icmp-timeout seconds
Example:
Switch(config)# ip nat translation icmp-timeout 45
(Optional) Changes the ICMP timeout value.
Step 8
ip nat translation syn-timeout seconds
Example:
Switch(config)# ip nat translation syn-timeout 45
(Optional) Changes the synchronous (SYN) timeout value.
The synchronous timeout or the aging time is used only when a SYN request is received on a TCP session. When a synchronous
acknowledgment (SYNACK) request is received, the timeout changes to TCP timeout.
Step 9
end
Example:
Switch(config-if)# end
Exits interface configuration mode and returns to privileged EXEC mode.
Use SDM templates to configure system resources to optimize support for NAT.
After you set the template and the system reboots, you can use the show sdm prefer privileged EXEC command to verify the new template configuration. If you enter the show sdm prefer command before you enter the reload privileged EXEC command, the show sdm prefer command shows the template currently in use and the template that will become active after a reload.
Follow these steps to set the SDM template to maximize NAT usage:
Procedure
Command or Action
Purpose
Step 1
configure terminal
Example:
Switch# configure terminal
Enters global configuration mode.
Step 2
sdm prefer nat
Example:
Switch(config)# sdm prefer nat
Specifies the SDM template to be used on the switch.
Starting from Cisco IOS XE Gibraltar 16.12.1 , this template is available under the network-advantage license. On all earlier releases, it is available under the DNA Advantage
license.
Step 3
end
Example:
Switch(config)# end
Returns to the privileged EXEC mode.
Step 4
write memory
Example:
Switch# write memory
Save the current configuration before reload.
Step 5
reload
Example:
Switch# reload
Reloads the operating system.
Using Application-Level Gateways with NAT
NAT performs translation services on any TCP/UDP traffic that does not carry source and destination IP addresses in the application
data stream. Protocols that do not carry the source and destination IP addresses include HTTP, TFTP, telnet, archie, finger,
Network Time Protocol (NTP), Network File System (NFS), remote login (rlogin), remote shell (rsh) protocol, and remote copy
(rcp).
NAT Application-Level Gateway (ALG) enables certain applications that carry address/port information in their payloads to
function correctly across NAT domains. In addition to the usual translation of address/ports in the packet headers, ALGs take
care of translating the address/ports present in the payload and setting up temporary mappings.
Best Practices for NAT Configuration
In cases where both static and dynamic rules are configured, ensure that the local addresses specified in the rules do not
overlap. If such an overlap is possible, then the ACL associated with the dynamic rule should exclude the corresponding addresses
used by the static rule. Similarly, there must not be any overlap between the global addresses as this could lead to undesired
behavior.
Do not employ loose filtering such as permit ip any any in an ACL associated with NAT rule as this could result in unwanted packets being translated.
Do not share an address pool across multiple NAT rules.
Do not define the same inside global address in Static NAT and Dynamic Pool. This action can lead to undesirable results.
Exercise caution while modifying the default timeout values associated with NAT. Small timeout values could result in high
CPU usage.
Exercise caution while manually clearing the translation entries as this could result in the disruption of application sessions.
Follow these steps before you make NAT configuration changes during active translations.
Stop the ingress and egress of traffic matching the given configuration. This may require applying an appropriate ACL filter
or shutting down the given interfaces.
Clear any existing translation entries that correspond to the given configuration.
Make the desired configuration change and re-enable the stopped traffic.
Troubleshooting NAT
This section explains the basic steps to troubleshoot and verify NAT.
Clearly define what NAT is supposed to achieve.
Verify that correct translation table exists using the show ip nat translation command.
Verify that timer values are correctly configured using the show ip nat translation verbose command.
Check the ACL values for NAT using the show ip access-list command
Check the overall NAT configuration using the show ip nat statistics command.
Use the clear ip nat translation command to clear the NAT translational table entires before the timer expires.
Use debug nat ip and debug nat ip detailed commands to debug NAT configuration.
Feature Information for Network Address Translation
The following table provides release information about the feature or features described in this module. This table lists
only the software release that introduced support for a given feature in a given software release train. Unless noted otherwise,
subsequent releases of that software release train also support that feature.
Table 1. Feature Information for NAT
Feature Name
Releases
Feature Information
Support for Address Only Translation
Cisco IOS XE Fuji 16.9.1
Address only Translation (AOT) aims to increase the number of IP flows that can be translated and forwarded at line rate in
Network Address Translation (NAT). AOT optimizes the usage of hardware resources such as TCAMS and enables the handling of
more number of flows.
Support for NAT
Cisco IOS XE Gibraltar 16.10.1
This feature was introduced.
NAT enables private IP networks that uses unregistered IP address to connect to the internet. NAT operates on a device, usually
connecting two networks together, and translates the private addresses in the internal network into a global routable addresses,
before packets are forwarded onto another network.
License level for NAT
Cisco IOS XE Gibraltar 16.12.1
NAT is now available on the Network Advantage license. On all earlier releases, it is available on the DNA Advantage license.

 Feedback