Configuring Network Detection and Response

Prerequisites for Network Detection and Response

  • All the devices in a network must have reachability to the Stealthwatch Cloud portal. Also, all the encrypted traffic must use HTTPS (TCP port 443) to reach the Stealthwatch Cloud portal.

  • Ensure that there is sufficient bandwidth to avoid loss of data.

Restrictions for Network Detection and Response

  • Cisco Encrypted Traffic Analytics is not supported on the Stealthwatch Cloud portal.

  • HTTPs proxy is not supported.

  • Stealthwatch Cloud portal uses only the primary DNS server. An error is displayed if the primary DNS server fails.

  • If DNS servers configured on the device are unable to resolve the Stealthwatch cloud monitor URLs, file uploads fail even if the Stealthwatch cloud sensor is registered to the Stealthwatch cloud portal.

Information About Network Detection and Response

Cisco Secure Cloud Analytics (also known as the Stealthwatch Cloud) is a Network Detection and Response solution that uses enterprise telemetry to detect threats and provide accelerated threat response along with network segmentation. Cisco Secure Cloud Analytics also allows a network administrator to track all users logged into the network, and monitor their activities.

As part of the Network Detection and Response solution for Cisco Catalyst Switches, the enterprise telemetry used for analysis is Flexible NetFlow flows.

You must configure Stealthwatch Cloud properties on a device. You must then create a flow record and a flow exporter for the Stealthwatch Cloud portal.


Note


A flow record must have the mandatory 5-tuple fields—protocol, source address, source port, destination address, and destination port configured along with the flow start, flow end, number of packets, and number of bytes for the records to be uploaded into the Stealthwatch Cloud portal.


Configure the flow record and flow exporter to a flow monitor. All the flows that are then generated from the flow monitor are converted into custom format and uploaded into the Stealthwatch Cloud portal.

How to Configure Network Detection and Response

The following sections provide configuration information on network detection and response.

Configuring a Certificate for Registration

To configure a certificate for registration, perform this procedure.

Procedure

  Command or Action Purpose

Step 1

enable

Example:

Device> enable

Enables privileged EXEC mode.

Enter your password, if prompted.

Step 2

configure terminal

Example:

Device# configure terminal

Enters global configuration mode.

Step 3

crypto pki trustpoint name

Example:

Device(config)# crypto pki trustpoint stealthwatch1

Declares the trustpoint and a given name and enters ca-trustpoint configuration mode.

Step 4

revocation-check method1 [method2 method3]

Example:

Device(ca-trustpoint)# revocation-check none

Checks the revocation status of a certificate.

none : Certificate checking is ignored.

Step 5

enrollment mode

Example:

Device(ca-trustpoint)# enrollment terminal

Specifies terminal as the enrollment mode of the certificate.

Step 6

exit

Example:

Device(ca-trustpoint)# exit

Exits ca-trustpoint configuration mode and returns to global configuration mode.

Step 7

crypto pki authenticate name

Example:

Device(config)# crypto pki authenticate stealthwatch1
Enter the base 64 encoded CA certificate.
End with a blank line or the word "quit" on a line by itself

Authenticates the trustpoint name and enters ca-trustpoint configuration mode.

When prompted, copy and paste the Starfield Services Root Certificate from https://www.amazontrust.com/repository/SFC2CA-SFSRootCAG2.pem.

The system prompts you with the following statement:
% Do you accept this certificate? [yes/no]:
Enter yes to confirm.

Step 8

exit

Example:

Device(config)# exit

Returns to privileged EXEC mode.

Step 9

show pki trustpoints name

Example:

Device# show crypto pki trustpoints stealthwatch1

(Optional) Displays information about the configured trustpoint.

Configuring a Certificate for File Upload

To configure a certificate for file upload, perform this procedure.

Before you begin

Download the Baltimore CyberTrust Root certificate:

  1. Open https://www.digicert.com/kb/digicert-root-certificates.htm in a web browser.

  2. Under Baltimore CyberTrust Root, click Download PEM.

  3. Choose a location and save the BaltimoreCyberTrustRoot.crt.pem file.

Procedure

  Command or Action Purpose

Step 1

enable

Example:

Device> enable

Enables privileged EXEC mode.

Enter your password, if prompted.

Step 2

configure terminal

Example:

Device# configure terminal

Enters global configuration mode.

Step 3

crypto pki trustpoint name

Example:

Device(config)# crypto pki trustpoint stealthwatch2

Declares the trustpoint and a given name and enters ca-trustpoint configuration mode.

Step 4

revocation-check method1 [method2 method3]

Example:

Device(ca-trustpoint)# revocation-check none

Checks the revocation status of a certificate.

none : Certificate checking is ignored.

Step 5

enrollment terminal

Example:

Device(ca-trustpoint)# enrollment terminal

Specifies terminal as the enrollment mode of the certificate.

Step 6

exit

Example:

Device(ca-trustpoint)# exit

Exits ca-trustpoint configuration mode and returns to global configuration mode.

Step 7

crypto pki authenticate name

Example:

Device(config)# crypto pki authenticate stealthwatch2
Enter the base 64 encoded CA certificate.
End with a blank line or the word "quit" on a line by itself

Authenticates the trustpoint name and enters ca-trustpoint configuration mode.

When prompted, copy and paste the text from the BaltimoreCyberTrustRoot.crt.pem file.

The system prompts you with the following statement:
% Do you accept this certificate? [yes/no]:
Enter yes to confirm.

Step 8

exit

Example:

Device(config)# exit

Returns to privileged EXEC mode.

Step 9

show pki trustpoints name

Example:

Device# show crypto pki trustpoints stealthwatch2

(Optional) Displays information about the configured trustpoint.

Configuring Stealthwatch Cloud on a Device

To configure Stealthwatch Cloud on a device, perform this procedure.

Before you begin

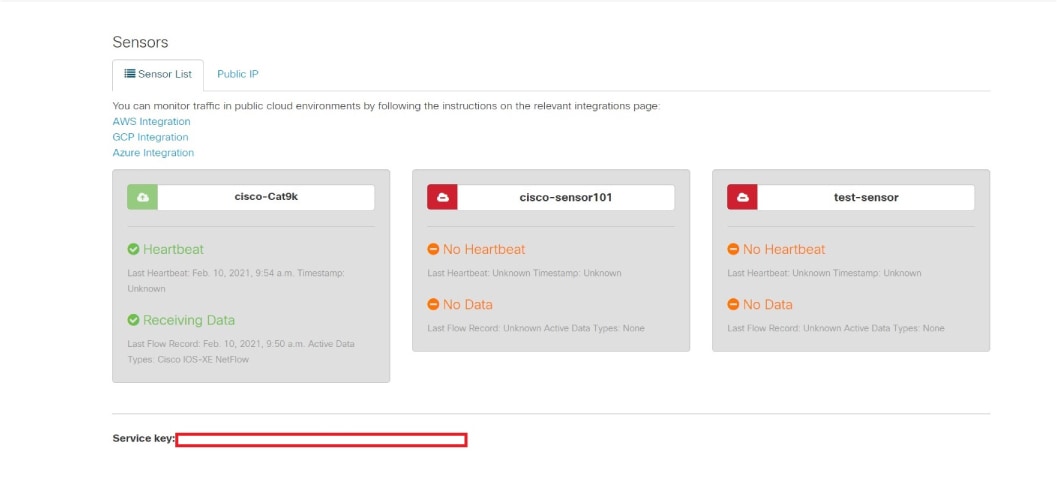
To view the service key from the Stealthwatch Cloud portal, peform the following steps:

  1. Open the Stealthwatch Cloud portal from a browser.

  2. In the Dashboard view, click the cloud icon located on the right corner of the window, and select Sensors.

  3. Navigate to the bottom of the window to locate the service key.


    Note


    The SCA cloud sensor contains different URLs based on region. Locate your regional server and the root CA that signed that server's certificate, and add it as a trustpoint to your switch.


Procedure

  Command or Action Purpose

Step 1

enable

Example:

Device> enable

Enables privileged EXEC mode.

Enter your password, if prompted.

Step 2

configure terminal

Example:

Device# configure terminal

Enters global configuration mode.

Step 3

stealthwatch-cloud-monitor

Example:

Device(config)# stealthwatch-cloud-monitor

Configures the Stealthwatch Cloud monitor and enters stealthwatch-cloud-monitor configuration mode.

Step 4

service-key SwC-service-key

Example:

Device(config-stealthwatch-cloud-monitor)# service-key xxxxxxxxxxxxxxxxxxxxxxxxxxxxxxxxx

Configures the Stealthwatch Cloud service key.

Step 5

sensor-name SwC-sensor-name

Example:

Device(config-stealthwatch-cloud-monitor)# sensor-name mysensor

(Optional) Sets a sensor name for the Stealthwatch Cloud registration. By default, the device serial number is used as the sensor name.

Step 6

url SwC-server-url

Example:

Device(config-stealthwatch-cloud-monitor)# url https://sensors.eu-2.obsrvbl.com

(Optional) Configures the URL of the Stealthwatch Cloud server.

To avoid redirects, configure the appropriate Stealthwatch Cloud server URL. If no URL is configured, by default, the URL of the Stealthwatch Cloud server, located in the U.S, is used. Based on your location, the default URL redirects you to the nearest Stealthwatch Cloud server URL.

Step 7

end

Example:

Device(config-stealthwatch-cloud-monitor)# end

Returns to privileged EXEC mode.

How to Integrate Flexible NetFlow with the Stealthwatch Cloud Portal

The following sections provide configuration information on how to integrate Flexible Netflow with the Stealthwatch Cloud portal.

Creating a Flow Record

To create a flow record, perform this procedure.

Procedure
  Command or Action Purpose

Step 1

enable

Example:
Device> enable

Enables privileged EXEC mode.

Enter your password, if prompted.

Step 2

configure terminal

Example:
Device# configure terminal

Enters global configuration mode.

Step 3

flow record record-name

Example:
Device(config)# flow record SWCRec

Creates a flow record and enters flow-record configuration mode.

Step 4

description description

Example:
Device(config-flow-record)# description swc flow

(Optional) Creates a description for the flow record.

Step 5

match ipv4 source address

Example:
Device(config-flow-record)# match ipv4 source address

Configures the IPv4 source address as a key field for the record.

Step 6

match ipv4 destination address

Example:
Device(config-flow-record)# match ipv4 destination address

Configures the IPv4 destination address as a key field for the record.

Step 7

match transport source-port

Example:
Device(config-flow-record)# match transport source-port

Configures the source port as a key field for the record.

Step 8

match transport destination-port

Example:
Device(config-flow-record)# match transport destination-port

Configures the destination port as a key field for the record.

Step 9

match ipv4 protocol

Example:
Device(config-flow-record)# match ipv4 protocol

Configures the IPv4 protocol as a key field for the record.

Step 10

collect counter bytes long

Example:
Device(config-flow-record)# collect counter bytes long

Configures the number of bytes seen in a flow as a nonkey field and enables collecting the total number of bytes from the flow.

Step 11

collect counter packets long

Example:
Device(config-flow-record)# collect counter packets long

Configures the number of packets seen in a flow as a nonkey field and enables collecting the total number of packets from the flow.

Step 12

collect timestamp absolute first

Example:
Device(config-flow-record)# collect timestamp absolute first

Configures the timestamp seen in a flow as a nonkey field and enables the collection of the absolute time the first packet was seen, from the flow.

Step 13

collect timestamp absolute last

Example:
Device(config-flow-record)# collect timestamp absolute last

Configures the timestamp seen in a flow as a nonkey field and enables the collection of the absolute time the most recent packet was seen, from the flow.

Step 14

end

Example:
Device(config-flow-record)# end

Returns to privileged EXEC mode.

Creating a Flow Exporter

To create a flow exporter, peform this procedure.


Note


Only one active flow exporter can be configured for Stealthwatch Cloud.


Procedure
  Command or Action Purpose

Step 1

enable

Example:
Device> enable

Enables privileged EXEC mode.

Enter your password, if prompted.

Step 2

configure terminal

Example:
Device# configure terminal

Enters global configuration mode.

Step 3

flow exporter name

Example:
Device(config)# flow exporter SWCExp

Creates a flow exporter and enters flow-exporter configuration mode.

Step 4

destination {hostname}

Example:
Device(config-flow-exporter)# destination stealthwatch-cloud

Sets the IPv4 destination address or hostname for this exporter.

Step 5

end

Example:
Device(config-flow-record)# end

Returns to privileged EXEC mode.

Configuring a Flow Monitor

To configure a flow monitor, perform this procedure.

Procedure
  Command or Action Purpose

Step 1

enable

Example:
Device> enable

Enables privileged EXEC mode.

Enter your password, if prompted.

Step 2

configure terminal

Example:
Device# configure terminal

Enters global configuration mode.

Step 3

flow monitor flow-monitor-name

Example:
Device(config)# flow monitor SWCMon

Defines the flow monitor.

Step 4

cache timeout active seconds

Example:
Device(config-flow-monitor)# cache timeout active 60

Specifies the active flow timeout in seconds.

Step 5

exporter flow-exporter-name

Example:
Device(config-flow-monitor)# exporter SWCExp

Exports the flow information to the exporter.

Step 6

record flow-exporter-name

Example:
Device(config-flow-monitor)# record SWCRec

Specifies the flow record with a basic IPv4 template.

Step 7

end

Example:
Device(config-flow-monitor)# end

Returns to privileged EXEC mode.

Applying a Flow to an Interface

To apply a flow to an interface, perform this procedure.

Procedure
  Command or Action Purpose

Step 1

enable

Example:
Device> enable

Enables privileged EXEC mode.

Enter your password, if prompted.

Step 2

configure terminal

Example:
Device# configure terminal

Enters global configuration mode.

Step 3

interface type number

Example:
Device(config)# interface gigabitethernet 1/0/1

Specifies an interface and enters interface configuration mode.

Step 4

ip flow monitor monitor-name input

Example:
Device(config-if)# ip flow monitor SWCMon input

Associates an IPv4 flow monitor to the interface for input packets.

Step 5

ip flow monitor monitor-name output

Example:
Device(config-if)# ip flow monitor SWCMon output

Associates an IPv4 flow monitor to the interface for output packets.

Step 6

end

Example:
Device(config-if)# end

Exits interface configuration mode and returns to privileged EXEC mode.

Verifying Network Detection and Response Configuration

Use the following commands in privileged EXEC mode to verify Network Detection and Response configuration.

Table 1. Commands to Verify Network Detection and Response Configuration

Command

Purpose

show stealth-watch-cloud detail

Displays the Stealthwatch Cloud registration status and its configured values.

show platform software fed switch switch-number swc statistics

Displays the statistical information of the Stealthwatch Cloud integration.

clear platform software fed switch switch-number swc statistics

Clears the statistical information of the Stealthwatch Cloud integration.

show platform software fed switch switch-number swc connection

Displays the connection details and events of the Stealthwatch Cloud integration.

clear platform software fed switch switch-number swc connection

Clears the connection details and events of the Stealthwatch Cloud integration.

Configuration Examples for Network Detection and Response

The following sections provide configuration examples for Network Detection and Response.

Example: Configuring and Integrating Stealthwatch Cloud on a Device

The following example shows how to configure and integrate Stealthwatch Cloud on a device:

Device> enable
Device# configure terminal
Device(config)# stealthwatch-cloud-monitor
Device(stealthwatch-cloud-monitor)# service-key XXXXXXXXXXXXXXXXXXXXX
Device(stealthwatch-cloud-monitor)# sensor-name mysensor
Device(stealthwatch-cloud-monitor)# url https://sensors.eu-2.obsrvbl.com
Device(stealthwatch-cloud-monitor)# exit
Device(config)# flow record SWCRec
Device(config-flow-record)# description for stealthwatch cloud
Device(config-flow-record)# match ipv4 source address
Device(config-flow-record)# match ipv4 destination address
Device(config-flow-record)# match ipv4 protocol
Device(config-flow-record)# match transport source-port
Device(config-flow-record)# match transport destination-port
Device(config-flow-record)# match flow cts source group-tag
Device(config-flow-record)# match flow cts destination group-tag
Device(config-flow-record)# collect counter byte long 
Device(config-flow-record)# collect counter packet long 
Device(config-flow-record)# collect timestamp absolute first 
Device(config-flow-record)# collect timestamp absolute last 
Device(config-flow-record)# exit
Device(config)# flow exporter SWCExp
Device(config-flow-exporter)# destination stealthwatch-cloud
Device(config- flow-exporter)# exit
Device(config)# flow monitor SWCMon
Device(config-flow-monitor)# cache timeout active 60
Device(config-flow-monitor)# exporter SWCExp
Device(config-flow-monitor)# record SWCRec
Device(config-flow-monitor)# exit
Device(config)# interface gigabitethernet 1/0/1
Device(config-if)# ip flow monitor SWCMon input
Device(config-if)# ip flow monitor SWCMon output
Device(config-if)# end

Example: Verifying Stealthwatch Cloud Configuration

The following example shows a sample output of the show stealthwatch-cloud detail command:

Device> enable
Device# show stealthwatch-cloud detail
========================================
Stealthwatch Cloud Parameters
========================================
   Service Key  : XXXXXXXXXXXXXXXXXXXXXXXX
   Sensor Name  : C9200
   URL          : https://sensor.eu-prod.obsrvbl.com
========================================
Stealthwatch Cloud Sensor Info
========================================
   Sensor Status    : Registered
   Last heartbeat   : 2020-08-21T10:35:16

The following is a sample output of the show platform fed switch active swc statistics command:

Device> enable
Device# show platform software fed switch active swc statistics
==========================
SWC Upload Statistics:
==========================
 1: Last file uploaded		:  202102100928_1 
 2: Time of upload		:  02/10/21 09:29:41 UTC 
 3: Current file uploading	:   
 4: Files queued for upload	:   
 5: Number of files queued	:  0 
 6: Last failed upload		:   
 7: Files failed to upload	:  0 
 8: Files successfully uploaded	:  1 
==========================
SWC File Creation Statistics:
==========================
 9: Last file created		:  202102100929_1
10: Time of creation		:  02/10/21 09:29:08 UTC 
==========================
SWC Flow Statistics:
==========================
11: Number of flows in prev file:  15 
12: Number of flows in curr file:  11 
13: Invalid dropped flows	:  0 
14: Error dropped flows		:  0 
==========================
SWC Flags:
==========================
15: Is Registered		:  Registered 
16: Delete debug 		:  Disabled 
17: Exporter delete debug 	:  Disabled 
18: Certificate Validation 	:  Enabled 

The following is a sample output of the show platform software fed switch active swc connection command:

Device> enable
Device# show platform software fed switch active swc connection
Stealthwatch-Cloud details
  Registration
    #ID         : 0xc000001
    URL         : https://sensor.ext.obsrvbl.com
    Service Key : XXXXXXXXXXXXXXXXXXXXXXXX
    Sensor Name : C9200
    Registered  : N/A
  Connection
    Status               : DOWN
<<— Status will be in UP state only when the flow uploads into the Stealthwatch Cloud.
    Last status update   : 02/09/2021 10:10:47
    # Flaps              : 0
    # Heartbeats         : 0
    # Lost heartbeats    : 0
    Total RX bytes       : 7360
    Total TX bytes       : 869
    Upload Speed (B/s)   : 127
    Download Speed (B/s) : 58
    # Open sessions      : 0
    # Redirections       : 0
    # Timeouts           : 0

  HTTP Events
    GET response                   : 4
    GET request                    : 4
    GET Status Code 2XX            : 4
    PUT response                   : 12
    PUT request                    : 12
    PUT Status Code 2XX            : 2
    POST response                  : 2
    POST request                   : 2
    POST Status Code 2XX           : 2

  API Events
    TX                             : 4
    OK                             : 2
    Error                          : 2

  Event History
Timestamp               #Times   Event               RC Context
----------------------- -------- ------------------- -- ----------------------------------------
02/10/2021 09:29:41.126 2        SEND_OK              0 ID:0003                                 
02/10/2021 09:29:39.795 2        SIGNAL_DATA          0 ID:0003                                 
02/10/2021 09:29:38.279 12       PUT_DATA             0 ID:0003                                 
02/10/2021 09:29:37.962 4        GET_URL              0 ID:0003                                 
02/10/2021 09:29:37.961 4        SEND_START           0 ID:0003                                 
02/10/2021 09:27:41.484 2        SEND_ERR             0 ID:0001                                 
02/10/2021 09:27:41.484 2        MAX_ATTEMPTS         0 ID:0001                                 
02/10/2021 09:22:53.670 4        REGISTER_OK          0 Not applicable                          
02/10/2021 09:22:53.670 4        SEND_ABORT_ALL       0 config change                           
02/10/2021 09:22:53.670 1        OPTIONS_CONFIG       0 File Extension: .csv.gz (reset)         
02/10/2021 09:22:53.669 1        OPTIONS_CONFIG       0 Data Type: ios-xe-catalyst              
02/10/2021 09:22:53.669 1        OPTIONS_CONFIG       0 URL: https://sensor.ext.obsrvbl.com (res
02/10/2021 09:22:53.668 1        OPTIONS_CONFIG       0 Sensor Name: niinamdaUS (reset)         
02/10/2021 09:22:53.553 1        OPTIONS_CONFIG       0 Service Key: b5tQtXJM8AGZSp6oB8PvK4H0FiW

Feature History for Network Detection and Response

This table provides release and related information for the features explained in this module.

These features are available in all the releases subsequent to the one they were introduced in, unless noted otherwise.

Release

Feature

Feature Information

Cisco IOS XE Bengaluru 17.5.1

Network Detection and Response

Cisco Secure Cloud Analytics (also known as Stealthwatch Cloud) is a Network Detection and Response solution that provides advanced threat detection, accelerated threat response, and simplified network segmentation

Use the Cisco Feature Navigator to find information about platform and software image support. To access Cisco Feature Navigator, go to http://www.cisco.com/go/cfn.