Prerequisites for IPv6 Client Address Learning
Before configuring IPv6 client address learning, configure the clients to support IPv6.
The documentation set for this product strives to use bias-free language. For the purposes of this documentation set, bias-free is defined as language that does not imply discrimination based on age, disability, gender, racial identity, ethnic identity, sexual orientation, socioeconomic status, and intersectionality. Exceptions may be present in the documentation due to language that is hardcoded in the user interfaces of the product software, language used based on RFP documentation, or language that is used by a referenced third-party product. Learn more about how Cisco is using Inclusive Language.
Before configuring IPv6 client address learning, configure the clients to support IPv6.
Client Address Learning is configured on device to learn the client's IPv4 and IPv6 address and clients transition state maintained by the device on an association, re-association, de-authentication and timeout.
There are three ways for IPv6 client to acquire IPv6 addresses:
Stateless Address Auto-Configuration (SLACC)
Stateful DHCPv6
Static Configuration
For all of these methods, the IPv6 client always sends neighbor solicitation DAD (Duplicate Address Detection) request to ensure there is no duplicate IP address on the network. The device snoops the client's NDP and DHCPv6 packets to learn about its client IP addresses.
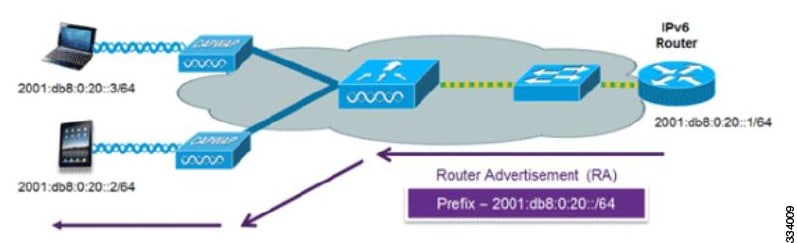
The most common method for IPv6 client address assignment is Stateless Address Auto-Configuration (SLAAC). SLAAC provides simple plug-and-play connectivity where clients self-assign an address based on the IPv6 prefix. This process is achieved
Stateless Address Auto-Configuration (SLAAC) is configured as follows:
The last 64 bits of the IP v6 address can be learned based on the following 2 algorithms:
The following Cisco IOS configuration commands from a Cisco-capable IPv6 router are used to enable SLAAC addressing and router advertisements:
ipv6 unicast-routing
interface Vlan20
description IPv6-SLAAC
ip address 192.168.20.1 255.255.255.0
ipv6 address FE80:DB8:0:20::1 linklocal
ipv6 address 2001:DB8:0:20::1/64
ipv6 enable
end
The use of DHCPv6 is not required for IPv6 client connectivity if SLAAC is already deployed. There are two modes of operation for DHCPv6 called Stateless and Stateful.
The DHCPv6 Stateless mode is used to provide clients with additional network information that is not available in the router advertisement, but not an IPv6 address as this is already provided by SLAAC. This information can include the DNS domain name, DNS server(s), and other DHCP vendor-specific options. This interface configuration is for a Cisco IOS IPv6 router implementing stateless DHCPv6 with SLAAC enabled:
ipv6 unicast-routing
ipv6 dhcp pool IPV6_DHCPPOOL
address prefix 2001:db8:5:10::/64
domain-name cisco.com
dns-server 2001:db8:6:6::1
interface Vlan20
description IPv6-DHCP-Stateless
ip address 192.168.20.1 255.255.255.0
ipv6 nd other-config-flag
ipv6 dhcp server IPV6_DHCPPOOL
ipv6 address 2001:DB8:0:20::1/64
end
The DHCPv6 Stateful option, also known as managed mode, operates similarly to DHCPv4 in that it assigns unique addresses to each client instead of the client generating the last 64 bits of the address as in SLAAC. This interface configuration is for a Cisco IOS IPv6 router implementing stateful DHCPv6 on a local Device:
ipv6 unicast-routing
ipv6 dhcp pool IPV6_DHCPPOOL
address prefix 2001:db8:5:10::/64
domain-name cisco.com
dns-server 2001:db8:6:6::1
interface Vlan20
description IPv6-DHCP-Stateful
ip address 192.168.20.1 255.255.255.0
ipv6 address 2001:DB8:0:20::1/64
ipv6 nd prefix 2001:DB8:0:20::/64 no-advertise
ipv6 nd managed-config-flag
ipv6 nd other-config-flag
ipv6 dhcp server IPV6_DHCPPOOL
end
This interface configuration is for a Cisco IOS IPv6 router implementing stateful DHCPv6 on an external DHCP server:
ipv6 unicast-routing
domain-name cisco.com
dns-server 2001:db8:6:6::1
interface Vlan20
description IPv6-DHCP-Stateful
ip address 192.168.20.1 255.255.255.0
ipv6 address 2001:DB8:0:20::1/64
ipv6 nd prefix 2001:DB8:0:20::/64 no-advertise
ipv6 nd managed-config-flag
ipv6 nd other-config-flag
ipv6 dhcp_relay destination 2001:DB8:0:20::2
endStatically configured address on a client.
A Router Solicitation message is issued by a host to facilitate local routers to transmit Router Advertisement from which it can obtain information about local routing or perform Stateless Auto-configuration. Router Advertisements are transmitted periodically and the host prompts with an immediate Router Advertisement using a Router Solicitation such as - when it boots or following a restart operation.
A Router Advertisement message is issued periodically by a router or in response to a Router Solicitation message from a host. The information contained in these messages is used by hosts to perform Stateless Auto-configuration and to modify its routing table.
IPv6 Neighbor Discovery is a set of messages and processes that determine relationships between neighboring nodes. Neighbor Discovery replaces ARP, ICMP Router Discovery, and ICMP Redirect used in IPv4.
IPv6 Neighbor Discovery inspection analyzes neighbor discovery messages in order to build a trusted binding table database, and IPv6 neighbor discovery packets that do not comply are dropped. The neighbor binding table in the switch tracks each IPv6 address and its associated MAC address. Clients are expired from the table according to Neighbor Binding timers.
The IPv6 addresses of clients are cached by the device. When the device receives an NS multicast looking for an IPv6 address, and if the target address is known to the device and belongs to one of its clients, the device will reply with an NA message on behalf of the client. The result of this process generates the equivalent of the Address Resolution Protocol (ARP) table of IPv4 but is more efficient - uses generally fewer messages.
 Note |
The device acts like proxy and respond with NA, only when the ipv6 nd suppress command is configured |
If the device does not have the IPv6 address of a client, the device will not respond with NA and forward the NS packet . To resolve this, an NS Multicast Forwarding knob is provided. If this knob is enabled, the device gets the NS packet for the IPv6 address that it does not have (cache miss) and forwards it . This packet reaches the intended client and the client replies with NA.
This cache miss scenario occurs rarely, and only very few clients which do not implement complete IPv6 stack may not advertise their IPv6 address during NDP.
IPv6 clients configure IPv6 addresses and populate their router tables based on IPv6 router advertisement (RA) packets. The RA guard feature is similar to the RA guard feature of wired networks. RA guard increases the security of the IPv6 network by dropping the unwanted or rogue RA packets that come from clients. If this feature is not configured, malicious IPv6 clients announce themselves as the router for the network often with high priority, which would take higher precedence over legitimate IPv6 routers.
Port on which the frame is received
IPv6 source address
Prefix list
The following configuration information created on the switch is available to RA-Guard to validate against the information found in the received RA frame:
Trusted/Untrusted ports for receiving RA-guard messages
Trusted/Untrusted IPv6 source addresses of RA-sender
Trusted/Untrusted Prefix list and Prefix ranges
Router Preference
RA guard occurs at the device. You can configure the device to drop RA messages at the device. All IPv6 RA messages are dropped, which protects other clients and upstream wired network from malicious IPv6 clients.
//Create a policy for RA Guard//
ipv6 nd raguard policy raguard-router
trusted-port
device-role router
//Applying the RA Guard Policy on port/interface//
interface tengigabitethernet1/0/1 (Katana)
interface gigabitethernet1/0/1 (Edison)

ipv6 nd raguard attach-policy raguard-routerIPv6 unicasting must always be enabled on the switch . IPv6 unicast routing is disabled.
To configure IPv6 unicast, perform this procedure:
To enable the forwarding of IPv6 unicast datagrams, use the ipv6 unicast-routing command in global configuration mode. To disable the forwarding of IPv6 unicast datagrams, use the no form of this command.
| Command or Action | Purpose | |
|---|---|---|
| Step 1 |
enable Example: |
Enables privileged EXEC mode. Enter your password if prompted. |
| Step 2 |
configure terminal Example: |
Enters global configuration mode. |
| Step 3 |
ipv6 unicast routing Example: |
|
Configure RA Guard policy on the device to add IPv6 client addresses and populate the router table based on IPv6 router advertisement packets.
To configuring RA guard policy, perform this procedure:
| Command or Action | Purpose | |
|---|---|---|
| Step 1 |
enable Example: |
Enables privileged EXEC mode. Enter your password if prompted. |
| Step 2 |
configure terminal Example: |
Enters global configuration mode. |
| Step 3 |
ipv6 nd raguard policy raguard-router Example: |
|
| Step 4 |
trustedport Example: |
|
| Step 5 |
device-role router Example: |
|
| Step 6 |
exit Example: |
|
Applying the RA Guard policy on the device will block all the untrusted RA's.
To apply RA guard policy, perform this procedure:
| Command or Action | Purpose | |
|---|---|---|
| Step 1 |
enable Example: |
Enables privileged EXEC mode. Enter your password if prompted. |
| Step 2 |
configure terminal Example: |
Enters global configuration mode. |
| Step 3 |
interface tengigabitethernet 1/0/1 Example: |
|
| Step 4 |
ipv6 nd raguard attach-policy raguard-router Example: |
|
| Step 5 |
exit Example: |
|
IPv6 snooping must always be enabled on the switch .
To configuring IPv6 snooping, perform this procedure:
Enable IPv6 on the client machine.
| Command or Action | Purpose | |
|---|---|---|
| Step 1 |
enable Example: |
Enables privileged EXEC mode. Enter your password if prompted. |
| Step 2 |
configure terminal Example: |
Enters global configuration mode. |
| Step 3 |
vlan configuration 1 Example: |
Enters VLAN configuration mode. |
| Step 4 |
ipv6 snooping Example: |
Enables IPv6 snooping on the Vlan. |
| Step 5 |
ipv6 nd suppress Example: |
Enables the IPv6 ND suppress on the Vlan. |
| Step 6 |
exit Example: |
Saves the configuration and comes out of the Vlan configuration mode. |
The IPv6 neighbor discovery (ND) multicast suppress feature stops as many ND multicast neighbor solicit (NS) messages as possible by dropping them (and responding to solicitations on behalf of the targets) or converting them into unicast traffic. This feature runs on a layer 2 switch and is used to reduce the amount of control traffic necessary for proper link operations.
When an address is inserted into the binding table, an address resolution request sent to a multicast address is intercepted, and the device either responds on behalf of the address owner or, at layer 2, converts the request into a unicast message and forwards it to its destination.
To configure IPv6 ND suppress policy, perform this procedure:
| Command or Action | Purpose | |
|---|---|---|
| Step 1 |
enable Example: |
Enables privileged EXEC mode. Enter your password if prompted. |
| Step 2 |
configure terminal Example: |
Enters global configuration mode. |
| Step 3 |
ipv6 nd suppress policy Example: |
Defines the ND suppress policy name and enters ND suppress policy configuration mode. |
Neighbor Discover (ND) suppress can be enabled or disabled on either the VLAN or a switchport.
To configure IPv6 snooping on VLAN/PortChannel, perform this procedure:
| Command or Action | Purpose | |
|---|---|---|
| Step 1 |
enable Example: |
Enables privileged EXEC mode. Enter your password if prompted. |
| Step 2 |
configure terminal Example: |
Enters global configuration mode. |
| Step 3 |
vlan config901 Example: |
|
| Step 4 |
ipv6 nd suppress Example: |
|
| Step 5 |
end Example: |
|
| Step 6 |
interface gi1/0/1 Example: |
Creates a gigabitethernet port interface. |
| Step 7 |
ipv6 nd suppress Example: |
|
| Step 8 |
end Example: |
|
To configure IPv6 on an interface, perform this procedure:
Enable IPv6 on the client and IPv6 support on the wired infrastructure.
| Command or Action | Purpose | |
|---|---|---|
| Step 1 |
enable Example: |
Enables privileged EXEC mode. Enter your password if prompted. |
| Step 2 |
configure terminal Example: |
Enters global configuration mode. |
| Step 3 |
interface vlan 1 Example: |
Creates a interface and enters interface configuration mode. |
| Step 4 |
ip address fe80::1 link-local Example: |
Configures IPv6 address on the interface using the link-local option. |
| Step 5 |
ipv6 enable Example: |
(Optional) Enables IPv6 on the interface. |
| Step 6 |
end Example: |
Exits from the interface mode. |
To configure DHCP Pool on an interface, perform this procedure:
| Command or Action | Purpose | |
|---|---|---|
| Step 1 |
enable Example: |
Enables privileged EXEC mode. Enter your password if prompted. |
| Step 2 |
configure terminal Example: |
Enters global configuration mode. |
| Step 3 |
ipv6 dhcp pool Vlan21 Example: |
Enters the configuration mode and configures the IPv6 DHCP pool on the Vlan. |
| Step 4 |
address prefix 2001:DB8:0:1:FFFF:1234::/64 lifetime 300 10 Example: |
Enters the configuration-dhcp mode and configures the address pool and its lifetime on a Vlan. |
| Step 5 |
dns-server 2001:100:0:1::1 Example: |
Configures the DNS servers for the DHCP pool. |
| Step 6 |
domain-name example.com Example: |
Configures the domain name to complete unqualified host names. |
| Step 7 |
end Example: |
Returns to privileged EXEC mode. Alternatively, you can also press Ctrl-Z to exit global configuration mode. |
To configure stateless auto address configuration without DHCP, perform this procedure:
| Command or Action | Purpose | |
|---|---|---|
| Step 1 |
enable Example: |
Enables privileged EXEC mode. Enter your password if prompted. |
| Step 2 |
configure terminal Example: |
Enters global configuration mode. |
| Step 3 |
interface vlan 1 Example: |
Creates a interface and enters interface configuration mode. |
| Step 4 |
ip address fe80::1 link-local Example: |
Configures IPv6 address on the interface using the link-local option. |
| Step 5 |
ipv6 enable Example: |
(Optional) Enables IPv6 on the interface. |
| Step 6 |
no ipv6 nd managed-config-flag Example: |
Ensures the attached hosts do not use stateful autoconfiguration to obtain addresses. |
| Step 7 |
no ipv6 nd other-config-flag Example: |
Ensures the attached hosts do not use stateful autoconfiguration to obtain non-address options from DHCP (domain etc). |
| Step 8 |
end Example: |
Returns to privileged EXEC mode. Alternatively, you can also press Ctrl-Z to exit global configuration mode. |
To configure stateless auto address configuration with DHCP, perform this procedure:
| Command or Action | Purpose | |
|---|---|---|
| Step 1 |
enable Example: |
Enables privileged EXEC mode. Enter your password if prompted. |
| Step 2 |
configure terminal Example: |
Enters global configuration mode. |
| Step 3 |
interface vlan 1 Example: |
Creates a interface and enters interface configuration mode. |
| Step 4 |
ip address fe80::1 link-local Example: |
Configures IPv6 address on the interface using the link-local option. |
| Step 5 |
ipv6 enable Example: |
(Optional) Enables IPv6 on the interface. |
| Step 6 |
no ipv6 nd managed-config-flag Example: |
Ensures the attached hosts do not use stateful autoconfiguration to obtain addresses. |
| Step 7 |
ipv6 nd other-config-flag Example: |
Ensures the attached hosts do not use stateful autoconfiguration to obtain non-address options from DHCP (domain etc). |
| Step 8 |
end Example: |
Exits from the interface mode. |
This interface configuration is for a Cisco IOS IPv6 router implementing stateful DHCPv6 on a local Device
| Command or Action | Purpose | |
|---|---|---|
| Step 1 |
enable Example: |
Enables privileged EXEC mode. Enter your password if prompted. |
| Step 2 |
configure terminal Example: |
Enters global configuration mode. |
| Step 3 |
ipv6 unicast-routing Example: |
Configures IPv6 for unicasting. |
| Step 4 |
ipv6 dhcp pool IPv6_DHCPPOOL Example: |
Enters the configuration mode and configures the IPv6 DHCP pool on the VLAN. |
| Step 5 |
address prefix 2001:DB8:0:1:FFFF:1234::/64 Example: |
Specifies the address range to provide in the pool. |
| Step 6 |
dns-server 2001:100:0:1::1 Example: |
Provides the DNS server option to DHCP clients. |
| Step 7 |
domain-name example.com Example: |
Provides the domain name option to DHCP clients. |
| Step 8 |
exit Example: |
Returns to the previous mode. |
| Step 9 |
interface vlan1 Example: |
Enters the interface mode to configure the stateful DHCP. |
| Step 10 |
description IPv6-DHCP-Stateful Example: |
Enter description for the stateful IPv6 DHCP. |
| Step 11 |
ipv6 address 2001:DB8:0:20::1/64 Example: |
Enters the IPv6 address for the stateful IPv6 DHCP. |
| Step 12 |
ip address 192.168.20.1 255.255.255.0 Example: |
Enters the IPv6 address for the stateful IPv6 DHCP. |
| Step 13 |
ipv6 nd prefix 2001:db8::/64 no-advertise Example: |
Configures the IPv6 routing prefix advertisement that must not be advertised. |
| Step 14 |
ipv6 nd managed-config-flag Example: |
Configures IPv6 interfaces neighbor discovery to allow the hosts to uses DHCP for address configuration. |
| Step 15 |
ipv6 nd other-config-flag Example: |
Configures IPv6 interfaces neighbor discovery to allow the hosts to uses DHCP for non-address configuration. |
| Step 16 |
ipv6 dhcp server IPv6_DHCPPOOL Example: |
Configures the DHCP server on the interface. |
This interface configuration is for a Cisco IOS IPv6 router implementing stateful DHCPv6 on an external DHCP server.
| Command or Action | Purpose | |
|---|---|---|
| Step 1 |
enable Example: |
Enables privileged EXEC mode. Enter your password if prompted. |
| Step 2 |
configure terminal Example: |
Enters global configuration mode. |
| Step 3 |
ipv6 unicast-routing Example: |
Configures the IPv6 for unicasting. |
| Step 4 |
dns-server 2001:100:0:1::1 Example: |
Provides the DNS server option to DHCP clients. |
| Step 5 |
domain-name example.com Example: |
Provides the domain name option to DHCP clients. |
| Step 6 |
exit Example: |
Returns to the previous mode. |
| Step 7 |
interface vlan1 Example: |
Enters the interface mode to configure the stateful DHCP. |
| Step 8 |
description IPv6-DHCP-Stateful Example: |
Enter description for the stateful IPv6 DHCP. |
| Step 9 |
ipv6 address 2001:DB8:0:20::1/64 Example: |
Enters the IPv6 address for the stateful IPv6 DHCP. |
| Step 10 |
ip address 192.168.20.1 255.255.255.0 Example: |
Enters the IPv6 address for the stateful IPv6 DHCP. |
| Step 11 |
ipv6 nd prefix 2001:db8::/64 no-advertise Example: |
Configures the IPv6 routing prefix advertisement that must not be advertised. |
| Step 12 |
ipv6 nd managed-config-flag Example: |
Configures IPv6 interfaces neighbor discovery to allow the hosts to uses DHCP for address configuration. |
| Step 13 |
ipv6 nd other-config-flag Example: |
Configures IPv6 interfaces neighbor discovery to allow the hosts to uses DHCP for non-address configuration. |
| Step 14 |
ipv6 dhcp_relay destination 2001:DB8:0:20::2 Example: |
Configures the DHCP server on the interface. |
This example displays the output of the show ipv6 dhcp pool command. This command displays the IPv6 service configuration on the device. The vlan 21 configured pool detail displays 6 clients that are currently using addresses from the pool.
| Command or Action | Purpose |
|---|---|
|
show ipv6 dhcp pool Example: |
Displays the IPv6 service configuration on the device. |
| Related Topic | Document Title |
|---|---|
|
Cisco IOS commands |
| MIB | MIBs Link |
|---|---|
| All the supported MIBs for this release. |
To locate and download MIBs for selected platforms, Cisco IOS releases, and feature sets, use Cisco MIB Locator found at the following URL: |
| Description | Link |
|---|---|
|
The Cisco Support website provides extensive online resources, including documentation and tools for troubleshooting and resolving technical issues with Cisco products and technologies. To receive security and technical information about your products, you can subscribe to various services, such as the Product Alert Tool (accessed from Field Notices), the Cisco Technical Services Newsletter, and Really Simple Syndication (RSS) Feeds. Access to most tools on the Cisco Support website requires a Cisco.com user ID and password. |
|
Feature |
Release |
Modification |
|---|---|---|
|
IPv6 Client Address Learning Functionality |
Cisco IOS XE Fuji 16.8.1a |
This feature was introduced. This feature was introduced for Cisco Catalyst 9500 Series Switches - High Performance |
 Feedback