Overview of Port-Based Traffic Control
Port-based traffic control is a set of Layer 2 features on the Cisco Catalyst switches used to filter or block packets at the port level in response to specific traffic conditions. The following port-based traffic control features are supported:
-
Storm Control
-
Protected Ports
-
Port Blocking
Information About Storm Control
Storm Control
Storm control prevents traffic on a LAN from being disrupted by a broadcast, multicast, or unicast storm on one of the physical interfaces. A LAN storm occurs when packets flood the LAN, creating excessive traffic and degrading network performance. Errors in the protocol-stack implementation, mistakes in network configurations, or users issuing a denial-of-service attack can cause a storm.
Storm control (or traffic suppression) monitors packets passing from an interface to the switching bus and determines if the packet is unicast, multicast, or broadcast. The switch counts the number of packets of a specified type received within the 1-second time interval and compares the measurement with a predefined suppression-level threshold.
How Traffic Activity is Measured
Storm control uses one of these methods to measure traffic activity:
-
Bandwidth as a percentage of the total available bandwidth of the port that can be used by the broadcast, multicast, or unicast traffic
-
Traffic rate in packets per second at which broadcast, multicast, or unicast packets are received
-
Traffic rate in bits per second at which broadcast, multicast, or unicast packets are received
With each method, the port blocks traffic when the rising threshold is reached. The port remains blocked until the traffic rate drops below the falling threshold (if one is specified) and then resumes normal forwarding. If the falling suppression level is not specified, the switch blocks all traffic until the traffic rate drops below the rising suppression level. In general, the higher the level, the less effective the protection against broadcast storms.
 Note |
When the storm control threshold for multicast traffic is reached, all multicast traffic except control traffic, such as bridge protocol data unit (BDPU) and Cisco Discovery Protocol frames, are blocked. However, the switch does not differentiate between routing updates, such as OSPF, and regular multicast data traffic, so both types of traffic are blocked. |
Traffic Patterns
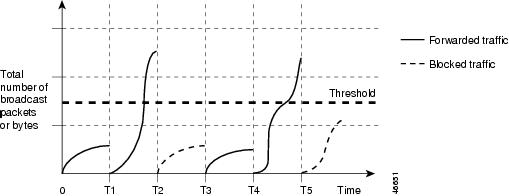
Broadcast traffic being forwarded exceeded the configured threshold between time intervals T1 and T2 and between T4 and T5. When the amount of specified traffic exceeds the threshold, all traffic of that kind is dropped for the next time period. Therefore, broadcast traffic is blocked during the intervals following T2 and T5. At the next time interval (for example, T3), if broadcast traffic does not exceed the threshold, it is again forwarded.
The combination of the storm-control suppression level and the 1-second time interval controls the way the storm control algorithm works. A higher threshold allows more packets to pass through. A threshold value of 100 percent means that no limit is placed on the traffic. A value of 0.0 means that all broadcast, multicast, or unicast traffic on that port is blocked.
Note |
Because packets do not arrive at uniform intervals, the 1-second time interval during which traffic activity is measured can affect the behavior of storm control. |
You use the storm-control interface configuration commands to set the threshold value for each traffic type.
How to Configure Storm Control
Configuring Storm Control and Threshold Levels
You configure storm control on a port and enter the threshold level that you want to be used for a particular type of traffic.
However, because of hardware limitations and the way in which packets of different sizes are counted, threshold percentages are approximations. Depending on the sizes of the packets making up the incoming traffic, the actual enforced threshold might differ from the configured level by several percentage points.
Note |
Storm control is supported on physical interfaces. You can also configure storm control on an EtherChannel. When storm control is configured on an EtherChannel, the storm control settings propagate to the EtherChannel physical interfaces. |
Follow these steps to storm control and threshold levels:
Before you begin
Storm control is supported on physical interfaces. You can also configure storm control on an EtherChannel. When storm control is configured on an EtherChannel, the storm control settings propagate to the EtherChannel physical interfaces.
Procedure
| Command or Action | Purpose | |
|---|---|---|
|
Step 1 |
enable Example: |
Enables privileged EXEC mode.
|
|
Step 2 |
configure terminal Example: |
Enters global configuration mode. |
|
Step 3 |
interface interface-id Example: |
Specifies the interface to be configured, and enter interface configuration mode. |
|
Step 4 |
storm-control {broadcast | multicast | unicast} level {level [level-low] | bps bps [bps-low] | pps pps [pps-low]} Example: |
Configures broadcast, multicast, or unicast storm control. By default, storm control is disabled. The keywords have these meanings:
For BPS and PPS settings, you can use metric suffixes such as k, m, and g for large number thresholds. |
|
Step 5 |
storm-control action {shutdown | trap} Example: |
Specifies the action to be taken when a storm is detected. The default is to filter out the traffic and not to send traps.
|
|
Step 6 |
end Example: |
Returns to privileged EXEC mode. |
|
Step 7 |
show storm-control [interface-id] [broadcast | multicast | unicast] Example: |
Verifies the storm control suppression levels set on the interface for the specified traffic type. If you do not enter a traffic type, details for all traffic types (broadcast, multicast and unicast) are displayed. |
|
Step 8 |
copy running-config startup-config Example: |
(Optional) Saves your entries in the configuration file. |
Information About Protected Ports
Protected Ports
Some applications require that no traffic be forwarded at Layer 2 between ports on the same switch so that one neighbor does not see the traffic generated by another neighbor. In such an environment, the use of protected ports ensures that there is no exchange of unicast, broadcast, or multicast traffic between these ports on the switch.
Protected ports have these features:
-
A protected port does not forward any traffic (unicast, multicast, or broadcast) to any other port that is also a protected port. Data traffic cannot be forwarded between protected ports at Layer 2; only control traffic, such as PIM packets, is forwarded because these packets are processed by the CPU and forwarded in software. All data traffic passing between protected ports must be forwarded through a Layer 3 device.
-
Forwarding behavior between a protected port and a nonprotected port proceeds as usual.
Default Protected Port Configuration
The default is to have no protected ports defined.
Protected Ports Guidelines
You can configure protected ports on a physical interface (for example, Gigabit Ethernet port 1) or an EtherChannel group (for example, port-channel 5). When you enable protected ports for a port channel, it is enabled for all ports in the port-channel group.
How to Configure Protected Ports
Configuring a Protected Port
Before you begin
Protected ports are not pre-defined. This is the task to configure one.
Procedure
| Command or Action | Purpose | |
|---|---|---|
|
Step 1 |
enable Example: |
Enables privileged EXEC mode.
|
|
Step 2 |
configure terminal Example: |
Enters global configuration mode. |
|
Step 3 |
interface interface-id Example: |
Specifies the interface to be configured, and enter interface configuration mode. |
|
Step 4 |
switchport protected Example: |
Configures the interface to be a protected port. |
|
Step 5 |
end Example: |
Returns to privileged EXEC mode. |
|
Step 6 |
show interfaces interface-id switchport Example: |
Verifies your entries. |
|
Step 7 |
show running-config Example: |
Verifies your entries. |
|
Step 8 |
copy running-config startup-config Example: |
(Optional) Saves your entries in the configuration file. |
Monitoring Protected Ports
|
Command |
Purpose |
|---|---|
|
show interfaces [interface-id] switchport |
Displays the administrative and operational status of all switching (nonrouting) ports or the specified port, including port blocking and port protection settings. |
Information About Port Blocking
Port Blocking
By default, the switch floods packets with unknown destination MAC addresses out of all ports. If unknown unicast and multicast traffic is forwarded to a protected port, there could be security issues. To prevent unknown unicast or multicast traffic from being forwarded from one port to another, you can block a port (protected or nonprotected) from flooding unknown unicast or multicast packets to other ports.
Note |
With multicast traffic, the port blocking feature blocks only pure Layer 2 packets. Multicast packets that contain IPv4 or IPv6 information in the header are not blocked. |
How to Configure Port Blocking
Blocking Flooded Traffic on an Interface
Before you begin
The interface can be a physical interface or an EtherChannel group. When you block multicast or unicast traffic for a port channel, it is blocked on all ports in the port-channel group.
Procedure
| Command or Action | Purpose | |
|---|---|---|
|
Step 1 |
enable Example: |
Enables privileged EXEC mode.
|
|
Step 2 |
configure terminal Example: |
Enters global configuration mode. |
|
Step 3 |
interface interface-id Example: |
Specifies the interface to be configured, and enter interface configuration mode. |
|
Step 4 |
switchport block multicast Example: |
Blocks unknown multicast forwarding out of the port. |
|
Step 5 |
switchport block unicast Example: |
Blocks unknown unicast forwarding out of the port. |
|
Step 6 |
end Example: |
Returns to privileged EXEC mode. |
|
Step 7 |
show interfaces interface-id switchport Example: |
Verifies your entries. |
|
Step 8 |
show running-config Example: |
Verifies your entries. |
|
Step 9 |
copy running-config startup-config Example: |
(Optional) Saves your entries in the configuration file. |
Monitoring Port Blocking
|
Command |
Purpose |
|---|---|
|
show interfaces [interface-id] switchport |
Displays the administrative and operational status of all switching (nonrouting) ports or the specified port, including port blocking and port protection settings. |
Additional References for Port-Based Traffic Control
MIBs
| MIB | MIBs Link |
|---|---|
|
All the supported MIBs for this release. |
To locate and download MIBs for selected platforms, Cisco IOS releases, and feature sets, use Cisco MIB Locator found at the following URL: |
Technical Assistance
| Description | Link |
|---|---|
|
The Cisco Support website provides extensive online resources, including documentation and tools for troubleshooting and resolving technical issues with Cisco products and technologies. To receive security and technical information about your products, you can subscribe to various services, such as the Product Alert Tool (accessed from Field Notices), the Cisco Technical Services Newsletter, and Really Simple Syndication (RSS) Feeds. Access to most tools on the Cisco Support website requires a Cisco.com user ID and password. |
Feature History for Port-Based Traffic Control
This table provides release and related information for features explained in this module.
These features are available on all releases subsequent to the one they were introduced in, unless noted otherwise.
|
Release |
Feature |
Feature Information |
|---|---|---|
|
Cisco IOS XE Everest 16.6.1 |
Port-Based Traffic Control |
Port-based traffic control is a set of Layer 2 features on the Cisco Catalyst switches used to filter or block packets at the port level in response to specific traffic conditions. |
Use Cisco Feature Navigator to find information about platform and software image support. To access Cisco Feature Navigator, go to http://www.cisco.com/go/cfn.
 Feedback