The documentation set for this product strives to use bias-free language. For the purposes of this documentation set, bias-free is defined as language that does not imply discrimination based on age, disability, gender, racial identity, ethnic identity, sexual orientation, socioeconomic status, and intersectionality. Exceptions may be present in the documentation due to language that is hardcoded in the user interfaces of the product software, language used based on RFP documentation, or language that is used by a referenced third-party product. Learn more about how Cisco is using Inclusive Language.
Auto-upgrade across active and standby Router Processors (RPs) is not supported.
Information About Performing Device Setup Configuration
Review the sections in this module before performing your initial device configuration tasks that include IP address assignments and DHCP autoconfiguration.
Device Boot Process
To start your device, you need to follow the procedures in the hardware installation guide for installing and powering on the deviceand setting up the initial device configuration.
The normal boot process involves the operation of the boot loader software and includes these activities:
Performs low-level CPU initialization. It initializes the CPU registers, which control where physical memory is mapped, its
quantity, its speed, and so forth.
Performs power-on self-test (POST) for the CPU subsystem and tests the system DRAM.
Initializes the file systems on the system board.
Loads a default operating system software image into memory and boots up the device.
The boot loader provides access to the file systems before the operating system is loaded. Normally, the boot loader is used
only to load, decompress, and start the operating system. After the boot loader gives the operating system control of the
CPU, the boot loader is not active until the next system reset or power-on.
The boot loader also provides trap-door access into the system if the operating system has problems serious enough that it
cannot be used. The trap-door mechanism provides enough access to the system so that if it is necessary, you can reinstall
the operating system software image by using the Xmodem Protocol, recover from a lost or forgotten password, and finally restart
the operating system.
Before you can assign device information, make sure you have connected a PC or terminal to the console port or a PC to the Ethernet management port, and
make sure you have configured the PC or terminal-emulation software baud rate and character format to match these of the device console port:
Baud rate default is 9600.
Data bits default is 8.
Note
If the data bits option is set to 8, set the parity option to none.
Stop bits default is 2 (minor).
Parity settings default is none.
Software Install Overview
The Software Install feature provides a uniform experience across different types of upgrades, such as full image install,
Software Maintenance Upgrade (SMU), and In-Service Model Update (data model package).
The Software Install feature facilitates moving from one version of the software to another version in install mode. Use the
install command in privileged EXEC mode to install or upgrade a software image. You can also downgrade to a previous version of the
software image, using the install mode.
The method that you use to upgrade Cisco IOS XE software depends on whether the switch is running in install mode or in bundle
mode. In bundle mode or consolidated boot mode, a .bin image file is used from a local or remote location to boot the device.
In the install boot mode, the bootloader uses the packages.conf file to boot up the device.
The following software install features are supported on your switch:
Software bundle installation on a standalone switch.
Software rollback to a previously installed package set.
Software Boot Modes
Your device supports two modes to boot the software packages:
Installed Boot Mode
You can boot your device in installed mode by booting the software package provisioning file that resides in flash:
Switch: boot flash:packages.conf
Note
We recommend that you use the install mode for Cisco Catalyst 9200 Series Switches.
Note
The packages.conf file for particular release is created on following the install workflow described in the section, Installing a Software Package.
The provisioning file contains a list of software packages to boot, mount, and run. The ISO file system in each installed
package is mounted to the root file system directly from flash.
Note
The packages and provisioning file used to boot in installed mode must reside in flash. Booting in installed mode from usbflash0:
or tftp: is not supported.
Bundle Boot Mode
You can boot your device in bundle boot mode by booting the bundle (.bin) file:
switch: boot flash:cat9k_iosxe.16.06.01.SPA.bin
The provisioning file contained in a bundle is used to decide which packages to boot, mount, and run. Packages are extracted
from the bundle and copied to RAM. The ISO file system in each package is mounted to the root file system.
Unlike install boot mode, additional memory that is equivalent to the size of the bundle is used when booting in bundle mode.
Changing the Boot Mode
To change a device running in bundle boot mode to install mode, set the boot variable to flash:packages.conf, and execute
the install add file flash:cat9k_2.bin activate commit command. After the command is executed, the device reboots in install boot mode.
Installing the Software Package
You can install the software package on a device by using the install add, install activate, and install commit commands in privileged EXEC mode.
The install add command copies the software package from a local or remote location to the device. The location can be FTP, HTTP, HTTPs,
or TFTP. The command extracts individual components of the .bin file into sub-packages and packages.conf file. It also validates
the file to ensure that the image file is specific to the platform.
For the install activate command to work, the package must be available in the device bootflash. When this command is configured, previously added
packages from the .bin file get activated, and the system reloads.
Enable the install commit command to make updates persistent over reloads.
Installing an update replaces any previously installed software image. At any time, only one image is installed on the device.
The following flow chart explains how the software install works:
Figure 1. Committing a Software Package
Note
The install activate command reloads the device with the new image.
Terminating a Software Install
You can terminate the activation of a software image in the following ways:
Using the install activate auto-abort-timer command. When the device reloads after activating a new image, the auto-abort-timer is triggered. If the timer expires before
issuing the install commit command, then the installation process is terminated; the device reloads again and boots up with the previous version of
the software image.
Use the install auto-abort-timer stop command to stop this timer.
Using the install abort command. This command rolls back to the version that was running before installing the new software. Use this command before
issuing the install commit command.
Devices Information Assignment
You can assign IP information through the device setup program, through a DHCP server, or manually.
Use the device setup program if you want to be prompted for specific IP information. With this program, you can also configure a hostname
and an enable secret password.
It gives you the option of assigning a Telnet password (to provide security during remote management) and configuring your
switch as a command or member switch of a cluster or as a standalone switch.
Use a DHCP server for centralized control and automatic assignment of IP information after the server is configured.
Note
If you are using DHCP, do not respond to any of the questions in the setup program until the device receives the dynamically assigned IP address and reads the configuration file.
If you are an experienced user familiar with the device configuration steps, manually configure the device. Otherwise, use the setup program described in the Boot Process section.
Default Switch Information
Table 1. Default Switch Information
Feature
Default Setting
IP address and subnet mask
No IP address or subnet mask are defined.
Default gateway
No default gateway is defined.
Enable secret password
No password is defined.
Hostname
The factory-assigned default hostname is Device.
Telnet password
No password is defined.
Cluster command switch functionality
Disabled.
Cluster name
No cluster name is defined.
DHCP-Based Autoconfiguration Overview
DHCP provides configuration information to Internet hosts and internetworking devices. This protocol consists of two components:
one for delivering configuration parameters from a DHCP server to a device and an operation for allocating network addresses
to devices. DHCP is built on a client-server model, in which designated DHCP servers allocate network addresses and deliver
configuration parameters to dynamically configured devices. The device can act as both a DHCP client and a DHCP server.
During DHCP-based autoconfiguration, your device (DHCP client) is automatically configured at startup with IP address information and a configuration file.
With DHCP-based autoconfiguration, no DHCP client-side configuration is needed on your device. However, you need to configure the DHCP server for various lease options associated with IP addresses.
If you want to use DHCP to relay the configuration file location on the network, you might also need to configure a Trivial
File Transfer Protocol (TFTP) server and a Domain Name System (DNS) server.
The DHCP server for your device can be on the same LAN or on a different LAN than the device. If the DHCP server is running on a different LAN, you should configure a DHCP relay device between your device and the DHCP server. A relay device forwards broadcast traffic between two directly connected LANs. A router does not forward
broadcast packets, but it forwards packets based on the destination IP address in the received packet.
DHCP-based autoconfiguration replaces the BOOTP client functionality on your device.
DHCP Client Request Process
When you boot up your device, the DHCP client is invoked and requests configuration information from a DHCP server when the configuration file is not
present on the device. If the configuration file is present and the configuration includes the ip address dhcp interface configuration command on specific routed interfaces, the DHCP client is invoked and requests the IP address information
for those interfaces.
This is the sequence of messages that are exchanged between the DHCP client and the DHCP server.
Figure 2. DHCP Client and Server Message Exchange
The client, Device A, broadcasts a DHCPDISCOVER message to locate a DHCP server. The DHCP server offers configuration parameters (such as an
IP address, subnet mask, gateway IP address, DNS IP address, a lease for the IP address, and so forth) to the client in a
DHCPOFFER unicast message.
In a DHCPREQUEST broadcast message, the client returns a formal request for the offered configuration information to the DHCP
server. The formal request is broadcast so that all other DHCP servers that received the DHCPDISCOVER broadcast message from
the client can reclaim the IP addresses that they offered to the client.
The DHCP server confirms that the IP address has been allocated to the client by returning a DHCPACK unicast message to the
client. With this message, the client and server are bound, and the client uses configuration information received from the
server. The amount of information the device receives depends on how you configure the DHCP server.
If the configuration parameters sent to the client in the DHCPOFFER unicast message are invalid (a configuration error exists),
the client returns a DHCPDECLINE broadcast message to the DHCP server.
The DHCP server sends the client a DHCPNAK denial broadcast message, which means that the offered configuration parameters
have not been assigned, that an error has occurred during the negotiation of the parameters, or that the client has been slow
in responding to the DHCPOFFER message (the DHCP server assigned the parameters to another client).
A DHCP client might receive offers from multiple DHCP or BOOTP servers and can accept any of the offers; however, the client
usually accepts the first offer it receives. The offer from the DHCP server is not a guarantee that the IP address is allocated
to the client; however, the server usually reserves the address until the client has had a chance to formally request the
address. If the device accepts replies from a BOOTP server and configures itself, the device broadcasts, instead of unicasts, TFTP requests to obtain the device configuration file.
The DHCP hostname option allows a group of devices to obtain hostnames and a standard configuration from the central management DHCP server. A client (device) includes in its DCHPDISCOVER message an option 12 field used to request a hostname and other configuration parameters from
the DHCP server. The configuration files on all clients are identical except for their DHCP-obtained hostnames.
DHCP-based Autoconfiguration and Image Update
You can use the DHCP image upgrade features to configure a DHCP server to download both a new image and a new configuration
file to one or more devices in a network. Simultaneous image and configuration upgrade for all switches in the network helps ensure that each new device added to a network receives the same image and configuration.
There are two types of DHCP image upgrades: DHCP autoconfiguration and DHCP auto-image update.
Restrictions for DHCP-based Autoconfiguration
The DHCP-based autoconfiguration with a saved configuration process stops if there is not at least one Layer 3 interface in
an up state without an assigned IP address in the network.
Unless you configure a timeout, the DHCP-based autoconfiguration with a saved configuration feature tries indefinitely to
download an IP address.
The auto-install process stops if a configuration file cannot be downloaded or if the configuration file is corrupted.
The configuration file that is downloaded from TFTP is merged with the existing configuration in the running configuration
but is not saved in the NVRAM unless you enter the write memory or copy running-configuration startup-configuration privileged EXEC command. If the downloaded configuration is saved to the startup configuration, the feature is not triggered
during subsequent system restarts.
DHCP Autoconfiguration
DHCP autoconfiguration downloads a configuration file to one or more devices in your network from a DHCP server. The downloaded configuration file becomes the running configuration of the device. It does not over write the bootup configuration saved in the flash, until you reload the device.
DHCP Auto-Image Update
You can use DHCP auto-image upgrade with DHCP autoconfiguration to download both a configuration and a new image to one or
more devices in your network. The device (or devices) downloading the new configuration and the new image can be blank (or only have a default factory configuration loaded).
If the new configuration is downloaded to a switch that already has a configuration, the downloaded configuration is appended
to the configuration file stored on the switch. (Any existing configuration is not overwritten by the downloaded one.)
To enable a DHCP auto-image update on the device, the TFTP server where the image and configuration files are located must be configured with the correct option 67 (the configuration
filename), option 66 (the DHCP server hostname) option 150 (the TFTP server address), and option 125 (description of the Cisco
IOS image file) settings.
After you install the device in your network, the auto-image update feature starts. The downloaded configuration file is saved in the running configuration
of the device, and the new image is downloaded and installed on the device. When you reboot the device, the configuration is stored in the saved configuration on the device.
DHCP Server Configuration Guidelines
Follow these guidelines if you are configuring a device as a DHCP server:
You should configure the DHCP server with reserved leases that are bound to each device by the device hardware address.
If you want the device to receive IP address information, you must configure the DHCP server with these lease options:
IP address of the client (required)
Subnet mask of the client (required)
DNS server IP address (optional)
Router IP address (default gateway address to be used by the device) (required)
If you want the device to receive the configuration file from a TFTP server, you must configure the DHCP server with these lease options:
TFTP server name (required)
Boot filename (the name of the configuration file that the client needs) (recommended)
Hostname (optional)
Depending on the settings of the DHCP server, the device can receive IP address information, the configuration file, or both.
If you do not configure the DHCP server with the lease options described previously, it replies to client requests with only
those parameters that are configured. If the IP address and the subnet mask are not in the reply, the device is not configured. If the router IP address or the TFTP server name are not found, the device might send broadcast, instead of unicast, TFTP requests. Unavailability of other lease options does not affect autoconfiguration.
The device can act as a DHCP server. By default, the Cisco IOS DHCP server and relay agent features are enabled on your device but are not configured. (These features are not operational.)
Purpose of the TFTP Server
Based on the DHCP server configuration, the device attempts to download one or more configuration files from the TFTP server. If you configured the DHCP server to respond to
the device with all the options required for IP connectivity to the TFTP server, and if you configured the DHCP server with a TFTP server
name, address, and configuration filename, the device attempts to download the specified configuration file from the specified TFTP server.
If you did not specify the configuration filename, the TFTP server, or if the configuration file could not be downloaded,
the device attempts to download a configuration file by using various combinations of filenames and TFTP server addresses. The files
include the specified configuration filename (if any) and these files: network-config, cisconet.cfg, hostname.config, or hostname.cfg, where hostname is the device’s current hostname. The TFTP server addresses used include the specified TFTP server address (if any) and the broadcast address
(255.255.255.255).
For the device to successfully download a configuration file, the TFTP server must contain one or more configuration files in its base directory.
The files can include these files:
The configuration file named in the DHCP reply (the actual device configuration file).
The network-confg or the cisconet.cfg file (known as the default configuration files).
The router-confg or the ciscortr.cfg file (These files contain commands common to all devices. Normally, if the DHCP and TFTP servers are properly configured, these files are not accessed.)
If you specify the TFTP server name in the DHCP server-lease database, you must also configure the TFTP server name-to-IP-address
mapping in the DNS-server database.
If the TFTP server to be used is on a different LAN from the device, or if it is to be accessed by the device through the broadcast address (which occurs if the DHCP server response does not contain all the required information described
previously), a relay must be configured to forward the TFTP packets to the TFTP server. The preferred solution is to configure
the DHCP server with all the required information.
Purpose of the DNS Server
The DHCP server uses the DNS server to resolve the TFTP server name to an IP address. You must configure the TFTP server name-to-IP
address map on the DNS server. The TFTP server contains the configuration files for the device.
You can configure the IP addresses of the DNS servers in the lease database of the DHCP server from where the DHCP replies
will retrieve them. You can enter up to two DNS server IP addresses in the lease database.
The DNS server can be on the same LAN or on a different LAN from the device. If it is on a different LAN, the device must be able to access it through a router.
How to Obtain Configuration Files
Depending on the availability of the IP address and the configuration filename in the DHCP reserved lease, the device obtains its configuration information in these ways:
The IP address and the configuration filename is reserved for the device and provided in the DHCP reply (one-file read method).
The device receives its IP address, subnet mask, TFTP server address, and the configuration filename from the DHCP server. The device sends a unicast message to the TFTP server to retrieve the named configuration file from the base directory of the server
and upon receipt, it completes its boot up process.
The IP address and the configuration filename is reserved for the device, but the TFTP server address is not provided in the DHCP reply (one-file read method).
The device receives its IP address, subnet mask, and the configuration filename from the DHCP server. The device sends a broadcast message to a TFTP server to retrieve the named configuration file from the base directory of the server,
and upon receipt, it completes its boot-up process.
Only the IP address is reserved for the device and provided in the DHCP reply. The configuration filename is not provided (two-file read method).
The device receives its IP address, subnet mask, and the TFTP server address from the DHCP server. The device sends a unicast message to the TFTP server to retrieve the network-confg or cisconet.cfg default configuration file. (If
the network-confg file cannot be read, the device reads the cisconet.cfg file.)
The default configuration file contains the hostnames-to-IP-address mapping for the device. The device fills its host table with the information in the file and obtains its hostname. If the hostname is not found in the file,
the device uses the hostname in the DHCP reply. If the hostname is not specified in the DHCP reply, the device uses the default Switch as its hostname.
After obtaining its hostname from the default configuration file or the DHCP reply, the device reads the configuration file that has the same name as its hostname (hostname-confg or hostname.cfg, depending on whether network-confg or cisconet.cfg was read earlier) from the TFTP server. If the cisconet.cfg file
is read, the filename of the host is truncated to eight characters.
If the device cannot read the network-confg, cisconet.cfg, or the hostname file, it reads the router-confg file. If the device cannot read the router-confg file, it reads the ciscortr.cfg file.
Note
The device broadcasts TFTP server requests if the TFTP server is not obtained from the DHCP replies, if all attempts to read the configuration
file through unicast transmissions fail, or if the TFTP server name cannot be resolved to an IP address.
How to Control Environment Variables
With a normally operating device, you enter the boot loader mode only through the console connection configured for 9600 bps. Unplug the device power cord, and press the Mode button while reconnecting the power cord. You can release the Mode button after all the amber system LEDs turn on and remain solid. The boot loader device prompt then appears.
The device boot loader software provides support for nonvolatile environment variables, which can be used to control how the boot loader,
or any other software running on the system, operates. Boot loader environment variables are similar to environment variables
that can be set on UNIX or DOS systems.
Environment variables that have values are stored in flash memory outside of the flash file system.
Each line in these files contains an environment variable name and an equal sign followed by the value of the variable. A
variable has no value if it is not present; it has a value if it is listed even if the value is a null string. A variable
that is set to a null string (for example, “ ”) is a variable with a value. Many environment variables are predefined and
have default values.
You can change the settings of the environment variables by accessing the boot loader or by using Cisco IOS commands. Under
normal circumstances, it is not necessary to alter the setting of the environment variables.
Common Environment Variables
This table describes the function of the most common environment variables.
Table 2. Common Environment Variables
Variable
Boot Loader Command
Cisco IOS Global Configuration Command
BOOT
set BOOTfilesystem:/file-url ...
A semicolon-separated list of executable files to try to load and execute when automatically booting.
boot system {filesystem:/file-url ... | switch {number | all}}
Specifies the Cisco IOS image to load during the next boot cycle . This command changes the setting of the BOOT environment
variable.
The package provisioning file, also referred to as the packages.conf file, is used by the system to determine which software packages to activate during boot up.
When booting in installed mode, the package provisioning file specified in the boot command is used to determine which packages to activate. For example boot flash:packages.conf.
When booting in bundle mode, the package provisioning file contained in the booted bundle is used to activate the packages
included in the bundle. For example, boot flash:image.bin.
MANUAL_BOOT
set MANUAL_BOOT yes
Decides whether the switch automatically or manually boots.
Valid values are 1, yes, 0, and no. If it is set to no or 0, the boot loader attempts to automatically boot up the system.
If it is set to anything else, you must manually boot up the switch from the boot loader mode.
boot manual
Enables manually booting the switch during the next boot cycle and changes the setting of the MANUAL_BOOT environment variable.
The next time you reboot the system, the switch is in boot loader mode. To boot up the system, use the boot flash:filesystem:/file-url boot loader command, and specify the name of the bootable image.
CONFIG_FILE
set CONFIG_FILE flash:/file-url
Changes the filename that Cisco IOS uses to read and write a nonvolatile copy of the system configuration.
boot config-file flash:/file-url
Specifies the filename that Cisco IOS uses to read and write a nonvolatile copy of the system configuration. This command
changes the CONFIG_FILE environment variable.
BAUD
set BAUD baud-rate
line console 0
speed speed-value
Configures the baud rate.
ENABLE_BREAK
set ENABLE_BREAK yes/no
boot enable-break switch yes/no
Enables a break to the auto-boot cycle. You have 5 seconds to enter the break command.
Environment Variables for TFTP
When the switch is connected to a PC through the Ethernet management port, you can download or upload a configuration file
to the boot loader by using TFTP. Make sure the environment variables in this table are configured.
Table 3. Environment Variables for TFTP
Variable
Description
MAC_ADDR
Specifies the MAC address of the switch.
Note
We recommend that you do not modify this variable.
However, if you modify this variable after the boot loader is up or the value is different from the saved value, enter this
command before using TFTP. A reset is required for the new value to take effect.
IP_ADDRESS
Specifies the IP address and the subnet mask for the associated IP subnet of the switch.
DEFAULT_GATEWAY
Specifies the IP address and subnet mask of the default gateway.
Scheduled Reload of the Software Image
You can schedule a reload of the software image to occur on the device at a later time (for example, late at night or during the weekend when the device is used less), or you can synchronize a reload network-wide (for example, to perform a software upgrade on all devices in the network).
Note
A scheduled reload must take place within approximately 24 days.
You have these reload options:
Reload of the software to take affect in the specified minutes or hours and minutes. The reload must take place within approximately
24 hours. You can specify the reason for the reload in a string up to 255 characters in length.
Reload of the software to take place at the specified time (using a 24-hour clock). If you specify the month and day, the
reload is scheduled to take place at the specified time and date. If you do not specify the month and day, the reload takes
place at the specified time on the current day (if the specified time is later than the current time) or on the next day (if
the specified time is earlier than the current time). Specifying 00:00 schedules the reload for midnight.
The reload command halts the system. If the system is not set to manually boot up, it reboots itself.
If your device is configured for manual booting, do not reload it from a virtual terminal. This restriction prevents the device from entering the boot loader mode and then taking it from the remote user’s control.
If you modify your configuration file, the device prompts you to save the configuration before reloading. During the save operation, the system requests whether you want to
proceed with the save if the CONFIG_FILE environment variable points to a startup configuration file that no longer exists.
If you proceed in this situation, the system enters setup mode upon reload.
To cancel a previously scheduled reload, use the reload cancel privileged EXEC command.
How to Perform Device Setup Configuration
Using DHCP to download a new image and a new configuration to a device requires that you configure at least two devices. One device acts as a DHCP and TFTP server and the second device (client) is configured to download either a new configuration file or a new configuration file and a new image file.
This task describes how to configure DHCP autoconfiguration of the TFTP and DHCP settings on an existing device in the network so that it can support the autoconfiguration of a new device.
SUMMARY STEPS
configure terminal
ip dhcp poolpoolname
bootfilename
networknetwork-number mask prefix-length
default-routeraddress
option 150address
exit
tftp-server flash:filename.text
interfaceinterface-id
no switchport
ip addressaddress mask
end
DETAILED STEPS
Command or Action
Purpose
Step 1
configure terminal
Example:
Device# configure terminal
Enters global configuration mode.
Step 2
ip dhcp poolpoolname
Example:
Device(config)# ip dhcp pool pool
Creates a name for the DHCP server address pool, and enters DHCP pool configuration mode.
Step 3
bootfilename
Example:
Device(dhcp-config)# boot config-boot.text
Specifies the name of the configuration file that is used as a boot image.
Specifies the subnet network number and mask of the DHCP address pool.
Note
The prefix length specifies the number of bits that comprise the address prefix. The prefix is an alternative way of specifying
the network mask of the client. The prefix length must be preceded by a forward slash (/).
Step 5
default-routeraddress
Example:
Device(dhcp-config)# default-router 10.10.10.1
Specifies the IP address of the default router for a DHCP client.
Specifies the configuration file on the TFTP server.
Step 9
interfaceinterface-id
Example:
Device(config)# interface gigabitethernet1/0/4
Specifies the address of the client that will receive the configuration file.
Step 10
no switchport
Example:
Device(config-if)# no switchport
Puts the interface into Layer 3 mode.
Step 11
ip addressaddress mask
Example:
Device(config-if)# ip address 10.10.10.1 255.255.255.0
Specifies the IP address and mask for the interface.
Step 12
end
Example:
Device(config-if)# end
Returns to privileged EXEC mode.
Configuring DHCP Auto-Image Update (Configuration File and Image)
This task describes DHCP autoconfiguration to configure TFTP and DHCP settings on an existing device to support the installation of a new switch.
Before you begin
You must first create a text file (for example, autoinstall_dhcp) that will be uploaded to the device. In the text file, put the name of the image that you want to download (for example, cat9k_iosxe.16.xx.xx.SPA.bin).
SUMMARY STEPS
configure terminal
ip dhcp poolpoolname
bootfilename
networknetwork-number mask prefix-length
default-routeraddress
option 150address
option 125hex
copy tftp flashfilename.txt
copy tftp flashimagename.bin
exit
tftp-server flash:config.text
tftp-server flash:imagename.bin
tftp-server flash:filename.txt
interfaceinterface-id
no switchport
ip addressaddress mask
end
copyrunning-configstartup-config
DETAILED STEPS
Command or Action
Purpose
Step 1
configure terminal
Example:
Device# configure terminal
Enters global configuration mode.
Step 2
ip dhcp poolpoolname
Example:
Device(config)# ip dhcp pool pool1
Creates a name for the DHCP server address pool and enter DHCP pool configuration mode.
Step 3
bootfilename
Example:
Device(dhcp-config)# boot config-boot.text
Specifies the name of the file that is used as a boot image.
Specifies the subnet network number and mask of the DHCP address pool.
Note
The prefix length specifies the number of bits that comprise the address prefix. The prefix is an alternative way of specifying
the network mask of the client. The prefix length must be preceded by a forward slash (/).
Step 5
default-routeraddress
Example:
Device(dhcp-config)# default-router 10.10.10.1
Specifies the IP address of the default router for a DHCP client.
Specifies the text file that contains the name of the image file to download
Step 14
interfaceinterface-id
Example:
Device(config)# interface gigabitEthernet1/0/4
Specifies the address of the client that will receive the configuration file.
Step 15
no switchport
Example:
Device(config-if)# no switchport
Puts the interface into Layer 3 mode.
Step 16
ip addressaddress mask
Example:
Device(config-if)# ip address 10.10.10.1 255.255.255.0
Specifies the IP address and mask for the interface.
Step 17
end
Example:
Device(config-if)# end
Returns to privileged EXEC mode.
Step 18
copyrunning-configstartup-config
Example:
Device(config-if)# end
(Optional) Saves your entries in the configuration file.
Configuring the Client to Download Files from DHCP Server
Note
You should only configure and enable the Layer 3 interface. Do not assign an IP address or DHCP-based autoconfiguration with
a saved configuration.
SUMMARY STEPS
configure terminal
boot host dhcp
boot host retry timeouttimeout-value
banner config-save ^Cwarning-message^C
end
show boot
DETAILED STEPS
Command or Action
Purpose
Step 1
configure terminal
Example:
Device# configure terminal
Enters global configuration mode.
Step 2
boot host dhcp
Example:
Device(conf)# boot host dhcp
Enables autoconfiguration with a saved configuration.
Step 3
boot host retry timeouttimeout-value
Example:
Device(conf)# boot host retry timeout 300
(Optional) Sets the amount of time the system tries to download a configuration file.
Note
If you do not set a timeout, the system will try indefinitely to obtain an IP address from the DHCP server.
Step 4
banner config-save ^Cwarning-message^C
Example:
Device(conf)# banner config-save ^C Caution - Saving Configuration File
to NVRAM May Cause You to No longer Automatically Download Configuration Files at Reboot^C
(Optional) Creates warning messages to be displayed when you try to save the configuration file to NVRAM.
Step 5
end
Example:
Device(config-if)# end
Returns to privileged EXEC mode.
Step 6
show boot
Example:
Device# show boot
Verifies the configuration.
Manually Assigning IP Information to Multiple SVIs
This task describes how to manually assign IP information to multiple switched virtual interfaces (SVIs):
SUMMARY STEPS
configure terminal
interface vlanvlan-id
ip addressip-address subnet-mask
exit
ip default-gatewayip-address
end
show interfaces vlanvlan-id
show ip redirects
DETAILED STEPS
Command or Action
Purpose
Step 1
configure terminal
Example:
Device# configure terminal
Enters global configuration mode.
Step 2
interface vlanvlan-id
Example:
Device(config)# interface vlan 99
Enters interface configuration mode, and enters the VLAN to which the IP information is assigned. The range is 1 to 4094.
Step 3
ip addressip-address subnet-mask
Example:
Device(config-vlan)# ip address 10.10.10.2 255.255.255.0
Enters the IP address and subnet mask.
Step 4
exit
Example:
Device(config-vlan)# exit
Returns to global configuration mode.
Step 5
ip default-gatewayip-address
Example:
Device(config)# ip default-gateway 10.10.10.1
Enters the IP address of the next-hop router interface that is directly connected to the device where a default gateway is being configured. The default gateway receives IP packets with unresolved destination IP addresses
from the device.
Once the default gateway is configured, the device has connectivity to the remote networks with which a host needs to communicate.
Note
When your device is configured to route with IP, it does not need to have a default gateway set.
Note
The device capwap relays on default-gateway configuration to support routed access point join the device.
Step 6
end
Example:
Device(config)# end
Returns to privileged EXEC mode.
Step 7
show interfaces vlanvlan-id
Example:
Device# show interfaces vlan 99
Verifies the configured IP address.
Step 8
show ip redirects
Example:
Device# show ip redirects
Verifies the configured default gateway.
Modifying the Device Startup Configuration
Specifying the Filename to Read and Write the System Configuration
By default, the Cisco IOS software uses the config.text file to read and write a nonvolatile copy of the system configuration.
However, you can specify a different filename, which will be loaded during the next boot cycle.
Before you begin
Use a standalone device for this task.
SUMMARY STEPS
configure terminal
boot flash:/file-url
end
show boot
copyrunning-configstartup-config
DETAILED STEPS
Command or Action
Purpose
Step 1
configure terminal
Example:
Switch# configure terminal
Enters global configuration mode.
Step 2
boot flash:/file-url
Example:
Switch(config)# boot flash:config.text
Specifies the configuration file to load during the next boot cycle.
file-url—The path (directory) and the configuration filename.
Filenames and directory names are case-sensitive.
Step 3
end
Example:
Switch(config)# end
Returns to privileged EXEC mode.
Step 4
show boot
Example:
Switch# show boot
Verifies your entries.
The boot global configuration command changes the setting of the CONFIG_FILE environment variable.
Step 5
copyrunning-configstartup-config
Example:
Switch# copy running-config startup-config
(Optional) Saves your entries in the configuration file.
Manually Booting the Switch
By default, the switch automatically boots up; however, you can configure it to manually boot up.
Before you begin
Use a standalone switch for this task.
SUMMARY STEPS
configure terminal
boot manual
end
show boot
copyrunning-configstartup-config
DETAILED STEPS
Command or Action
Purpose
Step 1
configure terminal
Example:
Device# configure terminal
Enters global configuration mode.
Step 2
boot manual
Example:
Device(config)# boot manual
Enables the switch to manually boot up during the next boot cycle.
Step 3
end
Example:
Device(config)# end
Returns to privileged EXEC mode.
Step 4
show boot
Example:
Device# show boot
Verifies your entries.
The boot manual global command changes the setting of the MANUAL_BOOT environment variable.
The next time you reboot the system, the switch is in boot loader mode, shown by the switch: prompt. To boot up the system, use the bootfilesystem:/file-url boot loader command.
filesystem:—Uses flash: for the system board flash device.
Switch: boot flash:
For file-url—Specifies the path (directory) and the name of the bootable image.
Filenames and directory names are case-sensitive.
Step 5
copyrunning-configstartup-config
Example:
Device# copy running-config startup-config
(Optional) Saves your entries in the configuration file.
Booting the Device in Installed Mode
Installing a Software Package
You can install, activate, and commit a software package using a single command or using separate commands. This task shows
how to use the install add file activate commit command for installing a software package.
Copies the software install package from a remote location (via FTP, HTTP, HTTPs, TFTP) to the device, performs a compatibility
check for the platform and image versions, activates the software package, and makes the package persistent across reloads.
This command extracts the individual components of the .bin file into sub-packages and packages.conf file.
The device reloads after executing this command.
Step 3
exit
Example:
Device# exit
Exits privileged EXEC mode and returns to user EXEC mode.
Copies the software install package from a remote location (via FTP, HTTP, HTTPs, TFTP) to the device, and performs a compatibility
check for the platform and image versions.
This command extracts the individual components of the .bin file into sub-packages and packages.conf file.
Step 3
install activate [auto-abort-timer]
Example:
Device# install activate
Activates the added software install package, and reloads the device.
When doing a full software install, do not provide a package filename.
The auto-abort-timer keyword, automatically rolls back the software image activation.
The automatic timer is triggered after the new image is activated. If the timer expires prior to the issuing of the install commit command, then the install process is automatically terminated. The device reloads, and boots up with a previous version of
the software image.
Step 4
install abort
Example:
Device# install abort
(Optional) Terminates the software install activation, and rolls back to the version that was running before current installation
procedure.
You can use this command only when the image is in an activated state; and not when the image is in a committed state.
Step 5
install commit
Example:
Device# install commit
Makes the changes persistent over reload.
The install commit command completes the new image installation. Changes are persistent across reloads until the auto-abort timer expires.
Step 6
install rollback to committed
Example:
Device# install rollback to committed
(Optional) Rolls back the update to the last committed version.
(Optional) Deletes all unused and inactive software installation files.
Step 8
show install summary
Example:
Device# show install summary
Displays information about the active package.
The output of this command varies according to the install commands that are configured.
Booting the Device in Bundle Mode
There are several methods by which you can boot the device—either by copying the bin file from the TFTP server and then boot the device, or by booting the device straight from flash or USB flash using the commands boot flash:<image.bin> or boot usbflash0:<image.bin> .
The following procedure explains how to boot the device from the TFTP server in the bundle mode.
This task describes how to configure your device to reload the software image at a later time.
SUMMARY STEPS
configure terminal
copy running-config startup-config
reload in [hh:]mm [text]
reload at hh: mm [month day | day month] [text]
reload cancel
show reload
DETAILED STEPS
Command or Action
Purpose
Step 1
configure terminal
Example:
Device# configure terminal
Enters global configuration mode.
Step 2
copy running-config startup-config
Example:
Device# copy running-config startup-config
Saves your device configuration information to the startup configuration before you use the reload command.
Step 3
reload in [hh:]mm [text]
Example:
Device# reload in 12
System configuration has been modified. Save? [yes/no]: y
Schedules a reload of the software to take affect in the specified minutes or hours and minutes. The reload must take place
within approximately 24 days. You can specify the reason for the reload in a string up to 255 characters in length.
Step 4
reload at hh: mm [month day | day month] [text]
Example:
Device(config)# reload at 14:00
Specifies the time in hours and minutes for the reload to occur.
Note
Use the at keyword only if the device system clock has been set (through Network Time Protocol (NTP), the hardware calendar, or manually). The time is relative
to the configured time zone on the device. To schedule reloads across several devices to occur simultaneously, the time on each device must be synchronized with NTP.
Step 5
reload cancel
Example:
Device(config)# reload cancel
Cancels a previously scheduled reload.
Step 6
show reload
Example:
show reload
Displays information about a previously scheduled reload or identifies if a reload has been scheduled on the device.
Monitoring Device Setup Configuration
Examples: Displaying Software Bootup in Install Mode
This example displays software bootup in install mode:
switch: boot bootflash:packages.conf
attempting to boot from [bootflash:packages.conf]
Located file packages.conf
#
#################################################################################################################################################################################################################################################################################################
Loading image in Verbose mode: 0
Cisco Package: invalid params - disabling isord
sd 6:0:0:0: [sda] No Caching mode page found
ARDBEG device bus 22: slot 0: fn 0 cpld regs ffffc90000400000 cpldiomem = ffffc90000600000 mmio start 87f99000000 , len 1048576
chr_mmap: Allocating DMA Reserve Pool ...
dplr_intrpt: Entered dplr_intrpt_module_init dplr_intrpt 1
usb 1-1: device not accepting address 2, error -110
usb 1-1: device not accepting address 3, error -110
usb 1-1: device not accepting address 4, error -110
usb 1-1: device not accepting address 5, error -110
usb usb1-port1: unable to enumerate USB device
Restricted Rights Legend
Use, duplication, or disclosure by the Government is
subject to restrictions as set forth in subparagraph
(c) of the Commercial Computer Software - Restricted
Rights clause at FAR sec. 52.227-19 and subparagraph
(c) (1) (ii) of the Rights in Technical Data and Computer
Software clause at DFARS sec. 252.227-7013.
cisco Systems, Inc.
170 West Tasman Drive
San Jose, California 95134-1706
Cisco IOS Software [Everest], Catalyst L3 Switch Software (CAT9K_IOSXE), Experimental Version 16.6.20170902:081931 [v166_throttle-/scratch/mcpre/BLD-BLD_V166_THROTTLE_LATEST_20170902_091308 126]
Copyright (c) 1986-2017 by Cisco Systems, Inc.
Compiled Sat 02-Sep-17 06:26 by mcpre
Cisco IOS-XE software, Copyright (c) 2005-2017 by cisco Systems, Inc.
All rights reserved. Certain components of Cisco IOS-XE software are
licensed under the GNU General Public License ("GPL") Version 2.0. The
software code licensed under GPL Version 2.0 is free software that comes
with ABSOLUTELY NO WARRANTY. You can redistribute and/or modify such
GPL code under the terms of GPL Version 2.0. For more details, see the
documentation or "License Notice" file accompanying the IOS-XE software,
or the applicable URL provided on the flyer accompanying the IOS-XE
software.
FIPS: Flash Key Check : Begin
FIPS: Flash Key Check : End, Not Found, FIPS Mode Not Enabled
This product contains cryptographic features and is subject to United
States and local country laws governing import, export, transfer and
use. Delivery of Cisco cryptographic products does not imply
third-party authority to import, export, distribute or use encryption.
Importers, exporters, distributors and users are responsible for
compliance with U.S. and local country laws. By using this product you
agree to comply with applicable laws and regulations. If you are unable
to comply with U.S. and local laws, return this product immediately.
A summary of U.S. laws governing Cisco cryptographic products may be found at:
http://www.cisco.com/wwl/export/crypto/tool/stqrg.html
If you require further assistance please contact us by sending email to
export@cisco.com.
cisco WS-XC7R (X86) processor (revision V00) with 869290K/6147K bytes of memory.
Processor board ID FXS1939Q43K
8 Ten Gigabit Ethernet interfaces
2 Forty Gigabit Ethernet interfaces
32768K bytes of non-volatile configuration memory.
15958516K bytes of physical memory.
11161600K bytes of Bootflash at bootflash:.
1638400K bytes of Crash Files at crashinfo:.
0K bytes of WebUI ODM Files at webui:.
%INIT: waited 0 seconds for NVRAM to be available
vstack
^
% Invalid input detected at '^' marker.
Press RETURN to get started!
This example displays software bootup in bundle mode:
switch: boot bootflash:cat9k_iosxe.BLD_V166_THROTTLE_LATEST_20170902_091308_2.SSA.bin
attempting to boot from [bootflash:cat9k_iosxe.BLD_V166_THROTTLE_LATEST_20170902_091308_2.SSA.bin]
Located file cat9k_iosxe.BLD_V166_THROTTLE_LATEST_20170902_091308_2.SSA.bin
#################################################################################################################################################################################################################################################################################################################################################################################################################################################################################################################################################################################################################################################################################################################################################################################################################################################################################################################################################################################################################################################################################################################################################################################################################################################################################################################################################################################################################################################################################################################################################################################################################################################################################################################################################################################################################################################################################################################################################################################################################################################################################################################################################################################################################################################################################################################################################################################################################################################################################################################################################################################################################################################################################################################################################################################################################################################################################################################################################################################################################################################################################################################################################################################################################################################################################################################################################################################################################################################################################################################################################################################################################################################################################################################################################################################################################################################################################################################################################################################################################################################################################################################################################################################################################################################################################################################################################################################################################################################################################################################################################################################################################################################################################################################################################################################################################################################################################################################################################################################################################################################################################################################################################################################################################################################################################################################################################################################################################################################################################################################################################################################################################################################################################################################################################################################################################################################################################################################################################################################
Loading image in Verbose mode: 0
Validate packages: SHA-1 hash:
calculated F6F000E8:101DA244:03579E26:16DF84F5:6D8FEADB
expected F6F000E8:101DA244:03579E26:16DF84F5:6D8FEADB
sd 6:0:0:0: [sda] No Caching mode page found
ARDBEG device bus 22: slot 0: fn 0 cpld regs ffffc90000400000 cpldiomem = ffffc90000600000 mmio start 87f99000000 , len 1048576
chr_mmap: Allocating DMA Reserve Pool ...
dplr_intrpt: Entered dplr_intrpt_module_init dplr_intrpt 1
usb 1-1: device not accepting address 2, error -110
usb 1-1: device not accepting address 3, error -110
usb 1-1: device not accepting address 4, error -110
usb 1-1: device not accepting address 5, error -110
usb usb1-port1: unable to enumerate USB device
Restricted Rights Legend
Use, duplication, or disclosure by the Government is
subject to restrictions as set forth in subparagraph
(c) of the Commercial Computer Software - Restricted
Rights clause at FAR sec. 52.227-19 and subparagraph
(c) (1) (ii) of the Rights in Technical Data and Computer
Software clause at DFARS sec. 252.227-7013.
cisco Systems, Inc.
170 West Tasman Drive
San Jose, California 95134-1706
Cisco IOS Software [Everest], Catalyst L3 Switch Software (CAT9K_IOSXE), Experimental Version 16.6.20170902:081931 [v166_throttle-/scratch/mcpre/BLD-BLD_V166_THROTTLE_LATEST_20170902_091308 126]
Copyright (c) 1986-2017 by Cisco Systems, Inc.
Compiled Sat 02-Sep-17 06:26 by mcpre
Cisco IOS-XE software, Copyright (c) 2005-2017 by cisco Systems, Inc.
All rights reserved. Certain components of Cisco IOS-XE software are
licensed under the GNU General Public License ("GPL") Version 2.0. The
software code licensed under GPL Version 2.0 is free software that comes
with ABSOLUTELY NO WARRANTY. You can redistribute and/or modify such
GPL code under the terms of GPL Version 2.0. For more details, see the
documentation or "License Notice" file accompanying the IOS-XE software,
or the applicable URL provided on the flyer accompanying the IOS-XE
software.
FIPS: Flash Key Check : Begin
FIPS: Flash Key Check : End, Not Found, FIPS Mode Not Enabled
This product contains cryptographic features and is subject to United
States and local country laws governing import, export, transfer and
use. Delivery of Cisco cryptographic products does not imply
third-party authority to import, export, distribute or use encryption.
Importers, exporters, distributors and users are responsible for
compliance with U.S. and local country laws. By using this product you
agree to comply with applicable laws and regulations. If you are unable
to comply with U.S. and local laws, return this product immediately.
A summary of U.S. laws governing Cisco cryptographic products may be found at:
http://www.cisco.com/wwl/export/crypto/tool/stqrg.html
If you require further assistance please contact us by sending email to
export@cisco.com.
cisco WS-XC7R (X86) processor (revision V00) with 869290K/6147K bytes of memory.
Processor board ID FXS1939Q43K
8 Ten Gigabit Ethernet interfaces
2 Forty Gigabit Ethernet interfaces
32768K bytes of non-volatile configuration memory.
15958516K bytes of physical memory.
11161600K bytes of Bootflash at bootflash:.
1638400K bytes of Crash Files at crashinfo:.
0K bytes of WebUI ODM Files at webui:.
%INIT: waited 0 seconds for NVRAM to be available
vstack
^
% Invalid input detected at '^' marker.
Press RETURN to get started!
Configuration Examples for Performing Device Setup
Example: Managing an Update Package
The following example shows how to add a software package file:
Device# install add file tftp://172.16.0.1//tftpboot/folder1/
cat9k_iosxe.16.06.01.SPA.bin
install_add: START Fri Jun 23 21:07:59 IST 2017
install_add: Adding PACKAGE
--- Starting Add ---
Performing Add on Active/Standby
issu_helper.sh (13338): drop_caches: 3
[R0] Add package(s) on R0
[R0] Finished Add on R0
Checking status of Add on [R0]
Add: Passed on [R0]
Finished Add
SUCCESS: install_add Fri Jun 23 21:09:10 IST 2017
Device#
The following is sample output from the showinstallsummary command after adding a software package file to the device:
Device# show install summary

[ R0 ] Installed Package(s) Information:
State (St): I - Inactive, U - Activated & Uncommitted,
            C - Activated & Committed, D - Deactivated & Uncommitted
--------------------------------------------------------------------------------
Type  St   Filename/Version
--------------------------------------------------------------------------------
IMG   I    16.6.1.0
IMG   C    16.6.2.0
The following example shows how to activate an added software package file:
Device# install activate

install_activate: START Fri Jun 23 21:13:25 IST 2017
install_activate: Activating PACKAGE
ISOFS: Unable to identify CD-ROM format.
Following packages shall be activated:
/flash/cat9k-webui.BLD_V166_THROTTLE_LATEST_20170622_152342.SSA.pkg
/flash/cat9k-srdriver.BLD_V166_THROTTLE_LATEST_20170622_152342.SSA.pkg
/flash/cat9k-sipspa.BLD_V166_THROTTLE_LATEST_20170622_152342.SSA.pkg
/flash/cat9k-sipbase.BLD_V166_THROTTLE_LATEST_20170622_152342.SSA.pkg
/flash/cat9k-rpboot.BLD_V166_THROTTLE_LATEST_20170622_152342.SSA.pkg
/flash/cat9k-rpbase.BLD_V166_THROTTLE_LATEST_20170622_152342.SSA.pkg
/flash/cat9k-guestshell.BLD_V166_THROTTLE_LATEST_20170622_152342.SSA.pkg
/flash/cat9k-espbase.BLD_V166_THROTTLE_LATEST_20170622_152342.SSA.pkg
/flash/cat9k-cc_srdriver.BLD_V166_THROTTLE_LATEST_20170622_152342.SSA.pkg

This operation requires a reload of the system. Do you want to proceed? [y/n]y
--- Starting Activate ---
Performing Activate on Active/Standby
  [R0] Activate package(s) on R0
    --- Starting list of software package changes ---
    Old files list:
      Removed cat9k-cc_srdriver.BLD_POLARIS_DEV_LATEST_20170622_233647.SSA.pkg
      Removed cat9k-espbase.BLD_POLARIS_DEV_LATEST_20170622_233647.SSA.pkg
      Removed cat9k-guestshell.BLD_POLARIS_DEV_LATEST_20170622_233647.SSA.pkg
      Removed cat9k-rpbase.BLD_POLARIS_DEV_LATEST_20170622_233647.SSA.pkg
      Removed cat9k-rpboot.BLD_POLARIS_DEV_LATEST_20170622_233647.SSA.pkg
      Removed cat9k-sipbase.BLD_POLARIS_DEV_LATEST_20170622_233647.SSA.pkg
      Removed cat9k-sipspa.BLD_POLARIS_DEV_LATEST_20170622_233647.SSA.pkg
      Removed cat9k-srdriver.BLD_POLARIS_DEV_LATEST_20170622_233647.SSA.pkg
      Removed cat9k-webui.BLD_POLARIS_DEV_LATEST_20170622_233647.SSA.pkg
    New files list:
      Added cat9k-cc_srdriver.BLD_V166_THROTTLE_LATEST_20170622_152342.SSA.pkg
      Added cat9k-espbase.BLD_V166_THROTTLE_LATEST_20170622_152342.SSA.pkg
      Added cat9k-guestshell.BLD_V166_THROTTLE_LATEST_20170622_152342.SSA.pkg
      Added cat9k-rpbase.BLD_V166_THROTTLE_LATEST_20170622_152342.SSA.pkg
      Added cat9k-rpboot.BLD_V166_THROTTLE_LATEST_20170622_152342.SSA.pkg
      Added cat9k-sipbase.BLD_V166_THROTTLE_LATEST_20170622_152342.SSA.pkg
      Added cat9k-sipspa.BLD_V166_THROTTLE_LATEST_20170622_152342.SSA.pkg
      Added cat9k-srdriver.BLD_V166_THROTTLE_LATEST_20170622_152342.SSA.pkg
      Added cat9k-webui.BLD_V166_THROTTLE_LATEST_20170622_152342.SSA.pkg
    Finished list of software package changes
  [R0] Finished Activate on R0
Checking status of Activate on [R0]
Activate: Passed on [R0]
Finished Activate

Install will reload the system now!

Device#
The following sample output from the showinstallsummary command displays the status of the software package as active and uncommitted:
Device# show install summary

[ R0 ] Installed Package(s) Information:
State (St): I - Inactive, U - Activated & Uncommitted,
            C - Activated & Committed, D - Deactivated & Uncommitted
--------------------------------------------------------------------------------
Type  St   Filename/Version
--------------------------------------------------------------------------------
IMG   I    16.6.2.0
IMG   U    16.6.1.0
Device#
The following example shows how to execute the installcommitcommand:
Device# installcommit
install_commit: START Fri Jun 23 21:24:45 IST 2017
install_commit: Committing PACKAGE
--- Starting Commit ---
Performing Commit on Active/Standby
[R0] Commit package(s) on R0
[R0] Finished Commit on R0
Checking status of Commit on [R0]
Commit: Passed on [R0]
Finished Commit
SUCCESS: install_commit Fri Jun 23 21:24:48 IST 2017
Device#
The following example shows how to rollback an update package to the base package:
Device# install rollback to committed

install_rollback: START Tue Jun 20 14:55:12 PDT 2017

 This operation requires a reload of the system. Do you want to proceed? [y/n]
*Jun 20 14:55:12.911 PDT: %IOSXE-5-PLATFORM:  R0/0: Jun 20 14:55:12 install_engine.sh:
 %INSTALL-5-INSTALL_START_INFO: Started install rollbacky
--- Starting Rollback ---
Performing Rollback on Active/Standby
  [R0] Rollback package(s) on R0
    --- Starting rollback impact ---
    Changes that are part of this rollback
    Current    :  rp 0 0   rp_boot         cat9k-rpboot.BLD_V166_THROTTLE_LATEST_20170618_152248_2.SSA.pkg
    Current    :  rp 1 0   rp_boot         cat9k-rpboot.BLD_V166_THROTTLE_LATEST_20170618_152248_2.SSA.pkg
    Replacement:  rp 0 0   rp_boot         cat9k-rpboot.BLD_V166_THROTTLE_LATEST_20170618_152248.SSA.pkg
    Replacement:  rp 1 0   rp_boot         cat9k-rpboot.BLD_V166_THROTTLE_LATEST_20170618_152248.SSA.pkg
    Current    :   cc 0  0  cc_srdriver     cat9k-cc_srdriver.BLD_V166_THROTTLE_LATEST_20170618_152248_2.SSA.pkg
    Current    :   cc 0 0   cc              cat9k-sipbase.BLD_V166_THROTTLE_LATEST_20170618_152248_2.SSA.pkg
    Current    :   cc 0 0   cc_spa          cat9k-sipspa.BLD_V166_THROTTLE_LATEST_20170618_152248_2.SSA.pkg
    Current    :   cc 1  0  cc_srdriver     cat9k-cc_srdriver.BLD_V166_THROTTLE_LATEST_20170618_152248_2.SSA.pkg
    Current    :   cc 1 0   cc              cat9k-sipbase.BLD_V166_THROTTLE_LATEST_20170618_152248_2.SSA.pkg
    Current    :   cc 1 0   cc_spa          cat9k-sipspa.BLD_V166_THROTTLE_LATEST_20170618_152248_2.SSA.pkg
    Current    :   cc 10 0  cc              cat9k-sipbase.BLD_V166_THROTTLE_LATEST_20170618_152248_2.SSA.pkg
    Current    :   cc 10 0  cc_spa          cat9k-sipspa.BLD_V166_THROTTLE_LATEST_20170618_152248_2.SSA.pkg
    Current    :   cc 10 0  cc_srdriver     cat9k-cc_srdriver.BLD_V166_THROTTLE_LATEST_20170618_152248_2.SSA.pkg
    Current    :   cc 2  0  cc_srdriver     cat9k-cc_srdriver.BLD_V166_THROTTLE_LATEST_20170618_152248_2.SSA.pkg
    Current    :   cc 2 0   cc              cat9k-sipbase.BLD_V166_THROTTLE_LATEST_20170618_152248_2.SSA.pkg
    Current    :   cc 2 0   cc_spa          cat9k-sipspa.BLD_V166_THROTTLE_LATEST_20170618_152248_2.SSA.pkg
    Current    :   cc 3  0  cc_srdriver     cat9k-cc_srdriver.BLD_V166_THROTTLE_LATEST_20170618_152248_2.SSA.pkg
    Current    :   cc 3 0   cc              cat9k-sipbase.BLD_V166_THROTTLE_LATEST_20170618_152248_2.SSA.pkg
    Current    :   cc 3 0   cc_spa          cat9k-sipspa.BLD_V166_THROTTLE_LATEST_20170618_152248_2.SSA.pkg
    Current    :   cc 4  0  cc_srdriver     cat9k-cc_srdriver.BLD_V166_THROTTLE_LATEST_20170618_152248_2.SSA.pkg
    Current    :   cc 4 0   cc              cat9k-sipbase.BLD_V166_THROTTLE_LATEST_20170618_152248_2.SSA.pkg
    Current    :   cc 4 0   cc_spa          cat9k-sipspa.BLD_V166_THROTTLE_LATEST_20170618_152248_2.SSA.pkg
    Current    :   cc 5  0  cc_srdriver     cat9k-cc_srdriver.BLD_V166_THROTTLE_LATEST_20170618_152248_2.SSA.pkg
    Current    :   cc 5 0   cc              cat9k-sipbase.BLD_V166_THROTTLE_LATEST_20170618_152248_2.SSA.pkg
    Current    :   cc 5 0   cc_spa          cat9k-sipspa.BLD_V166_THROTTLE_LATEST_20170618_152248_2.SSA.pkg
    Current    :   cc 6  0  cc_srdriver     cat9k-cc_srdriver.BLD_V166_THROTTLE_LATEST_20170618_152248_2.SSA.pkg
    Current    :   cc 6 0   cc              cat9k-sipbase.BLD_V166_THROTTLE_LATEST_20170618_152248_2.SSA.pkg
    Current    :   cc 6 0   cc_spa          cat9k-sipspa.BLD_V166_THROTTLE_LATEST_20170618_152248_2.SSA.pkg
    Current    :   cc 7  0  cc_srdriver     cat9k-cc_srdriver.BLD_V166_THROTTLE_LATEST_20170618_152248_2.SSA.pkg
    Current    :   cc 7 0   cc              cat9k-sipbase.BLD_V166_THROTTLE_LATEST_20170618_152248_2.SSA.pkg
    Current    :   cc 7 0   cc_spa          cat9k-sipspa.BLD_V166_THROTTLE_LATEST_20170618_152248_2.SSA.pkg
    Current    :   cc 8  0  cc_srdriver     cat9k-cc_srdriver.BLD_V166_THROTTLE_LATEST_20170618_152248_2.SSA.pkg
    Current    :   cc 8 0   cc              cat9k-sipbase.BLD_V166_THROTTLE_LATEST_20170618_152248_2.SSA.pkg
    Current    :   cc 8 0   cc_spa          cat9k-sipspa.BLD_V166_THROTTLE_LATEST_20170618_152248_2.SSA.pkg
    Current    :   cc 9  0  cc_srdriver     cat9k-cc_srdriver.BLD_V166_THROTTLE_LATEST_20170618_152248_2.SSA.pkg
    Current    :   cc 9 0   cc              cat9k-sipbase.BLD_V166_THROTTLE_LATEST_20170618_152248_2.SSA.pkg
    Current    :   cc 9 0   cc_spa          cat9k-sipspa.BLD_V166_THROTTLE_LATEST_20170618_152248_2.SSA.pkg
    Current    :   fp 0 0   fp              cat9k-espbase.BLD_V166_THROTTLE_LATEST_20170618_152248_2.SSA.pkg
    Current    :   fp 1 0   fp              cat9k-espbase.BLD_V166_THROTTLE_LATEST_20170618_152248_2.SSA.pkg
    Current    :   rp 0 0   guestshell      cat9k-guestshell.BLD_V166_THROTTLE_LATEST_20170618_152248_2.SSA.pkg
    Current    :   rp 0 0   rp_base         cat9k-rpbase.BLD_V166_THROTTLE_LATEST_20170618_152248_2.SSA.pkg
    Current    :   rp 0 0   rp_daemons      cat9k-rpbase.BLD_V166_THROTTLE_LATEST_20170618_152248_2.SSA.pkg
    Current    :   rp 0 0   rp_iosd         cat9k-rpbase.BLD_V166_THROTTLE_LATEST_20170618_152248_2.SSA.pkg
    Current    :   rp 0 0   rp_security     cat9k-rpbase.BLD_V166_THROTTLE_LATEST_20170618_152248_2.SSA.pkg
    Current    :   rp 0 0   rp_webui        cat9k-webui.BLD_V166_THROTTLE_LATEST_20170618_152248_2.SSA.pkg
    Current    :   rp 0 0   srdriver        cat9k-srdriver.BLD_V166_THROTTLE_LATEST_20170618_152248_2.SSA.pkg
    Current    :   rp 1 0   guestshell      cat9k-guestshell.BLD_V166_THROTTLE_LATEST_20170618_152248_2.SSA.pkg
    Current    :   rp 1 0   rp_base         cat9k-rpbase.BLD_V166_THROTTLE_LATEST_20170618_152248_2.SSA.pkg
    Current    :   rp 1 0   rp_daemons      cat9k-rpbase.BLD_V166_THROTTLE_LATEST_20170618_152248_2.SSA.pkg
    Current    :   rp 1 0   rp_iosd         cat9k-rpbase.BLD_V166_THROTTLE_LATEST_20170618_152248_2.SSA.pkg
    Current    :   rp 1 0   rp_security     cat9k-rpbase.BLD_V166_THROTTLE_LATEST_20170618_152248_2.SSA.pkg
    Current    :   rp 1 0   rp_webui        cat9k-webui.BLD_V166_THROTTLE_LATEST_20170618_152248_2.SSA.pkg
    Current    :   rp 1 0   srdriver        cat9k-srdriver.BLD_V166_THROTTLE_LATEST_20170618_152248_2.SSA.pkg
    Replacement:   cc 0  0  cc_srdriver     cat9k-cc_srdriver.BLD_V166_THROTTLE_LATEST_20170618_152248.SSA.pkg
    Replacement:   cc 0 0   cc              cat9k-sipbase.BLD_V166_THROTTLE_LATEST_20170618_152248.SSA.pkg
    Replacement:   cc 0 0   cc_spa          cat9k-sipspa.BLD_V166_THROTTLE_LATEST_20170618_152248.SSA.pkg
    Replacement:   cc 1  0  cc_srdriver     cat9k-cc_srdriver.BLD_V166_THROTTLE_LATEST_20170618_152248.SSA.pkg
    Replacement:   cc 1 0   cc              cat9k-sipbase.BLD_V166_THROTTLE_LATEST_20170618_152248.SSA.pkg
    Replacement:   cc 1 0   cc_spa          cat9k-sipspa.BLD_V166_THROTTLE_LATEST_20170618_152248.SSA.pkg
    Replacement:   cc 10 0  cc              cat9k-sipbase.BLD_V166_THROTTLE_LATEST_20170618_152248.SSA.pkg
    Replacement:   cc 10 0  cc_spa          cat9k-sipspa.BLD_V166_THROTTLE_LATEST_20170618_152248.SSA.pkg
    Replacement:   cc 10 0  cc_srdriver     cat9k-cc_srdriver.BLD_V166_THROTTLE_LATEST_20170618_152248.SSA.pkg
    Replacement:   cc 2  0  cc_srdriver     cat9k-cc_srdriver.BLD_V166_THROTTLE_LATEST_20170618_152248.SSA.pkg
    Replacement:   cc 2 0   cc              cat9k-sipbase.BLD_V166_THROTTLE_LATEST_20170618_152248.SSA.pkg
    Replacement:   cc 2 0   cc_spa          cat9k-sipspa.BLD_V166_THROTTLE_LATEST_20170618_152248.SSA.pkg
    Replacement:   cc 3  0  cc_srdriver     cat9k-cc_srdriver.BLD_V166_THROTTLE_LATEST_20170618_152248.SSA.pkg
    Replacement:   cc 3 0   cc              cat9k-sipbase.BLD_V166_THROTTLE_LATEST_20170618_152248.SSA.pkg
    Replacement:   cc 3 0   cc_spa          cat9k-sipspa.BLD_V166_THROTTLE_LATEST_20170618_152248.SSA.pkg
    Replacement:   cc 4  0  cc_srdriver     cat9k-cc_srdriver.BLD_V166_THROTTLE_LATEST_20170618_152248.SSA.pkg
    Replacement:   cc 4 0   cc              cat9k-sipbase.BLD_V166_THROTTLE_LATEST_20170618_152248.SSA.pkg
    Replacement:   cc 4 0   cc_spa          cat9k-sipspa.BLD_V166_THROTTLE_LATEST_20170618_152248.SSA.pkg
    Replacement:   cc 5  0  cc_srdriver     cat9k-cc_srdriver.BLD_V166_THROTTLE_LATEST_20170618_152248.SSA.pkg
    Replacement:   cc 5 0   cc              cat9k-sipbase.BLD_V166_THROTTLE_LATEST_20170618_152248.SSA.pkg
    Replacement:   cc 5 0   cc_spa          cat9k-sipspa.BLD_V166_THROTTLE_LATEST_20170618_152248.SSA.pkg
    Replacement:   cc 6  0  cc_srdriver     cat9k-cc_srdriver.BLD_V166_THROTTLE_LATEST_20170618_152248.SSA.pkg
    Replacement:   cc 6 0   cc              cat9k-sipbase.BLD_V166_THROTTLE_LATEST_20170618_152248.SSA.pkg
    Replacement:   cc 6 0   cc_spa          cat9k-sipspa.BLD_V166_THROTTLE_LATEST_20170618_152248.SSA.pkg
    Replacement:   cc 7  0  cc_srdriver     cat9k-cc_srdriver.BLD_V166_THROTTLE_LATEST_20170618_152248.SSA.pkg
    Replacement:   cc 7 0   cc              cat9k-sipbase.BLD_V166_THROTTLE_LATEST_20170618_152248.SSA.pkg
    Replacement:   cc 7 0   cc_spa          cat9k-sipspa.BLD_V166_THROTTLE_LATEST_20170618_152248.SSA.pkg
    Replacement:   cc 8  0  cc_srdriver     cat9k-cc_srdriver.BLD_V166_THROTTLE_LATEST_20170618_152248.SSA.pkg
    Replacement:   cc 8 0   cc              cat9k-sipbase.BLD_V166_THROTTLE_LATEST_20170618_152248.SSA.pkg
    Replacement:   cc 8 0   cc_spa          cat9k-sipspa.BLD_V166_THROTTLE_LATEST_20170618_152248.SSA.pkg
    Replacement:   cc 9  0  cc_srdriver     cat9k-cc_srdriver.BLD_V166_THROTTLE_LATEST_20170618_152248.SSA.pkg
    Replacement:   cc 9 0   cc              cat9k-sipbase.BLD_V166_THROTTLE_LATEST_20170618_152248.SSA.pkg
    Replacement:   cc 9 0   cc_spa          cat9k-sipspa.BLD_V166_THROTTLE_LATEST_20170618_152248.SSA.pkg
    Replacement:   fp 0 0   fp              cat9k-espbase.BLD_V166_THROTTLE_LATEST_20170618_152248.SSA.pkg
    Replacement:   fp 1 0   fp              cat9k-espbase.BLD_V166_THROTTLE_LATEST_20170618_152248.SSA.pkg
    Replacement:   rp 0 0   guestshell      cat9k-guestshell.BLD_V166_THROTTLE_LATEST_20170618_152248.SSA.pkg
    Replacement:   rp 0 0   rp_base         cat9k-rpbase.BLD_V166_THROTTLE_LATEST_20170618_152248.SSA.pkg
    Replacement:   rp 0 0   rp_daemons      cat9k-rpbase.BLD_V166_THROTTLE_LATEST_20170618_152248.SSA.pkg
    Replacement:   rp 0 0   rp_iosd         cat9k-rpbase.BLD_V166_THROTTLE_LATEST_20170618_152248.SSA.pkg
    Replacement:   rp 0 0   rp_security     cat9k-rpbase.BLD_V166_THROTTLE_LATEST_20170618_152248.SSA.pkg
    Replacement:   rp 0 0   rp_webui        cat9k-webui.BLD_V166_THROTTLE_LATEST_20170618_152248.SSA.pkg
    Replacement:   rp 0 0   srdriver        cat9k-srdriver.BLD_V166_THROTTLE_LATEST_20170618_152248.SSA.pkg
    Replacement:   rp 1 0   guestshell      cat9k-guestshell.BLD_V166_THROTTLE_LATEST_20170618_152248.SSA.pkg
    Replacement:   rp 1 0   rp_base         cat9k-rpbase.BLD_V166_THROTTLE_LATEST_20170618_152248.SSA.pkg
    Replacement:   rp 1 0   rp_daemons      cat9k-rpbase.BLD_V166_THROTTLE_LATEST_20170618_152248.SSA.pkg
    Replacement:   rp 1 0   rp_iosd         cat9k-rpbase.BLD_V166_THROTTLE_LATEST_20170618_152248.SSA.pkg
    Replacement:   rp 1 0   rp_security     cat9k-rpbase.BLD_V166_THROTTLE_LATEST_20170618_152248.SSA.pkg
    Replacement:   rp 1 0   rp_webui        cat9k-webui.BLD_V166_THROTTLE_LATEST_20170618_152248.SSA.pkg
    Replacement:   rp 1 0   srdriver        cat9k-srdriver.BLD_V166_THROTTLE_LATEST_20170618_152248.SSA.pkg
    Finished rollback impact
  [R0] Finished Rollback on R0
Checking status of Rollback on [R0]
Rollback: Passed on [R0]
Finished Rollback


Install will reload the system now!
SUCCESS: install_rollback  Tue Jun 20 14:56:54 PDT 2017

Device#
The following is sample output from the install remove inactive command:
Device# install remove inactive

install_remove: START Tue Jun 20 14:14:40 PDT 2017
Cleaning up unnecessary package files
No path specified, will use booted path flash:packages.conf
Cleaning flash:
  Scanning boot directory for packages ... done.
  Preparing packages list to delete ...
    cat9k-cc_srdriver.BLD_V166_THROTTLE_LATEST_20170618_152248.SSA.pkg
      File is in use, will not delete.
    cat9k-espbase.BLD_V166_THROTTLE_LATEST_20170618_152248.SSA.pkg
      File is in use, will not delete.
    cat9k-guestshell.BLD_V166_THROTTLE_LATEST_20170618_152248.SSA.pkg
      File is in use, will not delete.
    cat9k-rpbase.BLD_V166_THROTTLE_LATEST_20170618_152248.SSA.pkg
      File is in use, will not delete.
    cat9k-rpboot.BLD_V166_THROTTLE_LATEST_20170618_152248.SSA.pkg
      File is in use, will not delete.
    cat9k-sipbase.BLD_V166_THROTTLE_LATEST_20170618_152248.SSA.pkg
      File is in use, will not delete.
    cat9k-sipspa.BLD_V166_THROTTLE_LATEST_20170618_152248.SSA.pkg
      File is in use, will not delete.
    cat9k-srdriver.BLD_V166_THROTTLE_LATEST_20170618_152248.SSA.pkg
      File is in use, will not delete.
    cat9k-webui.BLD_V166_THROTTLE_LATEST_20170618_152248.SSA.pkg
      File is in use, will not delete.
    packages.conf
      File is in use, will not delete.
  done.


The following files will be deleted:
[R0]:
/flash/cat9k-cc_srdriver.BLD_V166_THROTTLE_LATEST_20170618_152248_2.SSA.pkg
/flash/cat9k-espbase.BLD_V166_THROTTLE_LATEST_20170618_152248_2.SSA.pkg
/flash/cat9k-guestshell.BLD_V166_THROTTLE_LATEST_20170618_152248_2.SSA.pkg
/flash/cat9k-rpbase.BLD_V166_THROTTLE_LATEST_20170618_152248_2.SSA.pkg
/flash/cat9k-rpboot.BLD_V166_THROTTLE_LATEST_20170618_152248_2.SSA.pkg
/flash/cat9k-sipbase.BLD_V166_THROTTLE_LATEST_20170618_152248_2.SSA.pkg
/flash/cat9k-sipspa.BLD_V166_THROTTLE_LATEST_20170618_152248_2.SSA.pkg
/flash/cat9k-srdriver.BLD_V166_THROTTLE_LATEST_20170618_152248_2.SSA.pkg
/flash/cat9k-webui.BLD_V166_THROTTLE_LATEST_20170618_152248_2.SSA.pkg
/flash/cat9k_1.bin
/flash/cat9k_1.conf
/flash/cat9k_2.1.conf
/flash/cat9k_2.bin
/flash/cat9k_2.conf
/flash/cat9k_iosxe.BLD_V166_THROTTLE_LATEST_20170618_152248.SSA.bin
/flash/packages.conf.00-


Do you want to remove the above files? [y/n]y
[R0]:
Deleting file flash:cat9k-cc_srdriver.BLD_V166_THROTTLE_LATEST_20170618_152248_2.SSA.pkg ... done.
Deleting file flash:cat9k-espbase.BLD_V166_THROTTLE_LATEST_20170618_152248_2.SSA.pkg ... done.
Deleting file flash:cat9k-guestshell.BLD_V166_THROTTLE_LATEST_20170618_152248_2.SSA.pkg ... done.
Deleting file flash:cat9k-rpbase.BLD_V166_THROTTLE_LATEST_20170618_152248_2.SSA.pkg ... done.
Deleting file flash:cat9k-rpboot.BLD_V166_THROTTLE_LATEST_20170618_152248_2.SSA.pkg ... done.
Deleting file flash:cat9k-sipbase.BLD_V166_THROTTLE_LATEST_20170618_152248_2.SSA.pkg ... done.
Deleting file flash:cat9k-sipspa.BLD_V166_THROTTLE_LATEST_20170618_152248_2.SSA.pkg ... done.
Deleting file flash:cat9k-srdriver.BLD_V166_THROTTLE_LATEST_20170618_152248_2.SSA.pkg ... done.
Deleting file flash:cat9k-webui.BLD_V166_THROTTLE_LATEST_20170618_152248_2.SSA.pkg ... done.
Deleting file flash:cat9k_1.bin ... done.
Deleting file flash:cat9k_1.conf ... done.
Deleting file flash:cat9k_2.1.conf ... done.
Deleting file flash:cat9k_2.bin ... done.
Deleting file flash:cat9k_2.conf ... done.
Deleting file flash:cat9k_iosxe.BLD_V166_THROTTLE_LATEST_20170618_152248.SSA.bin ... done.
Deleting file flash:packages.conf.00- ... done.
SUCCESS: Files deleted.
--- Starting Post_Remove_Cleanup ---
Performing Post_Remove_Cleanup on Active/Standby
  [R0] Post_Remove_Cleanup package(s) on R0
  [R0] Finished Post_Remove_Cleanup on R0
Checking status of Post_Remove_Cleanup on [R0]
Post_Remove_Cleanup: Passed on [R0]
Finished Post_Remove_Cleanup


SUCCESS: install_remove  Tue Jun 20 14:16:29 PDT 2017
Device#
The following is sample output from the install abort command:
Device# install abort

install_abort: START Tue Jun 20 14:06:48 PDT 2017
install_abort: Abort type PACKAGE

This install abort would require a reload. Do you want to proceed? [y/n]

*Jun 20 14:06:49.820 PDT:%IOSXE-5-PLATFORM:  R0/0: Jun 20 14:06:49 install_engine.sh:
 %INSTALL-5-INSTALL_START_INFO: Started install aborty
--- Starting Abort ---
Performing Abort on Active/Standby
  [R0] Abort package(s) on R0
    --- Starting rollback impact ---
    Changes that are part of this rollback
    Current    :  rp 0 0   rp_boot         cat9k-rpboot.BLD_V166_THROTTLE_LATEST_20170618_152248_2.SSA.pkg
    Current    :  rp 1 0   rp_boot         cat9k-rpboot.BLD_V166_THROTTLE_LATEST_20170618_152248_2.SSA.pkg
    Replacement:  rp 0 0   rp_boot         cat9k-rpboot.BLD_V166_THROTTLE_LATEST_20170618_152248.SSA.pkg
    Replacement:  rp 1 0   rp_boot         cat9k-rpboot.BLD_V166_THROTTLE_LATEST_20170618_152248.SSA.pkg
    Current    :   cc 0  0  cc_srdriver     cat9k-cc_srdriver.BLD_V166_THROTTLE_LATEST_20170618_152248_2.SSA.pkg
    Current    :   cc 0 0   cc              cat9k-sipbase.BLD_V166_THROTTLE_LATEST_20170618_152248_2.SSA.pkg
    Current    :   cc 0 0   cc_spa          cat9k-sipspa.BLD_V166_THROTTLE_LATEST_20170618_152248_2.SSA.pkg
    Current    :   cc 1  0  cc_srdriver     cat9k-cc_srdriver.BLD_V166_THROTTLE_LATEST_20170618_152248_2.SSA.pkg
    Current    :   cc 1 0   cc              cat9k-sipbase.BLD_V166_THROTTLE_LATEST_20170618_152248_2.SSA.pkg
    Current    :   cc 1 0   cc_spa          cat9k-sipspa.BLD_V166_THROTTLE_LATEST_20170618_152248_2.SSA.pkg
    Current    :   cc 10 0  cc              cat9k-sipbase.BLD_V166_THROTTLE_LATEST_20170618_152248_2.SSA.pkg
    Current    :   cc 10 0  cc_spa          cat9k-sipspa.BLD_V166_THROTTLE_LATEST_20170618_152248_2.SSA.pkg
    Current    :   cc 10 0  cc_srdriver     cat9k-cc_srdriver.BLD_V166_THROTTLE_LATEST_20170618_152248_2.SSA.pkg
    Current    :   cc 2  0  cc_srdriver     cat9k-cc_srdriver.BLD_V166_THROTTLE_LATEST_20170618_152248_2.SSA.pkg
    Current    :   cc 2 0   cc              cat9k-sipbase.BLD_V166_THROTTLE_LATEST_20170618_152248_2.SSA.pkg
    Current    :   cc 2 0   cc_spa          cat9k-sipspa.BLD_V166_THROTTLE_LATEST_20170618_152248_2.SSA.pkg
    Current    :   cc 3  0  cc_srdriver     cat9k-cc_srdriver.BLD_V166_THROTTLE_LATEST_20170618_152248_2.SSA.pkg
    Current    :   cc 3 0   cc              cat9k-sipbase.BLD_V166_THROTTLE_LATEST_20170618_152248_2.SSA.pkg
    Current    :   cc 3 0   cc_spa          cat9k-sipspa.BLD_V166_THROTTLE_LATEST_20170618_152248_2.SSA.pkg
    Current    :   cc 4  0  cc_srdriver     cat9k-cc_srdriver.BLD_V166_THROTTLE_LATEST_20170618_152248_2.SSA.pkg
    Current    :   cc 4 0   cc              cat9k-sipbase.BLD_V166_THROTTLE_LATEST_20170618_152248_2.SSA.pkg
    Current    :   cc 4 0   cc_spa          cat9k-sipspa.BLD_V166_THROTTLE_LATEST_20170618_152248_2.SSA.pkg
    Current    :   cc 5  0  cc_srdriver     cat9k-cc_srdriver.BLD_V166_THROTTLE_LATEST_20170618_152248_2.SSA.pkg
    Current    :   cc 5 0   cc              cat9k-sipbase.BLD_V166_THROTTLE_LATEST_20170618_152248_2.SSA.pkg
    Current    :   cc 5 0   cc_spa          cat9k-sipspa.BLD_V166_THROTTLE_LATEST_20170618_152248_2.SSA.pkg
    Current    :   cc 6  0  cc_srdriver     cat9k-cc_srdriver.BLD_V166_THROTTLE_LATEST_20170618_152248_2.SSA.pkg
    Current    :   cc 6 0   cc              cat9k-sipbase.BLD_V166_THROTTLE_LATEST_20170618_152248_2.SSA.pkg
    Current    :   cc 6 0   cc_spa          cat9k-sipspa.BLD_V166_THROTTLE_LATEST_20170618_152248_2.SSA.pkg
    Current    :   cc 7  0  cc_srdriver     cat9k-cc_srdriver.BLD_V166_THROTTLE_LATEST_20170618_152248_2.SSA.pkg
    Current    :   cc 7 0   cc              cat9k-sipbase.BLD_V166_THROTTLE_LATEST_20170618_152248_2.SSA.pkg
    Current    :   cc 7 0   cc_spa          cat9k-sipspa.BLD_V166_THROTTLE_LATEST_20170618_152248_2.SSA.pkg
    Current    :   cc 8  0  cc_srdriver     cat9k-cc_srdriver.BLD_V166_THROTTLE_LATEST_20170618_152248_2.SSA.pkg
    Current    :   cc 8 0   cc              cat9k-sipbase.BLD_V166_THROTTLE_LATEST_20170618_152248_2.SSA.pkg
    Current    :   cc 8 0   cc_spa          cat9k-sipspa.BLD_V166_THROTTLE_LATEST_20170618_152248_2.SSA.pkg
    Current    :   cc 9  0  cc_srdriver     cat9k-cc_srdriver.BLD_V166_THROTTLE_LATEST_20170618_152248_2.SSA.pkg
    Current    :   cc 9 0   cc              cat9k-sipbase.BLD_V166_THROTTLE_LATEST_20170618_152248_2.SSA.pkg
    Current    :   cc 9 0   cc_spa          cat9k-sipspa.BLD_V166_THROTTLE_LATEST_20170618_152248_2.SSA.pkg
    Current    :   fp 0 0   fp              cat9k-espbase.BLD_V166_THROTTLE_LATEST_20170618_152248_2.SSA.pkg
    Current    :   fp 1 0   fp              cat9k-espbase.BLD_V166_THROTTLE_LATEST_20170618_152248_2.SSA.pkg
    Current    :   rp 0 0   guestshell      cat9k-guestshell.BLD_V166_THROTTLE_LATEST_20170618_152248_2.SSA.pkg
    Current    :   rp 0 0   rp_base         cat9k-rpbase.BLD_V166_THROTTLE_LATEST_20170618_152248_2.SSA.pkg
    Current    :   rp 0 0   rp_daemons      cat9k-rpbase.BLD_V166_THROTTLE_LATEST_20170618_152248_2.SSA.pkg
    Current    :   rp 0 0   rp_iosd         cat9k-rpbase.BLD_V166_THROTTLE_LATEST_20170618_152248_2.SSA.pkg
    Current    :   rp 0 0   rp_security     cat9k-rpbase.BLD_V166_THROTTLE_LATEST_20170618_152248_2.SSA.pkg
    Current    :   rp 0 0   rp_webui        cat9k-webui.BLD_V166_THROTTLE_LATEST_20170618_152248_2.SSA.pkg
    Current    :   rp 0 0   srdriver        cat9k-srdriver.BLD_V166_THROTTLE_LATEST_20170618_152248_2.SSA.pkg
    Current    :   rp 1 0   guestshell      cat9k-guestshell.BLD_V166_THROTTLE_LATEST_20170618_152248_2.SSA.pkg
    Current    :   rp 1 0   rp_base         cat9k-rpbase.BLD_V166_THROTTLE_LATEST_20170618_152248_2.SSA.pkg
    Current    :   rp 1 0   rp_daemons      cat9k-rpbase.BLD_V166_THROTTLE_LATEST_20170618_152248_2.SSA.pkg
    Current    :   rp 1 0   rp_iosd         cat9k-rpbase.BLD_V166_THROTTLE_LATEST_20170618_152248_2.SSA.pkg
    Current    :   rp 1 0   rp_security     cat9k-rpbase.BLD_V166_THROTTLE_LATEST_20170618_152248_2.SSA.pkg
    Current    :   rp 1 0   rp_webui        cat9k-webui.BLD_V166_THROTTLE_LATEST_20170618_152248_2.SSA.pkg
    Current    :   rp 1 0   srdriver        cat9k-srdriver.BLD_V166_THROTTLE_LATEST_20170618_152248_2.SSA.pkg
    Replacement:   cc 0  0  cc_srdriver     cat9k-cc_srdriver.BLD_V166_THROTTLE_LATEST_20170618_152248.SSA.pkg
    Replacement:   cc 0 0   cc              cat9k-sipbase.BLD_V166_THROTTLE_LATEST_20170618_152248.SSA.pkg
    Replacement:   cc 0 0   cc_spa          cat9k-sipspa.BLD_V166_THROTTLE_LATEST_20170618_152248.SSA.pkg
    Replacement:   cc 1  0  cc_srdriver     cat9k-cc_srdriver.BLD_V166_THROTTLE_LATEST_20170618_152248.SSA.pkg
    Replacement:   cc 1 0   cc              cat9k-sipbase.BLD_V166_THROTTLE_LATEST_20170618_152248.SSA.pkg
    Replacement:   cc 1 0   cc_spa          cat9k-sipspa.BLD_V166_THROTTLE_LATEST_20170618_152248.SSA.pkg
    Replacement:   cc 10 0  cc              cat9k-sipbase.BLD_V166_THROTTLE_LATEST_20170618_152248.SSA.pkg
    Replacement:   cc 10 0  cc_spa          cat9k-sipspa.BLD_V166_THROTTLE_LATEST_20170618_152248.SSA.pkg
    Replacement:   cc 10 0  cc_srdriver     cat9k-cc_srdriver.BLD_V166_THROTTLE_LATEST_20170618_152248.SSA.pkg
    Replacement:   cc 2  0  cc_srdriver     cat9k-cc_srdriver.BLD_V166_THROTTLE_LATEST_20170618_152248.SSA.pkg
    Replacement:   cc 2 0   cc              cat9k-sipbase.BLD_V166_THROTTLE_LATEST_20170618_152248.SSA.pkg
    Replacement:   cc 2 0   cc_spa          cat9k-sipspa.BLD_V166_THROTTLE_LATEST_20170618_152248.SSA.pkg
    Replacement:   cc 3  0  cc_srdriver     cat9k-cc_srdriver.BLD_V166_THROTTLE_LATEST_20170618_152248.SSA.pkg
    Replacement:   cc 3 0   cc              cat9k-sipbase.BLD_V166_THROTTLE_LATEST_20170618_152248.SSA.pkg
    Replacement:   cc 3 0   cc_spa          cat9k-sipspa.BLD_V166_THROTTLE_LATEST_20170618_152248.SSA.pkg
    Replacement:   cc 4  0  cc_srdriver     cat9k-cc_srdriver.BLD_V166_THROTTLE_LATEST_20170618_152248.SSA.pkg
    Replacement:   cc 4 0   cc              cat9k-sipbase.BLD_V166_THROTTLE_LATEST_20170618_152248.SSA.pkg
    Replacement:   cc 4 0   cc_spa          cat9k-sipspa.BLD_V166_THROTTLE_LATEST_20170618_152248.SSA.pkg
    Replacement:   cc 5  0  cc_srdriver     cat9k-cc_srdriver.BLD_V166_THROTTLE_LATEST_20170618_152248.SSA.pkg
    Replacement:   cc 5 0   cc              cat9k-sipbase.BLD_V166_THROTTLE_LATEST_20170618_152248.SSA.pkg
    Replacement:   cc 5 0   cc_spa          cat9k-sipspa.BLD_V166_THROTTLE_LATEST_20170618_152248.SSA.pkg
    Replacement:   cc 6  0  cc_srdriver     cat9k-cc_srdriver.BLD_V166_THROTTLE_LATEST_20170618_152248.SSA.pkg
    Replacement:   cc 6 0   cc              cat9k-sipbase.BLD_V166_THROTTLE_LATEST_20170618_152248.SSA.pkg
    Replacement:   cc 6 0   cc_spa          cat9k-sipspa.BLD_V166_THROTTLE_LATEST_20170618_152248.SSA.pkg
    Replacement:   cc 7  0  cc_srdriver     cat9k-cc_srdriver.BLD_V166_THROTTLE_LATEST_20170618_152248.SSA.pkg
    Replacement:   cc 7 0   cc              cat9k-sipbase.BLD_V166_THROTTLE_LATEST_20170618_152248.SSA.pkg
    Replacement:   cc 7 0   cc_spa          cat9k-sipspa.BLD_V166_THROTTLE_LATEST_20170618_152248.SSA.pkg
    Replacement:   cc 8  0  cc_srdriver     cat9k-cc_srdriver.BLD_V166_THROTTLE_LATEST_20170618_152248.SSA.pkg
    Replacement:   cc 8 0   cc              cat9k-sipbase.BLD_V166_THROTTLE_LATEST_20170618_152248.SSA.pkg
    Replacement:   cc 8 0   cc_spa          cat9k-sipspa.BLD_V166_THROTTLE_LATEST_20170618_152248.SSA.pkg
    Replacement:   cc 9  0  cc_srdriver     cat9k-cc_srdriver.BLD_V166_THROTTLE_LATEST_20170618_152248.SSA.pkg
    Replacement:   cc 9 0   cc              cat9k-sipbase.BLD_V166_THROTTLE_LATEST_20170618_152248.SSA.pkg
    Replacement:   cc 9 0   cc_spa          cat9k-sipspa.BLD_V166_THROTTLE_LATEST_20170618_152248.SSA.pkg
    Replacement:   fp 0 0   fp              cat9k-espbase.BLD_V166_THROTTLE_LATEST_20170618_152248.SSA.pkg
    Replacement:   fp 1 0   fp              cat9k-espbase.BLD_V166_THROTTLE_LATEST_20170618_152248.SSA.pkg
    Replacement:   rp 0 0   guestshell      cat9k-guestshell.BLD_V166_THROTTLE_LATEST_20170618_152248.SSA.pkg
    Replacement:   rp 0 0   rp_base         cat9k-rpbase.BLD_V166_THROTTLE_LATEST_20170618_152248.SSA.pkg
    Replacement:   rp 0 0   rp_daemons      cat9k-rpbase.BLD_V166_THROTTLE_LATEST_20170618_152248.SSA.pkg
    Replacement:   rp 0 0   rp_iosd         cat9k-rpbase.BLD_V166_THROTTLE_LATEST_20170618_152248.SSA.pkg
    Replacement:   rp 0 0   rp_security     cat9k-rpbase.BLD_V166_THROTTLE_LATEST_20170618_152248.SSA.pkg
    Replacement:   rp 0 0   rp_webui        cat9k-webui.BLD_V166_THROTTLE_LATEST_20170618_152248.SSA.pkg
    Replacement:   rp 0 0   srdriver        cat9k-srdriver.BLD_V166_THROTTLE_LATEST_20170618_152248.SSA.pkg
    Replacement:   rp 1 0   guestshell      cat9k-guestshell.BLD_V166_THROTTLE_LATEST_20170618_152248.SSA.pkg
    Replacement:   rp 1 0   rp_base         cat9k-rpbase.BLD_V166_THROTTLE_LATEST_20170618_152248.SSA.pkg
    Replacement:   rp 1 0   rp_daemons      cat9k-rpbase.BLD_V166_THROTTLE_LATEST_20170618_152248.SSA.pkg
    Replacement:   rp 1 0   rp_iosd         cat9k-rpbase.BLD_V166_THROTTLE_LATEST_20170618_152248.SSA.pkg
    Replacement:   rp 1 0   rp_security     cat9k-rpbase.BLD_V166_THROTTLE_LATEST_20170618_152248.SSA.pkg
    Replacement:   rp 1 0   rp_webui        cat9k-webui.BLD_V166_THROTTLE_LATEST_20170618_152248.SSA.pkg
    Replacement:   rp 1 0   srdriver        cat9k-srdriver.BLD_V166_THROTTLE_LATEST_20170618_152248.SSA.pkg
    Finished rollback impact
  [R0] Finished Abort on R0
Checking status of Abort on [R0]
Abort: Passed on [R0]
Finished Abort


Install will reload the system now!
SUCCESS: install_abort  Tue Jun 20 14:08:25 PDT 2017

Device#
The following is sample output from the install activate auto-abort-timer command:
Device# install activate auto-abort-timer 30

install_activate: START Tue Jun 20 17:26:07 PDT 2017
install_activate: Activating PACKAGE


*Jun 20 17:26:08.572 PDT: %IOSXE-5-PLATFORM:  R0/0: Jun 20 17:26:08 install_engine.sh:
 %INSTALL-5-INSTALL_START_INFO: Started install activate


Following packages shall be activated:
/flash/cat9k-webui.BLD_V166_THROTTLE_LATEST_20170618_152248_2.SSA.pkg
/flash/cat9k-srdriver.BLD_V166_THROTTLE_LATEST_20170618_152248_2.SSA.pkg
/flash/cat9k-sipspa.BLD_V166_THROTTLE_LATEST_20170618_152248_2.SSA.pkg
/flash/cat9k-sipbase.BLD_V166_THROTTLE_LATEST_20170618_152248_2.SSA.pkg
/flash/cat9k-rpboot.BLD_V166_THROTTLE_LATEST_20170618_152248_2.SSA.pkg
/flash/cat9k-rpbase.BLD_V166_THROTTLE_LATEST_20170618_152248_2.SSA.pkg
/flash/cat9k-guestshell.BLD_V166_THROTTLE_LATEST_20170618_152248_2.SSA.pkg
/flash/cat9k-espbase.BLD_V166_THROTTLE_LATEST_20170618_152248_2.SSA.pkg
/flash/cat9k-cc_srdriver.BLD_V166_THROTTLE_LATEST_20170618_152248_2.SSA.pkg


This operation requires a reload of the system. Do you want to proceed? [y/n]
*Jun 20 18:07:47.821 PDT: %ENVIRONMENTAL-6-NOTICE: Temp: DopplerD, Location: R0, State: Minor, Reading: 85 Celsius
*Jun 20 18:13:47.848 PDT: %ENVIRONMENTAL-6-NOTICE: Temp:    inlet, Location: R0, State: Minor, Reading: 46 Celsiusy
--- Starting Activate ---
Performing Activate on Active/Standby
  [R0] Activate package(s) on R0
    --- Starting list of software package changes ---
    Old files list:
      Removed cat9k-cc_srdriver.BLD_V166_THROTTLE_LATEST_20170618_152248.SSA.pkg
      Removed cat9k-espbase.BLD_V166_THROTTLE_LATEST_20170618_152248.SSA.pkg
      Removed cat9k-guestshell.BLD_V166_THROTTLE_LATEST_20170618_152248.SSA.pkg
      Removed cat9k-rpbase.BLD_V166_THROTTLE_LATEST_20170618_152248.SSA.pkg
      Removed cat9k-rpboot.BLD_V166_THROTTLE_LATEST_20170618_152248.SSA.pkg
      Removed cat9k-sipbase.BLD_V166_THROTTLE_LATEST_20170618_152248.SSA.pkg
      Removed cat9k-sipspa.BLD_V166_THROTTLE_LATEST_20170618_152248.SSA.pkg
      Removed cat9k-srdriver.BLD_V166_THROTTLE_LATEST_20170618_152248.SSA.pkg
      Removed cat9k-webui.BLD_V166_THROTTLE_LATEST_20170618_152248.SSA.pkg
    New files list:
      Added cat9k-cc_srdriver.BLD_V166_THROTTLE_LATEST_20170618_152248_2.SSA.pkg
      Added cat9k-espbase.BLD_V166_THROTTLE_LATEST_20170618_152248_2.SSA.pkg
      Added cat9k-guestshell.BLD_V166_THROTTLE_LATEST_20170618_152248_2.SSA.pkg
      Added cat9k-rpbase.BLD_V166_THROTTLE_LATEST_20170618_152248_2.SSA.pkg
      Added cat9k-rpboot.BLD_V166_THROTTLE_LATEST_20170618_152248_2.SSA.pkg
      Added cat9k-sipbase.BLD_V166_THROTTLE_LATEST_20170618_152248_2.SSA.pkg
      Added cat9k-sipspa.BLD_V166_THROTTLE_LATEST_20170618_152248_2.SSA.pkg
      Added cat9k-srdriver.BLD_V166_THROTTLE_LATEST_20170618_152248_2.SSA.pkg
      Added cat9k-webui.BLD_V166_THROTTLE_LATEST_20170618_152248_2.SSA.pkg
    Finished list of software package changes
  [R0] Finished Activate on R0
Checking status of Activate on [R0]
Activate: Passed on [R0]
Finished Activate


*Jun 20 18:53:02.320 PDT: %IOSXE-5-PLATFORM:  R0/0: Jun 20 18:53:02 rollback_timer.sh:
 %INSTALL-5-INSTALL_AUTO_ABORT_TIMER_PROGRESS: Install auto abort timer will expire in 1800 seconds
 Install will reload
 the system now!
SUCCESS: install_activate  Tue Jun 20 18:53:27 PDT 2017
Device#
Verifying Software Install
SUMMARY STEPS
enable
show install log
show install summary
show install package filesystem: filename
show install active
show install inactive
show install committed
show install uncommitted
DETAILED STEPS
Step 1
enable
Example:
Device> enable
Enables privileged EXEC mode.
Enter your password if prompted.
Step 2
show install log
Example:
Device# show install log
Displays information about all the software install operations that was performed since boot-up of the device.
Device# show install log

[0|install_op_boot]: START Sun Jun 11 15:01:37 Universal 2017
[0|install_op_boot]: END SUCCESS  Sun Jun 11 15:01:44 Universal 2017
[1|install_commit]: START Mon Jun 12 07:27:31 UTC 2017
[1|install_commit(INFO, )]: Releasing transaction lock...
[1|install_commit(CONSOLE, )]: Committing PACKAGE
[remote|install_commit]: START Mon Jun 12 07:28:08 UTC 2017
[remote|install_commit(INFO, )]: Releasing transaction lock...
[remote|install_commit]: END SUCCESS  Mon Jun 12 07:28:41 UTC 2017
[1|install_commit(INFO, )]: [1 2 3]: Performing Commit
  SUCCESS: Commit finished
[1|install_commit(INFO, )]: install_commit: START Mon Jun 12 07:28:08 UTC 2017
  SUCCESS: install_commit  Mon Jun 12 07:28:41 UTC 2017
[1|install_commit(INFO, )]: Remote output from switch 2
[1|install_commit(INFO, )]: install_commit: START Mon Jun 12 07:28:12 UTC 2017
  SUCCESS: install_commit  Mon Jun 12 07:28:44 UTC 2017
[1|install_commit(INFO, )]: install_commit: START Mon Jun 12 07:28:12 UTC 2017
  SUCCESS: install_commit  Mon Jun 12 07:28:45 UTC 2017
[1|install_commit]: END SUCCESS  Mon Jun 12 07:28:47 UTC 2017
Step 3
show install summary
Example:
Device# show install summary
Displays information about the image versions and their corresponding install state for all members/field-replaceable unit
(FRU).
The output of this command differs based on the install command that is executed.
Device# show install summary

[ R0 ] Installed Package(s) Information:
State (St): I - Inactive, U - Activated & Uncommitted,
            C - Activated & Committed, D - Deactivated & Uncommitted
--------------------------------------------------------------------------------
Type  St   Filename/Version
--------------------------------------------------------------------------------
IMG   I    16.6.2.0
IMG   C    16.6.1.0

Device#
Step 4
show install package filesystem: filename
Example:
Device# show install package flash:cat9k_iosxe.16.06.01.SPA.bin
Displays information about the specified software install package file.
Device# show install package flash:cat9k_iosxe.16.06.01.SPA.bin

Package: cat9k_iosxe.16.06.01.SPA.bin
  Size: 333806196
  Timestamp: Sun Jun 11 14:47:23 2017 UTC
  Canonical path: /flash/cat9k_iosxe.16.06.01.SPA.bin

 Raw disk-file SHA1sum:
    5e9ef6ed1f7472b35eddd61df300e44b14b65ec4
  Header size:     1000 bytes
  Package type:    10002
  Package flags:   0
  Header version:  3

  Internal package information:
    Name: cc_srdriver
    BuildTime:
    ReleaseDate: Sun-27-Aug-17-09:05
    BootArchitecture: none
    RouteProcessor: cat9k
    Platform: CAT9K
    User: mcpre
    PackageName: cc_srdriver
    Build: BLD_V166_THROTTLE_LATEST_20170827_090555
    CardTypes:

  Package is not bootable.
Device#
Step 5
show install active
Example:
Device# show install active
Displays information about the active software install package.
Device# show install active
[ R0 ] Active Package(s) Information:
State (St): I - Inactive, U - Activated & Uncommitted,
            C - Activated & Committed, D - Deactivated & Uncommitted
--------------------------------------------------------------------------------
Type  St   Filename/Version
--------------------------------------------------------------------------------
IMG   C    16.6.2.0
Step 6
show install inactive
Example:
Device# show install inactive
Displays information about the inactive packages.
Device# show install inactive

[ R0 ] Inactive Package(s) Information:
State (St): I - Inactive, U - Activated & Uncommitted,
            C - Activated & Committed, D - Deactivated & Uncommitted
--------------------------------------------------------------------------------
Type  St   Filename/Version
--------------------------------------------------------------------------------
IMG   I    16.7.1.0
Device#
Step 7
show install committed
Example:
Device# show install committed
Displays information about committed packages.
Device# show install committed
[ R0 ] Committed Package(s) Information:
State (St): I - Inactive, U - Activated & Uncommitted,
            C - Activated & Committed, D - Deactivated & Uncommitted
--------------------------------------------------------------------------------
Type  St   Filename/Version
--------------------------------------------------------------------------------
IMG   C    16.6.1.0
Device#
Step 8
show install uncommitted
Example:
Device# show install uncommitted
Displays information about uncommitted packages.
Device# show install uncommitted
[ R0 ] Uncommitted Package(s) Information:
State (St): I - Inactive, U - Activated & Uncommitted,
            C - Activated & Committed, D - Deactivated & Uncommitted
--------------------------------------------------------------------------------
Type  St   Filename/Version
--------------------------------------------------------------------------------
IMG   U    16.6.2.0
Device#
Example: Configuring a Device as a DHCP Server
Device# configure terminalDevice(config)# ip dhcp poolpool1Device(dhcp-config)# network10.10.10.0 255.255.255.0Device(dhcp-config)# bootconfig-boot.textDevice(dhcp-config)# default-router 10.10.10.1Device(dhcp-config)# option 150 10.10.10.1Device(dhcp-config)# exitDevice(config)# tftp-server flash:config-boot.textDevice(config)# interface gigabitethernet1/0/4 Device(config-if)# no switchportDevice(config-if)# ip address 10.10.10.1 255.255.255.0Device(config-if)# end
Example: Configuring DHCP Auto-Image Update
Device# configure terminalDevice(config)# ip dhcp poolpool1Device(dhcp-config)# network10.10.10.0 255.255.255.0Device(dhcp-config)# bootconfig-boot.text Device(dhcp-config)# default-router 10.10.10.1Device(dhcp-config)# option150 10.10.10.1Device(dhcp-config)# option 125 hex 0000.0009.0a05.08661.7574.6f69.6e73.7461.6c6c.5f64.686370 Device(dhcp-config)# exitDevice(config)# tftp-server flash:config-boot.textDevice(config)# tftp-server flash:image_nameDevice(config)# tftp-server flash:boot-config.textDevice(config)# tftp-server flash: autoinstall_dhcpDevice(config)# interface gigabitethernet1/0/4Device(config-if)# no switchportDevice(config-if)# ip address 10.10.10.1 255.255.255.0Device(config-if)# end
Example: Configuring a Device to Download Configurations from a DHCP Server
This example uses a Layer 3 SVI interface on VLAN 99 to enable DHCP-based autoconfiguration with a saved configuration:
Device# configure terminalDevice(config)# boot host dhcpDevice(config)# boot host retry timeout 300Device(config)# banner config-save ^C Caution - Saving Configuration File to NVRAM May Cause You to No longer Automatically Download Configuration Files at Reboot^CDevice(config)# vlan 99Device(config-vlan)# interface vlan 99Device(config-if)# no shutdownDevice(config-if)# endDevice# show boot
BOOT path-list:
Config file: flash:/config.text
Private Config file: flash:/private-config.text
Enable Break: no
Manual Boot: no
HELPER path-list:
NVRAM/Config file
buffer size: 32768
Timeout for Config
Download: 300 seconds
Config Download
via DHCP: enabled (next boot: enabled)
Device#
Examples: Scheduling Software Image Reload
This example shows how to reload the software on the device on the current day at 7:30 p.m:
Device# reload at 19:30
Reload scheduled for 19:30:00 UTC Wed Jun 5 2013 (in 2 hours and 25 minutes)
Proceed with reload? [confirm]
This example shows how to reload the software on the device at a future time:
Device# reload at 02:00 jun 20
Reload scheduled for 02:00:00 UTC Thu Jun 20 2013 (in 344 hours and 53 minutes)
Proceed with reload? [confirm]
Additional References For Performing Device Setup
Related Documents
Related Topic
Document Title
Device setup commands
Boot loader commands
Command Reference (Catalyst 9400 Series Switches)
Hardware installation
Cisco Catalyst 9400 Series Switches Hardware Installation Guide
.
Feature History for Performing Device Setup Configuration
This table provides release and related information for features explained in this module.
These features are available on all releases subsequent to the one they were introduced in, unless noted otherwise.
Release
Feature
Feature Information
Cisco IOS XE Everest 16.6.1
Device Setup Configuration
A device setup configuration can be performed, including auto configuration of IP address assignments and DHCP.
Use Cisco Feature Navigator to find information about platform and software image support. To access Cisco Feature Navigator,
go to http://www.cisco.com/go/cfn.

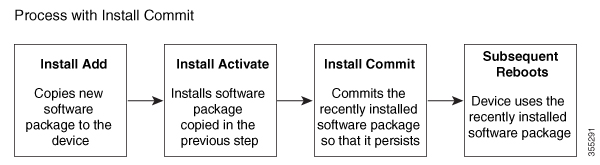
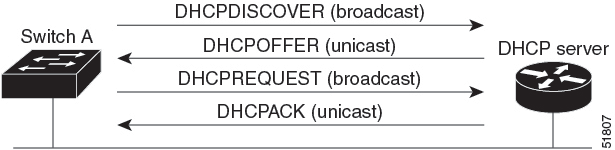
 Feedback