Configuring IPv6 ACLs

IPv6 ACLs Overview

You can filter IP Version 6 (IPv6) traffic by creating IPv6 access control lists (ACLs) and applying them to interfaces similar to how you create and apply IP Version 4 (IPv4) named ACLs. You can also create and apply input router ACLs to filter Layer 3 management traffic when the switch is running IP base and LAN base feature sets.

A switch supports three types of IPv6 ACLs:

  • IPv6 router ACLs are supported on outbound or inbound traffic on Layer 3 interfaces, which can be routed ports, switch virtual interfaces (SVIs), or Layer 3 EtherChannels. IPv6 router ACLs apply only to IPv6 packets that are routed.

  • IPv6 port ACLs are supported on outbound and inbound Layer 2 interfaces. IPv6 port ACLs are applied to all IPv6 packets entering the interface.

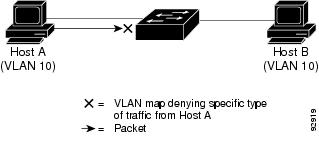
  • VLAN ACLs or VLAN maps access-control all packets in a VLAN. You can use VLAN maps to filter traffic between devices in the same VLAN. ACL VLAN maps are applied on L2 VLANs. VLAN maps are configured to provide access control based on Layer 3 addresses for IPv6. Unsupported protocols are access-controlled through MAC addresses using Ethernet ACEs. After a VLAN map is applied to a VLAN, all packets entering the VLAN are checked against the VLAN map.

The switch supports VLAN ACLs (VLAN maps) for IPv6 traffic.

You can apply both IPv4 and IPv6 ACLs to an interface. As with IPv4 ACLs, IPv6 port ACLs take precedence over router ACLs.

Switch Stacks and IPv6 ACLs

The active switch supports IPv6 ACLs in hardware and distributes the IPv6 ACLs to the stack members.

If a standby switch takes over as the active switch, it distributes the ACL configuration to all stack members. The member switches sync up the configuration distributed by the new active switch and flush out entries that are not required.

When an ACL is modified, attached to, or detached from an interface, the active switch distributes the change to all stack members.

ACL Precedence

When VLAN maps, Port ACLs, and router ACLs are configured on the same switch, the filtering precedence, from greatest to least for ingress traffic is port ACL, VLAN map, and then router ACL. For egress traffic, the filtering precedence is router ACL, VLAN map, and then port ACL.

The following examples describe simple use cases:

  • When both an input port ACL and a VLAN map are applied, incoming packets received on ports with a port ACL applied are filtered by the port ACL. Other packets are filtered by the VLAN map

  • When an input router ACL and input port ACL exist in a switch virtual interface (SVI), incoming packets received on ports to which a port ACL is applied are filtered by the port ACL. Incoming routed IP packets received on other ports are filtered by the router ACL. Other packets are not filtered.

  • When an output router ACL and input port ACL exist in an SVI, incoming packets received on the ports to which a port ACL is applied are filtered by the port ACL. Outgoing routed IP packets are filtered by the router ACL. Other packets are not filtered.

  • When a VLAN map, input router ACL, and input port ACL exist in an SVI, incoming packets received on the ports to which a port ACL is applied are only filtered by the port ACL. Incoming routed IP packets received on other ports are filtered by both the VLAN map and the router ACL. Other packets are filtered only by the VLAN map.

  • When a VLAN map, output router ACL, and input port ACL exist in an SVI, incoming packets received on the ports to which a port ACL is applied are only filtered by the port ACL. Outgoing routed IP packets are filtered by both the VLAN map and the router ACL. Other packets are filtered only by the VLAN map.

VLAN Maps

VLAN ACLs or VLAN maps are used to control network traffic within a VLAN. You can apply VLAN maps to all packets that are bridged within a VLAN in the switch or switch stack. VACLs are strictly for security packet filtering and for redirecting traffic to specific physical interfaces. VACLs are not defined by direction (ingress or egress).

All non-IP protocols are access-controlled through MAC addresses and Ethertype using MAC VLAN maps. (IP traffic is not access controlled by MAC VLAN maps.) You can enforce VLAN maps only on packets going through the switch; you cannot enforce VLAN maps on traffic between hosts on a hub or on another switch connected to this switch.

With VLAN maps, forwarding of packets is permitted or denied, based on the action specified in the map.

Figure 1. Using VLAN Maps to Control Traffic. This figure shows how a VLAN map is applied to prevent a specific type of traffic from Host A in VLAN 10 from being forwarded. You can apply only one VLAN map to a VLAN.
Using VLAN maps to control traffic.

Hitless TCAM Update

The Hitless TCAM update for IPv4 and IPv6 provides the capability to apply existing features to the incoming traffic while updating new features in the TCAM. Any change in IPv4 and IPv6 ACL on a given interface would trigger a reprogramming of TCAM.

Starting with Cisco IOS XE Fuji 16.8.1a, Hitless TCAM update is enabled.

This feature is always enabled. You cannot disable this feature.

The Hitless TCAM update follows the below ACL change rules:
  • If there are value compare unit (VCU) registers in use from ACEs with layer 4 operators, there could be a few packet drops during the change.

  • If there are not enough VCU bits remaining to add a second set of access control entries and if there is not enough space in TCAM to expand these entries, the old ACL change method will apply; which will drop all packets, delete the old ACL, add the new ACL entries into TCAM, and then remove the entry that is causing the packets to drop.

  • If there is not enough space in TCAM to add the modified entries, the old ACL change method will automatically be applied.

    Note


    • To perform Hitless ACL update for an IPv4 ACL which has X number of ACEs, TCAM should have a free space for accommodating X+1 entries.

    • To perform Hitless ACL update for an IPv6 ACL which has X number of ACEs, TCAM should have a free space for accommodating 2X+2 entries.


Interactions with Other Features and Switches

  • If an IPv6 router ACL is configured to deny a packet, the packet is not routed. A copy of the packet is sent to the Internet Control Message Protocol (ICMP) queue to generate an ICMP unreachable message for the frame.

  • If a bridged frame is to be dropped due to a port ACL, the frame is not bridged.

  • You can create both IPv4 and IPv6 ACLs on a switch or switch stack, and you can apply both IPv4 and IPv6 ACLs to the same interface. Each ACL must have a unique name; an error message appears if you try to use a name that is already configured.

    You use different commands to create IPv4 and IPv6 ACLs and to attach IPv4 or IPv6 ACLs to the same Layer 2 or Layer 3 interface. If you use the wrong command to attach an ACL (for example, an IPv4 command to attach an IPv6 ACL), you receive an error message.

  • You cannot use MAC ACLs to filter IPv6 frames. MAC ACLs can only filter non-IP frames.

  • If the hardware memory is full, packets are dropped on the interface and an unload error message is logged.

Restrictions for IPv6 ACLs

With IPv4, you can configure standard and extended numbered IP ACLs, named IP ACLs, and MAC ACLs. IPv6 supports only named ACLs.

The switch supports most Cisco IOS-supported IPv6 ACLs with some exceptions:

  • The switch does not support matching on these keywords: routing header, and undetermined-transport.

  • The switch does not support reflexive ACLs (the reflect keyword).

  • This release supports port ACLs, router ACLs and VLAN ACLs (VLAN maps) for IPv6.

  • The switch does not apply MAC-based ACLs on IPv6 frames.

  • When configuring an ACL, there is no restriction on keywords entered in the ACL, regardless of whether or not they are supported on the platform. When you apply the ACL to an interface that requires hardware forwarding (physical ports or SVIs), the switch checks to determine whether or not the ACL can be supported on the interface. If not, attaching the ACL is rejected.

  • If an ACL is applied to an interface and you attempt to add an access control entry (ACE) with an unsupported keyword, the switch does not allow the ACE to be added to the ACL that is currently attached to the interface.

IPv6 ACLs on the switch have these characteristics:

  • Fragmented frames (the fragments keyword as in IPv4) are supported

  • The same statistics supported in IPv4 are supported for IPv6 ACLs.

  • If the switch runs out of hardware space, the packets associated with the ACL are dropped on the interface.

  • Logging is supported for router ACLs, but not for port ACLs.

  • The switch supports IPv6 address-matching for a full range of prefix-lengths.

Default Configuration for IPv6 ACLs

The default IPv6 ACL configuration is as follows:

Switch# show access-lists preauth_ipv6_acl
IPv6 access list preauth_ipv6_acl (per-user)
permit udp any any eq domain sequence 10
permit tcp any any eq domain sequence 20
permit icmp any any nd-ns sequence 30
permit icmp any any nd-na sequence 40
permit icmp any any router-solicitation sequence 50
permit icmp any any router-advertisement sequence 60
permit icmp any any redirect sequence 70
permit udp any eq 547 any eq 546 sequence 80
permit udp any eq 546 any eq 547 sequence 90
deny ipv6 any any sequence 100

Configuring IPv6 ACLs

To filter IPv6 traffic, perform this procedure:

Procedure

  Command or Action Purpose

Step 1

enable

Example:


Device> enable

Enables privileged EXEC mode.

  • Enter your password if prompted.

Step 2

configure terminal

Example:


Device# configure terminal

Enters global configuration mode.

Step 3

{ipv6 access-list list-name

Example:

Device(config)# ipv6 access-list example_acl_list

Defines an IPv6 ACL name, and enters IPv6 access list configuration mode.

Step 4

{deny | permit} protocol {source-ipv6-prefix/ |prefix-length |any| host source-ipv6-address} [ operator [ port-number ]] { destination-ipv6-prefix/ prefix-length | any | host destination-ipv6-address} [operator [port-number]][dscp value] [fragments] [log] [log-input][sequence value] [time-range name]

Enter deny or permit to specify whether to deny or permit the packet if conditions are matched. These are the conditions:

  • For protocol, enter the name or number of an IP: ahp , esp , icmp , ipv6 , pcp , stcp , tcp , or udp , or an integer in the range 0 to 255 representing an IPv6 protocol number.

  • The source-ipv6-prefix/prefix-length or destination-ipv6-prefix/ prefix-length is the source or destination IPv6 network or class of networks for which to set deny or permit conditions, specified in hexadecimal and using 16-bit values between colons (see RFC 2373).

  • Enter any as an abbreviation for the IPv6 prefix ::/0.

  • For host source-ipv6-address or destination-ipv6-address , enter the source or destination IPv6 host address for which to set deny or permit conditions, specified in hexadecimal using 16-bit values between colons.

  • (Optional) For operator, specify an operand that compares the source or destination ports of the specified protocol. Operands are lt (less than), gt (greater than), eq (equal), neq (not equal), and range .

    If the operator follows the source-ipv6-prefix/prefix-length argument, it must match the source port. If the operator follows the destination-ipv6- prefix/prefix-length argument, it must match the destination port.

  • (Optional) The port-number is a decimal number from 0 to 65535 or the name of a TCP or UDP port. You can use TCP port names only when filtering TCP. You can use UDP port names only when filtering UDP.

  • (Optional) Enter dscp value to match a differentiated services code point value against the traffic class value in the Traffic Class field of each IPv6 packet header. The acceptable range is from 0 to 63.

  • (Optional) Enter fragments to check noninitial fragments. This keyword is visible only if the protocol is ipv6.

  • (Optional) Enter log to cause an logging message to be sent to the console about the packet that matches the entry. Enter log-input to include the input interface in the log entry. Logging is supported only for router ACLs.

  • (Optional) Enter sequence value to specify the sequence number for the access list statement. The acceptable range is from 1 to 4,294,967,295.

  • (Optional) Enter time-range name to specify the time range that applies to the deny or permit statement.

Step 5

{deny | permit} tcp {source-ipv6-prefix/prefix-length | any | host source-ipv6-address} [operator [port-number]] {destination-ipv6- prefix/prefix-length | any | host destination-ipv6-address} [operator [port-number]] [ack] [dscp value] [established] [fin] [log] [log-input] [neq {port | protocol}] [psh] [range {port | protocol}] [rst] [sequence value] [syn] [time-range name] [urg]

(Optional) Define a TCP access list and the access conditions.

Enter tcp for Transmission Control Protocol. The parameters are the same as those described in Step 3a, with these additional optional parameters:

  • ack : Acknowledgment bit set.

  • established : An established connection. A match occurs if the TCP datagram has the ACK or RST bits set.

  • fin : Finished bit set; no more data from sender.

  • neq { port |protocol} : Matches only packets that are not on a given port number.

  • psh —Push function bit set.

  • range { port |protocol} : Matches only packets in the port number range.

  • rst : Reset bit set.

  • syn : Synchronize bit set.

  • urg : Urgent pointer bit set.

Step 6

{deny | permit} udp {source-ipv6-prefix/prefix-length | any | host source-ipv6-address} [operator [port-number]] {destination-ipv6-prefix/prefix-length | any | host destination-ipv6-address} [operator [port-number]] [dscp value] [log] [log-input] [neq {port | protocol}] [range {port | protocol}] [sequence value] [time-range name]]

(Optional) Define a UDP access list and the access conditions.

Enter udp for the User Datagram Protocol. The UDP parameters are the same as those described for TCP, except that the [operator [port]] port number or name must be a UDP port number or name, and the established parameter is not valid for UDP.

Step 7

{deny | permit} icmp {source-ipv6-prefix/prefix-length | any | host source-ipv6-address} [operator [port-number]] {destination-ipv6-prefix/prefix-length | any | host destination-ipv6-address} [operator [port-number]] [icmp-type [icmp-code] | icmp-message] [dscp value] [log] [log-input] [sequence value] [time-range name]

(Optional) Define an ICMP access list and the access conditions.

Enter icmp for Internet Control Message Protocol. The ICMP parameters are the same as those described for most IP protocols in Step 1, with the addition of the ICMP message type and code parameters. These optional keywords have these meanings:

  • icmp-type : Enter to filter by ICMP message type, a number from 0 to 255.

  • icmp-code : Enter to filter ICMP packets that are filtered by the ICMP message code type, a number from 0 to 255.

  • icmp-message : Enter to filter ICMP packets by the ICMP message type name or the ICMP message type and code name. To see a list of ICMP message type names and code names, use the ? key or see command reference for this release.

Step 8

end

Return to privileged EXEC mode.

Step 9

show ipv6 access-list

Verify the access list configuration.

Step 10

show running-config

Example:


Device# show running-config 

Verifies your entries.

Step 11

copy running-config startup-config

Example:


Device# copy running-config startup-config 

(Optional) Saves your entries in the configuration file.

Attaching an IPv6 ACL to an Interface

You can apply an ACL to outbound or inbound traffic on Layer 3 interfaces, or to inbound traffic on Layer 2 interfaces. You can also apply ACLs only to inbound management traffic on Layer 3 interfaces.

Follow these steps to control access to an interface.

Procedure

  Command or Action Purpose

Step 1

enable

Example:


Device> enable

Enables privileged EXEC mode.

  • Enter your password if prompted.

Step 2

configure terminal

Example:


Device# configure terminal

Enters global configuration mode.

Step 3

interface interface-id

Identify a Layer 2 interface (for port ACLs) or Layer 3 interface (for router ACLs) on which to apply an access list, and enter interface configuration mode.

Step 4

no switchport

If applying a router ACL, this changes the interface from Layer 2 mode (the default) to Layer 3 mode.

Step 5

ipv6 address ipv6-address

Configure an IPv6 address on a Layer 3 interface (for router ACLs).

Step 6

ipv6 traffic-filter access-list-name {in | out}

Apply the access list to incoming or outgoing traffic on the interface.

Step 7

end

Example:


Device(config)# end

Returns to privileged EXEC mode.

Step 8

show running-config

Example:


Device# show running-config 

Verifies your entries.

Step 9

copy running-config startup-config

Example:


Device# copy running-config startup-config 

(Optional) Saves your entries in the configuration file.

Configuring a VLAN Map

To create a VLAN map and apply it to one or more VLANs, perform these steps:

Before you begin

Create the IPv6 ACL that you want to apply to the VLAN.

Procedure

  Command or Action Purpose

Step 1

enable

Example:


Device> enable

Enables privileged EXEC mode.

  • Enter your password if prompted.

Step 2

configure terminal

Example:


Device# configure terminal

Enters global configuration mode.

Step 3

vlan access-map name [number]

Example:


Device(config)# vlan access-map map_1 20

Creates a VLAN map, and give it a name and (optionally) a number. The number is the sequence number of the entry within the map.

When you create VLAN maps with the same name, numbers are assigned sequentially in increments of 10. When modifying or deleting maps, you can enter the number of the map entry that you want to modify or delete.

VLAN maps do not use the specific permit or deny keywords. To deny a packet by using VLAN maps, create an ACL that would match the packet, and set the action to drop. A permit in the ACL counts as a match. A deny in the ACL means no match.

Entering this command changes to access-map configuration mode.

Step 4

match {ip | ipv6 | mac} address {name | number} [name | number]

Example:


Device(config-access-map)# match ipv6 address ip_net

Match the packet against one or more access lists. Note that packets are only matched against access lists of the correct protocol type. IP packets are matched against IP access lists. Non-IP packets are only matched against named MAC access lists.

Note


If the VLAN map is configured with a match clause for a type of packet (IP or MAC) and the map action is drop, all packets that match the type are dropped. If the VLAN map has no match clause, and the configured action is drop, all IP and Layer 2 packets are dropped.

Step 5

Enter one of the following commands to specify an IP packet or a non-IP packet (with only a known MAC address) and to match the packet against one or more ACLs:

  • action { forward}
    Device(config-access-map)# action forward
  • action { drop}
    Device(config-access-map)# action drop

Sets the action for the map entry.

Step 6

vlan filter mapname vlan-list list

Example:


Device(config)# vlan filter map 1 vlan-list 20-22

Applies the VLAN map to one or more VLAN IDs.

The list can be a single VLAN ID (22), a consecutive list (10-22), or a string of VLAN IDs (12, 22, 30). Spaces around the comma and hyphen are optional.

Applying a VLAN Map to a VLAN

Beginning in privileged EXEC mode, follow these steps to apply a VLAN map to one or more VLANs:

Procedure

  Command or Action Purpose

Step 1

enable

Example:


Device> enable

Enables privileged EXEC mode.

  • Enter your password if prompted.

Step 2

configure terminal

Example:


Device# configure terminal

Enters global configuration mode.

Step 3

vlan filter mapname vlan-list list

Example:


Device(config)# vlan filter map 1 vlan-list 20-22

Applies the VLAN map to one or more VLAN IDs.

The list can be a single VLAN ID (22), a consecutive list (10-22), or a string of VLAN IDs (12, 22, 30). Spaces around the comma and hyphen are optional.

Step 4

end

Example:


Device(config)# end

Returns to privileged EXEC mode.

Step 5

show running-config

Example:


Device# show running-config

Displays the access list configuration.

Step 6

copy running-config startup-config

Example:


Device# copy running-config startup-config

(Optional) Saves your entries in the configuration file.

Monitoring IPv6 ACLs

You can display information about all configured access lists, all IPv6 access lists, or a specific access list by using one or more of the privileged EXEC commands shown in the table below:

Table 1. show ACL commands
Command Purpose
show access-lists

Displays all access lists configured on the switch.

show ipv6 access-list [access-list-name]

Displays all configured IPv6 access lists or the access list specified by name.

show vlan access-map [map-name]

Displays VLAN access map configuration.

show vlan filter [access-map access-map | vlan vlan-id]

Displays the mapping between VACLs and VLANs.

This is an example of the output from the show access-lists privileged EXEC command. The output shows all access lists that are configured on the switch or switch stack.

Switch # show access-lists 
Extended IP access list hello
    10 permit ip any any
IPv6 access list ipv6
    permit ipv6 any any sequence 10

This is an example of the output from the show ipv6 access-list privileged EXEC command. The output shows only IPv6 access lists configured on the switch or switch stack

Switch# show ipv6 access-list
IPv6 access list inbound
    permit tcp any any eq bgp (8 matches) sequence 10
    permit tcp any any eq telnet (15 matches) sequence 20
    permit udp any any sequence 30
IPv6 access list outbound
    deny udp any any sequence 10
    deny tcp any any eq telnet sequence 20

This is an example of the output from the show vlan access-map privileged EXEC command. The output shows VLAN access map information.

Switch# show vlan access-map
Vlan access-map "m1"  10
  Match clauses:
    ipv6 address: ip2
  Action: drop

Feature History for IPv6 ACLs

This table provides release and related information for features explained in this module.

These features are available on all releases subsequent to the one they were introduced in, unless noted otherwise.

Release

Feature

Feature Information

Cisco IOS XE Everest 16.5.1a

IPv6 ACLs

You can filter IPv6 traffic by creating IPv6 ACLs and applying them to interfaces similar to how you create and apply IPv4 named ACLs. You can also create and apply input router ACLs to filter Layer 3 management traffic.

Support for this feature was introduced on all the models of the Cisco Catalyst 9500 Series Switches.

Cisco IOS XE Fuji 16.8.1a

IPv6 ACLs

Support for this feature was introduced on the C9500-32C, C9500-32QC, C9500-48Y4C, and C9500-24Y4C models of the Cisco Catalyst 9500 Series Switches.

Use Cisco Feature Navigator to find information about platform and software image support. To access Cisco Feature Navigator, go to http://www.cisco.com/go/cfn.