Configuring Layer 3 Subinterface Queuing

Restrictions for Layer 3 Subinterface Queuing

  • Subinterface Queuing is supported only on Cisco Catalyst 9600 Series Supervisor 2 Module (C9600X-SUP-2).

  • Subinterface queuing is supported only on Layer 3 subinterfaces.

  • Queuing policy is not supported on port channels or subinterfaces of port channels.

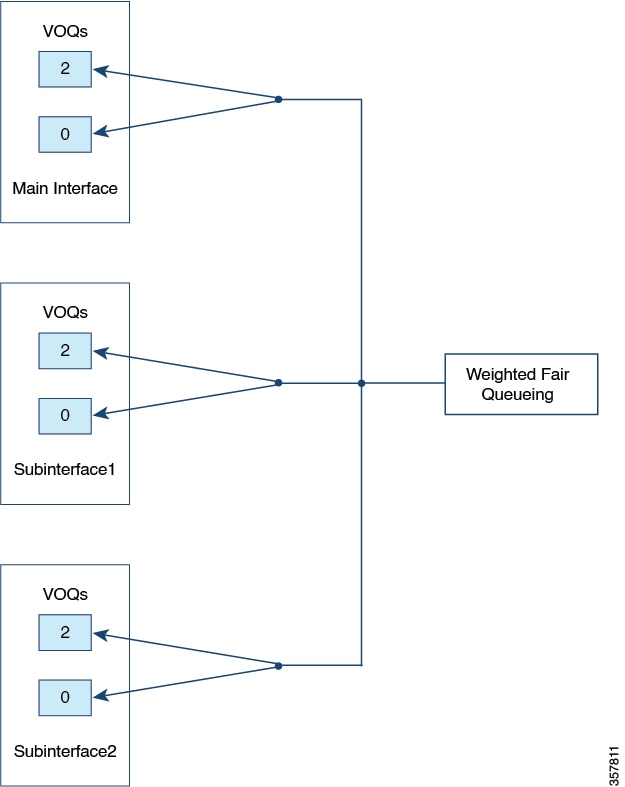
  • Subinterface queuing supports a maximum of two queues—priority traffic class (class 7) and nonpriority traffic class (class default).

  • Subinterface queuing is not supported for multicast traffic.

  • Queued traffic on subinterfaces cannot be re-marked on the main interface using the re-mark policy.

  • Hierarchical queuing is supported on the subinterface with this restriction—the parent policy can contain only class-default, which can have shape or bandwidth remaining ratio or both shape and bandwidth remaining ratio.

  • Shaping is only supported in:

    • Priority traffic class for child or non-HQoS queuing policy.

    • Class-default for parent policy in HQoS policy.

  • Bandwidth remaining ratio is not supported for queue policies with priority level defined.

  • Bandwidth remaining ratio is only supported in the parent class of the HQoS queuing policy on subinterfaces.

  • Traffic on all the subinterfaces without queuing policy applied, flows through the main interface queues, while traffic for the subinterfaces with queuing policy applied, flows through their respective queues.

  • For direct, connected interfaces with defined IP addresses, traffic does not flow through subinterface queues but through the main interface queue. For indirect connected interfaces, traffic flows through subinterface queues.

  • The no switchport command should be run to configure layer 3 subinterfaces.

  • If a policy is applied on any of the subinterfaces, you cannot apply or remove a policy on the main interface without removing the policy on the subinterface. You can only modify the policy on the main interface.

  • Queuing policy maps can be applied to a maximum of 400 Layer 3 subinterfaces.

  • When HQoS is enabled on a subinterface, and the parent is configured with shape rate value (in percent), then the parent shape rate value is calculated using the main interface physical bandwidth as the reference bandwidth.

  • When queuing policy is enabled on a subinterface, the subinterface queuing packet drop statistics are not reflected in the total packet drop statistics at the main interface level.

Information About Layer 3 Subinterface Queuing

The following sections describe different queuing modes of Layer 3 subinterfaces.

Default Queuing Mode

In default queuing mode, the main interface queue configuration has absolute priority control over the subinterface queues. The main interface has eight queues (7 to 0 in order) by default, which can be configured using [pP(8-p)Q, where p=1 to 7, P=priority, and Q=queue] combination. A subinterface has two queues (Q1 and Q0) that map to or share the priority level with the queues (Q1 and Q0) of the main interface. Therefore, these subinterface queues are lower in priority when compared to the main interface queues, based on the policy applied on the main interface.

Figure 1. Default Queuing Mode

Subinterface Propagation Queuing Mode

In this mode, the main interface queues are treated and configured just as any other subinterface queue, and all the behavior and restrictions of the subinterface queues are applicable to the main interface queue as well. A queue of the same priority level across the main interface and subinterfaces contend for bandwidth or priority at the same level. Further, in this mode a user can configure bandwidth distribution ratio between the main interface and subinterfaces. A user cannot change the mode of the main interface when queuing policy is applied on the main interface.

Figure 2. Subinterface Propagation Queuing Mode

Hierarchical QoS

The following HQoS configuration options are supported:

  • Port shaper: Port shaper is used to limit or shape the overall transmittion rate for a given port (main or subinterface). Port shaper is supported through a HQoS queuing policy on the main interface and subinterfaces with the shaper configured on the parent policy.

    • Main interface: Port shaper applied on the main interface is applicable to all subinterfaces.


      Note


      The above is applicable only if the main interface is not in priority propagation mode. If the main interface is in priority propagation mode, it is treated as a subinterface and its shaper value is not applicable to the subinterfaces.


    • Subinterface: Port shaper is applied only to the subinterface on which the port shaper policy is applied.

  • Port bandwidth distribution ratio among subinterfaces: Port bandwidth remaining ratio is used to govern or configure bandwidth ditribution ratio between subinterfaces. Port bandwidth remaining ratio is supported with the bandwidth remaining ratio command that is configured on the parent policy applied on the subinterface.

    Port bandwidth remaining ratio is also supported between the main interface and subinterface when subinterface priority propagation mode is enabled.

    A maximum of seven ratio values are supported. Therefore, even if there are several subinterfaces under a main interface, there can only be a maximum of seven absolute bandwidth distribution ratio values between them.


Note


The value of a port shaper set on the main interface is the maximum allowed value on subinterfaces even if a higher port shaper value is defined on the subinterfaces.


How to Configure Layer 3 Subinterface Queuing

The following sections provide configuration information about Layer 3 subinterface queuing.

Enabling Subinterface Queuing Policy

This procedure describes how to enable subinterface queuing policy.

Procedure

  Command or Action Purpose

Step 1

enable

Example:


Device> enable

Enables privileged EXEC mode.

Enter your password, if prompted.

Step 2

configure terminal

Example:


Device# configure terminal

Enters global configuration mode.

Step 3

class-map {match-any | match-all} {class name}

Example:


Device(config)# class-map match-all traffic-class7

Enters class map configuration mode, and creates a class map to be used for matching packets to the class whose name you specify.

  • match-any : At least one of the match criteria must be met for traffic entering the traffic class to be classified as being a part of the traffic class.

  • match-all : All of the match criteria must be met for traffic entering the traffic class to be classified as part of the traffic class.

    Note


    match-all is the default. If match-any or match-all is not explicitly defined, match-all is chosen by default.

Step 4

match traffic-class traffic class value

Example:


Device(config-cmap)# match traffic-class 7

Matches QoS traffic class value (from 1 to 7).

Note


Only traffic class 7 is supported for queueing on subinterfaces. If it is not a subinterface queue, you can perform steps 3 and 4 to create class maps for all the traffic classes (7 to 1), and attach these to policy-map queues.

Step 5

exit

Example:


Device(config-cmap)# exit

Exits class map configuration mode and enters global configuration mode.

Step 6

policy-map type queueing policy name

Example:


Device(config)# policy-map type queueing subif_q_policy

Specifies the name of the main interface queueing profile policy and enters policy map configuration mode.

Step 7

class class-name

Example:


Device(config-pmap)# class traffic-class7

Specifies the name of the class to be associated with the policy and enters policy class map configuration mode. Command options for policy class map configuration mode include the following:

  • word : Class map name.

  • class-default : System default class matching otherwise unclassified packets, if any.

Step 8

shape average {Kb/s | percent}

Example:


Device(config-pmap-c)# shape average percent 10

Configures the traffic shaping average. The parameters include:

  • Kb/s : Use this argument to configure a specific value. The range is 1.2 Mbps to 400 Gbps.

  • percent : Allocates a maximum bandwidth to a particular class. The queue can oversubscribe bandwidth in case other queues do not utilize the entire port bandwidth. The total sum cannot exceed 100 percent, and in case it is less than 100 percent, the rest of the bandwidth is divided along all nonpriority queues based on the bandwidth remaining ratio.

Step 9

priority level level

Example:


Device(config-pmap-c)# priority level 1

Configures a multilevel priority queue.

Step 10

exit

Example:


Device(config-pmap-c)# exit

Exits policy class map configuration mode and enters class map configuration mode.

Step 11

exit

Example:


Device(config-pmap)# exit

Exits policy map configuration mode and enters global configuration mode.

Step 12

interface interface-id

Example:


Device(config)# interface HundredGigE1/0/9

Identifies the main interface and enters interface configuration mode.

Step 13

no switchport

Example:


Device(config-if)# no switchport

Switches the interface that is in Layer 2 mode into Layer 3 mode for Layer 3 configuration.

Step 14

exit

Example:


Device(config-if)# exit

Exits interface configuration mode and enters global configuration mode.

Step 15

interface interface-id.subinterface-id

Example:


Device(config)# interface HundredGigE1/0/9.1

Identifies the subinterface and enters subinterface configuration mode.

Step 16

encapsulation dot1Q vlan-id

Example:


Device(config-subif)# encapsulation dot1Q 11

Enables IEEE 802.1Q encapsulation of traffic on the subinterface.

Step 17

service-policy type queueing output policy name

Example:


Device(config-subif)# service-policy type queueing output subif_q_policy

Attaches two queue policy maps to the subinterface.

Step 18

end

Example:


Device(config-subif)# end

Returns to privileged EXEC mode.

Enabling Subinterface Priority Propagation Mode

This procedure describes how to enable subinterface priority propagation mode on the main interface.

Procedure

  Command or Action Purpose

Step 1

enable

Example:


Device> enable

Enables privileged EXEC mode.

Enter your password, if prompted.

Step 2

configure terminal

Example:


Device# configure terminal

Enters global configuration mode.

Step 3

interface interface-id

Example:


Device(config)# interface HundredGigE1/0/23

Identifies the main interface and enters interface configuration mode.

Step 4

no switchport

Example:


Device(config-if)# no switchport

Switches the main interface that is in Layer 2 mode to Layer 3 mode for Layer 3 configuration.

Step 5

queuing mode sub-interface priority-propagation

Example:


Device(config-if)# queuing mode sub-interface priority-propagation

Enables subinterface priority propagation mode.

Note


This mode can be enabled only when no policy is applied on the main interface.

Step 6

end

Example:


Device(config-subif)# end

Exits subinterface configuration mode and returns to privileged EXEC mode.

Configuring Hierarchical QoS Policy on a Subinterface

This procedure describes how to configure HQoS policy on a subinterface.

Procedure

  Command or Action Purpose

Step 1

enable

Example:


Device> enable

Enables privileged EXEC mode.

Enter your password, if prompted.

Step 2

configure terminal

Example:


Device# configure terminal

Enters global configuration mode.

Step 3

class-map match-all {classname}

Example:


Device(config)# class-map match-all traffic-class7

Configures the class map to match all the criteria for traffic entering the traffic class, and enters class map configuration mode.

Step 4

match traffic-class class value

Example:


Device(config-cmap)# match traffic-class 7

Matches QoS traffic class value.

Step 5

exit

Example:


Device(config-cmap)# exit

Exits class map configuration mode and enters global configuration mode.

Step 6

policy-map type queueing child policy name

Example:


Device(config)# policy-map type queueing child

Specifies the child queueing profile policy and enters policy map configuration mode.

Step 7

class class-name

Example:


Device(config-pmap)# class traffic-class7

Specifies the name of the class to be associated with the policy and enters policy class map configuration mode. Command options for policy class map configuration mode include the following:

  • word : Class map name.

  • class-default : System default class matching any otherwise unclassified packets.

Step 8

shape average {Kb/s | percent}

Example:


Device(config-pmap-c)# shape average 1000000

Configures the traffic shaping average. The parameters include:

  • Kb/s : Use this command to configure a specific value. The range is 1.2 Mbps to 400 Gbps.

  • percent : Allocates a maximum bandwidth to a particular class.

Step 9

priority level level

Example:


Device(config-pmap-c)# priority level 1

Specifies the priority level of the queue.

Step 10

exit

Example:


Device(config-pmap-c)# exit

Exits policy class map configuration mode and enters class map configuration mode.

Step 11

exit

Example:


Device(config-pmap)# exit

Exits policy map configuration mode and enters global configuration mode.

Step 12

policy-map type queueing parent policy name

Example:


Device(config)# policy-map type queueing parent

Specifies the parent queueing profile policy and enters policy map configuration mode.

Step 13

class class-default

Example:


Device(config-pmap)# class class-default

Specifies the class default to be associated with the parent policy and enters policy class map configuration mode.

Step 14

shape average {port shaper value} {Kb/s | percent}

Example:


Device(config-pmap-c)# shape average 2000000000

Configures the traffic shaping average.

Note


The shaping average must be greater than 1.35G.

Step 15

service-policy child policy-map name

Example:


Device(config-pmap-c)# service-policy child

Configures the QoS service policy of a child.

Step 16

exit

Example:


Device(config-pmap-c)# exit

Exits policy class map configuration mode and enters class map configuration mode.

Step 17

exit

Example:


Device(config-pmap)# exit

Exits policy map configuration mode and enters global configuration mode.

Step 18

interface interface-id

Example:


Device(config)# interface HundredGigE1/0/5

Identifies the interface and enters interface configuration mode.

Step 19

no switchport

Example:


Device(config-if)# no switchport

Switches the interface that is in Layer 2 mode into Layer 3 mode for Layer 3 configuration.

Step 20

exit

Example:


Device(config-pmap)# exit

Exits interface configuration mode and enters global configuration mode.

Step 21

interface interface-id.subinterface-id

Example:


Device(config)# interface HundredGigE1/0/5.1

Identifies the subinterface and enters subinterface configuration mode.

Step 22

encapsulation dot1Q vlan-id

Example:


Device(config-if)# encapsulation dot1Q 11

Enables IEEE 802.1Q encapsulation of traffic on a subinterface.

Step 23

service-policy type queueing output parent policy name

Example:


Device(config-if)# service-policy type queueing output parent

Attaches the parent queue policy map to the subinterface.

Step 24

end

Example:


Device(config-if)# end

Returns to privileged EXEC mode.

Configuration Examples for Layer 3 Subinterface Queuing

The following sections provide configuration examples for Layer 3 subinterface queuing.

Example: Enabling Subinterface Queuing Policy

The following is an example of how to enable the subinterface queuing policy:


Device# configure terminal
Device(config)# class-map match-all traffic-class7
Device(config-cmap)# match traffic-class 7
Device(config)# policy-map type queueing llq
Device(config-pmap)# class traffic-class7
Device(config-pmap-c)# shape average percent 10
Device(config-pmap-c)# priority level 1
Device(config-pmap-c)# exit
Device(config-pmap)# exit
Device(config)# interface HundredGigE1/0/9
Device(config-if)# no switchport
Device(config-if)# exit
Device(config)# interface HundredGigE1/0/9.1
Device(config-subif)# encapsulation dot1Q 11
Device(config-subif)# service-policy type queueing output subif_q_policy
Device(config-subif)# end

Example: Enabling Subinterface Priority Propagation Mode

The following is an example of how to enable the subinterface priority propagation mode:


Device# configure terminal
Device(config)# interface HundredGigE1/0/23
Device(config-if)# no switchport
Device(config-if)# queuing mode sub-interface priority-propagation
Device(config-subif)# end

Example: Configuring Hierarchical QoS Policy on Subinterface

The following is an example of how to configure the hierarchical QoS policy on a subinterface:


Device# configure terminal
Device(config)# class-map match-all traffic-class7
Device(config-cmap)# match traffic-class 7
Device(config-cmap)# exit
Device(config)# policy-map type queueing child
Device(config-pmap)# class traffic-class7
Device(config-pmap-c)# shape average 1000000
Device(config-pmap-c)# priority level 1
Device(config-pmap-c)# exit
Device(config-pmap)# exit
Device(config)# policy-map type queueing parent
Device(config-pmap)# class class-default
Device(config-pmap-c)# shape average 2000000000
Device(config-pmap-c)# service-policy child
Device(config-pmap-c)# exit
Device(config-pmap)# exit
Device(config)# interface HundredGigE1/0/5
Device(config-if)# no switchport
Device(config-pmap)# exit
Device(config)# interface HundredGigE1/0/5.1
Device(config-if)# encapsulation dot1Q 11
Device(config-if)# service-policy type queueing output parent
Device(config-if)# end

The following is an example of how to configure the hierarchical QoS bandwidth remaining ratio on subinterface:


Device# configure terminal
Device(config)# class-map match-all traffic-class7
Device(config-cmap)# match traffic-class 7
Device(config-cmap)# exit
Device(config)# policy-map type queueing child
Device(config-pmap)# class traffic-class7
Device(config-pmap-c)# shape average 1000000
Device(config-pmap-c)# priority level 1
Device(config-pmap-c)# exit
Device(config-pmap)# exit
Device(config)# policy-map type queueing parent_ratio_5
Device(config-pmap)# class class-default
Device(config-pmap-c)# bandwidth remaining ratio 5
Device(config-pmap-c)# service-policy child
Device(config-pmap-c)# exit
Device(config-pmap)# exit
Device(config)# policy-map type queueing parent_ratio_10
Device(config-pmap)# class class-default
Device(config-pmap-c)# bandwidth remaining ratio 10
Device(config-pmap-c)# service-policy child
Device(config-pmap-c)# exit
Device(config-pmap)# exit
Device(config)# interface HundredGigE1/0/5
Device(config-if)# no switchport
Device(config-pmap)# exit
Device(config)# interface HundredGigE1/0/5.1
Device(config-if)# encapsulation dot1Q 11
Device(config-if)# service-policy type queueing output parent_ratio_5
Device(config-if)# exit
Device(config)# interface HundredGigE1/0/5.2
Device(config-if)# encapsulation dot1Q 15
Device(config-if)# service-policy type queueing output parent_ratio_10
Device(config-if)# end

Monitoring Layer 3 Subinterface Queuing Configuration

The following commands can be used to monitor Layer 3 subinterface queuing configuration on the device.

Command Description

show policy-map type queueing interface interface-id[.subinterface]

Displays the runtime representation and statistics of all the queueing policies configured on the device.

show running interface interface-id[.subinterface]

Displays the configured interface and values under it.

show running policy-map name

Displays a list of the policy maps along with traffic class information.

Feature History for Layer 3 Subinterface Queuing

This table provides release and related information for features explained in this module.

These features are available on all the releases subsequent to the one they were introduced in, unless noted otherwise.

Release

Feature

Feature Information

Cisco IOS XE Cupertino 17.8.1

Layer 3 Subinterface Queuing

Queuing support on Layer 3 subinterfaces has been introduced on the Cisco Catalyst 9600 Series Supervisor 2 Module (C9600X-SUP-2).

Use Cisco Feature Navigator to find information about platform and software image support. To access Cisco Feature Navigator, go to Cisco Feature Navigator.