Network Edge Access Topology

802.1x Supplicant and Authenticator Switches with Network Edge Access Topology

The 802.1x standard defines a client-server-based access control and authentication protocol that prevents unauthorized clients from connecting to a LAN through publicly accessible ports unless they are properly authenticated. The authentication server authenticates each client connected to a switch port before making available any services offered by the switch or the LAN. For more information about 802.1x, including configuration information, see Configuring IEEE 802.1x Port-Based Authentication.

The Network Edge Access Topology (NEAT) feature extends identity to areas outside the wiring closet. This allows any type of device to authenticate on the port. NEAT uses Client Information Signalling Protocol (CISP) to propagate Client MAC and VLAN information between supplicant and Authenticator. CISP and NEAT are supported only on L2 ports, not on L3 ports. You can configure NEAT on Cisco Catalyst IE9300 Rugged Series Switches.

  • 802.1x switch supplicant: You can configure a switch to act as a supplicant to another switch by using the 802.1x supplicant feature. This configuration is helpful in a scenario, where, for example, a switch is outside a wiring closet and is connected to an upstream switch through a trunk port. A switch configured with the 802.1x switch supplicant feature authenticates with the upstream switch for secure connectivity. Once the supplicant switch authenticates successfully the port mode changes from access to trunk in an authenticator switch. In a supplicant switch you must manually configure the trunk when enabling CISP.

  • If the access VLAN is configured on the authenticator switch, it becomes the native VLAN for the trunk port after successful authentication.

In the default state, when you connect a supplicant switch to an authenticator switch that has BPDU guard enabled, the authenticator port could be error-disabled if it receives a Spanning Tree Protocol (STP) bridge protocol data unit (BPDU) packets before the supplicant switch has authenticated. You can control traffic exiting the supplicant port during the authentication period. Entering the dot1x supplicant controlled transient global configuration command temporarily blocks the supplicant port during authentication to ensure that the authenticator port does not shut down before authentication completes. If authentication fails, the supplicant port opens. Entering the no dot1x supplicant controlled transient global configuration command opens the supplicant port during the authentication period. This is the default behavior.

We strongly recommend using the dot1x supplicant controlled transientcommand on a supplicant switch when BPDU guard is enabled on the authenticator switch port with the spanning-tree bpduguard enable interface configuration command.


Note


If you globally enable BPDU guard on the authenticator switch by using the spanning-tree portfast bpduguard default global configuration command, entering the dot1x supplicant controlled transient command on the Supplicant switch does not prevent the BPDU violation.

You can enable MDA or multiauth mode on the authenticator switch interface that connects to one more supplicant switches. Multihost mode is not supported on the authenticator switch interface.

When you reboot an authenticator switch with single-host mode enabled on the interface, the interface may move to err-disabled state before authentication. To recover from err-disabled state, flap the authenticator port to activate the interface again and initiate authentication.

Use the dot1x supplicant force-multicast global configuration command on the supplicant switch for NEAT to work in all host modes.

  • Host Authorization: Ensures that only traffic from authorized hosts (connecting to the switch with supplicant) is allowed on the network. The switches use CISP to send the MAC addresses connecting to the supplicant switch to the authenticator switch.

  • Auto enablement: Automatically enables trunk configuration on the authenticator switch, allowing user traffic from multiple VLANs coming from supplicant switches. Configure the cisco-av-pair as device-traffic-class=switch at the ISE. (You can configure this under the group or the user settings.)

    Figure 1. Authenticator and Supplicant Switch Using CISP
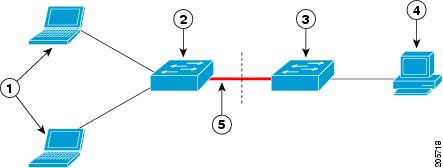
1

Workstations (clients)

2

Supplicant switch (outside wiring closet)

3

Authenticator switch

4

Cisco ISE

5

Trunk port


Note


The switchport nonegotiate command is not supported on supplicant and authenticator switches with NEAT. This command should not be configured at the supplicant side of the topology. If configured on the authenticator side, the internal macros will automatically remove this command from the port.


Guidelines and Limitations

The following are guidelines and limitations for configuring and using NEAT.

  • A Radius server such as Cisco's Identity Server Engine (ISE) is required.

  • CISP and NEAT are supported only on L2 ports, not on L3 ports.

  • NEAT and 802.1x are not supported on EtherChannel ports.

  • NEAT is not supported on dynamic ports.

  • MACsec is supported with NEAT.

  • NEAT can operate with PTP.

  • MAB and NEAT are mutually exclusive. You cannot enable MAB when NEAT is enabled on an interface, and you should not enable NEAT when MAB is enabled on an interface.

Configure an Authenticator Switch with NEAT

Configuring this feature requires that one switch outside a wiring closet is configured as a supplicant and is connected to an authenticator switch.


Note


  • The cisco-av-pairs must be configured as device-traffic-class=switch on the ISE, which sets the interface as a trunk after the supplicant is successfully authenticated.


Beginning in privileged EXEC mode, follow these steps to configure a switch as an authenticator:

SUMMARY STEPS

  1. enable
  2. configure terminal
  3. cisp enable
  4. interface interface-id
  5. switchport mode access
  6. authentication port-control auto
  7. dot1x pae authenticator
  8. spanning-tree portfast
  9. end

DETAILED STEPS

  Command or Action Purpose

Step 1

enable

Example:


Device> enable

Enables privileged EXEC mode.

  • Enter your password if prompted.

Step 2

configure terminal

Example:


Device# configure terminal

Enters global configuration mode.

Step 3

cisp enable

Example:


Device(config)# cisp enable

Enables CISP.

Step 4

interface interface-id

Example:


Device(config)# interface gigabitethernet 1/0/2

Specifies the port to be configured, and enters interface configuration mode.

Step 5

switchport mode access

Example:


Device(config-if)# switchport mode access

Sets the port mode to access .

Step 6

authentication port-control auto

Example:


Device(config-if)# authentication port-control auto

Sets the port-authentication mode to auto.

Step 7

dot1x pae authenticator

Example:


Device(config-if)# dot1x pae authenticator

Configures the interface as a port access entity (PAE) authenticator.

Step 8

spanning-tree portfast

Example:


Device(config-if)# spanning-tree portfast trunk

Enables the interface to quickly transition to spanning-tree forwarding state for an interface which is a member of multiple VLANs. Use this command only when you are sure that the switch-to-switch connection is not part of a Layer2 loop.

Step 9

end

Example:


Device(config-if)# end

Exits interface configuration mode and returns to privileged EXEC mode.

Configure a Supplicant Switch with NEAT

Beginning in privileged EXEC mode, follow these steps to configure a switch as a supplicant:

SUMMARY STEPS

  1. enable
  2. configure terminal
  3. cisp enable
  4. eap profile profile-name
  5. method type
  6. exit
  7. dot1x credentials profile
  8. username suppswitch
  9. password password
  10. dot1x supplicant force-multicast
  11. interface interface-id
  12. switchport trunk encapsulation dot1q
  13. switchport mode trunk
  14. dot1x pae supplicant
  15. dot1x credentials profile-name
  16. dot1x supplicant eap profile profile-name
  17. end

DETAILED STEPS

  Command or Action Purpose

Step 1

enable

Example:


Device> enable

Enables privileged EXEC mode.

  • Enter your password if prompted.

Step 2

configure terminal

Example:


Device# configure terminal

Enters global configuration mode.

Step 3

cisp enable

Example:


Device(config)# cisp enable

Enables CISP.

Step 4

eap profile profile-name

Example:

Device(config)# eap profile CISP

Creates an Extensible Authentication Protocol (EAP) profile and enters EAP profile configuration mode.

Step 5

method type

Example:

Device(config-eap-profile)# method md5

Specifies the EAP authentication method.

Step 6

exit

Example:


Device(config-eap-profile)# exit 

Exits EAP profile configuration mode.

Step 7

dot1x credentials profile

Example:


Device(config)# dot1x credentials test

Creates 802.1x credentials profile. This must be attached to the port that is configured as supplicant.

Step 8

username suppswitch

Example:


Device(config)# username suppswitch

Creates a username.

Step 9

password password

Example:


Device(config)# password myswitch

Creates a password for the new username.

Step 10

dot1x supplicant force-multicast

Example:


Device(config)# dot1x supplicant force-multicast

Forces the switch to send only multicast EAPOL packets when it receives either unicast or multicast packets.

This also allows NEAT to work on the supplicant switch in all host modes.

Step 11

interface interface-id

Example:


Device(config)# interface gigabitethernet1/0/1

Specifies the port to be configured, and enters interface configuration mode.

Step 12

switchport trunk encapsulation dot1q

Example:


Device(config-if)# switchport trunk encapsulation dot1q

Sets the port to trunk mode.

Step 13

switchport mode trunk

Example:


Device(config-if)# switchport mode trunk

Configures the interface as a VLAN trunk port.

Step 14

dot1x pae supplicant

Example:


Device(config-if)# dot1x pae supplicant

Configures the interface as a port access entity (PAE) supplicant.

Step 15

dot1x credentials profile-name

Example:


Device(config-if)# dot1x credentials test

Attaches the 802.1x credentials profile to the interface.

Step 16

dot1x supplicant eap profile profile-name

Example:


Device(config-if)# dot1x supplicant eap profile cisp

Assigns the EAP-TLS profile to the 802.1X interface.

Step 17

end

Example:


Device(config-if)# end

Exits interface configuration mode and returns to privileged EXEC mode.

Verifying Configuration

Use the following show commands to verify information about Client Information Signalling Protocol (CISP) and Network Edge Access Topology (NEAT) configuration:

  • show cisp interface <interface name>

  • show cisp clients

  • show cisp summary

  • show cisp registrations

Following is example output for show cisp commands. GigabitEthernet 1/0/1 is configured as Authenticator, and GigabitEthernet 1/0/2 is configured as Supplicant.

Auth# show cisp interface Gi1/0/2

CISP Status for interface Gi1/0/2
 ------------------------------------- 
Version: 1 
Mode: Supplicant Peer 
Mode: Authenticator 
Supp State: Idle

Auth# show cisp clients 

Authenticator Client Table:
 ------------------------
 MAC Address VLAN Interface
 ---------------------------------
 0050.5695.4de8 1 Gi1/0/10 
6c03.09e7.3947 1 Gi1/0/10 
6c03.09e7.3954 11 Gi1/0/10 
6c03.09e7.4485 1 Gi1/0/10
 9077.ee4a.8567 1 Gi1/0/10 
e41f.7ba1.bbd4 1 Gi1/0/10 

Supplicant Client Table: 
------------------------ 
MAC Address VLAN Interface 
--------------------------------- 
9077.ee4a.856b 11 Vl11 
9077.ee4a.8572 1 Ap1/1 
e41f.7bc7.2f03 1 Gi1/0/9

Auth# show cisp summary

CISP is running on the following interface(s):
----------------------------------------------
Gi1/0/2 (Authenticator)

Supp# show cisp summary

CISP is running on the following interface(s):
----------------------------------------------
Gi1/0/1 (Supplicant)

Auth# show cisp registrations

Interface(s) with CISP registered user(s):
------------------------------------------
Gi1/0/2
Auth Mgr (Authenticator)

Supp# show cisp registration

Interface(s) with CISP registered user(s):
------------------------------------------
Gi1/0/1
802.1x Sup (Supplicant)

Use the following debug commands to troubleshoot CISP and NEAT:

  • debug access-session errors

  • debug access-session event

  • debug dot1x errors

  • debug dot1x packets

  • debug dot1x events

Feature History

Feature Name

Release

Feature Information

Network Edge Access Topology (NEAT)

Cisco IOS XE 17.8.1

Initial support on Cisco Catalyst IE9300 Rugged Series Switches