Configuring SMB Direct with RoCE v2 in Windows

Guidelines for Using SMB Direct support on Windows using RDMA over converged Ethernet (RoCE) v2

General Guidelines and Limitations:

  • Cisco Intersight Managed Mode support Microsoft SMB Direct with RoCE v2 on Microsoft Windows Server 2019 and later. Cisco recommends that you have all KB updates from Microsoft for your Windows Server release.


    Note


    • RoCE v2 is not supported on Microsoft Windows Server 2016.

    • Refer to Windows Requirements for specific supported Operating System(OS).


  • Cisco recommends you check UCS Hardware and Software Compatibility specific to your UCS Manager release to determine support for Microsoft SMB Direct with RoCE v2 on Microsoft Windows.

  • Microsoft SMB Direct with RoCE v2 is supported only with Cisco UCS VIC 1400 Series, VIC 14000, and VIC 15000 Series adapters. It is not supported with UCS VIC 1200 Series and VIC 1300 Series adapters. SMB Direct with RoCE v2 is supported on all UCS Fabric Interconnects.


    Note


    RoCE v1 is not supported on Cisco UCS VIC 1400 Series, VIC 14000 Series, and VIC 15000 series adapters.


  • RoCE v2 configuration is supported only between Cisco adapters. Interoperability between Cisco adapters and third party adapters is not supported.

  • RoCE v2 supports two RoCE v2 enabled vNIC per adapter and four virtual ports per adapter interface, independent of SET switch configuration.

  • RoCE v2 enabled vNIC interfaces must have the no-drop QoS system class enabled in Cisco Intersight Managed Mode domain profile.

  • The RoCE Properties queue pairs setting must for be a minimum of four queue pairs and maximum number of queue pairs per adapter is 2048.

  • The QoS No Drop class configuration must be properly configured on upstream switches such as Cisco Nexus 9000 series switches. QoS configurations will vary between different upstream switches.

  • The maximum number of memory regions per rNIC interface is 131072.

  • SMB Direct with RoCE v2 is supported on both IPv4 and IPv6.

  • RoCE v2 cannot be used on the same vNIC interface as NVGRE, NetFlow, and VMQ features.

  • RoCE v2 cannot be used with usNIC.

  • RoCE v2 cannot be used with GENEVE offload.

MTU Properties:

  • In older versions of the VIC driver, the MTU was derived from either a Cisco Intersight server profile or from the Cisco IMC vNIC MTU setting in standalone mode. This behavior varies for Cisco UCS VIC 1400 Series, VIC 14000 Series, and VIC 15000 Series adapters, where MTU is controlled from the Windows OS Jumbo Packet advanced property.

  • The RoCE v2 MTU value is always power-of-two and its maximum limit is 4096.

  • RoCE v2 MTU is derived from the Ethernet MTU.

  • RoCE v2 MTU is the highest power-of-two that is less than the Ethernet MTU. For example:

    • If the Ethernet value is 1500, then the RoCE v2 MTU value is 1024

    • If the Ethernet value is 4096, then the RoCE v2 MTU value is 4096

    • If the Ethernet value is 9000, then the RoCE v2 MTU value is 4096

Windows NDPKI Modes of Operation:

  • Cisco's implementation of Network Direct Kernel Provider Interface (NDPKI) supports two modes of operation: Mode 1 and Mode 2. Implementation of Network Direct Kernel Provider Interface (NDKPI) differs in Mode 1 and Mode 2 of operation: Mode 1 is native RDMA, and Mode 2 involves configuration for the virtual port with RDMA. Cisco does not support NDPKI Mode 3 operation.

  • The recommended default adapter policy for RoCE v2 Mode 1 is Win-HPN-SMBd.

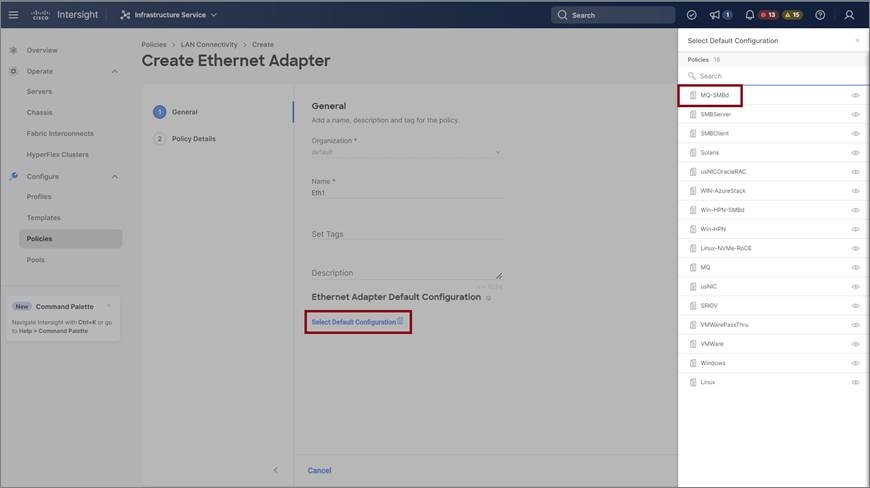
  • The recommended default adapter policy for RoCE v2 Mode 2 is MQ-SMBd.

  • RoCE v2 enabled vNICs for Mode 2 operation require the QoS host control policy set to full.

  • Mode 2 is inclusive of Mode 1: Mode 1 must be enabled to operate Mode 2.

  • On Windows, the RoCE v2 interface supports both MSI & MSIx interrupts mode. Default interrupt mode is MSIx. Cisco recommends you avoid changing interrupt mode when the interface is configured with RoCE v2 properties.

Downgrade Limitations:

  • Cisco recommends you remove the RoCE v2 configuration before downgrading to any non-supported firmware release. If the configuration is not removed or disabled, downgrade will fail.
Overview of Configuring RoCE v2 Mode 1 and Mode 2 in Windows

Configuration of RoCE v2 on the Windows platform requires first configuring RoCE v2 Mode 1, then configuring RoCE v2 Mode 2.

  • To configure RoCE v2 Mode 1, you will:

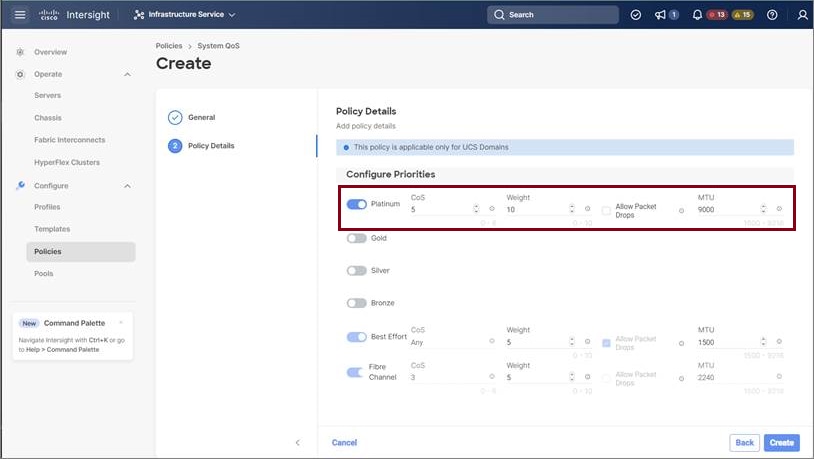
    • Configure a no-drop class in System QoS policy. Platinum with CoS 5 is a default setting in Cisco Intersight domain profile.

    • Configure Mode 1 in Cisco Intersight by creating an Ethernet Adapter policy or using Win-HPN-SMBd, the default (pre-defined) configuration in Ethernet Adapter policy.

    • Configure Mode 1 on the host operating system.

  • To configure RoCE v2 Mode 2, RoCE v2 Mode 1 must be configured first and you will:

    • Configure an Ethernet Adapter policy with VMMQ connection or use the MQ-SMBd default (pre-defined) configuration in Ethernet Adapter policy for Mode 2 in Cisco Intersight.

    • Configure Mode 2 on the host operating system.

Windows Requirements

Configuration and use of RDMA over Converged Ethernet for RoCE v2 in Windows Server requires the following:

  • VIC Driver version 5.4.0.x or later

  • Cisco UCS M5 B-Series and C-Series with Cisco UCS 1400 Series adapters.

  • Cisco UCS M6 B-Series, C-Series, or X-Series servers with Cisco UCS VIC 1400, VIC 14000, or VIC 15000 series adapters.

  • Cisco UCS M7 C-Series, or X-Series servers with Cisco UCS VIC 1400, VIC 14000, or VIC 15000 series adapters.

  • Cisco UCS M8 C-Series servers with Cisco UCS VIC 1400, VIC 14000, or VIC 15000 series adapters.


Note


All Powershell commands or advanced property configurations are common across Windows 2019 and 2022 unless explicitly mentioned.


Configuring Mode 1 on Cisco Intersight

Use these steps to configure the RoCE v2 Mode 1 interface on Cisco Interisght.

To avoid possible RDMA packet drops, ensure same no-drop COS is configured across the network. The following steps allows you to configure a no-drop class in System QoS policies and use it for RDMA supported interfaces.

Procedure


Step 1

Navigate to CONFIGURE > Policies. Click Create Policy, select UCS Domain platform type, search or choose System QoS, and click Start.

Step 2

In the General page, enter the policy name and click Next, and then in the Policy Details page, configure the property setting for System QoS policy as follows:

Step 3

Click Create

Step 4

Associate the System QoS policy to the Domain Profile and deploy.

Note


For more information, see Creating System QoS Policy in Configuring Domain Policies and Configuring Domain Profiles.


The System QoS Policy is successfully created and deployed to the Domain Profile.

What to do next

Configure the server profile with RoCE v2 vNIC settings in LAN Connectivity policy.

Enabling RoCE Settings in LAN Connectivity Policy

Use these steps to configure the RoCE v2 vNIC settings in Mode 1. In Cisco Intersight LAN Connectivity policy, you can enable the RoCE settings on Ethernet QoS policy and Ethernet Adapter policy for Mode 1 configuration as follows:

Procedure


Step 1

Navigate to CONFIGURE > Policies. Click Create Policy, select UCS Server platform type, search or choose LAN Connectivity policy, and click Start.

Step 2

In the policy General page, enter the policy name, select the Target Platform as UCS Server (Standalone) or UCS Server (FI-Attached), and click Next.

Step 3

In the Policy Details page, click Add vNIC to create a new vNIC.

Step 4

In the Add vNIC page, follow the configuration parameters to enable the RoCE vNIC settings:

  • In the General section, provide a name for virtual ethernet interface.

  • In the Consistent Device Naming (CDN) section of the Standalone server or the Failover section of FI-attached server, do the following:

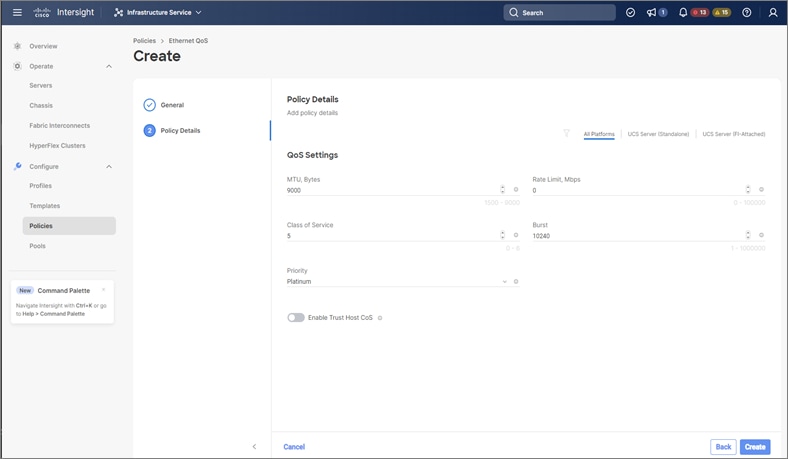
    • Click Select Policy link below the Ethernet QoS. Use the Create New button to create a new Ethernet QoS policy with the following property settings:

      • For MTU, choose or enter 1500, 4096, or 9000

      • For Priority, choose Platinum or any no-drop

      • For Class of Service, choose or enter 5

        Note


        This property is available only on Standalone servers.

      • Slide to Enable Trust Host CoS toggle button.

        Note


        This property is available only on Intersight Managed Mode servers.

    • Click Select Policy link below the Ethernet Adapter. Follow on to click Create an Ethernet Adapter Policy:

      • Use the Default Configuration: Click Create New to create a new policy. In the General page, enter the name of the policy and under Ethernet Adapter Default Configuration click Select Default Configuration to search and select Win-HPN-SMBd, the pre-defined Ethernet Adapter Default Configuration. Click Next and then Create.

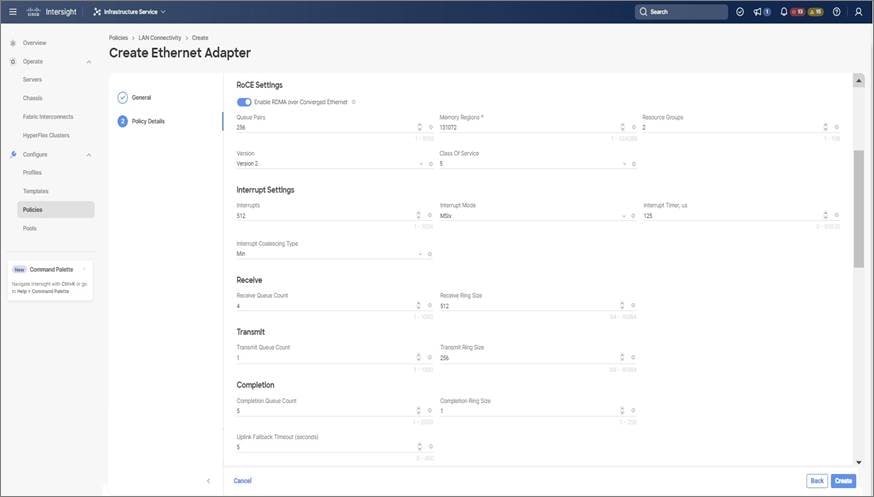
      • Configure RoCE Settings in the policy: Click Create New to create a new policy. In the General page, enter the name of the policy. Under Policy Details page on right pane, use the following property settings, then click Next, and then Create..
        • For Enable RDMA over Converged Ethernet, slide to enable.

        • For Queue Pairs, choose or enter 256

        • For Memory Regions, choose or enter 131072

        • For Resource Groups, choose or enter 2

        • For Version, select Version 2

    • Click Add to add and save the new vNIC settings.

Note


All the fields with * are mandatory for creating LAN Connectivity Policy. Ensure they are filled out or selected with appropriate policies.

Step 5

Click Create to complete the LAN Connectivity policy with RoCE v2 property settings.

Step 6

Associate the LAN Connectivity policy to the server profile and deploy.

Note


For more information, see Creating a LAN Connectivity Policy, Creating an Ethernet QoS Policy, and Creating an Ethernet Adapter Policy in Configuring UCS Server Policies and Configuring UCS Server Profiles.


The LAN Connectivity policy with the Ethernet QoS policy and Ethernet Adapter policy vNIC setting is successfully created and the server profile is deployed to enable RoCE v2 configuration.

What to do next

Once the policy configuration for RoCE v2 is complete, reboot the server, and proceed with the RoCE v2 Mode 1 configuration of the host.

Configuring SMB Direct Mode 1 on the Host System

You will configure connection between smb-client and smb-server on two host interfaces. For each of these servers, smb-client and smb-server, configure the RoCE v2-enabled vNIC as described below.

Before you begin

Configure RoCE v2 for Mode 1 in Cisco Intersight.

Procedure


Step 1

In the Windows host, go to the Device Manager and select the appropriate Cisco VIC Internet Interface.

Step 2

Go to Tools > Computer Management > Device Manager > Network Adapter > click on VIC Network Adapter > Properties > Advanced > Network Direct Functionality. Perform this operation for both the smb-server and smb-client vNICs.

Step 3

Verify that RoCE is enabled on the host operating system using PowerShell.

The Get-NetOffloadGlobalSetting command shows NetworkDirect is enabled.

PS C:\Users\Administrator> Get-NetOffloadGlobalSetting
 
ReceiveSideScaling           : Enabled
ReceiveSegmentCoalescing     : Enabled
Chimney                      : Disabled
TaskOffload                  : Enabled
NetworkDirect                : Enabled
NetworkDirectAcrossIPSubnets : Blocked
PacketCoalescingFilter       : Disabled

Note


If the NetworkDirect setting is showing as disabled, enable it using the command: Set-NetOffloadGlobalSetting -NetworkDirect enabled

Step 4

Bring up Powershell and enter the command:

get-SmbClientNetworkInterface

Step 5

Enter enable - netadapterrdma [-name] ["Ethernetname"]

Step 6

Verify the overall RoCE v2 Mode 1 configuration at the Host as follows:

  1. Use the Powershell command netstat -xan to verify the listeners in both the smb-client and smb-server Windows host; listeners will be shown in the command output.

  2. Go to the smb-client server fileshare and start an I/O operation.

  3. Go to the performance monitor and check that it displays the RDMA activity.

Step 7

In the Powershell command window, check the connection entries with the netstat -xan output command to make sure they are displayed. You can also run netstat -xan from the command prompt. If the connection entry shows up in netstat-xan output, the RoCE v2 mode1 connections are correctly established between client and server.

Note


IP values are representative only.

Step 8

By default, Microsoft's SMB Direct establishes two RDMA connections per RDMA interface. You can change the number of RDMA connections per RDMA interface to one or any number of connections.

For example, to increase the number of RDMA connections to 4, type the following command in PowerShell:

PS C:\Users\Administrator> Set-ItemProperty -Path ` "HKLM:\SYSTEM\CurrentControlSet\Services\LanmanWorkstation\Parameters" ConnectionCountPerRdmaNetworkInterface -Type DWORD -Value 4 –Force

Configuring Mode 2 on Cisco Intersight

Use these steps to configure the RoCE v2 policies in Mode 2. In Cisco Intersight LAN Connectivity Policy, you can enable the RoCE settings on Ethernet QoS policy and Ethernet Adapter policy, and VMMQ Adapter policy for Mode 2 configuration as follows:

Before you begin

Configure RoCE v2 Policies in Mode 1.

Procedure


Step 1

Navigate to CONFIGURE > Policies. Click Create Policy, select UCS Server platform type, search or choose LAN Connectivity policy, and click Start.

Step 2

In the policy General page, enter the policy name, select the Target Platform as UCS Server (Standalone) or UCS Server (FI-Attached), and click Next.

Step 3

In the Policy Details page, click Add vNIC to create a new vNIC.

Step 4

In the Add vNIC page, follow the configuration parameters to enable the RoCE vNIC settings:

  1. In the General section, provide a name for virtual ethernet interface.

  2. In the Consistent Device Naming (CDN) section of the Standalone server or the Failover section of FI-attached server, do the following:

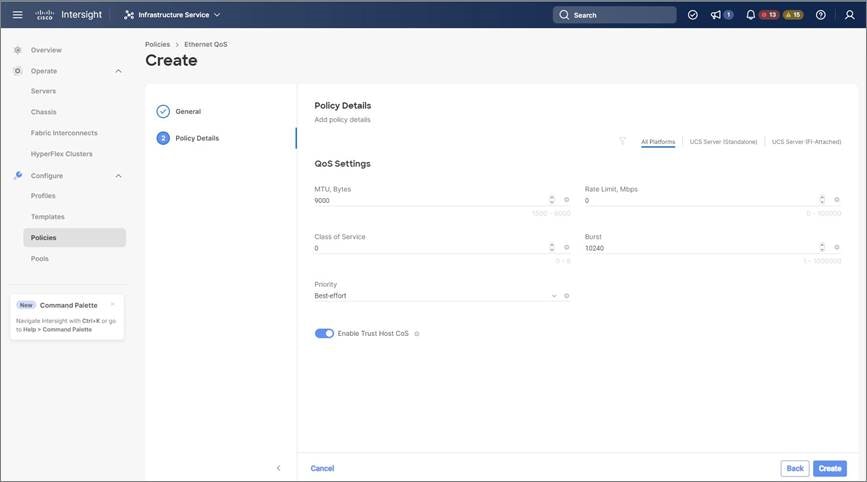
    • Click Select Policy link below the Ethernet QoS. Use the Create New button to create a new Ethernet QoS policy with the following property settings:

      • For MTU, choose or enter 1500, 4096, or 9000

      • For Priority, choose or enter Best-effort

      • Enable Trust Host CoS, slide to enable

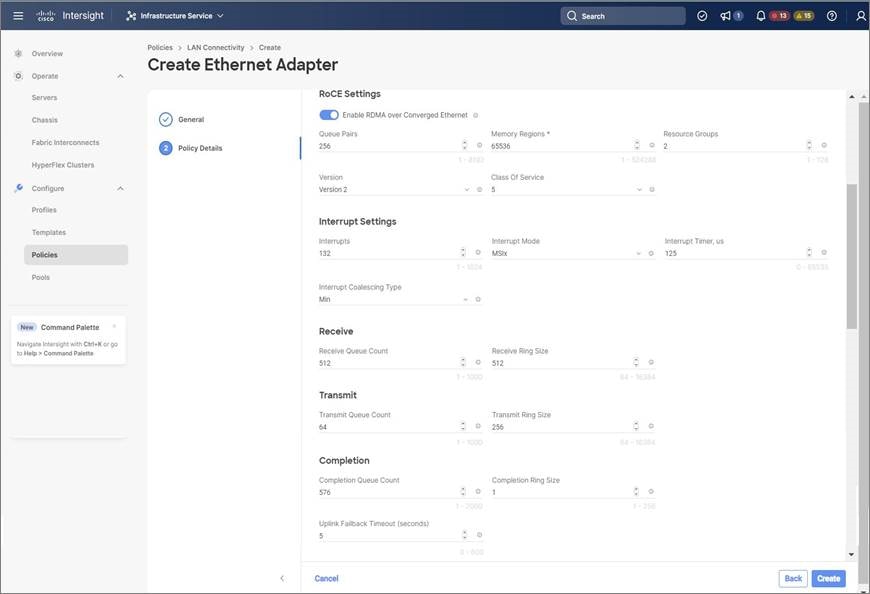
    • Click Select Policy link below the Ethernet Adapter. Use Create New button to create a new Ethernet Adapter policy with the following property settings:

      • For Enable RDMA over Converged Ethernet, slide to enable.

      • For Queue Pairs, select or enter 256

      • For Memory Regions, select or enter 65536

      • For Resource Groups, select or enter 2

      • For Version, choose Version 2

      • For Class of Service, choose or enter 5

    • In the Connection section, use the following property setting for VMQ Connection and to create VMMQ Adapter policy:

      • For connection, select VMQ.

      • Enable Virtual Machine Multi-Queue using slider button.

      • For Number of Sub vNICs, select or enter 4

      • For VMMQ Adapter Policy, click Select Policy link below the VMMQ Adapter Policy and do the following:

        • Click Create New to create a new policy. In the General page, enter the name of the policy and click Select Default Configuration to search and select MQ-SMBd, the pre-defined VMMQ Adapter default configuration.

          Attention


          Do not modify the pre-defined parameters under Policy Details page, retain the default settings.

        • Click Next and then Create.

    • Click Add to add and save the new vNIC settings.

    Note


    All the fields with * are mandatory and ensure it is filled out or selected with appropriate policies.

Step 5

Click Create to complete the LAN Connectivity policy with RoCE v2 property settings.

Step 6

Associate the LAN Connectivity policy to the server profile.

Note


For more information on Creating an Ethernet QoS, Ethernet Adapter Policy, and VMMQ Adapter Policy, see Configuring UCS Server Policies and Configuring UCS Server Profiles.


The LAN Connectivity Policy with Ethernet QoS Policy, Ethernet Adapter Policy, and VMMQ Adapter Policy are successfully created and deployed to enable RoCE v2 configuration.

What to do next

Once the policy configuration for RoCE v2 is complete, reboot the server and proceed with the RoCE v2 Mode 2 configuration on the host operating system.

Configuring Mode 2 on the Host System

This task uses Hyper-V virtualization software that is compatible with Windows Server 2019 and Windows Server 2022.

Follow the below procedure for the host operating system configuration for RoCEv2 Mode 2.

Before you begin

  • Configure and confirm the connection for Mode 1 for both Cisco Intersight and Host.

  • Configure Mode 2 in Cisco Intersight.

Procedure


Step 1

Go the Hyper-V switch manager.

Step 2

Create a new Virtual Network Switch (vswitch) for the RoCE v2-enabled Ethernet interface.

  1. Choose External Network and select VIC Ethernet Interface 2 and Allow management operating system to share this network adapter.

  2. Click OK to create the create the virtual switch.

Bring up the Powershell interface.

Step 3

Configure the non-default vport and enable RDMA with the following Powershell commands:

add-vmNetworkAdapter -switchname vswitch -name vp1 -managementOS
enable-netAdapterRdma -name "vEthernet (vp1)"
  1. Configure set-switch using the following Powershell command.

    new-vmswitch -name setswitch -netAdapterName “Ethernet x” -enableEmbeddedTeam $true

    This creates the switch. Use the following to display the interfaces:

    get-netadapterrdma
    add-vmNetworkAdapter -switchname setswtch -name svp1
    You will see the new vport when you again enter
    get-netadapterrdma
  2. Add a vport.

    add-vmNetworkAdapter -switchname setswtch -name svp1
    You will see the new vport when you again enter
    get-netadapterrdma
  3. Enable the RDMA on the vport:

    enable-netAdapterRdma -name “vEthernet (svp1)”

Step 4

Configure the IPV4 addresses on the RDMA enabled vport in both servers.

Step 5

Create a share in smb-server and map the share in the smb-client.

  1. For smb-client and smb-server in the host system, configure the RoCE v2-enabled vNIC as described above.

  2. Configure the IPV4 addresses of the primary fabric and sub-vNICs in both servers, using the same IP subnet and same unique vlan for both.

  3. Create a share in smb-server and map the share in the smb-client.

Step 6

Verify the Mode 2 configuration.

  1. Use the Powershell command netstat -xan to display listeners and their associated IP addresses.

  2. Start any RDMA I/O in the file share in smb-client.

  3. Issue the netstat -xan command again and check for the connection entries to verify they are displayed.


What to do next

Troubleshoot any items if necessary.

Deleting the RoCE v2 Interface Using Cisco Intersight

Use these steps to remove the RoCE v2 interface.

Procedure


Step 1

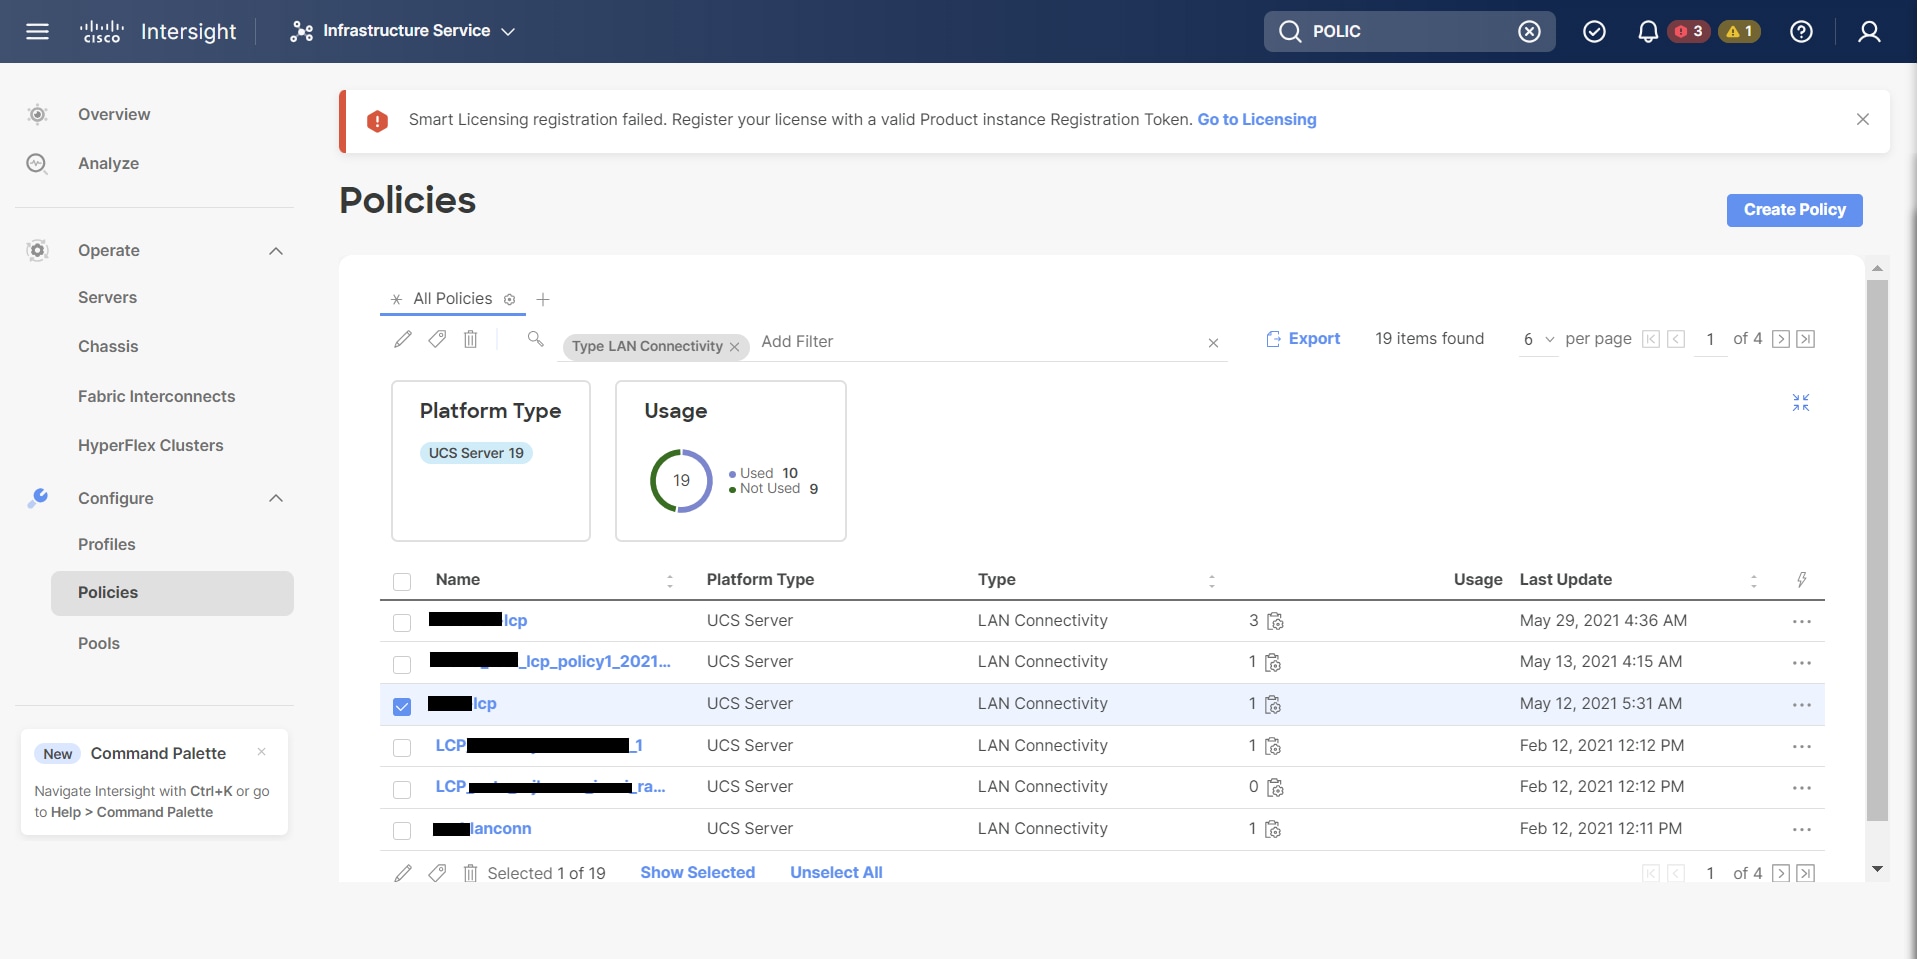
Navigate to CONFIGURE > Policies. In the Add Filter field, select Type: LAN Connectivity.

Step 2

Select the appropriate LAN Connectivity policy created for RoCE V2 configuration and use the delete icon on the top or bottom of the policy list.

Step 3

Click Delete to delete the policy.

Step 4

Upon deleting the RoCE v2 configuration, re-deploy the server profile and reboot the server.