Call Home and Smart Call Home Configuration

Call Home in UCS Overview

Call Home provides an email-based notification for critical system policies. A range of message formats are available for compatibility with pager services or XML-based automated parsing applications. You can use this feature to page a network support engineer, email a Network Operations Center, or use Cisco Smart Call Home services to generate a case with the Technical Assistance Center.

The Call Home feature can deliver alert messages containing information about diagnostics and environmental faults and events.

The Call Home feature can deliver alerts to multiple recipients, referred to as Call Home destination profiles. Each profile includes configurable message formats and content categories. A predefined destination profile is provided for sending alerts to the Cisco TAC, but you also can define your own destination profiles.

When you configure Call Home to send messages, Cisco UCS Manager executes the appropriate CLI show command and attaches the command output to the message.

Cisco UCS delivers Call Home messages in the following formats:

  • Short text format which provides a one or two line description of the fault that is suitable for pagers or printed reports.

  • Full text format which provides fully formatted message with detailed information that is suitable for human reading.

  • XML machine-readable format that uses Extensible Markup Language (XML) and Adaptive Messaging Language (AML) XML Schema Definition (XSD). The AML XSD is published on the Cisco.com website. The XML format enables communication with the Cisco Systems Technical Assistance Center.

For information about the faults that can trigger Call Home email alerts, see the Cisco UCS Faults and Error Messages Reference.

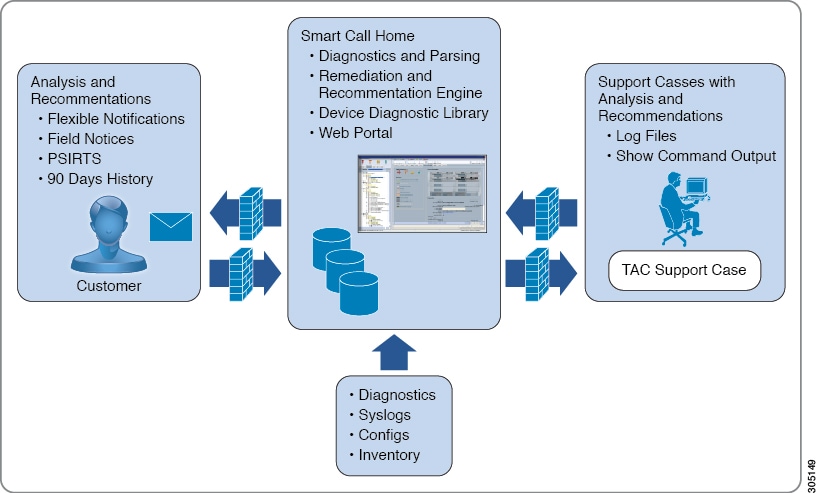
The following figure shows the flow of events after a Cisco UCS fault is triggered in a system with Call Home configured:

Figure 1. Flow of Events after a Fault is Triggered
Flowchart showing events that can occur after a fault is triggered in a Cisco UCS domain

Call Home Considerations and Guidelines

How you configure Call Home depends on how you intend to use the feature. The information you need to consider before you configure Call Home includes the following:

Destination Profile

You must configure at least one destination profile. The destination profile or profiles that you use depends upon whether the receiving entity is a pager, email, or automated service such as Cisco Smart Call Home.

If the destination profile uses email message delivery, you must specify a Simple Mail Transfer Protocol (SMTP) server when you configure Call Home.

Contact Information

The contact email, phone, and street address information should be configured so that the receiver can determine the origin of messages received from the Cisco UCS domain.

Cisco Smart Call Home sends the registration email to this email address after you send a system inventory to begin the registration process.

If an email address includes special characters, such as # (hash), spaces, or & (ampersand), the email server might not be able to deliver email messages to that address. Cisco recommends that you use email addresses which comply with RFC2821 and RFC2822 and include only 7bit ASCII characters.

IP Connectivity to Email Server or HTTP Server

The fabric interconnect must have IP connectivity to an email server or the destination HTTP server. In a cluster configuration, both fabric interconnects must have IP connectivity. This connectivity ensures that the current, active fabric interconnect can send Call Home email messages. The source of these email messages is always the IP address of a fabric interconnect. The virtual IP address assigned to Cisco UCS Manager in a cluster configuration is never the source of the email.


Note


Ensure that you add each fabric interconnect IP in the SMTP server. Call Home email messages cannot be delivered if the fabric interconnect IPs are not configured in the SMTP server.


Smart Call Home

If Cisco Smart Call Home is used, the following are required:

  • An active service contract must cover the device being configured.

  • The customer ID associated with the Smart Call Home configuration in Cisco UCS must be the CCO (Cisco.com) account name associated with a support contract that includes Smart Call Home.

Cisco UCS Faults and Call Home Severity Levels

Because Call Home is present across several Cisco product lines, Call Home has its own standardized severity levels. The following table describes how the underlying Cisco UCS fault levels map to the Call Home severity levels. You need to understand this mapping when you configure the Level setting for Call Home profiles.

Table 1. Mapping of Faults and Call Home Severity Levels

Call Home Severity

Cisco UCS Fault

Call Home Meaning

(9) Catastrophic

N/A

Network-wide catastrophic failure.

(8) Disaster

N/A

Significant network impact.

(7) Fatal

N/A

System is unusable.

(6) Critical

Critical

Critical conditions, immediate attention needed.

(5) Major

Major

Major conditions.

(4) Minor

Minor

Minor conditions.

(3) Warning

Warning

Warning conditions.

(2) Notification

Info

Basic notifications and informational messages. Possibly independently insignificant.

(1) Normal

Clear

Normal event, signifying a return to normal state.

(0) debug

N/A

Debugging messages.

Cisco Smart Call Home

Cisco Smart Call Home is a web application which leverages the Call Home feature of Cisco UCS. Smart Call Home offers proactive diagnostics and real-time email alerts of critical system events, which results in higher network availability and increased operational efficiency. Smart Call Home is a secure connected service offered by Cisco Unified Computing Support Service and Cisco Unified Computing Mission Critical Support Service for Cisco UCS.

Figure 2. Cisco Smart Call Home Features


Note


Using Smart Call Home requires the following:

  • A Cisco.com ID associated with a corresponding Cisco Unified Computing Support Service or Cisco Unified Computing Mission Critical Support Service contract for your company.

  • Cisco Unified Computing Support Service or Cisco Unified Computing Mission Critical Support Service for the device to be registered.


You can configure and register Cisco UCS Manager to send Smart Call Home email alerts to either the Smart Call Home System or the secure Transport Gateway. Email alerts sent to the secure Transport Gateway are forwarded to the Smart Call Home System using HTTPS.


Note


For security reasons, we recommend using the Transport Gateway option. The Transport Gateway can be downloaded from Cisco.com.


To configure Smart Call Home, do the following:

  • Enable the Smart Call Home feature.

  • Configure the contact information.

  • Configure the email information.

  • Configure the SMTP server information.

  • Configure the default CiscoTAC-1 profile.


    Note


    In order to apply Callhome sendtestAlert functionality at least one of the email destination should be set for profiles other than CiscoTAC-1.


  • Send a Smart Call Home inventory message to start the registration process.

  • Ensure that the Cisco.com ID you plan to use as the Call Home Customer ID for the Cisco UCS domain has the contract numbers from the registration added to its entitlements. You can update the ID in the Account Propertiesunder Additional Access in the Profile Manager on Cisco.com.

Anonymous Reporting

After you upgrade to the latest release of Cisco UCS Manager, by default, you are prompted with a dialog box to enable anonymous reporting.

To enable anonymous reporting, you need to enter details about the SMTP server and the data file that is stored on the fabric switch. This report is generated every seven days and is compared with the previous version of the same report. When Cisco UCS Manager identifies changes in the report, the report is sent as an e-mail.

Configuring Call Home

Procedure

  Command or Action Purpose

Step 1

UCS-A# scope monitoring

Enters monitoring mode.

Step 2

UCS-A /monitoring # scope callhome

Enters monitoring call home mode.

Step 3

UCS-A /monitoring/callhome # enable

Enables Call Home.

Step 4

UCS-A /monitoring/callhome # set contact name

Specifies the name of the main Call Home contact person.

Step 5

UCS-A /monitoring/callhome # set email email-addr

Specifies the email address of the main Call Home contact person.

Note


If an email address includes special characters, such as # (hash), spaces, or & (ampersand), the email server might not be able to deliver email messages to that address. Cisco recommends that you use email addresses which comply with RFC2821 and RFC2822 and include only 7bit ASCII characters.

Step 6

UCS-A /monitoring/callhome # set phone-contact phone-num

Specifies the phone number of the main Call Home contact person. The phone number must be in international format, starting with a + (plus sign) and a country code.

Step 7

UCS-A /monitoring/callhome # set street-address street-addr

Specifies the street address of the main Call Home contact person.

Enter up to 255 ASCII characters.

Step 8

UCS-A /monitoring/callhome # set customer-id id-num

Specifies the CCO identification number that includes the contract numbers for the support contract in its entitlements. The number can be up to 255 alphanumeric characters in free format.

Step 9

UCS-A /monitoring/callhome # set contract-id id-num

Specifies the contract identification number from the service agreement. The number can be up to 255 alphanumeric characters in free format.

Step 10

UCS-A /monitoring/callhome # set site-id id-num

Specifies the site identification number from the service agreement. The number can be up to 255 alphanumeric characters in free format.

Step 11

UCS-A /monitoring/callhome # set from-email email-addr

Specifies the email address to use for the From field in Call Home messages.

Step 12

UCS-A /monitoring/callhome # set reply-to-email email-addr

Specifies the email address to use for the Reply To field in Call Home messages.

Step 13

UCS-A /monitoring/callhome # set hostname {hostname | ip-addr| ip6-addr}

Specifies the hostname, IPv4 or IPv6 address of the SMTP server that Call Home uses to send email messages.

Step 14

UCS-A /monitoring/callhome # set port port-num

Specifies the SMTP server port that Call Home uses to send email messages. Valid port numbers are 1 to 65535.

Step 15

UCS-A /monitoring/callhome # set throttling {off | on}

Enables or disables Call Home throttling. When enabled, throttling prevents too many Call Home email messages from being sent for the same event. By default, throttling is enabled.

Step 16

UCS-A /monitoring/callhome # set urgency {alerts | critical | debugging | emergencies | errors | information | notifications | warnings}

Specifies the urgency level for Call Home email messages. In the context of a large UCS deployment with several pairs of fabric interconnects, the urgency level potentially allows you to attach significance to Call Home messages from one particular Cisco UCS domain versus another. In the context of a small UCS deployment involving only two fabric interconnects, the urgency level holds little meaning.

Step 17

UCS-A /monitoring/callhome # commit-buffer

Commits the transaction to the system configuration.

Example

The following example configures Call Home with and IPv4 hostname and commits the transaction:

UCS-A# scope monitoring
UCS-A /monitoring* # scope callhome
UCS-A /monitoring/callhome* # enable
UCS-A /monitoring/callhome* # set contact "Steve Jones"
UCS-A /monitoring/callhome* # set email admin@MyCompany.com
UCS-A /monitoring/callhome* # set phone-contact +1-001-408-555-1234
UCS-A /monitoring/callhome* # set street-address "123 N. Main Street, Anytown, CA, 99885"
UCS-A /monitoring/callhome* # set customer-id 1234567
UCS-A /monitoring/callhome* # set contract-id 99887766
UCS-A /monitoring/callhome* # set site-id 5432112
UCS-A /monitoring/callhome* # set from-email person@MyCompany.com
UCS-A /monitoring/callhome* # set reply-to-email person@MyCompany.com
UCS-A /monitoring/callhome* # set hostname 192.168.100.12
UCS-A /monitoring/callhome* # set port 25
UCS-A /monitoring/callhome* # set throttling on
UCS-A /monitoring/callhome* # set urgency information
UCS-A /monitoring/callhome* # commit-buffer
UCS-A /monitoring/callhome # 

The following example configures Call Home with and IPv6 hostname and commits the transaction:

UCS-A# scope monitoring
UCS-A /monitoring* # scope callhome
UCS-A /monitoring/callhome* # enable
UCS-A /monitoring/callhome* # set contact "Steve Jones"
UCS-A /monitoring/callhome* # set email admin@MyCompany.com
UCS-A /monitoring/callhome* # set phone-contact +1-001-408-555-1234
UCS-A /monitoring/callhome* # set street-address "123 N. Main Street, Anytown, CA, 99885"
UCS-A /monitoring/callhome* # set customer-id 1234567
UCS-A /monitoring/callhome* # set contract-id 99887766
UCS-A /monitoring/callhome* # set site-id 5432112
UCS-A /monitoring/callhome* # set from-email person@MyCompany.com
UCS-A /monitoring/callhome* # set reply-to-email person@MyCompany.com
UCS-A /monitoring/callhome* # set hostname 2001::25
UCS-A /monitoring/callhome* # set port 25
UCS-A /monitoring/callhome* # set throttling on
UCS-A /monitoring/callhome* # set urgency information
UCS-A /monitoring/callhome* # commit-buffer
UCS-A /monitoring/callhome # 

Enabling Call Home

Procedure

  Command or Action Purpose

Step 1

UCS-A# scope monitoring

Enters monitoring mode.

Step 2

UCS-A /monitoring # scope callhome

Enters monitoring call home mode.

Step 3

UCS-A /monitoring/callhome # enable

Enables Call Home.

Step 4

UCS-A /monitoring/callhome # commit-buffer

Commits the transaction to the system configuration.

Example

The following example enables Call Home and commits the transaction:

UCS-A# scope monitoring
UCS-A /monitoring # scope callhome
UCS-A /monitoring/callhome # enable
UCS-A /monitoring/callhome* # commit-buffer
UCS-A /monitoring/callhome # 

Disabling Call Home

Procedure

  Command or Action Purpose

Step 1

UCS-A# scope monitoring

Enters monitoring mode.

Step 2

UCS-A /monitoring # scope callhome

Enters monitoring call home mode.

Step 3

UCS-A /monitoring/callhome # disable

Enables Call Home.

Step 4

UCS-A /monitoring/callhome # commit-buffer

Commits the transaction to the system configuration.

Example

The following example disables Call Home and commits the transaction:

UCS-A# scope monitoring
UCS-A /monitoring # scope callhome
UCS-A /monitoring/callhome # disable
UCS-A /monitoring/callhome* # commit-buffer
UCS-A /monitoring/callhome # 

Configuring System Inventory Messages

Configuring System Inventory Messages

Procedure

  Command or Action Purpose

Step 1

UCS-A# scope monitoring

Enters monitoring mode.

Step 2

UCS-A /monitoring # scope callhome

Enters monitoring call home mode.

Step 3

UCS-A /monitoring/callhome # scope inventory

Enters monitoring call home inventory mode.

Step 4

UCS-A /monitoring/callhome/inventory # set send-periodically {off | on}

Enables or disables the sending of inventory messages. When the on keyword is specified, inventory messages are automatically sent to the Call Home database.

Step 5

UCS-A /monitoring/callhome/inventory # set interval-days interval-num

Specifies the time interval (in days) at which inventory messages will be sent.

Step 6

UCS-A /monitoring/callhome/inventory # set timeofday-hour hour

Specifies the hour (using 24-hour format) that inventory messages are sent.

Step 7

UCS-A /monitoring/callhome/inventory # set timeofday-minute minute

Specifies the number of minutes after the hour that inventory messages are sent.

Step 8

UCS-A /monitoring/callhome/inventory # commit-buffer

Commits the transaction to the system configuration.

Example

The following example configures Call Home system inventory messages and commits the transaction:

UCS-A# scope monitoring
UCS-A /monitoring* # scope callhome
UCS-A /monitoring/callhome* # scope inventory
UCS-A /monitoring/callhome/inventory* # set send-periodically on
UCS-A /monitoring/callhome/inventory* # set interval-days 15
UCS-A /monitoring/callhome/inventory* # set timeofday-hour 21
UCS-A /monitoring/callhome/inventory* # set timeofday-minute 30
UCS-A /monitoring/callhome/inventory* # commit-buffer
UCS-A /monitoring/callhome/inventory # 

Sending a System Inventory Message

Use this procedure if you need to manually send a system inventory message outside of the scheduled messages.


Note


The system inventory message is sent only to those recipients defined in CiscoTAC-1 profile.


Procedure

  Command or Action Purpose

Step 1

UCS-A# scope monitoring

Enters monitoring mode.

Step 2

UCS-A /monitoring # scope callhome

Enters monitoring call home mode.

Step 3

UCS-A /monitoring/callhome # scope inventory

Enters monitoring call home inventory mode.

Step 4

UCS-A /monitoring/callhome/inventory # send

Sends the system inventory message to the Call Home database.

Example

The following example sends the system inventory message to the Call Home database:

UCS-A# scope monitoring
UCS-A /monitoring # scope callhome
UCS-A /monitoring/callhome # scope inventory
UCS-A /monitoring/callhome/inventory* # send

Configuring Call Home Profiles

Call Home Profiles

Call Home profiles determine which alerts are sent to designated recipients. You can configure the profiles to send email alerts for events and faults at a desired severity level and for specific alert groups that represent categories of alerts. You can also use these profiles to specify the format of the alert for a specific set of recipients and alert groups.

Alert groups and Call Home profiles enable you to filter the alerts and ensure that a specific profile only receives certain categories of alerts. For example, a data center may have a hardware team that handles issues with fans and power supplies. This hardware team does not care about server POST failures or licensing issues. To ensure that the hardware team only receives relevant alerts, create a Call Home profile for the hardware team and check only the "environmental" alert group.

By default, you must configure the Cisco TAC-1 profile. You can also create additional profiles to send email alerts to one or more alert groups, when events occur at the level that you specify and provide the recipients with the appropriate amount of information about those alerts.

For example, you may want to configure two profiles for faults with a major severity:

  • A profile that sends an alert to the Supervisor alert group in the short text format. Members of this group receive a one- or two-line description of the fault that they can use to track the issue.

  • A profile that sends an alert to the CiscoTAC alert group in the XML format. Members of this group receive a detailed message in the machine-readable format preferred by the Cisco Systems Technical Assistance Center.

Call Home Alert Groups

An alert group is a predefined subset of Call Home alerts. Alert groups allow you to select the set of Call Home alerts that you want to send to a predefined or custom Call Home profile. Cisco UCS Manager sends Call Home alerts to e-mail destinations in a destination profile only under the following conditions:

  • If the Call Home alert belongs to one of the alert groups associated with that destination profile.

  • If the alert has a Call Home message severity at or above the message severity set in the destination profile.

Each alert that Cisco UCS Manager generates fits into a category represented by an alert group. The following table describes those alert groups:

Alert Group Description

Cisco TAC

All critical alerts from the other alert groups destined for Smart Call Home.

Diagnostic

Events generated by diagnostics, such as the POST completion on a server.

Environmental

Events related to power, fan, and environment-sensing elements such as temperature alarms.

Note


A Call Home alert is not generated when fans or PSUs are manually removed from the chassis. This is by design.

Configuring a Call Home Profile

By default, you must configure the Cisco TAC-1 profile, However, you can also create additional profiles to send email alerts to one or more specified groups when events occur at the level that you specify.

Procedure

  Command or Action Purpose

Step 1

UCS-A# scope monitoring

Enters monitoring mode.

Step 2

UCS-A /monitoring # scope callhome

Enters monitoring call home mode.

Step 3

UCS-A /monitoring/callhome # create profile profile-name

Enters monitoring call home profile mode.

Step 4

UCS-A /monitoring/callhome/profile # set level {critical | debug | disaster | fatal | major | minor | normal | notification | warning}

Specifies the event level for the profile. Each profile can have its own unique event level.

Cisco UCS faults that are greater than or equal to the event level will trigger this profile.

Step 5

UCS-A /monitoring/callhome/profile # set alertgroups group-name

  • ciscotac
  • diagnostic
  • environmental
  • inventory
  • license
  • lifecycle
  • linecard
  • supervisor
  • syslogport
  • system
  • test

Specifies one or more groups that are alerted based on the profile. The group-name argument can be one or more of the following keywords entered on the same command line:

Step 6

(Optional) UCS-A /monitoring/callhome/profile # add alertgroups group-names

(Optional)

Adds one or more groups to the existing list of groups that are alerted based on the Call Home profile.

Note


You must use the add alertgroups command to add more alert groups to the existing alert group list. Using the set alertgroups command will replace any pre-existing alert groups with a new group list.

Step 7

UCS-A /monitoring/callhome/profile # set format {shorttxt | xml}

Specifies the formatting method to use for the e-mail messages.

Step 8

UCS-A /monitoring/callhome/profile # set maxsize id-num

Specifies the maximum size (in characters) of the email message.

Step 9

UCS-A /monitoring/callhome/profile # create destination email-addr

Specifies the email address to which Call Home alerts should be sent. This email address receives Callhome Alerts/Faults. Use multiple create destination commands in monitoring call home profile mode to specify multiple email recipients. Use the delete destination command in monitoring call home profile mode to delete a specified email recipient.

Step 10

UCS-A /monitoring/callhome/profile/destination # commit-buffer

Commits the transaction to the system configuration.

Example

The following example configures a Call Home profile and commits the transaction:

UCS-A# scope monitoring
UCS-A /monitoring* # scope callhome
UCS-A /monitoring/callhome* # create profile TestProfile
UCS-A /monitoring/callhome/profile* # set level normal
UCS-A /monitoring/callhome/profile* # set alertgroups test diagnostic
UCS-A /monitoring/callhome/profile* # set format xml
UCS-A /monitoring/callhome/profile* # set maxsize 100000
UCS-A /monitoring/callhome/profile* # create destination admin@MyCompany.com
UCS-A /monitoring/callhome/profile/destination* # commit-buffer
UCS-A /monitoring/callhome/profile/destination # 

Deleting a Call Home Profile

Procedure

  Command or Action Purpose

Step 1

UCS-A# scope monitoring

Enters monitoring mode.

Step 2

UCS-A /monitoring # scope callhome

Enters monitoring call home mode.

Step 3

UCS-A /monitoring/callhome # delete profile profile-name

Deletes the specified profile.

Step 4

UCS-A /monitoring/callhome # commit-buffer

Commits the transaction to the system configuration.

Example

The following example deletes the Call Home profile named TestProfile and commits the transaction:

UCS-A# scope monitoring
UCS-A /monitoring # scope callhome
UCS-A /monitoring/callhome # delete profile TestProfile
UCS-A /monitoring/callhome* # commit-buffer
UCS-A /monitoring/callhome # 

Sending a Test Call Home Alert

Before you begin

Configure Call Home and a Call Home Profile.

Procedure

  Command or Action Purpose

Step 1

UCS-A# scope monitoring

Enters monitoring mode.

Step 2

UCS-A /monitoring # scope callhome

Enters monitoring call home mode.

Step 3

UCS-A /monitoring/callhome # send-test-alert {[alert-group {diagnostic | environmental}] [alert-level {critical | debug | fatal | major | minor | normal | notify | warning}] [alert-message-type {conf | diag | env | inventory | syslog | test}] [alert-message-subtype {delta | full | goldmajor | goldminor | goldnormal | major | minor | nosubtype | test}] [alert-description description]}

Sends a test Call Home alert. The test Call Home alert must specify all alert-* parameters or Cisco UCS Manager cannot generate the test message. The alert-* parameters include the following:

  • alert-description —Alert description

  • alert-group —Alert group

  • alert-level —Event severity level

  • alert-message-type —Message type

  • alert-message-subtype —Message subtype

When a test Call Home alert is sent, Call Home responds as it would to any other alert and delivers it to the configured destination email addresses.

Example

The following example sends a test Call Home alert to the configured destination email address of the environmental alert group:

UCS-A# scope monitoring
UCS-A /monitoring # scope callhome
UCS-A /monitoring/callhome # send-test-alert alert-group diagnostic 
alert-level critical alert-message-type test alert-message-subtype major 
alert-description "This is a test alert"

Configuring Call Home Policies

Call Home Policies

Call Home policies determine whether or not Call Home alerts are sent for a specific type of fault or system event. By default, Call Home is enabled to send alerts for certain types of faults and system events.


Note


You can configure Cisco UCS Manager not to process the default faults and system events.


To disable alerts for a type of fault or event, you must first create a Call Home policy for that type and then disable the policy.

Configuring a Call Home Policy


Tip


By default, email alerts are sent for all critical system events. However, you can optionally configure Call Home policies to enable or disable sending email alerts for other critical system events.


Procedure

  Command or Action Purpose

Step 1

UCS-A# scope monitoring

Enters monitoring mode.

Step 2

UCS-A /monitoring # scope callhome

Enters monitoring call home mode.

Step 3

UCS-A /monitoring/callhome # create policy {equipment-inoperable | fru-problem | identity-unestablishable | thermal-problem | voltage-problem}

Creates the specified policy and enters monitoring call home policy mode.

Step 4

UCS-A /monitoring/callhome/policy # {disabled | enabled}

Disables or enables the sending of email alerts for the specified policy.

Step 5

UCS-A /monitoring/callhome/policy # commit-buffer

Commits the transaction to the system configuration.

Example

The following example creates a Call Home policy that disables the sending of email alerts for system events pertaining to voltage problems and commits the transaction:

UCS-A# scope monitoring
UCS-A /monitoring* # scope callhome
UCS-A /monitoring/callhome* # create policy voltage-problem
UCS-A /monitoring/callhome/policy* # disabled
UCS-A /monitoring/callhome/policy* # commit-buffer
UCS-A /monitoring/callhome/policy # 

Disabling a Call Home Policy

Procedure

  Command or Action Purpose

Step 1

UCS-A# scope monitoring

Enters monitoring mode.

Step 2

UCS-A /monitoring # scope callhome

Enters monitoring call home mode.

Step 3

UCS-A /monitoring/callhome # scope policy {equipment-inoperable | fru-problem | identity-unestablishable | thermal-problem | voltage-problem}

Enters monitoring call home policy mode for the specified policy.

Step 4

UCS-A /monitoring/callhome/policy # disable

Disables the specified policy.

Step 5

UCS-A /monitoring/callhome/policy # commit-buffer

Commits the transaction to the system configuration.

Example

The following example disables the Call Home policy named voltage-problem and commits the transaction:

UCS-A# scope monitoring
UCS-A /monitoring # scope callhome
UCS-A /monitoring/callhome # scope policy voltage-problem
UCS-A /monitoring/callhome/policy # disable
UCS-A /monitoring/callhome/policy* # commit-buffer
UCS-A /monitoring/callhome/policy # 

Enabling a Call Home Policy

Procedure

  Command or Action Purpose

Step 1

UCS-A# scope monitoring

Enters monitoring mode.

Step 2

UCS-A /monitoring # scope callhome

Enters monitoring call home mode.

Step 3

UCS-A /monitoring/callhome # scope policy {equipment-inoperable | fru-problem | identity-unestablishable | thermal-problem | voltage-problem}

Enters monitoring call home policy mode for the specified policy.

Step 4

UCS-A /monitoring/callhome/policy # enable

Enables the specified policy.

Step 5

UCS-A /monitoring/callhome/policy # commit-buffer

Commits the transaction to the system configuration.

Example

The following example enables the Call Home policy named voltage-problem and commits the transaction:

UCS-A# scope monitoring
UCS-A /monitoring # scope callhome
UCS-A /monitoring/callhome # scope policy voltage-problem
UCS-A /monitoring/callhome/policy # enable
UCS-A /monitoring/callhome/policy* # commit-buffer
UCS-A /monitoring/callhome/policy # 

Deleting a Call Home Policy

Procedure

  Command or Action Purpose

Step 1

UCS-A# scope monitoring

Enters monitoring mode.

Step 2

UCS-A /monitoring # scope callhome

Enters monitoring call home mode.

Step 3

UCS-A /monitoring/callhome # delete policy {equipment-inoperable | fru-problem | identity-unestablishable | thermal-problem | voltage-problem}

Deletes the specified policy

Step 4

UCS-A /monitoring/callhome # commit-buffer

Commits the transaction to the system configuration.

Example

The following example deletes the Call Home policy named voltage-problem and commits the transaction:

UCS-A# scope monitoring
UCS-A /monitoring # scope callhome
UCS-A /monitoring/callhome # delete policy voltage-problems
UCS-A /monitoring/callhome* # commit-buffer
UCS-A /monitoring/callhome # 

Configuring Anonymous Reporting

Enabling Anonymous Reporting

Procedure

  Command or Action Purpose

Step 1

UCS-A # scope monitoring

Enters monitoring mode.

Step 2

UCS-A/monitoring # scope callhome

Enters monitoring call home mode.

Step 3

(Optional) UCS-A/monitoring/callhome # show anonymous-reporting

(Optional)

Displays if anonymous reporting is enabled or disabled.

Step 4

UCS-A/monitoring/callhome # enable anonymous-reporting

Enables anonymous reporting on Smart Call Home.

Step 5

UCS-A/monitoring/callhome # commit-buffer

Commits the transaction to the system configuration.

Example

The following example shows how to enable anonymous reporting on the Call Home server:

UCS-A # scope monitoring
UCS-A/monitoring #scope callhome
UCS-A/mnitoring/callhome # show anonymous-reporting 
Anonymous Reporting:
    Admin State
    -----------
    Off
UCS-A/monitoring/callhome* # enable anonymous-reporting
UCS-A/monitoring/callhome # commit-buffer
UCS-A/monitoring/callhome # show anonymous-reporting 
Anonymous Reporting:
    Admin State
    -----------
    On

Disabling Anonymous Reporting

Procedure

  Command or Action Purpose

Step 1

UCS-A # scope monitoring

Enters monitoring mode.

Step 2

UCS-A/monitoring # scope callhome

Enters monitoring call home mode.

Step 3

(Optional) UCS-A/monitoring/callhome # show anonymous-reporting

(Optional)

Displays if anonymous reporting is enabled or disabled.

Step 4

UCS-A/monitoring/callhome # disable anonymous-reporting

Disables anonymous reporting on the Smart Call Home server.

Step 5

UCS-A/monitoring/callhome # commit-buffer

Commits the transaction to the system configuration.

Example

The following example shows how to disable anonymous reporting on the Call Home server:

UCS-A # scope monitoring
UCS-A/monitoring # scope callhome
UCS-A/mnitoring/callhome # show anonymous-reporting 
Anonymous Reporting:
    Admin State
    -----------
    On
UCS-A/monitoring/callhome* # disable anonymous-reporting
UCS-A/monitoring/callhome # commit-buffer
UCS-A/monitoring/callhome # show anonymous-reporting 
Anonymous Reporting:
    Admin State
    -----------
    Off

Viewing Anonymous Reports

Procedure

  Command or Action Purpose

Step 1

UCS-A # scope monitoring

Enters monitoring mode.

Step 2

UCS-A/monitoring # scope callhome

Enters monitoring call home mode.

Step 3

UCS-A/monitoring/callhome # scope anonymous-reporting

Enters anonymous reporting mode.

Step 4

UCS-A/monitoring/callhome/anonymous-reporting # show detail

Displays the SMTP server address and server port.

Step 5

UCS-A/monitoring/callhome/anonymous-reporting # show inventory

Displays the anonymous reporting information.

Step 6

UCS-A/monitoring/callhome/anonymous-reporting # show content

Displays the anonymous report sample information.

Example

The following example shows how to display anonymous reports from the Call Home server:

UCS-A # scope monitoring
UCS-A/monitoring # scope callhome
UCS-A/monitoring/callhome # scope anonymous-reporting 
UCS-A/monitoring/callhome/anonymous-reporting # show detail
UCS-A/monitoring/callhome/anonymous-reporting # show inventory
UCS-A/monitoring/callhome/anonymous-reporting # show content
<anonymousData>
<discreteData
smartCallHomeContract="false"
ethernetMode="EndHost"
fcMode="EndHost"
disjointL2Used="false"
fabricFailoverUsed="false"
numVnicAdaptTempl="3"
numServiceProfiles="7"
updatingSPtemplUsed="false"
initialSPtemplUsed="true"
lanConnPolicyUsed="true"
sanConnPolicyUsed="false"
updatingAdaptTemplUsed="false"
initialAdaptTemplUsed="true"
numMsoftVMnets="10"
numOfVMs="3"
discreteFEX="false"
ucsCentralConnected="false"/>
<bladeUnit
chassisId="1"
slotId="4"
…..

Configuring Smart Call Home

Configuring Smart Call Home

Procedure

  Command or Action Purpose

Step 1

UCS-A# scope monitoring

Enters monitoring mode.

Step 2

UCS-A /monitoring # scope callhome

Enters monitoring call home mode.

Step 3

UCS-A /monitoring/callhome # enable

Enables Call Home.

Step 4

UCS-A /monitoring/callhome # set contact name

Cisco Smart Call Home sends the registration email to this email address.

Step 5

UCS-A /monitoring/callhome # set email email-addr

Specifies the email address of the main Call Home contact person.

Cisco Smart Call Home sends the registration email to this email address.

Step 6

UCS-A /monitoring/callhome # set phone-contact phone-num

Specifies the phone number of the main Call Home contact person. The phone number must be in international format, starting with a + (plus sign) and a country code.

Step 7

UCS-A /monitoring/callhome # set street-address street-addr

Specifies the street address of the main Call Home contact person.

Step 8

UCS-A /monitoring/callhome # set customer-id id-num

Specifies the CCO identification number that includes the contract numbers for the support contract in its entitlements. The number can be up to 255 alphanumeric characters in free format.

Step 9

UCS-A /monitoring/callhome # set contract-id id-num

Specifies the contract identification number from the service agreement. The number can be up to 255 alphanumeric characters in free format.

Step 10

UCS-A /monitoring/callhome # set site-id id-num

Specifies the site identification number from the service agreement. The number can be up to 255 alphanumeric characters in free format.

Step 11

UCS-A /monitoring/callhome # set from-email email-addr

Specifies the email address to use for the From field in Call Home messages.

Step 12

UCS-A /monitoring/callhome # set reply-to-email email-addr

Specifies the email address to use for the Reply To field in Call Home messages.

Step 13

UCS-A /monitoring/callhome # set hostname {hostname | ip-addr}

Specifies the hostname or IP address of the SMTP server that Call Home uses to send email messages.

Step 14

UCS-A /monitoring/callhome # set port port-num

Specifies the SMTP server port that Call Home uses to send email messages. Valid port numbers are 1 to 65535.

Step 15

UCS-A /monitoring/callhome # set throttling {off | on}

Enables or disables Call Home throttling. When enabled, throttling prevents too many Call Home email messages from being sent for the same event. By default, throttling is enabled.

Step 16

UCS-A /monitoring/callhome # set urgency {alerts | critical | debugging | emergencies | errors | information | notifications | warnings}

Specifies the urgency level for Call Home email messages.

Step 17

UCS-A /monitoring/callhome # commit-buffer

Commits the transaction to the system configuration.

Example

The following example configures Call Home and commits the transaction:

UCS-A# scope monitoring
UCS-A /monitoring* # scope callhome
UCS-A /monitoring/callhome* # enable
UCS-A /monitoring/callhome* # set contact "Steve Jones"
UCS-A /monitoring/callhome* # set email admin@MyCompany.com
UCS-A /monitoring/callhome* # set phone-contact +1-001-408-555-1234
UCS-A /monitoring/callhome* # set street-address "123 N. Main Street, Anytown, CA, 99885"
UCS-A /monitoring/callhome* # set customer-id 1234567
UCS-A /monitoring/callhome* # set contract-id 99887766
UCS-A /monitoring/callhome* # set site-id 5432112
UCS-A /monitoring/callhome* # set from-email person@MyCompany.com
UCS-A /monitoring/callhome* # set reply-to-email person@MyCompany.com
UCS-A /monitoring/callhome* # set hostname 192.168.100.12
UCS-A /monitoring/callhome* # set port 25
UCS-A /monitoring/callhome* # set throttling on
UCS-A /monitoring/callhome* # set urgency information
UCS-A /monitoring/callhome* # commit-buffer
UCS-A /monitoring/callhome #

What to do next

Continue to "Configuring the Default Cisco TAC-1 Profile" to configure a Call Home profile for use with Smart Call Home.

Configuring the Default Cisco TAC-1 Profile

The following are the default settings for the CiscoTAC-1 profile:


Note


In order to apply Callhome sendtestAlert functionality at least one of the Email Destination should be set for profiles other than CiscoTAC-1.


  • Level is normal

  • Only the CiscoTAC alert group is selected

  • Format is xml

  • Maximum message size is 5000000

Before you begin

Complete the "Configuring Smart Call Home" section.

Procedure

  Command or Action Purpose

Step 1

UCS-A /monitoring/callhome # scope profile CiscoTac-1

Enters monitoring call home profile mode for the default Cisco TAC-1 profile.

Step 2

UCS-A /monitoring/callhome/profile # set level normal

Specifies the normal event level for the profile.

Step 3

UCS-A /monitoring/callhome/profile # set alertgroups ciscotac

Specifies the ciscotac alert group for the profile.

Step 4

UCS-A /monitoring/callhome/profile # set format xml

Specifies the e-mail message format to xml .

Step 5

UCS-A /monitoring/callhome/profile # set maxsize 5000000

Specifies the maximum size of 5000000 for email messages.

Step 6

UCS-A /monitoring/callhome/profile # create destination callhome@cisco.com

Specifies the email recipient to callhome@cisco.com .

Step 7

UCS-A /monitoring/callhome/profile/destination # exit

Exits to monitoring call home profile mode.

Step 8

UCS-A /monitoring/callhome/profile # exit

Exits to monitoring call home mode.

Example

The following example configures the default Cisco TAC-1 profile for use with Smart Call Home:


UCS-A /monitoring/callhome* # scope profile CiscoTac-1
UCS-A /monitoring/callhome/profile* # set level normal
UCS-A /monitoring/callhome/profile* # set alertgroups ciscotac
UCS-A /monitoring/callhome/profile* # set format xml
UCS-A /monitoring/callhome/profile* # set maxsize 5000000
UCS-A /monitoring/callhome/profile* # create destination callhome@cisco.com
UCS-A /monitoring/callhome/profile/destination* # exit
UCS-A /monitoring/callhome/profile* # exit
UCS-A /monitoring/callhome* #

What to do next

Continue to "Configuring a System Inventory Message for Smart Call Home" to configure system inventory messages for use with Smart Call Home.

Configuring a System Inventory Message for Smart Call Home

Before you begin

Complete the "Configuring the Default Cisco TAC-1 Profile" section.

Procedure

  Command or Action Purpose

Step 1

UCS-A /monitoring/callhome # scope inventory

Enters monitoring call home inventory mode.

Step 2

UCS-A /monitoring/callhome/inventory # set send-periodically {off | on}

Enables or disables the sending of inventory messages. When the on keyword is specified, inventory messages are automatically sent to the Call Home database.

Step 3

UCS-A /monitoring/callhome/inventory # set interval-days interval-num

Specifies the the time interval (in days) at which inventory messages will be sent.

Step 4

UCS-A /monitoring/callhome/inventory # set timeofday-hour hour

Specifies the hour (using 24-hour format) that inventory messages are sent.

Step 5

UCS-A /monitoring/callhome/inventory # set timeofday-minute minute

Specifies the number of minutes after the hour that inventory messages are sent.

Step 6

UCS-A /monitoring/callhome/inventory # commit-buffer

Commits the transaction to the system configuration.

Example

The following example configures Call Home system inventory messages and commits the transaction:


UCS-A /monitoring/callhome* # scope inventory
UCS-A /monitoring/callhome/inventory* # set send-periodically on
UCS-A /monitoring/callhome/inventory* # set interval-days 15
UCS-A /monitoring/callhome/inventory* # set timeofday-hour 21
UCS-A /monitoring/callhome/inventory* # set timeofday-minute 30
UCS-A /monitoring/callhome/inventory* # commit-buffer
UCS-A /monitoring/callhome/inventory # 

What to do next

Continue to "Registering Smart Call Home" to send an inventory message that starts the Smart Call Home registration process.

Registering Smart Call Home

Before you begin

Complete the "Configuring a System Inventory Message for Smart Call Home" section.

Procedure

Command or Action Purpose

UCS-A /monitoring/callhome/inventory # send

Sends the system inventory message to the Smart Call Home database.

When Cisco receives the system inventory, a Smart Call Home registration email is sent to the email address that you configured as the email address for the main Smart Call Home contact.

Example

The following example sends the system inventory message to the Smart Call Home database:


UCS-A /monitoring/callhome/inventory # send

What to do next

When you receive the registration email from Cisco, do the following to complete registration for Smart Call Home:

  1. Click the link in the email.

    The link opens the Cisco Smart Call Home portal in your web browser.

  2. Log into the Cisco Smart Call Home portal.

  3. Follow the steps provided by Cisco Smart Call Home.

    After you agree to the terms and conditions, the Cisco Smart Call Home registration for the Cisco UCS domain is complete.