Recovery Procedure for Cisco Digital Media Manager 5.2
This document provides the information that you require to recover from a software failure of the Cisco Digital Media Manager (DMM) 5.2.
This chapter includes the following sections:
Prerequisites
Complete the following tasks before you begin:
•![]() Contact your sales engineer or Cisco TAC to obtain the recovery DVD for Cisco Digital Media Manager 5.2.
Contact your sales engineer or Cisco TAC to obtain the recovery DVD for Cisco Digital Media Manager 5.2.
•![]() Write down the network configuration information for your site (DHCP or Static network settings).
Write down the network configuration information for your site (DHCP or Static network settings).
•![]() Obtain physical access to the appliance.
Obtain physical access to the appliance.
Recovery Process
The following table shows the major steps you must take to perform a software recovery on your Cisco DMM appliance.
|
|
|
|
|---|---|---|
Step 1 |
If possible, back up your Cisco DMM. If you cannot create a new backup, be sure you have access to a previous backup. |
|
Step 2 |
Perform the software recovery procedure. |
|
Step 3 |
Restore your Cisco DMM configuration. |
|
Step 4 |
If you are using the Cisco DMM with Cisco Show and Share, pair the appliances. |
Chapter 3, "Pairing the Cisco Digital Media Suite Appliances" |
Back Up the Cisco DMM Appliance
If you can access the Cisco DMM HTTP or AAI interface, create a new backup of your Cisco DMM configuration. The backup includes all the configuration and database information for the Cisco DMM appliance, including license information, so you will not need to obtain new or reinstall existing licenses. Because the license is specific to the appliance, you cannot use this recovery procedure to replicate the configuration from one Cisco DMM appliance to another.

You can back up a DMM appliance by using DMS-Admin or AAI. Refer to the following resources for more information for the type of backup you will peform:
•![]() DMS-Admin backup—User Guide for Cisco Digital Media Manager 5.2.x
DMS-Admin backup—User Guide for Cisco Digital Media Manager 5.2.x
•![]() AAI backup—Administration Guide for Cisco Digital Media System 5.2.x Appliances
AAI backup—Administration Guide for Cisco Digital Media System 5.2.x Appliances
If you cannot access the Cisco DMM HTTP or AAI interface, you will need to use a previous backup of the system. You will lose any changes that were made since that backup.
Recover the Cisco DMM Software

To recover the DMM, complete the following steps:
Step 1 ![]() Insert the recovery DVD in the CD/DVD-ROM drive and restart the appliance.
Insert the recovery DVD in the CD/DVD-ROM drive and restart the appliance.
If you see the following screen briefly, the server appliance is booting from the recovery DVD.

The recovery process takes about two minutes for initial loading and then asks for your confirmation to overwrite the existing system. Overwriting erases all the existing data on the DMM server appliance. By default No is selected.
Step 2 ![]() Use the Tab key to navigate to Yes, and press Enter to proceed.
Use the Tab key to navigate to Yes, and press Enter to proceed.
The file system formatting screen displays.

The package installation screen displays.

The post-installation screen displays.

After the installation completes, the server appliance reboots, and displays the booting system message.

Step 3 ![]() The first time you boot the Digital Media Manager server appliance, the first boot configuration tool starts automatically and opens the DMS appliance administration interface (AAI). Press Enter when the Start of First Boot screen displays.
The first time you boot the Digital Media Manager server appliance, the first boot configuration tool starts automatically and opens the DMS appliance administration interface (AAI). Press Enter when the Start of First Boot screen displays.
Step 4 ![]() In the HOSTNAME Configuration screen, enter the fully qualified domain name of the appliance (hostename plus the domain name).
In the HOSTNAME Configuration screen, enter the fully qualified domain name of the appliance (hostename plus the domain name).
This screen is an example of the hostname of the appliance being set to server.example.com.

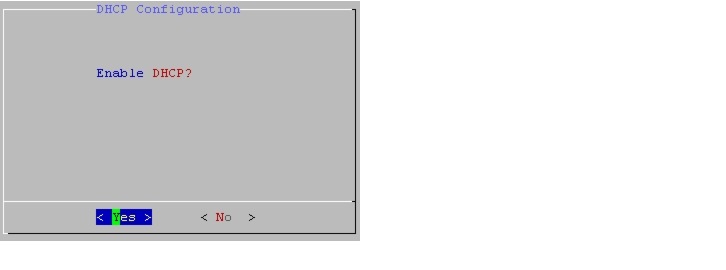
Step 5 ![]() The DHCP configuration screen displays. If the server appliance gets the IP address automatically from the DHCP server, select Yes.
The DHCP configuration screen displays. If the server appliance gets the IP address automatically from the DHCP server, select Yes.

Note ![]() Cisco does not recommend using DHCP for the DMM appliance.
Cisco does not recommend using DHCP for the DMM appliance.

Step 6 ![]() If DHCP is enabled, go Step 12, time zone configuration. If DHCP is disabled, enter the IP address, subnet mask, default gateway, primary DNS and, if available, a secondary DNS in the Configure TCP/IP screen.
If DHCP is enabled, go Step 12, time zone configuration. If DHCP is disabled, enter the IP address, subnet mask, default gateway, primary DNS and, if available, a secondary DNS in the Configure TCP/IP screen.

Step 7 ![]() Confirm the network settings. Press Enter if all the information is correct. If the information is incorrect, use the arrow keys to navigate to No and press Enter to re-configure your settings. Then, wait until the network settings are applied. The following example reflects the example configurations shown in Step 6.
Confirm the network settings. Press Enter if all the information is correct. If the information is incorrect, use the arrow keys to navigate to No and press Enter to re-configure your settings. Then, wait until the network settings are applied. The following example reflects the example configurations shown in Step 6.

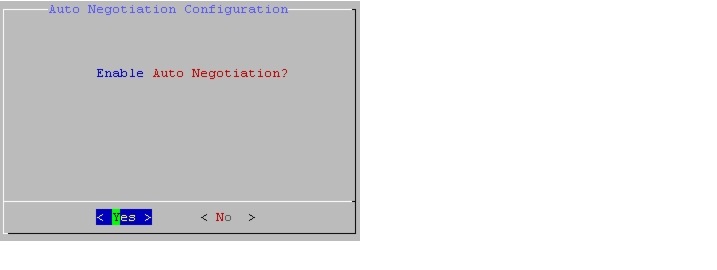
Step 8 ![]() If your network infrastructure requires you to manually specify network negotiation settings, select No to disable auto-negotiation.
If your network infrastructure requires you to manually specify network negotiation settings, select No to disable auto-negotiation.

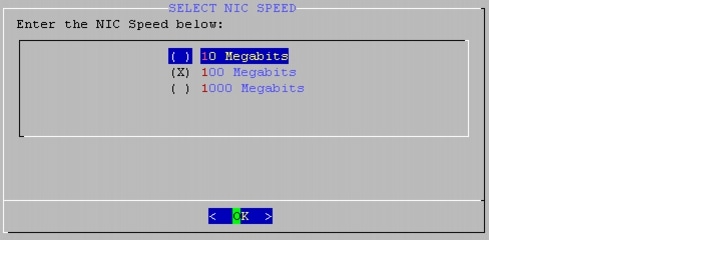
Step 9 ![]() If you enabled auto-negotiation, go to Step 12, time zone configuration. If auto-negotiation is disabled, set the NIC speed to 10, 100, or 1000 Megabits.
If you enabled auto-negotiation, go to Step 12, time zone configuration. If auto-negotiation is disabled, set the NIC speed to 10, 100, or 1000 Megabits.

Step 10 ![]() Set your NIC to either full or half duplex.
Set your NIC to either full or half duplex.

Step 11 ![]() Confirm the NIC speed and duplex settings.
Confirm the NIC speed and duplex settings.
Step 12 ![]() Configure the time zone. Select the time zone by using the up and down arrow. Press Tab, and then press Space to select or to deselect System clock uses UTC. Press Tab again to navigate to the OK button, and press Enter.
Configure the time zone. Select the time zone by using the up and down arrow. Press Tab, and then press Space to select or to deselect System clock uses UTC. Press Tab again to navigate to the OK button, and press Enter.

Step 13 ![]() Confirm the time zone setting. Press Enter if all the information is correct. If any information is incorrect, use the arrow keys to navigate to No, and press Enter to reconfigure your settings.
Confirm the time zone setting. Press Enter if all the information is correct. If any information is incorrect, use the arrow keys to navigate to No, and press Enter to reconfigure your settings.
Step 14 ![]() Select the date. Press Tab and use the up and down arrows to change the month. Press Tab, and use the up and down arrows to change the year. Press Tab, and use the up and down arrows and left and right arrows to select day. Press Tab, and select the OK button. Press Enter to submit the information.
Select the date. Press Tab and use the up and down arrows to change the month. Press Tab, and use the up and down arrows to change the year. Press Tab, and use the up and down arrows and left and right arrows to select day. Press Tab, and select the OK button. Press Enter to submit the information.

Step 15 ![]() Confirm the date. Press Enter if the information is correct. If you need to change the information, use the arrow keys to navigate to No, and press Enter to reconfigure your settings.
Confirm the date. Press Enter if the information is correct. If you need to change the information, use the arrow keys to navigate to No, and press Enter to reconfigure your settings.
Step 16 ![]() Select the time in 24-hour format. Press Tab, and use the up and down arrows to set the hour. Press Tab, and use the up and down arrows to set the minutes. Press Tab, and use the up and down arrows to set the seconds. Press Tab, and select the OK button. Press Enter to submit the information.
Select the time in 24-hour format. Press Tab, and use the up and down arrows to set the hour. Press Tab, and use the up and down arrows to set the minutes. Press Tab, and use the up and down arrows to set the seconds. Press Tab, and select the OK button. Press Enter to submit the information.

Step 17 ![]() Confirm the time. Press Enter if all the information is correct. If any information is not correct, use the arrows to navigate to No, and press Enter to reconfigure your settings.
Confirm the time. Press Enter if all the information is correct. If any information is not correct, use the arrows to navigate to No, and press Enter to reconfigure your settings.
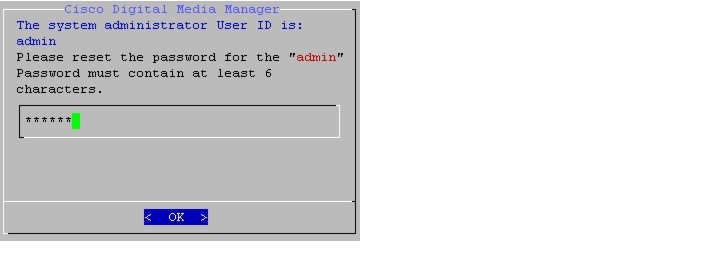
Step 18 ![]() Set the password for admin, the default administrator account for this appliance. Your password cannot be null and must contain six characters.
Set the password for admin, the default administrator account for this appliance. Your password cannot be null and must contain six characters.

Step 19 ![]() Confirm the password for the admin user.
Confirm the password for the admin user.
Step 20 ![]() A confirmation screen displays for your admin password change. Press Enter to continue.
A confirmation screen displays for your admin password change. Press Enter to continue.
Step 21 ![]() Set the password for pwadmin user. The pwadmin account allows you to reset your admin user password. The password cannot be null and must contain six characters.
Set the password for pwadmin user. The pwadmin account allows you to reset your admin user password. The password cannot be null and must contain six characters.

Step 22 ![]() Confirm the password for pwadmin user.
Confirm the password for pwadmin user.
Step 23 ![]() A confirmation screen displays for your pwadmin password change. Press Enter to continue.
A confirmation screen displays for your pwadmin password change. Press Enter to continue.
The End of First Boot screen displays. You can now log in through the AAI as admin by using the new password or as pwadmin by using the new password.
Step 24 ![]() Proceed to the "Restore the Cisco DMM Settings" procedure.
Proceed to the "Restore the Cisco DMM Settings" procedure.
Restore the Cisco DMM Settings
You can use the DMS-Admin or the AAI interface to restore your server. However, AAI backup files and DMS-Admin backup files are not compatible because the files can contain different information. DMS-Admin backup files contain Cisco Show and Share information if you have deployed a Cisco Show and Share appliance.
Therefore, you must use the same method to restore your data that you used to back up the appliance. Refer to the following resources for information about the type of restore you must perform:
•![]() DMS-Admin restore—User Guide for Cisco Digital Media Manager 5.2.x
DMS-Admin restore—User Guide for Cisco Digital Media Manager 5.2.x
•![]() AAI restore—Administration Guide for Cisco Digital Media System 5.2.x Appliances
AAI restore—Administration Guide for Cisco Digital Media System 5.2.x Appliances
If you are using the Cisco DMM with Cisco Show and Shares, go to Chapter 3, "Pairing the Cisco Digital Media Suite Appliances" after restoring your settings.
 Feedback