CDR Analysis and Reporting Configuration Overview
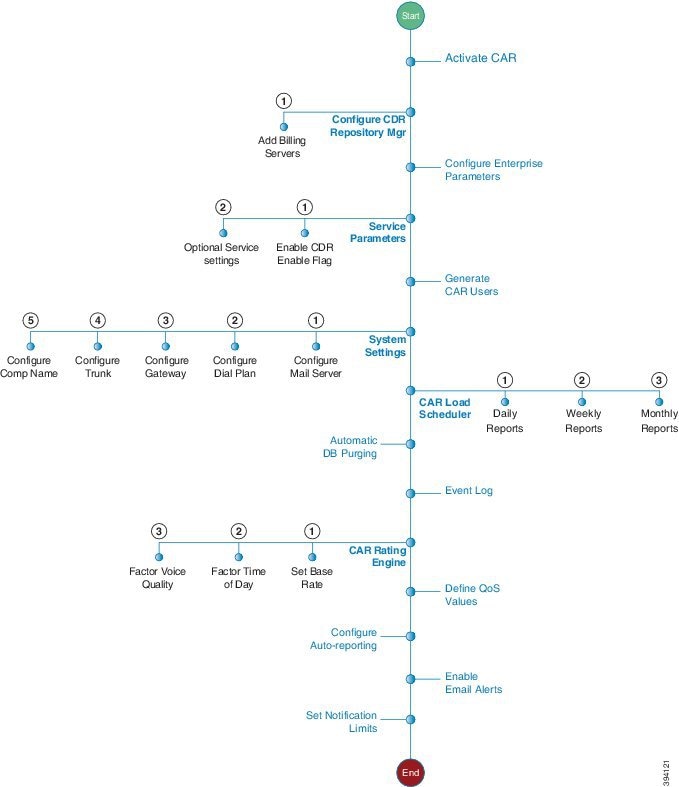
The following diagram illustrates the initial system configuration for Cisco CDR Analysis and Reporting.
The documentation set for this product strives to use bias-free language. For the purposes of this documentation set, bias-free is defined as language that does not imply discrimination based on age, disability, gender, racial identity, ethnic identity, sexual orientation, socioeconomic status, and intersectionality. Exceptions may be present in the documentation due to language that is hardcoded in the user interfaces of the product software, language used based on RFP documentation, or language that is used by a referenced third-party product. Learn more about how Cisco is using Inclusive Language.
The following diagram illustrates the initial system configuration for Cisco CDR Analysis and Reporting.
| Command or Action | Purpose | |
|---|---|---|
|
Step 1 |
Activate the following feature services:
|
|
|
Step 2 |
Set disk utilization and file preservation parameters for the CDR Repository Manager. |
|
|
Step 3 |
Use this procedure if you want to send CDR records to an application billing server. You can configure up to eight billing servers. |
|
|
Step 4 |
Configure optional enterprise-level parameters for CDRs. |
|
|
Step 5 |
You must set the CDR Enabled Flag to True for CDRs to be generated. Also, configure optional service parameters for CDRs. |
|
|
Step 6 |
Generate CAR administrators, managers and users. |
|
|
Step 7 |
Log on to the Cisco CDR Analysis and Reporting tool. |
|
|
Step 8 |
Configure the system parameters that apply: |
Configure the CAR system parameters that apply to your deployment. For many deployments, the default values may be sufficient. |
|
Step 9 |
Configure the Load Scheduler for when CAR loads CDRs. |
|
|
Step 10 |
Configure schedules for the following reports: |
Configure schedules for daily, weekly, and monthly reports. |
|
Step 11 |
Configure rules for when you want the system to purge CDR files automatically. |
|
|
Step 12 |
Configure the generation of event logs. |
|
|
Step 13 |
Configure the CAR Rating Engine. Configure the parameters that apply: |
Set a monetary base rate for the cost of calls. You can further qualify the cost by applying time-of-day and voice-quality factors. |
|
Step 14 |
Configure acceptable ranges for jitter, latency, and lost packets. |
|
|
Step 15 |
Configure rules for the reports that you want to generate automatically. |
|
|
Step 16 |
Turn on email alerting for Charge Limit Notifications and QoS Notifications. |
|
|
Step 17 |
Set notifications around when a user's daily charge exceeds a maximum and when QoS drops below a specifed limit. |
|
|
Step 18 |
Install Locales |
Optional. If your users want to view localized user and manager reports, install the proper locales. For details, refer to the Administration Guide for Cisco Unified Communications Manager. |
|
Step 19 |
Run a DRS backup |
Back up CAR, including the database and pregenerated reports. For details on how to run a backup, refer to the Administration Guide for Cisco Unified Communications Manager. |
User Reports
System Reports
Device Reports
Cisco CDR Analysis and Reporting (CAR) also uses the following network services, all which are running by default. You can confirm that they are running in the Tools - Network Services window of Cisco Unified Serviceability:
Cisco CDR Repository Manager
Cisco CDR Agent
Cisco CAR Scheduler
Cisco SOAP - CallRecord Service
Cisco CAR DB
|
Step 1 |
Choose . |
||
|
Step 2 |
From the Servers drop-down list box, choose the publisher node and click Go. The window displays the service names for the server that you chose, the service type, and the activation status of the services. |
||
|
Step 3 |
Check the check boxes next to the following CDR Services: |
||
|
Step 4 |
After you have finished making the appropriate changes, click Save.
|
Use this procedure to configure disk utilization and file preservation settings for the CDR Repository Manager. For field descriptions, refer to the online help.
|
Step 1 |
Choose . |
||
|
Step 2 |
Click the CDR Manager general parameter value that you want to change. |
||
|
Step 3 |
Enter the new parameter settings. |
||
|
Step 4 |
Click Update.
|
Use the following procedure if you want to deploy application billing servers to which you will send CDRs. You can configure up to three billing servers.
Cipher Support
For Unified Communications Manager 11.5, Unified Communications Manager advertises the following CBC and CTR ciphers for SFTP connections:
aes128-cbc
3des-cbc
aes128-ctr
aes192-ctr
aes256-ctr
 Note |
Make sure that the backup SFTP Server supports one of these ciphers to communicate with Unified Communications Manager. |
From Unified Communications Manager 12.0 release onwards, CBC ciphers are not supported. Unified Communications Manager supports and advertises only the following CTR ciphers:
aes256-ctr
aes128-ctr
aes192-ctr
Note |
Make sure that the backup SFTP Server supports one of these CTR ciphers to communicate with Unified Communications Manager. |
|
Step 1 |
Choose . The CDR Management Configuration window displays. |
|
Step 2 |
Perform one of the following tasks:
|
|
Step 3 |
Enter the application billing server parameter settings. |
|
Step 4 |
Click Add or Update. |
If you have a billing server that is deployed with SFTP, and you are using a non-default cipher that you configured on both Unified Communications Manager and on the billing server, a connection issue may result if you restart a Unified Communications Manager server, or if you restart the Cisco CallManager service. If this occurs, the billing server is unable to authenticate and the connection are broken.
After the restart, Unified Communications Manager advertises only the default ciphers and will not advertise any new ciphers that you installed, which will result in an authentication issue if you are using a non-default cipher. If you run into this issue, generate a new key and reset the connection:
|
Step 1 |
Choose . The CDR Management Configuration window displays. |
|
Step 2 |
Under Billing Application Server Parameters, locate your billing server. |
|
Step 3 |
Click Reset to generate a new key that corresponds to your billing server. |
|
Step 1 |
From Cisco Unified CM Administration, choose . |
|
Step 2 |
Under CDR Parameters, configure values for the following parameters. For detailed field descriptions, click the parameter name in the GUI:
|
|
Step 3 |
Under CCM Web Service Parameters, configure values for the following parameters:
|
|
Step 4 |
Click Save. |
|
Step 1 |
From Cisco Unified CM Administration, choose . |
|
Step 2 |
From the Server drop-down, choose a Unified Communications Manager node. |
|
Step 3 |
From the Service drop-down, choose Cisco CallManager. |
|
Step 4 |
Click Advanced. |
|
Step 5 |
Under System, configure values for the following parameters:.
|
|
Step 6 |
Under Clusterwide Parameters (Device - General), set the following optional parameters:
|
|
Step 7 |
Under Clusterwide Parameters (Device - Phone), set the Add Incoming Number Prefix to CDR parameter to True if you want the system to add the incoming number prefix (for example, a National Number Prefix or Subscriber Number Prefix) to the CDR record. The default setting is False. |
If the parameter is set to False, the CDR will contain the prefix that is added to the call when the type of number is a National number or Subscriber number.
If the parameter is set to True, the CDR contains the prefix that is added to the calling party number when the type of number is a:
National number
International number only when the destination is not a gateway
Subscriber number
Unknown number only when the destination is not a gateway
|
Inbound Side of Call |
Outbound Side of Call |
|
|---|---|---|
|
National Number Prefix |
1214 |
|
|
International Number Prefix |
011 |
|
|
Subscriber Number Prefix |
214 |
|
|
Unknown Number Prefix |
972 |
Any user can act as a CAR administrator (including application users). However, you must add the end user to an access control group that provides access to the CAR tool (such as Standard CAR Admin Users or Standard CCM Super Users). End users who have been identified as CAR administrators have full control over the CAR system. The administrator can modify all the parameters that relate to the system and the reports. End users who have not been identified as CAR administrators can access only designated CAR reports.
Note |
If you decide to create a customized access control group, rather than the predefined default groups, your customized group must include the Standard Admin Rep Tool Admin role. For details on how to configure user access, refer to the Administration Guide for Cisco Unified Communications Manager. |
 Tip |
To use CAR, ensure that at least one CAR administrator exists in the Unified Communications Manager database. |
Before you log in to CAR, you must configure at least one CAR user that has administrative privileges in CAR. To configure CAR administrators, managers, and users, perform the following procedure:
|
Step 1 |
In Cisco Unified CM Administration, add an end user by choosing . For additional information on how to perform this task, see the Cisco Unified Communications Manager Administration Guide. To create a manager, make sure that you enter a value in the Manager User ID field.
|
||||
|
Step 2 |
Choose . |
||||
|
Step 3 |
Click Find to view the list of access control groups. |
||||
|
Step 4 |
Select an access control group that provides CAR access. For example, Standard CAR Admin Users or Standard CCM Super Users. |
||||
|
Step 5 |
Click Add End Users to Group. |
||||
|
Step 6 |
Check the check boxes for the users that you want to add to the group and click Add Selected. The user displays in the Users in Group group box.
|
Note |
An application user that acts as a CAR administrator can configure all reports except the Individual Bill report. An application user that acts as a CAR administrator cannot access end user (CCM user) windows. CAR notifications do not get sent to the application user because no mail ID exists for the application user. |
CDR Analysis and Reporting set default values for all system parameters. Before you generate any reports in CAR, Cisco recommends that you customize several system parameters. Because default values are provided for all system parameters, Cisco recommends customizing but does not require it.
Note |
The following system parameters refer to the CAR system parameters. Be aware that they are separate and distinct from the Unified Communications Manager enterprise and service parameters that are discussed in the previous sections. |
CAR allows you to set the following parameters:
Mail server criteria - CAR uses this information to successfully connect to the email server to send alerts and reports by email. If you do not want to send alerts or reports by email, you do not need to specify this information.
Dial plan - The default dial plan in CAR specifies the North American numbering plan (NANP). Ensure that the dial plan is properly configured, so call classifications are correct in the reports. If you have modified the default NANP that Cisco Unified CM Administration provides, or if you are outside the NANP, be sure to configure the dial plan according to your Unified Communications Manager dial plan.
Gateways - To utilize the gateway reports, you need to configure gateways in CAR. You should do this after installation of any existing gateways in your Cisco IP telephony system and when you add gateways to the system. If the system deletes any gateways, CAR gets the latest list of gateways, and any configuration that is specified in CAR for the deleted gateways gets deleted. CAR uses the area code information to determine whether calls are local or long distance. You must provide the Number of Ports information for each gateway to enable CAR to generate the Utilization reports.
System preferences - You can set CAR system preferences for the Company Name parameter.
Only CAR administrators and normal end users can log on to the CAR web interface. Users do not need to be a member of a standard CAR administrator group to be a CAR administrator. Any user who has the role “Standard Admin Rep Tool Admin” associated with the user ID can access CAR as a CAR administrator. The user ID role association gets done by adding the user to a user group that has the role that is associated with it. “Standard CAR Admin Group” and “Standard CCM Super Users” comprise two groups that have the role “Standard Admin Rep Tool Admin” associated with them. The default application user that gets created at installation, who is a member of the “Standard CCM Super Users” group, can log in to CAR as a CAR administrator but only as an application user. This user cannot access the Individual Bills report.
CAR supports custom CAR Admin groups. Any custom group that has the role "Standard CAR Admin Group" associated with it can add users who are considered to be CAR administrators when logging into the CAR web interface.
End users who are not CAR administrators can log in to CAR only if they have the role "Standard CCM End Users" associated with them. You can do this user ID - role association by adding the end user to the "Standard CCM End Users" group or any other group that has the specified role associated. Any end user without the "Standard CCM End Users" group association cannot log in to the CAR web interface.
Any user without the "Standard CCM End Users" or "Standard Admin Rep Tool Admin" role cannot log in to CAR. An attempt by this user to log in to CAR generates a 403 error, and the user gets redirected to the login window with no error message. CAR Web Service traces will log the username of the user who tried to access the application.
CAR facilitates users to change their password by using a Change Password window if the user password has expired. When users with an expired password try to log into CAR, they receive IMS_Error_Code 5, 6, or 8. CAR uses the ChangePasswordFilter of ccmadmin to redirect the user to change-password.jsp when any of the preceding error codes are received.
Note |
The database throttle limits the concurrent users to 100; because of this limit, IMS also supports only 100 users with a login rate of approximately 112 ms. |
If an error occurs while you are resetting the user password, the following message displays on the Change-Password window: "System error while changing password for user. Please contact system administrator."
Even though the CAR Administrator status extends to any user with the role "Standard Admin Rep Tool Admin," CAR notifications, alerts, and pregen reports only get sent to users who are members of the group "Standard CAR Admin Group" and not all CAR administrators.
To log on to CAR, perform the following procedure:
Perform the following tasks:
Before you can log in to CAR, verify that the Cisco CAR Web Service and the CiscoCAR Scheduler service that is run on the first server. After you activate the services, the option CDR Analysis and Reporting displays under the Tools menu in Cisco Unified Serviceability. For information on how to activate services, see the Activate CAR.
Configure CAR administrators, managers, and users as described in Generate CAR Users.
|
Step 1 |
To log on to CAR, perform one of the following tasks:
|
||||||||||||||||||||||
|
Step 2 |
After the CAR logon window displays, enter your user ID in the User Name field. |
||||||||||||||||||||||
|
Step 3 |
In the Password field, enter your password. Click Login. The CAR window displays. If the user ID or password is invalid, CAR displays one of the Identity Management System (IMS) messages that are listed in the following table.
After you log on to CAR, the following warning messages are displayed on a dashboard, if any:
|
This section describes how to log out of CAR.
|
Step 1 |
At the CAR window, choose Logout. |
|
Step 2 |
A prompt message "For security reasons, it is advisable to close the browser window on Logout. Do you want to close the browser window?" displays. To close the CAR window (browser), click OK; clicking Cancel displays the CAR Logon window. |
Unless you want to use the default values, you should customize several system parameters before you generate any reports. This section describes the system parameters that affect CAR. Because default values are provided for all system parameters, Cisco recommends customizing, but does not require it. You can customize parameters for the following:
Mail server
Dial Plan
Gateway
Trunk
Company Name
To send email alerts and reports by email, you must specify the mail server configuration information. CAR uses the configuration information to successfully connect to the email server.
This section describes how to specify email server information.
|
Step 1 |
Choose . The Mail Parameters window displays. |
||
|
Step 2 |
In the Mail ID field, only enter the email identifier that will be used in the From field when emails are sent (for example, smith1@abc.com, enter smith1 in the Mail ID field.
|
||
|
Step 3 |
In the Mail Server Name field, enter the domain name for the server that runs the email system (that is, abc.com from the previous example. |
||
|
Step 4 |
Click Update . |
The default dial plan in CAR specifies the North American numbering plan (NANP). Make sure that the dial plan is properly configured, so call classifications display correctly in the reports.
Note |
If you have modified the default NANP that is provided in Cisco Unified CM Administration, or if you are outside the NANP, be sure to configure the dial plan in CAR according to your Unified Communications Manager dial plan. At least one condition must exist to configure the Dial Plan. For more information about dial plan, see the Cisco Unified Communications Manager Online Help and the Cisco Unified Communications Manager System Guide. |
To configure the dial plan, define the parameters for the outgoing call classifications. Call classifications include International, Local, Long Distance, On Net, and so on. For example, if local calls in your area equal six digits in length, you would specify a row in the dial plan as follows:
|
Condition |
No of Digits |
Pattern |
Call Type |
|
= |
6 |
! |
Local |
This section describes how to update the CAR dial plan configuration.
|
Step 1 |
Choose . The Dial Plan Configuration window displays. |
||
|
Step 2 |
In the Toll Free Numbers field, enter the numbers in your dial plan that can be placed without a charge. |
||
|
Step 3 |
Update the values in the table by using the following fields: |
||
|
Step 4 |
To add more rows, check the check box in the row below where you want to add rows and click Add Rows link. The system adds a row above the row that you chose. To delete a row, check the check box by the row that you want to delete and click Delete Rows.
|
||
|
Step 5 |
Click Update. |
If you have modified the default dial plan in CAR, you can restore the default values that are based on the North American numbering plan (NANP).
The following table provides the default NANP values.
|
Row |
Condition |
No of Digits |
Pattern |
Call Type |
|---|---|---|---|---|
|
1 |
= |
5 |
! |
OnNet |
|
2 |
= |
7 |
! |
Local |
|
3 |
= |
10 |
T! |
Others |
|
4 |
= |
10 |
G! |
Local |
|
5 |
= |
10 |
K! |
Local |
|
6 |
= |
10 |
! |
Long Distance |
|
7 |
= |
11 |
T! |
Others |
|
8 |
= |
11 |
XG! |
Local |
|
9 |
= |
11 |
XK! |
Local |
|
10 |
= |
11 |
! |
Long Distance |
|
11 |
> |
3 |
011! |
International |
The following information explains the default table values.
Row 1 - If the number of digits that are dialed equals 5 and the pattern is! (more than one digit, in this case, 5 digits), the call gets classified as On Net.
Row 2 - If the number of digits that are dialed equals 7 and the pattern is! (more than one digit, in this case, 7 digits), the call gets classified as Local.
Row 3 - If the number of digits that are dialed equals 10 and the pattern is T! (more than one digit, in this case a 10-digit number that starts with a Toll Free number code), the call gets classified as Others.
Row 4 - If the number of digits that are dialed equals 10 and the pattern is G! (more than one digit, in this case a 10-digit number that starts with a gateway code), the call gets classified as Local.
Row 5 - If the number of digits that are dialed equals 10 and the pattern is K! (more than one digit, in this case a 10-digit number that starts with a trunk code), the call gets classified as Local.
Row 6 - If the number of digits hat is that are dialed equals 10 and the pattern is! (more than one digit, in this case a 10-digit number), the call gets classified as Long Distance.
Row 7 - If the number of digits that are dialed equals 11 and the pattern is T! (more than one digit, in this case an 11-digit number that starts with a toll-free number code), the call gets classified as Others.
Row 8 - If the number of digits that are dialed equals 11 and the pattern is XG! (more than one digit, in this case an 11-digit number that starts with any single digit followed by a gateway code), the call gets classified as Local.
Row 9 - If the number of digits that are dialed equals 11 and the pattern is XK! (more than one digit, in this case an 11-digit number that starts with any single digit followed by a trunk code), the call gets classified as Local.
Row 10 - If the number of digits that are dialed equals 11 and the pattern is! (more than one digit, in this case an 11-digit number), the call gets classified as Long Distance.
Row 11 - If the number of digits dialed is greater than 3 and starts with 011, the call gets classified as International.
If none of the condition gets satisfied, the call gets classified as Others. This section describes how to restore the NANP dial plan values in CAR.
Note |
The combination of characters, such as '!!', 'GG', 'KK', 'TT', 'GK', 'KG' is not allowed in dial plan configuration. |
|
Step 1 |
Choose . The Dial Plan Configuration window displays. |
|
Step 2 |
Click Restore Defaults. The restoration takes effect at midnight. To make changes take effect immediately, restart the Cisco CAR Scheduler service. |
Tip |
Configure the gateways in CAR for existing Unified Communications Manager system gateways. After you add gateways to Cisco Unified CM Administration, configure the new gateways in CAR. When gateway is deleted from the Unified Communications Manager system, the system automatically removes the gateways (and any configuration settings that you specified) from CAR |
CAR uses the area code information to determine whether calls are local or long distance. You must provide the Number of Ports information for each gateway to enable CAR to generate the Utilization reports.
Note |
"G" acts as a wildcard for the gateway area codes that is used in a Dial Plan configuration. |
This section describes how to configure gateways in CAR.
|
Step 1 |
Choose . The Gateway Configuration window displays.
|
||
|
Step 2 |
Perform one of the following tasks: |
||
|
Step 3 |
In the Max No. of Ports field, enter the number of ports for each gateway that you want to configure. The maximum number of ports range goes from 1 to 999.
|
||
|
Step 4 |
Click Update. You can run reports in CAR on any or all the configured gateways. |
Tip |
Configure the trunks in CAR for existing Unified Communications Manager system trunks. After you add trunks to Cisco Unified CM Administration, configure the new trunks in CAR. When trunks are deleted from the Unified Communications Manager system, the system automatically removes the trunks (and any configuration settings that you specified) from CAR. |
CAR uses the area code information to determine whether calls are local or long distance. You must provide the Number of Ports information for each trunk to enable CAR to generate the Utilization reports.
This section describes how to configure trunks in CAR.
|
Step 1 |
Choose . The Trunk Configuration window displays.
|
||
|
Step 2 |
Perform one of the following tasks: |
||
|
Step 3 |
In the Max No. of Ports field, enter the number of ports for each trunk that you want to configure. The maximum number of ports range goes from 1 to 999.
|
||
|
Step 4 |
Click Update. You can run reports in CAR on any or all the configured trunks. |
CAR provides default system preferences; however, you can customize the system by specifying values for the system parameters.
This section describes how to specify values for system preferences.
|
Step 1 |
Choose . The System Preferences window displays. The list of available system parameters displays in the Parameter Name list. |
||||
|
Step 2 |
In the Parameter Value field, enter the desired value for the parameter as described in the following table.
|
||||
|
Step 3 |
Click Update. |
By default, CDR data loads continuously 24 hours a day, 7 days a week, and loads only CDR records.
Note |
The default batch size equals 600 CDR or CMR records. The default sleep time between each CDR batch equals 2500 and 3000ms for each CMR batch. However you can, configure the batch size from the tbl_system_preferences table "LOADER_BATCH" column to have any value 50-2000. |
This section describes how to customize the loading schedule, how to restore the default loading schedule if it is customized, and how to disable CDR loading.
Disable CDR loading when you are installing or upgrading the system. The CDR data does not get updated when CDR loading is disabled. Be sure to enable CDR loading again as soon as possible. The CAR tool does not affect the CDR generation in Unified Communications Manager.
Tip |
To manually delete the CAR data and reload the database with CDRs. |
|
Step 1 |
Choose . The CDR Load window displays. |
||||||||
|
Step 2 |
Choose one of the following options: |
||||||||
|
Step 3 |
In the Load CDR & CMR area, complete the fields as described in the following table.
Uninhibited loading allows you to set a time during which CDR data load continuously. CDR data does not load automatically in the duration that is specified. The CDR data loads uninhibited in the specified duration only if loading starts at the duration that is specified in the Load CDR and CMR area settings. If CDR data loading starts at an uninhibited loading interval, loading continues to the end of the uninhibited loading interval, plus the time in the duration field that is set in the Load CDR and CMR area, or until no new files to process exist. Uninhibited loading takes precedence over any values that are set for scheduled loading. If you do not want uninhibited loading of CDR data, set the From and To values at 00:00. |
||||||||
|
Step 4 |
In the Uninhibited Loading of CDR area, complete the fields as described in the following table:
|
||||||||
|
Step 5 |
Click Update. CAR loads CDR data based on the time, interval, and duration that you have specified. Changes take effect at midnight. You can force the change to take effect immediately by stopping and restarting the CAR Scheduler service.
|
The Daily Report Scheduler schedules the time and duration of CAR daily reports.
Specify the reports to be generated by using the Automatic Generation/Alert Option.
This section describes how to schedule the time and duration of the automatic daily reports.
|
Step 1 |
Choose . The Daily Scheduler window displays. |
||
|
Step 2 |
From the Time drop-down list box, choose the hour and minute when you want daily reports to be generated. A 24-hour clock represents time, where 0 equals midnight, and 1 through 11 represent a.m. hours, and 12 through 23 represent the p.m. hours of 1 p.m. through 11 p.m., respectively. |
||
|
Step 3 |
From the Life drop-down list box, choose the duration of the report from the range of 0 to 12 days.
|
||
|
Step 4 |
Click Update. Reports with report generation interval of Daily in the Automatic Generation/Alert Option and enabled automatically generate every day at the time that you specify and get deleted after the number of days that you specify. Changes take effect at midnight. You can force the change to take effect immediately by stopping and restarting the CAR Scheduler service.
|
The Weekly Report Scheduler schedules the day, time, and duration of the automatic weekly reports.
Use the Automatic Generation/Alert Option to specify the reports to be generated.
This section describes how to schedule the day, time, and duration of the automatic weekly reports.
|
Step 1 |
Choose . The Weekly Scheduler window displays. |
||
|
Step 2 |
From the Day of Week drop-down list box, choose the day that you want reports to be generated. |
||
|
Step 3 |
From the Time drop-down list box, choose the hour and minute when you want reports to be generated. A 24-hour clock represents time, where 0 equals midnight, and 1 through 11 represent a.m. hours, and 12 through 23 represent the p.m. hours of 1 p.m. through 11 p.m., respectively. |
||
|
Step 4 |
From the Life drop-down list box, choose the duration of the report from the range of 00 to 12 weeks. The option that you choose indicates how many weeks the report remains on the disk before the report gets deleted.
|
||
|
Step 5 |
Click Update. Reports with report generation interval of Weekly in the Automatic Generation/Alert Option and enabled automatically generate every week at the time that you specify and get deleted after the number of weeks that you specify. Changes take effect at midnight. For the changes to take effect immediately, stop and restart the CAR Scheduler service in the Control Center - Feature Services window.
|
The Monthly Report Scheduler schedules the day, time, and duration of CAR monthly reports.
Use the Automatic Generation/Alert Option to specify the reports to be generated.
This section describes how to schedule the day, time, and duration of the automatic monthly reports.
|
Step 1 |
Choose . The Monthly Scheduler window displays. |
||
|
Step 2 |
From the Day of Month drop-down list box in the Monthly Bill Generation row, choose the day of the month on which you want the report to be generated. If you set the value to a day that does not occur in a given month (such as 29, 30, or 31), the report generates on the last day of that month. |
||
|
Step 3 |
From the Time drop-down list box in the Monthly Bill Generation row, choose the hour and minute when you want the report to be generated. A 24-hour clock represents time, where 0 equals midnight, and 1 through 11 represent a.m. hours, and 12 through 23 represent the p.m. hours of 1 p.m. through 11 p.m., respectively. |
||
|
Step 4 |
From the Life drop-down list box in the Monthly Bill Generation row, choose the duration of the report from the range of 00 to 12 months. The option that you choose indicates how many months the report remains on the disk before the report gets deleted.
|
||
|
Step 5 |
From the Day of Month drop-down list box in the Other Monthly Reports row, choose the day of the month on which you want the reports to be generated. If you set this value to a day that does not occur in a given month (such as 29, 30, or 31), the report generates on the last day of that month. |
||
|
Step 6 |
From the Time drop-down list box in the Other Monthly Reports row, choose the hour and minute that you want reports to be generated. A 24-hour clock represents time, where 0 equals midnight, and 1 through 11 represent a.m. hours, and 12 through 23 represent the p.m. hours of 1 p.m. through 11 p.m., respectively. |
||
|
Step 7 |
From the Life drop-down list box in the Other Monthly Reports row, choose the life of the report from the range of 00 to 12 months. The option that you choose indicates how many months the report remains on the disk before the report gets deleted.
|
||
|
Step 8 |
Click Update. Reports with report generation interval of Monthly in Automatic Generation/Alert Option and enabled automatically generate every month at the time that you specify and are deleted after the number of months that you specify. Changes take effect at midnight. For the changes to take effect immediately, stop and restart the CAR Scheduler service in the Control Center - Feature Services window.
|
This release of Unified Communications Manager introduces a CAR alarm catalog (CARAlarmCatalog.xml) for the CAR Scheduler.
The following table displays the alarms/alerts in this catalog.
To configure these alarms, go to .
|
Name |
Severity |
Description |
|---|---|---|
|
CARSchedulerJobFailed |
ERROR_ALARM |
A critical CAR scheduled job failed. An alert gets raised when critical CDR Scheduler jobs and tasks fail (for example, DailyCdrLoad, PopulateSchedules, etc.). |
|
CARSchedulerJobError |
ERROR_ALARM |
A CAR scheduled job failed. An alarm gets sent for all other noncritical CAR Scheduler jobs and tasks (for example, daily, weekly, and monthly reports, QoSNotification, ChargeLimitNotification, etc.). |
|
BadCDRFileFound |
ERROR_ALARM |
Bad CDR or CMR flat file was found during CDR Load to the CAR database. The CDR Loader can detect bad or corrupted CDR and/or CMR flat files and log the specified error. Information on the failure cause (specified reason for the bad record) and the failure summary (tracks number of bad records in comparison to the total records in the file) gets provided. |
|
CARIDSEngineDebug |
DEBUG_ALARM |
Indicates debug events from CAR IDS database engine. This alarm provides low-level debugging information from CAR IDS database engine. System administrator can disregard this alarm. |
|
CARIDSEngineInformation |
INFORMATION_ALARM |
No error has occurred but some routine event has completed in CAR IDS database engine. |
|
CARIDSEngineCritical |
CRITICAL_ALARM |
This alarm does not compromise data or prevent the use of the system but requires monitoring by the CAR DB adminstrator. |
|
CARIDSEngineFailure |
ERROR_ALARM |
Combined alarm for emergency and error situations. This alarm indicates that something unexpected occurred that can compromise data, or access to data, or cause CAR IDS to fail. |
For additional information on these alarms and recommended action, see the alarm definitions at .
You can configure CAR to notify you when the CAR database size exceeds a percentage of the maximum number of records. You can set the message and the maximum number of records and specify the alert percentage.
You can configure the system to maintain the CAR database size between the low water mark and the high water mark values that you configure through the Configure Automatic Database Purge window. When the database size reaches the low water mark, CAR sends an alert to the user. When the database size reaches the high water mark, the system deletes records based on the deletion age and sends an e-mail.
To configure the CAR system database, go to .
This section describes how to manually purge selected records from the CAR database and how to delete all of the CAR data and reload the database with new CDR data. You may want to reload the database to reclassify calls after dial-plan updates, user-device association changes, call rate changes, and so on.
Before you begin to manually purge data, disable the CDR Loader.
Choose .
Chosse either of the following:
Disable Loader - check the Disable Loader check box and click the Update.
Enable CDR loading to load the data into CAR. Changes take effect at midnight. You can force the change to take effect immediately by stopping and restarting the CAR Scheduler service.
Enable Loader - uncheck the Disable Loader check box.
Manual purging of the CDRs gets stopped if the CAR Web Service is stopped during the manual purge process. Manual purging cannot begin again until the CAR Web Service restarts. Then you must begin the manual purge process again.
There are two ways to intentionally stop the CAR Web Service:
Deactivate the CAR Web Service in the Serviceability Service Activation window ().
Stop the CAR Web Service in the Feature Services window of the Serviceability Control Center ().
The CDR Loader cannot begin again until either the CAR Web Service or the CAR Scheduler gets restarted.
A CAR administrator can no longer generate CAR reports when a manual purge of the CAR database is in process or CDR records are reloading. The following error message displays when you try to run reports during these processes:
10023: Manual Purge/Reload is in process. Please run the reports once the Manual Purge/Reload is over.
Both the Purge button and the Reload All Call Detail Records button get disabled, and the following alert message displays on the Manual Purge window, when either a manual purge or CDR reload occurs:
Manual Purge/Reload is still running. User will not be allowed to run another instance of Manual Purge/Reload. So, both Purge and Reload All Call Detail Records buttons are disabled.
|
Step 1 |
Choose . The Manual Database Purge window displays. |
||||||||||||||||||||
|
Step 2 |
Choose one of the following actions: |
||||||||||||||||||||
|
Step 3 |
In the Select Table field, choose the table in the database that you want purged. To view the tables for which manual purge is permitted, the total number of records in the table, and the latest record and oldest record in the table, click Table Information. The Table Information window displays. You will see a table with the following information:
To return to the Manual Database Purge window, click Close. |
||||||||||||||||||||
|
Step 4 |
In the Delete records field, choose a date that will determine which records will be purged by clicking one of the following radio buttons:
|
||||||||||||||||||||
|
Step 5 |
Choose the date range of the CAR records that you want to delete. |
||||||||||||||||||||
|
Step 6 |
To delete all records older than or between the dates that you specified, click Purge. A prompt advises you that you are about to permanently delete the specified records. |
||||||||||||||||||||
|
Step 7 |
To purge the records, click OK or click Cancel to abort the purge operation. If you click OK, the records get purged from the selected table. After successful deletion of records, the status message shows the number of records that were deleted from the table. |
This section describes how to schedule and disable automatic purging of the CAR database. By default, the system enables automatic database purge.
|
Step 1 |
Choose . The Configure Automatic Database Purge window displays. At the top of the window, the percentage amount of the CAR database space that has been used gets displayed. The maximum CAR Database space that is available gets displayed in megabytes. |
||
|
Step 2 |
From the Low Water Mark drop-down list box, choose the minimum percentage of the maximum CAR database size that you want the system to use for CAR data. The default value specifies 80percent.
|
||
|
Step 3 |
From the High Water Mark drop-down list box, choose the maximum percentage of the maximum CAR database size that you want the system to use for CAR data. The default value specifies 90percent. |
||
|
Step 4 |
In the Max Age of Call Detail Records field, enter the maximum number of days that you want to keep the CDRs in the CAR database. Enter a number between 1 and 180. The default value specifies 60days. CAR deletes all CDRs that are older than the specified number of days.
|
||
|
Step 5 |
Click Update. The changes take effect at midnight. To make changes take effect immediately, restart the Cisco CAR Scheduler service.
In cases where there are large number of CDRs present in the billing tables and deleting the partitions does not bring the record count below the 2M or HWM limit, CAR holds at least two days data in the database. When the record count in the database reaches the 2M or HWM limit:
If the record count does not fall below the 2M or HWM limit even after deleting the records, CAR holds at least two days records and stops the CAR loader. Also, CAR sends an e-mail notification to CAR administrator to proceed with manual purge. Following an upgrade, the Configure Automatic Database Purge > MAX DATABASE AGE parameter will be changed to one of the following:
|
CAR provides logs that you can use to track the status of the various activities. The event log tracks events that the CAR Scheduler triggers, such as automatically generated reports, loading of CDRs, report deletions, and database purging.
The event log provides a report on the status of the activities that the CAR Scheduler controls. The event log report shows whether the tasks started, completed successfully, or are in progress.
This section describes how to generate the event log report. The event log includes a list of tasks/reports that are scheduled on a daily, weekly, or monthly basis.
This release of Unified Communications Manager introduces the Task Monitor and Database Maintenance as new features.
TaskMonitor monitors the status of other jobs and cleans up Informix Dynamic Server (IDS) memory when necessary by using the IDS command "onmode -F." DatabaseMaintenance runs the IDS-recommended optimized database maintenance "update statistics" procedures.
Task Monitor begins about 1minute after the Scheduler starts, and 1minute after the Scheduler repopulates the schedules every day at midnight (00.00). The Task Monitor periodically (every 5minutes) monitors the status of all jobs for the day from the tbl_event_log with the exception of the following jobs: PopulateSchedules, TaskMonitor, DatabaseMaintenance, and DailyCdrLoad.
When a task does not start on schedule because a previous task is still running, you may see something like the following trace message:
2008-02-14 08:00:04, 602 WARN [main] services. Scheduler - runTasks(): Job [DailyCdrLoad] thread is busy, hence it will be removed from today’s schedule and not be started!”
The Scheduler gives a grace period to periodically sleep for 10seconds and then check whether the task thread is complete. The Scheduler sleeps up to 2 minutes total. If the task thread is not complete after the 2minutes of wait, the next task gets removed from the current schedule, and does not run until its next scheduled time.
The following table displays the list of tasks/reports and how often they are scheduled.
|
Task |
Scheduled |
|---|---|
|
CDR Load |
Daily |
|
Task Monitor1 |
Daily |
|
Database Maintenance2 |
Daily |
|
QoS Notification |
Daily |
|
Charge Limit Notification |
Daily |
|
Database Alert |
Daily |
|
Delete Reports |
Daily |
|
Database Purge |
Daily |
|
Traffic Summary - Hour of Day |
Daily |
|
Top N Charge |
Daily |
|
Top N Duration |
Daily |
|
Top N Calls |
Daily |
|
Conference - Detail |
Daily |
|
Traffic Summary - Day of week |
Weekly |
|
Conference Bridge Utilization - Day of week |
Weekly |
|
Voice Messaging Utilization - Day of week |
Weekly |
|
Route Pattern/Hunt Pilot Utilization - Day of week |
Weekly |
|
Route/Hunt List Utilization - Day of week |
Weekly |
|
Route Group Utilization - Day of week |
Weekly |
|
Gateway Utilization - Day of week |
Weekly |
|
Line Group Utilization - Day of week |
Weekly |
|
QoS Summary |
Monthly |
|
Gateway Summary |
Monthly |
|
Traffic Summary - Day of month |
Monthly |
|
System Overview |
Monthly |
|
Department Bill Summary |
Monthly |
|
Individual Bill Summary |
Monthly |
|
Top N Charge |
Monthly |
|
Top N Duration |
Monthly |
|
Top N Calls |
Monthly |
|
Conference - Summary |
Monthly |
|
Step 1 |
Choose . The Event Log window displays. |
||||||||||||||||
|
Step 2 |
Click the Daily radio button to choose daily jobs, the Weekly radio button to choose weekly jobs, or the Monthly radio button to choose monthly jobs. |
||||||||||||||||
|
Step 3 |
In the List of Jobs area, choose the tasks for which you want information. |
||||||||||||||||
|
Step 4 |
To add the chosen task to the Selected Jobs area, click the right arrow icon. |
||||||||||||||||
|
Step 5 |
To remove tasks from the Selected Jobs area, choose the task that you want removed and click the left arrow icon. |
||||||||||||||||
|
Step 6 |
To add tasks with a different frequency, repeat the previous steps. For example, you can have daily reports and reports that include monthly or weekly tasks. |
||||||||||||||||
|
Step 7 |
Choose the status to include in the report. You must choose at least one status as described in the following table.
|
||||||||||||||||
|
Step 8 |
Choose a date range by choosing From and To values. |
||||||||||||||||
|
Step 9 |
To generate the event log report, click OK . |
||||||||||||||||
|
Step 10 |
Print the log by right-clicking on the screen and choosing Print.
|
|
Parameter |
Description |
|---|---|
|
Sl No |
Serial number |
|
Jobs |
Name of the task |
|
Start Time |
Time the task starts |
|
End Time |
Time the task ends |
|
Status |
Unsuccessful, in progress, completed |
|
Date |
Date the task is scheduled |
Before you start generating reports with CAR, configure items such as the rating engine, QoS values, automatic report generation and notification limits.
You can use CAR to set a base monetary rate for the cost of calls based on a time increment. You can further qualify the cost by applying the time-of-day and voice-quality factors. Service providers who must account for service to subscribers commonly use this feature. Some organizations also use this information to establish billing costs for users and departments in the organization for accounting or budgeting purposes.
Reports that use these rating parameters include Individual Bill, Department Bill, Top N by Charge, TopN by Duration, and Top N by Number of Calls.
Note |
If you do not change the default value for charge base/block, the cost will always equal zero because the default base charge per block equals zero. |
The charge of any call comprises the multiplication of the basic charge of the call, multiplication factor for time of day, and multiplication factor for voice quality. You can set the basic charge for a call through the . See the following list:
Basic charge = cost, or number of units, applied to the duration block that is specified in the Number of Blocks section.
Number of blocks = total duration of call, in seconds, for which you want the base charge to be applied.
You can set the multiplication factor for time of day through the window. The basis of the settings provides the connect time of the call.
You can set the multiplication factor for voice quality through the window.
CAR generates QoS reports. To qualify the data that is presented in those reports, CAR uses predefined values that are set about voice quality. You can specify the value ranges that are good, acceptable, fair, and poor for jitter, latency, and lost packets.
CAR automatically generates reports based on a schedule. Report generation can include a daily, weekly, or monthly summary report, QoS reports, traffic reports, Device/Route Plan utilization reports, and so on, that you may want to view on a regular basis.
You can specify limits for QoS and daily charges, so the administrator gets alerted by e-mail when these limits are exceeded. The alerts go to all users that are designated as CAR Administrators through Cisco Unified CM Administration.
Use the CAR rating engine configuration to define the base rate and duration, time of day, and voice quality rating parameters for calls.
Note |
Rating parameters for calls get used during CAR loading. If you want old CDR records in the CAR database to use new values for these parameters, you must reload all the CDRs in the CAR database. |
To establish a cost basis for calls, you must specify a base rate for all calls. For example, if your service provider charges you 6 cents for each minute, billed in 10-second increments, you can set the base rate at which all calls are charged at 1cent for each 10-second increment.
This section describes how to establish the base charge and duration values.
Note |
If you use the default base charge value, reports do not provide any costs. The system provides default values, but if left to the defaults, the Rating Engine stays disabled and does not provide costs. |
|
Step 1 |
Choose . The Call Duration window displays. |
||
|
Step 2 |
In the To (seconds) field, enter the seconds for which you want the base charge to be applied. For example, if you are billed in 6-second increments, enter 6 in this field. If you are billed a flat rate for each minute regardless of call duration, enter 60 in this field, so the charge is based on whole minutes. |
||
|
Step 3 |
In the Base Charge/Block field, enter the cost basis for the seconds that are shown in the To (seconds) field. For example, if you are billed 6 cents for each minute in 6-second increments, enter 0.006 in this field. If you are billed 7 cents for each minute in whole minutes (no incremental billing), enter 0.07 in this field. In the preceding examples, if you are billed in 6-second increments and the cost is 0.006 for each 6-second increment, a call that lasts 7 seconds would cost 0.012. Rationale: Each 6-second increment costs 0.006, and two blocks from 0–6 seconds occurred. Likewise, if you are billed in whole minutes and the cost is 7 cents for each minute, a call that lasted 3 minutes would cost 21 cents. Rationale: Each 60-second increment costs 7 cents, and three blocks of 1 minute occurred. |
||
|
Step 4 |
Click Update.
|
To further define the cost of calls, you can specify a multiplication factor for certain times of day. For example, if you want to charge subscribers a premium for daytime calls, you can apply a multiplication factor to the base charge/block that you specified in the Call Duration window.
This section describes how to establish certain times of day when calls cost more.
Note |
If you do not want to increase call cost by time of day, you can use the default values. The default multiplication factor specifies 1, so no increase in call cost for time of day occurs. |
|
Step 1 |
Choose . The Time of Day window displays. |
||
|
Step 2 |
To add rows, click the Add Rows link. The system adds a row between 00:00:00 and 23:59:59. |
||
|
Step 3 |
To add additional rows, check the check box for the row above which you want to add a new row and click the Add Rows link.
|
||
|
Step 4 |
Enter the From and To time ranges in 24-hour, minute, and second format. A 24-hour period, from 00:00:00 to 23:59:59, represents the default time range. If you want to set one time-of-day range from 8am to 5 pm, you will need to establish three time-of-day ranges: the first from 00:00:00 to 07:59:59, the second from 08:00:00 to 16:59:59, and the third from 17:00:00 to 23:59:59.
|
||
|
Step 5 |
Enter the Multiplication Factor that designates a number by which you want the base charge/block to be multiplied when a call occurs in the specified time range. For example, if you charge a premium of double the price for calls that are placed between 8a.m. and 5p.m., the multiplication factor equals 2.00. A multiplication factor of 1.00 does not affect the cost of the call. |
||
|
Step 6 |
To add the time-of-day and multiplication factors, click Update .
|
To further define the cost of calls, you can specify a multiplication factor for the voice quality of a call. For example, if subscribers are paying a premium price to ensure the highest voice quality on calls, you can apply various multiplication factors to the base charge/block that you specified in the Call Duration window depending on the voice quality. Using a multiplication factor other than 1.00 helps differentiate between the various voice qualities calls as well.
This section describes how to establish call cost when calls that have a certain voice quality cost more.
Note |
If you do not want to increase, call cost by voice quality, you can use the default values. The default multiplication factor equals 1.00, so no increase in call cost occurs for voice quality. |
|
Step 1 |
Choose . The Voice Quality window displays. |
||
|
Step 2 |
In the Multiplication Factor field, enter the number by which you want the base charge/block to be multiplied when a call occurs in the specified voice-quality category. The 'Define QoS values' section defines the voice-quality categories: Good, Acceptable, Fair, and Poor. Example Voice Quality Good; Factor 1.2 Voice Quality Acceptable; Factor 1.0 Voice Quality Fair; Factor 1.0 Voice Quality Poor; Factor 0.8 A good call gets charged 1.2 times that of an acceptable or fair call. A poor call gets charged 0.8 times that of an acceptable or fair call.
|
||
|
Step 3 |
Cick Update .
|
QoS values get configured for lost packets, jitter, and latency based on good, acceptable, fair, or poor criteria.
If a call does not satisfy any of the criteria that are set for any of the four voice-quality categories, it receives a classification of NA (not applicable); likewise, if the system is not configured to generate CMR data (or if the CMR is bad), the CMR receives a classification of NA (not applicable).
Enter NA to ignore the values of a parameter. For example, a QoS parameter such as jitter, has NA, and the QoS is defined as good, which means that the QoS depends only on the values of latency and lost packets. All three parameters cannot have NA as values. Infinity designates the maximum value that is available for any parameter. If you specify a rule where a jitter value from 500 to Infinity is considered poor, a call with jitter greater than 500 receives a classification of poor.
Note |
Be aware that the classifications of "NA" and "Infinity" are case-sensitive. |
This section describes how to define the QoS values.
|
Step 1 |
Choose . The Define Quality of Service window displays. The following table describes the QoS default values.
|
||||||||
|
Step 2 |
To add rows, check the check box for the row above which you want to add a new row and click Add Rows link. The new row gets added above the row that you checked, and the check box is cleared. The rows represent the values that CAR uses to quantify the conditions good, acceptable, fair, and poor in the QoS reports. For each value set, enter the upper and lower limits in the From and To columns.
|
||||||||
|
Step 3 |
For each value that you have set, choose the Quality of Service. |
||||||||
|
Step 4 |
Click Update.
|
Before You Begin
Before you start generating reports with CAR, configure the system.
The following table displays the list of reports that the system enables or disables for automatic generation, the report generation interval, and the recipients of the report.
|
Name of Report |
Report Generation Interval |
Recipients |
||
|---|---|---|---|---|
|
Department Bill Summary |
Monthly |
|
||
|
Gateway Summary |
Monthly |
|
||
|
Individual Bill |
Monthly |
|
||
|
Individual Bill Summary |
Monthly |
|
||
|
Conference Summary |
Monthly |
|
||
|
Conference Detail |
Daily |
|
||
|
QoS Summary |
Monthly |
|
||
|
System Overview |
Monthly |
|
||
|
Top N Charge |
Daily |
|
||
|
Top N Charge |
Monthly |
|
||
|
Top N Duration |
Daily |
|
||
|
Top N Duration |
Monthly |
|
||
|
Top N Calls |
Daily |
|
||
|
Top N Calls |
Monthly |
|
||
|
Traffic Summary - Day of Month |
Monthly |
|
||
|
Traffic Summary - Day of Week |
Weekly |
|
||
|
Traffic Summary - Hour of Day |
Daily |
|
||
|
Conference Bridge Util - Day of Week |
Weekly |
|
||
|
Voice Messaging Util - Day of Week |
Weekly |
|
||
|
Route Pattern/Hunt Pilot Util - Day of Week |
Weekly |
|
||
|
Route/Hunt List Util - Day of Week |
Weekly |
|
||
|
Route Group Util - Day of Week |
Weekly |
|
||
|
Line Group Util - Day of Week |
Weekly |
|
||
|
Gateway Util - Day of Week |
Weekly |
|
Note |
In large setups, with a large number of gateways, route groups, route lists, and route patterns, enabling all the Utilization reports (Gateway Utilization, Line Group Utilization, Route Group Utilization, Route List Utilization, and Route Pattern Utilization) increases the CPU usage of the system, therefore increasing the time in which reports are generated. This also affects system performance. Cisco recommends that you enable only Gateway Utilization reports for automatic generation, due to the number of gateways that are typically found in a large system. You can generate all Utilization reports on demand by selecting five or less gateways, route groups, route lists, or route groups. |
Automatically generating reports involves a two-step process:
First, enable the reports that you want to generate unless they are enabled by default.
Second, schedule the reports for the day and time that you want them to generate. (CAR provides a default schedule. If the default schedule is acceptable, only enable the reports that you want to generate automatically.)
CAR provides e-mail alerts for various events. Enabling the system for e-mail alerts involves a two-step process:
First, enable the e-mail alerts. Default enables some, but not all, reports.
Second, configure the e-mail that is sent when the alert criteria are met.
This section describes how to enable or disable one or all reports for automatic generation. You can also customize the report parameters and enable a mailing option, so reports get emaileded when they are created. When the report gets mailed, CAR generates the email address by using the mail ID for the CAR administrator(s) and the mail domain that is configured in the Mail Parameters window; that is, CAR uses <mail ID for the CAR administrator> @ <domain that is configured in the mail parameters window>.
For all new installations of Unified Communications Manager, you must first enable the email alerts and reports for automatic generation. The default status for all reports and alerts specifies Disabled.
For all Unified Communications Manager upgrades from Release 5.x to a later release of Unified Communications Manager, the tbl_pregenmail_option table data migrates only if the CAR Scheduler service is active.
When you upgrade to another version of Unified Communications Manager, disable all reports and alerts while the upgrade is in process to conserve system resources. Remember to enable the reports and alerts after the upgrade completes.
The Generated Report Schedule describes reports that are enabled by default.
|
Step 1 |
Choose . The Automatic Report Generation/Alert Option window displays. |
||
|
Step 2 |
In the Reports [Report Generation Interval] box, choose the report that you want to automatically generate based on the schedule that you defined in the System Scheduler. See the Set Up CDR Load Schedule. |
||
|
Step 3 |
In the Status field, choose Enabled or Disabled. |
||
|
Step 4 |
To customize the report or have the report emailed when it is generated, click Customize Parameters. The Customize Parameters window displays.
|
||
|
Step 5 |
Choose the CSV or PDF radio button, depending on the type of report that you want the system to mail. |
||
|
Step 6 |
To have the report mailed to all CAR administrators, check the Mailing Option check box. |
||
|
Step 7 |
To save the values that you specified, click Update. The Customize Parameters window closes. |
||
|
Step 8 |
To enable or customize other reports, repeat the previous steps. |
||
|
Step 9 |
Click Update. Changes take effect at midnight. You can force the change to take effect immediately by stopping and restarting the CAR Scheduler service. |
There are two Alerts by Mail that are available. These alerts are:
Charge Limit Notification
QoS Notification
See the Set Notification Limits for information on how to configure these alerts.
This section describes how to enable these alerts to be mailed to users.
|
Step 1 |
Choose . The Automatic Report Generation/Alert window displays. |
|
Step 2 |
In the Alerts by Mail box, choose the alert that you want to enable or disable. |
|
Step 3 |
In the Status field, choose Enabled or Disabled. |
|
Step 4 |
Click Update. |
|
Step 5 |
To enable or disable alerts by mail, repeat the previous steps. Changes take effect at midnight. You can force the change to take effect immediately by stopping and restarting the CAR Scheduler service. |
Before You Begin
Before you start generating reports with CAR, configure the system.
This section describes how to specify the notification limits for QoS and daily charges.
|
Step 1 |
Choose . The Set Limits for Notification window displays. |
|
Step 2 |
In the Daily QoS Parameters area, enter a threshold for good and poor calls. The threshold applies in the form of a percentage of all calls that must be exceeded to trigger an email alert to the administrator. The default for good calls specifies less than 20 percent, meaning that when good calls represent less than 20 percent of all calls per day, an alert gets sent. The default for poor calls specifies greater than 30 percent, meaning that when poor calls represent more than 30 percent of all calls per day, an alert gets sent. The alert is called the QoS Notification. |
|
Step 3 |
In the Daily Charge Limit area, enter the number of monetary units (such as dollars, francs, or pounds) that, when exceeded by any user in the system, will trigger sending an email alert to the administrator. The alert is called the Charge Limit Notification. |
|
Step 4 |
Click Update. Changes take effect immediately. The new values get used whenever the next alert is sent. |
 Feedback