Centralized Deployment Overview
The IM and Presence centralized deployment allows you to deploy your IM and Presence deployment and your telephony deployment in separate clusters. The central IM and Presence cluster handles IM and Presence for the enterprise, while the remote Cisco Unified Communications Manager telephony cluster handles voice and video calls for the enterprise.
The Centralized Deployment option provides the following benefits when compared to standard deployments:
-
The Centralized Deployment option does not require a 1x1 ratio of telephony clusters to IM and Presence Service clusters–you can scale your IM and Presence deployment and your telephony deployment separately, to the unique needs of each.
-
Full mesh topology is not required for the IM and Presence Service
-
Version independent from telephony–your IM and Presence central cluster can be running a different version than your Cisco Unified Communications Manager telephony clusters.
-
Can manage IM and Presence upgrades and settings from the central cluster.
-
Lower cost option, particularly for large deployments with many Cisco Unified Communications Manager clusters
-
Easy XMPP Federation with third parties.
-
Supports calendar integration with Microsoft Outlook. For configuration details, refer to the document Microsoft Outlook Calendar Integration for the IM and Presence Service.
OVA Requirements
For Centralized Deployments, we recommend the 25,000 user IM and Presence OVA with a minimum OVA of 15,000 users. The 15,000 user OVA can grow to 25,000 users. With a 25K OVA template, and a six-node cluster with High Availability enabled, the IM and Presence Service central deployment supports up to 75,000 clients. To support 75K users with 25K OVA, default trace level for XCP router needs to be changed from Info to Error. For the Unified Communications Manager publisher node in the central cluster, the following requirements apply:
-
A 25,000 IM and Presence OVA (maximum 75,000 users) can be deployed with a 10,000 user OVA installed on the central cluster's Unified Communications Manager publisher node
-
A 15,000 IM and Presence OVA (maximum 45,000 users) can be deployed with a 7,500 user OVA installed on the central cluster's Unified Communications Manager publisher node
 Note |
If you plan to enable Multiple Device Messaging, measure deployments by the number of clients instead of the number of users as each user may have multiple Jabber clients. For example, if you have 25,000 users, and each user has two Jabber clients, your deployment requires the capacity of 50,000 users. |
Interclustering for Centralized Deployment
Interclustering is supported between two centralized clusters. Intercluster peering is tested with one cluster with 25K (with 25K OVA) and another with 15K (with 15K OVA) devices and no performance issues were observed.
Centralized Deployment Setup vs Standard (Decentralized) Deployments
|
Setup Phase |
Differences with Standard Deployments |
|---|---|
|
Installation Phase |
The installation process for an IM and Presence central deployment is the same as for the standard deployment. However, with central deployments, the IM and Presence central cluster is installed separately from your telephony cluster, and may be located on separate hardware servers. Depending on how you plan your topology, the IM and Presence central cluster may be installed on separate physical hardware from your telephony cluster. For the IM and Presence central cluster, you must still install Cisco Unified Communications Manager and then install the IM and Presence Service on the same servers. However, the Cisco Unified Communications Manager instance of the IM and Presence central cluster is for database and user provisioning primarily, and does not handle voice or video calls. |
| Configuration Phase |
Compared to standard (decentralized) deployments, the following extra configurations are required to set up the IM and Presence Service Central Deployment:
The following configurations, which are used with Standard Deployments of the IM and Presence Service, but are not required with Central Deployments:
|
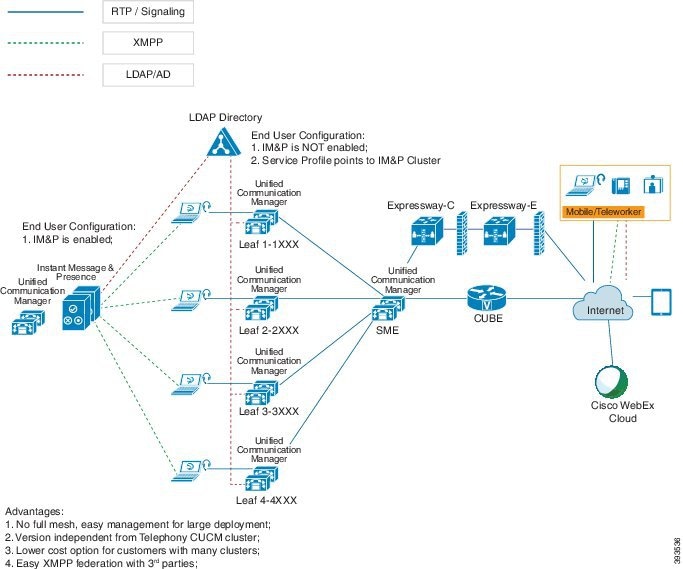
Centralized Cluster Deployment Architecture
The following diagram highlights the cluster architecture for this deployment option. Cisco Jabber clients connect to multiple Cisco Unified Communications Manager clusters for voice and video calling. In this example, the Cisco Unified Communications Manager telephony clusters are leaf clusters in a Session Management Edition deployment. For Rich Presence, Cisco Jabber clients connect to the IM and Presence Service central cluster. The IM and Presence central cluster manages instant messaging and presence for the Jabber clients.
Note |
Your IM and Presence cluster still contains an instance for Cisco Unified Communications Manager. However, this instance is for handling shared features such as database and user provisioning–it does not handle telephony. |
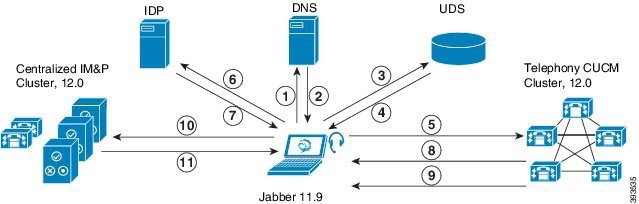
Centralized Cluster Use Case
To connect your telephony and IM and Presence clusters, a new system for exchanging access keys is introduced. This diagram shows the flow for SSO logins:
-
[1]-[2]: Query DNS to get SRV record.
-
[3]-[4]: Query UDS to get the Home Cisco Unified Communications Manager cluster.
-
[5]-[8]: Get Access Token and Refresh Token from Cisco Unified Communications Manager cluster through SAML SSO.
-
[9]: Read UC Service Profile. The service profile contains an IM and Presence profile and points to the IM and Presence central cluster.
-
[10]: Client registers to the IM and Presence cluster using the same Access Token through SOAP and XMPP interfaces.
-
[11]: The token is validated and a response is sent back to Jabber client.
 Feedback