Cisco Finesse Desktop Interface

When you sign in to Cisco Finesse, the appearance of the desktop depends on whether your role is that of an agent or a supervisor. Supervisors have additional features that appear on their desktops. The supported resolution for the Finesse desktop is 1366 x 768 or higher.

Finesse Agent Desktop


Note

Cisco Finesse has undergone a user experience refresh in release 12.0(1).


After you sign in, you can change your status to Ready to make yourself available for calls. The buttons in the call control area change depending on the situation.

For example, the following buttons are available in the described situations:

Situation

Buttons Available

When you are on a call

Consult, Direct Transfer, Hold, Keypad, and End

When there is a call on hold and you are on a consult call

Conference, Transfer, Retrieve, and End

When you are on a conference call

Hold, Consult, Keypad, and End


Note

Finesse agent desktop controls should be preferred over the agent phone device for call control operations for a more robust and efficient experience for the agent.


Finesse provides a separate state control for chat and email. If you handle chat and email contacts, you must change your status to Ready on the Chat and Email Control gadget.

The Finesse agent desktop provides the following out of the box functionality:

  • Basic call control: Answer, hold, retrieve, end, and make calls.

  • Advanced call control: Make a consult call and transfer or conference the call after the consultation.

  • Agent state and call timers: The agent state timer indicates the duration in Ready or Not Ready state. The call timer indicates total call time, hold time, and wrap-up time.

  • Schedule a callback: Schedule a callback for an Outbound Dialer call to call a customer back at a more convenient time.

  • Preview Outbound Personal Callback calls: After you preview a personal callback call, you can choose to accept or reject the contact.

  • Direct Preview Outbound calls: Preview the customer information for the call before you choose to accept, reject, or close the contact.

  • Reclassify a Direct Preview Outbound call: If you do not reach the customer, you can reclassify the call as Answering Machine, Fax/Modem, Busy, or Invalid Number.

  • Send DTMF digits: Send DTMF digits to interact with an IVR system.

  • Not Ready and Sign Out reasons: Reasons to indicate why you are changing your status to Not Ready or Sign Out (your administrator defines these reasons).

  • Phonebooks: List of contacts from which you can select one to call. Your administrator defines the contacts that are listed in your phonebook.

  • Workflows: Your administrator can define workflows that are triggered by call and digital channels events (for example, your administrator may create a workflow that causes a browser pop on your desktop when a call arrives).
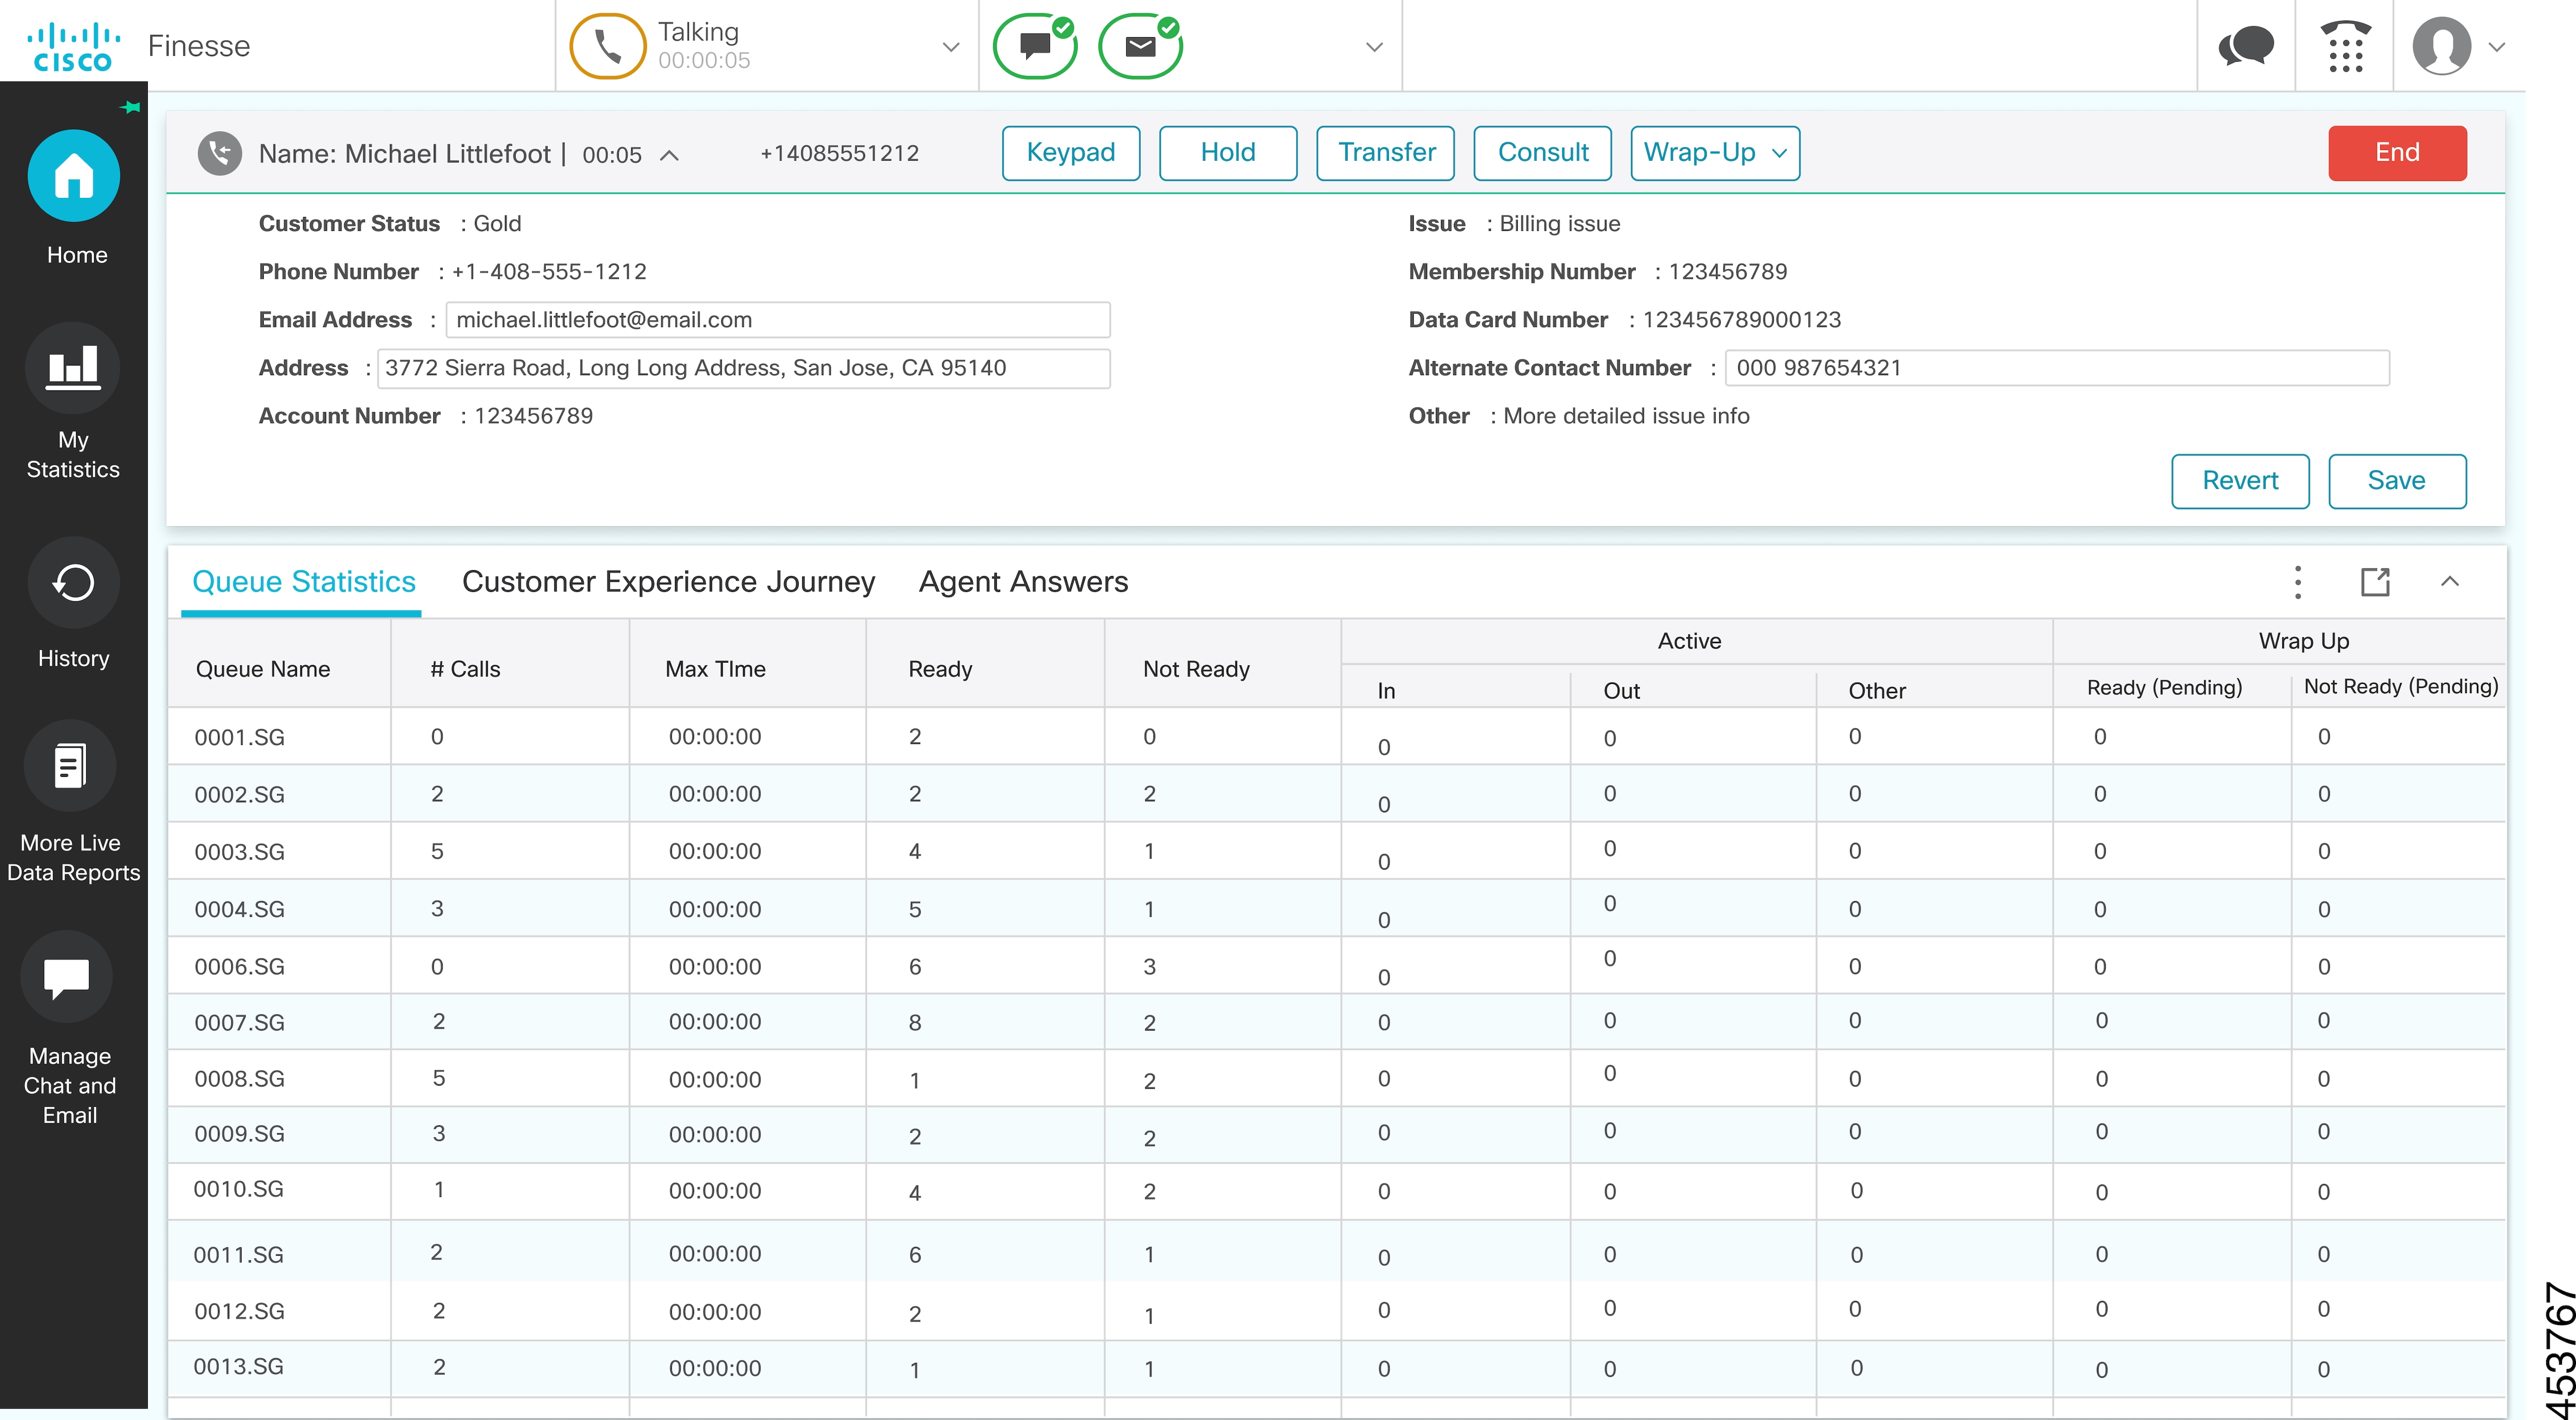
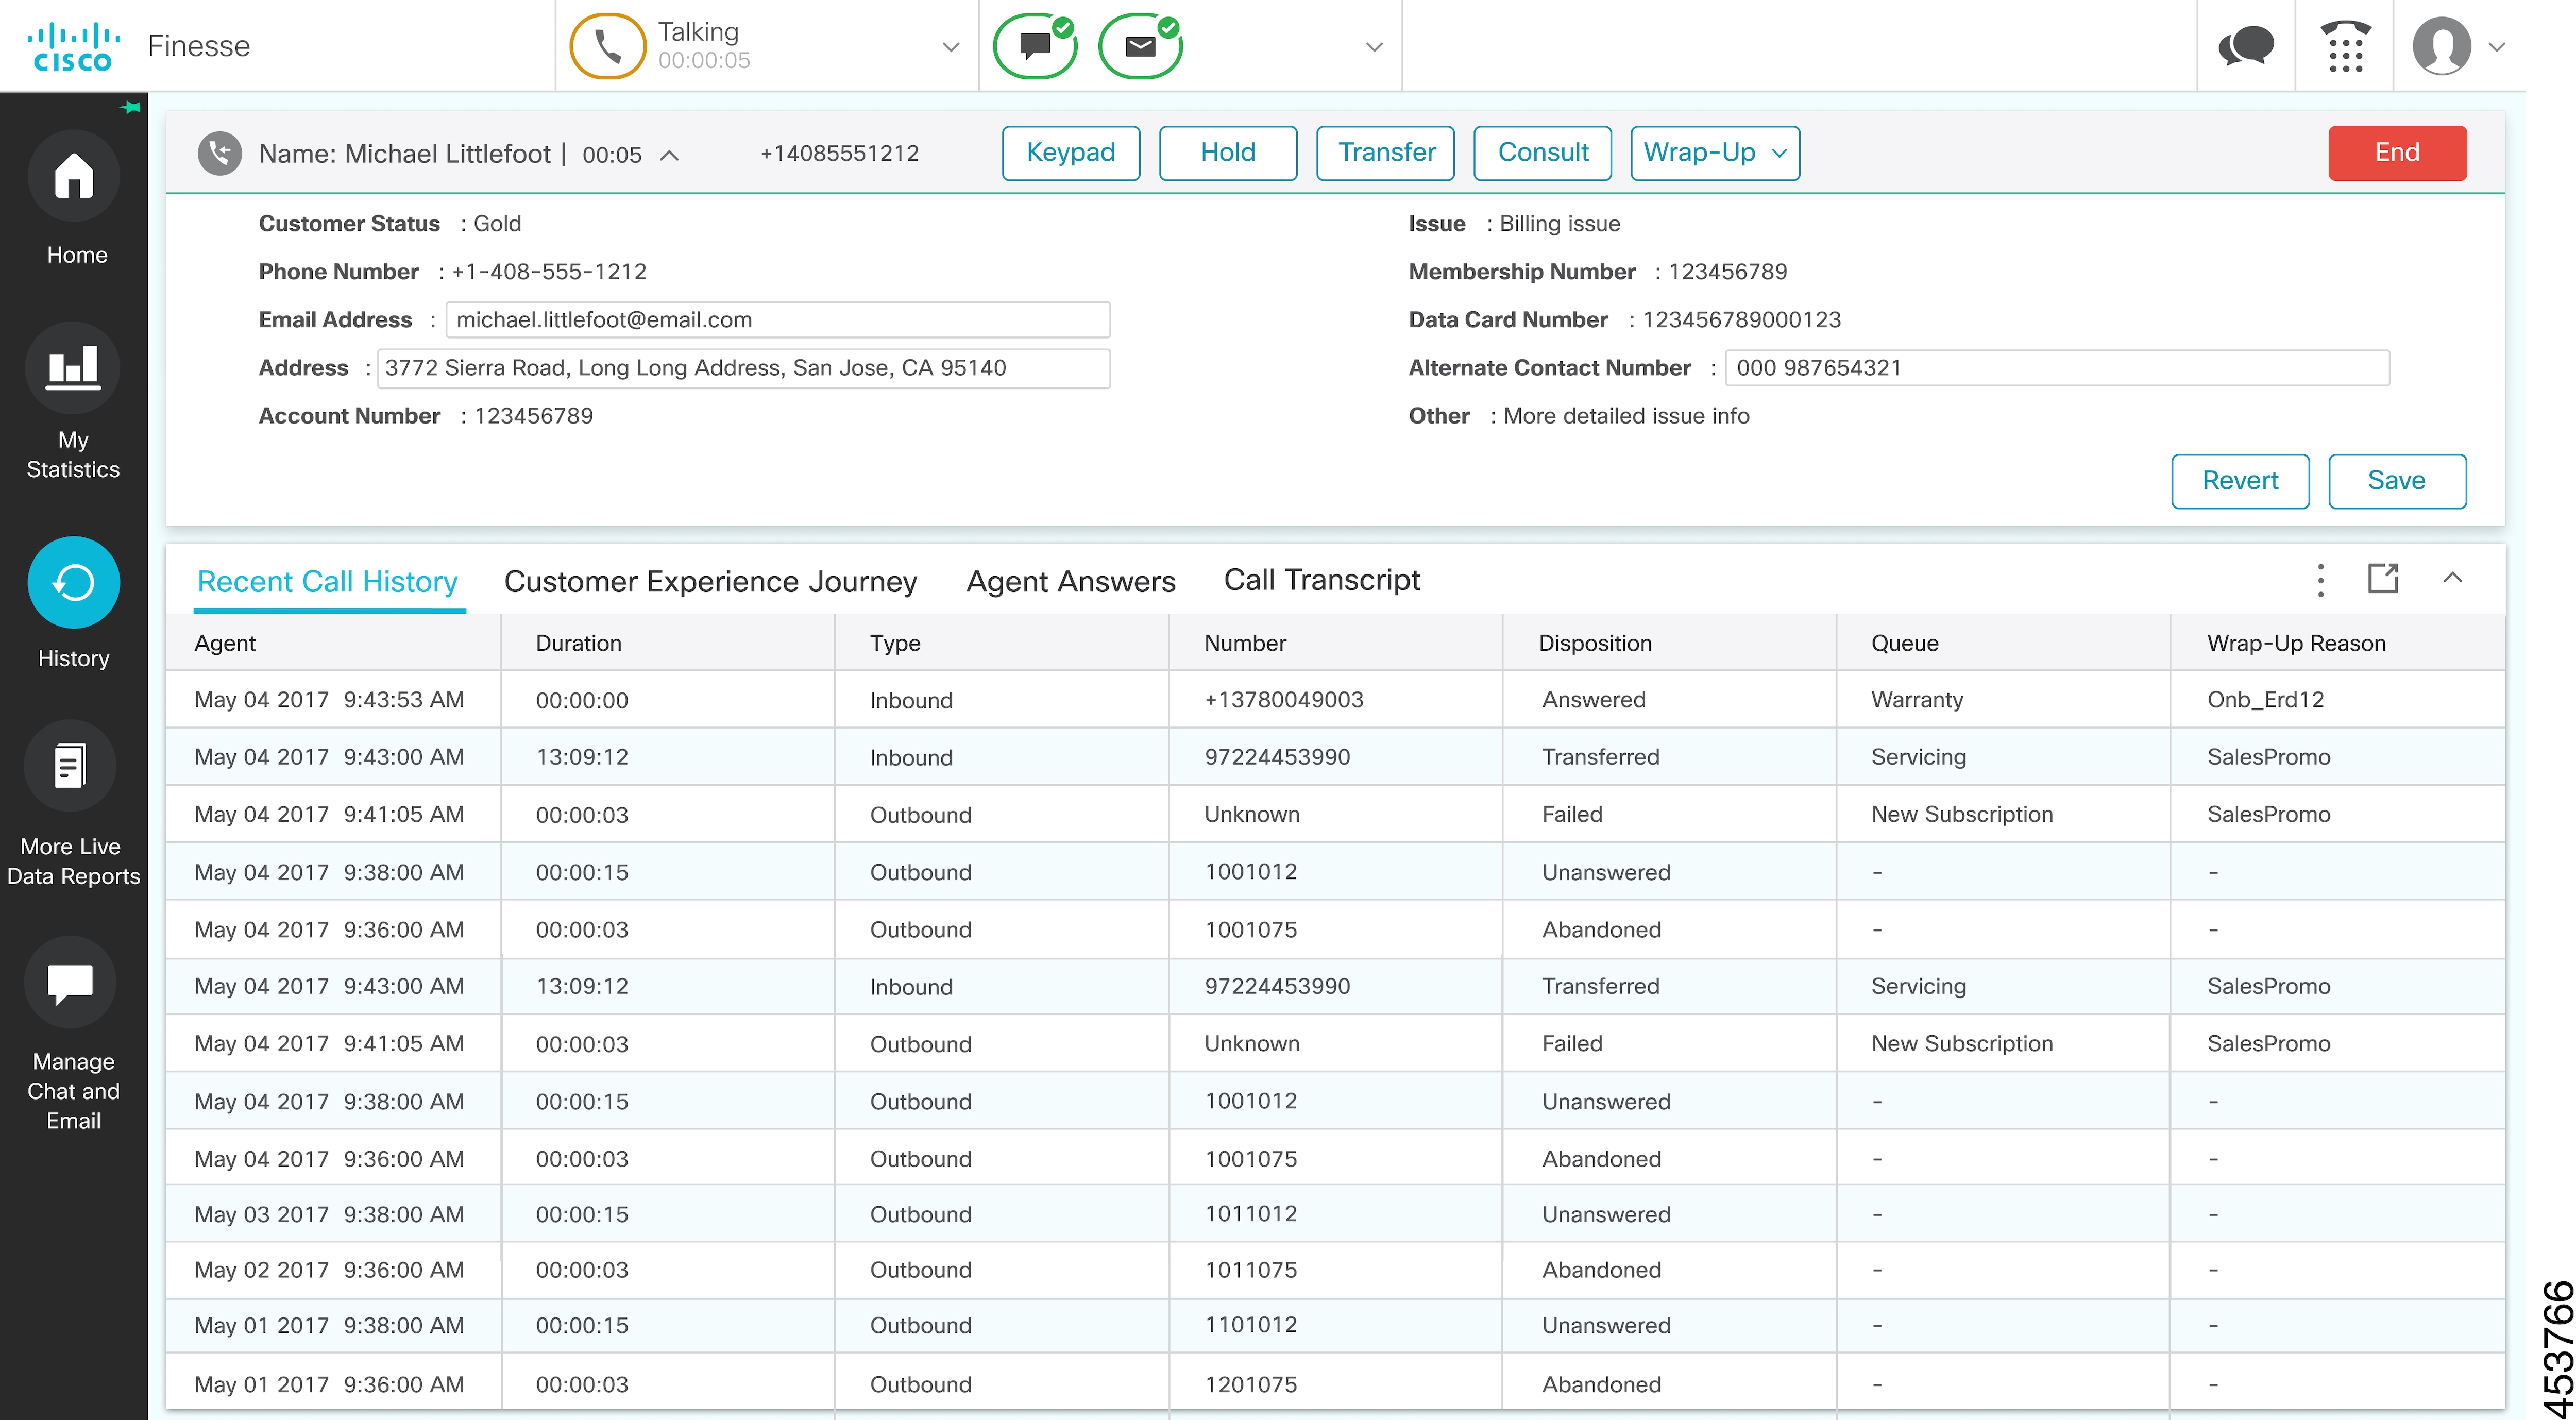
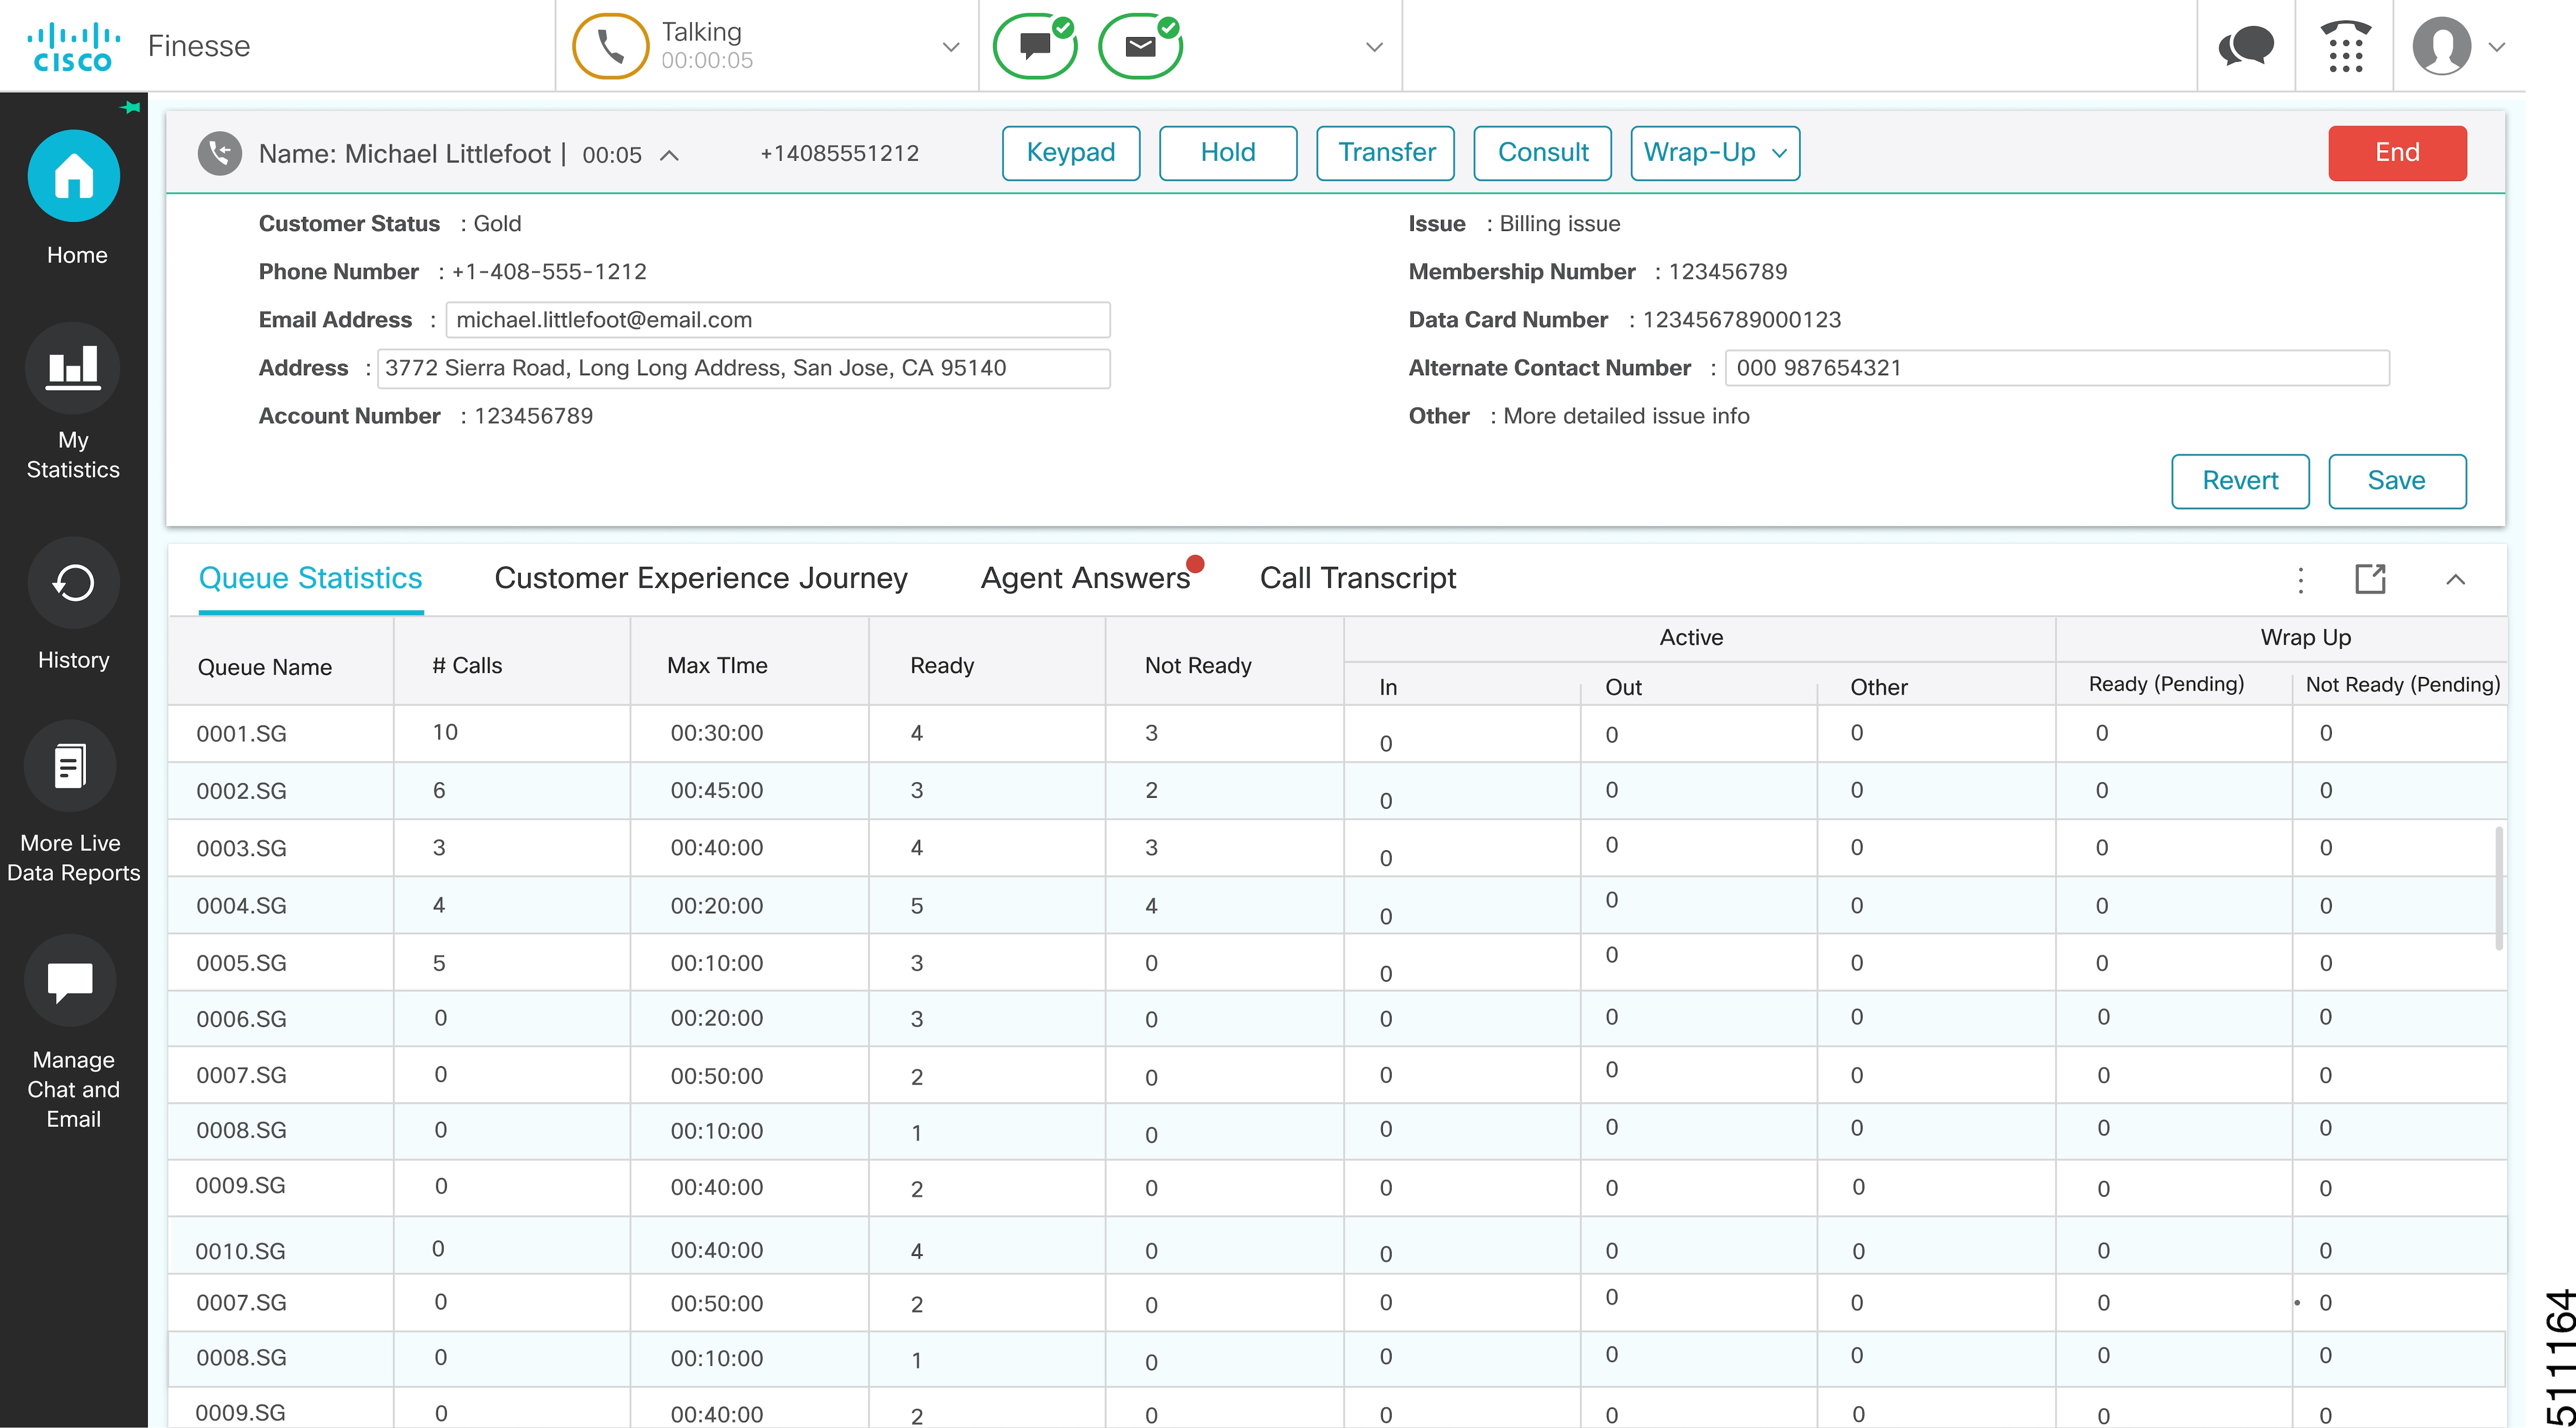
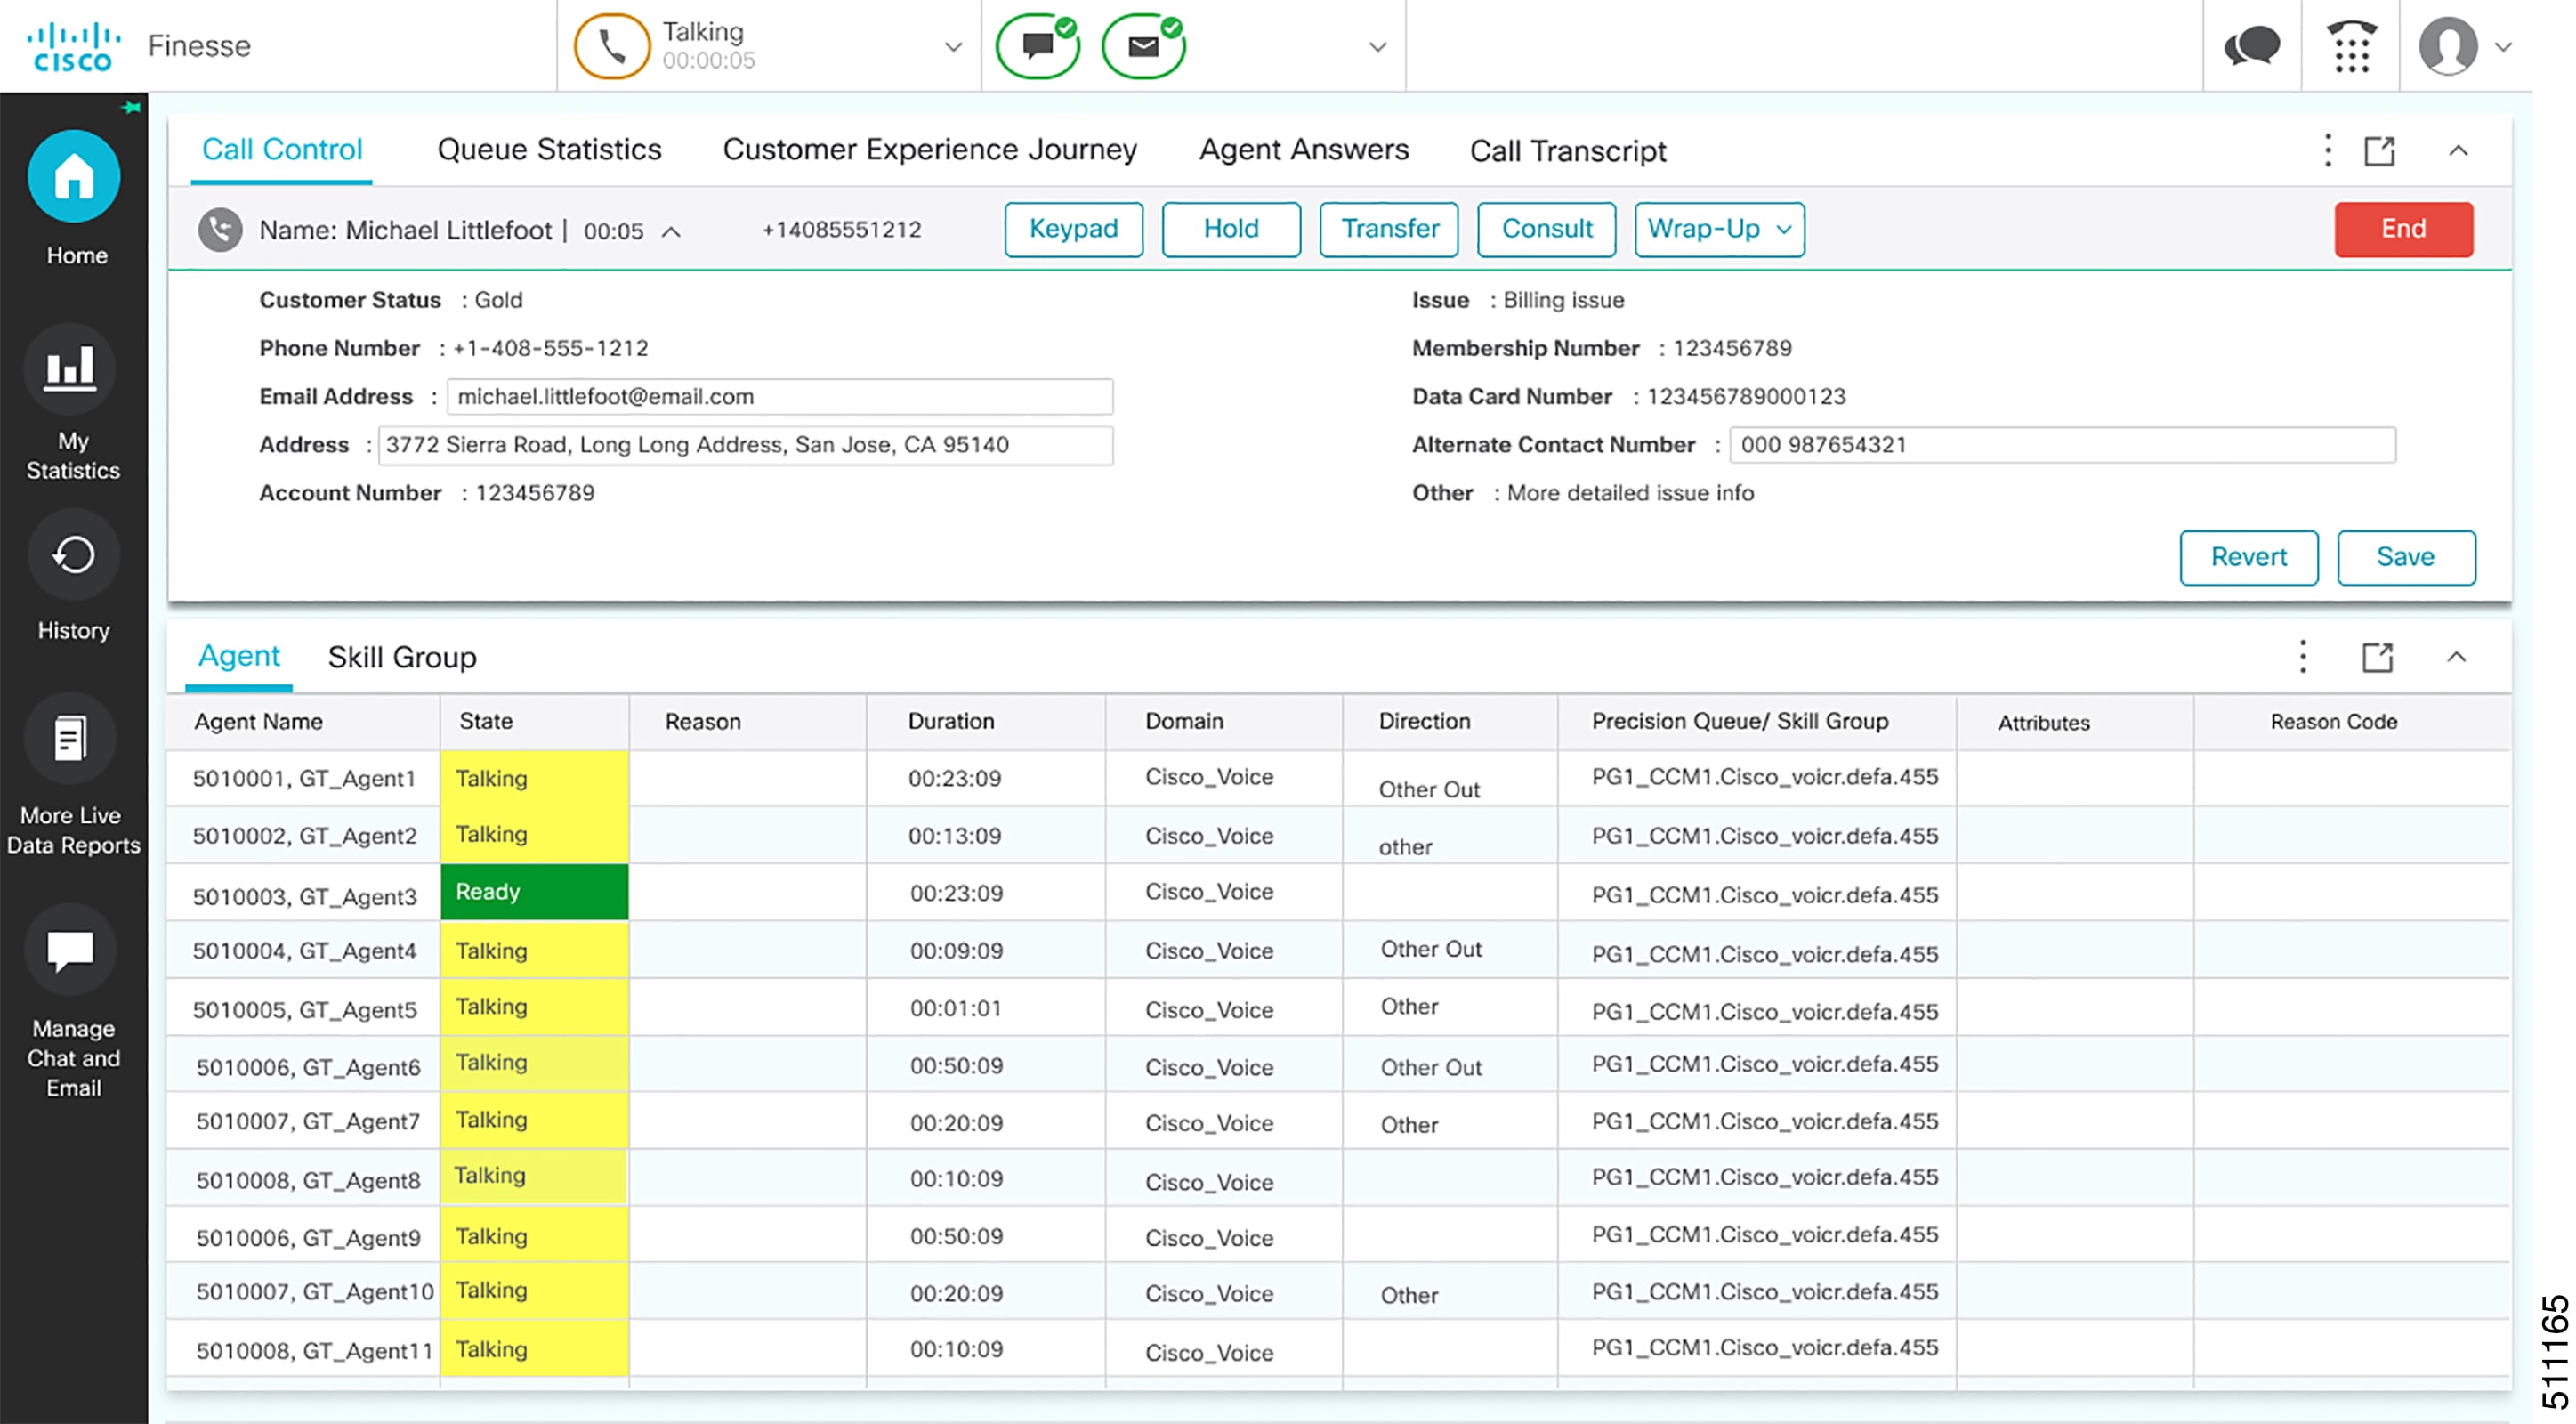
  • Live Data reports

  • Web Chat: Accept, interact, end chat sessions, and other chat enhancements discussed in detail in the respective sections in this guide.

  • Email: View, reply to customer email messages, and other email enhancements discussed in detail in the respective sections in this guide.

  • Direct Transfer: You can directly transfer the calls to another agent without any consult.

  • System Reason Codes: Due to system generated events, your state may change to either Not Ready or Sign Out with system generated reason codes. In this case, agent state is displayed in yellow.

  • Desktop Chat: You can chat with other agents, supervisor, or with other Subject Matter Experts in the organization.

  • Making a Call: You can make a call from the dialpad, by either entering the number or using the one-click option in the phone book.

  • Team Message: Teams can view the messages sent by their repective supervisors and take necessary action.

  • Agent Device Selection: Agents can select the telephony device when logging into Cisco Finesse desktop.

The functionality available to you depends on what your administrator has configured. For example, if your administrator did not define Wrap-Up Reasons, you cannot choose a wrap-up reason.

Finesse Supervisor Desktop


Note

Cisco Finesse has undergone a user experience refresh in release 12.0(1).


Finesse Supervisor Desktop provides call control functionality and the following:

  • Team Performance gadget

  • Live Data gadget

  • Team Message


Note

To ensure all features of the Finesse supervisor desktop work properly, you must disable pop-up blockers.


Team Performance Gadget

On the Team Performance gadget, you can select a team from a list of teams assigned to you. You can view the agents on that team, their current state, the time in state, their recent call history, and state history and their extension. Click the column headers to sort the information by Agent Name, State, Time in State, or Extension.

The Time in State field refreshes every 10 seconds. When an agent's state changes, the Finesse server sends out an agent state notification and the timer resets to 0. An agent state change includes changing from Not Ready with a reason code to Not Ready with a new reason code.


Note

For the logged out agent, the Time in State field shows the total duration since the agent has logged out. For the time in the logged out state to be displayed, the agent must have logged in or changed the state at least once via Finesse desktop or through other applications post Finesse server restart. If not, this field displays a blank value.


Team Performance gadget also provides the following functionality:

  • Silent monitoring: Silently monitor an agent's call.

  • Force state change: Force an agent into Ready or Not Ready state or sign out an agent.

When you silently monitor an agent, the Barge In button appears in the call control area. Click this button to barge in to a call between the agent and customer. After you barge in, you can choose to intercept the call by dropping the agent.

Team Message

Supervisors can broadcast messages to their teams. Teams can view the messages sent by their respective supervisors and take necessary action. This is a one-way communication from supervisors to their teams.

State and Call Timers

The agent state timer appears next to the agent state drop-down when you are in Not Ready or Ready state. This timer updates every second and the format is mm:ss. If you are in any state for more than one hour, the format changes to hh:mm:ss (for example, 05:25 or 01:10:25).

When you change state (for example, from Not Ready to Ready or change the reason code of Not Ready), the timer resets to 00:00.

Finesse provides a separate state control for chat and email. This state control does not have a timer.

The Finesse desktop provides call timers in the Call Control gadget (in the format mm:ss). The call timers provide the following information:

  • Total Call Time: Indicates the duration of your current call.

  • Hold Time: Indicates the total call on hold time. When you place a call on hold, this timer shows the hold time, followed by the total call time in parentheses.

  • Wrap-Up Time: Indicates the duration that you have been in wrap-up state. If wrap-up is enabled, you transition to wrap-up state when you end the call. Depending on the configuration done by the administrator, the timer can either countdown or count up the time.

If the call exceeds one hour, the timer still displays in minutes and seconds. For example, at one hour and 15 seconds, the timer displays 1:00:15.


Note

If the Finesse server cannot accurately calculate the state time or the call time (such as under certain failover conditions), the timer displays in the format "- -:- -"


For chat contacts, a timer appears in the Manage Chat and Email gadget that indicates the duration of the chat session. For email contacts, a timestamp appears in the Manage Chat and Email gadget that indicates the time that the system received the email contact.

Finesse Desktop Behavior

If the Cisco Finesse desktop is not the active window and one of the following events occurs, the Finesse desktop either becomes the active window or flashes in the taskbar:

  • You receive an incoming call on the desktop.

  • You are signed out due to failover or inactivity.

  • Your Supervisor signs you out.

The Cisco Finesse desktop behavior varies based on the browser and the number of tabs opened.

Toaster Notification

When there is an incoming call, chat or email and the Cisco Finesse desktop window or tab is inactive, Finesse displays a notification with the call, chat or email details. Click the notification to restore the Finesse desktop.

The Operating System controls the position of the notification and might display it at any one of the four corners of your computer screen.

Toaster notifications fade out time for chat can be configured through Subsystems > Chat and Email > Channel Parameters > No Answer Timeout submenu option from the Unified CCX Administration menu bar.

Browser Settings for Chrome

The toaster notifications may not pop up in the Chrome browser for Windows 10, but are displayed in the Notification Action Center. To display the notifications on your desktop, and not in the Notification Action Center, disable the Enable Native Notifications feature in the Chrome browser (version 86 and earlier). Notifications, displayed on your desktop, are in the native format.

  1. Open Chrome and enter chrome://flags/#enable-native-notifications.

  2. Press the Enter key on your keyboard.

  3. Select the Disabled option from the labeled box drop-down list.

  4. Click Relaunch Now.

    The notifications are displayed on your desktop in the native format.

Multi-Tab Gadgets

Finesse desktop supports accessing multiple gadgets through tabs within a single gadget called Multi-Tab gadget. The Multi-Tab gadget allows rendering gadgets in a single desktop view, thus presenting more information to agents and supervisors in a concise and readily accessible manner. Agents and supervisors do not have to scroll down the page or switch between desktop container tabs to see additional information.

The Multi-Tab gadget can host any gadget supported by the desktop, except the Advanced Capabilities and Manage Chat and Email gadgets. Multiple instances of Multi-Tab gadgets are supported, which allows agents and supervisors to stack groups of gadgets to customize their desktop.

The main features of Multi-Tab gadget are as follows:

  • Page-level gadgets and other types of gadgets can be hosted side by side as tabs within the Multi-Tab gadget.

  • Gadget tabs can be dragged and dropped to different locations in the Multi-Tab gadget header.

  • Shortcut keys can be used to switch between gadgets within the Multi-Tab gadget.

  • Individual gadgets within a Multi-Tab gadget can have different heights that are defined by the Cisco Finesse administrator in the Desktop Layout. However, it is possible for an agent to enable a common height for all gadgets by using the Dynamic Height toggle button.

  • The Call Control gadget can be hosted as a tab within the Multi-Tab gadget.

  • Gadgets can be made to appear or hide based on the desktop context, using APIs. For more information, see the Multi-Tab Gadgets section in the Cisco Finesse Web Services Developer and JavaScript Guide at https://developer.cisco.com/docs/finesse/.

  • Notifications can be made to appear or hide to control user attention, using APIs. For more information, see the Multi-Tab Gadgets section in the Cisco Finesse Web Services Developer and JavaScript Guide at https://developer.cisco.com/docs/finesse/.

  • By default, seven gadget tabs can appear in the Multi-Tab gadget header. Additional tabs are moved into the tab selector drop-down list.

The following figure shows the default configurations of the Finesse desktop containing the Multi-Tab gadget.

Figure 1. Multi-Tab Gadgets

Ordering of Multi-Tab Gadget Tabs

The Multi-Tab gadget feature allows agents and supervisors to view multiple gadgets in a single view. The sequence of the tabs is based on the desktop layout configured by the administrator. When agents and supervisors log in for the first time, the gadget configured as the default in the desktop layout appears as the left-most gadget and has the default focus. Gadgets can be reordered by dragging them. For a particular agent or supervisor, this order is retained across logouts when the same browser is used (browser cache should not be cleared). Any change in the desktop layout by the administrator, the tab order is reset to the default layout during the next session or when the page is reloaded.

Multi-Tab Behavior When Switching Between Desktop Container Tabs

When you switch the desktop container tab using the navigation bar, only the page-level gadgets are retained in the Multi-Tab gadget. The other gadgets are replaced with a new set of gadgets that are configured for the new desktop container tab.

For example, when agents and supervisors navigate from the Home desktop container tab to the History desktop container tab, the page-level gadgets remain the same. However, the desktop container specific gadget Queue Statistics is replaced by the Recent Call History gadget.

Figure 2. History

Reset Tab Order

The Reset Tab Order button changes the sequence of the gadget tabs to the default order that was configured by the Cisco Finesse administrator.

Dynamic Height

The Dynamic Height toggle button determines if individual gadgets within a Multi-Tab gadget have different heights (as configured by the Cisco Finesse administrator) or retain a common height.

If the Dynamic Height toggle button is set to On, individual gadgets within a Multi-Tab Gadget acquire the respective height configured by the Cisco Finesse administrator.

If the Dynamic Height toggle button is set to Off, all individual gadgets within a Multi-Tab Gadget retain a common height. A scroll bar might appear for the gadgets whose content is larger than the configured common height.


Note

Dynamic height functionality is unavailable or disabled in the following scenarios:

  • When the drag-and-drop feature is enabled.

  • When maximized view is selected, where the gadget stays maximized when switching between tabs.

  • When the gadget is collapsed and gadget contents are not being shown.


Drag and Drop

The Multi-Tab gadget feature enables agents and supervisors to drag and drop the gadget tabs relative to one another within the Multi-Tab gadget header. Select a gadget by clicking on a gadget tab. Drag the gadget and drop it at the desired location on the Multi-Tab gadget header. The order of gadgets moved by agents and supervisors is retained across fail overs and browser reboots. This can be cleared by using the Reset Tab Order button. This order is lost when agents and supervisors switches to a different browser or when the browser cache is cleared.

Drop Down

When there are more gadgets in the header than specified by the maxTabsOnTabbedGadgetHeader desktop property, a drop-down icon appears next to the last visible gadget name (more information, see the Cisco Finesse CLI chapter in the Cisco Finesse Administration Guide at https://www.cisco.com/c/en/us/support/customer-collaboration/finesse/products-maintenance-guides-list.html). Upon clicking on the icon, the remaining gadget tabs are displayed in the drop-down list and can be used to activate any of the required tabs. The drop-down icon displays a notification indicator when any of the gadget tabs that are part of the drop-down displays a notification.

Maximize and Collapse

The Multi-Tab gadget functionality supports the maximize and collapse options when configured as a page-level gadget or a desktop container tab level gadget in the default layout setting. Once the Multi-Tab gadget is maximized, it stays maximized even when alternate tabs are activated. Agents and supervisors can restore the view by selecting the restore button from the Multi-Tab menu. Upon selecting the collapse menu item it collapses Multi-Tab gadget content area and retains only the header containing the tabs.


Note

Maximize and Collapse features are unavailable in the Multi-Tab gadget when the desktop drag-and-drop feature is enabled (For more information about enabling the drag-and-drop feature, see the Drag-and-Drop and Resize Gadget or Component section in the Cisco Unified Contact Center Express Administration and Operations Guide at https://www.cisco.com/c/en/us/support/customer-collaboration/unified-contact-center-express/products-maintenance-guides-list.html).


Multi-Tab Gadget Notifications

A notification is shown in the gadgets to alert agents and supervisors about new activity in the gadget. A small red dot is displayed on the top-right corner of the gadget name to notify agents and supervisors about content changes within the gadget. When the gadget is under the drop-down list, the notification icon appears in the drop-down symbol.

The following figure demonstrates the notification functionality in Multi-Tab gadgets.

Figure 3. Notification
Figure 4. Notification

Note

Notification functionality is unavailable for screen readers.


Call Control Gadget in Multi-Tab

Finesse desktop Call Control gadget can be hosted as a tab within the Multi-Tab gadget. This frees up space within the desktop area. Once included, the Call Control gadget automatically hides or shows up depending on if the call is present on the desktop. It also shows notifications for changes in the call context.

The following figure demonstrates the desktop Call Control gadget placed within a Multi-Tab gadget.

Figure 5. Call Control Gadget in Multi-Tab
Figure 6. Call Control Gadget in Multi-Tab

Call Control Notifications in Multi-Tab Gadgets

When the Call Control gadget is configured as one of the multi-tab gadgets, notification appears during the following scenarios:

  • When an agent answers an incoming call, accepts an outbound call, or dials a number.

  • If an agent is in some other tab when the call ends and the agent moves to Wrap-Up state.

  • When an agent applies any shortcut key, except in the following condition: The agent is in a different tab, there is only a single call that the agent is handling, and the End Call shortcut key is pressed. In this scenario, Call Control is not activated.

Third-Party Gadget Notifications in Multi-Tab Gadgets

Third-party gadgets can be included in a Multi-Tab gadget on the Finesse desktop.

The Cisco Finesse administrator cannot configure notification settings for third-party gadgets. Only the developer of the third-party gadget can configure notification settings for the gadget.

Accessibility

Multi-Tab gadget tabs can be switched using keyboard shortcuts. For more information see Agent Keyboard Shortcuts.

Finesse Desktop Failover

In a contact center deployment, Cisco Finesse is installed on two nodes. If the Finesse server that you are currently signed in goes out of service, a banner appears at the top of the desktop notifying that the desktop has lost connection to the server.

The Finesse desktop checks if the current Finesse server state is recovered and if the alternate Finesse server is available.

If the current Finesse server recovers, the desktop is reconnected. If it does not recover and the alternate server is available, your desktop redirects to the alternate server and automatically signs you in.

If the desktop fails over or reconnects and the last state you selected prior to the failover was Ready, Finesse attempts to preserve that state. When Finesse recovers, the desktop attempts to send a request to put you back in Ready state.


Note

When the desktop tries to connect to the alternate server, you may see the following pop-up message:

Following certificates should be accepted before using Cisco Finesse Desktop.....

If you are unable to accept the security certificates, and keep seeing the message to accept the certificates, close the pop-up and continue to sign in.


Note

The Cisco Finesse desktop can only preserve Ready states that were selected on the same desktop. The following exceptions apply:

  • If you are in Wrap-Up state when the desktop recovers, Cisco Finesse does not send a request because that would automatically end your wrap-up session. After the wrap-up timer expires, your state is determined by Unified Communications Manager and may depend on the type of failover that occurred.

  • If your state was changed to Not Ready (either by your supervisor or by the system (for example, Ring No Answer), your selection of Ready is not preserved.

  • Unsolicited state changes are not taken into account. For example, if a supervisor changes your state to Ready (you did not select Ready), your Ready state may not be preserved. If your last selection was Ready and the system attempts to change your state to Ready (such as for Ring No Answer), your selection of Ready is preserved.


One Finesse Desktop or Finesse IPPA Session Per Agent

Finesse has the following agent session behavior:

  • Finesse does not support agents simultaneously sign in to Finesse desktop and Finesse IPPA. Agents must sign in to Finesse desktop or Finesse IPPA.

  • Finesse can support a mix of agents where some agents use Finesse IPPA and other agents use Finesse desktop (license permitting).

  • When agents are signed in to the Finesse desktop or Finesse IPPA, they can also simultaneously sign in to a third-party application using the Finesse API. (This setup is considered a custom development. Similar to other Finesse customizations, the customer or partner is responsible for proper development and testing of this custom setup.)

Accessibility

The Finesse desktop supports features that improve accessibility for low-vision and vision-impaired users. The following table shows how to navigate the Finesse desktop using the accessibility features.


Note

If you are using Mac keyboard, then press Option instead of Alt. For example, for Language Selector Drop-Down press Option–Down Arrow.


Table 1. Web Accessibility

Desktop Element

To Perform the Following Actions

Use the Following Keys

Address Bar

Move between the address bar and the frames

F6

Sign-in Page

Language Selector Drop-Down

Access the drop-down

Tab and Shift-Tab from the ID field

Open the drop-down

Alt-Down Arrow or Enter

Scroll the drop-down

Up and Down Arrows

Select a language

Enter

Hide the drop-down

Esc

Mobile Agent Help Tooltips

Access and display a tooltip

Tab and Shift-Tab

Hide a tooltip

Esc

Certificate Acceptance

Toggle between the certificate links

Tab and Shift-Tab

Open the certificate link to accept the certifiate

Enter

Call Control Gadget

Incoming Call Popover

Accept the incoming call

Enter

Call Control Gadget Navigation

Access the call control gadget, phone book, and keypad

Tab and Shift-Tab

Open and close the call control gadget

Enter

Phone Book

Navigate the phone book contact entries

Arrow keys

Select the contact to make a call

Enter

Select the contact to copy the number to the dialler

Enter

Dialpad

Toggle between the phone book and the keypad

Tab, Shift - Tab, and Enter

Navigate the keypad number buttons

Arrow keys, Tab, and Shift - Tab

Make a new call, Transfer a call, or consult a call

Press Enter in the number display field

OR

Navigate to the Call button and press Enter

Wrap-Up Reason Drop-Down

Access the drop-down

Tab and Shift-Tab

Open the drop-down

Enter

Scroll the list of wrap-up reasons

Up and Down Arrows

Select a wrap-up reason

Space Bar

Apply the wrap-up reasons

Enter

Close the drop-down

Esc

Callback and Reclassify Dialog Boxes (Outbound Calls)

Access the Callback and Reclassify buttons

Tab and Shift-Tab

Open the Callback and Reclassify dialog boxes

Enter (on the respective buttons)

Close dialog boxes

Press Esc

OR

Navigate away from the dialog boxes using Tab or Shift-Tab

Reclassify Dialog Box

Navigate the elements

Tab, Shift-Tab, Up and Down Arrows

Select an option

Enter

Close the Reclassify dialog box

Esc

Callback Date and Time Calendar

Navigate to and from the Calendar

Tab and Shift-Tab

Navigate within the Calendar

Arrows

Select a Calendar date

Enter

Move to the first or last days of a month

Home and End

Close the pop-up

Esc

Callback Date and Time Controls

Navigate the elements

Tab and Shift-Tab

Increase and decrease the Hour and Minute values

Up and Down Arrows

Toggle the AM/PM button

Enter

Close the pop-up

Esc

Desktop Chat

Certificate Acceptance

Toggle between the certificate links

Tab and Shift-Tab

Open the certificate link to accept the certifiate

Enter

Change Status

Open the drop-down to change the status

Enter

Toggle between the status

Arrow Keys, Tab and Shift-Tab

Apply Status

Enter

Search Contacts

Toggles between the search results

Tab and Shift-Tab

Close the search results drop-down

Esc

Contact List

Toggle between contacts and groups

Arrow Keys, Tab and Shift-Tab

Select multiple contacts

Ctrl + Up and Down arrows

After selecting multiple contacts, navigate to the Move or Delete options

Tab and Shift-Tab

Select the Move or Delete option

Enter

Contact

Navigate to contact header options

Tab

Open contact header options

Enter

Navigate contact header options

Arrow Keys, Tab and Shift-Tab

Navigate through Add, Edit and Delete Contact windows

Tab and Shift-Tab

Select an option

Enter

Group

Navigate to group header options

Tab

Open group header options

Enter

Navigate group header options

Arrow Keys, Tab and Shift-Tab

Navigate through Edit and Delete Group windows

Tab and Shift-Tab

Select an option

Enter

Team Message

Team Message

Navigate the elements

Tab, Shift-Tab, Up and Down arrows

Select an option

Enter

Close the dialog box

Esc

Show recent messages

Shift-Tab

Back and Delete

Tab-Enter

Queue Statistics Gadget

Queue Statistics Gadget

Access the Queue Statistics Gadget

Tab and Shift-Tab

Navigate the Queue Statistics table header

Tab and Shift-Tab

Navigate the Queue Statistics table cells

Tab and Shift-Tab

Desktop

Send Error Report

Access and display a tooltip

Tab and Shift-Tab

Hide a tooltip

Esc

To send the error report

Enter

Sign out

To sign out of the Finesse desktop Enter

Third-Party Gadget

Maximize Icon

Access the maximize icon

Tab and Shift-Tab

Maximize and restore a third-party gadget

Enter

Digital Channels

Agent State

Access the digital channel agent state gadget

Tab and Shift-Tab

Open and close the gadget options drop-down.

Enter

Close the gadget options drop-down.

Esc

Navigating options in drop-down.

Up and Down Arrows

Select an option in drop-down.

Enter

Screen Reader Support

Cisco Finesse also supports JAWS screen reading software for the following elements.

For more information on the supported JAWS version, see Voluntary Product Accessibility Templates (VPAT) report for Contact Center at https://www.cisco.com/c/en/us/about/accessibility/voluntary-product-accessibility-templates.html.

Page or gadget

Element

Notes

Sign-in Page

Mobile agent help icon

The screen reader reads descriptive text for the help icon.

Invalid Sign in error

When a sign-in error occurs due to invalid password or username, the screen reader reads the error.

Queue Statistics gadget

Title

The screen reader reads the gadget title (Queue Statistics).

Table

The screen reader reads each table header and each cell in the table.

Note 

The values in a cell may not be up-to-date. For the screen reader to read the latest value, move to another cell and then return to the old cell.

Call Control Gadget

Phone Book

The screen reader reads the contents of the phone book.

Note 
  • The screen reader is not able to read the summary of this table by using CTRL+INSERT+T. As a workaround, use the heading key instead.

  • The phone book does not support use of CTRL+ALT+RIGHT/LEFT/UP/DOWN arrow keys to move between cells in the table.

Keypad

The screen reader reads the number of the keypad and the letters that go with it (ABC, DEF, and so on).

Note 
  • In the table summary, if you select the table, the screen reader reads the summary of the table, which is Keypad.

  • If you press Enter on a Keypad button with JAWS enabled, the digits are not entered or displayed in the edit box on top of the Keypad.

  • If you use Ctrl+Alt+Right, Left, Up, and Down arrow keys to move between the cells, extra buttons are read on the Keypad.

Call row errors

The screen reader reads the call row error messages.

Agent Desktop

Headings

The screen reader reads all the headings on the Agent Desktop (HTML elements <h1> to <h6]>).

Failover Banner

During failover, the screen reader reads the statement from the red banner. When the Failover is complete, the screen reader reads the statement from the green banner.

State Change text

Whenever the agent state changes, the screen reader reads the new state.

Desktop

Send clients logs help icon

The screen reader reads descriptive text for the help icon.

Access Keyboard Shortcuts

Use the keyboard shortcuts for easy access to the Cisco Finesse agent and supervisor desktop features. The keyboard shortcuts are available for both agent and supervisor only if the administrator has configured this feature.

Note

To execute a keyboard shortcut, ensure focus is inside the desktop screen.


Procedure


Press Ctrl + Alt + F.

or

Click the user options icon on the top-right corner of your screen > click Keyboard Shortcuts.

The Keyboard Shortcuts List dialog box lists the following:

  • Pre-defined keyboard shortcuts

  • Third-party gadgets keyboard shortcuts

  • Conflicting keyboard shortcuts

Note 

Keyboard shortcuts will not respond if there are any conflicts between gadgets or components. To resolve these conflicts, contact your administrator.


Agent Keyboard Shortcuts

The following table lists the agent-specific keyboard shortcuts.

Table 2. Agent Keyboard Shortcuts List (Windows)
Group Action Shortcut Key Notes

Agent State

Ready for Call Ctrl + Alt + R -
Not Ready for Call Ctrl + Alt + N Displays the reason codes drop-down when there are multiple Not Ready reason codes listed.
Open Digital Channel State Control Ctrl + Shift + L -
Ready for All Digital Channels Ctrl + Shift + V -
Not Ready for All Digital Channels Ctrl + Shift + Z -

Application

Switch between Popover Ctrl + Alt + P Toggles between the popovers when there are multiple popover notifications.
Maximize/Restore view Ctrl + Shift + 0 -

Call Handling

Make New Call Ctrl + Alt + O -
Direct Transfer Call Ctrl + Alt + Q -
Open Keypad (DTMF) Ctrl + Alt + K -
Open Consult Ctrl + Alt + C -
Wrap-Up Call Ctrl + Alt + W -
Reclassify Call Ctrl + Alt + Y -
Schedule Callback Ctrl + Alt + S -
Answer/Accept Call Ctrl + Alt + A Use the shortcut key in the following scenarios:
  • Answers an incoming call

  • Accepts an Outbound Option or Direct Preview call

Close - Remove Record from Campaign Ctrl + Alt + J -
Reject - Return Record to Campaign/Close this Callback Ctrl + Alt + U -
End Call Ctrl + Alt + E Ends the last active call when there are multiple calls.
Hold Call Ctrl + Alt + V Places the call that has the hold option when there are more than one call. If all calls have the Hold option, then the latest active call is placed on hold.
Retrieve Call Ctrl + Alt + G Retrieves the call that has the Retrieve option when there are more than one call. If all calls have the Retrieve option, then the latest call that is placed on hold is retrieved.
Transfer Call Ctrl + Alt + X -
Conference Call Ctrl + Alt + H -

Desktop Chat

Toggle, Minimize and Maximize Chat Window Ctrl + Shift + 1 -
Open Desktop Chat Ctrl + Shift + 3 -

Edit Call Variable

Save Edited Call Variable Values

Ctrl + Alt + M

-

Revert Edited Call Variable Values

Ctrl + Alt + Z

-

Keyboard Shortcuts Keyboard Shortcuts List

Ctrl + Alt + F

-

Multi-Tab Gadget

Switch to the next tab

Alt+Shift+N

Switches to the next tab within the Multi-Tab gadget.

Switch to the previous tab

Alt+Shift+P

Switches to the previous tab within the Multi-Tab gadget.

Note 
For these Multi-Tab shortcuts to function, the focus should be inside the multi-tab gadget.
Navigation Home Ctrl + Alt + 1 The order of the shortcut key number depend on how the gadgets are arranged in your navigation bar. For example, if the My History gadget is the first in your navigation bar, then Ctrl + Alt + 1 opens the My History gadget.
My History Ctrl + Alt + 2 -
My Statistics Ctrl + Alt + 3 -
Manage Customer Ctrl + Alt + 4 -
Send Error Report Send Error Report Ctrl + Shift + 2 -
Sign Out Sign Out Ctrl + Alt + L -

Note

  • The letters used in the keyboard shortcuts are not case-sensitive.

  • If you are using Mac keyboard, then press Option instead of Alt. For example, to access the keyboard shortcuts list press Control–Option–F.

  • If you are using Mac machine running Firefox browser, then set the Full Keyboard Access to All controls (System Preferences > Keyboard > Shortcuts) to shift the keyboard focus to all controls.


Email and Chat Keyboard Shortcuts

The following table lists the keyboard shortcuts that can be used in active Email and Chat gadgets.

Table 3. Keyboard Shortcut List (Windows)

Group

Action

Shortcut Key

Notes

Manage Chat and Email

Reply

Alt+Shift+r

Reply to an email.

Reply All

Alt+Shift+b

Reply to all recipients of an email.

Forward

Alt+Shift+g

Forward an email.

Insert Image

Alt+i

Insert an image in an email. The cursor must be in Reply, Reply All, or Forward pane.

Attach a file

Alt+m

Attach a file to an email. The cursor must be in Reply, Reply All, or Forward pane.

Insert Predefined Response

Alt+p

Insert a predefined response to an email. The cursor must be in Reply, Reply All, or Forward pane.

Insert Hyperlink

Alt+l

Insert a hyperlink in an email. The cursor must be in Reply, Reply All, or Forward pane.

Exit out of the Email Editor Pane

Esc

Close open dialog box, pop-up, tool tip, and drop-down.

Discard

Alt+Shift+y

Close an email without saving any changes.

Wrap-up

Alt+Shift+w

Initiate wrap-up for an email.

Requeue

Alt+Shift+q

List CSQs with a search option.

Send

Alt+Shift+s

Send the selected email.

Insert Predefined Response

Alt+p

List predefined responses that are specific to the role (Agent or Supervisor).

Wrap-up

Alt+Shift+w

Initiate wrap-up for a chat.

Invite Agent

Ctrl+Alt+i

Invite an agent or a supervisor for an ongoing chat.

End

Ctrl+Shift+6

End the active chat.

Leave

Ctrl+Shift+7

Exit from the active group chat.


Note

If you are using Mac keyboard, press option instead of Alt. For example, to reply to an email press option+shift+R.


Supervisor Keyboard Shortcuts

When you sign in as a supervisor, the Keyboard Shortcuts List dialog box lists both the agent and supervisor-specific keyboard shortcuts. For more information on agent-specific keyboard shortcuts, see Agent Keyboard Shortcuts.

The following table lists the supervisor-specific keyboard shortcuts.

Table 4. Supervisor Keyboard Shortcuts List (Windows)
Group Action Shortcut Key
Call Handling Barge in Call Ctrl + Alt + B
Drop Participant Ctrl + Alt + D
Team Message Open Team Message Window Ctrl + Shift + Y
Team Performance Select Team Ctrl + Shift + F

Note

  • The letters used in the keyboard shortcuts are not case-sensitive.

  • If you are using Mac keyboard, then press Option instead of Alt. For example, to access the keyboard shortcuts list press Control–Option–F.

  • If you are using Mac machine running Firefox browser, then set the Full Keyboard Access to All controls (System Preferences > Keyboard > Shortcuts) to shift the keyboard focus to all controls.


VPN-less Access to Finesse Desktop

Agents and supervisors can access the Finesse desktop through the Internet without connecting to VPN.

The URLs of the agents and supervisors may be different when they access the Finesse desktop with and without VPN. You can contact your administrator for details on the Finesse URL to be used when logging in remotely.