- Preface
- Introduction
- CTI OS Client Interface Library Architecture
- CIL Coding Conventions
- Building Your Custom CTI Application
- CTI OS ActiveX Controls
- Event Interfaces and Events
- CtiOs Object
- Session Object
- Agent Object
- Call Object
- SkillGroup Object
- Helper Classes
- SilentMonitorManager Object
- CTI OS Keywords and Enumerated Types
- CTI OS Logging
- Log In an Agent
- Duplicate Login Attempts
- Overview of Duplicate Login Attempts
- Create Values in CTI OS Server Registry to Control Duplicate Login Attempts
- Agent Login with Incorrect Credentials
- Get Registry Configuration Values to Desktop Application
- Detect Duplicate Login Attempt in Desktop Application
- Handle Duplicate Login Attempts in Desktop Application
- Log Out an Agent
- CTI OS Based Silent Monitoring
- Unified CM-Based Silent Monitoring in Your Application
Building Your Custom CTI Application
This chapter discusses how to build your custom CTI application to use the CTI OS Client Interface Library. This chapter helps translate the choice of programming language and environment into a set of steps you will need to take to reference the CTI OS CIL components in your application and compile (and, if necessary link) your application.
This chapter is organized in sections according to the programming language and interface you are using:
-
ActiveX Controls. This section covers using the CTI OS ActiveX controls in a COM container such as Visual Basic.
-
COM CIL in C++. This section covers the steps you require to use the CILs COM components in a Microsoft Visual C++ application.
-
C++ CIL using static libraries. This section covers the steps you require to reference the CILs C++ classes in your application, and how to link the C++ static library files into a Microsoft Visual C++ application.
-
Java CIL libraries. This section covers considerations for installing and using the Java CIL libraries.
-
.NET CIL Class libraries. This section covers the steps you require to reference the .NET CIL components in a C# and Visual Basic .NET project files.
- Environment Set Up for .NET
- Integration Between Your Application and CTI OS via CIL
- CTI Application Testing
- Developer Sample Applications
- CTI OS ActiveX Controls
- COM CIL in Visual C++ 8.0(1)
- C++ CIL and Static Libraries
- Java CIL Libraries
- .NET CIL Libraries
- CTI OS Server Connection
- Agent Login and Logout
- Calls
- Making Requests
- Events
- Agent Statistics
- Skill Group Statistics
- Silent Monitoring
- Agent Greeting
- Deployment of Custom CTI OS Applications
- Supervisor Applications
- Sample Code in CTI OS Toolkit
Environment Set Up for .NET
Cisco CTI OS Toolkit introduces support for application development using Microsoft Visual Studio .NET 2010 and .NET 3.5 framework. You do not have to modify existing .NET 2.0 controls to run .NET 3.5 CLR. Cisco CTI OS Toolkit provides a native .NET class library (.NET CIL) and runtime callable wrappers for COM CIL and the CTI OS ActiveX controls. The CTI OS Toolkit consists of a set of production ready desktops, and five software development kits.
However, as the standard framework for Net 2010 is .NET 4.0, to use VS2010 developers must change the default setting on NET 2010 to .Net3.5. Instructions for making this change are available at the following Microsoft website:
https://msdn.microsoft.com/en-us/library/bb398202.aspx
The .NET CIL and the runtime callable wrappers (RCWs) are installed in the Global Assembly Cache (GAC) by the setup program such that all the components are available to any of the sample included in the toolkit and any new application in development. Use the CTI OS toolkit for environment settings for building .NET applications. There are, however, additional configuration steps for integration with the development environment.
The Production Ready Contact Center Desktop applications are the CTI OS Toolkit Agent Desktop, CTI OS Toolkit IPCC Supervisor Desktop, the CTI OS Toolkit Outbound Option Desktop, and the default client desktops for Cisco CTI OS used by call center agents and supervisors These desktop applications are built using the COM CIL and the CTI OS ActiveX controls. These applications are implemented using Visual Basic .NET (VB.NET) and Visual Studio.NET 2005 (VS.2005).
Microsoft Visual Studio .NET 2005
Visual Studio 2005 offers a wider spectrum of development possibilities and an advanced design experience. In addition, with Service Pack 1 it also provides:
-
Microsoft .NET Framework 2.0 & 3.0 application development.
-
New processor support (for example, Core Duo) for code generation and profiling.
-
Additional support for project file based Web applications.
-
Secure C++ application development.
To access the .NET CIL and the RCWs directly from Visual Studio .NET 2010 you need to add the following configuration to your environment.
- Add CTI OS Toolkit Components to Add Reference Dialog Box
- Add Cisco CTI OS ActiveX Controls to Toolbox
Add CTI OS Toolkit Components to Add Reference Dialog Box
In Visual Studio .NET 2005 and 2010, you can select class libraries and assemblies from the .NET tab of the Add Reference dialog box. This facilitates the development process and ensures you can always use the correct version of the components.
To enable the .NET CIL class libraries to appear on the Add References dialog box, follow the steps described in http://msdn.microsoft.com/en-us/library/wkze6zky(v=VS.100).aspx
Set a registry key that specifies the location of assemblies to appear.
To do this, add one of the following registry keys, where <AssemblyLocation> is the directory of the assemblies that you want to appear in the Add Reference dialog box:
[HKEY_LOCAL_MACHINE\SOFTWARE\Microsoft\.NETFramework\<version>\AssemblyFoldersEx\MyAss emblies]@="<AssemblyLocation>"
[HKEY_LOCAL_MACHINE\SOFTWARE\Microsoft\.NETFramework\<version>\AssemblyFoldersEx\MyAss emblies]@="<AssemblyLocation>"
Creating the registry key under the HKEY_LOCAL_MACHINE node allows all users to see the assemblies in the specified location in the Add Reference dialog box. Creating the registry key under the HKEY_CURRENT_USER node affects only the setting for the current user.
For example, if you want to add:
- Cisco .NET CIL to the
Add
Reference dialog box
[HKEY_LOCAL_MACHINE\SOFTWARE\Microsoft\.NETFramework\<version>\AssemblyFoldersEx\MyAss emblies]@="<AssemblyLocation>"
- Cisco CTI OS RCWs to the
Add
Reference
dialog box
[HKEY_LOCAL_MACHINE\SOFTWARE\Microsoft\.NETFramework\v2.0.50727\AssemblyFoldersEx\Cisc oCtiOsRCWs]@="C:\Program Files\Cisco Systems\CTIOS Client\CTIOS Toolkit\Win32 CIL\.NETInterops"
Add Cisco CTI OS ActiveX Controls to Toolbox
The Visual Studio .NET 2005 and 2010 IDE allows visual editing of Windows Forms based applications using the toolbox of visual components available. Because Windows Forms applications are native, the visual components are also native. However, you can still use ActiveX controls and include them in the toolbox.
Adding CTI OS ActiveX controls to the toolbox provides pre-packaged CTI functionality such as Agent Login, Make Call, Transfer Call, Barge In, and so on. The ActiveX controls use COM CIL as the API to provide call center and telephony services. These components are used in rapid software development. You can drag and drop selected components into your project, and immediately gain the selected CTI functionality. These components are used in development environments such as: Microsoft Visual Basic 6.0, Microsoft Visual C++ 6.0, 7.0 & 8.0, Power Builder and others.
To use the Cisco CTI OS ActiveX controls in Visual Studio .NET 2005 and 2010, you must configure the Cisco CTI OS RCWs as described in the previous section:
Integration Between Your Application and CTI OS via CIL
Creating an integration between your application and CTI OS via the CIL is straightforward. The first step is to articulate the desired behavior, and to create a complete design specification for the integration.
Integration Planning and Design
Good design depends on understanding how CTI fits into your application and workflow. Your requirements analysis and design process should address the following points, as they relate to your specific application:
-
Start with the call flow. What kind of call processing is done before calls are targeted for a specific skill? Determine how you collect CTI data from the caller before the call arrives at an agent.
-
Study agent workflow. What are the points where CTI can make the workflow easier and faster? Build a business case for the CTI integration.
-
Evaluate what CTI will do for your application. A good approach is to make a list based on the priority (for example, screen pop, then call control) and then design and implement features in that order.
-
Design how CTI should work within your application. What are the interaction points? Get specifications as to which screens interact, and which data values should be sent between your application and the CTI OS platform.
-
Determine when the application should connect to the CTI OS Server. Some applications are server-type integrations that connect at startup, specify a monitor-mode event filter, and stay connected permanently. Agent-mode applications connect up when a specific agent begins the work shift.
-
Clean up when you are done. When and how does the application stop? Some applications stay up and running permanently, while others have a defined runtime, such as agent workday or shift. For server-type applications without a specified stopping point, create an object lifetime model and procedure for recovering no-longer-used resources. For applications with a specific stopping point, determine the kind of clean up that needs to be done when the application closes (for example, disconnect from server, release resources).
Language and Interface
The CTI OS Client Interface Library API comes in programming languages, each with benefits and costs. The choice of interface is important to direct you through this developers guide, because this guide addresses the CIL API for the C++ and COM programming environments.
The main decision point in choosing which API to use depends on your workstation operating system, your existing applications, and the language skills of your developers.
-
ActiveX Controls. The CTI OS ActiveX controls are the appropriate choice for creating a rapid drag and drop integration of CTI and third-party call control with an existing desktop application. The CTI OS ActiveX controls are an appropriate choice for developing a CTI integration with any fully ActiveX-compliant container, or any other container that fully supports ActiveX features (for example, Powerbuilder, Delphi, and many third-party CRM packages). The ActiveX controls are the easiest to implement in graphical environments, and help achieve the fastest integrations by providing a complete user interface. All CTI OS ActiveX components are distributed via dynamic link library files (.dll), which you only have to register once to work on any Microsoft Windows platform. These components are not appropriate for non-Windows environments. You can use the CTI OS ActiveX controls in Windows Forms .NET applications only if the Runtime Callable Wrappers (RCWs) provided with the CTI OS Toolkit are a part of the project. For more information, see CTI OS ActiveX Controls.
-
COM. The CTI OS Client Interface Library for Microsoft's Component Object Model (COM) is the appropriate choice for developing a CTI integration with any COM-compliant container, or any other container that supports COM features, such as Microsoft Internet Explorer or Visual Basic for Applications scripting languages. The COM CIL is the easiest to implement in scripting environments, and helps achieve the fastest integrations requiring a custom or non-graphical user interface. All CTI OS components are distributed via dynamic link library files (.dll), which you only have to register once to work on any Microsoft Windows platform. These components are not appropriate for non-Windows environments. You can use the COM CIL in Windows Forms .NET applications only if the Runtime Callable Wrappers (RCWs) provided with the CTI OS Toolkit are a part of the project. For more information, see Hook for Screenpops.
-
C++. The CTI OS Client Interface Library for C++ is the appropriate choice for building a high-performance application running on a Windows platform in a C++ development environment. The C++ CIL is distributed as a set of header files (.h) that specify the class interfaces to use and statically linked libraries (.lib) that contain the compiled implementation code.
-
Java. The CTI OS Java Client Interface Library (Java CIL) is an appropriate choice for non-Microsoft (typically UNIX) operating systems, as well as for browser based applications.
-
.NET Cil class libraries. This section covers the steps required to reference the .NET CIL components in a C# and Visual Basic .NET project files.
CTI Application Testing
Testing is often characterized as the most time-consuming part of any application development process.
Test Plan Development
Testing CTI applications requires a detailed test plan, specific to the business requirements set forth in the requirements gathering phase of the project. The test plan should list behaviors (test cases) and set requirements to prove that each test case is successfully accomplished. If a test case fails, it should be investigated and corrected (if appropriate) before proceeding to the next phase of testing.
Perform (at minimum) the following test phases:
-
Unit Testing. In a unit test, you ensure that the new code units can execute properly. Each component operates correctly based on the input, and produces the correct output. An example of a unit test is to stub-in or hardcode the expected screen-pop data and ensure that all the screens come up properly based on this data.
-
Integration Testing. In an integration test, you ensure that the new components work together properly. The physical connections and data passing between the layers and servers involved in the system are tested. An example of an integration test is testing your client application with the CTI OS server, to ensure that you can pass data correctly through the components.
-
System Testing. In a system test, you ensure that the correct application behavior is exhibited. An example of a system test is to make a phone call to a VRU, collect the appropriate caller information, transfer the call to an agent, and ensure that the screen pop arrives correctly.
-
User Acceptance Testing. In a user acceptance test, you ensure that your application has met all business requirements set by your analysis and design process. An example of a user acceptance test is to try your new application with real agents and ensure that it satisfies their requirements.
Test Environment
The CTI OS Software Development Toolkit (SDK) CD media includes a CTIServerSimulator that you can use for application development and demonstration purposes. It can roughly simulate a Lucent PBX/ACD or a Cisco Unified Contact Center environment. Documentation on how to configure and use the simulator is available in the Tools\Simulator directory.
 Note | This simulator is appropriate only for preliminary testing of client applications. Because it does not fully replicate the behavior of the actual switch environment, you should not use the simulator for any type of QA testing. To ensure proper design conformance and ensure the correctness of the application, you must test the CTI application with the actual telephony environment in which it will run. This enables the event flow and third-party control components, which are driven by the switch- and implementation-specific call flow, to be properly and thoroughly tested. |
Developer Sample Applications
The CTI OS Software Development Toolkit (SDK) is distributed with a rich set of Developer Sample Applications (DSAs) for Cisco Unified CCE customers and similar Production Class Applications for Unified ICM customers.
The DSAs are provided as tools for Unified CCE customers to accelerate development efforts. The DSAs demonstrate several basic working applications that use varying implementations of the CTI OS Client Interface Library API. The samples are organized by programming language and demonstrate the syntax and usage of the API. For many developers, these DSAs form the foundation of your custom application. The samples are available for you to customize and distribute as a part of your finished product.
For Unified ICM ACD types (such as Avaya, Aspect, and so on), you can deploy some DSAs as Production Class Applications. Cisco certifies and supports the out-of-the-box CTI OS Agent Desktop application in a production environment when used in conjunction with a supported Unified ICM ACD. Refer to the ACD Supplement, Cisco Unified Intelligent Contact Management (Unified ICM)ACD PG Supportability Matrices for the current list of supported ACD types.
For Unified CCE, these same DSAs are generally not intended for production use "as-is". They are neither certified nor supported by Cisco as working out-of-the-box applications.
The following table lists the sample programs in the CTI OS Toolkit.
|
Program Name |
Location |
Description |
|---|---|---|
|
CTI Toolkit Outbound Desktop |
CTIOS Toolkit\Win32 CIL\Samples\CTI Toolkit Outbound Desktop |
A softphone application that demonstrates Outbound Option (formerly Blended Agent) functionality. |
|
All Agents Sample .NET |
CTIOS Toolkit\dotNet CIL\Samples\All Agents Sample.NET |
A Microsoft C# program demonstrating a monitor mode application. This program lists all agents in a grid along with current state updates. |
|
All Calls Sample.NET |
CTIOS Toolkit\dotNet CIL\Samples\All Calls Sample.NET |
Similar to AllAgents but lists calls instead of agents. |
|
CTI Toolkit Combo Desktop.NET |
CTIOS Toolkit\dotNet CIL\Samples\CTI Toolkit Combo Desktop.NET |
A Microsoft C# program that interfaces to CTI OS via the .NET CIL interface. The program demonstrates how to build a multi-functional contact center desktop that contains Agent, Supervisor and Outbound Option features. |
|
CtiOs Data Grid.NET |
CTIOS Toolkit\dotNet CIL\Samples\CtiOs Data Grid.NET |
Microsoft C# program that implements a Tabular Grid used by the CTI Toolkit Combo Desktop.NET to show calls and statistics. |
|
CTI Toolkit Agent Desktop |
CTTIOS Toolkit\Win32 CIL\Samples\CTI Toolkit AgentDesktop |
A Visual Basic .NET program using the CTI OS ActiveX controls. The application is the source code used by the out of the box CTI Toolkit Agent Desktop. |
|
CTI Toolkit Supervisor Desktop |
CTTIOS Toolkit\Win32 CIL\Samples\CTI Toolkit SupervisorDesktop |
A Visual Basic .NET program using the CTI OS ActiveX controls. The application is the source code used by the out of the box CTI Toolkit Supervisor Desktop. |
|
C++Phone |
CTIOS Toolkit\Win32 CIL\Samples\CTI Toolkit C++Phone |
A softphone written in C++ linking to the static C++ libraries. Sending requests and event handling as well as the use of the wait object is demonstrated. |
|
JavaPhone |
CTIOS Toolkit\Java CIL samples |
A Java counterpart to the C++phone sample programs. |
|
AllAgents |
CTIOS Toolkit\Java CILsamples |
A Java counterpart to the Visual Basic all agents program. |
CTI OS ActiveX Controls
This section discusses the steps involved in building CTI OS Applications with Microsoft Visual Basic .NET (VB.NET) using the CTI OS ActiveX controls.
Build Simple Softphone with ActiveX Controls
To use the CTI OS ActiveX controls, you must copy the ActiveX controls on the target system and register with Windows. You accomplish this with the CTI OS toolkit install, as well as the CTI OS Agent and Supervisor installs. For more information, see Deployment of Custom CTI OS Applications.
After you launch Visual Basic .NET, you can use the ActiveX controls by selecting them via the Customized Toolbox dialog ( via the menu).
Note | Note: If the CTI OS ActiveX controls are not listed as shown in the following figure the files are either not copied on the target system or the controls were not properly registered. |
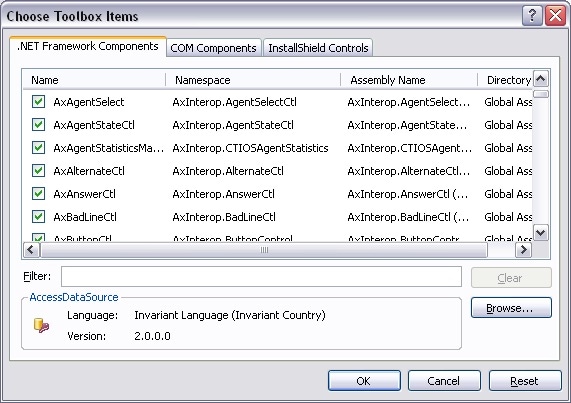
After you select the CTI OS ActiveX controls in the .NET Framework Components tab, you should see them in the Visual Basic .NET ToolBox. You can now drag and drop the CTI OS ActiveX RCWs components onto the Windows Form. For a softphone application, it is useful to start with the CallAppearanceCtl (see the following figure).
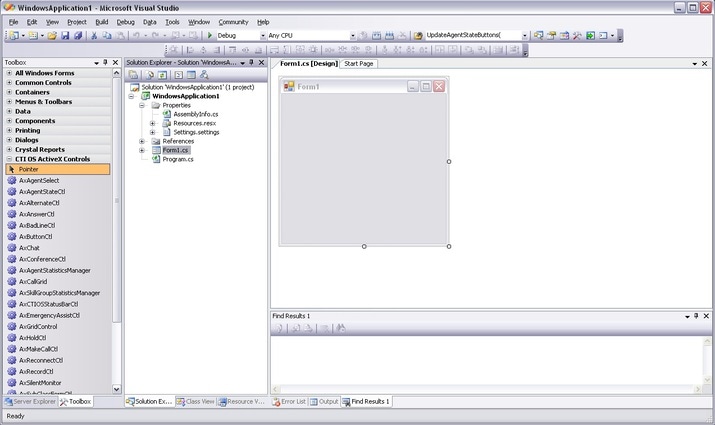
On the very left, the Toolbox is visible showing some of the CTI OS ActiveX RCWs icons. On the form, the AxCallGrid has been dragged and dropped.
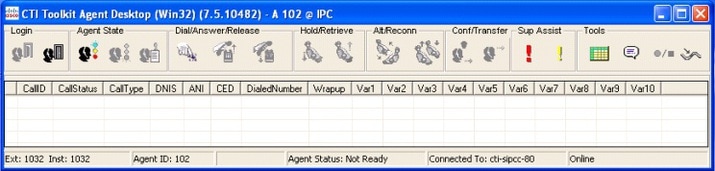
For a complete description of the ActiveX controls see CTI OS ActiveX Controls. The following figure shows the CTI OS Toolkit Agent Desktop application, which is also included as a sample on the CTI OS CD.
Once all ActiveX controls are placed on the phone, you can create an executable in Visual Basic .NET via or selecting <F7>.
Hook for Screenpops
This agent desktop application did not require any Visual Basic .NET coding. You can choose to add some custom code to add a hook for screenpops. For example, you may want to retrieve CallVariables, which are passed along with certain call events.
CTI OS SessionResolver
A CTI OS Client application connects to CTI OS with a Session object (see Session Object). Depending on the application, a client can use one or more Session objects. For most agent desktop applications, however, it is useful to employ only a single Session object.
If you choose to write a program not using ActiveX controls, you can create a Session object and use it directly (see CTI Toolkit AgentDesktop at the Win32 CIL samples).
However, in the case of an application built with the ActiveX controls, all ActiveX controls must use the same session object. The ActiveX controls accomplish this by retrieving a pointer to the same session object via the SessionResolver. The program hosting the ActiveX can obtain the Same session object by using the SessionResolver.GetSession method to retrieve a session named "".
VB .NET Code Sample to Retrieve Common Session
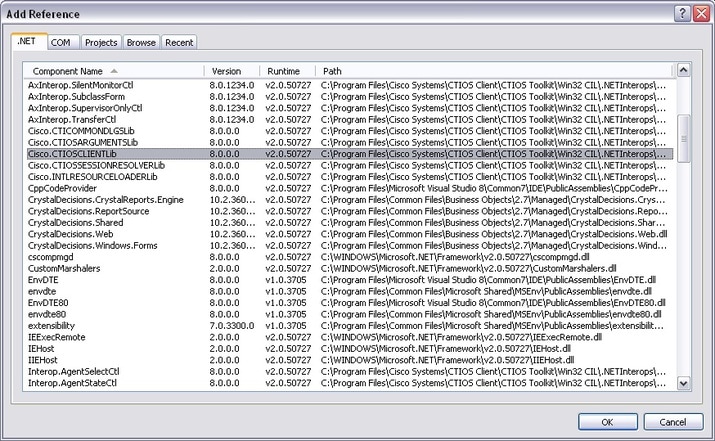
The following sample VB .NET code retrieves the common session and listens for a CallEstablishedEvent occurring in that session. If a CallEstablishedEvent occurs, it retrieves CallVariable 1 and puts it in the Windows Clipboard (from where you can retrieve it via CTRL-v or used by other applications).
This code uses the COM CIL Interfaces and therefore, needs the following references: Cisco.CTIOSCLIENTLib, Cisco.CTIOSARGUMENTSLib, Cisco.CTIOSSESSIONRESOLVERLib. The references are shown in the following figure (in Visual Basic .NET, select ...).
' VB sample for a simple CTIOS phone
' needs references to Cisco.CTIOSCLIENTLib
Cisco.CTIOSSESSIONRESOLVERLib and Cisco.CTIOSARGUMENTSLib
'
' dim CTIOS session interface
' the session interface handles connect, setagent and others
Dim WithEvents m_session As Cisco.CTIOSCLIENTLib.Session

' the sessionresolver is needed to retrieve the session pointer
Dim m_sessionresolver As Cisco.CTIOSSESSIONRESOLVERLib.SessionResolver

Private Sub Form_Initialize_Renamed()
    ' instantiate the sessionresolver
    Set m_sessionresolver = New Cisco.CTIOSSESSIONRESOLVERLib.SessionResolver

    ' CTI OS ActiveX controls use the session named "" - blank
    ' since the CTI OS ActiveX controls do the connection and login,
    ' all we do is listen for events
    Set m_session = m_sessionresolver.GetSession("")
End Sub

Private Sub Form_Terminate_Renamed()
    Call m_sessionresolver.RemoveSession("")
End Sub

Private Sub m_Session_OnCallEstablished(ByVal pIArguments
As Cisco.CTIOSCLIENTLib.Arguments)
' Handles m_Session.OnCallEstablished
    GetCallVariable1 pIArguments
End Sub

Function GetCallVariable1(ByVal pIArguments As CTIOSCLIENTLib.IArguments)

    Dim m_uid As String
    m_uid = pIArguments.GetValueString("Uniqueobjectid")
    Dim m_call As Cisco.CTIOSCLIENTLib.Call
    Set m_call = m_session.GetObjectFromObjectID(m_uid)

    ' retrieve callvar1
    Dim m_callvar1 As String
    m_callvar1 = m_call.GetValueString("Callvariable1")

    'copy call variable1 to the clipboard
    Clipboard.SetText m_callvar1
End Function
Note | Visual Basic 6.0 is no longer supported. |
COM CIL in Visual C++ 8.0(1)
- COM Client Interface Library (COM CIL.)
- Add COM Support to Your Application
- Use CIL Dynamic Link Libraries
- Create COM Object at Run Time
- COM Events in C++
- Additional Information
COM Client Interface Library (COM CIL.)
You use this API in development environments that support COM/DCOM and OLE Automation. Examples: Microsoft Visual Basic 6.0, Microsoft Visual C++ 6.0, 7.0 and 8.0, Borland Delphi, Power Builder, etc. COM CIL is an adaptor interface that uses C++ CIL as kernel. The API is deployed as a group of Dynamic Linked Libraries (DLLs).
Note | You must use Visual Studio .NET to build all C++ applications using COM CIL. Applications using COM CIL built with Visual C++ 6.0 are not supported. |
Building a custom Win32 (Console or Windows) CTI application in Visual C++ 8.0(1) with COM requires knowledge of creating and using COM components in Microsoft Visual C++ 8.0(1). Client applications of this type tend to be more complex to build, and more powerful and faster in execution, than scripting clients (for example, Visual Basic). All the CIL components for COM are distributed as COM Dynamic Link Libraries (COM DLL).
COM components must be registered with Windows to be accessible to COM containers including Microsoft Visual C++ 8.0(1). The components required for programming in Microsoft Visual C++ 8.0(1) are:
-
CTI OS Client library (CTIOSClient.dll). This is the main CIL library for COM. The objects available in this library are described fully in Chapters 8 through 11.
-
CTI OS Arguments Library (arguments.dll). The Arguments helper class is used extensively in CTI OS, and is described fully in Helper Classes
-
CTI OS Session Resolver (ctiossessionresolver.dll). This object allows multiple applications or controls to use a single CTI OS Session object. It is required when building an application that includes the CTI OS ActiveX controls.
Add COM Support to Your Application
Your application must support COM to use these objects in your CTI application. To add COM support to your application, you must use one of the following:
- Microsoft Foundation Classes (MFC). The following header files are required for MFC applications to use COM: afxwin.h, afxext.h, afxdisp.h, and afxdtctl.h. If you build an application using the Microsoft Visual C++ 7.1(1) application wizard, these files are included automatically.
- Microsoft's ActiveX Template Library (ATL). To use ATL, include the standard COM header file: atlbase.h.
Important Note About COM Method Syntax
In this manual, the syntax used to describe method calls in COM shows standard COM data types such as BSTR, VARIANT and SAFEARRAY. Be aware that these data types can be encapsulated by wrapper classes proper to the environment depending on the development environment, tools, and how the COM CIL is included in your project application.
For example, in a Microsoft Visual C++ 7.1(1) project a VARIANT type can be either a CComVariant or _variant_t, and a BSTR type can be either a CComBSTR or _bstr_t.
For more information, see the documentation for your development environment.
Use CIL Dynamic Link Libraries
Next, you must import the COM Dynamic Link Libraries into your C++ application. The following code sample (which you might put into your StdAfx.h file) depicts how to use a COM Dynamic Link Library in C++:
#import "..\..\Distribution\COM\ctiossessionresolver.dll" using namespace CTIOSSESSIONRESOLVERLib;
#import "..\..\Distribution\COM\ctiosclient.dll" using namespace CTIOSCLIENTLib;
Note | You must register three DLLs, but you do not need to import the arguments.dll into your project because it is imported by the ctiosclient.dll type library. |
Create COM Object at Run Time
Note | Only the apartment threading model is supported. |
COM objects in C++ are created via the COM runtime library. To create a COM object at run time, your program must use the CreateInstance() method call.
// Create SessionResolver and Session object
hRes = m_pSessionResolver.CreateInstance    (OLESTR("CTIOSSessionResolver.SessionResolver"));

if (m_pSessionResolver)
{
    m_pSession = m_pSessionResolver->GetSession(_bstr_t(""));
}
Once the Session object is created, you can use it to make requests, and subscribe for events.
COM Events in C++
In this model, client applications subscribe for events by registering an instance of an event sink in the client with the event source. The COM Session object publishes several event interfaces (event sources), and clients can subscribe to any or all of them.
To receive COM events, you must first create an event sink class, which should derive from a COM event sink class. The Comphone sample application uses the MFC class CCmdTarget.
class CEventSink : public CCmdTarget
{
//...
};
This class must implement the method signatures for the events it expects to receive. When an event is fired from the event source, the corresponding method in your event sink class is invoked, and you can perform your custom event handling code at that time.
To subscribe for an event, the client must call the AtlAdvise() method, specifying a pointer to the interface of the event source:
// Add event sink as event listener for the _IallEvents interface

HRESULT hRes =
AtlAdvise(m_pSession, m_EventSink.GetIDispatch(FALSE),
__uuidof(_IAllEvents), &m_dwEventSinkAdvise);
When the program run is complete, the client must unsubscribe from the event source, using the AtlUnadvise() method:
// Unsubscribe from the Session object for the _IAllEvents interface

HRESULT hRes =
AtlUnadvise( m_pSession, __uuidof(_IAllEvents), m_dwEventSinkAdvise );
Additional Information
-
For more information about the CTI OS client start up and shut down sequence, see section Disconnect from CTI OS Server Before Shutdown.
-
For more information about the CTI OS Client Interface Library objects, see Chapters 8 through 12.
The C++ Client Interface Library (C++ CIL.) application is a programming interface (API) you can use to build high performance CTI enabled desktop or server-to-server integration that use Cisco CTI OS. The API is deployed as a set of C++ static libraries that you can use to build Win 32 or console based applications.
-
For more information about a sample application that uses the CIL COM interface written in C++, see the Comphone sample application on the CTI OS CD.
C++ CIL and Static Libraries
Note | You must use Visual Studio .NET 2005 to build all C++ applications using C++ CIL 8.0(1). Applications using C++ CIL 8.0(1) built with Visual Studio .NET 2003 are not supported. |
The CTI OS Client Interface Library for C++ is the most powerful, object-oriented CTI interface for C++ developers. It provides the same interface methods and events as the COM interface for C++, but is more straightforward for C++ developers who are not experienced COM programmers, and provides faster code execution.
The CIL interface for C++ is a set of C++ header files (.h), and static libraries compiled for the Win32 platform (Windows NT, Windows 2000). The header files required to access the class definitions are located on the CTI OS SDK media in the CTIOSToolkit\Include\ directory, and the static libraries are located in the CTI OS Toolkit\Win32 CIL\Libs directory.
- Header Files and Libraries
- Configure Project Settings for Compiling and Linking
- Subscribe for Events for in C++
- STLPort
- Additional Information
Header Files and Libraries
The header files you most likely require are all included in the main CIL header file, CIL.h, which you would include in your application:
#include <Cil.h>
To link your application code with the CIL for C++, you require the following C++ static libraries:
-
ConnectionLibSpd.lib. This library contains the connection-layer services for CIL.
-
ServiceLibSpd.lib. This library contains the service-layer services for CIL.
-
SessionLib.lib. This library contains the object-interface services for CIL.
-
UtilLibSpd.lib. This library contains helper classes for CIL.
-
ArgumentsLibSpd.lib. This library contains the Arguments data structure for CIL.
-
SilentMonitorLib.lib. This library contains all the services required to establish and control silent monitor sessions.
-
SecuritySpd.Lib. This library contains the services required to establish secure connections with CTI OS Server.
-
SilentMonitorClient.lib. This library is used by the CIL to communicate with the silent monitor service.
-
SilentMonitorCommon.lib and ServiceEventHandler.lib. These libraries contain support classes for SilentMonitorClient.lib.
Note | The preceding are the release versions of the libraries. The Debug equivalent libraries use the same library name with the appended "d" instead of Spd; for example, for ArgumentsLibSpd, the Debug library is ArgumentsLibd.lib. |
In addition to the aforementioned CTI OS CIL libraries, your application requires:
-
The standard Microsoft sockets library, Wsock32.lib
-
The standard multimedia library, winmm.lib
-
The OpenSSL standard libraries:
A console C++ application with C++ CIL needs to use the following in stdafx.h:
#pragma once
#define WIN32_LEAN_AND_MEAN // Exclude rarely-used stuff from Windows headers
#include <iostream>
#include <tchar.h>
Use the following libraries in linker in addition to the CIL libraries:
Configure Project Settings for Compiling and Linking
You must configure some program settings to set up your Visual C++ 8.0(1) application.
You access
the Program Setting in Visual C++ 8.0(1) under the
menu.

In the Project Settings dialog box, select the C/C++ tab, select "General" and then select "Additional include Directories". Provide either the absolute or relative path to find the header files (.h) required for your application. This path points to the CTIOSToolkit\Win32 CIL\Include directory, where the CIL header files are installed.
In the Property Pages dialog box, select the C/C++ folder. Select Code Generation. For a Debug Mode program, the setting for "Runtime Library" is "Multi-threaded Debug DLL (/MDd)". For a Release Mode program, the setting is "Multi-threaded DLL (/MD)."
Under the "Preprocessor," set the "Preprocessor Definitions". You need to provide the compiler with the following define constants _USE_NUMERIC_KEYWORDS=0;_WIN32_WINNT=0x0500; WIN32_LEAN_AND_MEAN in addition to the defaults.
You must set the following settings for the C++ compiler:
_CRT_SECURE_CPP_OVERLOAD_STANDARD_NAMES=1
_CRT_SECURE_CPP_OVERLOAD_STANDARD_NAMES_COUNT=1

Next, set
the link settings for your project, under the Link folder. You must list all
the static libraries (in the section
Header Files and Libraries)
for your program to link with the settings described in
Configure Project Settings for Compiling and Linking.
The libraries required for CIL (in addition to the default libraries) are
described in the section
Header Files and Libraries.

Finally, on the Link folder, select "General" to "Input." Set the "Additional Library Directories:" to the location of the CTIOSToolkit\Win32 CIL\Libs directory.
These are all the Project Settings required for CTI OS. Click OK, and save your project settings.

Subscribe for Events for in C++
The publisher-subscriber model provides event interfaces in C++. To subscribe for events, you must create a callback class (event sink), or implement the event interface in your main class. You can derive the callback class from the Adapter classes defined in CIL.h, such as AllInOneEventsAdapter.h.
To register for an event, use the appropriate AddEventListener method on the Session object:
// Initialize the event sink
m_pEventSink = new CEventSink(&m_ctiSession, &m_ctiAgent, this);

// Add event sink as an event listener
m_ctiSession.AddAllInOneEventListener((IAllInOne *) m_pEventSink);
To remove an event listener (upon program termination), use the appropriate RemoveEventListener on the Session object:
// Tell session object to remove our event sink
m_ctiSession.RemoveSessionEventListener((IAllInOne *) m_pEventSink);
STLPort
Version 7.1(1)(0) of the Cisco CTI OS Toolkit no longer uses STLPort. It now uses Microsoft's version of STL, which removes any special configuration of the build environment.
Additional Information
-
For more information about the CTI OS client start up and shut down sequence, see the section Disconnect from CTI OS Server Before Shutdown.
-
For more information about the CTI OS Client Interface Library objects, see Chapters 6 through 11.
-
For a complete sample application that uses the CIL interface with C++ static libraries, see the C++ phone sample application on the CTI OS CD.
Java CIL Libraries
The Java CIL provides a powerful cross-platform library for developing Java CTI applications. This Java API allows the creation of multiplatform client application that can be executed either in MS Windows or Linux. JavaTM CIL is built to support the 1.6 Java Development Kit (JDK) and JREIt is built using a similar architecture to the C++ CIL. The interface is similar to C++ with some minor differences. A developer porting a C++ CIL application to Java or working between a Java and C++ should find it fairly easy to switch between the two.
The Java CIL consists of two packages contained in a single JAR file called JavaCIL.jar. The packages are com.cisco.cti.ctios.util and com.cisco.cti.ctios.cil. You can use CTI OS Client Install to install the Java CIL on Windows or you can copy it directly from the CTIOS_JavaCIL directory on the CTI OS media under Installs\CTIOSClient. The Java CIL also includes JavaDoc with the distribution. No install is provided for Linux. You need to mount the CDROM and copy the CTIOS_JavaCIL directory from the media. You can check the Java CIL version by using the CheckVersion.bat program in Windows or the checkversion shell script on Linux. Both of these are in the same directory as the JAR file.
Sun JRE installers are also included on the media as a convenience for developers who need to obtain the correct version of the JRE.
The Java CIL ships with a GUI TestPhone application that provides most of the functionality found on the CTI OS Agent and Supervisor Desktops. The distribution also includes samples that are Java versions of some of the C++/COM/VB sample applications. For more information, see Developer Sample Applications.
The CTI OS Java Test Phone was updated and compiled with CTI OS Java CIL 8.0(1) using the JDK/JRE 1.6_01 for Linux and was functionally tested on Red Hat Linux Enterprise 5.0.
Note | Although Cisco ships an older version of JDK, which is JDK 1.6, you can upgrade to the latest version (such as JDK 1.8), to solve any security vulnerabilities and explore the additional features it provides. As per the third-party software support policy that applies to both JRE and Java, you can apply the latest version, roll back, or remove it if you encounter any issues. Cisco has not explicitly qualified the latest version of JDK with Java CIL |
Additional Information
-
For more information about differences between the C++ and Java event publishing, see Event Interfaces and Events and Keywords.
-
For more information about differences in method calls and syntax for those classes between C++ and Java, see CtiOs Object.
-
For more information about differences between C++ and Java tracing, see CTI OS Client Logs (COM and C++).
.NET CIL Libraries
The .NET CIL provides native .NET class libraries for developing native .NET Framework applications. It is built using the same architecture as the Java CIL and the interface is similar to C++. As a result, a developer porting a C++ CIL application to .NET CIL between a .NET and Win32 should find it fairly easy to switch between the two. The .NET Client Interface Library (.NET CIL.) API provides native support for the Microsoft .NET Framework Common Language Runtime 2.0 (CLR). You can use the API with all major .NET Programming languages (C#, VB.NET, Managed C++, ASP.NET, etc). The API is deployed as .NET Assemblies that are registered in the system Global Assembly Cache (GAC).
The .NET CIL consists of two class libraries: NetCil.dll and NetUtil.dll that must be added as references on the build project. See the CTI OS Toolkit Combo Desktop sample.
To deploy the client application, use the Global Assembly Cache Tool (gacutil.exe) that is included with Microsoft Visual Studio .NET 2005 or the Microsoft .NET Framework 1.1 Configuration Manager to install the NetCil.dll and NetUtil.dll class libraries on the host Global Assembly Cache (GAC). Included with the .NET CIL libraries are sample programs that teach the use of the API in a .NET programming environment. For more information, see Developer Sample Applications
Note | In addition to NetCil.dll and NetUtil.dll, the .NET Combo sample requires the CTIOSVideoCtl.dll, which is in: C:\Program Files\Cisco Systems\CTIOS Client\CTIOS Toolkit\dotNet CIL\Controls. |
Additional Information
-
For more information about the differences between the C++, and .NET and Java event publishing, see Event Interfaces and Events and CTI OS Client Logs (COM and C++).
-
For more information about the differences in method calls and syntax for those classes between C++ and Java, see CtiOs Object.
CTI OS Server Connection
To connect a desktop application to the CTI OS server, you must:
-
Create a session instance, described below.
-
Set the event listener and subscribe to events, described below.
-
Set connection parameters, described below.
-
Call the Connect() method, described on Connect Session to CTI OS Server.
-
Set the connection mode, described on Connection Mode. This section also describes how to deal with connection failures, on Connection Failures.
Although the Cisco Security Agent (CSA) is now in end-of-life status and no longer supported, if your system is a duplexed Unified CCE PG with a CSA installed and one side of the CTI OS server is not running, CSA does not respond to login requests on the CTI OS server port. This triggers a time-out (20 second delay) before you attempt to connect to the active CTIOS server in the CTI OS client machine TCP stack. On start-up or login, the CTI OS client randomly chooses a CTI OS server side to connect and it may connect to the server side that is not running.
To avoid this delay/time-out, you must:
- Connect to CTI OS Server
- Set Event Listener and Subscribe to Events
- Set Connection Parameters for Session
- Connect Session to CTI OS Server
- Connection Failures
- Connection Mode
- Settings Download
- Disconnect from CTI OS Server Before Shutdown
Connect to CTI OS Server
To connect to the CTI OS Server, you must first create an instance of the CtiOsSession object.
The following line shows this in Java:
CtiOsSession rSession = new CtiOsSession();
Session Object Lifetime (C++ Only)
In C++, you must create a Session object on the heap memory store so that it can exist beyond the scope of the method creating it. (In COM, VB, and Java, this is handled automatically.)
CCtiOsSession * m_pSession = NULL;
m_pSession = new CCtiOsSession();
The client application holds a reference to the Session object as long as it is in use, but the client programmer must release the last reference to the object to prevent a memory leak when the object is no longer needed.
During application cleanup, you must dispose the Session object only by invoking the CCtiOsSession::Release() method. This ensures proper memory cleanup.
m_pSession->Release();
Set Event Listener and Subscribe to Events
Before making any method calls with the Session instance, you must set the session as an event listener for the desktop application and subscribe to events.
The following lines show this in Java:
rSession.AddEventListener(this, CtiOs_Enums.SubscriberList.eAllInOneList);
In this example, the session is adding the containing class, the desktop application as the listener, and using the eAllInOneList field in the CtiOs_Enums.SubscriberList class to subscribe to all events.
Set Connection Parameters for Session
| Step 1 | Create an instance of the Arguments class. | ||
| Step 2 | Set values for the CTI OS servers, ports, and the heartbeat value.
The following example demonstrates this task in Java: /* 1. Create Arguments object.*/ Arguments rArgs = new Arguments(); /* 2. Set Connection values.*/ rArgs.SetValue(CTIOS_enums.CTIOS_CTIOSA, "CTIOSServerA"); rArgs.SetValue(CTIOS_enums.CTIOS_PORTA, 42408); rArgs.SetValue(CTIOS_enums.CTIOS_CTIOSB, "CTIOSServerB"); rArgs.SetValue(CTIOS_enums.CTIOS_PORTB, 42408); rArgs.SetValue(CTIOS_enums.CTIOS_HEARTBEAT, 100); |
Note | The Arguments.setValue() methods return a boolean value to indicate whether the method succeeded (true) or not (false). |
Connect Session to CTI OS Server
After successfully creating the Session instance, you must connect it to the CTI OS Server using the Session.Connect() method, using the Arguments instance you constructed when setting connection parameters, as described in the previous section.
The following line shows this in Java:
int returnCode = session.Connect(rArgs);
For more information about the possible values and meanings of the int value returned by the Connect() method in the Java CIL, see Connection Attempt Error Codes in Java and .NET CIL.
When successful, the Connect() method generates the OnConnection() event. Code within the OnConnection() event sets the connection mode, as described in the next section.
Connection Failures
This section contains the following information:
Also see Deal with Failover in Monitor Mode.
- Connection Failure Events
- Connection Attempt Error Codes in Java and .NET CIL
- Configure Agent to Automatically Log In After Failover
- Stop Failover Procedure
Connection Failure Events
If the Connect() method does not succeed, one of the following events is generated:
OnConnectionRejected() event indicates that an unsupported version mismatch was found.
OnCTIOSFailure() indicates that the CTI OS Server requested in the Connect() method is down. If an OnConnectionFailure() event is generated, the application is in Failover and the CIL continues to attempt to connect until the connection succeeds or until the application calls Disconnect(). The Arguments parameter for the event includes the following keywords:
For more information on the contents of the OnConnectionFailure() event, see the description in Chapter 6.
Connection Attempt Error Codes in Java and .NET CIL
The following field values can be returned by the Connect() method. See the documentation for the CtiOs_Enums.CilError interface in the CIL JavaDoc for information on these fields.
-
CIL_OK - The connection process has successfully begun. The CIL either fires the OnConnection() event to indicate that the CIL successfully connected or fires the OnConnectionFailure() event and go into failover mode. If the latter occurs, the CIL continues to attempt to connect, alternating between hosts CTIOS_CTIOSA and CTIOS_CTIOSB, until the connection succeeds, at which point the CIL fires the OnConnection() event.
-
E_CTIOS_INVALID_ARGUMENT - A null Arguments parameter was passed to the Connect() method. The connection failed. No events are fired.
-
E_CTIOS_MISSING_ARGUMENT - The Arguments parameter did not contain values for both CTIOS_CTIOSA and CTIOS_CTIOSB. At least one of these values must be provided. The connection failed. No events are fired.
-
E_CTIOS_IN_FAILOVER - A previous connection attempt failed and the CIL is currently in failover and attempting to establish a connection. This continues until a connection is established, at which point the CIL fires an OnConnection() event indicating that the previous Connect() method succeeded. To attempt to connect again with different parameters, the application must first use the Disconnect() method.
-
E_CTIOS_SESSION_NOT_DISCONNECTED - The Session is not disconnected (i.e. a previous Connect() method is in progress, or the Session is already connected). The application must call the Disconnect() method before attempting to establish another connection. The CIL may fire an OnConnection() event for the to previous call to the Connect() method if the connection was in progress, but will not fire one corresponding to this method call.
-
E_CTIOS_UNEXPECTED - There was an unanticipated error. The connection failed. No events are fired.
Note | After the application receives a Connect return code of CIL_OK, it does not call Connect again on that session until it receives an OnConnectionClosed event after a call to Disconnect. |
Configure Agent to Automatically Log In After Failover
If you are using CTI OS in an Unified Contact Center Enterprise (Unified CCE) environment, you can configure the agent to automatically relogin in the event of a failover.
To configure the agent to log back in automatically, add the CTIOS_AUTOLOGIN keyword with the value "1" to the Arguments instance used to configure the agent:
rArgs.SetValue(CtiOs_IKeywordIDs.CTIOS_AUTOLOGIN, "1");
For more information on logging in an agent, see Log In an Agent.
Stop Failover Procedure
To stop the failover procedure, call the Disconnect(args) method, with the Arguments instance containing the CTIOS_FORCEDDISCONNECT keyword as a parameter.
Connection Mode
After you create the session, you must specify the connection mode for the session. You must use one of two modes:
- Set Connection Mode in OnConnection() Event Handler
- Agent Mode
- Select Agent Mode
- Monitor Mode
- Monitor Mode Filters
- Select Monitor Mode
- Deal with Failover in Monitor Mode
Set Connection Mode in OnConnection() Event Handler
To ensure that you only try to set the connection mode on valid connections, place the code to set the connection mode within the OnConnection() event handler. The OnConnection() event is generated by a successful Connect() method.
 Caution | The application contains logic within the OnConnection() event handler to ensure it attempts to set the connection mode only during the initial connection, and not in an OnConnection() event due to failover. |
Agent Mode
You use Agent mode for connections when the client application must log in and control a specific agent. When in Agent mode, the connection also receives call events for calls on that agent's instrument, as well as system events.
Select Agent Mode
To select Agent mode for the connection, in the OnConnection() event:
| Step 1 | Set properties
for the agent.
| ||
| Step 2 | Set the agent
for the Session object to that Agent object.
The following example, which assumes the Session object has been created and connected to the CTI OS Server, demonstrates this task in Java: void OnConnection(Arguments rArgs) {
/* 1. Create and agent and set the required properties. */
Agent agent = new Agent();
agent.SetValue(CtiOs_IKeywordIDs.CTIOS_AGENTID, "275");
agent.SetValue(CtiOs_IKeywordIDs.CTIOS_PERIPHERALID, "5002");
/* 2. Set the session's agent */
int returnValue = session.SetAgent(agent);
}
When successful, the SetAgent() method generates the following events: |
Monitor Mode
Use Monitor Mode for applications that need to receive all events that CTI OS Server publishes or a specified subset of those events. Monitor Mode applications may receive events for calls, multiple agents, or statistics. The session receives specific events based on the event filter specified when setting the session to Monitor Mode.
Caution |
Caution | When a Monitor Mode session is initialized, the CTI OS Server performs a CPU intensive sequence of operations to provide the application with a snapshot of the state of the system. A large number of Monitor Mode applications connecting to CTI OS server at the same time, such as in a fail-over scenario, can cause significant performance degradation on CTI OS Server. Therefore, minimize the number of Monitor Mode applications connecting to CTI OS Server to two (2). |
 Warning | Note that you can only use the button enablement feature in agent mode sessions and is not intended for Monitor Mode applications. |
Monitor Mode Filters
Overview Monitor Mode Filters
To set a connection to Monitor Mode, you must create a filter that specifies which events to monitor over that connection. The filter is a String; that String is the value for the CtiOs_IKeywordIDs.CTIOS_FILTER key in an Arguments instance. That Arguments instance is the argument for the SetMessageFilter() method.
Note | By default the CTIOS server does a snapshotting which results in sending the info about all agents to the monitor mode connection. You control the behavior using the CTIOS_MONITORSESSIONSNAPSHOTMODE argument in the messagefilter args. Use filter arg Enum_CtiOs.CTIOS_MONITORSESSIONSNAPSHOTMODE, 1 to turn off the snapshot. |
Filter String Syntax
The filter String you create to specify events to monitor must adhere to a specific syntax to accurately instruct the CTI OS Server to send the correct events.
The general syntax for the filter String is as follows:
"key1=value1, value2, value3;key2=value4, value5, value6"
Note | The filter String may also contain an asterisk (*), which is used as a wildcard to indicate any possible value. In addition, you can use a prefix to * to narrow the results. For example, using 10* matches 1001, 1002, 10003. However, CTI OS ignores any characters that follow the asterisk. For example, using 10*1 matches both 1001and 1002. |
The filter String must contain at least one key, and there must be at least one value for that key. However, a key can take multiple values, and the filter String can contain multiple keys.
Multiple values for a single key must be separated by commas (,). Multiple keys must be separated by semicolons (;).
Note | Multiple keys in a single filter combine using a logical AND. That is, the filter is instructing CTI OS to send to this connection only events that meet all the criteria included in the filter. |
For example, a filter String could be as follows:
S_MESSAGEID + "=" + CtiOs_Enums.EventID.eAgentStateEvent + ";" + S_AGENTID + "=5128";
This example works as follows:
-
The first key-value pair, S_MESSAGEID + "=" + CtiOs_Enums.EventID.eAgentStateEvent, serves to request events with a message ID equal to eAgentStateEvent; that is, it requests agent state events.
-
The second key-value pair, S_AGENTID + "=5128", specifies that the request is for the agent with the ID 5128.
-
The result of the filter then is that the connection receives agent state events for agent 5128.
Filter Keys
Filter keys can be any known key value used by CTI OS. These keys have corresponding fields in the CtiOs_IKeywords interface.
Note | When constructing the filter String, use the fields that begin with "S_", as these are the String values for the key. |
String sFilter = S_AGENTID + "=5128,5129,5130";
In this example, S_AGENTID is the String representation of the key indicating an Agent ID.
Filters for Events for Monitored Calls
If a client filter mode application wants to filter for events for monitored calls, the applications does the following:
Select Monitor Mode
| Step 1 | Specify the filter String. See the previous section for filter details. | ||
| Step 2 | Create an Arguments instance and add an item with CtiOs_IKeywordIDs.CTIOS_FILTER as the keyword and the filter String as the value. | ||
| Step 3 | Use the
CtiOsSession.SetMessageFilterArgs(args) method to select Monitor mode and to
set the event filter.
|
Caution | A Monitor mode application that monitors any Call-related events must also monitor the OnCallEnd() event, as described on OnCallEnd() Event Monitoring. |
The following example, which assumes the Session object has been created, demonstrates this task in Java:
/* 1. Constructing message filter string /

String filter = "messageid=" + eAgentStateEvent + "," + eAgentInfoEvent
+ "," + eCTIOSFailureEvent;

/* 2. Create the Arguments object*/
Arguments rArgs = new Arguments();

/* 3. Add the filter to the Arguments instance.*/
rArgs.SetValue(CtiOs_IKeywordIDs.CTIOS_FILTER, filter);

/* 3. Set the message filter.*/
int returnValue = session.SetMessageFilter(rArgs);
When successful, the SetMessageFilter() method generates the following events:
Deal with Failover in Monitor Mode
The CTI OS CIL does not support failover for Monitor Mode. Agents in Monitor Mode cannot recover their state after a failover. Furthermore, after a failover, the CTI OS CIL may leak Call objects.
| Step 1 | When the application detects a failover, for example, in a CTIOSFailure() event indicating a connection failure or an offline component, wait until the CIL has failed over and everything is back online and the CIL is connected to CTI OS. The Monitor Mode application determines when all required servers are online. You can do this by monitoring OnCtiosFailure() events and keeping track of system status changes as they occur. |
| Step 2 | Use the Disconnect() method to disconnect the session from CTI OS. |
| Step 3 | Follow the steps starting at the beginning of the section Silent Monitoring to: |
Settings Download
One of the many useful features of CTI OS is the ability to configure Agent Desktop settings after what is on the server and have them available to all agent desktops via the RequestDesktopSettings() method. You can make any changes after what is on the server instead of changing each and every desktop. Settings download are considered as part of the process of setting up a connection that the client application uses.
Desktop settings are stored in the registries on the machines running CTI OS Server. Centralizing the desktop settings on the server streamlines the process of changing or updating the agent desktop. A settings download occurs every time a client application connects and ensures that all the desktops are based on the same settings.
You can downloading settings from CTI OS Server after connecting and setting the mode via the RequestDesktopSettings() method on the Session object. The OnGlobalSettingsDownloadConf event indicates success and also returns the settings which are now available to the client application in the form of properties on the Session object. You can access these properties via the GetValue() methods. Refer to Chapter 9 for a list of all the properties of the Session object.
You can make the request for desktop settings either in the OnConnection event or in the OnSetAgentModeEvent event (if Agent mode has been specified). Sample code:
Private Sub m_Session_OnConnection(ByVal pDispParam As Object)
'Issue a request to the server to send us all the Desktop 'Settings
m_Session.RequestDesktopSettings eAgentDesktop

End Sub
The OnGlobalSettingsDownloadConf event passes back the settings and you can access them via the Session object. For example, the following snippet checks for Sound Preferences and specifically to see if the Dial Tone is Mute or not:
Private Sub m_session_OnGlobalSettingsDownloadConf(ByVal pDispParam As Object)

Dim SoundArgs As CTIOSARGUMENTSLib.Arguments
' check if "SoundPreferences is a valid property

If m_session.IsValid("SoundPreferences ") = 1 Then
  Set SoundArgs = m_session.GetValue("SoundPreferences")
  Dim DialToneArgs As CTIOSARGUMENTSLib.Arguments
   If Not SoundArgs Is Nothing Then
      If SoundArgs.IsValid("DialTone") = 1 Then
          Set DialToneArgs = SoundArgs.GetValue("DialTone")
      End If
   End If

   Dim Mute As Integer
   If Not DialToneArgs Is Nothing Then
     If DialToneArgs.IsValid("Mute") = 1 Then
       Mute = DialToneArgs.GetValueInt("Mute")
       If Mute = 1 Then
         MsgBox "Dial Tone MUTE"//Your logic here
       Else
         MsgBox "Dial Tone  NOT MUTE"//Your logic here
       End If
     End If
End If
End If
End Sub
Disconnect from CTI OS Server Before Shutdown
Disconnecting from CTI OS Server (via the Disconnect() method) before shutting down is an important part of the client application functionality. The Disconnect() method closes the socket connection between the client application and CTI OS. On most switches, it does not log the agent out. If no logout request was issued before the Disconnect(), then on most switches the agent stays logged into the instrument even after the client application has shut down.
Note | Disconnect is a higher priority method than all others. Before calling Disconnect, ensure that all prior requests have completed lest the call to Disconnect abort these requests. For example, calling Disconnect immediately after calling Logout can result in an agent not being logged out. |
Upon Disconnect(), each object maintained by the Session (Call, Skillgroup, Wait) is released and no further events are received. Cleaning up the Agent object is the developer's responsibility because it was handed to the Session (via the SetAgent()) method.
In the C++ and COM CIL only, to disconnect from CTI OS Server when the session mode has not yet been established by means of calling either CCtiOsSsession::SetAgent(...) or CCtiOsSsession::SetMessageFilter(...), you must call for disconnect with an Arguments array containing the CTIOS_FORCEDDISCONNECT set to True.
m_session.Disconnect
// Perform disconnect
       if(m_ctiSession->GetValueInt(CTIOS_CONNECTIONMODE) == eSessionModeNotSet )
       {  // If the session mode has not yet been set by SetAgent or
                           // SetSessionMode at the time of the disconnect.
         // we need to indicate the session that a disconnect needs to
         // be forced
         bool   bAllocOk = true;
         Arguments * pDisconnectArgs = NULL;
         bAllocOk = Arguments::CreateInstance(&pDisconnectArgs);

         if ((false==bAllocOk) || (pDisconnectArgs == NULL))
         {
            CDialog::OnClose();
            argsWaitParams.Release();
            return;
         }

         pDisconnectArgs->AddItem(CTIOS_FORCEDDISCONNECT,true);
         m_ctiSession->Disconnect(*pDisconnectArgs);
         pDisconnectArgs->Release();
       }
       else
       {
         m_ctiSession->Disconnect();
       }
Agent Login and Logout
Log In an Agent
When the connection to the CTI OS Server is established and the mode set, you log in the agent.
Note | Before attempting to log in an agent, you typically request global configuration data to correctly handle a duplicate log in attempt. For more information, see Get Registry Configuration Values to Desktop Application. |
| Step 1 | Create an instance of the Arguments class. | ||||
| Step 2 | Set log in
values for the agent in the Arguments instance.
| ||||
| Step 3 | Log in the
agent.
The following example, which assumes the Agent object has been created, demonstrates this task in Java: public void SetAgentMode(Arguments rArgs) {
/* 1. Create Arguments object*/
Arguments rArgs = new Arguments();
/* 2. Set log in values.*/
rArgs.SetValue(CtiOs_IKeywordIDs.CTIOS_AGENTID, "275");
rArgs.SetValue(CtiOs_IKeywordIDs.CTIOS_PERIPHERALID, "5002");
rArgs.SetValue(CtiOs_IKeywordIDs.CTIOS_AGENTINSTRUMENT, "5002")
rArgs.SetValue(CtiOs_IKeywordIDs.CTIOS_AGENTPASSWORD, "********");
rArgs.SetValue(CtiOs_IKeywordIDs.CTIOS_AUTOLOGIN, "1");
/* 3. Log in the agent.*/
int returnValue = agent.Login(rArgs);
}
The Login() method generates the following events:
When not successful, the Login() method generates the eControlFailureConf() event. |
Duplicate Login Attempts
- Overview of Duplicate Login Attempts
- Create Values in CTI OS Server Registry to Control Duplicate Login Attempts
- Agent Login with Incorrect Credentials
- Get Registry Configuration Values to Desktop Application
- Detect Duplicate Login Attempt in Desktop Application
- Handle Duplicate Login Attempts in Desktop Application
Overview of Duplicate Login Attempts
A duplicate log in attempt occurs when an agent who is already logged in tries to log in a second time using the same ID. Desktop applications must account for such a possible situation and have a plan for dealing with it.
You can handle duplicate log in attempts in three ways:
-
Allow the Duplicate Log In with No Warning
-
Allow the Duplicate Log In with a Warning
-
Do not allow a duplicate log in
You control how duplicate log in attempts are handled in two ways:
-
By configuring how duplicate log in attempts are handled on a global basis by creating custom values in the CTI OS Server Registry. By using custom values in the CTI OS Server registry to control how duplicate log in attempts are handled and downloading these settings to your desktop application as described in Log Out an Agent, you can enable flexibility without having to modify your desktop application code.
-
By implementing code in your desktop application to detect and to handle the duplicate log in attempt error according to the custom values in the CTI OS Server Registry. You can write code to handle duplicate log in attempts in each of the three ways listed above. When you need to change how such attempts are handled, you simply change the registry settings; you would not have to change the desktop application code.
Create Values in CTI OS Server Registry to Control Duplicate Login Attempts
You can create keys in the CTI OS Server Registry that instruct desktop applications to handle duplicate log in attempts in a specific way.
Warning | The CTI OS CIL Two has keys that exist by default in the registry: WarnIfAlreadyLoggedIn and RejectIfAlreadyLoggedIn. You must not use these keys in your desktop application. You must instead create other keys as described in this section. |
The custom keys you create can be set to 0 (False) or 1 (True).
The following table lists the settings to control how duplicate log in attempts are handled:
|
Goal |
custom_WarnIfAgentLoggedIn |
custom_RejectIfAgentLoggedIn |
|---|---|---|
|
To warn the agent of the duplicate log in attempt, but to allow the agent to proceed. |
1 |
0 |
|
To allow the agent to proceed with the duplicate log in attempt with no warning. |
0 |
0 |
|
To not allow the agent to proceed with a duplicate log in attempt. |
0 or 1 |
1 |
| Step 1 | Open the registry and navigate to: HKEY_LOCAL_MACHINE\Software\Cisco Systems, Inc.\CTIOS\[CTI Instance Name]\CTIOS1\EnterpriseDesktopSettings\AllDesktops\Login\ConnectionProfiles\Name\[Profile Name]. |
| Step 2 | Right click in the registry window and select . The new value appears in the window. |
| Step 3 | Change the value name to custom_WarnIfAgentLoggedIn. |
| Step 4 | Double-click the value to open the Edit DWORD Value dialog box. |
| Step 5 | Enter 1 in the Value data field to set the value to true, or 0 to set it to false. |
| Step 6 | Repeat steps 2 through 5 for the value custom_RejectIfAgentLoggedIn. |
Agent Login with Incorrect Credentials
To prevent another agent log in with incorrect credentials, use the SendIdentifyClientRequest method to identify and detect the log in request.
Set the Method Argument to Nil. To invoke this method, use the session object.
C++: int SendIdentifyClientRequest()
.NET: CilError SendIdentifyClientRequest()
Java: int SendIdentifyClientRequest()
Following is an example of how to use the method:
if (CIL_OK != SessionObj.SendIdentifyClientRequest())
{
    LOG(CRITICAL, "CCtiOsSession::SetAgent(...), SendIdentifyClientRequest: authentication
 will fail, aborting..");
    ReportError(CIL_FAIL);
    return CIL_FAIL;
}
Get Registry Configuration Values to Desktop Application
To get CTI OS registry configuration values to your desktop application to handle duplicate log in attempts correctly, you must request global configuration settings, then extract the custom settings from the event. You typically do this task before attempting to log in an agent, in the OnConnection() event.
| Step 1 | Create an instance of the Arguments class. | ||
| Step 2 | In the Arguments instance, set the value for the CTIOS_DESKTOPTYPE
key to either:
| ||
| Step 3 | Request desktop settings for the session using the
RequestDesktopSettings() method. This results in a
OnGlobalSettingsDownloadConf() event.
The following example demonstrates steps 1 through 3 in Java:
/* 1. Create Arguments object*/
Arguments rArgs = new Arguments();

/* 2. Set the desktop type.*/
rArgs.SetValue("CTIOS_DESKTOPTYPE",
 CtiOs_Enums.DesktopType.eAgentDesktop);

/* 3. Request desktop settings. This should cause CTI OS to send the
OnGlobalSettingsDownloadConf event.*/
int returnValue = session.RequestDesktopSettings(rArgs);
| ||
| Step 4 | In the OnGlobalSettingsDownloadConf() event, get the Arguments instance for Login configuration from the event Arguments parameter. Use the S_LOGIN key from the CtiOs_IKeywordIDs interface. | ||
| Step 5 | Get the Arguments instance for the correct switch from the Login Arguments instance. The example below uses the "SoftACD" login configuration information, the key for which is established by the CTI OS Server installation. | ||
| Step 6 | Get the Integer instances for the custom values you established for the key in the CTI OS Server registry. | ||
| Step 7 | For convenience, get the int values for those Integers to test
with, as described in the section
Duplicate Login Attempts.
The following example demonstrates steps 4 through 7 in Java:
void OnGlobalSettingsDownloadConf(Arguments rArgs) {

     /* 4. Get the Arguments instance for the Login configuration
     information from the event Arguments parameter.*/

 Arguments logInArgs = rArgs.getValueArray(CTIOS_LOGIN);

/* 5. Get the Arguments instance for the Connection Profile
from the Login Arguments instance. */

Arguments connectionProfilesArgs = logInArgs.GetValueArray(CTIOS_CONNECTIONPROFILES);

/* 6. Get the Arguments instance for the specific switch from the Connection
Profiles instance */

Arguments IPCCLogInArgs = connectionProfilesArgs.GetValueArray("SoftACD")

/* 7. Get the Integer instances for the custom values you entered in the CTI OS Server registry.*/

      Integer warningIntObj = IPCCLogInArgs.GetValueIntObj("custom_WarnIfAgentLoggedIn");

      Integer rejectIntObj =IPCCLogInArgs.GetValueIntObj("custom_RejectIfAgentLoggedIn");

/* 8. Get the int values for those object to test later.*/

      custom_WarnIfAgentLoggedIn = warnIntObj.intValue();
      custom_RejectIfAgentLoggedIn = rejectIntObj.intValue();
}
|
Detect Duplicate Login Attempt in Desktop Application
You detect the duplicate log in attempt in the OnQueryAgentStateConf() event, which is sent after the application calls SetAgent():
| Step 1 | Get the agent state value from the Arguments instance passed to the event. |
| Step 2 | Test the agent state value in the CtiOs_Enums.AgentState
interface, as follows.
(state != eLogout) && (state != eUnknown) |
| Step 3 | If the test is true, handle the duplicate log in attempt as
described in the next section.
The following example demonstrates this task in Java: public void eQueryAgentStateConf(Arguments rArgs) {
/* 1. Get the agent state value*/
Short agentState = rArgs.getValueShortObj(CTIOS_AGENTSTATE)
/*Test the agent state*/
if (agentState.intValue() != eLogout
&& agentState.intValue() != eUnknown) {
/*If the agent is logged in, handle duplicate log in attempt.*/
}
}
|
Handle Duplicate Login Attempts in Desktop Application
If you detect from the OnQueryAgentStateConf() event that the agent is already logged in as described in the previous section, do the following:
Log Out an Agent
| Step 1 | Create an instance of the Arguments class. | ||
| Step 2 | Set log out
values for the agent in the Arguments instance.
| ||
| Step 3 | Log out the
agent.
The following example demonstrates this task in Java: /* 1. Create Arguments object*/ Arguments rArgs = new Arguments(); /* 2. Set log out values.*/ rArgs.SetValue(CTIOS_EVENTREASONCODE, 1); /* 3. Log out the agent.*/ int returnValue = agent.Logout(rArgs); |
Typical Logout Procedure
When the Logout button is clicked the following actions need to happen:
-
Call Logout request on your current agent.
You need to call Logout and not use SetAgentState(eLogout), because Logout provides additional logic to support pre-Logout notification, Logout failure notification, and resource cleanup.
Here is the sample code for the same:
if(m_ctiAgent) { Arguments &rArgAgentLogout = Arguments::CreateInstance(); //add reason code if needed rArgAgentLogout.AddItem(CTIOS_EVENTREASONCODE, reasonCode); int nRetVal = m_ctiAgent->Logout(rArgAgentLogout); rArgAgentLogout.Release(); } -
Receive a response for the Logout request.
You can expect the following events in response to a Logout request:
-
OnAgentStateChange (with Logout agent state).
or
OnControlFailure (with the reason for the failure).
-
OnPostLogout (you additionally receive this event if the Logout request succeeds).
Note
You can disable statistics either prior to issuing the Logout request or upon receipt of the OnAgentStateChange to logout state. Use the OnPostLogout event to trigger session disconnect. This guarantee that all event listeners can make CTI OS server requests in response to the logout OnAgentStateChange event.See the following example code:
void CMyAppEventSink::OnPostLogout(Arguments & rArguments )
{
   // Do not Disconnect if the reason code is Forced Logout
   // (particular failover case):
   int nAgentState = 0;
   if ( rArguments.GetValueInt(CTIOS_AGENTSTATE, &nAgentState) )
   {
      if (nAgentState == eLogout)
      {
         int nReasonCode = 0;
         if ( rArguments.GetValueInt(CTIOS_EVENTREASONCODE,
                                               &nReasonCode) )
         {
            if (CTIOS_FORCED_LOGOUT_REASON_CODE ==
                                      (unsigned short)nReasonCode)
            {
               return;
            }
         }
      }
   }

   //Disconnect otherwise
   if( IsConnected() ) //if session is connected
   {
      if(m_ctiSession)
      {
         m_ctiSession->Disconnect();
      }
   }
}
-
-
If you are not concerned with whether the agent is successfully logged out prior to disconnect, issue a session Disconnect request without a Logout request.
-
Additionally, you must wait for OnConnectionClosed before destroying Agent and Session objects. This guarantee that the CIL has completed cleanup of the Session object prior to your calling Release on these objects.
-
Ensure that the Agent Object is set to NULL in the session before you Release the session object. For example, whenever your application is exiting and you are disconnecting the session object (for example, when the user closes your application window) do something similar to the code below:
if (m_ctiSession)
{
    m_ctiSession->Disconnect();

    // stop all events for this session
    int nRetVal =
        m_pctiSession->RemoveAllInOneEventListener((IAllInOne *)
                                                 m_pmyEventSink);


//The application is closing, remove current agent from session
    CAgent * pNullAgent = NULL;
    m_Session->SetAgent(*pNullAgent);
    m_Session->Release();
    m_Session = NULL;
}

if(m_ctiAgent)
{
    m_ctiAgent->Release();
    m_ctiAgent = NULL;
}

if (m_pmyEventSink)
{
    m_pmyEventSink->Release();
    m_pmyEventSink = NULL;
}
Calls
- Multiple Call Handling
- Current Call
- Get Call Object from Session
- Set Current Call for Session
- Call Wrapup
- Logout and NotReady Reason Codes
- Applications and OnButtonEnablementChange() Event
Multiple Call Handling
It is critical that you design an Agent Mode desktop application to store all the calls on the specific device to do the following:
-
Apply incoming events to the correct call
-
Select the correct call on which to make method calls (for example, telephony requests)
It is not necessary to maintain a set of Call objects to do this. Instead, the application can store the string UniqueObjectID of each call (keyword CTIOS_UNIQUEOBJECTID). CTIOS_UNIQUEOBJECTID is always included in the args parameter for each call event. You can obtain the actual Call object with the Session object's GetObjectFromObjectID() method to make a method call.
Current Call
The CIL maintains a concept of a Current Call, which is the call for which the last OnButtonEnablementChange() event was fired. Knowing which call is the Current Call is useful when there are multiple components which set and act on the Current Call, such as telephony ActiveX Controls.
The CTI OS ActiveX controls included in the CTI OS Toolkit use the concept of the Current Call. The CallAppearance grid control sets the Current Call when the user clicks on a particular call in the grid. When the user clicks the Answer control, this control must get the Current Call to call the Answer() method on the correct call.
The Current Call is set according to the following rules:
-
When there is only 1 call on a device, the CIL sets it to the Current Call.
-
When there are multiple calls on a device and an application wants to act on a call that is not the Current Call, it sets a different call to the Current Call with the SetCurrentCall() method.
-
When the call which is the Current Call ends, leaving multiple calls on the device, the application must set another call to be the Current Call.
-
Whenever the Current Call is set to a different call, OnCurrentCallChanged() event is fired as well as an OnButtonEnablementChange() event.
Get Call Object from Session
You can get the Call object from the session using the GetObjectFromObjectID() method.
The following code fragment, which assumes that existing Call Unique Identifiers are stored in an array called UIDArray, shows how to get a specific Call object in Java:
String sThisUID = UIDArray[Index];
Call ThisCall =  (Call) m_Session.GetObjectFromObjectID(sThisUID);
Set Current Call for Session
To set the current call you use the SetCurrentCall() method for the Session. The following code fragment, which assumes you retrieved the Call object as described in the previous section, shows how to set the current call.
The following line shows this in Java:
m_Session.SetCurrentCall(ThisCall);
Call Wrapup
The agent/supervisor desktop behaves differently at the end of a call depending on the following factors:
-
The direction of the call (inbound or outbound)
-
Configuration of Unified CCE or the ACD (whether wrapup data is required, optional, or not allowed)
-
Configuration of CTI OS server
The CTI Toolkit Combo Desktop .NET sample shows how to use this information to display a wrapup dialog box that allows the agent to select from a set of pre-configured wrapup strings after an inbound call goes into wrapup state (see ProcessOnAgentStateEvent in SoftphoneForm.cs). On an agent state change event, if the state changes to WorkReady or WorkNotready state, this indicates that the agent has transitioned to call wrapup state. The CTI OS server provides the following key/value pairs in the event arguments to determine whether wrapup data is associated with the call and whether that data is required or optional.
CTIOS_INCOMINGOROUTGOING indicates the direction of the call. The defined values are:
0 = the direction of the call is unknown
1 = the call is an incoming call and the agent may enter wrapup data
2 = the call is an outgoing call and the agent may not enter wrapup data
You can use the GetValueInt method to obtain this value on the Agent object.
CTIOS_WRAPUPOKENABLED indicates whether wrapup data is required for the recently ended call. A value of false indicates that wrapup data is not required. A value of true indicates that wrapup data is required. (In the Combo Desktop sample, this value is used as a boolean to determine whether the "Ok" button on the wrapup dialog box is enabled when no wrapup information is selected.) You can use the GetValueBool method to obtain this value on the Agent object.
The wrapup strings that are configured on CTI OS server are sent to the client during the login procedure and are stored under the keyword CTIOS_INCOMINGWRAPUPSTRINGS as an Arguments array within the Agent object. You can use the GetValueArray method to obtain the wrapup strings on the Agent object. For more information about how to configure wrapup strings on CTI OS server see the CTI OS System Manager Guide for Cisco Unified ICM/Contact Center Enterprise.
Logout and NotReady Reason Codes
Depending on the configuration of Unified CC or the configuration of CTI OS server, the agent/supervisor desktop may be required to supply a reason code when requesting an agent state change to Logout or NotReady state. The CTI Toolkit Combo Desktop .NET sample provides examples of how to implement reason codes in an agent/supervisor desktop. (See the btnLogout_Click and btnNotReady_Click methods in SoftphoneForm.cs.)
CTI OS server informs the CTI OS client of this configuration during the login process and the information is stored in the following properties on the Agent object:
CTIOS_LOGOUTREASONREQUIRED - This boolean value indicates whether a reason code is required for logout. A value of true indicates that a reason code is required. A value of false indicates that a reason code is not required. You can use the GetValueBool method to get this value on the Agent object.
CTIOS_LOGOUTREASONCODES - This Arguments array provides a list of the logout reason codes configured on CTI OS server. You can use the GetValueArray method to get this value on the Agent object.
CTIOS_NOTREADYREASONREQUIRED - This boolean value indicates whether a reason code is required when setting an agent to NotReady state. A value of true indicates that a reason code is required. A value of false indicates that a reason code is not required. You can use the GetValueBool method to obtain the value on the Agent object.
CTIOS_NOTREADYREASONCODES - This Arguments array provides a list of the not ready reason codes configured on CTI OS server. You can use the GetValueArray method to obtain the value on the Agent object.
Applications and OnButtonEnablementChange() Event
An application receives an OnButtonEnablementChange() event in the following situations:
When the Current Call is changed.
When the call that is the Current Call receives an event, which includes a CTIOS_ENABLEMENTMASK argument. Usually the included enablement mask is changed from what it was set to, but occasionally it is the same. This mask is used to indicate which functions are allowed for this Call in its current state.
For example, when a Call receives an OnCallDelivered() event with a Connection State of LCS_ALERTING, its enablement mask is changed to set the Answer bit. When this Call is answered, and it receives the OnCallEstablished() event, the mask no longer sets the Answer bit, but instead enables the Hold, Release, TransferInit and ConferenceInit bits.
- In the OnButtonEnablementChange() Event
- Not Ready Bitmasks in OnButtonEnablementChange() Event
- OnButtonEnablementChange() Event in Supervisor Desktop Applications
In the OnButtonEnablementChange() Event
To see if a button should be enabled, do a bitwise "AND" with the appropriate value listed in the Table included under the OnButtonEnablementChange event in Chapter 6.
The following examples shows this in Java:
Integer IMask = rArgs.GetValueIntObj(CTIOS_ENABLEMENTMASK);
if (null != IMask) {
            int iMask = IMask.intValue();
     if (iMask & ENABLE_ANSWER) {
            //Enable the AnswerCall button
              }
     else {
           //Disable the AnswerCall button
            }
}
     // else do nothing
Not Ready Bitmasks in OnButtonEnablementChange() Event
A client application receiving the OnButtonEnablementChange() event must check both the ENABLE_NOTREADY and ENABLE_NOTREADY_WITH_REASON bitmasks in the event.
Caution | Failure to check both the ENABLE_NOTREADY and ENABLE_NOTREADY_WITH_REASON bitmasks can lead to problems properly displaying a NotReady control to the agent. |
The following example shows this in Java:
void OnButtonEnablementChange(Arguments rArguments) {
     m_appFrame.LogEvent("OnButtonEnablementChange", rArguments);

            // Get mask from message
            Long LMask = rArguments.GetValueUIntObj(CTIOS_ENABLEMENTMASK);
            if (null==LMask)
                         return;

     final long bitMask = LMask.longValue();

     /* Transfer modification of the GUI objects to the
EventDispatchThread or we could have a thread sync issue.  We're
currently on the CtiOsSession's event thread.*/

            SwingUtilities.invokeLater(new Runnable() {
                        public void run() {

    /* Enable a button if it's bit is
turned on.  Disable it if not.*/

                  m_appFrame.m_btnAnswer.setEnabled (((bitMask & ENABLE_ANSWER) > 0));
                  m_appFrame.m_btnConference.setEnabled
                           (((bitMask & ENABLE_CONFERENCE_COMPLETE) > 0));
                  m_appFrame.m_btnCCConference.setEnabled
                           (((bitMask & ENABLE_CONFERENCE_INIT) > 0));
                  m_appFrame.m_btnHold.setEnabled (((bitMask & ENABLE_HOLD) > 0));
                  m_appFrame.m_btnLogin.setEnabled (((bitMask & ENABLE_LOGIN)> 0));
                  m_appFrame.m_btnLogout.setEnabled
                     (((bitMask & (ENABLE_LOGOUT |

CtiOs_Enums.ButtonEnablement.ENABLE_LOGOUT_WITH_REASON)) >
                                                  0));
                    m_appFrame.m_btnMakeCall.setEnabled
                            (((bitMask & ENABLE_MAKECALL) > 0));
                    m_appFrame.m_btnNotReady.setEnabled(((bitMask & (ENABLE_NOTREADY |
                                    ENABLE_NOTREADY_WITH_REASON)) > 0));
                    m_appFrame.m_btnReady.setEnabled(((bitMask & ENABLE_READY) > 0));
                    m_appFrame.m_btnRelease.setEnabled(((bitMask & ENABLE_RELEASE)> 0));
                    m_appFrame.m_btnRetrieve.setEnabled
                               (((bitMask & ENABLE_RETRIEVE) > 0));
                    m_appFrame.m_btnSSTransfer.setEnabled
                               (((bitMask & ENABLE_SINGLE_STEP_TRANSFER)> 0));
                    m_appFrame.m_btnSSConference.setEnabled
                                  (((bitMask & ENABLE_SINGLE_STEP_CONFERENCE) > 0));
                    m_appFrame.m_btnTransfer.setEnabled
                                  (((bitMask & ENABLE_TRANSFER_COMPLETE)> 0));
                                  m_appFrame.m_btnCCTransfer.setEnabled
                        (((bitMask & ENABLE_TRANSFER_INIT) > 0));
                        }
         });
} // OnButtonEnablementChange
OnButtonEnablementChange() Event in Supervisor Desktop Applications
When a supervisor desktop application processes an OnButtonEnablementChange() event, the application checks for the CTIOS_MONITORED parameter and ignores this parameter if it is present and is TRUE. In a supervisor desktop application, the OnButtonEnablementChange() event can reflect button enablement for either a monitored team member or the supervisor.
Making Requests
Telephony requests are made through either an Agent object or a Call object by calling the appropriate API methods listed in Chapters 9 and 10. It is important to ensure that a user cannot make multiple duplicate requests before the first request has a chance to be sent to the switch and the appropriate events sent back to the application, because this results in either multiple failures or unexpected results.
Multiple Duplicate Requests
Because it is important for a custom application to prevent a user from making a number of duplicate requests, the user should not be able to click the same button multiple times. A custom application should disable a clicked button until it is all right for the user to click it again.
Some examples of when Sample softphones re-enable a button that was clicked and disabled are listed below:
-
Re-enable Connect/LoginBtn when:
-
Re-enable Logout/DisconnectBtn when:
-
Re-enable NotReadyBtn when:
-
Re-enable DialBtn, TransferBtn or ConferenceBtn when:
-
Re-enable TransferBtn & ConferenceBtn when:
-
Re-enable EmergencyBtn when:
-
Re-enable SupervisorAssistBtn when:
-
Re-enable any AgentStateBtn when:
-
Re-enable any of the buttons when:
Events
Event Order
A desktop application using the CTI OS API must handle events in the order they are sent by CTI OS.
Warning | Because many events include agent state data and button enablement data indicating valid agent state transitions, if events are handled out of order agents may not be presented with valid options. |
Coding Considerations for CIL Event Handling
The CTI OS CIL fires events to the application in a single thread. Keep the amount of time spent in a particular CIL event handler to a minimum to ensure timely delivery of subsequent CIL events. If a screenpop based on a call event (such as the OnCallDelivered event or the OnCallDataUpdate event) takes longer than a few seconds (for example, remote database lookup), delegate this operation to a separate thread or separate process so as not to block CTI OS event handling.
Note | The order of arrival of CIL events is highly dependent on the ACD that is in use at the customer site. Therefore, CIL event order is not guaranteed. Do not write your event handling code in a manner that relies on a particular event order. |
If an application calls a CIL API method from a CIL event callback routine it must ensure that the method call is made on the same thread as the CIL event callback. This rule applies to the following methods:
This rule must be followed in order to guarantee that events are fired from the CIL to the application in the proper sequence.
When handling events in the browser using JavaScript, keep event processing time to a minimum because all other JavaScript execution (e.g., handling of button clicks) may be blocked during handling of the event.
OnCallEnd() Event Monitoring
A Monitor Mode application that monitors any Call-related events must also monitor the OnCallEnd() event.
Warning | The Call object in the CTI OS CIL is only deleted when the OnCallEnd() event is received. If the OnCallEnd() and OnCallDataUpdate() events are not monitored, Call objects accumulate and cause a memory leak. |
Agent Statistics
- Overview of Agent Statistics
- Set Up Agent Application to Receive Agent Statistics
- Set Up Monitor Mode Application to Receive Agent Statistics
- Agent Statistics Access
- Agent Statistics Configuration
- Agent Statistics Computed by Sample CTI OS Desktop
Overview of Agent Statistics
This section describes how to work with agent statistics and contains the following subsections:
Set Up Agent Application to Receive Agent Statistics
| Step 1 | Create an instance of the Session class, as described on Connect to CTI OS Server. | ||||
| Step 2 | Subscribe for events for the session, as described on
Set Event Listener and Subscribe to Events.
| ||||
| Step 3 | Set connection parameters, as described on Set Connection Parameters for Session. | ||||
| Step 4 | Connect the desktop application to the CTI OS Server, as described on Connect Session to CTI OS Server. | ||||
| Step 5 | In the OnConnection() event handler, set the Agent for the session, as described on Select Agent Mode. | ||||
| Step 6 | Log in the agent, as described on Log In an Agent. | ||||
| Step 7 | Enable agents statistics using the EnableAgentStatistics() method.
| ||||
| Step 8 | To disable agents statistics, use the DisableAgentStatistics()
method.
The following example demonstrates this task in Java:
/* 1. Create session.*/
CtiOsSession rSession = new CtiOsSession();

/* 2. Add event listener.*/
rSession.AddEventListener(this,
      CtiOs_Enums.SubscriberList.eAgentList);

/* 3. Set Connection values.*/
Arguments rArgs = new Arguments();
rArgs.SetValue(CtiOs_IKeywordIDs.CTIOS_CTIOSA, "CTIOSServerA");
rArgs.SetValue(CtiOs_IKeywordIDs.CTIOS_PORTA, 42408);
rArgs.SetValue(CtiOs_IKeywordIDs.CTIOS_CTIOSB, "CTIOSServerB");
rArgs.SetValue(CtiOs_IKeywordIDs.CTIOS_PORTB, 42408);
rArgs.SetValue(CtiOs_IKeywordIDs.CTIOS_HEARTBEAT, 100);

/*4. Connect to server.*.
returnCode = rSession.Connect(rArgs);

public void OnConnection(Arguments rArgs) {

        /*5. Set agent for the session. */
        returnCode = rSession.SetAgent(agent);

        /* 6. Log in the agent.*/
        Arguments rArgs = new Arguments();
        rArgs.SetValue(CtiOs_IKeywordIDs.CTIOS_AGENTID, "275");
        rArgs.SetValue(CtiOs_IKeywordIDs.CTIOS_PERIPHERALID, "5002");
        rArgs.SetValue(CtiOs_IKeywordIDs.CTIOS_AGENTINSTRUMENT, "5002")
        rArgs.SetValue(CtiOs_IKeywordIDs.CTIOS_AGENTPASSWORD, "********");
        returnCode = agent.Login(rArgs);

        /* 7. Enable Agent statistics. */
        if (returnCode == CIL_OK) {
        agent.EnableAgentStatistics(new Arguments());
        }
}
|
Set Up Monitor Mode Application to Receive Agent Statistics
To set up a Monitor-mode application to receive agent statistics, follow the instructions below.
Note | The agent to monitor must be logged in Agent mode before a Monitor-mode application can receive statistics for that agent. CTI OS has a limitation in providing monitor-mode support to build agent desktop call-control applications, as well as having the ability to rely on button enablement messages. |
| Step 1 | Create an instance of the Session class, as described on Connect to CTI OS Server. | ||||
| Step 2 | Subscribe for events for the session, as described on
Set Event Listener and Subscribe to Events.
| ||||
| Step 3 | Set connection parameters, as described on Set Connection Parameters for Session. | ||||
| Step 4 | Connect the desktop application to the CTI OS Server, as described on Connect Session to CTI OS Server. | ||||
| Step 5 | Set a String variable to store the ID of the agent for which you
want statistics.
| ||||
| Step 6 | Set the message filter as described on
Filters for Events for Monitored Calls.
| ||||
| Step 7 | Wait for any event for the agent, to ensure that the Agent
instance exists for the Session.
| ||||
| Step 8 | Get the Agent instance from the Session using GetObjectFromObjectID() method. | ||||
| Step 9 | Enable agents statistics using the EnableAgentStatistics() method.
| ||||
| Step 10 | To disable agents statistics, use the DisableAgentStatistics()
method.
The following example demonstrates this task in Java:
/* 1. Create session.*/
CtiOsSession rSession = new CtiOsSession();

/* 2. Add event listener.*/
rSession.AddEventListener(this,
    CtiOs_Enums.SubscriberList.eAgentList);

/* 3. Set Connection values.*/
Arguments rArgs = new Arguments();
rArgs.SetValue(CtiOs_IKeywordIDs.CTIOS_CTIOSA, "CTIOSServerA");
rArgs.SetValue(CtiOs_IKeywordIDs.CTIOS_PORTA, 42408);
rArgs.SetValue(CtiOs_IKeywordIDs.CTIOS_CTIOSB, "CTIOSServerB");
rArgs.SetValue(CtiOs_IKeywordIDs.CTIOS_PORTB, 42408);
rArgs.SetValue(CtiOs_IKeywordIDs.CTIOS_HEARTBEAT, 100);

/*4. Connect to server.*.
int returnCode = rSession.Connect(rArgs);

/*5. Set String to AgentID*/
String UIDAgent = "agent.5000.5013";

/*6. Set the message filter. */
String filter = "MessageId=*;AgentId=5013;
rArgs = new Arguments();
rArgs.SetValue(CtiOs_IKeywordIDs.CTIOS_FILTER, filter);
returnCode = rSession.SetMessageFilter(rArgs);

/*7. Wait for agent events.*/

rArgs = new Arguments();

// Create a wait object in the session
WaitObject rWaitObj = rSession.CreateWaitObject(rArgs);

// Load the events into the Args for the wait object
rArgs.SetValue("Event1", eAgentStateEvent);
rArgs.SetValue("Event2", eQueryAgentStateConf);
rArgs.SetValue("Event3", eControlFailureConf);
rArgs.SetValue("Event4", eCTIOSFailureEvent);

// Set the mask for the WaitObject
rWaitObj.SetMask(rArgs);

// Wait for up to 9 seconds, and then give up
if (rWaitObj.WaitOnMultipleEvents(9000) != EVENT_SIGNALED)
{
    // Handle error ...
    return;
}

// Find out what triggered the wait
int iEventID = rWaitObj.GetTriggerEvent();
if (iEventID == eControlFailureConf|| iEventID == eCTIOSFailureEvent)
{
    // Handle error ...
    return;
}
|
Agent Statistics Access
- Overview of Agent Statistics Access
- eOnNewAgentStatisticsEvent() in Message Filter (JAVA)
- OnAgentStatistics() Event in Message Filter (C++ COM and VB)
- Get Agent Statistics Through Agent Instance
Overview of Agent Statistics Access
After you set up the applications to receive agent statistics, as described in the preceding section, you can access agent statistics in two ways:
-
By implementing the eOnNewAgentStatisticsEvent() (in Java) or the OnAgentStatistics() event (in C++, COM, or VB 6.0)
Caution | The name of the event to access agent statistics is different in Java when compared to other languages supported by CTI OS. |
The rest of this section describes these methods for accessing agent statistics.
eOnNewAgentStatisticsEvent() in Message Filter (JAVA)
To register to receive agent statistics, you must include the eOnNewAgentStatisticsEvent() in the message filter.
For example, in Java, the message filter to receive agent statistics is:
String filter = S_MESSAGEID + "=" +

CtiOs_Enums.EventID.eNewAgentStatisticsEvent;
For more information about message filters, see Monitor Mode Filters.
OnAgentStatistics() Event in Message Filter (C++ COM and VB)
To register to receive agent statistics, you must include the OnAgentStatistics() event in the message filter.
For more information about message filters, see Monitor Mode Filters.
Get Agent Statistics Through Agent Instance
After you use the EnableAgentStatistics() method for the agent, agent statistics are available through that Agent instance.
To get the agent statistics perform the following procedure:
| Step 1 | Get the Arguments instance containing statistics from the Agent instance using the GetValueArray() method. |
| Step 2 | Parse the Arguments instance as needed to get specific statistics.
The following example demonstrates this task in Java: /* 1. Get Arguments instance.*/ Arguments rArgs = agent.GetValueArray(CtiOs_IKeywordIDs.CTIOS_STATISTICS); /* 2. Parse as necessary. For example:*/ int availTimeSession = rArgs.GetValueIntObj(CtiOs_IKeywordIDs.CTIOS_AVAILTIMESESSION); |
Agent Statistics Configuration
You can change which agent statistics are sent to applications by modifying the registry on the CTI OS Server.
For more information about how to change which agent statistics are sent to applications by default, see the CTI OS System Manager Guide for Cisco Unified ICM/Contact Center Enterprise.
Agent Statistics Computed by Sample CTI OS Desktop
The sample CTI OS Desktop computes many agent statistics from data received from CTI Server. You may choose to develop applications that compute these same statistics. Therefore, these computed statistics (in italics) and the data and formulas used to derive them are listed below:
-
AvgTalkTimeToday = (AgentOutCallsTalkTimeToday + HandledCallsTalkTimeToday) / (AgentOutCallsToday + HandledCallsToday)
-
CallsHandledToday = AgentOutCallsToday + HandledCallsToday
-
TimeLoggedInToday = LoggedOnTimeToday
-
TimeTalkingToday = AgentOutCallsTalkTimeToday + HandledCallsTalkTimeToday
-
TimeHoldingToday = AgentOutCallsHeldTimeToday + IncomingCallsHeldTimeToday
-
TimeReadyToday = AvailTimeToday
-
TimeNotReadyToday = NotReadyTimeToday
-
AvgHoldTimeToday = (AgentOutCallsHeldTimeToday + IncomingCallsHeldTimeToday) / (AgentOutCallsToday + HandledCallsToday)
-
AvgHandleTimeToday = (AgentOutCallsTimeToday + HandledCallsTimeToday) / (AgentOutCallsToday + HandledCallsToday)
-
AvgIdleTimeToday = NotReadyTimeToday / (AagentOutCallsToday + HandledCallsToday)
-
PercentUtilitizationToday = (AgentOutCallsTimeToday + HandledCallsTimeToday) / (LoggedOnTimeToday + NotReadyTimeToday)
Skill Group Statistics
- Overview of Skill Group Statistics
- Set Up Monitor Mode Application to Receive Skill Group Statistics
- Skill Group Statistics Access
- Skill Group Statistics Sent to Desktop Application
- Skill Group Statistics Computed by Sample CTI OS Desktop
Overview of Skill Group Statistics
This section describes how to receive and work with skill group statistics in a server-to-server integration environment and contains the following subsections:
Set Up Monitor Mode Application to Receive Skill Group Statistics
To set up a Monitor-mode application to receive skill group statistics:
| Step 1 | Create an instance of the Session class, as described on Connect to CTI OS Server. | ||
| Step 2 | Subscribe for
events for the session, as described on
Set Event Listener and Subscribe to Events.
| ||
| Step 3 | Set connection parameters, as described on Set Connection Parameters for Session. | ||
| Step 4 | Connect the desktop application to the CTI OS Server, as described on Connect Session to CTI OS Server. | ||
| Step 5 | Set the message
filter as described on
Filters for Events for Monitored Calls.
| ||
| Step 6 | Enable
individual statistics as needed.
| ||
| Step 7 | When the desktop
application no longer requires the statistics for a certain skill group, the
application can disable those statistics.
|
Skill Group Statistics Access
- Overview of Skill Groups Statistics Access
- eOnNewSkillGroupStatisticsEvent() in Message Filter (JAVA)
- eOnNewSkillGroupStatisticsEvent() in Message Filter (C++ COM and VB)
Overview of Skill Groups Statistics Access
After you set up the application to receive skill group statistics, as described in the preceding section, you access skill group statistics through an event handler. The name of the event depends on the language of the application:
Caution | The name of the event through which to access skill group statistics is different in Java from other languages supported by CTI OS. |
eOnNewSkillGroupStatisticsEvent() in Message Filter (JAVA)
To register to receive skill group statistics, you must include the eOnNewSkillGroupStatisticsEvent() in the message filter.
For example, in Java, the message filter to receive skill group statistics is:
String filter = S_MESSAGEID + "=" +

CtiOs_Enums.EventID.eNewSkillGroupStatisticsEvent;
For more information about message filters, see Monitor Mode Filters.
eOnNewSkillGroupStatisticsEvent() in Message Filter (C++ COM and VB)
To register to receive skill group statistics, you must include the OnSkillGroupStatisticsUpdated() event in the message filter.
For more information about message filters, see Monitor Mode Filters.
Skill Group Statistics Sent to Desktop Application
You can change which skill group statistics are sent to desktop applications by modifying the registry on the CTI OS Server.
For more information about how to change which skill group statistics are sent to desktop applications, see the CTI OS System Manager Guide for Cisco Unified ICM/Contact Center Enterprise.
Skill Group Statistics Computed by Sample CTI OS Desktop
The sample CTI OS Desktop computes many skill group statistics from data received from CTI Server. You may choose to develop applications that compute these same statistics. These computed statistics (in italics) and the data and formulas used to derive them are listed below:
-
AvgCallsQTimeNow = CallsQTimeNow/CallsQNow
-
AvgAgentOutCallsTalkTimeToHalf = AgentOutCallsTalkTimeToHalf/AgentOutCallsToHalf
-
AvgAgentOutCallsTimeToHalf = AgentOutCallsTimeToHalf/AgentOutCallsToHalf
-
AvgAgentOutCallsHeldTimeToHalf = AgentOutCallsHeldTimeToHalf/AgentOutCallsHeldToHalf
-
AvgHandledCallsTalkTimeToHalf = HandledCallsTalkTimeToHalf/HandledCallsToHalf
-
AvgHandledCallsAfterCallTimeToHalf = HandledCallsAfterCallTimeToHalf/HandledCallsToHalf
-
AvgHandledCallsTimeToHalf = HandledCallsTimeToHalf/HandledCallsToHalf
-
AvgIncomingCallsHeldTimeToHalf = IncomingCallsHeldTimeToHalf/IncomingCallsHeldToHalf
-
AvgInternalCallsRcvdTimeToHalf = InternalCallsRcvdTimeToHalf/InternalCallsRcvdToHalf
-
AvgInternalCallsHeldTimeToHalf = InternalCallsHeldTimeToHalf/InternalCallsHeldToHalf
-
AvgCallsQTimeHalf = CallsQTimeHalf/CallsQHalf
-
AvgAgentOutCallsTalkTimeToday = AgentOutCallsTalkTimeToday/AgentOutCallsToday
-
AvgAgentOutCallsTimeToday = AgentOutCallsTimeToday/AgentOutCallsToday
-
AvgAgentOutCallsHeldTimeToday = AgentOutCallsHeldTimeToday/AgentOutCallsHeldToday
-
AvgHandledCallsTalkTimeToday = HandledCallsTalkTimeToday/HandledCallsToday
-
AvgHandledCallsAfterCallTimeToday = HandledCallsAfterCallTimeToday/HandledCallsToday
-
AvgHandledCallsTimeToday = HandledCallsTimeToday/HandledCallsToday
-
AvgIncomingCallsHeldTimeToday = IncomingCallsHeldTimeToday/IncomingCallsHeldToday
-
AvgInternalCallsRcvdTimeToday = InternalCallsRcvdTimeToday/InternalCallsRcvdToday
-
AvgInternalCallsHeldTimeToday = InternalCallsHeldTimeToday/InternalCallsHeldToday
-
AvgCallsQTimeToday = CallsQTimeToday/CallsQToday
Silent Monitoring
There are two (mutually exclusive) silent monitoring methods:
-
CTI OS based silent monitoring
-
Cisco Unified Communications Manager (Unified CM) based silent monitoring
For more information, see the CTI OS System Manager Guide for Cisco Unified ICM/Contact Center Enterprise. For more information about how to enable silent monitor in your application, see CTI OS Based Silent Monitoring or Unified CM-Based Silent Monitoring in Your Application, as applicable.
CTI OS Based Silent Monitoring
Note | CTI OS Silent Monitor functionality is only available in the C++ and COM CILs. |
The silent monitor manager object is responsible for establishing and maintaining the state of a silent monitor session.
The first thing a client application should do is to create a silent monitor object instance. The application should then set this object instance as the current manager in the session object. The CIL provides the interface to this functionality. A client application can work in one of two possible modes:
-
Monitoring mode. The client receives audio from a remote monitored target (device/agent).
-
Monitored mode. The client sends audio to a remote monitoring client.
Note |
- Create a Silent Monitor Object
- Session Mode
- Silent Monitor Session
- Silent Monitor Manager Shutdown
- CTI OS Silent Monitor Management in Monitor Mode
Create a Silent Monitor Object
The first step towards setting up a silent monitor session is creating a SilentMonitorManager using the Session object CreateSilentMonitorManager method. Then, set the new manager object as the current silent monitor manager using the Session object SetCurrentSilentMonitor method.
The following VB 6.0 code sample demonstrates how to create a SilentMonitorManager object with COM CIL and make it the current manager in the Session object:
Dim errorcode As Long
Dim m_nSMSessionKey As Integer
Dim m_SMManager As CTIOSCLIENTLib.SilentMonitorManager
Dim m_Args As New Arguments
'Create the silent monitor manager
Set m_SMManager = m_session.CreateSilentMonitorManager(m_Args)
'Make the object the current manager
errorcode = m_Session.SetCurrentSilentMonitor(m_SMManager)
Session Mode
After you set this new object as the current object, set the manager's work mode to Monitoring for the monitoring client and Monitored for the monitored client. The following sections provide code examples. For more information about syntax of the StartSMMonitoringMode and SMMonitoredMode methods, see SilentMonitorManager Object.
Monitoring Mode
In this mode, the client receives audio confirmation and session status events for a specific silent monitor session. This mode is intended for use by client applications developed for Supervisor desktop functionality. The StartSMMonitoringMode method on the SilentMonitorManager object selects this mode.
Following is a code sample for specifying the mode for the client application.
Dim m_Args As New Arguments
'Assemble arguments to set the work mode
m_Args.AddItem("HeartbeatInterval", 5)
m_Args.AddItem("HeartbeatTimeout", 15)
'Address or hostname of the silent monitor service
m_Args.AddItem("SMSAddr", "localhost")
'Port on which silent monitor service is listening
m_Args.AddItem("SMSListenPort", 42228)
'QoS setting when sending messages to the silent monitor service
m_Args.AddItem("SMSTOS", 0)
'Milliseconds between heartbeats
m_Args.AddItem("SMSHeartbeats", 5000)
'Number of missed heartbeats before the connection to the
'silent monitor service is considered disconnected
m_Args.AddItem("SMSRetries", 3)
'Port number where audio will be listened for
m_Args.AddItem("MediaTerminationPort", 4000)
'Set the working mode to monitoring
m_SMManager.StartSMMonitoringMode(args)
Monitored Mode
In this mode, the client sends audio and status reports on silent monitor session and receives requests for start and stop silent monitor session. This mode is intended for client applications developed for Agent desktop functionality. The StartSMMonitoredMode method on the SilentMonitorManager object selects this mode.
Following is a code sample for specifying the mode for the client application:
Dim m_Args As New Arguments
'Assemble arguments to set the work mode
m_Args.AddItem("HeartbeatInterval", 5)
m_Args.AddItem("HeartbeatTimeout", 15)
'Address or hostname of the silent monitor service
m_Args.AddItem("SMSAddr", "localhost")
'Port on which silent monitor service is listening
m_Args.AddItem("SMSListenPort", 42228)
'QoS setting when sending messages to the silent monitor service
m_Args.AddItem("SMSTOS", 0)
'Milliseconds between heartbeats
m_Args.AddItem("SMSHeartbeats", 5000)
'Number of missed heartbeats before the connection to the
'silent monitor service is considered disconnected
m_Args.AddItem("SMSRetries", 3)
'Extension number of the IP Phone to monitor
m_Args.AddItem("MonitoringDeviceID", 1234)
'Set the working mode to monitored
m_silentMonitor.StartSMMonitoredMode(args)
Silent Monitor Session
Initiating a silent monitor session starts with the client in monitoring mode, calling the StartSilentMonitorRequest method. This indicates that the CTI OS server send an OnSilentMonitorStartRequestedEvent to a remote client in monitored mode. The remote client, upon receiving the OnSilentMonitorStartRequestedEvent, chooses whether or not accept the request. The remote client acknowledges its approval or rejection by sending a status report back to the monitoring client. The monitoring client receives the acceptance or rejection via the OnSilentMonitorStatusReportEvent. When the session is accepted by the remote client, it immediately starts forwarding voice to the monitoring client. The monitoring client can terminate the silent monitoring session only by calling the StopSilentMonitorRequest method. CTI OS server issues the OnSilentMonitorStopRequestedEvent to the remote client. The monitored client stops sending audio immediately when OnSilentMonitorStopRequestedEvent is received by its SilentMonitorManager object.
Following are code samples for initiating and ending a silent monitor session:
Monitoring Client Code Sample
Private Sub btnStartSM_OnClick()
Dim m_Args As New Arguments

'Agent to monitor
 m_Args.AddItem("AgentID", "23840")
 m_Args.AddItem("PeripheralID", "5000")
 m_Args.AddItem("HeartbeatInterval", 5)
 m_Args.AddItem("HeartbeatTimeout", 15)

'If MonitoringIPPort is not specified, port 39200 will be used by 'default.
 m_Args.AddItem("MonitoringIPPort", 39200)

'Request silent monitor session to start
m_SMManager.StartSilentMonitorRequest(m_Args, m_nSMSessionKey)
End Sub

Private Sub m_session_OnSilentMonitorStatusReportEvent(By Val pIArguments As
CTIOSCLIENTLib.IArguments)
         Dim strAgent As String
         Dim nMode As Integer

         nMode pIArguments.GetValueInt("StatusCode)

If nMode = eSMStatusMonitorStarted Then strAgent =
pIArguments.GetValueString("MonitoredUniqueObjectID")
            MsgBox "Silent Monitor Status",,
"Started Monitoring Agent: " & strAgent
         Else
            MsgBox "Silent Monitor Status",,
"Request Failed with code = " & nMode
         End If
End Sub

Private Sub tmrScreening_Timer()
'After listening the conversation for 30 sec, drop monitoring session

'Assemble arguments for stop  request
'Agent to monitor
m_Args.AddItem "SMSessionKey", m_nSMSessionKey

'Request silent monitor session to stop
m_SMManager.StopSilentMonitorRequest(m_Args, m_nSMSessionKey)

End Sub
Monitored Client Code Sample
Private Sub m_session_OnSilentMonitorStartRequestedEvent(By Val pIArguments As
CTIOSCLIENTLib.IArguments)
     Dim strRequestInfo As String

     strRequestInfo =  pIArguments.DumpArgs
MsgBox "Request to Start Silent Monitor Received",, strRequestInfo
End Sub

Private Sub m_session_OnSilentMonitorStopRequestedEvent(By Val pIArguments As
CTIOSCLIENTLib.IArguments, bDoDefaultProcessing)
     Dim strRequestInfo As String

     strRequestInfo =  pIArguments.DumpArgs
MsgBox "Request to Stop Silent Monitor Received",, strRequestInfo
End Sub
Silent Monitor Manager Shutdown
Shutting down the Silent monitor object requires that the monitoring client call the StopSilentMonitorMode method when it is done monitoring an agent, and that the monitored client call the StopSilentMonitorMode method during cleanup. Each client must then remove the silent monitor manager from the Session object by calling SetMonitorCurrentSilentMonitor with a NULL pointer. Finally each client must destroy the silent monitor object using Session's DestroySilentMonitorManager method.
Following is a code sample for initiating and ending a silent monitor session:
'Stop Silent Monitor ModeRequest
m_SMManager.StopSilentMonitorMode
'Remove silent monitor manager object from session
errorcode = m_session_SetCurrentSilentMonitor(Nothing)
'Destroy silent monitor manager object
errorcode = m_session.DestroySilentMonitorManager()
CTI OS Silent Monitor Management in Monitor Mode
CTI OS Silent Monitor is configured, initiated, and ended the same in monitor mode as it is in agent mode. There is one additional step in monitor mode. You must include the OnCallRTPStarted and OnCallRTPStopped events in the filter used by the monitor mode application. An example follows.
// 116 = OnCallRTPStarted
// 117 = OnCallRTPStopped
m_session.SetMessageFilter("MessageID = 116, 117")
Note | For more information, see Session Modes. |
Unified CM-Based Silent Monitoring in Your Application
- CCM-Based Silent Monitor Overview
- CTI OS Monitor Mode Applications
- CCM-Based Silent Monitor Request
- Current Agent Being Silently Monitored
- CCM-Based Silent Monitor Request End
- Determine if CCM-Based Silent Monitoring Is Enabled
CCM-Based Silent Monitor Overview
CCM based silent monitor is the Call Manager implementation of silent monitor. When CCM based silent monitor is used, silent monitor is implemented as a call. After initiating silent monitor, the supervisor is able to hear agent conversations using their phone.
Agents can only be silent monitored by one supervisor at a time.
CCM based silent monitor is supported in all CILs.
The CTI Toolkit Combo Desktop .Net sample includes CCM based silent monitor source code.
The following section describes how to enable CCM based silent monitor in custom CTI OS applications.
CTI OS Monitor Mode Applications
CCM based silent monitor is not supported for CTI OS monitor mode applications.
CCM-Based Silent Monitor Request
Before you initiate CCM based silent monitor, ensure that you configure CCM based silent monitor. For more information, see Determine if CCM-Based Silent Monitoring Is Enabled.
CCM based silent monitoring is initiated through the SuperviseCall() method associated with the supervisor's Agent object. To start silent monitor:
-
Set the SupervisoryAction parameter to eSupervisorMonitor.
-
Set the AgentReference parameter to the unique object ID of the agent to be silent monitored.
-
Set the AgentCallReference parameter to the unique object ID of the call to be silent monitored.
When the request is successfully initiated and the silent monitor call is established, the supervisor and agent applications receive the OnSilentMonitorStartedEvent. You can use this event to trigger application specific logic.
The following figure illustrates the messaging that occurs between the CIL and CTI OS Server after an application initiates a CCM based silent monitor request using Agent.SuperviseCall().
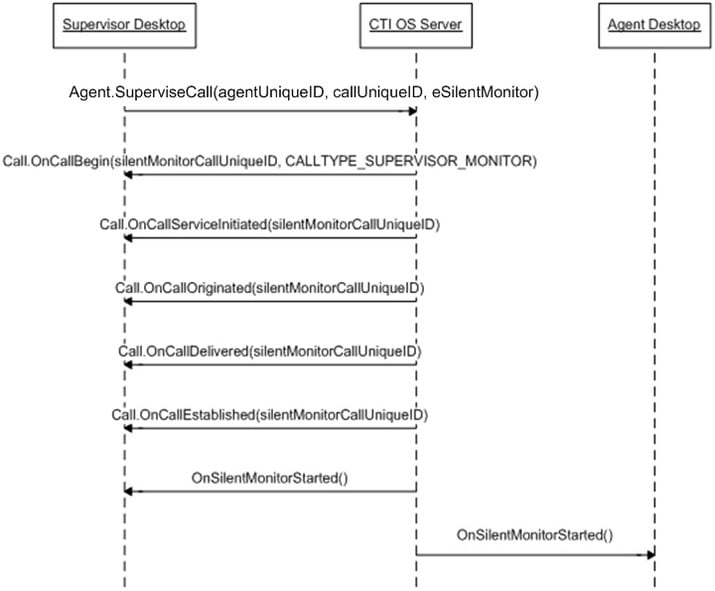
C# Code Sample for Initiating Silent Monitor Session
Agent curAgent = session.GetCurrentAgent() ;
Agent monAgent = curAgent.GetMonitoredAgent() ;
Call monCall = curAgent.GetMonitoredCall() ;

string monAgentID;
monAgent.GetValueString(
    Enum_CtiOs.CTIOS_UNIQUEOBJECTID,
    out monAgentID);

string monCallID;
monCall.GetValueString(
    Enum_CtiOs.CTIOS_UNIQUEOBJECTID,
    out monCallID);

Arguments args = new Arguments() ;
args.SetValue(Enum_CtiOs.CTIOS_AGENTREFERENCE, monAgentID) ;
args.SetValue(Enum_CtiOs.CTIOS_AGENTCALLREFERENCE, monCallID) ;
args.SetValue(
    Enum_CtiOs.CTIOS_SUPERVISORYACTION,
    SupervisoryAction.eSupervisorMonitor) ;

CilError ret = curAgent.SuperviseCall(args) ;
Current Agent Being Silently Monitored
If an application needs to determine if the current agent is being silently monitored, then compare the current agent unique object ID against the silent monitor target agent unique ID carried in the SilentMonitorStartedEvent.
Code Sample for Determining if Current Agent Is Target of Silent Monitor Call
Note | The parameter args carries the payload of an OnSilentMonitorStartedEvent. |
public bool IsCurrentAgentTargetAgent(Arguments args)
{
        bool isTarget = false ;

        if ( m_ctiSession != null )
        {
               Agent rAgent = m_ctiSession.GetCurrentAgent() ;
               if ( rAgent != null )
               {
                    string curAgentUID ;
                 rAgent.GetValueString(Enum_CtiOs.CTIOS_UNIQUEOBJECTID,
                                       out curAgentUID) ;
                       if ( curAgentUID != null )
                       {
                              string targetAgentUID ;
                              args.GetValueString(Enum_CtiOs.CTIOS_SILENTMONITOR_TARGET_AGENTUID,
                         out targetAgentUID) ;

                               if ( targetAgentUID != null )
				                           {
                                       isTarget = curAgentUID == targetAgentUID;
                               }
                       }
                }
        }

        return isTarget ;
}
CCM-Based Silent Monitor Request End
CCM based silent monitoring is stopped using the SuperviseCall method associated with the supervisor's Agent object. To stop silent monitor, set the SupervisoryAction parameter to eSupervisorClear. Set the AgentReference parameter to the unique object ID of the agent currently silent monitored. Set the AgentCallReference parameter to the unique object ID of the call that resulted from the initiation of silent monitor (Agent.SuperviseCall[eSupervisorMonitor]). The application receives the SilentMonitorStopRequestedEvent event when the stop silent monitoring request is processed.
The following figure illustrates the message flow.
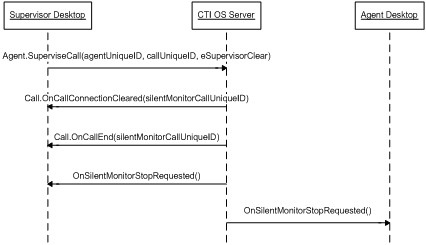
You can also release the silent monitor call using the Call.Clear() method.
Code Sample for Ending Silent Monitor Session
Agent curAgent = session.GetCurrentAgent();

string monAgentID;
curAgent.GetValueString(
   Enum_CtiOs.CTIOS_SILENTMONITOR_TARGET_AGENTUID,
   out monAgentID);

string monCallID;
curAgent.GetValueString(
   Enum_CtiOs.CTIOS_SILENTMONITOR_CALLUID,
   out monCallID);

Arguments args = new Arguments() ;
args.SetValue(Enum_CtiOs.CTIOS_AGENTREFERENCE, monAgentID) ;
args.SetValue(Enum_CtiOs.CTIOS_AGENTCALLREFERENCE, monCallID) ;

args.SetValue(
   Enum_CtiOs.CTIOS_SUPERVISORYACTION,
   SupervisoryAction.eSupervisorClear) ;

CilError ret = curAgent.SuperviseCall(args) ;
Determine if CCM-Based Silent Monitoring Is Enabled
To determine if CCM based silent monitoring is enabled, use the Session.IsCCMSilentMonitor() method if the application uses the C++, Java, or .Net CIL. Use the CCMBasedSilentMonitor value stored in the session object if the application uses the COM CIL:
/// <summary>
/// Determines if CCM Based Silent Monitor is enabled
/// </summary>
public bool IsCCMSilentMonitor()
{
    if ( m_ctiSession == null )
    {
       return false ;
    }
    return m_ctiSession.IsCCMSilentMonitor() ;
}
Agent Greeting
There are several ways to control the behavior of the Agent Greeting feature. You can enable or disable Agent Greeting for the duration of the Agent's login session. Note that when an Agent logs in, the feature is automatically enabled.
Arguments &rArgAgentAction = Arguments::CreateInstance();
rArgAgentAction.AddItem("AgentAction", commandRequested);
int nRetVal = m_pCtiAgent->SetAgentGreetingAction(rArgAgentAction);
rArgAgentAction.Release();

Where "commandRequested" is an int with the value 1 (to disable) or 2 (to enable).
Deployment of Custom CTI OS Applications
This section discusses the deployment of CTI OS applications in the various programming languages and interfaces.
- Application Deployment Using ActiveX Controls
- Application Deployment Using COM (but Not ActiveX Controls)
- Application Deployment Using C++ CIL
- Application Deployment Using .NET CIL
- Custom Application and CTI OS Security
Application Deployment Using ActiveX Controls
ActiveX controls need all the components for COM deployment plus the components listed in the following table.
|
DLL |
Description |
|---|---|
|
Agentselectctl |
AgentSelect ActiveX control |
|
agentstatectl.dll |
Agentstate ActiveX control |
|
AlternateCtl.dll |
Alternate ActiveX control |
|
answerctl.dll |
Answer/Release ActiveX control |
|
arguments.dll |
Arguments COM class |
|
badlinectl.dll |
Badline ActiveX control |
|
buttoncontrol.dll |
Basic Button ActiveX control |
|
ccnsmt.dll |
Cisco EVVBU Media Termination ActiveX control |
|
chatctl.dll |
Chat ActiveX control |
|
conferencectl.dll |
Conference ActiveX control |
|
cticommondlgs.dll |
Common Dialogs utility COM object |
|
CTIOSAgentStatistics.dll |
AgentStatistics ActiveX control |
|
ctioscallappearance.dll |
CallAppearance ActiveX control |
|
ctiosclient.dll |
COM cil interfaces |
|
ctiossessionresolver.dll |
COM sessionresolver |
|
CTIOSSkillGroupStatistics.dll |
SkillgroupStatistics ActiveX control |
|
ctiosstatusbar.dll |
StatusBar ActiveX control |
|
EmergencyAssistCtl.dll |
EmergencyAssist ActiveX control |
|
gridcontrol.dll |
GridControl ActiveX control |
|
holdctl.dll |
Hold/Retrieve ActiveX control |
|
IntlResourceLoader.dll |
Internationalization COM object |
|
makecallctl.dll |
MakeCall ActiveX control |
|
ReconnectCtl.dll |
Reconnect ActiveX control |
|
recordctl.dll |
Record ActiveX control |
|
SilentMonitorCtl.dll |
Standalone Silent Monitor ActiveX control |
|
SubclassForm.dll |
COM utility control |
|
SupervisorOnlyCtl.dll |
Supervisor ActiveX control |
|
transferctl.dll |
Transfer ActiveX control |
You must copy and register ActiveX controls using the regsvr32 Windows utility. Some ActiveX controls are dependent on others. For example, all Button type controls (for example, AgentStatectl.dll) depend on (buttoncontrol.dll) and all Grid type controls (for example, CtiosCallappearance.dll) depend on Gridcontrol.dll. The following table means that for a dll listed in the left column to work properly, all dlls listed in the right column (Dependencies) need to be available (copied and registered).
The following table lists the dependencies of CTI OS ActiveX controls.
|
DLL File |
Dependencies |
||
|---|---|---|---|
|
Agentselectctl |
ATL80.dll, ctiosclient.dll, arguments.dll, buttoncontrol.dll, MSVCP80.dll, MSVCR80.dll
|
||
|
agentstatectl.dll |
ATL80.dll, ctiosclient.dll, arguments.dll, buttoncontrol.dll, cticommondlgs.dll, MSVCP80.dll, MSVCR80.dll
|
||
|
AlternateCtl.dll |
ATL80.dll, ctiosclient.dll, arguments.dll, buttoncontrol.dll, MSVCP80.dll, MSVCR80.dll
|
||
|
answerctl.dll |
ATL80.dll, ctiosclient.dll, arguments.dll, buttoncontrol.dll, MSVCP80.dll, MSVCR80.dll
|
||
|
arguments.dll |
ATL80.dll, MSVCP80.dll, MSVCR80.dll
|
||
|
badlinectl.dll |
ATL80.dll, ctiosclient.dll, arguments.dll, buttoncontrol.dll, MSVCP80.dll, MSVCR80.dll
|
||
|
buttoncontrol.dll |
ATL80.dll, MSVCP80.dll, MSVCR80.dll
|
||
|
ccnsmt.dll |
Traceserver.dll, LIBG723.dll |
||
|
chatctl.dll |
ATL80.dll, ctiosclient.dll, arguments.dll, MSVCP80.dll, MSVCR80.dll
|
||
|
conferencectl.dll |
ATL80.dll, ctiosclient.dll, arguments.dll, buttoncontrol.dll, cticommondlgs.dll, MSVCP80.dll, MSVCR80.dll
|
||
|
cticommondlgs.dll |
ATL80.dll, ctiosclient.dll, arguments.dll, MSVCP80.dll, MSVCR80.dll
|
||
|
CTIOSAgentStatistics.dll |
ATL80.dll, ctiosclient.dll, arguments.dll, Gridcontrol.dll, MSVCP80.dll, MSVCR80.dll
|
||
|
ctioscallappearance.dll |
ATL80.dll, ctiosclient.dll, arguments.dll, buttoncontrol.dll, cticommondlgs.dll, MSVCP80.dll, MSVCR80.dll
|
||
|
ctiosclient.dll |
ATL80.dll, arguments.dll, ctiosracetext.exe, MSVCP80.dll, MSVCR80.dll
If the client application uses silent monitoring in monitoring mode, ccnsmt.dll is also a dependency. If the client application uses silent monitoring in monitored mode, wpcap.dll is also a dependency. |
||
|
ctiossessionresolver.dll |
ATL80.dll, ctiosclient.dll, arguments.dll, MSVCP80.dll, MSVCR80.dll
|
||
|
CTIOSSkillGroupStatistics.dll |
ATL80.dll, ctiosclient.dll, arguments.dll, Gridcontrol.dll, MSVCP80.dll, MSVCR80.dll
|
||
|
ctiosstatusbar.dll |
ATL80.dll, ctiosclient.dll, arguments.dll, cticommondlgs.dll, MSVCP80.dll, MSVCR80.dll
|
||
|
EmergencyAssistCtl.dll |
ATL80.dll, ctiosclient.dll, arguments.dll, buttoncontrol.dll, MSVCP80.dll, MSVCR80.dll
|
||
|
gridcontrol.dll |
ATL80.dll, MSVCP80.dll, MSVCR80.dll
|
||
|
holdctl.dll |
ATL80.dll, ctiosclient.dll, arguments.dll, buttoncontrol.dll, MSVCP80.dll, MSVCR80.dll
|
||
|
IntlResourceLoader.dll |
ATL80.dll, MSVCP80.dll, MSVCR80.dll
|
||
|
makecallctl.dll |
ATL80.dll, ctiosclient.dll, arguments.dll, buttoncontrol.dll, cticommondlgs.dll, MSVCP80.dll, MSVCR80.dll
|
||
|
ReconnectCtl.dll |
ATL80.dll, ctiosclient.dll, arguments.dll, buttoncontrol.dll, MSVCP80.dll, MSVCR80.dll
|
||
|
recordctl.dll |
ATL80.dll, ctiosclient.dll, arguments.dll, buttoncontrol.dll, MSVCP80.dll, MSVCR80.dll
|
||
|
SilentMonitorCtl.dll |
ATL80.dll, ctiosclient.dll, arguments.dll, ccnsmt.dll, MSVCP80.dll, MSVCR80.dll
|
||
|
SubclassForm.dll |
ATL80.dll, MSVCP80.dll, MSVCR80.dll
|
||
|
SupervisorOnlyCtl.dll |
ATL80.dll, ctiosclient.dll, arguments.dll, buttoncontrol.dll, MSVCP80.dll, MSVCR80.dll
|
||
|
transferctl.dll |
ATL80.dll, ctiosclient.dll, arguments.dll, buttoncontrol.dll, cticommondlgs.dll, MSVCP80.dll, MSVCR80.dll
|
Application Deployment Using COM (but Not ActiveX Controls)
Custom applications using COM from VB or C++ or any other Com supported development platform need the following COM Dynamic Link Libraries:
-
CTIOSClient.dll
When used in a.NET application must include: Cisco.CTIOSCLIENTLib.dll
-
Arguments.dll
When used in a.NET application must include: Cisco.CTIOSARGUMENTSLib.dll
-
CtiosSessionresolver.dll (only if used – see previous discussion)
When used in a.NET application must include: Cisco.CTIOSSESSIONRESOLVERLib.dll
-
ATL80.dll (only if not already available on target system)
-
If the client application uses silent monitoring in monitoring mode, ccnsmt.dll is needed. If the client application uses silent monitoring in monitored mode, wpcap.dll is also a dependency.
You must copy and register the dll files on the target system. To register, use the Windows utility regsvr32.exe providing the dll name (for example, regsvr32 ctiosclient.dll).
ATL80.dll is a Microsoft Dynamic Link Library implementing the Active Template Library used by CTI OS. It is usually available on most Windows client systems in a windows system directory (for example, \winnt\syste32 on Windows 2000). Because CTI OS depends on this DLL, you must copy and register it if it is not already available at the target system.
Application Deployment Using C++ CIL
Custom C++ applications link to the static CTI OS libraries. With your custom application, you should also distribute ctiostracetext.exe. For the tracing component to work, you need to register it on the system where your application will run. To register the trace tool, run ctiostracetext /RegServer. Besides ctiostracetex.exe, there is no need to ship additional components.
Application Deployment Using .NET CIL
Applications built with the .NET CIL class libraries require the following assemblies to be distributed with the custom application.
|
Library |
Description |
|---|---|
|
NetCil.dll |
.NET CIL Class library, contains the CTI OS object classes |
|
NetUtil.dll |
.NET Util Class library, contains helper and utility classes used in conjunction with .NET CIL |
Note | In addition to NetCil.dll and NetUtil.dll, the .NET Combo sample requires the CTIOSVideoCtl.dll, which is located in C:\Program Files\Cisco Systems\CTIOS Client\CTIOS Toolkit\dotNet CIL\Controls. |
You can install both assembly libraries in the Global Assembly Cache (GAC) at the application host computer or they can be at the working directory of the custom client application.
Custom Application and CTI OS Security
A custom application that launches the SecuritySetupPackage.exe program to create CTI OS client certificate request needs to add the InstallDir registry value under the following registry key:
SOFTWARE\Cisco Systems\CTI Desktop\CtiOs
If the InstallDir registry value does not exist, then the setup program fails and aborts the installation process, otherwise the program uses the InstallDir registry value to create and copy the security files to the right place after it appends Security directory to it.
For example, if the InstallDir registry value is
<drive>:\Program Files\Cisco Systems\CTIOS Client
then the security files should be under
<drive>:\Program Files\Cisco Systems\CTIOS Client\Security
Supervisor Applications
This section describes how to build a supervisor desktop for Unified CCE. The following documentation references the source of the CTI OS Toolkit Combo Desktop when describing how to build a supervisor desktop. This section also references a class called CTIObject. The CTI OS Toolkit Combo Desktop uses this class to wrap CIL functionality.
The source code for the Combo Desktop is found in the following directories.
-
<Install Drive>\Program Files\Cisco Systems\CTIOS Client\CTIOS Toolkit\dotNet CIL\Samples\CTI Toolkit Combo Desktop.NET
-
<Install Drive>\Program Files\Cisco Systems\CTIOS Client\CTIOS Toolkit\dotNet CIL\Samples\CtiOs Data Grid.NET
In the following section, string keys are used as keys to method calls. This is for the sake of readability. A developer writing an application can use either string or integer based keys.
- General Flow
- Monitored and Unmonitored Events
- Supervisor Application Flow to Request and Monitor Team
- Supervisor Application Flow to Monitor an Agent
- Supervisor Application Flow to Monitor a Call
General Flow
The general flow of a supervisor application is as follows:
-
Request the supervisor's teams.
-
Start monitoring the supervisor's team.
-
Select a team member and start monitoring the selected team member's activity.
-
Perform supervisory actions on the currently monitored call.
These steps illustrate the layers of a supervisor application. First, the application gets the team. After the team is retrieved, the supervisor application can monitor agents. This generates more events/information allowing the supervisor application to monitor agent calls.
Monitored and Unmonitored Events
When writing a supervisor application, developers are confronted with two types of events: monitored events and unmonitored events.
Unmonitored events are received for agent, call, and button enablement events associated with the supervisor. Monitored events are received to notify the supervisor of agent, call, and button enablement events corresponding to an agent or call that is currently monitored by the supervisor. These events carry a field named CTIOS_ISMONITORED. This field is set to true.
For example, if a supervisor changes state to ready, the supervisor receives an AgentStateEvent. If a supervisor is monitoring an agent and the monitored agent changes state, the supervisor receives an OnMonitoredAgentState event. Call events behave in a similar manner. When the supervisor puts a call on hold, the supervisor receives an OnCallHeld event. When the supervisor is monitoring an agent and that agent puts a call on hold, the supervisor receives an OnMonitoredCallHeld event.
Button enablement events behave differently. When the supervisor is monitoring agents on the supervisor's team, the agent receives OnButtonEnablementChange events for the monitored agent. It is important for the application not to apply these events to elements of the application that control the supervisor's or any of the supervisor's calls state. For example, if a monitored agent changes state to ready, the supervisor receives a ButtonEnablementChange event. The supervisor should not apply this event since the event does not apply to the supervisor's state.
To determine if an event is monitored, check the payload of the event for the "Monitored" field. If the field exists and is set to true, the event is a monitored event.
Supervisor Application Flow to Request and Monitor Team
This section discusses steps 1 and 2 in the flow of a supervisor application. The methods and events listed below are used to request and monitor the team.
Agent.RequestAgentList(Arguments args)
Agent.StartMonitoringAgentTeams(Arguments args)
OnNewAgentTeamMember
OnMonitoredAgentStateChange
OnMonitoredAgentInfo
OnSkillInfo
The following diagram illustrates the flow of messages between the application and CTI OS Server when the supervisor application requests its team and then requests to monitor the team. Because logging in a supervisor is the same as logging in an agent, this diagram picks up at the first AgentStateEvent after the agent has logged in.
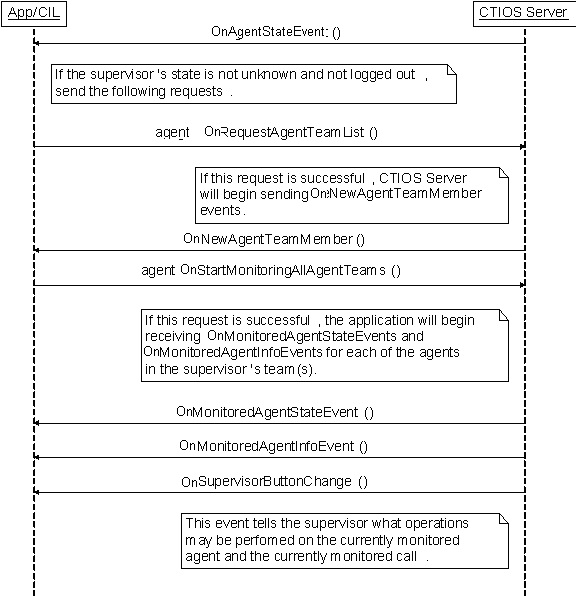
The requests leading up to and including Agent.StartMonitoringAgent() is in CTIObject.StartMonitoringAgent(). When writing a supervisor application, the developer should call Agent.RequestAgentTeamList() and Agent.StartMonitoringAllAgentTeams(). The developer should call these methods after the supervisor logs in. In the CTI OS Toolkit Combo Desktop, this is done when processing the eAgentStateEvent in the SupervisorUIManager class' ProcessAgentStateEvent() method. SupervisorUIManager checks to see that the current agent is a supervisor. If so and if CTIObject.StartMonitoringTeams() has not already been called, CTIObject.StartMonitoringTeams() is called. CTIObject.StartMonitoringTeams() then calls Agent.RequestAgentTeamList() and Agent.StartMonitoringAllAgentTeams().
If these requests are successful, the desktop begins receiving OnNewAgentTeamMember, OnMonitoredAgentStateChange, and MonitoredAgentInfoEvent events. The next sections describe how to handle each of these events.
- OnNewAgentTeamMember Events
- OnNewAgentTeamMember Events and Supervisors
- OnMonitoredAgentStateChange Events
- OnMonitoredAgentInfo Event
- Time in State
- OnSkillInfo Event
- Agent Team Information Displayed in Grid Format
OnNewAgentTeamMember Events
Process OnNewAgentTeamMember events as follows.
The OnNewAgentTeamMember event is received for two possible reasons:
-
After the application calls Agent.RequestAgentTeamList(), OnNewAgentTeamMember events are sent for each member of the supervisor's team.
-
An agent has been added or removed from the supervisor's team.
To address point 2 above, examine the field "ConfigOperation" in the payload of the OnNewAgentTeamMember event. If this flag does not exist or exists and is set to TeamConfigFlag.CONFIG_OPERATION_ADDAGENT (1), add the agent to the grid. If the flag exists and is not set to TeamConfigFlag.CONFIG_OPERATION_ADDAGENT, remove the agent from the grid.
In supervisor applications, use the value in the UniqueObjectID field of the event to uniquely reference/track each agent in the supervisor's team. This ID uniquely identifies each agent cached on the CIL.
OnNewAgentTeamMember Events and Supervisors
Note | Because the supervisor is considered part of the team, an OnNewAgentTeamMember event is sent for the supervisor logged in to the application. If the developer does not want to include the supervisor in the agent team grid, compare the current agent ID to the ID of the agent carried in the OnNewAgentTeamMember event. If the values are equal, do not add the supervisor to the grid. |
If the developer does not want to add primary supervisors to the grid, retrieve the Agent object stored in the CIL using the Session.GetObjectFromObjectID() method. When calling Session.GetObjectFromObjectID(), set the value in the "UniqueObjectID" (Enum_CtiOs.CTIOS_UNIQUEOBJECTID) field of the OnNewAgentTeamMember event as the key (first parameter to this method). This method returns an Agent object. Check the properties of the Agent object for the field "AgentFlags" (Enum_CtiOs.CTIOS_AGENTFLAGS). If the field exists with the TeamConfigFlag.AGENT_FLAG_PRIMARY_SUPERVISOR (0x01) bit set, the agent is a primary supervisor and should not be added to the grid.
It is possible for an agent to be team supervisor while not being a member of the team. Some supervisor applications, including the combo desktop, may not want to add this type of supervisor to the agent select grid. This is tricky because supervisors that are not part of the team generate OnMonitoredAgentStateChange events. The agent select grid normally updates when the OnMonitoredAgentStateChangeevent is received. To prevent this, supervisors who are not members of the team that they are supervising need to be marked as such. You can use this information to avoid updates when an OnMonitoredAgentStateChange event is received for a supervisor that is not part of the team. To accomplish this, the application leverages the following:
-
OnNewAgentTeamMember events are not received for supervisors that are not part of the team.
-
The CIL keeps a cache of all the agents and supervisors that it knows about. Agents in this cache have properties that can be modified by applications built on top of the CIL.
Knowing this, the application marks every agent that is included in a OnNewAgentTeamMember event as a member of this supervisor's team. When OnMonitoredAgentStateChange events are received, the agent select grid only updates when the agent that is represented by the event is marked as a member of the team. In short, any agent that does not send a OnNewAgentTeamMember event to the CIL is not displayed in the agent select grid. This is illustrated in the SupervisorUIManager.ProcessMonitoredAgentStateChange() method.
OnMonitoredAgentStateChange Events
OnMonitoredAgentStateChange events are sent when an agent in the supervisor's team changes state. Supervisor applications, like the CTI OS Toolkit Combo Desktop, use this event to update structures that store the supervisor's team (the agent team grid). This event is processed similar to OnNewAgentTeamMember. However, there is one subtle difference. Instead of using the Arguments object carried with the event, the application uses the arguments associated with the Agent object cached by the CIL. This is done to correctly handle skill group membership changes related to dynamic reskilling. The CIL contains logic that processes the OnMonitoredAgentStateChange and determines whether or not an agent has been added or removed from a skill group. The changes in the agent's skill group membership are reflected in the Agent object's properties.
OnMonitoredAgentInfo Event
You can use this event to populate the following agent information:
Time in State
If your application needs to track an agent's time in state, it can be done as follows. The algorithm is contained in AgentSelectGridHelper.cs. The first part of the algorithm resides in the AgentData.UpdateData() method. This method decides if the agent's state duration is known or unknown. An agent's state duration is unknown if the agent was just added to the grid or if the agent's state has not changed since being added to the grid. If a state change is detected after the agent was added to the grid, the time of the state change is marked.
Second, there is a timer callback that the AgentSelectGridHelper class starts when the grid is initialized. The timer callback fires every ten seconds. When the callback fires, the method AgentSelectGridHelper.m_durationTimer_Tick() cycles through all of the rows in the grid. Each row whose Time in State column is not unknown has its value set to the time the agent changed state minus the current time.
OnSkillInfo Event
OnSkillInfo events are sent to the CIL when skillgroup statistics are enabled using the Agent.EnableSkillGroupStatistics() method. These events are used to populate the fields in the Skill Name column of the team grid. OnSkillInfo events carry the ID of a skill group and its corresponding name. The AgentSelectGridHelper processes this event by storing a mapping of skill group IDs to skill group names. After the map is updated, each field in the Skill Name column is updated to reflect the new skill name.
Agent Team Information Displayed in Grid Format
If your application would like to display agent team information in a grid similar to the one used by the CTI OS Toolkit Combo Desktop, the following table illustrates which events supply information for each column.
Please refer to CtiOsDataGrid.AgentSelectGridHelper as an example of handling the OnNewAgentTeamMember event.
|
Column |
Event |
Field |
|---|---|---|
|
Name |
OnNewAgentTeamMember OnMonitoredAgentStateChange OnMonitoredAgentInfoEvent |
Enum_CtiOs.CTIOS_AGENTFIRSTNAME Enum_CtiOs.CTIOS_AGENTLASTNAME |
|
Login Name |
OnMonitoredAgentStateChange OnMonitoredAgentInfoEvent |
Enum_CtiOs.CTIOS_LOGINNAME |
|
Agent ID |
OnNewAgentTeamMember OnMonitoredAgentStateChange OnMonitoredAgentInfoEvent |
Enum_CtiOs.CTIOS_AGENTID |
|
Agent State |
OnNewAgentTeamMember OnMonitoredAgentStateChange |
Enum_CtiOs.CTIOS_STATE |
|
Time in State |
OnMonitoredAgentStateChange |
For more information, see Time in State. |
|
Skill Group |
OnMonitoredAgentStateChange |
Enum_CtiOs.CTIOS_NUMSKILLGROUPS |
|
Skill Name |
OnSkillInfoEvent |
For more information, see OnSkillInfo Event. |
|
Available for Call |
OnNewAgentTeamMember |
Enum_CtiOs.CTIOS_AGENTAVAILABILITYSTATUS |
Note | The Skill Group column lists the field from the Arguments object as CTIOS_NUMSKILLGROUPS. This field tells the developer how many skill groups the agent belongs to. To obtain information about each of the agent's skill groups the developer should construct the following loop to get information about each of the agent's skill groups (code taken from the sample source file CtiOsDataGrid\AgentSelectGridHelper.cs). |
// Check to see if the event carries an array of skillgroups
// (OnNewAgentTeamMember)
//
int numGroups ;
if ( args.GetValueInt(Enum_CtiOs.CTIOS_NUMSKILLGROUPS, out numGroups) )
{
    CtiOsDataGrid.Trace(
        Logger.TRACE_MASK_METHOD_AVG_LOGIC,
        methodName,
        "Found skillgroup numbers") ;

    m_skillGroupNumbers.Clear() ;

    for ( int j = 1 ; j <= numGroups ; j++ )
    {
        CtiOsDataGrid.Trace(
            Logger.TRACE_MASK_METHOD_AVG_LOGIC,
            methodName,
            string.Format("Looking for skillgroup at position {0}", j)) ;

        string unknownStr = string.Format(
            AgentSelectGridHelper.STRING_UNKNOWN_SG_FORMAT, j) ;

        // Keys for individual skillgroups are formatted as SkillGroup[{index}]
        //
        string sgKey = string.Format(
            AgentSelectGridHelper.STRING_SKILLGROUP_FORMAT, j) ;

        // Each element of the array is an argument containing
        // skillgroup information.
        //
        Arguments sgInfo ;
        if ( !args.GetValueArray(sgKey, out sgInfo) )
        {
            CtiOsDataGrid.Trace(
                Logger.TRACE_MASK_WARNING,
                methodName,
                string.Format("No skillgroup info at position {0}", j)) ;

            m_skillGroupNumbers.Add(unknownStr) ;
        }
        else
        {
            string sgStr ;
            if ( sgInfo.GetValueString(
                     Enum_CtiOs.CTIOS_SKILLGROUPNUMBER,
                     out sgStr) )
            {
                CtiOsDataGrid.Trace(
                    Logger.TRACE_MASK_METHOD_AVG_LOGIC,
                    methodName,
                    string.Format(
                        "Found skillgroup number {0} at position {1}", sgStr, j)) ;

                m_skillGroupNumbers.Add(sgStr) ;
            }
            else
            {
                CtiOsDataGrid.Trace(
                    Logger.TRACE_MASK_WARNING,
                    methodName,
                    string.Format("No skillgroup number at position {0}", j)) ;

                m_skillGroupNumbers.Add(unknownStr) ;
            }
        }
    }
}
Supervisor Application Flow to Monitor an Agent
This section discusses step 3 in the flow of a supervisor application. The methods and events listed below are used to monitor an agent.
Agent.StartMonitoringAgent(Arguments args)
OnSupervisorButtonChange
OnStopMonitoringAgent
OnMonitoredAgentStateChange
OnMonitoredCallBegin
OnMonitoredCallCleared
OnMonitoredCallConferenced
OnMonitoredCallConnectionCleared
OnMonitoredCallDataUpdate
OnMonitoredCallDelivered
OnMonitoredCallDequeued
OnMonitoredCallDiverted
OnMonitoredCallEstablished
OnMonitoredCallFailed
OnMonitoredCallHeld
OnMonitoredCallOriginated
OnMonitoredCallQueued
OnMonitoredCallReachedNetwork
OnMonitoredCallRetrieved
OnMonitoredCallServiceInitiated
OnMonitoredCallTransferred
OnMonitoredCallTranslationRoute
OnMonitoredCallEnd
After a supervisor application is informed of an agent team member via the OnNewAgentTeamMember event, the supervisor can monitor the agent via the Agent.StartMonitoringAgent() method. The following sequence diagram illustrates the call to StartMonitoringAgent() and the events sent upon successful completion of the call.
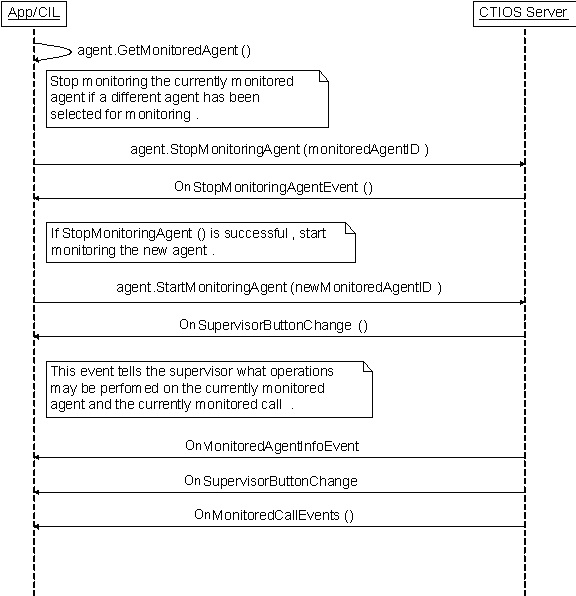
The requests leading up to and including Agent.StartMonitoringAgent() is in the CTIObject.StartMonitoringAgent() method. When calling the Agent.StopMonitoringAgent(), the Agent object associated with the supervisor (the current agent) is the target of the method. The parameter is an Arguments object set as follows:
|
Key |
Value |
|---|---|
|
AgentReference |
The UniqueObjectID of the currently monitored agent. |
When calling Agent.StartMonitoringAgent(), the Agent object associated with the supervisor (the current agent) is the target of the method. The parameter is an Arguments object set as follows:
|
Key |
Value |
|---|---|
|
AgentReference |
The UniqueObjectID of the agent to begin monitoring. |
- OnSupervisorButtonChange
- Monitored Call Events
- Supervisor Application Makes Agent Ready or Logs Agent Out
OnSupervisorButtonChange
This event is delivered to define the operations that the supervisor can successfully execute. The operations included in this event are as follows:
Log out an agent on the team
Make an agent on the team ready
Enable silent monitor
Enable barge-in on agent
Enable intercept call
The application uses the bitmask carried by this event to enable or disable the functionality listed above. The ProcessSupervisorButtonChange() method in SupervisorUIManager illustrates how to process this event.
Monitored Call Events
The majority of events listed with StartMonitoringAgent() are monitored call events. These events inform the supervisor of monitored agent calls beginning, ending, and changing. The combo desktop uses these events to populate its monitored calls grid.
Supervisor Application Makes Agent Ready or Logs Agent Out
When StartMonitoringAgent() is called for a given agent, the supervisor application begins receiving SupervisorButtonChange events. This event can indicate that the monitored agent is in a state where the supervisor can make the agent ready or log the agent out. The following section describes how a supervisor application can make an agent on the supervisor's team ready or log the agent out.
To make an agent ready, the desktop calls the method Agent.SetAgentState(). When calling this method, the Agent object representing the monitored agent is used as the target of the method. The parameter is an Arguments object populated with the following key/value pairs:
|
Key |
Value |
|---|---|
|
SupervisorID |
The ID of the supervisor who is making the agent ready. This value is the value of the AgentID key associated with the current agent (the current agent is the agent passed into the call to Session.SetAgent() when first logging in the agent). |
|
AgentState |
The state to which to set the agent. In this case, the state is ready (integer with value 3). |
To log out an agent, the desktop calls the method Agent.SetAgentState(). When calling this method, the Agent object representing the monitored agent is used as the target of the method. The parameter is an Arguments object populated with the following key/value pairs:
|
Key |
Value |
|---|---|
|
SupervisorID |
The ID of the supervisor who is making the agent ready. This value is the value of the AgentID key associated with the current agent (the current agent is the agent passed into the call to Session.SetAgent() when first logging in the agent). |
|
AgentState |
The state to which to set the agent. In this case, the state is ready (integer with value 3). |
|
EventReasonCode |
The value associated with this key is 999. The value 999 indicates to the rest of Unified CCE that the agent was logged out by their supervisor. |
An agent involved in a call is not logged out until the agent is disconnected from the call. Both the out-of-the-box desktop and the combo desktop warn the supervisor of this behavior. To do this, check the state of the currently monitored agent. If the agent's state is talking, hold, or reserved, the monitored agent is involved in one or more calls and is not logged out until the agent is disconnected from all calls. This is illustrated in SupervisorUIManager.m_btnMonLogoutAgentClick().
Successfully calling Agent.SetAgentState() should be followed by one or more SupervisorButtonChange and MonitoredAgentEvents reflecting the change in the monitored agent's state.
Supervisor Application Flow to Monitor a Call
This section discusses step 4 in the flow of a supervisor application. The methods and events listed below are used to monitor a call.
Agent.StartMonitoringCall()
Agent.SuperviseCall()
Events Processed
OnSupervisorButtonChange
AgentStateEvents
CallEvents
MonitoredCallEvents
MonitoredCallEvents
As stated in the "Monitoring Agents" section, calling Agent.StartMonitoringAgent() triggers MonitoredCallEvents for the agent specified in Agent.StartMonitoringAgent(). The MonitoredCallEvents received by the supervisor desktop inform the desktop of the state of the monitored agent's calls. The combo desktop uses these events to populate and update the monitored calls grid. For more information see the SupervisorUIManager and CallAppearanceHelper classes.
To monitor a call, the supervisor calls the Agent.StartMonitoringCall() method. The target of the call is the current agent (Agent object representing the supervisor). StartMonitoringCall() takes an Arguments object with the CallReference key set to the UniqueObjectID of the call to be monitored. This is illustrated in the CTIObject.StartMonitoringCall()method.
Barging into Calls
The following sequence diagram illustrates a request to barge into an agent's call. In this sequence diagram, the supervisor application is divided into four components to illustrate the different events that affect the different pieces of a supervisor application.
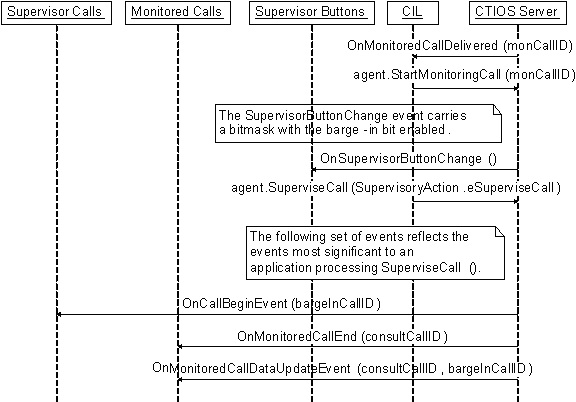
After Agent.StartMonitoringCall() is called for a specific call, the application begins receiving SupervisorButtonChange events. When a call is being monitored, the SupervisorButtonChange event can carry a bitmask indicating that the call can be barged into. To barge-in on a call, the application calls the Agent.SuperviseCall() method. The target of the SuperviseCall() method is the current agent (the Agent object that represents the supervisor). The parameter to the method is an Arguments object with the following key/value pairs:
|
Key |
Value |
|---|---|
|
AgentReference |
The UniqueObjectID of the currently monitored agent |
|
CallReference |
The UniqueObjectID of the currently monitored call |
|
SupervisoryAction |
The value 3. For the .NET CIL, this is SupervisoryAction.eSupervisorBargeIn |
When successfully calling this method, the application receives many events because this method not only changes the state of the monitored call, but also delivers a call to the supervisor which changes the supervisor's state. When an OnButtonEnablementChange event is received, be sure to check the monitored flag. If the flag does not exist or exists and is set to false, apply the event to any application specific logic or UI to control the supervisor's state. This is illustrated in SoftphoneForm.OnEvent(). Notice that this method discards any event that is monitored.
One or more OnSupervisorButtonChange events are received by the application. These events notify the application that it is now possible to intercept the agent's call.
The trickiest piece of handling the events that result from a successful call to Agent.SuperviseCall() is handing the resulting Call and MonitoredCall events. You should apply all CallEvents to whatever application specific object and/or UI element is managing calls directly connected to the supervisor's device (SoftphoneForm in the combo desktop). You should apply all MonitoredCallEvents to whatever application specific object and/or UI element is managing calls connected to the supervisor's team members/monitored agents (SupervisorUIManager in the combo desktop).
Calling SuperviseCall() with the SupervisoryAction set to barge-in initiates a consultative conference between the caller, agent, and supervisor. This means that whatever UI elements and/or objects that handle monitored calls has to be able to handle the set of events that set up a consultative conference. In general, this is not too difficult. The consultative call is joined to the conference call by sending a MonitoredCallEndEvent to end the consultative call. Then a MonitoredCallDataUpdateEvent is used to change the ID of the call to the conference. The MonitoredCallEndEvent takes care of cleaning up the consultative call. The trick is to check OnMonitoredCallDataUpdateEvents for the OldUniqueObjectID key. If this key exists, it means that the UniqueObjectID of a call has changed. OldUniqueObjectID stores the old/obsolete ID of the call. UniqueObjectID stores the new ID of the call. This new ID is carried in all future events for the call. Application logic must be updated based on this information or new events for the call are not tracked correctly.
Intercepting Calls
After a supervisor has barged into an agent's call, the supervisor can intercept the call. This is done by calling the Agent.SuperviseCall() method. The target of the SuperviseCall() method is the current agent (the Agent object that represents the supervisor). The parameter to the method is an Arguments object with the following key/value pairs:
|
Key |
Value |
|---|---|
|
AgentReference |
The UniqueObjectID of the currently monitored agent |
|
CallReference |
The UniqueObjectID of the currently monitored call |
|
SupervisoryAction |
The value 4. For the .NET CIL, this is SupervisoryAction.eSupervisorIntercept |
Calling this method removes the agent from the call. This means that OnMonitoredEndCall events are received for the agent. Also, OnSupervisorButtonChange events are sent to reflect the current state of the monitored agent.
Monitored Call Data
Setting monitored call data is similar to setting call data on an agent's call. The only difference is that the monitored call is the target of the Call.SetCallData() method. You can retrieve the currently monitored call by calling Agent.GetMonitoredCall() where the current agent (the Agent object that represents the supervisor) is the target of the Agent.GetMonitoredCall() method.
Sample Code in CTI OS Toolkit
The CTI OS Toolkit provides several samples that illustrate how to use the various CTI OS CILs in custom applications. These samples are categorized according to the CIL (.NET, Java, or Win32) that they use.
.NET Samples
Note | Of all the samples provided in the CTI OS toolkit, the .NET sample applications provide the most complete set of coding examples. Therefore, use the .NET samples as the reference implementation for custom CTI OS application development regardless of which language you plan to use in your custom development. Use the Java and Win32 samples as secondary references to highlight syntactic differences as well as minor implementation differences between the CILs. |
CTI Toolkit Combo Desktop.NET
The CTI Toolkit Combo Desktop.NET sample illustrates how to use the .NET CIL to build a fully functional agent or supervisor desktop. Though this sample is written in C#, it is a good reference for how to make CIL requests and handle CIL events in an agent mode CIL application. This sample illustrates the following CIL programming concepts:
CTI Toolkit Combo Desktop Configuration
The .NET CTI Combo desktop is configured via an XML file found in the current working directory of the desktop.
The name of the file used to configure the CTI Toolkit Combo Desktop is "CTIOSSoftphoneCSharp.exe.config". The desktop attempts to find the file in the current directory. If the file is not found, the desktop creates the file and displays the following error message.

The user can now edit the file to fill in the appropriate values.
Following is an example configuration file.
<?xml version="1.0" encoding="utf-8"?>
<configuration>
 <configSections>
    <section name="JoeUser" type="System.Configuration.SingleTagSectionHandler" />
<appSettings>
    <add key="LogFilePath" value=".\CtiOsClientLog" />
    <add key="CtiOsA" value="CtiOsServerA" />
    <add key="CtiOsB" value="CtiOsServerB" />
    <add key="PortA" value="42028" />
    <add key="PortB" value="42028" />
  </appSettings>
</configSections>
  <JoeUser TraceMask="0xf" AgentID="1003" AgentInstrument="3009" PeripheralID="5000" DialedNumbers="3011,3010" />
</configuration>
The configuration file is composed of the following elements. These elements are as follows:
configuration – This elements contains the configuration for the desktop.
appSettings – This section defines configuration settings that are shared by every Windows user that logs in to the system. A system administrator needs to configure these values for the appropriate CTI OS Servers and ports. Each of this element's sub-elements defines key value pairs used to configure the desktop.
LogFilePath – The value for this key is the path to the log file as well as the prefix of the name of the log file. The name of the Windows user, the log file's creation time, and the extension ".log" are appended to form the complete name of the log file. For example, if the desktop was run at 11:58 AM on May 23, 2005, the log file would have the name CtiOsClientLog.JoeUser.050523.11.58.04.5032.log.
CtiOsA – The name or IP address of one of the CTI OS Server peers.
CtiOsB – The name or IP address of the other CTI OS Server peer.
PortA – The port used to connect to the CTI OS Server specified by the CtiOsA key.
PortB – The port used to connect to the CTI OS Server specified by the CtiOsB key.
configSections – This section defines Windows user specific sections of the configuration file.
These sections are defined using the section element. Note that in the sample configuration file there is a section element under configSections corresponding to the element tagged with the Window's user name "JoeUser" under the configuration element. You should not have to manually modify this section. As different Windows users use the desktop, this section is modified to include section elements for each of the users.
The rest of the configuration file comprises elements that define configuration specific to different Windows users. For each section element in the configSections element, there is a corresponding element under the configuration element. These elements are used to store information specific to given users such as trace mask, agent login ID, dialed numbers, and so on. Most of the attributes in this element do not need to be modified. The one attribute that may need modification is the TraceMask attribute. This attribute is used to control the amount of information logged to the log file.
CtiOs Data Grid.NET
This sample is a set of helper classes that are used in other .NET CIL samples.
All Agents Sample.NET
This sample illustrates how to use the .NET CIL to build a monitor mode application that monitors agents. Though this sample is written in C#, it is a good reference in general for how to create a monitor mode CIL application. This sample illustrates the following CIL programming concepts:
All Calls Sample.NET
This sample illustrates how to use the .NET CIL to build a monitor mode application that monitors calls. This sample illustrates the following CIL programming concepts:
Java CIL Samples
AllAgents - This sample illustrates how to use the Java CIL to build a monitor mode application that monitors calls.
JavaPhone - This sample illustrates how to use the Java CIL to create a rudimentary agent mode application.
Win32 Samples
CTI Toolkit AgentDesktop - This sample illustrates how to use the Win32 COM CIL's ActiveX controls to create an agent desktop using VisualBasic .NET.
CTI Toolkit SupervisorDesktop - This sample illustrates how to use the Win32 COM CIL's ActiveX controls to create a supervisor desktop using VisualBasic .NET.
CTI Toolkit Outbound Desktop - This sample illustrates how to use the Win32 COM CIL's ActiveX controls to create an outbound option desktop using VisualBasic .NET.
CTI Toolkit C++Phone - This sample illustrates how to use the C++ CIL to create a rudimentary agent mode application.
 Feedback