VPN-less access to Finesse desktop
To enable this feature, use the Cisco provided Reverse Proxy Automated Installer that provides an in-built reverse-proxy, which is based on the OpenResty® Nginx proxy. Alternatively, any custom reverse-proxy pair must be deployed in the DMZ and configured to enable this feature.
VPN-less access to the desktop supports all standard functionality on the desktop including Real-Time and Historical Reports. The SSO authentication is supported along with mechanisms to tunnel ADFS access through the same proxy.
Media access remains unchanged in reverse-proxy deployments. To connect to the media, agents and supervisors can use the Cisco Jabber over Mobile and Remote Access solution (MRA). Otherwise, use the Mobile Agent capability of Contact Center Enterprise with a PSTN or mobile endpoint.
After deploying a reverse-proxy, if you want to access the Cisco Finesse desktop without connection to the VPN, read this chapter. Also, refer to the Nginx rules provided as part of the Reverse-Proxy installer artifact to replicate the same in your custom reverse-proxy. Refer to Reverse-Proxy selection and Configuration section to determine the capabilities required for a custom reverse-proxy.
 Note |
For Nginx-based reverse-proxy rules, installation, configuration, and security hardening instructions, refer to the Reverse-Proxy Installer section. Any reverse-proxy that meets the requirements as mentioned in the Reverse-Proxy Selection Criteria section can be used in place of Nginx. |
For the list of issues, see the Caveats section.
Attention |
The term "upstream servers" is used in this section to refer to all the solution components such as Finesse, CUIC, Cisco IdS, and IM&P servers that are configured to be accessed through reverse-proxy. |
Prerequisites
To configure VPN-less access to the Finesse desktop:
-
Finesse, IdS, and Cisco Unified Intelligence Center must be 12.6(1) ES02 or above.
-
In coresident deployments, LiveData and Cisco Unified Intelligence Center should be 12.6 ES02 or above.
-
LiveData and Unified CCE must be of the same version for a given deployment.
-
Unified CCE and LiveData standalone must be 11.6(1) or above with the latest ES for the respective versions.
-
DMZ with internet connectivity must be available to host the reverse-proxy.
Supported Reverse-Proxy Deployment Models
Reverse-Proxy deployment allows agents and supervisors to concurrently access the Finesse desktop from both LAN and via reverse-proxy. Cisco Contact Center supports the following two deployment models for VPN-less access to Finesse desktop using reverse-proxy:
-
One Finesse cluster connects to one high availability (HA) pair of reverse-proxy.
-
Multiple Finesse clusters connect to one HA pair of reverse-proxy.
Note |
This is applicable to Finesse, IdS, Cisco Unified Intelligence Center, and Live Data clusters. |


Load balancer, WAF, and proxy support for reverse-proxy deployments
The reverse-proxy configurations have security features that are dependent on the information about the actual client IP which is making the request. This information is required for enforcing security features such as enforcing rate limits, logging of client activity and blocking brute force attempts and for logging access to the system.
Deployments which directly terminate the internet Agent connections on the reverse-proxy don’t need anything special to be done here, as the reverse-proxy recieves the client IP due to the client connections terminating on the reverse-proxy.
However when other network devices are used to terminate the client connections, before forwarding them as fresh requests to the reverse-proxy itself, the client IPs are no longer visible to the reverse-proxy.

This happens when there are Load Balancers, Web Application Firewall (WAF), and so on, or when the client access itself is made from behind a forward proxy. CDN deployments also employ multiple reverse-proxies and fall into the same deployment category.
Such deployments MUST add certain configurations to enable the reverse-proxy to identify the actual client IP. The configurations that are required for such deployments are as follows:
-
The public IPs or the hostnames of these devices which forward the requests to the proxy in the reverse-proxy configurations, must be added in the core.env file using the variable NGX_LOAD_BALANCER_IPS.
-
The new requests originating from the intermediary devices, MUST populate the HTTP request header fields with the end-client IP to communicate the same to the reverse-proxy.
The name of this field isn’t predetermined and can be configured in the core.env file, in the variable NGX_LOAD_BALANCER_REAL_IP_HEADER.
Note
All CDN deployments provide a mechanism to extract the client IP as an HTTP header containing a single-client IP as part of the request payload. A custom header is often recommended to avoid conflict with the standard
X-FORWARDED-FORheader. The VPN-less reverse-proxy deployments are also recommended to provide the client IP using a custom header for similar reasons.

-
For security purpose, the devices which are front-ending the reverse-proxy MUST replace
X-FORWARDED-FORandX-REAL-IPheaders provided by the client with the actual client IP or drop them if the deployment doesn’t need these headers. -
If the deployment is using a custom HTTP header for communicating to the client IP, the particular field MUST be replaced with the client IP before forwarding them to the upstream reverse-proxy.
-
Verify the configuration by transmitting a high rate of requests to a Finesse API such as
SystemInfo/DesktopConfigfrom an external client. Verify through the Load Balancer or WAF to ensure that the client is blocked while the Load Balancer or intermediate devices aren’t blocked or rate limited. Ensure that the configurations are working as expected before going live.Refer to the Frequently Asked Questions section for instructions on how to send the requests to the proxy, and also on how to check whether a client is blocked or rate-limited.
-
Pretest the deployments with all WAF/IPS rules enabled to verify that the desktop API patterns are compatible with them before going live with the deployment. Certain WAF rules can be too restrictive and may need some modifications before they are deployed.
Note |
The reverse-proxy configurations provided have no protection against layer-3 attacks such as IP address spoofing or flooding. The proxy provides only rate-limiting, brute force attack detection, and restricting of requests to the allowed destinations. The operating system IP configurations are hardened to a certain level but there are no further protections that are available. It’s assumed that the relevant operating system hardening and traffic protection devices are employed to secure the deployment of Cisco Contact Center. For more details, refer to the Security Guidelines for Reverse-Proxy Deployment section in the Security Guide for Cisco Unified ICM/Contact Center Enterprise, Release 12.6(1) guide. Load Balancers and other devices that don’t have the HTTP header support can skip the second and third points that are mentioned above. However, this causes a suboptimal deployment which will be functional but loses some critical security features listed previously and isn’t a recommended configuration for certain features such as client IP logging for debugging purposes and blocking users attempting to brute force guess passwords. |
Access VPN-Less proxy through Forward proxy and NAT
The VPN-less configuration assumes that the proxy is accessed by clients/agents from the internet, who have separate individual IPs which can be used for enforcing security features. However, not all deployments dedicatedly use agents from the internet with their own unique IP addresses. Most deployments have agents accessing the reverse-proxy deployments both from the internet and from LAN using the same reverse-proxy access URI.

So, if you have a deployment which uses agents behind a proxy or a NAT that looks like what is shown above, certain configuration changes have to be made to ensure that the end-user IPs are correctly communicated to the reverse-proxy. The steps to configure are as follows:
-
The Forward proxy (device A in the diagram above) has to be well known in advance.
-
The Forward proxy device has to transmit the agent IPs in a predefined header. For example,
X-Client-IPas shown above. -
If there are other intermediary devices such as a Load Balancer or WAF at the network where Finesse is deployed, before the requests reach the reverse-proxy, these devices must be able to allow the Forward proxy by its IP address and then transmit the HTTP header without any changes.
Note
It’s crucial that the Forward proxy IP address is identified and only requests from this IP should be allowed to contain the predefined header from step 3. All other requests unless they are an identified proxy IP should strip this header
X-Client-IP.
-
In the core.env file, the variable NGX_LOAD_BALANCER_REAL_IP_HEADER should identify the header used to send the client IP. For example,
X-Client-IP. -
The public IPs or the hostnames of the forward proxy needs to be added in the installer core.env using the variable NGX_LOAD_BALANCER_IPS, if the deployment doesn’t have any other intermediary such as WAFS before the request reaches the reverse-proxy
Note |
Deployments that don’t have the HTTP header support can skip the steps 2–4. However, this causes a suboptimal deployment which is functional but loses certain security features listed above. These are dependent on client IP knowledge and these deployments are therefore not suggested. Reverse-proxy deployment can’t support multiple HTTP header names to transmit the client IP corresponding to different Forward proxies that the network is interacting with. |

Deployments that need to support forward proxies AND intermediary devices.
Deployments such as these should transmit or detect the final client IP of the users who are connecting from behind the Forward proxy A and this would be an agreement between Load Balancer and the Forward Proxy.
The Load Balancer or the final intermediary devices that forward requests to the VPN-less reverse-proxy should transmit the required headers. It must be configured as described in the section above. The Forward proxy information isn’t required to be added to the VPN-less configuration, if the intermediary device is able to identify the correct client IPs and transmit them to the reverse-proxy using the steps mentioned above.
However, if the actual client IP resolution isn’t set up between the Forward proxy and the Load Balancer, the reverse-proxy considers the IP of the Forward proxy as the actual client IP.
In this case to avoid rate-limiting to block the Forward proxy, its IP must be configured in the NGX_LOAD_BALANCER_IPS variable so that the proxy isn’t blocked or rate-limited. This would be a suboptimal deployment and such deployments aren’t suggested due to security constraints.
Authentication
For all requests and protocols that are accepted at the proxy, authentication is enforced before they are forwarded to the respective component servers (Finesse, LD, CUIC, and IM&P). The component servers also enforce authentication locally. Authentications made at the proxy use the Finesse login credentials, irrespective of the component server to which the requests are made.
Persistent connections such as WebSockets that rely on post connection application protocols (such as XMPP) for authentication, are authenticated at the proxy by verifying the peer IP address of the connection. The peer IP address must correspond to a system that has successfully authenticated an API request prior to establishing the socket connection.
Requests that do not require authentication, such as static files and images, are configured to be served by the reverse-proxy from its cache.
Non-SSO
Non-SSO authentication doesn’t require any extra component configurations and works along with the Nginx authentication scripts provided with the corresponding ES release. Authentication relies on the Finesse sign-in credentials. Access to all the end points are validated using the Finesse authentication services.
The list of valid users is cached at the proxy locally (updated every 15 minutes), which is used to validate the user in a request. User credentials are validated by forwarding the request to the configured Finesse URI and thereafter the credential hash is cached locally (every 15 minutes) to authenticate new requests locally. Any change in the username or password will take effect only after 15 minutes.
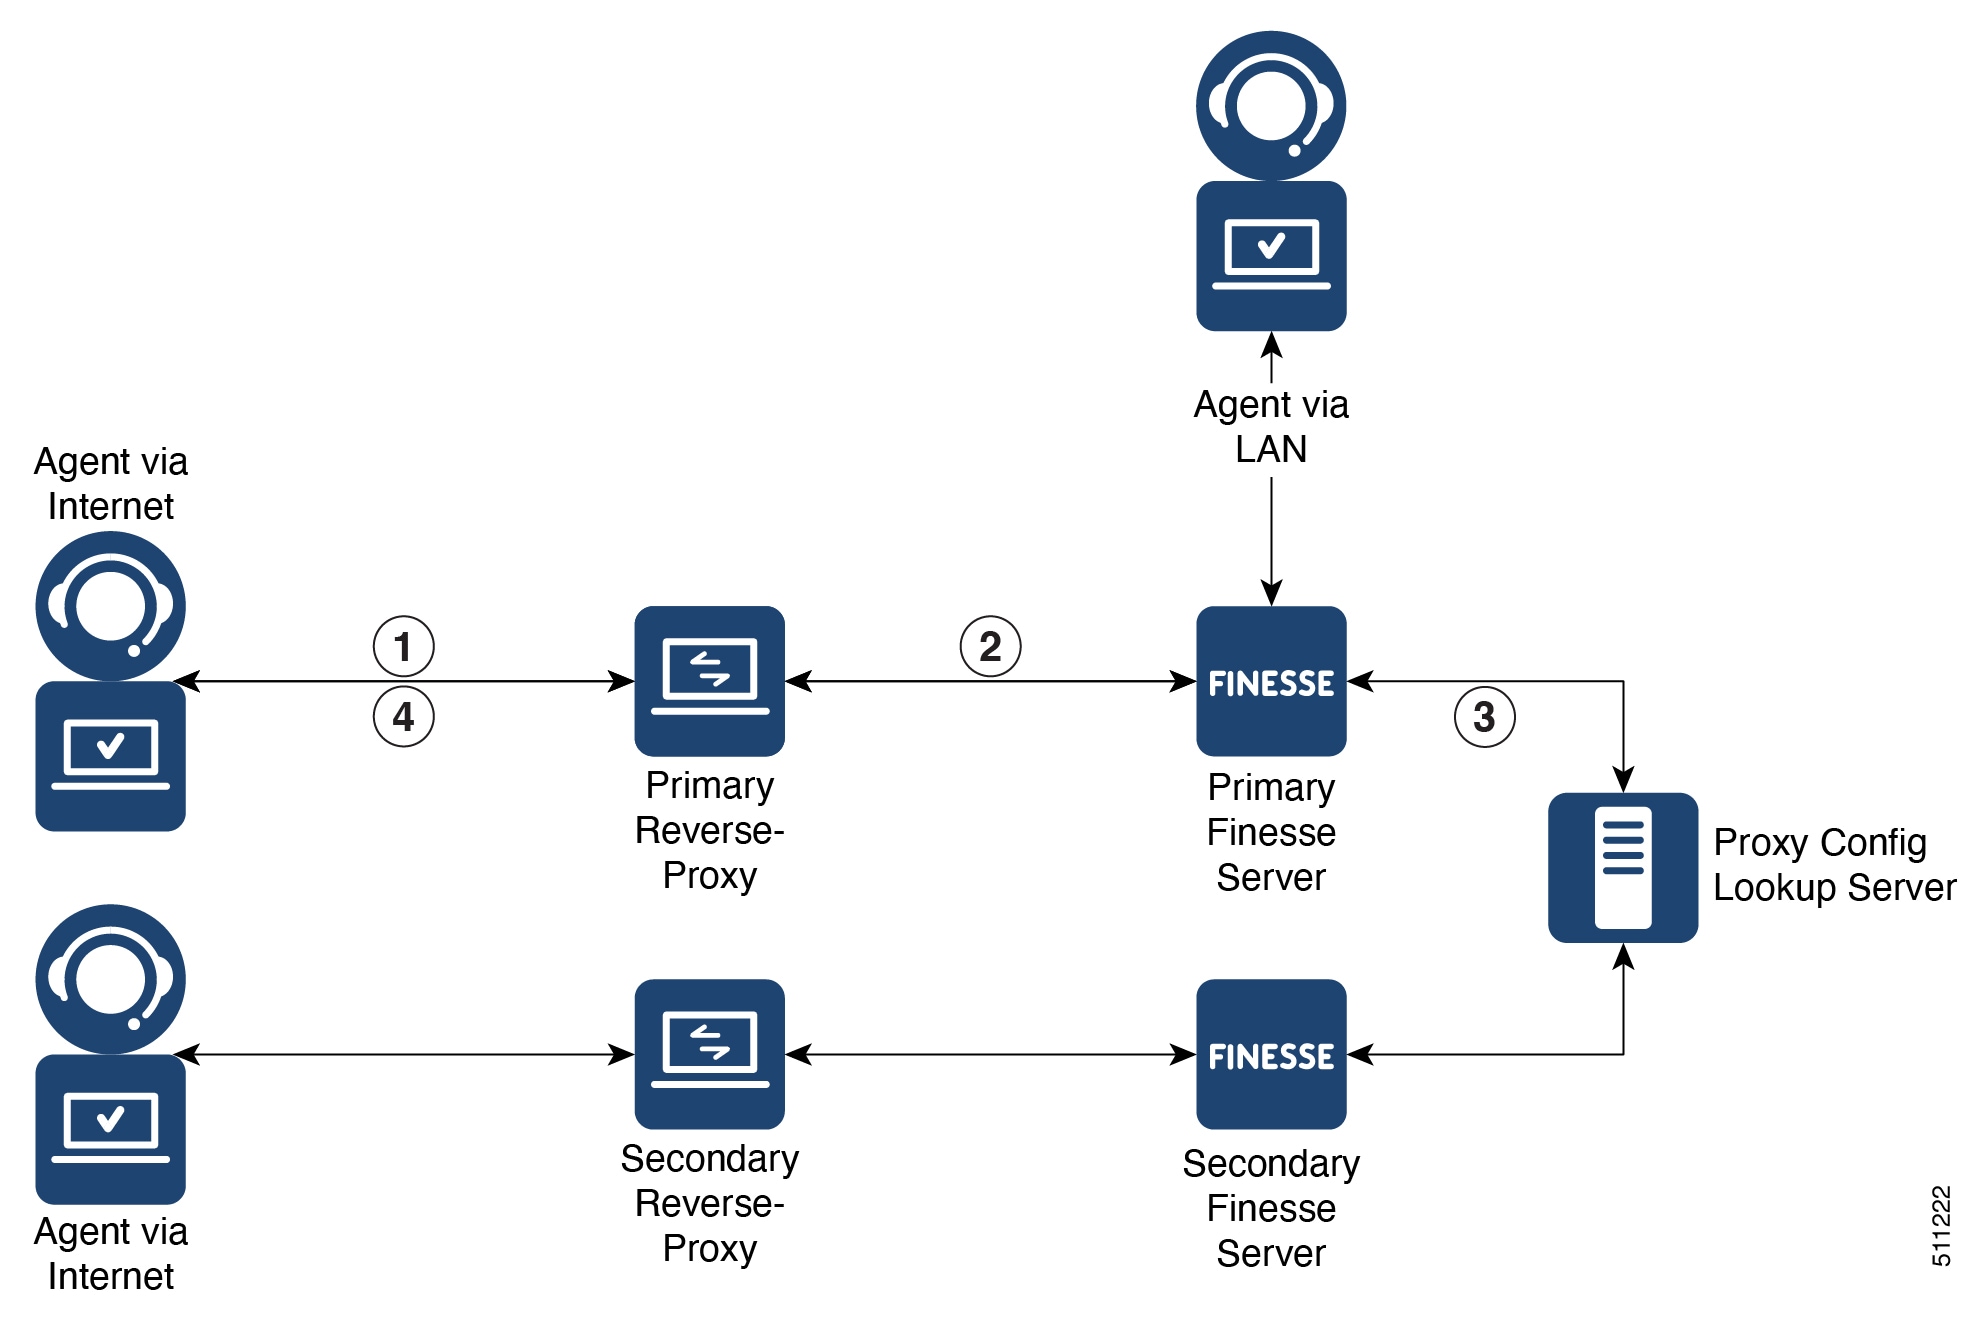
The following figure illustrates the sequence of non-SSO authentication, followed by a step-by-step description:
SSO
SSO authentication requires the administrator to configure the Cisco IdS token encryption key at the Nginx server within the configuration file. Obtain the Cisco IdS token encryption key from the Cisco IdS server using the show ids secret CLI command. For the SSO authentication to work, configure the key as part of one of the mandatory replacements that the administrator must perform.
Cisco Identity Service 12.6(2)
After the reverse-proxy backend onboarding is complete using the utils system reverse-proxy allowed-hosts add CLI, the new reverse-proxy installer components will be able to successfully get the public key automatically from the Cisco IdS server and use that for authenticating the JWT tokens.
Note |
ADFS 3.0 can be configured to be accessed through the reverse-proxy with the Introduction. Other IdP proxy configuration (proxy configuration, internet visibility, and High Availability for IdP) must be done separately by referring to the relevant IdP documentation. However, VPN-less configuration allows you to configure a different IdP hostname corresponding to the IdP-proxy to access the Finesse desktop. |
Cisco IdS SAML configuration has to be performed for the SSO authentication to work at the proxy. For more information on Cisco IdS SAML configuration, see the Single Sign-On chapter.
After SSO authentication is configured, a pair of valid tokens can be used to access any of the endpoints in the system. The proxy configuration validates the credentials by intercepting the token retrieval requests made to Cisco IdS or by decrypting valid tokens and thereafter caching them locally for further validations.
The following figure illustrates the sequence of SSO authentication, followed by a step-by-step description:

-
Agents and supervisors connect to one of the Finesse servers through the configured reverse-proxy.
-
Based on the hostname and reverse-proxy rules, the reverse-proxy forwards the request to the configured Finesse server.
-
The Finesse server checks the proxy configuration map to get the current Cisco IdS proxy hostname.
-
The browsers of agents and supervisors redirect to Cisco IdS through the reverse-proxy.
-
Cisco IdS redirects to the configured IdP URL.
-
The browsers of agents and supervisors redirect the SAML consumer endpoint request to the IdP proxy.
-
IdP sends the self-posting SAML assertion HTML from the browsers of agents and supervisors.
-
Cisco IdS verifies the SAML assertion and issues an authentication code to the Finesse servers.
-
Finesse validates the authentication code and gets a token from Cisco IdS. Finesse uses the token for authentication. The token has a time limit. For more information about SSO configuration and flow, see the Single Sign-On chapter.
-
Finesse serves the request to agents and supervisors through the reverse-proxy.
Note |
After sign-in, consecutive API requests are forwarded to the Finesse server. If the token is valid, the requests are authenticated using the token and is responded. |
Authenticate WebSocket connections
WebSocket connections don’t have a standard authentication mechanism. Therefore, applications rely on post-connection application level protocol payloads for validating the established connection. However, this mechanism is used to establish unauthenticated connections at scale, mounting DoS or DDoS attacks on the servers.
To mitigate this possibility, the provided OpenResty® Nginx reverse-proxy configuration performs specific checks before allowing WebSocket connections. The WebSocket connections are accepted only from those IP addresses that have successfully made an authenticated REST request. The REST request must be authenticated before establishing the WebSocket connection.
Reverse-proxy deployments that use L7 intermediaries, such as Content Delivery Network (CDN), often redirect traffic through interim servers before the traffic reaches the reverse-proxy. In such deployments, ensure that the X-Forwarded-For headers are correctly relayed to identify the client IP address. The X-Forwarded-For headers are used to authenticate the WebSocket connection by matching it with the previously authenticated REST request.
Note |
The clients that attempt to create WebSocket connections before issuing any REST requests, an Authorization Failed error message is displayed. |
Host-Mapping file for network translation
Reverse-proxy deployment requires an invalid mapping file to configure the list of externally visible hostname/port combinations. It’s also used to map to the actual server names and ports that are used by the Finesse, IdS, and CUIC servers. This mapping file which is configured on internal servers is the key configuration that allows the clients connected over the internet to be redirected to the required hosts and ports that are used on the internet.
The mapping file has to be deployed on a web server accessible to the component servers. Its URI must be configured using a dedicated web server available within the LAN. If such a server isn’t available, the reverse-proxy can be used instead. This requires that the proxy is accessible from within the LAN. Using the reverse-proxy presents a risk of exposing the information to external systems which can make an unauthorized connection to the DMZ.
Note |
For details on how to configure a Proxy Map to be served by the reverse-proxy itself, see the Reverse Proxy Automated Installer section. |
For all the requests that come through the reverse-proxy, the Finesse, IdS, and CUIC servers check the host-mapping file, to translate the internal hostnames and ports that are used on the LAN. They are translated to the publicly resolvable hostnames and ports that have to be used on the internet. This mapping file referred to as the Proxy-config map file, is the key configuration that allows the clients connected over the reverse-proxy to be redirected to the required hosts and ports that are used on the internet.
Configure the proxy-config map file by using the CLI available on Finesse, Cisco IdS, and CUIC servers. For details on the mapping file format and the data configured, refer to the Populate Network Translation Data section. For details on the CLI used to configure the file, refer to the section.
Configure the proxy-config map file by using the CLI available on Finesse, Cisco IdS, and CUIC servers. For details on the mapping file format and the data configured, refer to the Populate Network Translation Data section. For details on the CLI used to configure the file, refer to the utils system reverse-proxy config-uri CLI in the Configure Proxy Mapping by Using CLI section.
Port management
One of the main design aspects in deploying a reverse-proxy are the domain and the ports used to access the application. These aspects are interdependent and influence each other when designing the deployment.
The reverse-proxy must be able to determine to which upstream server an incoming request can be forwarded to where an incoming request should be forwarded to. This can be accomplished by changing either the port or the hostname used to access the application. Primarily, the combination of host and port must be unique for the proxy to differentiate and route traffic to the correct upstream component. It's a requirement for the proxy to even start correctly. The following are the options available to design the domain and port access:
-
Use a common domain and differentiate application access using multiple ports.
-
Use a common port and differentiate application access using multiple domains
After determining the domain and the port distribution, perform the following steps:
-
Change the proxy map configuration to match the required port and domain. See the Configure Proxy Mapping by Using CLI section.
-
The respective upstream component environment configuration in the reverse-proxy installer must be configured with the required hostname and port. See the Configure deployment environment configurations section.
Using a common domain with multiple ports
The following example illustrates how multiple application servers can be configured using this access pattern:
-
FinesseA = ReverseProxyDomain.com:8445
-
FinesseB = ReverseProxyDomain.com:8446
-
Finesse1A = ReverseProxyDomain.com:8447
-
Finesse2B = ReverseProxyDomain.com:8448
The following are the benefits of using multiple ports:
-
More granular packet level rate-limits applicable to each application can be applied at the ingress point to control rate-limits. Domain-level access means that the rate-limits can’t be granular.
-
A single-domain requires only a single SSL certificate to access the application. It could be a factor in reducing costs, unlike a multiple-domain application which requires a wildcard certificate.
The following are the disadvantages in using multiple ports:
-
Certain network deployments like CDNs don't support custom ports.
-
Security devices that automatically apply security rules might require custom configurations with non-standard ports.
-
Multiple ports must be opened in the DMZ firewall (10–15 ports are required for a standard 2k deployment). This isn’t recommended by the network security teams.
-
There’s an increased overhead regarding the port manageability.
-
Deploying new instances of the application requires firewall/network changes.
Note |
Ports other than the ones mentioned in the ProxyMap must be blocked and shouldn’t be available for access on the reverse proxy host. This must be blocked at the ingress point as the proxy doesn’t currently have rules to block this access at network level. The Cisco provided installer supports running multiple instances which cater to different sets of upstream servers, to aid in ease of maintenance. Multiple instances of the installer don't allow to use the same ports across different instances of the proxy. Only one process can bind to the same TCP port. Consider the above two points when deciding the port management strategy against proxy installer configuration. |
Using a common port and with multiple domains
The following example illustrates how multiple application servers can be configured using this access pattern.:
-
FinesseA = FinesseA-ReverseProxyDomain.com:443
-
FinesseB = FinesseB-ReverseProxyDomain.com:443
-
Finesse1A = Finesse1A-ReverseProxyDomain.com:443
-
Finesse2B = Finesse2B-ReverseProxyDomain.com:443
The single port configuration reverses the pros and cons listed above with the multiple port configuration.
Note |
Supporting a single port of access requires Unified Intelligence Center and LiveData components to be on 12.6(2)versions. |
DNS Configuration for Finesse, IdS, and CUIC servers
Each Finesse, IdS, CUIC, IM&P, and third-party component servers corresponding to a host that needs internet access must be addressable from the internet. This calls for a hostname and associated port which is resolvable from the internet to be mapped to the public port and matching IP of the reverse-proxy. It’s required so that the traffic is directed to the respective component servers.
DNS registration of the publicly resolvable hostnames and the corresponding IP addresses is mandatory before the requests reach the reverse-proxy.
SSL Certificates
For the hostnames that are configured, corresponding to each unique hostname that is used by the internet client, the respective certificates must be acquired and configured on the reverse-proxy. Even though self-signed certificates are supported, they are risky because the users access directly from the internet. The clients can be more secure by using CA-signed certificates. The best practice is to get CA certificates for proxy servers and third-party-gadget servers.
Reverse-Proxy selection and configurations
This section provides information about the recommendations for hardware, performance, scale, and gadget compatibility for reverse-proxy.
If you choose to not use the reverse-proxy installer that Cisco has provided and want to deploy a custom reverse proxy, see the Guidelines for Custom Reverse Proxy Deployment section.
Performance and Hardware Recommendations
Unified CCE deployments can be supported by Open Source Nginx 1.20 running on a CentOS 8.0 (4.18.0-305 64 bit) distribution, with the configurations and settings (mentioned in the Installing Nginx site) on a dual core 4 CPU (8 logical CPU) Intel Xeon CPU E5-2690 v2 (3.00GHz, 25MB cache) at an average of 10% CPU usage and peak of 15% CPU usage during logins.
Note |
The load has been tested on 2K deployments. |
It is expected that the same configuration can support three Finesse clusters with the required CUIC LD reports, and access to IdS.
A minimum of 8 GB memory is recommended for the proxy server when all other nonessential services and graphical subsystems are disabled.
Note |
It is recommended that deployments gradually onboard new solution components to the proxy until 50-55% of the proxy CPU is free. With this it can cope with unexpected spikes in traffic from the internet. Additional memory must be configured based on the in-memory cache configuration added to Nginx. The data analysis of top equivalent performance capture, made with the nmon tool, is available from the Installer download page https://software.cisco.com/download/home/283613135/type/284259728/release/12.6(2). The data represents the state of the proxy for desktop and supervisor operations, on a sample 2000 and 4000 UCCE deployment using SSO logins and CUIC LD reports as configured in the default layout for all agents for a period of eight hours. It can be used to derive the compute, disk, and network requirements for an installation using Nginx on comparable hardware. |
Determine Scale and Hardware for Proxy
Contact Center administrators should analyze the hardware required for the reverse-proxy, based on the number of agents and supervisors who may access the Finesse desktop without connecting to VPN. You can use the reference request rates provided for Finesse, IdS, and CUIC.
The type of proxy selected guides the hardware to be used, depending on whether the proxy is shipped as an installable software or is a hardware-based application.
Sizing configurations are pre-tested for OpenResty® Nginx proxy. Custom proxy deployments should consult their product documentation or run basic scaling tests to determine the rates that can be supported by the respective proxy and scale their hardware accordingly.
Determine Gadget Compatibility
Determining the gadget compatibility is an important activity for planning a VPN-less Finesse deployment.
After deploying the reverse-proxy, all Cisco-provided gadgets (Cisco Finesse and Cisco Unified Intelligence Center) work seamlessly with their respective servers of Release 12.6(1) or later. The Webex Experience Management and CCAI gadgets also work seamlessly with VPN-less Finesse deployments.
In some scenarios, depending on the gadget design, custom third-party gadgets require workarounds to enable them to work with the reverse-proxy deployment. Refer to the following sections to determine if any of your gadgets require workarounds.
Note |
|
Gadget Types and VPN-less Compatibility
Finesse gadgets are classified into the following types based on how they are designed operationally:
-
Gadgets that are self-contained within the desktop. These gadgets do not have to make any additional network requests, or are restricted to invoking Finesse APIs and APIs on the internet.
-
Gadgets that provide their functionality by communicating with an accompanying server that is deployed in the DMZ and is reachable directly from the internet and LAN.
Note
To enable the same desktop layout to be used by both LAN-based and internet-based clients, the server installed in a DMZ should also be reachable from servers such as Finesse in LAN, and from clients that are running within the LAN.
-
Gadgets that need to communicate with an accompanying server deployed in LAN, but uses desktop-provided makeRequest API to communicate to the server. The makeRequest API routes all the requests through the Finesse server and does not directly reach the server that is deployed in the LAN.
Note
These requests succeed in a reverse-proxy deployment only if the requests are made using the hostname and port. The hostname and the port must be reachable from LAN because the requests are run by Finesse server which runs on LAN.
-
Gadgets that have to communicate directly with any one of the following types of accompanying server:
-
Server deployed within the LAN and is not reachable directly from the internet.
-
Server that communicates with an additional port apart from the HTTP port used to load the gadget.
-
The last two types of gadgets have to be modified to be used in a reverse-proxy deployment. The steps required to enable these gadgets to be accessed from internet clients are as follows:
-
Enable VPN-less access for custom gadgets
-
Send hostname and port information to gadgets
-
Use gadget's URI Exclude feature to refer to Finesse resources
Enable VPN-less Access for Custom Gadgets
Gadgets that communicate directly with accompanying servers that are deployed in LAN must handle the following aspects to work correctly in a reverse-proxy deployment:
-
Use the right hostname and port for communicating with its accompanying server.
A gadget can find the correct hostname and port corresponding to the server from which the gadget was loaded, by using the gadgets.util.getUrlParameters().up_urlPrefs API provided by the Finesse Javascript API.
To find additional ports or hostnames that are required, data can be passed in as gadget preference such that the additional host and port information can be sent to the gadget. For more information, refer to the Send Hostname and Port Information to Gadgets section.
-
Ensure that the communications are forwarded correctly by the reverse-proxy.
After the gadget starts communicating with the correct host and port information, the hostname and port number have to be forwarded to the server deployed in the LAN. This can be done by opening the appropriate ports in the DMZ firewall. Also, ensure that the appropriate ports and rules are added to the reverse-proxy rules to forward the traffic to the correct server in the LAN.
-
Best Practice: If requests to external servers are made using Finesse authentication headers, a common validation is enabled to authenticate the requests at the proxy. Gadgets that do not use Finesse authentication should plan to implement their own custom authentication schemes to ensure that the requests are validated at the proxy before sending to the Finesse server.
Send Hostname and Port Information to Gadgets
Gadgets that send host and port information corresponding to a server deployed within the LAN can use the UserPreferences feature supported by Finessse gadgets. This feature allows a configurable, named information to be passed to the gadget. The information can be referenced within the gadget XML or programmatically by using a Javascript.
For more information on how to use UserPreferences method, refer to https://developer.cisco.com/docs/finesse/#!gadget-preferences.
The UserPreferences that are created for this purpose should start with the keyword externalServerHostAndPort in its name. This enables Finesse to substitute the host and port that are provided with the corresponding entry from the proxyMap file. For example:
<UserPref name="externalServerHostAndPort_chat” display_name="Chat_externalServerHostAndPort" default_value="SMHostName:7443"
                                       datatype ="hidden"/>
Note |
The |
When accessed from the LAN, the UserPreferences continues to have the default value that is configured in the XML. However, when accessed through the reverse-proxy, the UserPreferences receives the value from the proxyMap file. For example:
SMHostName:7443=external-proxy-host:4043
When accessed through the reverse-proxy, the gadget receives the port 4043 and host name as external-proxy-host.
Use Gadget URI Exclude Feature to Refer to Finesse Resources
Add the following content within the ModulePrefs tag of the gadget XML to ensure that the resources that are loaded from Finesse server are excluded from concatenation. This
step is mandatory for gadgets that load their XML from custom servers.
<Optional feature="content-rewrite">
<!-- these files will be directly served by Finesse, not through shindig -->
<Param name="exclude-url">finesse.min.js</Param></Optional>
Finesse URL
Agents and supervisors should bookmark two different pairs of URLs (publisher and subscriber) for accessing the Finesse desktop through both the Contact Center network and the reverse-proxy.
VPN-less Finesse configurations
To configure VPN-less access to Finesse desktop, the Contact Center administrators and the network administrators must work in tandem.
Note |
Don't allow access to the reverse-proxy in your external firewall until all security configurations are in place. To test your changes, use a host that isn’t publicly accessible. |
The configuration steps are as follows:
-
Populate Network Translation Data
-
Host the Mapping File
-
Add Proxy IP by Using CLI
-
Configure Reverse-Proxy Host Verification
-
Configure Proxy Mapping by Using CLI
-
Configure CORS and Frame-Ancestors
-
Configure SSO
Populate Network Translation Data
The Proxy-config map file is similar to a plain property file in which the values are separated by the equal sign. Left Hand Side (LHS) contains the host and port of Finesse, IdS, and Cisco Unified Intelligence Center. Right Hand Side (RHS) contains the values of the host and port that are exposed through reverse-proxy to access the Finesse desktop.
Network administrator and Finesse administrator must create a Proxy-config map file that has the mapping for all the default ports of the Cisco components. The external traffic from the Internet will be redirected to the default ports. For example, 8445 port of Finesse, 8553 port of IdS, and 8444 port of Cisco Unified Intelligence Center.
The Proxy-config map file must be hosted on a web server that is accessible by the Finesse, IdS, and Cisco Unified Intelligence Center servers. The following list is an example of systems and hosts that are required for a two-node Finesse cluster with two Cisco Unified Intelligence Center nodes using SSO mode:
-
Publisher = finesse1.internal.com
-
Subscriber = finesse2.internal.com
-
IdS Publisher = idspub.internal.com
-
IdS Subscriber = idssub.internal.com
-
IdP = idp.internal.com (optional)
-
CUIC Publisher = cuicpub.internal.com
-
CUIC Subscriber = cuicsub.internal.com
-
Proxy Node1 = proxy1.xyz.com
-
Proxy Node2 = proxy2.xyz.com
If the selected proxy supports port-based forwarding, the following is an example of a mapping file that contains the entries that are required for a two-node Finesse cluster with two Cisco Unified Intelligence Center nodes using non-SSO mode.
finesse1.internal.com:8445=finesse1.xyz.com:443
finesse2.internal.com:8445=finesse2.xyz.com:443
idspub.internal.com:8553=idspub.xyz.com:443
idssub.internal.com:8553=idssub.xyz.com:443
idp.internal.com:443=idp.xyz.com:443
cuicpub.internal.com:8444=cuicpub.xyz:8444
cuicsub.internal.com:8444=cuicsub.xyz:8444
Note |
|


Host the Mapping File
The mapping file that is created in the Populate Network Translation Data section, is used by the solution components (Finesse, IdS, and CUIC servers) servers to modify their responses, to enable clients to access the solution via the reverse-proxy. This requires the file to be hosted on any web server accessible by the component servers. The reverse-proxy server, Finesse server, or any web server configured by the administrator can be used for this purpose.
To access the mapping file, the host server's SSL certificate must be uploaded (using the cmplatform admin application) to the individual nodes of the services. After uploading the file, verify if the URL is accessible from Finesse, IdS, and CUIC servers. For example, https://proxyserver.xyz.com:10000/proxymap.txt. HTTP-based URLs are allowed for hosting the mapping file through HTTPS, which is the recommended access scheme.
admin:utils system reverse-proxy show-proxy-config-map

finesseXX.autobot.cvp:8445=astproxy.cisco.com:8445
finesseXYZ.autobot.cvp:8445=astproxy125.cisco.com:8445
cuic-YY.autobot.cvp:8444=astproxy.cisco.com:8444
cuic-YY.autobot.cvp:8447=astproxy.cisco.com:8447
livedata-LL.autobot.cvp:12005=astproxy.cisco.com:12005
livedata-LL.autobot.cvp:12008=astproxy.cisco.com:12008
cuic-PQR.autobot.cvp:8444=astproxy125.cisco.com:8444
cuic-PQR.autobot.cvp:8447=astproxy125.cisco.com:8447
livedata-ABC.autobot.cvp:12005=astproxy125.cisco.com:12005
livedata-ABC.autobot.cvp:12008=astproxy125.cisco.com:12008
ids.autobot.cvp:8553=astproxy.cisco.com:8553
ids2.autobot.cvp:8553=astproxy125.cisco.com:8553
finadfs-WXY.finesse.com:443=astproxy-idp.cisco.com:443
fincup1-WX.cisco.com:5280=astproxy.cisco.com:5280
fincup2-PQ.cisco.com:5280=astproxy125.cisco.com:15280
fincup3-RST.cisco.com:5280=astproxy.cisco.com:25280
Add Proxy IP by Using CLI
The administrator must use CLI to add the list of trusted reverse-proxy IP addresses and their corresponding hostnames. This must be done on all the nodes of Finesse, IdS, CUIC, and LiveData (12.6(1) ES01 and above). These components consider only requests from the configured hosts or IP addresses as valid.
Note |
|
The following is an example of the CLI to add the hosts and IP addresses:
admin:utils system reverse-proxy allowed-hosts add 10.78.95.178
Source 10.78.95.178 successfully added
admin:utils system reverse-proxy allowed-hosts add proxy.xyz.com
Source proxy.xyz.com successfully added

Restart Cisco Web Proxy Service for the changes to take effect: utils service restart Cisco Web Proxy Service
If the added hostname is not resolvable from a component, the following error is displayed:
admin:utils system reverse-proxy allowed-hosts add xyz.com

Either IPv4 address or hostname is invalid or is not resolvable. Now validating IPv6 address for source xyz.com

Operation failed, please enter valid source(s). Source xyz.com is invalid
After adding proxy hosts as trusted hosts through CLI on individual nodes, you must upload proxy server certificates to the Tomcat trust store of the respective components. This is required for proxy authentication to work. Otherwise, the traffic from proxy will be rejected by the components. For information about generating proxy certificates and uploading to the Tomcat trust store, see the Set up Nginx reverse proxy certificate and Generate and Copy CA Certificates of VOS Components sections in the Security Guide for Cisco Unified ICM/Contact Center Enterprise.
Note |
If you are upgrading from 12.6(1) ES01, you must copy and upload proxy server certificates to the Tomcat trust store of the respective components. The certificates are required at the component server to verify and allow TLS connections from the proxy. |
admin:utils system reverse-proxy allowed-hosts list

Source proxy.xyz.com successfully added list

The following source(s) are configured:

1. 10.78.95.178
2. proxy.xyz.com
3. proxy125.xyz.com
admin:utils system reverse-proxy allowed-hosts delete
Select the reverse-proxy source IP to delete:

 1) 10.78.95.178
 2) proxy.xyz.com
 3) proxy125.xyz.com
 4) all
 5) quit

Please select an option (1 - 5 or "q" ): 1

Delete operation successful
Configure Reverse-Proxy Host Verification
You can configure SSL certificate verification for communication between reverse-proxy host and the Cisco Web Proxy Service by running the following CLI command on both publisher and subscriber nodes of Finesse:
utils system reverse-proxy client-auth
This command has the following parameters:
-
enable
-
disable
-
status
By default, the host authentication is enabled.
The following is an example of the CLI to view the status of the host authentication:
admin:utils system reverse-proxy client-auth status

SSL certificate verification for connections established from reverse proxy hosts is disabled
The following is an example of the CLI to enable the host authentication:
admin:utils system reverse-proxy client-auth enable
SSL certificate verification enabled for connections established from reverse proxy hosts

Restart Cisco Web Proxy Service for the changes to take effect:
utils service restart Cisco Web Proxy Service
Note |
After enabling the reverse-proxy host authentication, browser-based clients that connect to Finesse Desktop via LAN hostname must select a client certificate. A pop-up is displayed on systems where client certificates are installed. Clients can choose any of the certificates listed in the pop-up, and continue to connect to Finesse. |
The following is an example of the CLI to disable the host authentication:
admin:utils system reverse-proxy client-auth disable
SSL certificate verification disabled for connections established from reverse proxy hosts

Restart Cisco Web Proxy Service for the changes to take effect:
utils service restart Cisco Web Proxy Service
Configure Proxy Mapping by Using CLI
The Proxy-config
map file can be configured in the Finesse, IdS, and CUIC servers using the utils system reverse-proxy config-uri command. If the URL is configured to use HTTPS protocol, Finesse, IdS, and CUIC must have the certificate (certificate of the web server hosting the URL) uploaded in /cmplatform. The administrator can configure a maximum of two URLs. The URL that is added first takes precedence and that URL is polled
to detect changes in the mapping file. When the URL is not accessible, the alternate URL is used. The following is an example
of the CLI to list the configured Proxy-config
map URLs:
admin:utils system reverse-proxy config-uri list

Currently no source is configured
The following is an example of the CLI to configure the Proxy-config map URL on the Finesse, IdS, and CUIC servers:
admin:utils system reverse-proxy config-uri add https://saproxy.xyz.com:10000/proxyconfig.txt

Operation failed, please enter valid source(s). Source https://saproxy.xyz.com:10000/proxyconfig.txt is invalid

admin:utils system reverse-proxy config-uri add https://saproxy.xyz.com:10000/proxymap.txt

Source https://saproxy.xyz.com:10000/proxymap.txt successfully added

admin:utils system reverse-proxy config-uri list

The following source(s) are configured:

1. https://saproxy.cisco.com:10000/proxymap.txt
The following is an example of the CLI to delete existing Proxy-config map URLs. This command lists all the configured Proxy-config URLs and gets user input to delete specific or all Proxy-config URLs:
admin:utils system reverse-proxy config-uri delete
Select the reverse-proxy source URI to delete:

 1) https://saproxy.xyz.com:10000/proxymap.txt
 2) all
 q) quit

Please select an option (1 - 2 or "q" ): 1

Delete operation successful
The following is an example of the CLI to set the Proxy-config update frequency (in minutes). Based on the set frequency, the local file system of Finesse, IdS, and CUIC are updated with the content from the Proxy-config map file. Before configuring the URL, this command does not return any value. After configuring the Proxy-config map URL, by default it returns one minute as the value.
admin:utils system reverse-proxy show-config-update-frequency
No config-uri configured

admin:utils system reverse-proxy config-uri add https://saproxy.xyz.com:10000/proxymap.txt

Source https://saproxy.xyz.com:10000/proxymap.txt successfully added

admin:utils system reverse-proxy show-config-update-frequency
1 minute

admin:utils system reverse-proxy set-config-update-frequency 5

admin:utils system reverse-proxy show-config-update-frequency
5 minutes
Configure CORS and Frame-Ancestors
Add both the primary and secondary reverse-proxy origins on publisher and subscriber nodes of Finesse and CUIC. If you change Cross-Origin Resource Sharing (CORS) allowed list and frame-ancestors, you must restart Finesse Notification and Tomcat services. For information about restarting Finesse notification service, see the Cisco Finesse Services section in Cisco Finesse Administration Guide.
-
Administrators must add the list of proxy server origins on the allowed list of CORS origins, if the CORS setting is enabled on Finesse, CUIC, and Live Data .
-
Frame-ancestors are added automatically while adding the reverse-proxy trusted hosts in Finesse servers.
-
Administrators must add frame-ancestors while adding reverse-proxy trusted hosts in CUIC servers.
-
Administrators must delete the corresponding allowed list of CORS and frame-ancestors entries while deleting the trusted hosts of a reverse-proxy.

Caution
If you do not delete the corresponding CORS and frame-ancestors entries, it becomes a security vulnerability.
Note |
CORS and frame-ancestors are not applicable to IdS. |
For information about deleting CORS see the Cross-Origin Resource Sharing (CORS) section in the Cisco Finesse Administration Guide.
For more information about configuring CORS, see the Live Data CORS Configuration section in Cisco Unified Contact Center Enterprise Installation and Upgrade Guide.
For information about deleting frame-ancestors see the Supported Content Security Policy Directives section in the Cisco Finesse Administration Guide.
Configure SSO
If SSO is enabled in Unified CCE, SSO must be configured for VPN-less access. Otherwise, agents and supervisors can't login to the Cisco Finesse desktop.
The steps to configure SSO are as follows:
-
Administrator must download proxy specific SAML SP metadata from IdS administration interface.
-
Add proxy relying party trust with IdP.
-
Add proxy redirect URIs to Finesse clients manually via IdS admin interface.
-
Validate SSO configuration for reverse-proxy from IdS admin
For more information, see the Single Sign-On.
Note |
|
Serviceability
Monitor Connected Agents and Supervisors
The reverse-proxy has to be monitored by using the proxy-specific features. For more information, refer to the specific reverse-proxy documentation.
Cisco Finesse allows administrators to view the list of currently connected agents and supervisors in cfadmin. The administrator can filter and see the agents and supervisors who are connected to the Finesse desktop based on the connection type. For example, agents and supervisors connected through the Contact Center network and those connected through reverse-proxy can be seen. For more information, see the Connected Agents section in Cisco Finesse Administration Guide at https://www.cisco.com/c/en/us/support/customer-collaboration/finesse/products-maintenance-guides-list.html. Administrators can also view the summary of connected users by using the following CLI command:
admin:utils finesse show_connected_users summary

Total Connected Users: 6

Desktop Users: 1
FIPPA Users: 2
Third-party Users: 3

Users connected to Finesse via LAN/WAN: 5
Users connected to Finesse via Proxy: 1

To view the complete list of signed-in users, log in to the Cisco Finesse
Administration Console, and navigate to the Connected Agents tab.
To view the real-time list of connected users by using an API, see the ConnectedUsersInfo section in Cisco Finesse Web Services Developer Guide at https://developer.cisco.com/docs/finesse/#!rest-api-dev-guide.
API Modifications to Support Reverse-Proxy Deployments
Finesse SystemInfo API
SystemInfo API is now secured when it is accessed through a reverse-proxy. The API is accessible with agent and supervisor credentials. The following field has been added to support this feature:
-
httpsPort: HTTPS port has to be used for all Finesse API and desktop notifications.
For more information, see the SystemInfo and ConnectedUsersInfo sections in Cisco Finesse Web Services Developer Guide at https://developer.cisco.com/docs/finesse/#!rest-api-dev-guide.
HTTP Return codes returned by the reverse-proxy
These are the HTTP return codes returned by the proxy in exceptional scenarios. The HTTP error code and the situations in which these custom error codes are sent are as follows:
|
Error Code |
Error |
Reason |
|---|---|---|
|
444 |
No Response |
Accessing https ports with http requests. |
|
401 |
Unauthorized |
Authentication Failed - Note, even SystemInfo requires to be authenticated when accessed through reverse-proxy. |
|
403 |
Forbidden |
When restricted pages are accessed or the user is unauthorized.
|
|
405 |
Method not allowed |
Accessing URLs with invalid HTTP methods. For example, most of the Cisco IdS URLs support only GET, POST, and OPTIONS methods. Anything other than these methods results in this error. |
|
412 |
Precondition Failed |
Check the User-Agent field of the request header. Reverse-proxy validates some of the pre-configured User-Agent headers that could be triggered from Bots. |
|
417 |
Expectation Failed |
The server can’t meet the requirements of the Expect request-header field. Please check the referrer header field is populated as one of the valid configured referrer headers. Please check the NGX_VALID_REFERRERS in the core.env file has all the valid referrer headers configured for the failed request. |
|
421 |
Misdirected Request |
Accessing URL that isn’t supported through reverse-proxy. Reverse-proxy configured to support only a set of upstream URLs. Any URL other than that is requested results in this error. |
|
429 |
Too Many Requests |
The response status code indicates that the user has sent too many requests in a given amount of time ("rate limiting"). Need to check the configured LB and rate limiting configurations on the core.env file and component's envs. |
Historical and Real Time Gadgets
The Cisco Unified Intelligence Center release 12.6.1 ES02 and above, supports Historical and Real Time report gadgets in agent and supervisor desktops in VPN-less deployments. To configure the Historical and Real Time report gadgets, refer to the Configure Historical Report Gadgets in Cisco Finesse section in Cisco Unified Intelligence Center User Guide at https://www.cisco.com/c/en/us/support/customer-collaboration/unified-intelligence-center/products-user-guide-list.html.
Note |
|
Security Guidelines
For information about security guidelines, see the Security Guidelines for Reverse-Proxy in Security Guide for Cisco Unified ICM/Contact Center Enterprise at
Caveats
Reverse-proxy deployment allows agents and supervisors to concurrently access the Cisco Finesse desktop from both LAN and through reverse-proxy. After configuring the reverse-proxy, when the agents and supervisors access the Finesse desktop through LAN, all the features work seamlessly. However, when the Finesse desktop is accessed through the reverse-proxy, the caveats are as follows:
-
Finesse IP Phone Agent (FIPPA) isn’t supported.
-
Administrative applications and the corresponding APIs of Finesse, IdS, and Cisco Unified Intelligence Center aren’t supported.
-
Multiple devices accessing the Finesse desktop through Network Address Translation (NAT) isn’t supported.
-
Multiple users accessing the VPN-less desktop from behind a common proxy isn’t supported when multiple sites are involved.
-
If threshold images are used in Live Data, Real Time, and Historical gadgets, add the reverse-proxy rules to allow images to be accessed through reverse-proxy. For more information on threshold images rules, refer to the Nginx TechNote article section.
-
After upgrading Finesse to 12.6(1), Cisco Unified Intelligence Center must be upgraded to 12.6(1) for the Live Data (LD) gadgets to work. Refer to the Unified CCE Compatibility Matrix for general compatibility between CUIC and Finesse when accessed through the Contact Center network or the reverse-proxy.
-
Third-party gadgets on the Finesse desktop could be incompatible with the reverse-proxy deployment. For more information on gadget compatibility, see the Determine Gadget Compatibility section.
-
Finesse API Compatibility:
-
Finesse Desktop supports only the WebSocket notification mechanism over reverse-proxy. For third-party servers, BOSH or XMPP over TCP communication through reverse-proxy isn’t supported.
-
When the SystemInfo API is accessed through a reverse-proxy, the authorization headers are required.
-
 Feedback