Context Service

Context Service

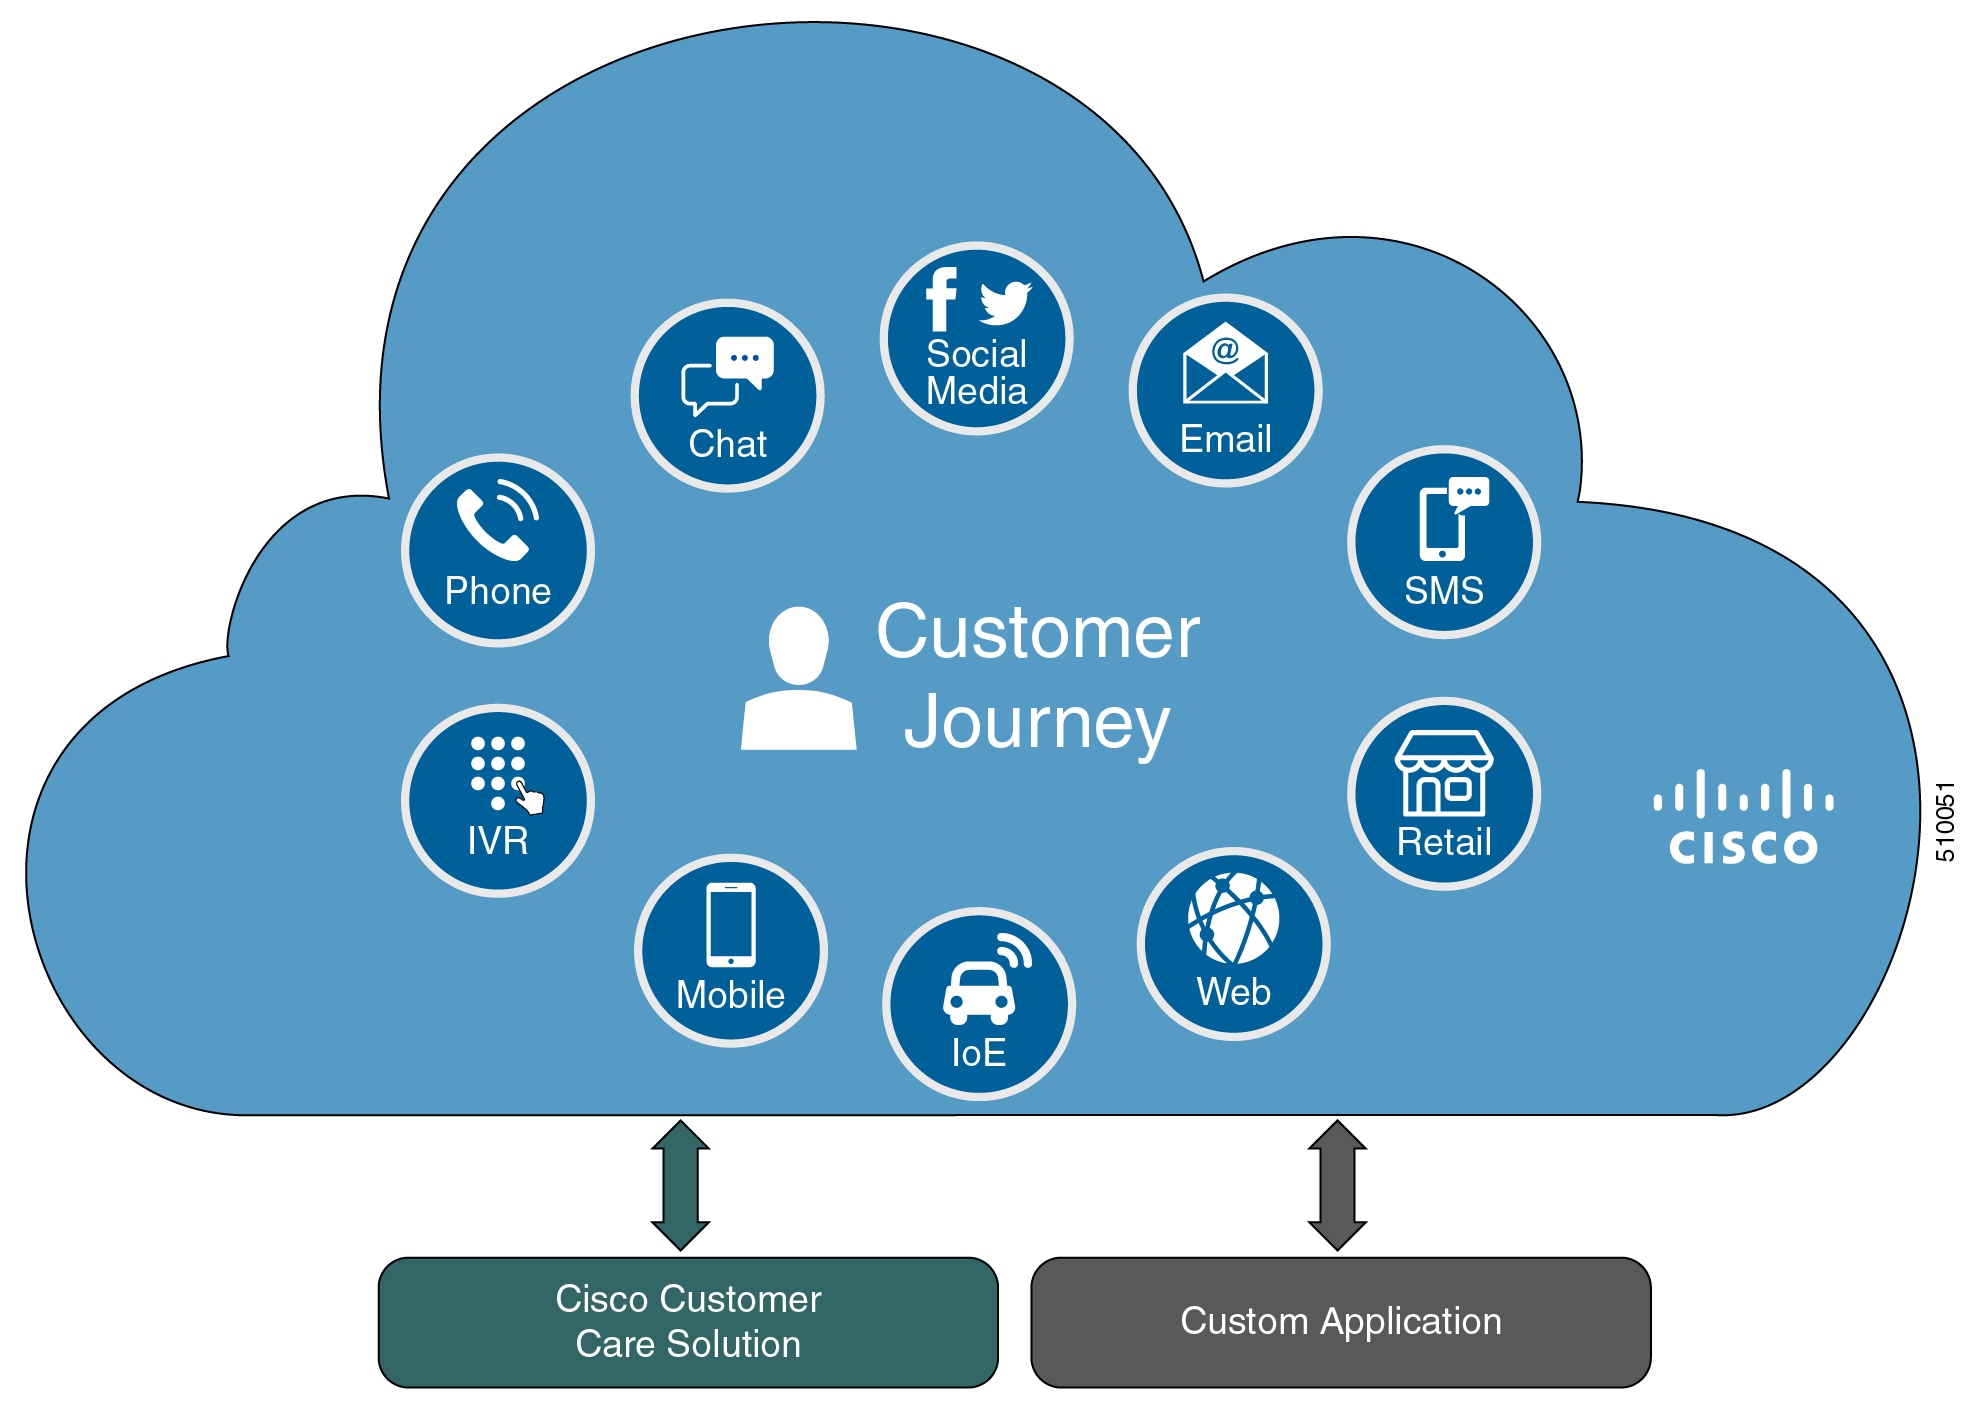
Cisco Context Service is a cloud-based, omnichannel solution. Context Service captures customer interaction history and provides flexible storage of the customer interaction data across all channels (including voice, chat, email, and Internet of Things).

Context Service provides an out-of-the-box integration with Unified Contact Center . You do not need to install any additional components. With Context Service integrated with your contact center, agents can access a customer's previous interactions with your organization. Context Service provides this information to your agents through the Customer Context gadget in the Cisco Finesse desktop.

Context Service provides a flexible data store for storing customer interaction data. You can define what data you want to store and how to store it. Cisco hosts and manages the service, eliminating the need for your organization to deploy and manage servers. Your organization owns the data, even though it's stored in the cloud. Your organization controls access to sensitive data. Cisco partners cannot access protected data unless you grant them access.

For more information about Context Service, see Cisco Context Service Help Central at https://help.webex.com/community/context-service.

Design Considerations

Omnichannel Customer Journey

The omnichannel customer journey captures and displays a customer's complete interaction history.

A customer purchases a motorcycle from a company (Cumulus Motorcycle). The customer now has a problem with the motorcycle, so he needs to schedule an appointment with Cumulus Motorcycle for repair. The customer browses the Cumulus web site to locate the nearest service center and chats with a Cumulus agent to determine if the service center that he selected is open on Sundays. In the chat, he tells the agent that he will call when he is ready to schedule an appointment.

The customer calls to schedule a service appointment. The VRU detects his chat and sends his call to a Cumulus Motorcycle agent who is context aware. The customer agrees on a date for service. The agent confirms the appointment, and sends the appointment details to the customer. When the customer realizes that he has a conflict with the appointment, he sends the SMS a new proposed date. The agent receives a screen pop with the customer's proposed date. The agent sends the customer the details for the new appointment. The customer brings his motorcycle into Cumulus Motorcycle for the scheduled service appointment, then picks up his repaired motorcycle.

Table 1. Components that enable the omnichannel customer journey

Activity

Components

The motorcycle dashboard indicates an error, and instructs the customer to contact Cumulus Motorcycle Customer Service immediately.

The motorcycle sends diagnostic metadata to the Cumulus data center which is connected to Context Service.

The customer browses the Cumulus website to locate the nearest service center. He clicks the Schedule Service Appointment link to view the Cumulus Service Centers located near him. The customer views the nearest Cumulus Service Center and clicks the link to chat with a Cumulus agent.

Enterprise Chat and Email

Finesse

The Cumulus backend server sends the IoT event data and creates an activity to show the current breadcrumbs in Context Service.

The customer calls to schedule a service appointment. The VRU detects his chat and sends his call to an agent.

SMS

Unified CVP

Finesse

Other components

The customer receives the appointment details.

SMS

The customer has a conflict with the scheduled date. The customer proposes a new date. The agent receives a screen pop with the customer's new date.

SMS

Finesse

The customer receives a SMS confirmation with the new date.

SMS (for example, Tropo).

The customer picks up his repaired motorcycle.

Task Flow to Enable Context Service

To enable Context Service in your contact center solution, follow this task flow:

Sequence

Task

Enable Context Service

1

Work with your Cisco account partner to onboard your organization: Enable Context Service for Your Organization

Configure and Register Components

2

Register your Unified CVP Call Servers: Register Unified CVP with Context Service.

3

Configure connection data in CVP Call Studio: Configure Context Service Connection Data in Call Studio.

4

Register your Cisco Finesse Servers: Register Cisco Finesse with Context Service.

5

Register Unified CCE Administration to support SocialMiner and ECE servers: Register Unified CCE Administration to Support Components.

6

Enable the POD.ID expanded call variable: Enable the POD.ID Expanded Call Variable.

Create scripts

7

Add Context Service to your CVP scripts: https://developer.cisco.com/site/context-service/index.gsp.

Context Service Setup

Context Service Prerequisites

Complete the following tasks before you enable Context Service.

  • Install and configure your contact center solution and any components that you plan to integrate with Context Service (Unified CVP, SocialMiner, ECE, and Cisco Finesse).

  • Ensure that port 443 (HTTPS) is available for Context Service to use.

  • Add the following URLs to your allowed list in your firewall so that your contact center components can connect to, and receive data from, the internet:

    • *.webex.com

    • *.wbx2.com

    • *.ciscoccservice.com


    Note

    You must use wildcard URLs in your allowed list because Context Service is accessed through multiple subdomains. Context Service subdomain names can dynamically change.


  • If Context Service uses a proxy server, configure the browser proxy with the URL specified in the Context Service Management gadget.

Enable Context Service for Your Organization

Context Service enables you to store and access customer interaction data in the cloud, creating a flexible and seamless omnichannel customer journey experience. To use Context Service:

  • Work with your Cisco account partner to enable Context Service for your organization.

  • Register Context Service for your organization to use with your contact center application.

  • Connect your contact center application to Context Service.


Note

You need Java Runtime Environment (JRE) version to 1.8.0_151 or later to use Context Service. Refer to the Compatibility Information for your specific release and update accordingly.

Create a Customer Organization and Enable Context Service

Your Cisco account partner can provide Context Service entitlement to your Cisco Webex Control Hub account.

This example shows how a partner adds a Context Service subscription to a customer organization. The example assumes that:

  • The partner is a full administrator or sales administrator and can add trials.

  • The Cisco Webex Control Hub account or the organization and accounts associated with the organization have been created.


Example: Add a Trial Service

Context Service is not tied to the trial services, and does not expire when the trial period is complete.

  1. Log in with your partner credentials to the Cisco Webex Control Hub.

  2. Click Start Trial on the Overview page. The Start New Trial window opens.

  3. Enter details about the trial:

    • Customer Information: Enter the name of the customer company and an email for the administrator.

    • Trial Services: Select the trials to add to this customer. To enable Context, select Message.

    • Licenses Quantity: Specify the number of licenses required for this customer trial. This number is usually the number of users who use this service. This option applies only to the Trial Services. Context Service is not bound by the number of licenses specified here.

    • Trial duration Specify the duration the trial lasts before you must purchase the service. This option applies only to the Trial Services and not Context Service.


      Note

      Context Service entitlement does not expire when the specified trial period ends. The organization can continue to use Context Service beyond the date of the specified Trial Duration.


    Note

    You cannot change the customer name and administrator email after you create the trial. You can modify the other terms of the trial as needed.

    Make sure that the email you provide is not already associated with a Cisco Webex Control Hub account.


  4. Scroll down to the Non Trial Services section and select Enable Context Service for Cisco Unified Contact Center.

  5. Click Next.

  6. A message is displayed that asks if you want to set up the services for the customer. Click No.

You now have provided Context Service entitlement to the organization. The customer now receives a welcome email at the specified email address with the subject line Welcome to Cisco Spark Service.

The customer must click Get Started in the email and sign in to Cisco Webex Control Hub to begin their trial. The customer uses the credentials in the email to sign in and is prompted to create a password.

Your Cisco Context Service is ready. To use the service, connect to Cisco Contact Center with Context Service Enabled. See Register Context Service for more information.

Component Configuration and Registration

Register Unified CVP with Context Service

The registration process has an inactivity session timeout of 10 minutes. If the session times out, sign in again.


Note

For Unified CVP, Context Service is not supported for a VXML Server that is deployed in a standalone mode.


Before you begin

  • Ensure that Unified CVP 11.6 is installed.

  • Ensure that your web browser allows popups.

  • If you are using Microsoft Internet Explorer, add a registry key, TabProcGrowth, at HKEY_CURRENT_USER\Software\Microsoft\Internet Explorer\Main. Set the type to String or DWORD (32-bit) and set the value to 0.

  • When your organization was entitled for Cisco Context Service, you received an email requesting a sign-in and a password change. Sign in using the registration email, and change the password. Now your organization is entitled to use Context Service.

Procedure


Step 1

In the CVP Operations Console, choose System > Cloud Services > Context Service to launch the Context Service Management page.

Step 2

Provide the following information for the CVP VXML server:

  • Proxy server URL—Specify the URL if your solution uses an optional proxy server to reach Context Service.

  • Timeout—The amount of time, in milliseconds, that the system waits for a response from Context Service for each operation.

    See the application's online help for the minimum, maximum, and default values for this setting for the component you are registering. Test this setting and tune it to match the latency for your solution.

  • Lab Mode—Indicates whether Context Service is in lab mode. In lab mode, you can test, develop, and debug Context Service. Lab mode allows you to delete objects from Context Service.

Step 3

Click Register.

A popup window appears in your browser prompting you to sign in to Cisco Spark.

Step 4

Enter your Cisco Webex Control Hub admin credentials and complete the registration. (See https://help.webex.com/docs/DOC-4165 for more information.)

Note 

Use the same organization admin account to register all components in one contact center solution.

Step 5

Check the Allow Access to Your Hybrid Services Node check box and then click Continue.

Cisco Webex Control Hub redirects the browser back to the application from which you began the registration.

If the registration is successful, the connection details are deployed on all running VXML Servers in the pool. If you add a VXML Server after registration, click Save & Deploy on the VXML server device configuration page to deploy the connection data to the new server.


Configure Context Service Connection Data in Call Studio

To debug a solution that uses Context Service, Call Studio requires your Context Service credentials and connection details.

Before you begin

Register Unified CVP with Context Service by using the Operations Console.

Procedure


Step 1

From the Operations Console, select System > Cloud Services > Context Service.

Step 2

Click Connection Data.

The system displays the credential information in the Connection Data area below the Connection Data button. The connection data is selected by default.

Note 

Carefully store the connection data. This data is the key to open your organization's data in the cloud.

Step 3

Copy the credentials onto the clipboard.

Step 4

Click OK.

Step 5

Launch Cisco Unified Call Studio.

Step 6

Choose Window > Preferences.

Step 7

On the Preferences window, choose Call Studio > Debug Preferences.

Step 8

In the Context Service area enter the following connector properties:

  1. In the Connection Data field, paste the connection data from the clipboard.

  2. In the Proxy URL field, enter the Proxy URL in the format: hostname:port or IP_address:port.

  3. In the Timeout field, enter how long the client waits for a response from Context Service. The allowed values are from 1200ms to 5000ms, with a default of 2400ms.

Step 9

Click OK.

Note 
To check the validity of connection data through the Proxy URL, click Test connection.
Step 10

Restart VXML service and Ops Console service.


Register Cisco Finesse with Context Service

Before you begin

  • Ensure that your web browser allows popups.

  • When your organization was entitled for Cisco Context Service, you received an email requesting a sign-in and a password change. Sign in using the registration email, and change the password. Now your organization is entitled to use Context Service.

  • If you wish to configure a proxy server for Context Service, configure the browser proxy with the proxy server URL you specified. Refer to your browser’s documentation for information about configuring proxy settings.

Procedure


Step 1

Register Cisco Finesse with Context Service from the Finesse administration console Context Service Management gadget.

Note 

Ensure to register all Finesse primary nodes.

Step 2

Provide the following information:

  • Proxy server URL—Specify the URL if your solution uses an optional proxy server to reach Context Service.

  • Timeout—The amount of time, in milliseconds, that the system waits for a response from Context Service for each operation.

    See the application's online help for the minimum, maximum, and default values for this setting for the component you are registering. Test this setting and tune it to match the latency for your solution.

  • Lab Mode—Indicate whether Context Service is in lab mode. In lab mode, you can test, develop, and debug Context Service. Lab mode allows you to delete objects from Context Service.

Step 3

Click Register.

A popup window appears in your browser prompting you to sign in to Cisco Spark.

Step 4

Enter your Cisco Webex Control Hub admin credentials. Complete the registration in Cisco Webex Control Hub. (See Register Your Applicartion with Context Service for more information.)

Note 

Use the same organization admin account to register all components in one contact center solution.

Cisco Webex Control Hub redirects the browser back to the application from which you initiated the registration.


What to do next

To change any of the settings after you register, edit the setting and save your change. You do not need to reregister.

After you register Cisco Finesse, agents can use the Context Service desktop gadget. It is available on the Manage Customer tab in the default agent desktop layout. If the gadget is not in your layout, you can add the gadget with the following XML:

<tab>
             <id>manageCustomer</id>
             <label>finesse.container.tabs.agent.manageCustomerLabel</label>
             <gadgets>
                      <gadget>/desktop/gadgets/CustomerContext.xml</gadget>
             </gadgets>
        </tab>

Register Unified CCE Administration to Support Components

You register Unified CCE through the Unified CCE Administration tool. This enables SocialMiner and Enterprise Chat and Email to access Context Service in a single operation.

Note

Before you register with Context Service through Unified CCE Administration, upgrade the JRE on your primary AW to version 1.8.0_151 or higher. For information on upgrading JRE, see the Cisco Unified Contact Center Enterprise Installation and Upgrade Guide.


Before you begin

  • Add SocialMiner and Enterprise Chat and Email to the System Inventory in Unified CCE Administration.

    Packaged CCE 2000 Agents always uses the Side A Administration & Data Server as the Principal AW for Context Service.

  • When your organization was entitled for Cisco Context Service, you received an email requesting a sign-in and a password change. Sign in using the registration email, and change the password. Now your organization is entitled to use Context Service.

Procedure


Step 1

Register from the Unified CCE Administration System > Feature > Context Service menu.

Step 2

Provide the following information:

  • Proxy server URL—Specify the URL if your solution uses an optional proxy server to reach Context Service.

  • Timeout—The amount of time, in milliseconds, that the system waits for a response from Context Service for each operation.

    See the application's online help for the minimum, maximum, and default values for this setting for the component you are registering. Test this setting and tune it to match the latency for your solution.

  • Lab Mode—Indicate whether Context Service is in lab mode. In lab mode, you can test, develop, and debug Context Service. Lab mode allows you to delete objects from Context Service.

Step 3

Click Register.

Your browser displays the Cisco Spark sign-in page.

Step 4

Enter your Cisco Webex Control Hub admin credentials. Complete the registration in Cisco Webex Control Hub. (See Register Your Application with Context Service for more information.)

Note 

Use the same organization admin account to register all components in one contact center solution.

Cisco Webex Control Hub redirects the browser back to the application from which you initiated the registration.


What to do next

Set up the ECE services in the System Console. For more information, see the Enterprise Chat and Email Deployment and Maintenance Guide (for Unified Contact Center Enterprise) at https://www.cisco.com/c/en/us/support/customer-collaboration/cisco-enterprise-chat-email/products-maintenance-guides-list.html .

Configure Context Service in ECE. For more information, see the Enterprise Chat and Email Administrator's Guide to System Console at https://www.cisco.com/c/en/us/support/customer-collaboration/cisco-enterprise-chat-email/products-maintenance-guides-list.html.

If you register CCE Context Service after it is deregistered, restart the ECE Context Service Process and Instance from the ECE System Console Page. To set up ECE services in the System Console, see the Enterprise Chat and Email Deployment and Maintenance Guide (for Unified Contact Center Enterprise) at https://www.cisco.com/c/en/us/support/customer-collaboration/cisco-enterprise-chat-email/products-maintenance-guides-list.html.

Enable the POD.ID Expanded Call Variable

Enable the built-in POD.ID expanded call variable to send task context data through the system.


Note

For a new incoming call Unified CVP creates a new POD and passes that POD information to CCE in the POD.ID ECC variable. In order to make Unified CVP send the POD.ID ECC variable to CCE, the Call Studio Script should contain CVP Subdialog_Start at the beginning of the script followed by the business logic of creating or updating the POD. The Call Studio Script should contain CVP Subdialog_Return at the end of script with Caller Input as “Yes” for Subdialog_Return in order to pass the POD ID to the CCE Application.


Procedure


Step 1

In Unified CCE Administration, navigate to Manage > Expanded Call Variables.

Step 2

Click the POD.ID row in the Expanded Call Variables list.

The Edit POD.ID window opens.
Step 3

Check the Enabled check box.

Step 4

Click Save.


Solution Serviceability

This section provides the information and resources to troubleshoot Context Service.

You can view service status for Context Service and subscribe to updates at https://status.ciscospark.com.

For Enterprise Chat and Email troubleshooting information, see the Enterprise Chat and Email Administrator's Guide to System Console at https://www.cisco.com/c/en/us/support/customer-collaboration/cisco-enterprise-chat-email/products-maintenance-guides-list.html.

Access Context Service Logs

The log file from Context Service is CCBU-runtime.<YYYY-MM-DDTHH-MM-SS.sss>.log.

The path to the log file is /opt/cisco/mmca/logs/runtime.

Context Service logs are stored at C:\icm\tomcat\logs\ContextService.*.log on the Principal AW.

Fusion Management Connector logs are stored at /opt/cisco/ccbu/logs/fusion-mgmt-connector directory

Cisco Finesse logs are stored at /opt/cisco/desktop/logs/finesse-auth

Cisco SocialMiner logs are stored at /opt/cisco/mmca/logs/runtime

For the location of Enterprise Chat and Email logs, see the Enterprise Chat and Email Administrator's Guide to System Console at https://www.cisco.com/c/en/us/support/customer-collaboration/cisco-enterprise-chat-email/products-maintenance-guides-list.html.

View Context Service Customer Record Statistics on OAMP

You can check Context Service customer record statistics in OAMP from the VXML logs.

Verify the VXML logs for any exceptions. Search the log $CVP_HOME/logs/VXML for the instances “Context service client stats summary” - Verify the reachability /connectivity. The report displays the count, latency, etc for each record. In the Dashboard Login to OAMP > System > ControlCenter > VXML Device's CS status. Alerts are captured in syslogServer.

Troubleshooting Context Service Registration Process

This section lists the issues and the possible solutions during registration of the components with the Context Service Cloud.

Cannot Configure Cisco SocialMiner

You cannot configure Cisco SocialMiner, if Context Service fails to connect with it.

Check the Context service logs at C:\icm\tomcat\logs\ContextService. If there are connectivity errors, the Context Service logs provide information similar to this:

0000001306: *.*.*.*: Aug 12 2016 16:58:15.629 -0400: %CCBU_pool-1-thread-35-Infrastructure-1548-3-REST_API_EXCEPTION:

%[exception=com.sun.jersey.api.client.ClientHandlerException:

java.net.SocketTimeoutException: connect timed out][message_string=Failed to make request. Exception is caught for rest call:GET https://*.*.*.*:443/ccp-webapp/ccp/contextServiceConfig]: The REST API has caught an exception

To fix the issue, check to see if Cisco SocialMiner is up and running. If Cisco SocialMiner is up and running, check its connection with the principal AW Machine.

If your issue is still unresolved, contact Cisco customer support.

Cannot Register Context Service

When you try to register with Context Service, if registration fails with the following error, check to see if you have an internet connection.

Failed to register with the Context Service because of a connection error. Verify that the server has internet access and/or the proxy server URL is correct.

If your registration fails due to incorrect proxy server URL, check the proxy server configuration in your browser.

If you are still unable to register, the Context Service SDK could have been corrupted, when an automatic update was run.

To recover the corrupted Context Service SDK:

  1. Stop the Cisco Tomcat service.

  2. Delete the C:\icm\ContextService directory.

  3. Restart the Cisco Tomcat service. The Context Service directory is recreated.

If your issue is still unresolved, contact customer support.

Cannot Deregister Context Service

If the AW-HDS-DDS side A can access only the key management system but not the rest of Context Service, registration succeeds. However, deregistration fails because the cluster was not created.

Check the Context Service logs on the Principal AW at: C:\icm\tomcat\logs\ContextService.*.log. If the cluster was not created, the SDK logs provide information similar to this:

0000000111: *.*.*.*: Aug 12 2016 10:46:59.835 -0400: %_Thread-25-6-com.cisco.thunderhead.RESTClient: Error on CREATE: https://hercules-a.wbx2.com/v1/connectors

0000000112: *.*.*.*: Aug 12 2016 10:46:59.835 -0400: %_Thread-25-3-com.cisco.thunderhead.RESTClient: Error: try #1: Exception trying to connect=com.sun.jersey.api.client.ClientHandlerException: org.apache.http.conn.HttpHostConnectException: Connect to hercules-a.wbx2.com:443 [hercules-a.wbx2.com/*.*.*.*, hercules-a.wbx2.com/*.*.*.*] failed: Connection timed out: connect

To fix this issue, check to see if your server is up and running.

If you are still unable to deregister, the Context Service SDK could be corrupt.

To recover the corrupted Context Service SDK:

  1. Stop the Cisco Tomcat service.

  2. Delete the C:\icm\ContextService directory.

  3. Restart the Cisco Tomcat service.

The Context Service directory is recreated. If the issue is still unresolved, contact Cisco support.

Cannot Register Context Service (Cisco Unified CVP)

Registration Failure

When you try to register with Context Service and if the registration fails, the following error message is displayed:

Registration with context Service failed. Try re-registering.

The reasons for this error can be the following:

  • Dynamic Context Service extension jar failure

  • Incorrect login credentials

To successfully register Context Service, follow these steps:

  1. Check the network connectivity.

  2. Check that the Context Service extension jar dynamically downloads in the following path:

    CVP_HOME\OPSConsoleServer\Tomcat\webapps\oamp\ WEB-INF\contextService\context-service-sdk-downloads
  3. If you use a proxy, ensure that the proxy is up and running.

  4. Ensure that you use the valid organization account credentials that was used to enable Context Service.

  5. Verify the OAMP log $CVP_HOME/logs/OAMP and search for instances of
    CS_SDK_STATUS
  6. Verify the connectivity. In the OAMP dashboard, log in to System > ControlCenter > OAMP CS status. Alerts are captured in syslogServer.

Unable to Register and Deregister Unified CVP With Context Service

Registration or deregistration of CVP with Context Service fails with this error Activity Failed/Register/Deregister failed

This error occurs if there is a network issue. Make sure that your network is available and connected. You also need to check Context service connection status in OAMP and VXML logs. These logs are updated every 30 seconds. You can also find status information in the system logs also.

Verify the OAMP logs for any exceptions. Search the log $CVP_HOME/logs/OAMP for instances of “CS_SDK_STATUS” - Verify the reachability /connectivity. In the Dashboard Login to OAMP > System > ControlCenter > OAMP CS status. Alerts are captured in syslogServer.

Verify the VXML logs for any exceptions. Search the log $CVP_HOME/logs/VXML for the instances “CS_SDK_STATUS” - Verify the reachability /connectivity. In the Dashboard Login to OAMP > System > ControlCenter > VXML Device's CS status. Alerts are captured in syslogServer.

Context Service Registration Incomplete

When registering or de-registering Context Service with Finesse, the process stops responding and continues to display one of the following messages:

Registration is in progress

OR

Deregistration is in progress

These messages could occur for the following reasons:

  • The proxy is invalid or not reachable. Make sure that the proxy URL is correct and reachable from Finesse.

  • The browser pop-up is disabled. Ensure the browser pop-up is enabled.

  • The Context Service Cloud services may not be reachable. For more information, see the Fusion Management Connector (FMC) logs located at: /opt/cisco/ccbu/logs/fusion-mgmt-connector directory.

  • Fusion Management Connector (FMC) is still in the loading state.

Context Service Registration Status Invalid

Registering Context Service with Finesse clients can fail with this error:

The Context service registration status is invalid. Check the Settings and try again.

This error could occur for the following reasons:

  • An invalid client setting update results in an invalid registration state. To ensure that the update keeps the connector in registered state, perform the following:

    1. Correct the client settings.

    2. Save and refresh the page.

    If the update is unsuccessful, try restarting the Cisco Tomcat service. If the issue still persists, re-register Context Service.

  • Connection data is invalid. Restart Cisco Tomcat service. If that doesn't help, contact Cisco Support.

Unable to Determine Context Service Registration Status or Client Settings

Context Service Management displays the following error messages in Cisco Finesse Administration:

  • Unable to determine registration status from system

  • Error while retrieving Context Service client settings from Database

These errors occur when the Fusion Management web application, deployed on the Platform Tomcat is down, or the Cisco Tomcat service is down in Cisco Finesse.

When this occurs:

  • Verify that the Cisco Tomcat service is up and running. The service may not respond with an XML in some error scenarios.

  • Restart Platform Tomcat and try again.

  • Check the logs under: /opt/cisco/ccbu/logs/fusion-mgmt-connector for more information.

Context Service Registration Incomplete Due to Pop-Up Window

As part of Context Service registration process, a pop-up window is displayed for Cisco Spark login. After the registration is complete, the popup window does not close automatically and the following error message is displayed:

Please wait while Finesse completes the Context Service registration. CAUTION: Do not close this window, otherwise the registration may fail. This window will close automatically when the registration is complete.

When this error message occurs:

Check the registration status in the Finesse Administration page. If the registration is complete, the pop-up window closes automatically.


Note

If you are using Firefox, enable the dom.allow_scripts_to_close_windows config to ensure that any additional tabs opened for context service registration close as expected.


Context Service Registration Incomplete Due to Page Refresh

As part of Context Service registration process, do not refresh the pop up page while the registration or deregistration process is in progress. This may result in an Undefined state for that respective component.

Troubleshooting Context Service Connectivity Process

This section describes the various connectivity related issues that are encountered and the troubleshooting that can be performed for a possible solution.

Activity Operation

Exception related to Activity operation failure

Deployment failure, dynamic jar download failure, context service client initialization failure, or incorrect connection data.

Check if the deployment of Context Service related data from OAMP to VXML server is successful from the Deployment Status button in OAMP.

  • If the deployment failed, in OAMP, select Device Management > Unified CVP XML Server. Select the failed VXML server and click Save & Deploy.

  • Ensure that VXML Server status is up.

Check that the Context Service extension jar dynamically downloads in the following path:

CVP_HOME\VXMLServer\Tomcat\webapps\CVP\ WEB-INF\contextservice\context-service-sdk-downloads

  • Check the network connectivity.

  • If you use a proxy server, make sure that it is working.

Ensure that the Context Service client initialization is successful.

  • Restart the VXML Server service.

Verify that the customer ID is valid and exists.

  • Create valid customers.

Verify the VXML logs for any exceptions. Search the log $CVP_HOME/logs/VXML for the instances “CS_SDK_STATUS” - Verify the reachability /connectivity. In the Dashboard Login to OAMP > System > ControlCenter > VXML Device's CS status. Alerts are captured in syslogServer.

Context Service Connection Data Not Published

The connection data is published in the following scenarios:

  • De-registering or cancelling Context Service.

  • Registering with Context Service.

  • Updating connection data when Context Services sends a notification.

This issue can occur when there is a change in the connection data in the cloud. Also, check for the following log statements in the fusion-management-connector logs at /opt/cisco/ccbu/logs/fusion-mgmt-connector/:

  • Error occurred while fetching runtime connector information from DB

  • There are no runtime connectors registered in system currently

  • Exception ocurred while fetching connection data

  • Exception occurred while publishing connection data

If the issue persists, contact Cisco Support.

Activity Count Mismatch Between CVP and Other Components

This issue can occur if there is a count mismatch between CVP and other components due to a break in network or cloud connectivity. You will get this error message Activity Failed.

Check the statistics. Context Service Statistics: Unified CVP fetches the customer record related statistics every 30 minutes and writes in the VXML logs and syslogs. These statistics are flushed out immediately post fetching.

Verify the VXML logs for any exceptions. Search the log $CVP_HOME/logs/VXML for the instances “CS_SDK_STATUS” - Verify the reachability /connectivity. In the Dashboard Login to OAMP > System > ControlCenter > VXML Device's CS status. Alerts are captured in syslogServer.

Activity Failure in Debug Mode

Error/Exception in VXMLlogs

Network issue, incorrect connection data

  • Verify that the proxy is correct.

  • Check if the proxy is working on the web browser.

  • Check if the connection data is valid.

Verify the VXML logs for any exceptions. Search the log $CVP_HOME/logs/VXML for the instances “CS_SDK_STATUS” - Verify the reachability /connectivity. In the Dashboard Login to OAMP > System > ControlCenter > VXML Device's CS status. Alerts are captured in syslogServer.

Periodic Logging of Context Service SDK Connector Status

  • Context Service status information is logged periodically into the respective log files.

  • The periodic interval is 30 minutes, and this is synchronized to the wall clock time. The log should appear at 1100hrs, 1130hrs, 1200hrs and so on.

  • The status message lists the overall status, services used by the connector, information on whether it is reachable, latency and so on.

  • Fusion Management Connector logs are located at /opt/cisco/ccbu/logs/fusion-mgmt-connector

  • Finesse Auth logs are located at: /opt/cisco/desktop/logs/finesse-auth.

Periodic Logging of Context Service JMX Counters

The JMX statistics information is logged into the logs located at /opt/cisco/desktop/logs/finesse-auth directory" with the text "CS_SDK_STATS_SUMMARY".


Note

This statistics information is not logged into the Fusion Management Connector logs.


Troubleshooting Context Service Runtime Process

This section describes the runtime related issues that are encountered during the runtime connection with the Context Service Cloud. The troubleshooting tips and the possible solution for each are presented.

Unable to Access Customer Context Information

In the Cisco Finesse desktop gadget, there may be instances where the customer's context information is not accessible and the following error message is displayed:

Experiencing issues with accessing customer's context information

This error message could occur due to the following reasons:

  • Invalid client settings. Check and correct the client settings.

  • Due to connectivity issues. Check if the Context Service connectivity is accessible from Cisco Finesse.

  • Cisco Finesse is not registered with Context Service. Check your Context Service registration. If Context Services is not registered, try again

Deregister a Component with Context Service

After registering a server, you can deregister it if you decide to stop using Context Service with that server.

Before you begin

Ensure that your web browser allows popups.

Procedure


Step 1

Launch the Context Service Management page for the server.

Step 2

Click Deregister.

Your browser displays the Cisco Spark sign-in page.

Step 3

Sign in with your Cisco Webex Control Hub admin credentials and confirm the removal of your Hybrid Services cluster.

You are redirected to the application page for the completion of the deregistration process. The browser window closes automatically after a successful deregistration. Avoid making any changes to the client settings until the deregistration is completed successfully.