Agent Request

Agent Request Feature Description

The Agent Request feature allows a customer to initiate a request on the web that results in a call from an agent.

Cisco Customer Collaboration Platform works in a Contact Center Enterprise (CCE) solution to process the request from its inception through the delivery of the callback.


Note


Enterprise Chat and Email also offers callback and delayed callback. You can use Agent Request , Enterprise Chat and Email, or both.


Important


The Agent Request feature can be used only if the customer or a partner develops a custom application. There is sample code on DevNet (formerly Cisco Developer Network) that you can use to understand how to start building your custom application to submit callback requests to Customer Collaboration Platform.


Customer Collaboration Platform and Agent Request

Customer Collaboration Platform provides the Callback API used by a custom application to request a phone call from a contact center agent.

The API works in conjunction with Customer Collaboration Platform callback feeds, campaigns, and notifications to pass callback requests to the contact center for routing.

The Callback API:

  • Allows custom applications to initiate a callback.

  • Forwards the callback request and callback details to CCE using a notification mechanism (the Connection to CCE notification type) through a Media Routing (MR) connection.

  • Allows custom applications to retrieve the state of the callback as well as the estimated wait time (EWT) until an agent becomes available.

  • Allows custom applications to cancel a requested callback.

The Callback API supports the use of Call variables and ECC variables for callback requests. Call variables and ECC variables send customer-specific information with the request. When you create a callback contact, the social contact associated with the callback contact includes all of the specified variables as extension fields.


Note


Customer Collaboration Platform supports scalar ECC variables only.


CCE and Agent Request

CCE services in the Agent Request solution:

  • Process the callback request.

  • Route the callback request to an agent and place a call from the agent's phone to the customer.

  • Notify Customer Collaboration Platform that the agent has been selected.

Agent Request Prerequisites

Install and configure Customer Collaboration Platform before implementing Agent Request. Customer Collaboration Platform must be geographically colocated with the Unified CCE PG on one side.

The customer or partner must build a custom application for the Agent Request feature. See Use the Sample Code to Create a Customer Callback Request.

Customer Collaboration Platform is always deployed in a DMZ. Remember to open the port you have configured for the MR PG. See Set up the Media Routing PG and PIM.

Agent Request Call Flow

The flow proceeds as follows:

  1. The customer application initiates an agent request by requesting a callback.

  2. Customer Collaboration Platform sends the request to the Unified CCE PG.

  3. The Unified CCE PG sends the request to the agent.

  4. A call is initiated from the agent's phone, on behalf of the agent, dialing the customer's phone number.


    Note


    The agent does not control when the call is placed.


Figure 1. Agent Request Call Flow

Agent Request Scenarios

  1. From the web, the customer requests to speak to an agent.

  2. The customer receives feedback that the request is accepted.

  3. The customer receives feedback that the call is queued and the estimated wait time.

  4. The customer receives feedback that a call is on its way.

  5. The agent's phone places an outbound call.

  6. The agent is presented with call context.

If Then

The customer is available

The customer receives and answers the call, and speaks to the agent

The customer is busy when the callback occurs

The agent receives a busy tone

The customer does not answer when the callback occurs

The agent hears ringing

The customer cancels the callback before an agent is selected

There is no impact on the agent

Configure Packaged CCE for Agent Request

Set up the Media Routing PG and PIM

Procedure


Step 1

Navigate to Unified CCE Administration > Overview > Infrastructure Settings > Peripheral Gateways. Determine the Peripheral ID for a Multichannel peripheral for the customer collaboration platform, as mentioned in the Cisco Packaged Contact Center Enterprise Administration and Configuration guide.

Note


In Packaged CCE 4000 and 12000 Agents deployment, fetch the Peripheral ID from the PG Explorer tool using Configuration Manager.

Step 2

From Cisco Unified CCE Tools, select Peripheral Gateway Setup.

Step 3

On the Components Setup screen, in the Instance Components panel, select the PG Instance component. Click Edit.

Step 4

In the Peripheral Gateways Properties screen, click Media Routing. Click Next.

Step 5

Click Yes at the prompt to stop the service.

Step 6

From the Peripheral Gateway Component Properties screen, click Add, select the next PIM, and configure with the Client Type of Media Routing as follows.

  1. Check Enabled.

  2. In the Peripheral Name field, enter MR.

  3. In the Peripheral ID field, enter the Peripheral ID for the unused Multichannel peripheral that you identified in Step 1.

  4. For Application Hostname (1), enter the hostname or IP address of Customer Collaboration Platform.

    Note


    The system does not support IP address change. Use the hostname if you foresee a change in IP address. This is applicable for all the Hostname/ IP Address fields.

  5. By default, Customer Collaboration Platform accepts the MR connection on Application Connection Port 38001. The Application Connection Port setting on Customer Collaboration Platform must match the setting on the MR PG; if you change the port on one side of the connection, you must change it on the other side.

  6. Leave the Application Hostname (2), field blank.

  7. Keep all other values.

  8. Click OK.

Step 7

Accept defaults and click Next until the Setup Complete screen opens.

Step 8

At the Setup Complete screen, check Yes to start the service. Click Finish.

Step 9

Click Exit Setup.

Step 10

Repeat from Step 1 for Side B.

Step 11

Navigate to Unified CCE Administration > Infrastructure Settings > Inventory.

Step 12

Add Customer Collaboration Platform as an external machine.

  1. Click Add Machine.

  2. Select Customer Collaboration Platform from the drop-down list.

  3. Enter the required information.

  4. Click Save.

The system automatically enables and completes the CCE Configuration for Multichannel Routing settings in Customer Collaboration Platform Administration, including the Application Connection Port you specified.

Unified CCE Administration Tools

This topic explains the Unified CCE Administration tools you use to configure Agent Request.

Before you begin

For details on the procedures for steps 2 to 5, refer to the Unified CCE Administration online help or to the Cisco Packaged Contact Center Enterprise Administration and Configuration Guide at https://www.cisco.com/en/US/products/ps12586/prod_maintenance_guides_list.html.

Procedure


Step 1

Sign in to Unified CCE Administration.

Step 2

Call Type: Create a call type for Agent Request.

Step 3

Dialed Number: Create a dialed number for Agent Request. You use this number when you configure the notification in Customer Collaboration Platform.

  1. For Routing Type, select Customer Collaboration Platform.

  2. For Media Routing Domain, select Cisco_Voice.

  3. For Call Type, select the call type that you created in Step 2.

Step 4

Expanded Call Variable: You can use an existing Expanded Call Variable, or you can create an expanded call variable for Agent Request.

Note


Arrays are not supported with the Agent Request feature.

CCE solutions support the Latin 1 character set only for Expanded Call Context variables and Call variables when used with Unified CVP, Finesse, and Customer Collaboration Platform.

Step 5

Create a Network VRU Script.

This network VRU script does not refer to a script that you create on a peripheral. This script satisfies a configuration requirement and provides a messaging vehicle to get the value of the estimated wait time to Customer Collaboration Platform using the MR PIM to fulfill the API call.

Use the Manage Network VRU Scripts gadget to create the new network VRU script. Choose a name (for example, VoiceCallback) and enter that name in both Name fields.

No configuration parameters are required for the network VRU script. Optionally, enter a description. In the remaining fields, leave the default values. You reference this configuration object when you configure the Run External Script node in the routing script.


Configure Customer Collaboration Platform for a Voice Callback Agent Request

To support a callback request, Customer Collaboration Platform must be configured with:

  • A callback feed

  • A campaign

  • A Connection to CCE notification configured for the campaign mentioned above that will be triggered by incoming callback requests with a matching tag.

Create Feed

Procedure


Step 1

Sign in to Customer Collaboration Platform.

Step 2

Click Configuration.

Step 3

On the Manage Feeds panel, click New.

Step 4

For Type, select Callback.

Step 5

Name the feed.

Step 6

For Reply Template, retain the default, No reply template.

Step 7

Configure the feed to automatically tag all callback requests that come in on that feed. For example, autotag with 'sendtocontactcenter'.

Make a note of the tag. It is used to trigger the notification to CCE.

Step 8

Click Save.


Create Campaign

Procedure


Step 1

Sign in to Customer Collaboration Platform.

Step 2

Click Configuration.

Step 3

On the Manage Campaigns panel, click New.

Step 4

Name the campaign.

Step 5

Enter an optional description.

Step 6

Make no selection in the Chat Invitation Feed drop-down list.

Step 7

Locate the Callback feed in the Available panel and move it to Selected.

Step 8

Click Save.


Create Notification

Procedure


Step 1

Sign in to Customer Collaboration Platform.

Step 2

Click Administration.

Step 3

On the Manage Notifications panel, click New.

Step 4

For Type, select Connection to CCE.

Step 5

Name the notification.

Step 6

From the Campaigns drop-down list, select the campaign that you created for the callback.

Step 7

In the Tags field, enter the tag that is automatically applied to callback requests by the feed. In our example 'sendtocontactcenter'.

Step 8

For Request Type, select Callback.

Step 9

In the Dialed Number/Script Selector field, enter the dialed number string that you have configured.

See Unified CCE Administration Tools.

Step 10

Click Save.


Create Script for Agent Request

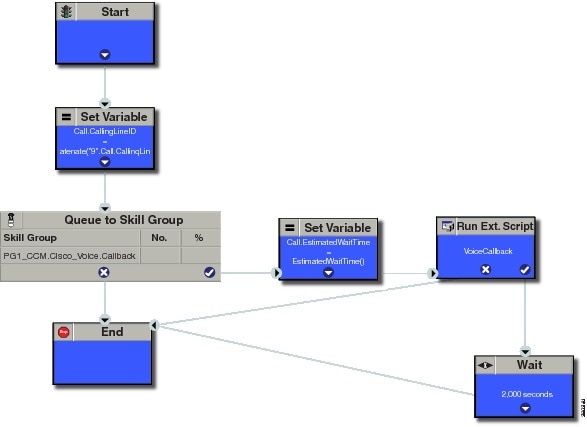
This illustration shows a sample script. The key below explains the nodes.

Script for Agent Request

Start node: Create the Start node by selecting a new Routing Script from the Script Editor.

Set Variable (Call.Calling Line ID) node: (optional). If required, you can set the CallingLineID (CLID/ ANI) variable to implement a "dial-plan," pre-pending a set of digits to the phone number provided by the customer so that it can be correctly routed. For example, it is often necessary to add 9 to the phone number to reach an outside line. In other cases, more pre-pended digits may be required to reach the end customer.

You can also set up Unified Communications Manager Route Patterns to respond to a certain set of digits by routing the call to an outside line with a specified area code. To implement a dial-plan, add a Set Variable node before the queue, as shown in this example. In this case, a 9 is pre-pended to the customer phone number using the built-in concatenate function.

Queue to Skill Group node: The Agent Request call can be queued against one or more Skill Groups, Precision Queues, or a queue-to-agent node. In the example script, the call is queued against a single skill group.

Set Variable (Call.Estimated Wait Time) node: A customer who requests a voice callback might want to know approximately how long it will be before the call is returned. You can configure voice callback to provide an estimate of the wait time back to the customer. The estimated wait time is calculated once, when the call enters the queue. The time is not updated as the position in the queue changes.

The default estimated wait time algorithm is based on a running five minute window of the rate of calls leaving the queue. Any calls that are routed or abandoned during the previous 5 minutes are taken into account as part of the rate leaving queue. For Precision Queues, the rate leaving queue represents the rate at which calls are delivered or abandoned from the entire precision queue, not any individual recision Queue steps. The algorithm computes the wait time for each of the queues against which the call is queued (Skill Groups or Precision Queues) and then returns the minimum estimated wait time. Queue to Agent is not supported.

While the queue builds, the small number of calls in the queue makes the estimated wait time less accurate and the value fluctuates rapidly. As the queue operates with more calls over time, the estimated wait time is more accurate and consistent.

Note that the built-in function also applies to inbound calls that queue.

Set the Call Wait time as follows:

  1. From the Set Variable node, select Call from the Object type drop-down menu.

  2. From the Variable drop-down menu, choose Estimated Wait Time().

    You can then work with the Formula Editor to use the default estimated wait value or create a formula and use your own value.

  3. Click Formula Editor, and do either of the following:

    • To use the default estimated wait value, click the Built-In Functions tab and choose EstimatedWaitTime()

    • To create a formula and use your own value, click the Variables tab and choose an entry in the Object type list and an entry in the Object list. Then double-click a variable in the Variable list.

Run Ext Script node: Apply the Network VRU script as follows:

  1. Click the Queue tab.

  2. Click Run External Script.

  3. Click inside the script. A Run External Script node appears.

  4. Double-click the node and choose the Network VRU script from the list; then click OK.

    The call variable Estimated Wait Time now contains a value in the EstimatedWaitTime field and can be passed to peripherals.

    Note that a Run External Script node is required to send the EstimatedWaitTime to Customer Collaboration Platform.

Wait node: The wait period before an agent becomes available.

End node: The script ends if no agent becomes available.

Use the Sample Code to Create a Customer Callback Request

Cisco Systems has made sample callback application code available to use as a baseline in building your own application. This sample includes retrieving and displaying the estimated wait time, assuming it has been configured in Unified CCE. You can find the sample code on DevNet.

Note


You cannot copy and paste this code to achieve a working application. It is a only a guideline.

For more information about how to use the Callback API, see the Cisco Customer Collaboration Platform Developer Guide.

Procedure


Step 1

Retrieve the feed id by entering this URL in a browser: https://<Customer Collaboration Platform_Hostname_or_Ip>/ccp-webapp/ccp/feed.

In the example output below, note that the value in the <name> field is "Callback." Look for the number of the feed id identified at the end of the refURL path (in this case, it is 100000) just before the </refURL> tag. Copy this number.


<feeds>
<Feed>
<changeStamp>0</changeStamp>
<name>Callback</name>
<pushFeedURL>https://128.107.81.27/ccp/callback/feed/100000</pushFeedURL>
<refURL>https://128.107.81.27/ccp-webapp/ccp/feed/100000</refURL>
<status>1</status>
<tags>
<tag>trial</tag>
</tags>
<type>10</type>
</Feed>
</feeds>

Step 2

Access the sample application from DevNet: https://developer.cisco.com.

Step 3

Enter values in the fields:

  • Title: A title or subject for the callback request.

  • Author: The name of the person submitting the callback request.

  • Phone: The phone number to call back.

  • Feed Id: The value from the refURL above.

Step 4

Click Call me back.


Agent Request Reporting

Cisco Unified Intelligence Center CCE reports include data for Agent Requests


Note


Agent requests that fail before being routed to CCE will not be included in the CCE solution-level reports. The Customer Collaboration Platform search function can be used to identify these requests.


Call Type and Call Type Skill Group Metrics

  • Calls Offered — Incremented when Call Type is entered (through Script Selector or Call Type node).

  • Calls Abandoned in Queue — Incremented when a Queued Callback request is canceled by the customer prior to when an Agent is selected to handle the Voice Callback call.
  • Calls Answered — Incremented if the call is placed from the agent and represents work accepted by the agent.

  • Calls Handled — Incremented if the customer answers the call. Calls Answered minus Calls Handled indicates how many calls failed to reach the intended customer.

  • Service Level Offered — Incremented for all routed calls, including voice callback calls initiated through the agent request API.

  • ServiceLevelCalls — Incremented if the call is presented to the agent within a service level.

  • Answer Intervals (1 - 10) — The appropriate bucket is incremented based on how long the call was in the queue.

Skill Group Metrics

Call Type Skill Group and Skill Group metrics are not counted in the same way. The skill group metric treats each call as agent-initiated; therefore, Calls Answered and Calls Handled are not incremented. AgentOutCallsTime, AgentOutCalls, AgentOutCallsTalkTime, AgentOutCallsOnHold, and AgentOutCallsOnHoldTime are incremented.

Agent Real Time

The direction in the Agent Real Time table is listed as Outbound.

Termination Call Detail

For custom reporting, the Termination Call Detail records contain a PeripheralCallType of 41 -Voice Callback.

Calls which do not successfully connect to a customer have a call disposition of 10 - Disconnect/Drop no answer. This includes agent request calls to busy numbers.