Configure Service Discovery

Service Discovery Options

Service discovery enables clients to automatically detect and locate services on your enterprise network. You can configure service discovery using one of the following options.

Option

Description

Configure DNS SRV records

The client automatically locates and connects to services.

This is the recommended option.

Customizations

You can customize service discovery by using installation parameters, URL configuration, or Enterprise Mobility Management.

Manual Connection Settings

Manual connection settings provide a fallback mechanism when service discovery is not used.

Configure DNS SRV records

Before you begin

Review your SRV record requirements in the Service Discovery chapter of the Planning Guide for Cisco Jabber.

Procedure


Create the SRV records for your deployment:

Option Description
_cisco-uds

Provides the location of Cisco Unified Communications Manager. The client can retrieve service profiles from Cisco Unified Communications Manager to determine the authenticator.

_collab-edge

Provides the location of Cisco VCS Expressway or Cisco Expressway-E. The client can retrieve service profiles from Cisco Unified Communications Manager to determine the authenticator.


Example of an SRV record

_cisco-uds._tcp.DOMAIN service location:
priority = 0
weight = 0
port = 8443
svr hostname=_cisco-uds._tcp.example.com

What to do next

Test SRV records

Test SRV records

After creating your SRV records test to see if they are accessible.


Tip


You can also use the SRV check tool on the Collaboration Solutions Analyzer site if you prefer a web-based option.


Procedure


Step 1

Open a command prompt.

Step 2

Enter nslookup.

The default DNS server and address is displayed. Confirm that this is the expected DNS server.

Step 3

Enter set type=SRV.

Step 4

Enter the name for each of your SRV records.

For example, _cisco-uds._tcp.exampledomain

  • Displays server and address—SRV record is accessible.

  • Displays _cisco-uds_tcp.exampledomain: Non-existent domain—There is an issue with your SRV record.


Customizations

Windows Customizations

Installer Switches: Cisco Jabber for Windows

When you install Cisco Jabber, you can specify the authenticator and server addresses. The installer saves these details to a bootstrap file. When users launch the client for the first time, it reads the bootstrap file. The bootstrap file takes priority if service discovery is deployed.

Bootstrap files provide a fallback mechanism for service discovery in situations where service discovery has not been deployed and where you do not want users to manually specify their connection settings.

The client only reads the bootstrap file on the initial launch. After the initial launch, the client caches the server addresses and configuration, and then loads from the cache on subsequent launches.

We recommend that you do not use a bootstrap file, and instead use service discovery, in on-premises deployments with Cisco Unified Communications Manager release 9.x and later.

Bootstrap Settings for On-Premises Deployments
The following table lists the argument values for various deployment types.

Product Mode

Server Releases

Argument Values

Full UC (Default Mode)

Release 9 and later:
  • Cisco Unified Communications Manager

  • Cisco Unified Communications Manager IM and Presence Service

Use the following installer switches and values:

  • AUTHENTICATOR=CUP
  • CUP_ADDRESS=

    <presence_server_address>

IM Only (Default Mode)

Release 9 and later:
  • Cisco Unified Communications Manager IM and Presence Service

Use the following installer switches and values:

  • AUTHENTICATOR=CUP
  • CUP_ADDRESS=

    <presence_server_address>

The following diagram illustrates how the client uses bootstrap settings in on-premises deployments:

Connect through bootstrap file

When users start the client for the first time, the following occurs:
  1. The client retrieves settings from the bootstrap file.

    The client starts in default mode and determines that Cisco Unified Communications Manager IM and Presence Service is the authenticator. The client also gets the address of the presence server, unless Service Discovery results dictate otherwise.

  2. The client authenticates to Cisco Unified Communications Manager IM and Presence Service .

  3. The client retrieves service profiles from the presence server.

Bootstrap Settings for On-Premises Deployments in Phone Mode
During installation, you set values for arguments as follows:
  • Set CUCM as the value for AUTHENTICATOR.

  • Set phone_mode as the value for PRODUCT_MODE.

  • Set the TFTP server address as the value for TFTP.

  • Set the CTI server address as the value for CTI.

  • Set the CCMCIP server address as the value for CCMCIP.

    Cisco Unified Communications Manager release 9.x and earlier—If you enable Cisco Extension Mobility, the Cisco Extension Mobility service must be activated on the Cisco Unified Communications Manager nodes that are used for CCMCIP. For information about Cisco Extension Mobility, see the Feature and Services guide for your Cisco Unified Communications Manager release.

The following diagram illustrates how the client uses bootstrap settings in phone mode deployments:
Client gets address from the bootstrap file
When users start the client for the first time, the following process occurs:
  1. The client retrieves settings from the bootstrap file.

    The client starts in phone mode and determines that Cisco Unified Communications Manager is the authenticator. The client also gets the addresses for the TFTP server (and CTI servers for Jabber for Windows and Jabber for Mac), unless Service Discovery results dictate otherwise.

  2. The client authenticates to Cisco Unified Communications Manager and gets configuration.

  3. The client retrieves device and client configuration.

Mac and Mobile Customizations

Configuration URL Workflow

Procedure
  Command or Action Purpose

Step 1

Configuration URL

Step 2

Provide Users with Configuration URL from a Website

Configuration URL

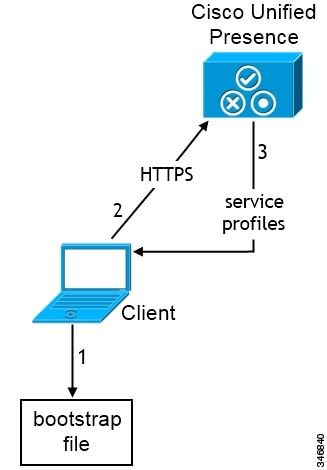
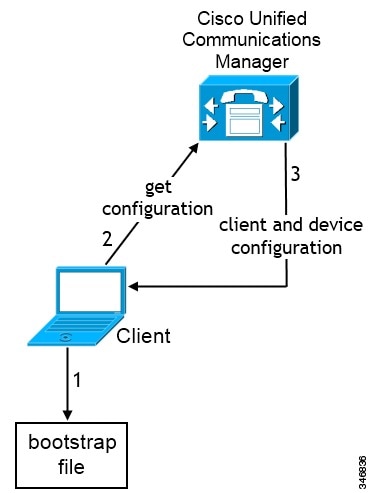
To enable users to launch Cisco Jabber without manually entering service discovery information, create and distribute a configuration URL to users.

You can provide a configuration URL link to users by emailing the link to the user directly, or by posting the link to a website.

Include the following parameters in the URL:

  • ServicesDomain—Required. Every configuration URL must include the domain of the IM and presence server that Cisco Jabber needs for service discovery.

  • VoiceServiceDomain—Required only if you deploy a hybrid cloud-based architecture where the domain of the IM and presence server differs from the domain of the voice server. Set this parameter to ensure that Cisco Jabber can discover voice services.

  • ServiceDiscoveryExcludedServices—Optional. You can exclude any of the following services from the service discovery process:

    • Webex—When you set this value, the client:

      • Does not perform CAS lookup

      • Looks for:

        • _cisco-uds

        • _cuplogin

        • _collab-edge

    • CUCM—When you set this value, the client:

      • Does not look for _cisco-uds

      • Looks for:

        • _cuplogin

        • _collab-edge

    • CUP—When you set this value, the client:

      • Does not look for _cuplogin

      • Looks for:

        • _cisco-uds

        • _collab-edge

    You can specify multiple, comma-separated values to exclude multiple services.

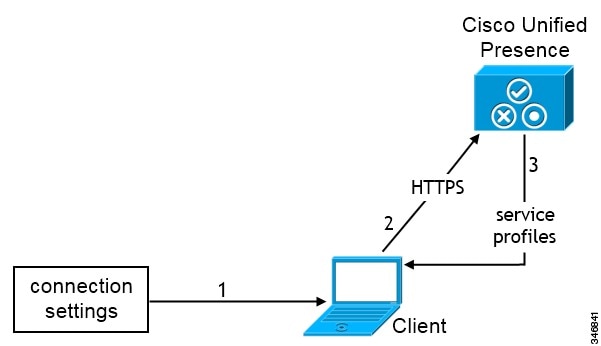
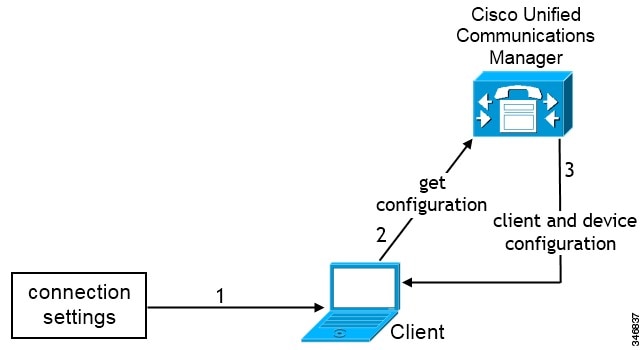
    If you exclude all three services, the client does not perform service discovery and prompts the user to manually enter connection settings.

  • ServicesDomainSsoEmailPrompt—Optional. Specifies whether the user is shown the email prompt for the purposes of determining their home cluster.

    • ON

    • OFF

  • EnablePRTEncryption—Optional. Specifies that the PRT file is encrypted. Applies to Cisco Jabber for Mac.

    • true

    • false

  • PRTCertificateName—Optional. Specifies the name of the certificate. Applies to Cisco Jabber for Mac.

  • InvalidCertificateBehavior—Optional. Specifies the client behavior for invalid certificates.

    • RejectAndNotify—A warning dialog displays and the client doesn't load.

    • PromptPerSession—A warning dialog displays and the user can accept or reject the invalid certificate.

  • PRTCertificateUrl—Specifies the name of a certificate with a public key in the trusted root certificate store. Applies to Cisco Jabber mobile clients.

  • Telephony_Enabled—Specifies whether the user has phone capability or not. The default is true.

    • True

    • False

  • ForceLaunchBrowser—Used to force user to use the external browser. Applies to Cisco Jabber mobile clients.

    • True

    • False


    Note


    ForceLaunchBrowser is used for client certificate deployments and for devices with Android OS below 5.0.


  • IP_Mode—Specifies the network IP protocol for the Jabber client.

    • IPv4-Only—Jabber will only attempt to make IPv4 connections.

    • IPv6-Only—Jabber will only attempt to make IPv6 connections.

    • Two Stacks (Default)—Jabber can connect with either IPv4 or IPv6.

Create the configuration URL in the following format:
ciscojabber://provision?ServicesDomain=<domain_for_service_discover>
&VoiceServicesDomain=<domain_for_voice_services>
&ServiceDiscoveryExcludedServices=<services_to_exclude_from_service_discover>
&ServicesDomainSsoEmailPrompt=<ON/OFF>

Note


The parameters are case sensitive.


Examples

  • ciscojabber://provision?ServicesDomain=cisco.com

  • ciscojabber://provision?ServicesDomain=cisco.com
    &VoiceServicesDomain=alphauk.cisco.com
  • ciscojabber://provision?ServicesDomain=service_domain
    &VoiceServicesDomain=voiceservice_domain&ServiceDiscoveryExcludedServices=WEBEX
  • ciscojabber://provision?ServicesDomain=cisco.com
    &VoiceServicesDomain=alphauk.cisco.com&ServiceDiscoveryExcludedServices=CUCM,CUP
  • ciscojabber://provision?ServicesDomain=cisco.com
    &VoiceServicesDomain=alphauk.cisco.com&ServiceDiscoveryExcludedServices=CUCM,CUP
    &ServicesDomainSsoEmailPrompt=OFF
Provide Users with Configuration URL from a Website

You can provide a configuration URL link to users by emailing the link to the user directly, or by posting the link to a website.


Note


Due to a limitation of the Android operating system, Cisco Jabber for Android users can encounter an issue if they open the configuration URL directly from an Android application. To work around this issue, we recommend that you distribute your configuration URL link using a website.


If you want to use the website explore option for URL provisioning, we recommended you to use Mozilla Firefox.

Use the following procedure to distribute the link from a website.

Procedure

Step 1

Create an internal web page that includes the configuration URL as an HTML hyperlink.

Step 2

Email the link to the internal web page to users.

In the email message, instruct users to perform the following steps:
  1. Install the client.

  2. Click the link in the email message to open the internal web page.

  3. Click the link on the internal web page to configure the client.


Manual Connection Settings

Manual connection settings provide a fallback mechanism when Service Discovery is not used.

When you start Cisco Jabber, you can specify the authenticator and server address in the Advanced settings window. The client caches the server address to the local application configuration that loads on subsequent starts.

Cisco Jabber prompts users to enter these advanced settings on the initial start as follows:
  • On-Premises with Cisco Unified Communications Manager release 9.x and Later — If the client cannot get the authenticator and server addresses from the service profile.

Settings that you enter in the Advanced settings window take priority over any other sources including SRV records and bootstrap settings.

If you select Cisco IM & Presence, the client retrieves UC services from Cisco Unified Communications Manager IM and Presence Service. The client does not use service profiles or SSO discovery.


Note


For Cisco Jabber for Windows, service discovery stops after 20 seconds regardless of the number of servers the SRV record resolves to. During service discovery, once Cisco Jabber finds _cisco-uds, it attempts to connect to the first 2 servers within 20 seconds. Cisco Jabber doesn't attempt to connect to any servers after it's attempted service discovery for the highest 2 priority servers.

Users can manually point to the working server or re-order SRV priorities to at least one of the top two priority servers available for service discovery.


Automatic Connection Setting for Service Discovery

Users can select the Automatic option in the Advanced settings window to discover servers automatically.

The Automatic option allows users change from manually setting the service connection details to using service discovery. For example, on the initial launch, you manually set the authenticator and specify a server address in the Advanced settings window.

The client always checks the cache for manual settings. The manual settings take higher priority over SRV records, and for Cisco Jabber for Windows, the bootstrap file. For this reason, if you decide to deploy SRV records and use service discovery, you override the manual settings from the initial launch.

Manual Connection Settings for On-Premises Deployments

Users can set Cisco Unified Presence or Cisco Unified Communications Manager IM and Presence Service as the authenticator and specify the server address in the Advanced settings window.


Remember


You can automatically set the default server address with the _cuplogin SRV record.


The following diagram illustrates how the client uses manual connection settings in on-premises deployments:
User enters connection settings
  1. Users manually enter connection settings in the Advanced settings window.

  2. The client authenticates to Cisco Unified Presence or Cisco Unified Communications Manager IM and Presence Service.

  3. The client retrieves service profiles from the presence server.

Manual Connection Settings for On-Premises Deployments in Phone Mode

Users can set Cisco Unified Communications Manager as the authenticator and specify the following server addresses in the Advanced settings window:

  • TFTP server

  • CCMCIP server

  • CTI server (Cisco Jabber for Windows and Cisco Jabber for Mac)

The following diagram illustrates how the client uses manual connection settings in phone mode deployments:
User enters connection settings
  1. Users manually enter connection settings in the Advanced settings window.

  2. The client authenticates to Cisco Unified Communications Manager and gets configuration.

  3. The client retrieves device and client configuration.