This section provides the list of Smart Licensing Using Policy-related system messages you may encounter, possible reasons
for failure (incase it is a failure message), and recommended action (if action is required).
For all error messages, if you are not able to solve the problem, contact your Cisco technical support representative with
the following information:
The message, exactly as it appears on the console or in the system log.
The output from the show license tech support , show license history message , and the show platform software sl-infra privileged EXEC commands.
Error Message %SMART_LIC-3-POLICY_INSTALL_FAILED: The installation of a new
licensing policy has failed: [chars].
Explanation: A policy was installed, but an error was detected while parsing the policy code, and installation failed. [chars] is the
error string with details of the failure.
Possible reasons for failure include:

Note
|
The device should have a valid clock and the NTP configuration.
|
Recommended Action:
For both possible failure reasons, ensure that the system clock is accurate and synchronized with CSSM. Configure the ntp server command in global configuration mode. For example:Device(config)# ntp server 198.51.100.100 version 2 prefer
If the above does not work and policy installation still fails, and contact your Cisco technical support representative.
----------------------------------------------------------------------------------------------------
----------------------------------------------------------------------------------------------------
Error Message %SMART_LIC-3-AUTHORIZATION_INSTALL_FAILED: The install of a new
licensing authorization code has failed on [chars]: [chars].
This message is not applicable to Cisco Catalyst Access, Core, and Aggregation Switches, because there are no enforced or
export-controlled licenses on these product instances.
----------------------------------------------------------------------------------------------------
----------------------------------------------------------------------------------------------------
Error Message %SMART_LIC-3-COMM_FAILED: Communications failure with the [chars] :
[chars]
Explanation: Smart Licensing communication either with CSSM, or CSLU, or SSM On-Prem failed. The first [chars] is the currently configured
transport type, and the second [chars] is the error string with details of the failure. This message appears for every communication
attempt that fails.
Possible reasons for failure include:
-
CSSM, CSLU, SSM On-Prem is not reachable: This means that there is a network reachability problem.
-
404 host not found: This means the CSSM server is down.
-
A TLS or SSL handshake failure caused by a missing client certificate. The certificate is required for TLS authentication
of the two communicating sides. A recent server upgrade may have cause the certificate to be removed. This reason applies
only to a topology where the product instance is directly connected to CSSM.
Note
|
If the error message is displayed for this reason, there is no actual configuration error or disruption in the communication
with CSSM.
|
For topologies where the product instance initiates the sending of RUM reports (Connected to CSSM Through CSLU: Product Instance-Initiated
Communication, Connected Directly to CSSM, CSLU Disconnected from CSSM: Product Instance-Initiated Communication, and SSM
On-Prem Deployment: Product Instance-Initiated Communication) if this communication failure message coincides with scheduled
reporting (license smart usage interval interval_in_days global configuration command), the product instance attempts to send out the RUM report for up to four hours after the scheduled
time has expired. If it is still unable to send out the report (because the communication failure persists), the system resets
the interval to 15 minutes. Once the communication failure is resolved, the system reverts the reporting interval to last
configured value.
Recommended Action:
Troubleshooting steps are provided for when CSSM is not reachable or there is a missing client certificate, when CSLU is not
reachable, and when SSM On-Prem is not reachable.
-
If a client certificate is missing and there is no actual configuration error or disruption in the communication with CSSM:
To resolve the error, configure the ip http client secure-trustpoint trustpoint-name command in global configuration mode. For trustpoint-name, enter only SLA-TrustPoint. This command specifies that the secure HTTP client should use the certificate associated with the trustpoint indicated by
the trustpoint-name argument.
-
If CSSM is not reachable and the configured transport type is smart:
-
Check if the smart URL is configured correctly. Use the show license status command in privileged EXEC mode, to check if the URL is exactly as follows: https://smartreceiver.cisco.com/licservice/license. If it is not, reconfigure the license smart url smart smar_URL command in global configuration mode.
-
Check DNS resolution. Verify that the product instance can ping
smartreceiver.cisco.com or the nslookup translated IP. The following example shows how to ping the translated IPDevice# ping 171.70.168.183
Type escape sequence to abort.
Sending 5, 100-byte ICMP Echos to 171.70.168.183, timeout is 2 seconds:
!!!!!
Success rate is 100 percent (5/5), round-trip min/avg/max = 1/1/2 ms
-
If CSSM is not reachable and the configured transport type is callhome:
-
Check if the URL is entered correctly. Use the show license status command in privileged EXEC mode, to check if the URL is exactly as follows: https://tools.cisco.com/its/service/oddce/services/DDCEService.
-
Check if Call Home profile
CiscoTAC-1 is active and destination URL is correct. Use the show call-home profile all command in privileged EXEC mode: Current smart-licensing transport settings:
Smart-license messages: enabled
Profile: CiscoTAC-1 (status: ACTIVE)
Destination URL(s): https://tools.cisco.com/its/service/oddce/services/DDCEService
-
Check DNS Resolution. Verify that the product instance can ping
tools.cisco.com, or the nslookup translated IP. Device# ping tools.cisco.com
Type escape sequence to abort.
Sending 5, 100-byte ICMP Echos to 173.37.145.8, timeout is 2 seconds:
!!!!!
Success rate is 100 percent (5/5), round-trip min/avg/max = 41/41/42 ms
If the above does not work check the following: if the product instance is set, if the product instance IP network is up.
To ensure that the network is up, configure the no shutdown command in interface configuration mode.
Check if the device is subnet masked with a subnet IP, and if the DNS IP is configured.
-
Verify that the HTTPs client source interface is correct.
Use the show ip http client command in privileged EXEC mode to display current configuration. Use ip http client source-interface command in global configuration mode to reconfigure it.
In case the above does not work, double-check your routing rules, and firewall settings.
-
If CSLU is not reachable:
-
Check if CSLU discovery works.
-
Zero-touch DNS discovery of cslu-local or DNS discovery of your domain..
In the show license all command output, check if the Last ACK received: field. If this has a recent timestamp it means that the product instance has connectivity with CSLU. If it is not, proceed
with the following checks:
Check if the product instance is able to ping cslu-local. A successful ping confirms that the product instance is reachable.
If the above does not work, configure the name server with an entry where hostname cslu-local is mapped to the CSLU IP address (the windows host where you installed CSLU). Configure the ip domain name domain-name and ip name-server server-address commands in global configuration mode. Here the CSLU IP is 192.168.0.1 and name-server creates entry cslu-local.example.com:Device(config)# ip domain name example.com
Device(config)# ip name-server 192.168.0.1
-
CSLU URL is configured.
In the show license all command output, under the Transport: header check the following: The Type: must be csluand Cslu address: must have the hostname or the IP address of the windows host where you have installed CSLU. Check if the rest of the address
is configured as shown below and check if the port number is 8182.Transport:
Type: cslu
Cslu address: http://192.168.0.1:8182/cslu/v1/pi
If it is not, configure the license smart transport cslu and license smart url cslu http://<cslu_ip_or_host>:8182/cslu/v1/pi commands in global configuration mode
-
For CSLU-initiated communication, in addition to the CSLU discovery checks listed above, check the following:
Verify HTTP connectivity. Use the show ip http server session-module command in privileged EXEC mode. In the output, under header HTTP server current connections:, check that SL_HTTP is active. If it is not re-configure the ip http commands as mentioned in
From a Web browser on the device where CSLU is installed, verify https://<product-instance-ip>/. This ensures that the REST API from CSLU to the product instance works as expected.
-
If SSM On-Prem is not reachable:
-
For product instance-initiated communication, check if the SSM On-Prem transport type and URL are configured correctly.
In the show license all command output, under the Transport: header check the following: The Type: must be csluand Cslu address: must have the hostname or the IP address of the server where you have installed SSM On-Prem and <tenantID> of the default local virtual account. See the example below: Transport:
Type: cslu
Cslu address: https://192.168.0.1/cslu/v1/pi/on-prem-default
Check if you have the correct URL from SSM On-Prem (Retrieving the Transport URL (SSM On-Prem UI)) and then configure license smart transport cslu and license smart url cslu http://<ip>/cslu/v1/pi/<tenant ID> commands in global configuration mode.
Check that you have configured any other required commands for your network as mentioned in Ensuring Network Reachability for Product Instance-Initiated Communication.
-
For SSM On-Prem-initiated communication, check HTTPs connectivity.
Use the show ip http server session-module command in privileged EXEC mode. In the output, under header HTTP server current connections:, check that SL_HTTP is active. If it is not re-configure the ip http commands as mentioned in Ensuring Network Reachability for SSM On-Prem-Initiated Communication.
-
Check trustpoint and that certificates are accepted.
For both forms of communication in an SSM On-Prem Deployment, ensure that the correct trustpoint is used and that the necessary
certificates are accepted:Device(config)# crypto pki trustpoint SLA-TrustPoint
Device(ca-trustpoint)#
Device(ca-trustpoint)# enrollment terminal
Device(ca-trustpoint)# revocation-check none
Device(ca-trustpoint)# end
Device# copy running-config startup-config
If the above does not work and policy installation still fails, contact your Cisco technical support representative.
----------------------------------------------------------------------------------------------------
----------------------------------------------------------------------------------------------------
Error Message  %SMART_LIC-3-COMM_RESTORED: Communications with the [chars] restored.
[chars] - depends on the transport type
        - Cisco Smart Software Manager (CSSM)
        - Cisco Smart License utility (CSLU)
Smart Agent communication with either the Cisco Smart Software Manager (CSSM) or the Cisco Smart License
utility (CSLU) has been restored. No action required.
Explanation: Product instance communication with either the CSSM, or CSLU, or SSM On-Prem is restored.
Recommended Action: No action required.
----------------------------------------------------------------------------------------------------
----------------------------------------------------------------------------------------------------
Error Message %SMART_LIC-3-POLICY_REMOVED: The licensing policy has been removed.
Explanation: A previously installed custom licensing policy has been removed. The Cisco default policy is then automatically effective. This may cause a change in the behavior of smart licensing.
Possible reasons for failure include:
If you have entered the license smart factory reset command in privileged EXEC mode all licensing information including the policy is removed.
Recommended Action:
If the policy was removed intentionally, then no further action is required.
If the policy was removed inadvertantly, you can reapply the policy. Depending on the topology you have implemented, follow
the corresponding method to retrieve the policy:
-
Connected Directly to CSSM:
Enter show license status , and check field Trust Code Installed:. If trust is established, then CSSM will automatically return the policy again. The policy is automatically re-installed
on product instances of the corresponding Virtual Account.
If trust has not been established, complete these tasks: and . When you have completed these tasks, CSSM will automatically return the policy again. The policy is then automatically installed
on all product instances of that Virtual Account.
-
Connected to CSSM Through CSLU:
-
For product instance-initiated communication), enter the license smart sync command in privileged EXEC mode. The synchronization request causes CSLU to push the missing information (a policy or authorization
code) to the product instance.
-
For CSLU-initiated communication, complete this task: . This causes CSLU to detect and re-furnish the missing policy in an ACK response.
-
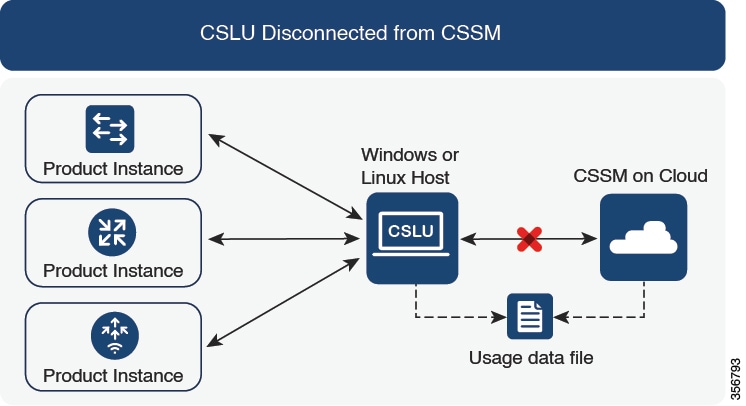
CSLU Disconnected from CSSM:
-
For product instance-initiated communication), enter the license smart sync command in privileged EXEC mode. The synchronization request causes CSLU to push the missing information (a policy or authorization
code) to the product instance. Then complete these tasks in the given order: > Uploading Data or Requests to CSSM and Downloading a File > .
-
For CSLU-initiated communication, complete this task: . This causes CSLU to detect and re-furnish the missing policy in an ACK response. Then complete these tasks in the given
order: > Uploading Data or Requests to CSSM and Downloading a File > .
-
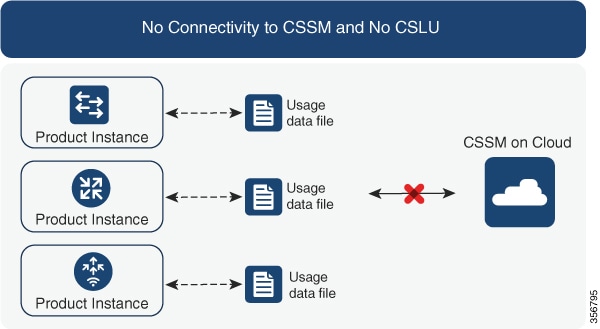
No Connectivity to CSSM and No CSLU
If you are in an entirely air-gapped network, from a workstation that has connectivity to the internet and CSSM complete this
task: .
Then complete this task on the product instance: .
-
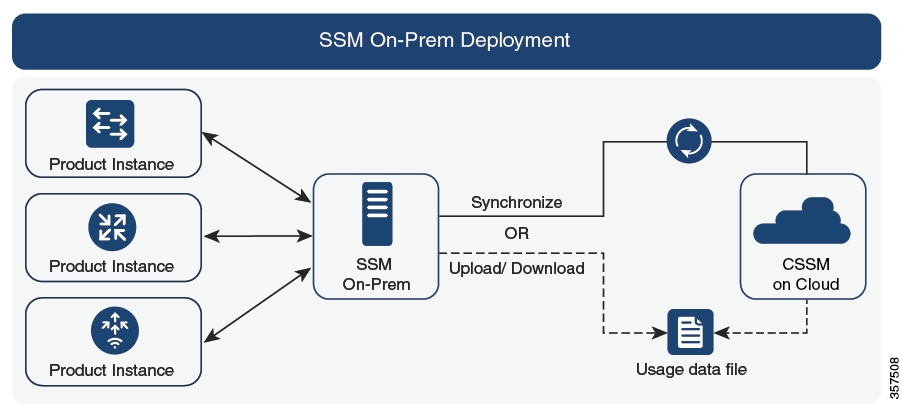
SSM On-Prem Deployment
-
For product instance-initiated communication), enter the license smart sync command in privileged EXEC mode. The causes the product instance to synchronize with SSM On-Prem and restore any required
or missing information. Then synchronize SSM On-Prem with CSSM if required:
-
For SSM On-Prem-initiated communication: In the SSM On-Prem UI, navigate to Reports > Synchronization pull schedule with the devices > Synchronize now with the device.
For both forms of communication in an SSM On-Prem Deployment, synchronize with CSSM using either option:
----------------------------------------------------------------------------------------------------
----------------------------------------------------------------------------------------------------
Error Message %SMART_LIC-3-TRUST_CODE_INSTALL_FAILED: The install of a new licensing
trust code has failed on [chars]: [chars].
Explanation: Trust code installation has failed. The first [chars] is the UDI where trust code installation was attempted. The second
[chars] is the error string with details of the failure.
Possible reasons for failure include:
-
A trust code is already installed: Trust codes are node-locked to the UDI of the product instance. If the UDI is already registered,
and you try to install another one, installation fails.
-
Smart Account-Virtual Account mismatch: This means the Smart Account or Virtual Account (for which the token ID was generated)
does not include the product instance on which you installed the trust code. The token generated in CSSM, applies at the Smart
Account or Virtual Account level and applies only to all product instances in that account.
-
A signature mismatch: This means that the system clock is not accurate.
-
Timestamp mismatch: This means the product instance time is not synchronized with CSSM, and can cause installation to fail.
Recommended Action:
-
A trust code is already installed: If you want to install a trust code inspite of an existing trust code on the product instance,
re-configure the license smart trust idtoken id_token_value{ local| all} [ force] command in privileged EXEC mode, and be sure to include the force keyword this time. Entering the force keyword sets a force flag in the message sent to CSSM to create a new trust code even if one already exists.
-
Smart Account-Virtual Account mismatch:
Log in to the CSSM Web UI at https://software.cisco.com and click Smart Software Licensing>Inventory > Product Instances.
Check if the product instance on which you want to generate the token is listed in the selected Virtual Account. If it is,
proceed to the next step. If not, check and select the correct Smart Account and Virtual Account. Then complete these tasks
again: and .
-
Timestamp mismatch and signature mismatch: Configure the ntp server command in global configuration mode. For example:
Device(config)# ntp server 198.51.100.100 version 2 prefer
----------------------------------------------------------------------------------------------------
----------------------------------------------------------------------------------------------------
Error Message    %SMART_LIC-4-REPORTING_NOT_SUPPORTED: The CSSM OnPrem that this
product instance is connected to is down rev and does not support the enhanced policy and usage
reporting mode.
Explanation: Cisco Smart Software Manager On-Prem (formerly known as Cisco Smart Software Manager satellite) is supported in the Smart
Licensing Using Policy environment starting with Cisco IOS XE Amsterdam 17.3.3 only (See SSM On-Prem). In unsupported releases, the product instance will behave as follows:
Recommended Action:
You have the following options:
----------------------------------------------------------------------------------------------------
----------------------------------------------------------------------------------------------------
Error Message %SMART_LIC-6-POLICY_INSTALL_SUCCESS: A new licensing policy
was successfully installed.
Explanation: A policy was installed in one of the following ways:
-
Using Cisco IOS commands.
-
CSLU-initiated communication.
-
As part of an ACK response.
Recommended Action: No action is required. If you want to know which policy is applied (the policy in-use) and its reporting requirements, enter
the show license all command in privileged EXEC mode.
----------------------------------------------------------------------------------------------------
----------------------------------------------------------------------------------------------------
Error Message %SMART_LIC-6-AUTHORIZATION_INSTALL_SUCCESS: A new licensing
authorization code was successfully installed on: [chars].
This message is not applicable to Cisco Catalyst Access, Core, and Aggregation Switches, because there are no enforced or
export-controlled licenses on these product instances.
----------------------------------------------------------------------------------------------------
----------------------------------------------------------------------------------------------------
Error Message %SMART_LIC-6-AUTHORIZATION_REMOVED: A licensing authorization code has
 been removed from [chars]
Explanation: [chars] is the UDI where the authorization code was installed. The authorization code has been removed. This removes the
licenses from the product instance and may cause a change in the behavior of smart licensing and the features using licenses.
Recommended Action: No action is required. If you want to see the current state of the license, enter the show license all command in privileged EXEC mode.
----------------------------------------------------------------------------------------------------
----------------------------------------------------------------------------------------------------
Error Message %SMART_LIC-6-REPORTING_REQUIRED: A Usage report acknowledgement
will be required in [dec] days.
Explanation: This is an alert which means that RUM reporting to Cisco is required. [dec] is the amount of time (in days) left to meet
this reporting requirements.
Recommended Action: Ensure that RUM reports are sent within the requested time. The topology you have implemented determines the reporting method.
-
Connected to CSSM Through CSLU
-
For product instance-initiated communication: Enter the license smart sync command in privileged EXEC mode. If CSLU is currently logged into CSSM the reports will be automatically sent to the associated
Smart Account and Virtual Account in CSSM.
-
For CSLU-initiated communication, complete this task: .
-
Connected Directly to CSSM: Enter the license smart sync command in privileged EXEC mode.
-
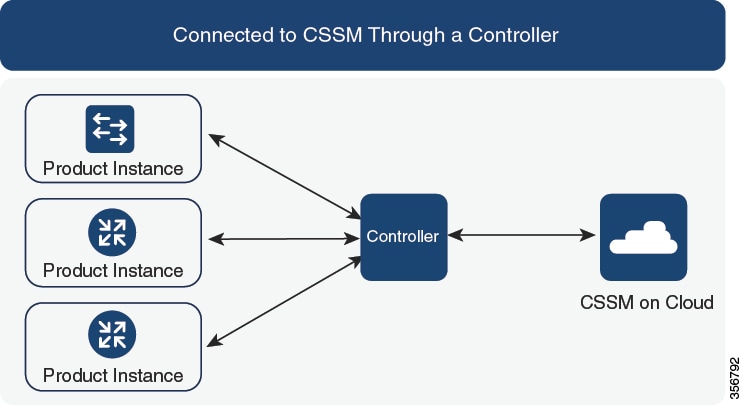
Connected to CSSM Through a Controller: If the product instance is managed by a controller, the controller will send the RUM
report at the scheduled time.
If you are using Cisco Catalyst Center as the controller, you have the option of ad-hoc reporting. See the Cisco Catalyst Center Administrator Guide of the required release (Release 2.2.2 onwards) > Manage Licenses > Upload Resource Utilization Details to CSSM.
-
CSLU Disconnected from CSSM: If the product instance is connected to CSLU, synchronize with the product instance as shown
for "Connected to CSSM Through CSLU"above, then complete these tasks: , , and .
-
No Connectivity to CSSM and No CSLU: Enter the license smart save usage command in privileged EXEC mode, to save the required usage information in a file. Then, from a workstation where you have
connectivity to CSSM, complete these tasks: > .
-
SSM On-Prem Deployment:
Synchronize the product instance with SSM On-Prem:
-
For product instance-initiated communication: Enter the license smart sync command in privileged EXEC mode. If CSLU is currently logged into CSSM the reports will be automatically sent to the associated
Smart Account and Virtual Account in CSSM.
-
For SSM On-Prem-initiated communication, complete this task: In the SSM On-Prem UI, navigate to Reports > Synchronization pull schedule with the devices > Synchronize now with the device.
Synchronize usage information with CSSM (choose one)
----------------------------------------------------------------------------------------------------
----------------------------------------------------------------------------------------------------
Error Message %SMART_LIC-6-TRUST_CODE_INSTALL_SUCCESS: A new licensing trust code
 was successfully installed on [chars].
Explanation:[chars] is the UDI where the trust code was successfully installed.
Recommended Action: No action is required. If you want to verify that the trust code is installed, enter the show license status command in privileged EXEC mode. Look for the updated timestamp under header Trust Code Installed: in the output.
----------------------------------------------------------------------------------------------------
----------------------------------------------------------------------------------------------------
Error Message %IOSXE_RP_EWLC_NOT-2-MSGDEVICENOTREG: Unregistered 9800-CL can only
be used in lab. For production usage, please register this device in [int] days. Failure to do so
will result in a limited number [50] of Access Points being allowed post this.
Explanation: An ACK is required on this product instance. [int] is the amount of time left to install an ACK on the product instance.
This system message is displayed once everyday, until the first ACK is made available on the product instance.
----------------------------------------------------------------------------------------------------
----------------------------------------------------------------------------------------------------
Error Message %CAPWAPAC_TRACE_MSG-3-MAX_LICENSE_AP_LIMIT_REACHED: Chassis 1 R0/0:
wncmgrd: Ap MAC: [enet] is not allowed to join. Please start reporting licensing to Cisco to get the
 ACK for resumption of usual operation.
Explanation: The ACK deadline for this product instance has passed and an ACK has still not been installed. [enet] is the MAC address of
the AP that is trying to join the Cisco Catalyst 9800-CL Wireless Controller but is not allowed because the requisite ACK
is not installed.
----------------------------------------------------------------------------------------------------
----------------------------------------------------------------------------------------------------


 Feedback