- Preface
- Overview
- Adding and Deleting Location Servers
- Synchronizing Location Servers with Cisco Wireless LAN Controllers and Cisco WCS
- Editing Location Server Properties
- Managing Location Server Users and Groups
- Configuring Event Notifications
- Location Planning and Verification
- Monitoring Location Servers and Site
- Performing Maintenance Operations
- Index
Cisco Location Appliance Configuration Guide, Release 5.2
Bias-Free Language
The documentation set for this product strives to use bias-free language. For the purposes of this documentation set, bias-free is defined as language that does not imply discrimination based on age, disability, gender, racial identity, ethnic identity, sexual orientation, socioeconomic status, and intersectionality. Exceptions may be present in the documentation due to language that is hardcoded in the user interfaces of the product software, language used based on RFP documentation, or language that is used by a referenced third-party product. Learn more about how Cisco is using Inclusive Language.
- Updated:
- March 17, 2015
Chapter: Editing Location Server Properties
Configuring and Viewing System Properties
This chapter describes how to configure and view system properties on the location server.
This chapter contains the following sections:
•![]() "Configuring General Properties" section
"Configuring General Properties" section
•![]() "Modifying NMSP Parameters" section
"Modifying NMSP Parameters" section
•![]() "Viewing Active Sessions on a System" section
"Viewing Active Sessions on a System" section
•![]() "Viewing and Configuring Advanced Parameters" section
"Viewing and Configuring Advanced Parameters" section
Configuring General Properties
You can use Cisco WCS to edit the general properties of a location server such as contact name, user name, password, and HTTPS.
To edit the general properties of a location server, follow these steps:
Step 1 ![]() In Cisco WCS, click Mobility > Mobility Services to display the Mobility Services window.
In Cisco WCS, click Mobility > Mobility Services to display the Mobility Services window.
Step 2 ![]() Click the name of the location server you want to edit. A two-tabbed panel labeled with General and Performance appears.
Click the name of the location server you want to edit. A two-tabbed panel labeled with General and Performance appears.

Note ![]() If the General Properties window does not display by default, select General Properties from the Systems menu left panel.
If the General Properties window does not display by default, select General Properties from the Systems menu left panel.
Step 3 ![]() Modify the parameters as appropriate in the General panel. Table 4-1 describes each parameter.
Modify the parameters as appropriate in the General panel. Table 4-1 describes each parameter.
Step 4 ![]() Click Save to update the Cisco WCS and location server databases.
Click Save to update the Cisco WCS and location server databases.
Modifying NMSP Parameters
Network Mobility Services Protocol (NMSP) is the protocol that manages communication between the location server and the controller. Transport of telemetry, emergency, and chokepoint information between the location server and the controller is managed by this protocol.
Note ![]() No change in the default parameter values is recommended unless the network is experiencing slow response or excessive latency.
No change in the default parameter values is recommended unless the network is experiencing slow response or excessive latency.
•![]() Telemetry, emergency and chokepoint information is only seen on controllers and Cisco WCS installed with release 4.1 software or later.
Telemetry, emergency and chokepoint information is only seen on controllers and Cisco WCS installed with release 4.1 software or later.
•![]() The TCP port (16113) that the controller and location server communicate over MUST be open (not blocked) on any farewell that exists between the controller and location server for NMSP to function.
The TCP port (16113) that the controller and location server communicate over MUST be open (not blocked) on any farewell that exists between the controller and location server for NMSP to function.
To configure NMSP parameters, follow these steps:
Step 1 ![]() In Cisco WCS, click Mobility> Mobility Services.
In Cisco WCS, click Mobility> Mobility Services.
Step 2 ![]() Click the name of the location server whose properties you want to edit.
Click the name of the location server whose properties you want to edit.
Step 3 ![]() From the System menu (left panel), select NMSP Parameters. The configuration options appear.
From the System menu (left panel), select NMSP Parameters. The configuration options appear.
Step 4 ![]() Modify the NMSP parameters as appropriate. Table 4-2 describes each parameter.
Modify the NMSP parameters as appropriate. Table 4-2 describes each parameter.
Step 5 ![]() Click Save to update the Cisco WCS and location server databases.
Click Save to update the Cisco WCS and location server databases.
Viewing Active Sessions on a System
You can view active user sessions on the location server.
For every session, Cisco WCS displays the following information:
•![]() Session identifier
Session identifier
•![]() IP address from which the location server is accessed
IP address from which the location server is accessed
•![]() Surname of the connected user
Surname of the connected user
•![]() Date and time when the session started
Date and time when the session started
•![]() Date and time when the location server was last accessed
Date and time when the location server was last accessed
•![]() How long the session was idle since it was last accessed
How long the session was idle since it was last accessed
To view active user sessions, follow these steps:
Step 1 ![]() In Cisco WCS, click Mobility > Mobility Services.
In Cisco WCS, click Mobility > Mobility Services.
Step 2 ![]() Click the name of the location server on which you want to view active sessions.
Click the name of the location server on which you want to view active sessions.
Step 3 ![]() Click System > Active Sessions.
Click System > Active Sessions.
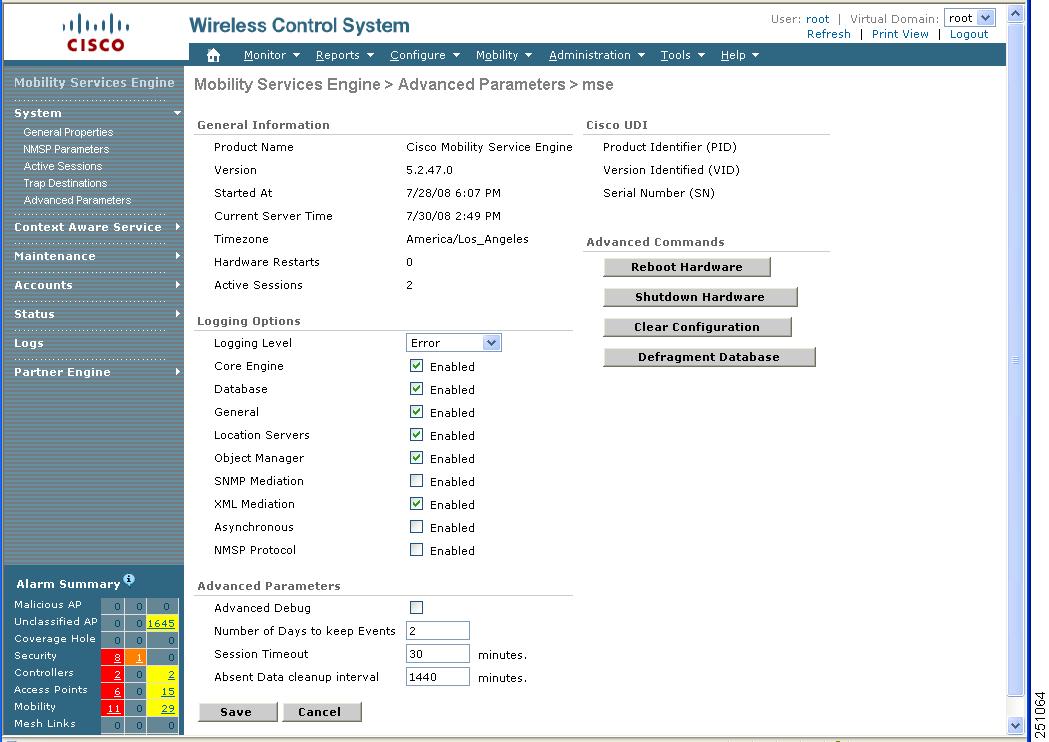
Viewing and Configuring Advanced Parameters
In Cisco WCS, at the Advanced Parameters window (Figure 4-1) you can both view general system level settings of the location server, and configure monitoring parameters.
•![]() Refer to the"Viewing Advanced Parameters Settings" section to review current system level settings of the advanced parameters.
Refer to the"Viewing Advanced Parameters Settings" section to review current system level settings of the advanced parameters.
•![]() Refer to the "Configuring Advanced Parameters" section to modify the current system level settings of the advanced parameters.
Refer to the "Configuring Advanced Parameters" section to modify the current system level settings of the advanced parameters.
Note ![]() You can also initiate advanced commands such as a system reboot, a system shutdown, clearing the configuration file, and defragment the system database. Refer to the "Initiating Advanced Commands" section for information on these commands and when they should be used
You can also initiate advanced commands such as a system reboot, a system shutdown, clearing the configuration file, and defragment the system database. Refer to the "Initiating Advanced Commands" section for information on these commands and when they should be used
Viewing Advanced Parameters Settings
To view the advanced parameter settings of the location server, follow these steps:
Step 1 ![]() In Cisco WCS, click Mobility > Mobility Services.
In Cisco WCS, click Mobility > Mobility Services.
Step 2 ![]() Click the name of a location server to view its status.
Click the name of a location server to view its status.
Step 3 ![]() Click System (left panel).
Click System (left panel).
Step 4 ![]() Click Advanced Parameters. The following window appears (Figure 4-1).
Click Advanced Parameters. The following window appears (Figure 4-1).
Figure 4-1 System > Advanced Parameters
Configuring Advanced Parameters
On the Advanced Parameters window, you can use Cisco WCS:
•![]() To specify the logging level and types of messages to log.
To specify the logging level and types of messages to log.
Refer to the "Configuring Logging Options" section.
•![]() To set how long events are kept, how long before a session time-outs, interval between data clean ups and enable or disable advanced debug level messages in the logs.
To set how long events are kept, how long before a session time-outs, interval between data clean ups and enable or disable advanced debug level messages in the logs.
Refer to the "Configuring Advanced Parameters" section.
Configuring Logging Options
You can use Cisco WCS to specify the logging level and types of messages to log.
To configure logging options, follow these steps:
Step 1 ![]() In Cisco WCS, click Mobility > Mobility Services.
In Cisco WCS, click Mobility > Mobility Services.
Step 2 ![]() Click the name of the location server that you want to configure.
Click the name of the location server that you want to configure.
Step 3 ![]() From the System menu (left panel) click Advanced Parameters. The advanced parameters for the selected location server appears.
From the System menu (left panel) click Advanced Parameters. The advanced parameters for the selected location server appears.
Step 4 ![]() Scroll down to the Logging Options section and choose the appropriate option from the Logging Level drop-down menu.
Scroll down to the Logging Options section and choose the appropriate option from the Logging Level drop-down menu.
There are four logging options: Off, Error, Information, and Trace.

Step 5 ![]() Check the Enabled check box next to each item listed in that section to begin logging of its events.
Check the Enabled check box next to each item listed in that section to begin logging of its events.
Step 6 ![]() Click Save to apply your changes.
Click Save to apply your changes.
Configuring Advanced Parameters
You can use Cisco WCS to set how long events are kept, how long before a session time-outs, interval between data clean ups and enable or disable advanced debug level messages in the logs.
To configure advanced parameters, follow these steps:
Step 1 ![]() In Cisco WCS, click Mobility > Mobility Services.
In Cisco WCS, click Mobility > Mobility Services.
Step 2 ![]() Click the name of the location server that you want to configure.
Click the name of the location server that you want to configure.
Step 3 ![]() From the System menu (left panel) click Advanced Parameters. The advanced parameters for the selected location server appears.
From the System menu (left panel) click Advanced Parameters. The advanced parameters for the selected location server appears.
Step 4 ![]() Scroll down to the Advanced Parameters section and make the appropriate changes. Table 4-3 describes the parameters.
Scroll down to the Advanced Parameters section and make the appropriate changes. Table 4-3 describes the parameters.
Initiating Advanced Commands
You can initiate a system reboot or shutdown, clear the system configuration or defragment a database by clicking the appropriate button on the Advanced Parameters page.
Reboot or Shutdown a System
To reboot or shutdown a location server, follow these steps:
Step 1 ![]() In Cisco WCS, click Mobility > Mobility Services.
In Cisco WCS, click Mobility > Mobility Services.
Step 2 ![]() Click the name of a location server you want to reboot or shutdown
Click the name of a location server you want to reboot or shutdown
Step 3 ![]() Click System (left panel).
Click System (left panel).
Step 4 ![]() Click Advanced Parameters.
Click Advanced Parameters.
Step 5 ![]() In the Advanced Commands section of the window (right), click the appropriate button (Reboot Hardware or Shutdown Hardware).
In the Advanced Commands section of the window (right), click the appropriate button (Reboot Hardware or Shutdown Hardware).
Click OK in the confirmation pop-up window to initiate either the reboot or shutdown process. Click Cancel to stop the process.
Clear a Configuration File
To clear a configuration file of a location server, follow these steps:
Step 1 ![]() In Cisco WCS, click Mobility > Mobility Services.
In Cisco WCS, click Mobility > Mobility Services.
Step 2 ![]() Click the name of a location server for which you want to clear its configuration file.
Click the name of a location server for which you want to clear its configuration file.
Step 3 ![]() Click System (left panel).
Click System (left panel).
Step 4 ![]() Click Advanced Parameters.
Click Advanced Parameters.
Step 5 ![]() In the Advanced Commands section of the window (right), click the Clear Configuration button.
In the Advanced Commands section of the window (right), click the Clear Configuration button.
Click OK in the confirmation pop-up window to initiate the process. Click Cancel to stop the process.
Defragment Database
To clear a configuration file of a location server, follow these steps:
Step 1 ![]() In Cisco WCS, click Mobility > Mobility Services.
In Cisco WCS, click Mobility > Mobility Services.
Step 2 ![]() Click the name of a location server for which you want to clear its configuration file.
Click the name of a location server for which you want to clear its configuration file.
Step 3 ![]() Click System (left panel).
Click System (left panel).
Step 4 ![]() Click Advanced Parameters.
Click Advanced Parameters.
Step 5 ![]() In the Advanced Commands section of the window (right), click the Clear Configuration button.
In the Advanced Commands section of the window (right), click the Clear Configuration button.
Click OK in the confirmation pop-up window to initiate the process. Click Cancel to stop the process.
 Feedback