- Virtualization Concepts
- Installation Overview
- Restrictions for Installing Cisco MSE in a VMware Virtual Machine
- Cisco MSE Virtual Appliance Deployment Checklist
- Prerequisites for Installing Cisco MSE in a VMware Virtual Machine
- Hardware Guidelines
- Release Upgrade Compatibility Matrix
- VM Alerts
- Downloading the Cisco MSE OVA File
- Deploying the Cisco MSE OVA File Using the VMware vSphere Client
- Installing a Cisco MSE Virtual Appliance
- Creating New Virtual Machines Using Hyper-V Manager
- Installing Cisco CMX Using Web Interface
- Upgrading from Cisco CMX 10.2
- Upgrading from Cisco CMX 10.1.x to 10.2
- Verifying Installing Cisco MSE in a VMware Virtual Machine
Installing Cisco MSE in a VMware Virtual Machine
This chapter describes how to install and deploy a Cisco Mobility Services Engine (MSE) virtual appliance.
Cisco MSE is a prebuilt software solution that comprises one or more virtual machines (VMs) that are packaged, maintained, updated, and managed as a single unit. Cisco MSE is distributed as an Open Virtual Appliance (OVA) for installation on a virtual appliance and as an ISO image for installation on a physical appliance.
Cisco MSE acts as a platform (physical or virtual Cisco Mobility Services Engine [MSE] appliance) to deploy and run the Cisco services.
If you choose Location during installation, you will see the following services in Cisco CMX GUI.
-
DETECT & LOCATE—Active for 120 day trial period unless either a CMX base or advanced license is added.
-
ANALYTICS—Active for 120 day trial period unless a CMX advanced license is added.
If you choose Presence during installation, you will see the following services in the Cisco CMX GUI.
- Virtualization Concepts
- Installation Overview
- Restrictions for Installing Cisco MSE in a VMware Virtual Machine
- Cisco MSE Virtual Appliance Deployment Checklist
- Prerequisites for Installing Cisco MSE in a VMware Virtual Machine
- Hardware Guidelines
- Release Upgrade Compatibility Matrix
- VM Alerts
- Downloading the Cisco MSE OVA File
- Deploying the Cisco MSE OVA File Using the VMware vSphere Client
- Installing a Cisco MSE Virtual Appliance
- Creating New Virtual Machines Using Hyper-V Manager
- Installing Cisco CMX Using Web Interface
- Upgrading from Cisco CMX 10.2
- Upgrading from Cisco CMX 10.1.x to 10.2
- Verifying Installing Cisco MSE in a VMware Virtual Machine
Virtualization Concepts
Refer to these documents for information on virtualization:
Installation Overview
The following table lists the Cisco MSE virtual appliance installation process and contains information about the sections providing details about them:
|
Step |
Task |
See |
|---|---|---|
|
1 |
Review the deployment checklist and prepare for the installation of a Cisco MSE virtual appliance. |
Cisco MSE Virtual Appliance Deployment Checklist and Hardware Guidelines |
|
2 |
Download the Cisco MSE Open Virtualization Archive (OVA) file from Cisco.com. |
|
|
3 |
Deploy the Cisco MSE OVA file. |
Deploying the Cisco MSE OVA File Using the VMware vSphere Client |
|
4 |
Configure the basic configurations and install the Cisco MSE virtual appliance. |
|
|
5 |
Set up the Cisco MSE virtual appliance. |
Restrictions for Installing Cisco MSE in a VMware Virtual Machine
-
Map size must be less than 5 MB in Cisco Prime Infrastructure.
-
There must be less than 1000 access points on a single map.
-
The Mobile Application Server and Wireless intrusion prevention system (wIPS) are not available.
-
A common NTP server must be used to synchronize the time.
-
Simple Mail Transfer Protocol (SMTP) Mail Server name and authentication mechanism must be used for the Cisco CMX mail notification system.
-
Cisco CMX 10.2 does not render any data on Cisco Prime Infrastructure maps. To allow client display in Cisco Prime Infrastructure 1.4 or later, a parallel Cisco MSE 8.0 is also required.
Cisco MSE Virtual Appliance Deployment Checklist
-
Cisco Wireless Controller has IP connectivity to a Cisco CMX instance.
-
Cisco Prime Infrastructure has IP connectivity to a Cisco CMX instance.
-
Port 16113 is routable from Cisco WLC to the Cisco CMX IP address.
-
Port 161 (for Simple Network Management Protocol [SNMP] traffic) is routable from Cisco WLC to the Cisco CMX IP address.
-
SSH client to log in with the root access to the VM is present.
-
A Secure Copy (SCP) client (on MAC native or installed on PC) or a Secure File Transfer Protocol (SFTP) exists to move files into Cisco CMX OVA (specifically, map files and images to upgrade).
Prerequisites for Installing Cisco MSE in a VMware Virtual Machine
-
VMWare vSphere client.
-
Cisco MSE 10.2 OVA, which can be downloaded from Download Software on cisco.com.
-
Hostname IP address, netmask, default gateway, DNS IP address, and Network Time Protocol (NTP) Server IP address or name.
-
Cisco WLC 7.6, 8.0 or later.
-
IP address, type, the SNMP version, and the SNMP write community string of Cisco WLC.
-
SNMP credentials of Cisco WLC (private key for V1 and V2, or username and password for V3).
-
Mail server settings (port number and security settings) and email address.
-
Cisco Prime Infrastructure 2.2, 3.0 or later with a hierarchy of maps in the order of campus, building, and floor.
-
Existing exported map file from Cisco Prime Infrastructure.
-
VMware virtualization environment ESXi 5.x, 6.0, and 6.5.
Hardware Guidelines
The following table lists the hardware guidelines for the Cisco MSE virtual appliance.
 Note | If the hardware requirements are not met, the OVA deployment fails. Similarly, the Cisco MSE setup fails during installation when the other minimum requirements listed in the table below are not met. |
|
Hardware Platform |
Basic Appliance |
Standard Appliance |
High-End Appliance |
|---|---|---|---|
|
CPU |
8 vCPU (2.4 GHz core) |
16 vCPU (2.4 GHz core) |
24 vCPU (2.4 GHz core) |
|
RAM |
24 GB |
48 GB |
64 GB 1 |
|
HDD |
500 GB |
500 GB |
1 TB |
Release Upgrade Compatibility Matrix
The following table lists the Cisco CMX releases available on Cisco.com.
|
Cisco CMX Release |
OVA |
3365 ISO |
Upgrade Option Only |
|---|---|---|---|
|
10.1.0 |
cmx-v10-1-0.ova |
— |
— |
|
10.1.1 |
— |
10.1.1 |
— |
|
10.1.1-2 |
— |
— |
cisco_cmx-10.1.1-2.tar.gz (cisco_cmx-10.1.1-2.x86_64.rpm and cisco_cmx_connect-10.1.1-30.x86_64.rpm) |
|
10.1.2 |
— |
— |
cisco_cmx-10.1.1-2.tar.gz |
|
10.2 |
10.2 OVA |
10.2 ISO |
10.2 backend upgrade (10.1 and 10.1.1 to 10.2) script and.CMX image file |
|
10.3 |
10.3 OVA |
10.3 ISO |
— |
|
Release |
Location and Analytics Node |
Location and Connect Node |
Location, Analytics, and Connect Node (L-Node) |
Connect and Presence Node (P-Node) |
|---|---|---|---|---|
|
10.1.0 |
Yes |
— |
— |
— |
|
10.1.1-2 |
Yes |
Yes |
Yes |
— |
|
10.1.2 |
Yes |
Yes |
Yes |
— |
|
10.2 |
Use the upgrade script to change Location and Analytics to Location, Analytics, and Connect internally. |
Use the upgrade script to change Location and Connect to Location, Analytics, and Connect internally. |
Yes |
Yes |
|
10.3 |
Use the upgrade script to change Location and Analytics to Location, Analytics, and Connect internally. |
Use the upgrade script to change Location and Connect to Location, Analytics, and Connect internally. |
Yes |
Yes |
|
Upgrade Path 12 |
Location and Connect Node |
Location and Analytics Node |
Location, Analytics, and Connect Node (L-Node) |
Connect and Presence Node (P-Node) |
|
10.1.0 OVA to 10.2 |
10.2 backend script to upgrade image to10.2 and change Location and Connect to Location, Connect, and Analytics. |
10.2 backend script to upgrade image to10.2 and change Location and Analytics to Location, Connect, and Analytics. |
10.2 backend script to upgrade image to 10.2. |
— |
|
10.1.1-2 tar.gz to 10.2 |
10.2 backend script to upgrade image to10.2 and change Location and Connect to Location, Connect, and Analytics. |
10.2 backend script to upgrade image to10.2 and change Location and Analytics to Location, Connect, and Analytics. |
10.2 backend script to upgrade image to 10.2. |
— |
|
10.1.2 tar.gz to 10.2 |
10.2 backend script to upgrade image to10.2 and change Location and Connect to Location, Connect, and Analytics. |
10.2 backend script to upgrade image to10.2 and change Location and Analytics to Location, Connect, and Analytics. |
10.2 backend script to upgrade image to 10.2. |
— |
|
10.2 OVA/ISO to 10.2 |
— |
— |
UI upgrade script to upgrade image. |
UI upgrade script to upgrade image |
VM Alerts
The following table displays the alerts shown on the VM for the following conditions:
|
Hard Disk Status |
Alert Shown |
|---|---|
|
50 percent |
Do Not Back Up |
|
80 percent |
System Is About To Run Out Of Space |
|
85 percent |
All The Services Are Stopped |
Downloading the Cisco MSE OVA File
| Step 1 | Download the Cisco MSE image from Download Software on cisco.com. |
| Step 2 | Save the Cisco MSE OVA installer to your computer and ensure that it is accessible. |
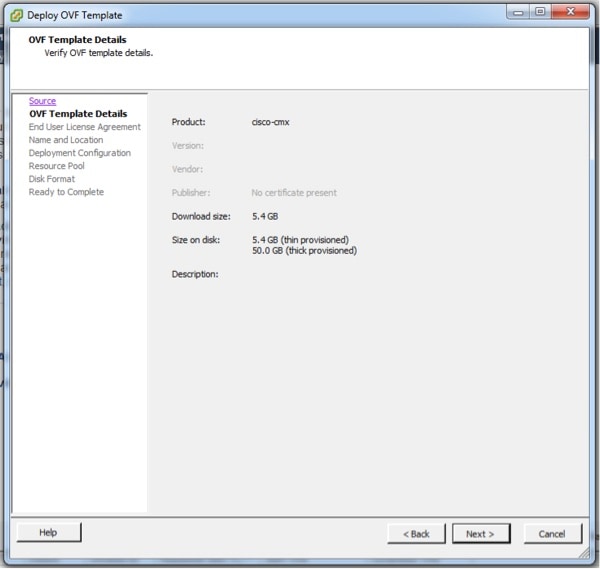
Deploying the Cisco MSE OVA File Using the VMware vSphere Client
To deploy the Cisco MSE OVA file using the VMware VSphere Client, follow these steps:


Installing a Cisco MSE Virtual Appliance
After the Cisco MSE is deployed, you can install and configure a Cisco MSE virtual appliance. Note the following points:
- Cisco MSE does not have a node install menu. However, there is a first-boot script that checks if a configuration exists on the device. If the script does not find a valid configuration, it launches the setup routine and initiates network configuration tasks using the CLI, followed by initial setup tasks on the browser.
-
The new first-boot script determines if the initial configuration is completed, and then displays the normal login prompt. If the initial configuration is not completed, the default login prompt is displayed.
Note | The cmxctl node install command is no longer valid. |
To install and configure a Cisco MSE virtual appliance, follow these steps:


Creating New Virtual Machines Using Hyper-V Manager
You can now run Cisco CMX on Microsoft Hyper-V virtualization hosts. This enables you to use Cisco CMX on virtual machines using any Hyper-V capable host running Windows Server 2008 R2 or later.
You can create a new virtual machine using Hyper-V Manager application. Ensure to specify 24 GB of memory or higher when creating the virtual machine in Hyper-V manager, and to subsequently increase the processor count for the virtual machine to 8 vCPU or higher before starting the new virtual machine.
If you are running Windows Server 2012 or later, we recommend you to convert the Cisco CMX .vhd disk image to .vhdx format before adding it to the new virtual machine.
To create a new virtual machine:
| Step 1 | Download the CMX .vhd file to the location on the drive where it will reside. | ||
| Step 2 | (Optional) Convert the .vhd file to .vhdx format. | ||
| Step 3 | Open the Hyper-V Manager
application and verify the Hyper-V virtual network switch configuration.
| ||
| Step 4 | To create a new VM, choose Action > New > Virtual Machine. | ||
| Step 5 | Enter a name for the new virtual machine. | ||
| Step 6 | Select to store the virtual machine in a different location, browse to the folder containing the .vhd or converted .vhdx file, and then click Next. | ||
| Step 7 | Choose
Generation 1 as the machine type, and then
click
Next.
| ||
| Step 8 | Specify 8192 or greater for the VM memory, and then click
Next.
| ||
| Step 9 | Under Connections, choose the appropriate virtual network switch to connect the VM, and then click Next. | ||
| Step 10 | Select Use an existing hard disk, and then navigate to the .vhd or .vhdx file on your hard disk. | ||
| Step 11 | In the Summary window, click Finish. | ||
| Step 12 | Edit the new VM settings and change the processor count to a minimum of 4. |
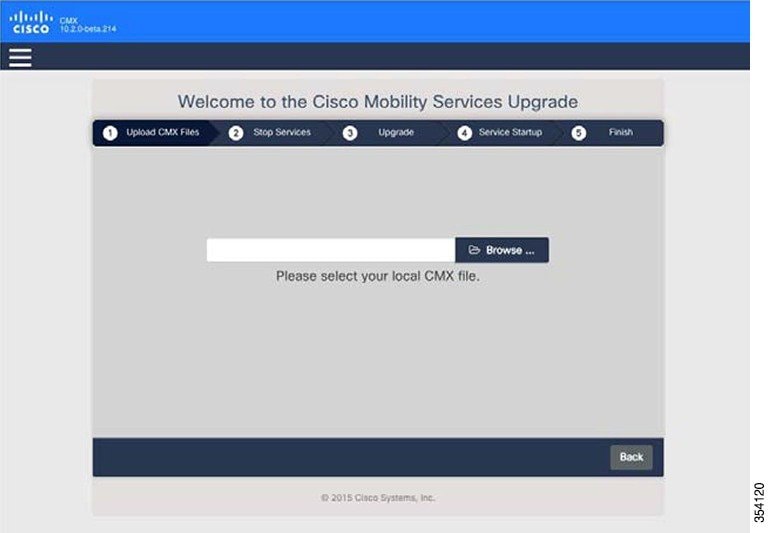
Installing Cisco CMX Using Web Interface
Launch the Cisco CMX user interface using Google Chrome 40 or later, and follow these steps:
| Step 1 | In the Cisco
CMX
web interface, enter the login credentials for a Cisco
CMX
administrator and click
Sign
in to continue.
The login username is cmxadmin. Use the password that was configured when the system was started for the first time.  | ||
| Step 2 | Choose the Cisco
CMX
type as either
Location or
Presence.
The
installation is initiated and services are started. Note that this may take a
few minutes.

| ||
| Step 3 | Click
Please
click to continue setup or press
Enter to proceed to the main portal.

The installation is complete. If this is a reinstallation, the Cisco CMX Welcome window is displayed. If this is a fresh installation, the user is automatically authenticated and the Cisco CMX Welcome is skipped. | ||
| Step 4 | Log in with the
username
admin and
password
admin.
 |
What to Do Next
A Setup Assistant window is displayed, from where you can complete the initial configuration. You must now set a password for the admin user, import Cisco WLC details and maps from Cisco Prime Infrastructure, and configure and test mail server settings.
Use https://<ip address> for all subsequent logins to the web user interface. Use https:// <ip-address>:1984 only for initial configuration.

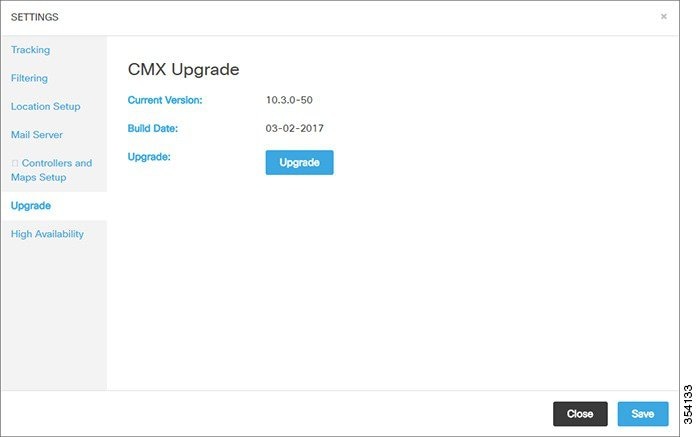
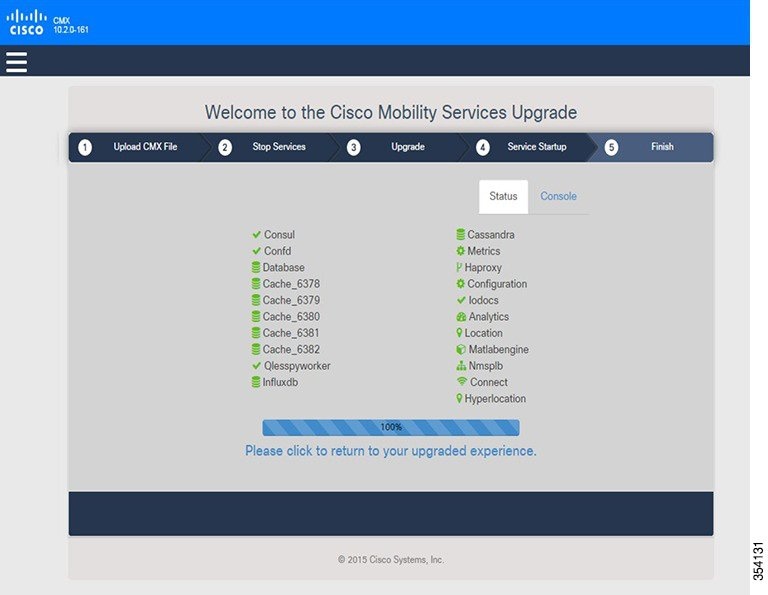
Upgrading from Cisco CMX 10.2
You can upgrade from Cisco CMX 10.2 using the Cisco CMX user interface.
| Step 1 | From the Cisco CMX top menu, choose SYSTEM > Dashboard. | ||
| Step 2 | In the top-right
corner of the
System
at a Glance
window, click
Settings.
 | ||
| Step 3 | In the left pane
of the
SETTINGS window, click
Upgrade, and then click the blue
Upgrade button.
 | ||
| Step 4 | Click
Local
File or
Remote
File .
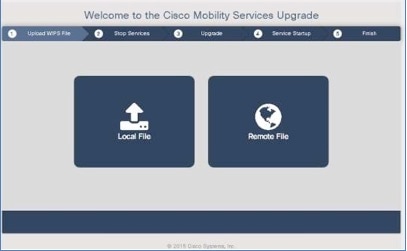 | ||
| Step 5 | Do one of the
following:
| ||
| Step 6 | Click
Upload.
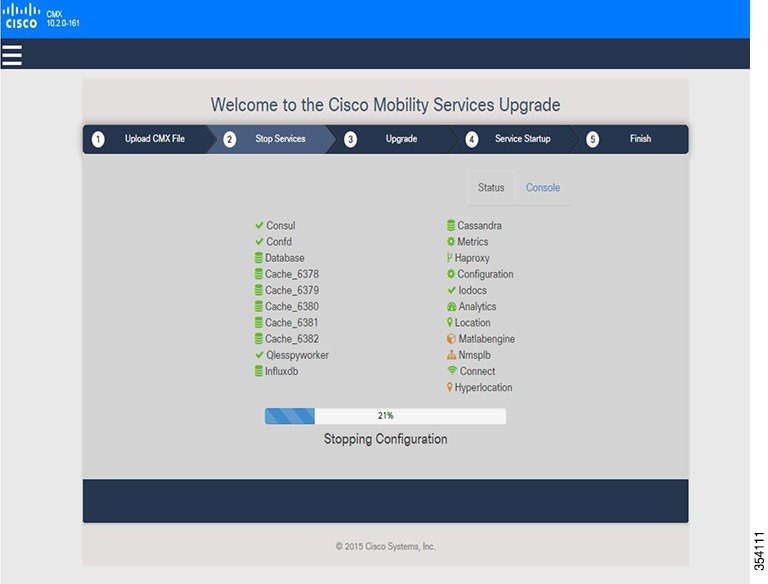 | ||
| Step 7 | Once the upgrade
process is complete, click the
Please
click to return to your upgraded experience blue text to go to the
Cisco CMX Welcome page, and login using the username and password (admin and
admin).
 |

Upgrading from Cisco CMX 10.1.x to 10.2
The upgrade from Cisco CMX 10.1 to Cisco CMX 10.2 is accomplished through the use of a helper script and a.cmx file. To perform the upgrade, perform the following steps:
| Step 1 | Download the. cmx file and the helper script as a.zip file from CCO. | ||
| Step 2 | Unzip the downloaded file. | ||
| Step 3 | Connect to the Cisco CMX CLI via SSH or CIMC KVM. | ||
| Step 4 | Edit the sshd_config file to
permit root access by changing the PermitRootLogin value to yes.
vi /etc/ssh/sshd_config | ||
| Step 5 | Move to the root directory.
cd / | ||
| Step 6 | Create a folder to hold the
script and the .cmx file.
mkdir upgrade | ||
| Step 7 | Move to the newly created
upgrade directory
cd /upgrade | ||
| Step 8 | Use the Secure Copy Protocol
to transfer both the cmx_upgrade.sh script and its associated.cmx file to the
upgrade folder on the existing 10.1 installation:
scp username@hostname_or_IP:/Users/username/Downloads/<CISCO_CMX$$$.cmx>.
| ||
| Step 9 | Ensure that both the script
and the.cmx file can be executed by the root user:
chmod +x cmx_upgrade.sh chmod +x <CISCO_CMX$$$.cmx> chmod 755 * | ||
| Step 10 | Stop all runnning
services.
cmxctl stop cmxctl stop -a | ||
| Step 11 | Run the upgrade script by
entering the following at the CLI prompt:
./cmx_upgrade.sh <CISCO_CMX$$$.cmx> | ||
| Step 12 | After the script runs to completion, you are prompted to reboot. | ||
| Step 13 | Login with user cmxadmin and password 'cisco' as prompted. | ||
| Step 14 | Configure new root and cmxadmin passowords. | ||
| Step 15 | Check version of upgraded
image.
cmxctl version | ||
| Step 16 | Run commands to start
services.
cmxctl start cmxctl status cmxos adminui start cmxctl version | ||
| Step 17 | After the completion of upgrade, remove the /upgrade folder. |
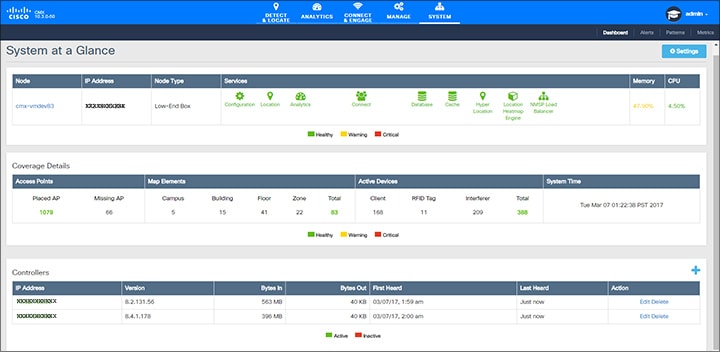
Verifying Installing Cisco MSE in a VMware Virtual Machine
You can verify the overall system health and status of the Cisco MSE services using the System tab in the Cisco MSE user interface. Ensure that all the services, memory, and CPU indicate a healthy status (green) for each Cisco MSE and Cisco CMX node, and that there is at least one active Cisco WLC.
The System tab contains the following subtabs: Feedback