Notification Services

Apple Push Notifications

Notification Configuration

To configure CPS to send a message to a subscriber with an Apple iPhone or other iOS device, perform the following steps.

Procedure


Step 1

Log in to Policy Builder.

Step 2

Go to Reference Data tab > Systems > a system or a cluster > Plugin Configurations > Notification Configuration.

Step 3

Click the check box next to Apple Push Notification Configuration.

Step 4

View the Notification Configuration screen.

The following parameters can be configured under Apple Push Notification Configuration:

Table 1. Apple Push Notification Parameters

Parameter

Description

APNS Server Address

  • Apple Production: Connects to gateway.push.apple.com on port 2195.

  • Apple Test: Connects to gateway.sandbox.push.apple.com on port 2195.

  • Other: Uses a server address other than the standard Apple ones. It also uses the other gateway and server port fields defined in Other Server Gateway and Other Server Port fields below.

Other: Uses a server address other than the standard Apple ones. It also uses the other gateway and server port fields defined in Other Server Gateway and Other Server Port fields below.

Recommendation: Other

Other Server Gateway

Name of a server gateway if Other is selected as APNS Server Address.

Other Server Port

Port number of the server gateway if Other is selected as APNS Server Address.

Certificate

The certificate for the authorization to the gateway. You must provide a certificate file that is loaded into CPS.

Certificate Password

Password added to the certificate when connecting to the APNS.

Step 5

Go to Message Configuration to configure the message to be sent for the notification configuration done above.


Message Configuration

To create the messages for a subscriber’s Apple iPhone or the Apple iOS operating system to be sent by CPS, perform the following steps.

Procedure


Step 1

Select Reference Data tab > Notifications > Apple Push Notifications.

Step 2

From right side, click Apple Push Notification under Create Child to open the pane.

Figure 1. Apple Push Notification Pane


The following parameters can be configured under Apple Push Notification:

Table 2. Apple Push Notification Message Configuration Parameters

Parameter

Description

Name

The name of the notification message. This name is used in the action phrase in the policy definition. Best practice is to make this short, but meaningful and unique.

Badge

Default is 0 (number).

The number to display as the badge of the Apple Push Notification icon. If this property is absent, the badge is not changed. To remove the badge, set the value of this property to 0.

Example: 1, 2, 3, ….

Sound

Default is 'default'.

The name of a sound file in the application bundle. The sound in this file is played as an alert. If the sound file doesn't exist or default is specified as the value, the default alert sound is played. The audio must be in one of the audio data formats that are compatible with system sounds. For more information, see https://developer.apple.com/library/ios/documentation/NetworkingInternet/Conceptual/RemoteNotificationsPG/Chapters/IPhoneOSClientImp.html#//apple_ref/doc/uid/TP40008194-CH103-SW6.

Example: sound1, alert7, buzzSound_A

Send Once Per Session

Click this check box if you want to send the notification once per session.

Custom Fields

You can add custom fields with values that can be sent to the application.

Field Name/Field Value

String

Example:

“high_score”: “1000”

“custom_field_1”: “display1”

“custom_field_2”: “false”

For more information on custom fields, refer to the following links:

Alert

This is the text that appears on the subscriber’s iPhone. If the message is too long, it is simply truncated. Test your messages before you place into production.

If you want to use a string, and substitute session information, use the syntax $Name, for example, to insert the receiver’s name in the email.

Alerts are limited to 160 characters. Alerts longer than that are truncated.

To use Apple Push Notifications, you need to configure Service Options.

For more information on the configuration, see #id_13242.


Email Notifications

Configure Notifications

CPS supports sending email notifications to one primary and one secondary email server, or alternatively to a pool of email servers

(See Multiple Email Notification Configuration).

When configured for one primary and one secondary email server, CPS will send all email notifications to the primary server. If the primary fails, CPS will retry the notification to the secondary server, if configured. If the secondary server notification fails, CPS will log that the notification was unable to be delivered.

To configure the primary and secondary email server connections that CPS will use to send email notifications to subscribers:

Procedure


Step 1

Login to Policy Builder.

Step 2

Go to Reference Data > Systems > a system or a cluster > Plugin Configurations > Notification Configuration.

Step 3

Click the check box next to Email Notification Configuration.

Step 4

View the Notification Configuration screen that drops down.

The following parameters can be configured under Email Notification Configuration:
Table 3. Email Notification Configuration Parameters

Parameter

Description

Mail Server Address

IP address or host name of the mail server to which the notification emails will be sent. Only IMAP email is supported at this time.

Login/Password

Enter any login and password information needed.

Enable TLS

Enables transport layer security. This option is used for connecting to services other than basic IMAP services, such as Google’s Gmail.

Smtp Port

Specifies the SMTP port. This option is used for connecting to services other than basic IMAP services, such as Google’s Gmail.

The following screen shows an example configuration using smtp.gmail.com.
Figure 2. Notification Configuration


Step 5

(Optional) To configure a secondary (backup) email server, click the check box next to Secondary Email Server and configure the parameters for the secondary server.

Step 6

Go to Configure Messages to configure the message to be sent for the notification configuration.


Configure Messages

Substitution value can be set from SPR, Balance, or the session and placed in the email body using $[variable].

In the following example, we are using a subscriber AVP code for email. The value “$email” is used in the body of the text and replaced then the email is sent.

We are also using $timeStamp to add the Date/Time.

Figure 3. Email Notification


The following parameters can be configured under Email Notifications:

Table 4. Email Notification Message Configuration Parameters

Parameter

Description

Name

Name of the message.

Message Encoding (DCS)

Select the required message coding from drop-down list. Valid values are ISO-8859-1, US-ASCII, UTF-16 (UCS-2) and UTF-8. Default value is UTF-8.

Subject

This is the subject line of the email to the subscriber.

From Email Address

The From field in the email.

Reply To Email Address

Who the subscriber may reply to.

Body (Text/Plain)

The text of the email the subscriber receives in plain format

Body (Text/HTML)

The text of the email the subscriber receives in HTML format.

To pull the values from SPR and replace in the email, we use the service option setting from the notification:

Figure 4. Service Option


For the timestamp, use the Value Retriever.

For the email, select from the “Pull value from…” column.

Figure 5. Subscriber AVP code Email Values


For reference, our subscriber has a Custom Data AVP set in the details of his subscriber record. This is where the value is being pulled from in Control Center.

Figure 6. Subscriber General Details


Logging

2015-05-01 14:34:46,345 [pool-2-thread-1] DEBUG c.b.n.impl.NotificationsManager.? - Email encoding : UTF8
2015-05-01 14:34:46,345 [pool-2-thread-1] DEBUG c.b.n.impl.NotificationsManager.? - Email Text body : Date/Time: 1430512486305
Dear bob@cisco.com, your new session has started
2015-05-01 14:34:46,345 [pool-2-thread-1] DEBUG c.b.n.impl.NotificationsManager.? - Email HTML body : <br/><br/>
Date/Time: 1430512486305
<br/><br/>
<b>Dear bob@cisco.com, your new session has started.</b>

To use Email Notifications, we need to configure Service Options.

For more information on the configuration, refer to Service Option Configuration.

Multiple Email Notification Configuration

Configure Notifications

This section describes how to configure CPS to send email notifications to multiple email servers.

When multiple email servers are configured, CPS utilizes a round-robin selection scheme to distribute the email notifications to subscribers. No weighting is used when selecting the email servers from the configured pool.

If CPS detects that the running status of an email server is DOWN, CPS will automatically skip this server and send the notifications to the next email server. If a message cannot be delivered by an email server, CPS will retry the same message to the next email server.


Note

In a CPS High Availability deployment, where two Policy Director (load balancer) VMs (lb01 and lb02) are used, each Policy Director operates a separate notification service. As a result, email notifications are first balanced across each Policy Director, and then each Policy Director delivers the message to an email server in a round robin fashion. This can result in concurrent messages being delivered to the same email server.

The following SNMP Notifications (Alarms) are used to monitor these email server connections. Refer to CPS SNMP and Alarms Guide, Release 9.1.0 and prior releases or CPS SNMP, Alarms and Clearing Procedures Guide, Release 10.0.0 and later releases for more information.

  • AllEmailNotificationServerDown

  • AtLeastOneEmailNotificationServerUp

  • EmailNotificationServerDown

  • EmailNotificationServerUp

To generate the SNMP Notifications (alarms), you need to configure -Dnotification.interface.monitor.emailserver=true in /etc/broadhop/qns.conf file. After configuring the parameter, run the following commands:

/var/qps/install/current/scripts/build_all.sh

/var/qps/install/current/scripts/upgrade/reinit.sh


Note

Before continuing with these steps to add a pool of email servers, first remove the Primary and Secondary servers configured under the Email Notification section of Policy Builder.

To configure a pool of email server connections that CPS uses to send email notifications to subscribers:

  1. Login to Policy Builder.

  2. Go to Reference Data > Systems > a system or a cluster > Plugin Configurations > Notification Configuration.

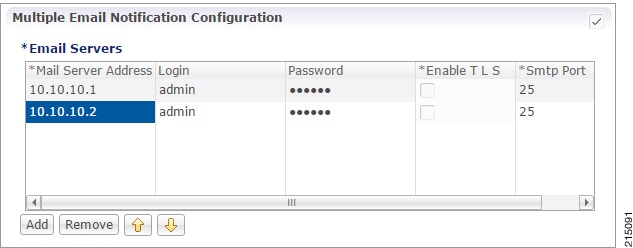
  3. Click the check box next to Multiple Email Notification Configuration.

  4. View the Notification Configuration screen that drops down.

  5. Click Add to add an email server to the list.

    Figure 7. Multiple Email Notification Configuration


    Note

    Moving an entry up or down in the table reflects only the display order; it has no impact on the selection when processing email notifications.

    The following parameters can be configured for each email server:

    Table 5. Email Notification Configuration Parameters

    Parameter

    Description

    Mail Server Address

    IP address or host name of the mail server to which the notification emails will be sent. Only IMAP email is supported at this time.

    Login/Password

    Enter any login and password information needed.

    Enable TLS

    Enables transport layer security. This option is used for connecting to services other than basic IMAP services, such as Google’s Gmail.

    Smtp Port

    Specifies the SMTP port. This option is used for connecting to services other than basic IMAP services, such as Google’s Gmail.

  6. Go to Message Configuration, to configure the message to be sent for the notification configuration.

SMS Notifications

Configure Notifications

CPS supports sending Short Message Service (SMS) notifications to one primary and one secondary SMSC server, or alternatively to a pool of SMSC servers.

See Multiple SMSC Server Configuration

The following section describes how to configure CPS to send SMS notifications to a primary SMSC server and a secondary SMSC server.

Procedure


Step 1

Login to Policy Builder.

Step 2

Go to Reference Data > Systems > a system or a cluster > Plugin Configurations > Notification Configuration .

Step 3

Click the check box next to SMS Notification Configuration.

Step 4

View the Notification Configuration screen that drops down.

The following parameters can be configured under SMS Notification:

Table 6. SMS Notification Parameters

Parameter

Description

SMSC Host Address

The TCP/IP address or host name of the SMPP server, that is, the URL of the SMSC host that pushes the SMS message.

SMSC Port

The TCP/IP port on the SMPP server to which the gateway connects.

System ID

The user name for the gateway to use when connecting to the SMPP server

Password

The password for the gateway to use when connecting to the SMPP server.

System Type

An optional login parameter used only if required by the SMPP server. The SMPP system administrator provides this value, usually a short text string.

Registered Delivery

Optional field for some custom deployments.

DataCoding (Advanced Use Only)

Optional field for some custom deployments.

Data Coding can be used instead of the Message Encoding and the other DCS fields on the Notification message definition screen, but should be used with care.

Note 
If it is necessary to use a specific value in this field for data coding, then the message alphabet information should be included in the Data Coding value per the SMS specification as well as any other necessary data coding information. The result is a combination of the capabilities of the SMSC and is not totally controlled by CPS.

Priority Flag

Optional field for some custom deployments.

Binding Type

TX (transmit)

or

TRX (transceiver)

Enquire Link Time

Specifies the Enquire Link Timer value. The plug-in instance performs an Enquire Link operation to the SMSC to keep the connection alive. The time between inquiries is specified by this timer value. Default value is 5000 seconds.

Reconnect

If checked, CPS will check connection to the SMSC at the interval specified in the“Reconnect Smsc Time” field.

Reconnect Smsc Time

The interval to check the connection to the SMSC, and reconnect if lost. This will check the primary and secondary if the secondary properties are set.

Other then the parameters mentioned in Table 1, the user can configure the following parameters after selecting Retry Configuration check box.

The following parameters can be configured under Retry.

Table 7. Retry Parameters

Parameter

Description

No. Of Retries

Number of retries allowed to resubmit the message.

Retry Interval

Interval in which message are resubmitted until success.

Go to Message Configuration, to configure the SMS message to be sent for the notification configuration done above.


Configure Messages

To create the SMS to be sent by CPS, perform the following steps:
  1. Select Reference Data > Notifications > SMS Notifications.

  2. From right side, click SMS Notification under Create Child to open the pane.

    The following parameters can be configured under SMS Notification:
    Table 8. SMS Notification Parameters

    Parameter

    Description

    Name

    Name of the notification message. This name is used later in the policy definition to send the SMS.

    Source Address

    Source address of the SMS message.

    Callback Number

    This is an optional field. This parameter is used to configure the callback number adhering to specification.The input format is a hexadecimal string. It will correspond to the exact hexadecimal sent in the stream.

    Currently, only a single callback number is supported.

    For more information, refer to SMS Notification Extension.

    Address TON

    Type of Number for the source. It defines the format of the phone numbers.

    Values: ABBREVIATED, ALPHANUMERIC, INTERNATIONAL, NATIONAL, NETWORK_SPECIFIC, SUBSCRIBER_NUMBER, UNKNOWN

    Address NPI

    Numbering Plan Indicator. It defines the format of the addresses.

    Values: DATA, ERMES, INTERNET, ISDN, LAND_MOBILE, NATIONAL, PRIVATE, TELEX, UNKNOWN, WAP

    Message Class (DCS)

    The message class per the SMPP specification. Valid values are CLASS0, CLASS1, CLASS2. Default value is CLASS1.

    Message Encoding (DCS)

    Defines the alphabet and byte encoding used for the message. Valid values are US-ASCII (7 bit), ISO-8859-1 (8 bit), and UTF-16 (UCS-2) which is 16 bit. Default value is US-ASCII.

    Override Character Limit (Advanced)

    Some SMSCs create multi-part messages for long SMS messages instead of having CPS create the multiple messages. This option provides such behavior by overriding the default single message size.

    This option is for advanced use only. The reason is that if space in the message submitted from CPS does not allow for header information, such as the User Data Header (UDH), then many SMSC are not accepted the messages at all.

    Compressed (DCS)

    Select this check box to set whether compression is used per the SMPP specification. Default is false.

    Use Plugin Config Data Coding Instead (DCS

    Select this check box when you want to use the value specified in Data Coding field in the Notifications Configuration screen instead of the Message Class, Message Encoding, Compressed, and Contain Message Class values on this screen.

    Contain Message Class

    Select this check box to set whether the contain message class options is used per the SMPP specification. Default is false.

    Use Message Encoding with Plugin Config Data Coding

    Select this check box when the “Use Plugin Config Data Coding Instead” check box above is checked. The check box "Use Plugin Config Data Coding Instead” must be true to use this value.

    This check box allows the Message Encoding value on this screen to define the byte conversion method that is used in conjunction with the Data Coding value in the Notifications Configuration screen.

    By default, the byte conversion method is US-ASCII regardless of the Plugin Configuration’s Data Coding value. Other UTF-16 conversions may use Big Endian, Little Endian or Byte Order Mark (BOM).

    This field is also important for ensuring the proper division of messages, particularly for non-English languages, for multi-part SMS message support.

    Message

    The text that the subscriber receives.

    SMS messages have character limits dependent on the selected DCS values. Text in excess of this limit triggers the submission of the multi-part messages to the SMSC.

WAP Settings

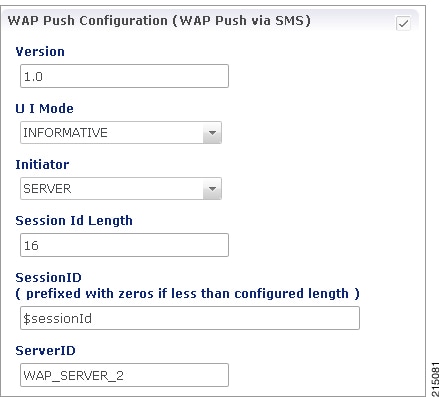
WAP push over SMS has been added to facilitate another way of initiation of notification from ANDSF server to the client (UE).

Figure 8. WAP Push Configuration


The following parameters can be configured under WAP Push Configuration:

Table 9. WAP Push Configuration Parameters

Parameter

Description

Version

String, version of WAP message. This can be updated to reflect changes. For example, 1.0, 2.0, 2.1.

No characters are allowed. Only numbers or '.' are allowed.

UI Mode

(User Interactive Mode): This field specifies the server recommendations whether the server wants the management session to be executed in background or show a notification to the user.

Values: NOT_SPECIFIED, INFORMATIVE, BACKGROUND, USER_INTERACTION

Default is NOT_SPECIFIED.

  • NOT_SPECIFIED: Specifies that the server doesn't have a recommendation to this element.
  • INFORMATIVE: Specifies that the server recommends the client to display an informative notification or maybe emitting a beep sound announcing the beginning of the provisioning session to the device user.
  • BACKGROUND: Specifies that the server recommends the management action SHOULD be done as a background event.
  • USER_INTERACTION: Specifies that the server recommends the client to prompt the device user for acceptance of the offered management session before the management session takes place.

Initiator

Specifies how the server has interpreted the initiation of the management action, either because the end user requested it or because the server has management actions to perform. Value from drop down is added to the WAP message and does not trigger any action on the CPS side.

  • Client: Specifies that the end user caused the device management session to start.

  • Server: Specifies that the server (operator, enterprise) caused the device management session to start.

Session Id Length

Integer - Up to 16

SessionID

Session Id is 16 bits which is 2 ASCII character according to the specification. However, there is no restriction on ANDSF session-id size, it can be of any length. In PB, session-id length is made configurable per notification template (Shown in snapshot above). When actual session id length is greater that the configured size then the notification would not be sent and an error would be logged.

However, if session is less than the configured size, then zero would be prefixed in order to make sure that it satisfies session-id length configured in PB. It is assumed that the client would strip off the prefix and send the server initiated policy pull.

ServerID

String - Up to 255 Characters

The field specifies the Server Identifier of the management server. For example, “Server_1”, “WAP_SERVER_2”

For more information on WAP fields, click WAP Fields.

To use SMS Notifications, we need to configure Service Options.

For more information on the configuration, refer to Service Option Configuration.

SMS Notification Extension

A new Service Configuration named as SmsNotificationExtension has been added. Note that since its an extension, it needs the base NotificationService also configured as a part of the main service for it to fetch the base template details. For example, an operator can specify their call-center number for subscribers to call back.

Figure 9. Select Service Configuration


The following parameters are configured under SmsNotificationExtension:

Table 10. SmsNotificationExtension Parameters

Parameter

Description

Priority

If there are multiple SMS Notification Extension configurations, this parameter will decide which Service configuration and corresponding parameter values to use. Higher the value, higher precedence it will have. For example, if there are two extension templates having priority as 1 and 2 each, the one with priority value 2 will be used.

Default value is 0.

Callback Number

This is the service configuration level value for the callback number. This will satisfy the need of overriding the template value.

Note 
Callback Number must be the exact hexadecimal string converted value of the call back number sent in the stream.

Currently, only a single callback number is supported.

Override Callback Of Template

This parameter helps to decide whether to use the service configuration callback number to override the template or not.

Default value is true.

Configure a service with the base Notification Service and select the SMS Notification Template.

Figure 10. Notification Object


Create a Use Case Template using the new SMS Extension.

Add multiple extensions at service option level and configure the corresponding values.

Figure 11. SMS Extension Configuration


Configure a Service which has the NotificationService configured with corresponding SMS Template chosen and on top we can add the other SMSExtensions.

Multiple SMSC Server Configuration

Configure Notifications

This section describes how to configure CPS to send SMS notifications to multiple SMSC servers.

When multiple SMSC servers are configured, CPS utilizes a round-robin selection scheme to distribute the SMS notifications to subscribers. No weighting is used when selecting the SMSC servers from the configured pool.

If CPS detects that the running status of an SMSC server is DOWN, or if the SMSC server is marked disabled in the Policy Builder interface, CPS will automatically skip this server and send the messages to the next SMSC server. If a message cannot be sent to an SMSC server, CPS will retry to send it to the next SMSC server.

In the event that an SMSC server goes down, CPS can also be configured to reconnect to the server automatically. The frequency at which CPS will attempt to reconnect is also configurable.


Note

In a CPS High Availability deployment, where two Policy Director (load balancer) VMs (lb01 and lb02) are used, each Policy Director operates a separate notification service. As a result, SMS notifications are first balanced across each Policy Director, and then each Policy Director delivers the message to an SMSC server in a round robin fashion. This can result in concurrent SMS messages being delivered to the same SMSC server.

The following SNMP Notifications (Alarms) have been introduced to monitor the SMSC server connections. Refer to CPS SNMP and Alarms Guide, Release 9.1.0 and prior releases or CPS SNMP, Alarms and Clearing Procedures Guide, Release 10.0.0 and later releases for more information.

  • AllSMSCNotificationServerDown

  • AtLeastOneSMSCNotificationServerUp

  • SMSCNotificationServerDown

  • SMSCNotificationServerUp


Note

Before continuing with these steps to add a pool of SMSC servers, first remove the Primary and Secondary servers configured under the SMS Notification Configuration section of Policy Builder.

To configure CPS to send SMS notifications to a pool of SMSC servers:

  1. Login to Policy Builder.

  2. Go to Reference Data > Systems > a system or a cluster > Plugin Configurations > Notification Configuration.

  3. Click the check box next to Multiple SMSC Server Configuration.

  4. View the Notification Configuration screen that drops down.

  5. Click Add to add an SMSC server to the list.


    Note

    Moving an entry up or down in the table reflects only the display order; it has no impact on the selection when processing SMS notifications.

    The following parameters can be configured for each SMSC server:

    Table 11. SMSC Server Parameters

    Parameter

    Description

    Admin Status

    This field allows the operator to disable a specific SMSC server without removing the configuration entirely. If a server is disabled, CPS will not send any SMS notifications to it.

    SMSC Host Address

    The TCP/IP address or host name of the SMPP server, that is, the URL of the SMSC host that pushes the SMS message.

    SMSC Port

    The TCP/IP port on the SMPP server to which the gateway connects.

    Binding Type

    TX (transmit)

    or

    TRX (transceiver)

    System ID

    The user name to use when connecting to the SMSC server

    Password

    The password to use when connecting to the SMSC server.

    Enquire Link Time

    Specifies the time between Enquiry Link operations in seconds. CPS performs an Enquire Link operation to the SMSC server to keep the connection alive.

    Default: 5000 seconds.

    System Type

    An optional login parameter used only if required by the SMSC server. The SMSC system administrator provides this value, usually a short text string.

    Registered Delivery

    Optional field for some custom deployments.

    DataCoding

    Optional field for some custom deployments.

    Data Coding can be used instead of the Message Encoding and the other DCS fields on the Notification message definition screen, but should be used with care.

    Note 
    If it is necessary to use a specific value in this field for data coding, then the message alphabet information should be included in the Data Coding value per the SMS specification as well as any other necessary data coding information. The result is a combination of the capabilities of the SMSC and is not totally controlled by CPS.

    Priority Flag

    Optional field for some custom deployments.

    Reconnect SMSC SMS

    If checked, CPS will attempt to reconnect to an SMSC server if the connection was lost or server was down.

    Reconnect SMSC Timer (seconds)

    The interval in which CPS will attempt to reconnect to the SMSC server.

    Default: 300 seconds

Refer to Message Configuration, to configure the SMS message to be sent for the notification configuration done above.

Real Time Notifications

Real time Notifications allows you to send SOAP/XML and REST/JSON messages to a defined server when policy thresholds are breached. The information related to real time notification is provided in the following feature files:

  • For AIO Setup:

    In /etc/broadhop/pb/features:

    • com.broadhop.client.feature.notifications

    In /etc/broadhop/pcrf/features:

    • com.broadhop.notifications.local.feature

    • com.broadhop.notifications.realtime.service.feature

    • com.broadhop.notifications.service.feature

  • For HA Setup:

    In /etc/broadhop/pb/features:

    • com.broadhop.client.feature.notifications

    In /etc/broadhop/pcrf/features:

    • com.broadhop.notifications.local.feature

    In /etc/broadhop/iomanager/features:

    • com.broadhop.notifications.realtime.service.feature

    • com.broadhop.notifications.service.feature

If the VMs are already deployed, after modifying the feature files, execute the following commands:

/var/qps/install/current/scripts/build_all.sh

/var/qps/install/current/scripts/upgrade/reinit.sh

Configure Notifications


Note

The number of real time notifications depends on the number of RAR generated by the Policy Server (QNS) VM. If you need to increase the number of realtime notification, Max Timer T P S (under Cluster in Policy Builder) value has to be tuned accordingly. For more information, contact your Cisco Account representative.

CPS doesn't support configurations to trigger multiple real time notifications for multiple threshold breaches occurring at the same time.


Procedure


Step 1

Log in to Policy Builder.

Step 2

Go to Reference Data > Systems > a system or a cluster > Plugin Configurations > Notification Configuration.

Step 3

Click the check box next to Realtime Notification Configuration.

Step 4

View the Notification Configuration screen that drops down.

The following parameters can be configured under Realtime Notification Configuration.

Table 12. Realtime Notification Configuration Parameters

Parameter

Description

Failed Notifications Directory

File system path where failed notifications are stored. So when CPS is not able to send notification on both Server URL and Server Fallback URL then that notification is stored in this path.

The path to the failed notifications directory needs to be created manually on Policy Directors (load balancers) (lb01 and lb02).

Max Storage allowed for failed Notifications (in MB)

Maximum size up to which CPS can store failed notifications in the failed notifications directory.

Go to Configure Messages, to configure the realtime notification message to be sent for the notification configuration done above.


Configure Messages

To create the realtime notification to be sent by CPS, perform the following steps:

Procedure


Step 1

Select Reference Data > Notifications > Real Time Notifications.

Step 2

On the right-hand-side panel, click Real Time Notification under Create Child to open the Notifications pane.

Figure 12. Real Time Notifications

The following parameters can be configured under Real Time Notifications:

Table 13. Real Time Notifications Parameters

Parameter

Description

Name

Name of the real-time notification message.

No of Retries

When CPS sends real-time notification to the provided Server URL and if it is not reachable then this field specifies how many times CPS should send the notification. Same is true for Server Fallback URL.

Default value is 3.

Retry Interval (secs)

The time to wait between retries configured in the No of Retries field.

Default value is 3.

Content Type

The content type is set based on the type of the payload template (Text/XML/JSON). You can select the following:

  • text/xml

  • application/json

  • application/x-www-form-urlencoded

The content type that you choose must match the template in the Payload Template field.

The default value is text/xml.

User Name

The user name for accessing the endpoint specified in the Server URL and Server Fallback URL fields.

If no user name is required, leave this field blank.

Password

The password for accessing the endpoint specified in the Server URL and Server Fallback URL fields.

If no password is required, leave this field blank.

Send Once Per Session

If checked, real-time notifications are generated for each session and not for all messages within that session.

Default value is true.

Server URL

Primary URL where CPS sends real-time notifications.

Server Fallback URL

When the Primary URL is not reachable, CPS tries to send notification to this URL for the configured No of Retries. When the number of retries are exhausted, CPS tries to send notification to the Server Fallback URL.

HTTP Post Parameter name (Keep this field if not applicable, Eg: SOAP)

For SOAP this field is not applicable and hence should be blank. This field specifies the HTTP Post parameter name.

Payload Template (Text/XML/JSON)

This field contains the payload template, so real-time notifications are generated using the configured template. CPS provides values to the fields specified in the template from the ongoing session. For all fields that are specified in the template with values found, the real-time notification is generated.

The names of the variables/placeholders defined here must match with the notification service parameter codes defined in service parameters of the corresponding use case template.

You should also ensure that the correct value retriever is selected for each notification service parameter code in the use case template.

The following example shows a JSON payload template for reference only.


{
  "notifications": [
     {
        "ctn_id": "$msisdn",
        "eventType":"$eventType", 
        "eventData":{
           "services":["$service"]
        }
     }
  ]
}

Configure the NotificationService parameters in a use case template that pertains to the JSON example above.

Figure 13. NotificationService Parameter Configuration for JSON Example
  • The $msisdn, $eventType, and $service notifications in the JSON example are added as Code values under Message Parameters.

  • These values are pulled using the Value Retriever for each message parameter. Use the select box provided in each Value Retriever field to select the retrievers.

    • For Code type eventType, the Value Retriever is Device Indicator Event Type which allows the retrieval of event type. This is currently hard-coded to QoS_Change.

    • For Code type service, the Value Retriever is Device Indicator Service which allows retrieval of service status (ON or OFF).

  • For the Notification To Send parameter, select the Real Time Notification you want from the list.

The following example shows an XML payload template for reference only.


<?xml version="1.0" encoding="utf-8"?>
    <soapenv:Envelope xmlns:soapenv="http://schemas.xmlsoap.org/soap/envelope/"
xmlns:ser="http://localhost:8080/dataTest/services/">
    <soapenv:Header/>
    <soapenv:Body>
        <ser:NewServiceStartedRequest>
           <UserId>$userId</UserId>
           <Balance>$balance</Balance>
           <Quota>$quota</Quota>
           <Timestamp>$timeStamp</Timestamp>
       </ser:NewServiceStartedRequest>
    </soapenv:Body>
</soapenv:Envelope>

Configure the NotificationService parameters in a use case template that pertains to the XML example above.

Figure 14. NotificationService Parameter Configuration for XML Example
  • Adding substitute values into the message body.

    To substitute any value into your message, add the character '$' to the beginning of the variable name. For example, $userName.

    The XML Template example contains the $userId, $balance, $quota, and $timeStamp variables, which we will replace with values from the session and post to the Server URL defined in the Notifications Plugin.

  • The Server URL is the destination of the message, and this is not set as an attribute of the subscriber like the other notifications.

  • Notification To Send: Select the Real Time Notification you want from the list.

Message Parameters (using the example XML payload template):

  • userId: This value is pulled using the Session User Name Retriever. Use the select box from the Value Retriever field.

  • balance: This value is pulled using the Balance Code Retriever. Use the select box from the Value Retriever field.

  • quota: This value is pulled using the Balance Code Retriever. Use the select box from the Value Retriever field.

  • timestamp: This value is pulled using the Timestamp Retriever. Use the select box from the Value Retriever field.

For more information on service options, refer to Service Option Configuration.


Service Option Configuration

This section provides an example Service Options configuration which can be used for SMS, EMAIL, Apple Push, and GMC notifications. The bodies of the messages are identical to make the service options parameters simpler to follow.

Adding substitute values into the message body

To substitute any value into your message, add the character '$' to the beginning of the variable name. For example, Ex. $userName.

This set of substitute variables are used as an example for SMS, EMAIL, Apple Push, and GCM.

  • $timeStamp

  • $userId

  • $nickName

You assign the variables their value using the Notification Service Parameters.

There are four values provide for the example configuration:

  • Notification To Send: Select the Notification you want from the list.

  • Timestamp: This value is pulled using Timestamp Retriever. Use the select box from the Value Retriever field.

  • userId: This value is pulled using Session User Name Retriever. Use the select box from the Value Retriever field.

  • Nickname: We are filling this value using the Subscriber AVP Code action, pulling from the Custom Data attached to the subscriber. You can see these values in the Control Center.

    nickName example: Custom AVP in the Control Center

    Figure 15. nickName Configuration


Apple Push Notification Destination

By default, this notification will go the Destination set in the Notifications section under the subscriber details for the type of Notification being sent.

For example, an Apple Push message will go to Apple Push Destination, and SMS to SMS, and so on.

Figure 16. Notification Destinations


To override the destination set for the subscriber, you can use the Override Destination field in the Service Option.

NAP Notification

CPS is enhanced to support decoding of the URL sent from the LDAP/NAP server.

Create (Payload):


%3C%3Fxml+version%3D%221.0%22+encoding%3D%22UTF-
8%22+standalone%3D%22yes%22%3F%3E%3CCustomerTransactions%3E%3CCustomerTransaction%3E%3
CTransactionInfo%3E%3CRequestedAction%3Ecreate%3C%2FRequestedAction%3E%3CCustomerID%3E
200569444%3C%2FCustomerID%3E%3Cmsisdn%3E4047047821%3C%2Fmsisdn%3E%3CVersion%3E1.4%3C%2
FVersion%3E%3CTransactionID%3E5153654875871906187%3C%2FTransactionID%3E%3CVendorID%3E5
3%3C%2FVendorID%3E%3C%2FTransactionInfo%3E%3CAccountInfo%3E%3CCustomerID%3E200569444%3
C%2FCustomerID%3E%3Cmsisdn%3E4047047821%3C%2Fmsisdn%3E%3Cimsi%3E310260399339533%3C%2Fi
msi%3E%3Cban%3E932945358%3C%2Fban%3E%3CaccountType%3EI%3C%2FaccountType%3E%3CaccountSu
bType%3ER%3C%2FaccountSubType%3E%3CbillCyclePeriod%3E14%3C%2FbillCyclePeriod%3E%3CStat
usCode%3EA%3C%2FStatusCode%3E%3CCustomerType%3E1%3C%2FCustomerType%3E%3CPAHmsisdn%3E40
47047821%3C%2FPAHmsisdn%3E%3CLanguage%3Eeng%3C%2FLanguage%3E%3CPairingFlag%3E1%3C%2FPa
iringFlag%3E%3C%2FAccountInfo%3E%3CServiceInfo%3E%3CVendorID%3E53%3C%2FVendorID%3E%3CF
eatures%3E%3CFeature%3E%3CName%3EB52ROAM%3C%2FName%3E%3C%2FFeature%3E%3C%2FFeatures%3E
%3C%2FServiceInfo%3E%3C%2FCustomerTransaction%3E%3C%2FCustomerTransactions%3E

After URL Decoding:


<?xml+version="1.0"+encoding="UTF-
8"+standalone="yes"?><CustomerTransactions><CustomerTransaction><TransactionInfo><Requ
estedAction>create</RequestedAction><CustomerID>200569444</CustomerID><msisdn>40470478
21</msisdn><Version>1.4</Version><TransactionID>5153654875871906187</TransactionID><Ve
ndorID>53</VendorID></TransactionInfo><AccountInfo><CustomerID>200569444</CustomerID><
msisdn>4047047821</msisdn><imsi>310260399339533</imsi><ban>932945358</ban><accountType
>I</accountType><accountSubType>R</accountSubType><billCyclePeriod>14</billCyclePeriod
><StatusCode>A</StatusCode><CustomerType>1</CustomerType><PAHmsisdn>4047047821</PAHmsi
sdn><Language>eng</Language><PairingFlag>1</PairingFlag></AccountInfo><ServiceInfo><Ve
ndorID>53</VendorID><Features><Feature><Name>B52ROAM</Name></Feature></Features></Serv
iceInfo></CustomerTransaction></CustomerTransactions>

The schema for such NAP notifications is not defined in a XSD but is a free flowing XML as defined by NAP. CPS has adapted its parsing code to ensure the entire XML is received and processed although only IMSI, service level and prepaid flag are submitted to the policy engine as LDAP change event message from the servlet.