Cisco Secure Client ISE ポスチャモジュールと Cisco Secure Firewall Management Center を使用したエンドポイント コンプライアンスの評価
はじめに
Cisco Secure Client の ISE ポスチャモジュールは、ネットワークへの接続を許可する前に、エンドポイント コンプライアンスを評価するのに役立ちます。この評価は、特定のバージョンのウイルス対策、スパイウェア対策、ファイル、レジストリキーなどに対して行うことができます。ポスチャ評価の際、ネットワークに接続しているすべてのクライアントは、準拠の必須要件を満たしている必要があります。
ISE ポスチャモジュールは、クライアント側評価を実行します。クライアントは、ISE からポスチャ要件ポリシーを受信し、ポスチャデータ収集を実行し、結果をポリシーと比較し、評価結果を ISE に返します。ポスチャサービスでは、ポスチャは、不明、準拠、および非準拠の各ポスチャ状態に分類されます。
利点
Threat Defense を使用して ISE ポスチャモジュールを設定すると、次のような大きな利点があります。
-
各エンドポイントでの ISE ポスチャモジュールおよびプロファイルの配布および管理が容易になります。
-
エンドポイントを企業のネットワークに接続する前にエンドポイント コンプライアンスを評価することが容易になります。
対象読者
このユースケースは、主に Management Center を使用してエンドポイント コンプライアンス評価用の ISE ポスチャモジュールを設定するネットワーク管理者を対象としています。
システム要件
次の表に、この機能でサポートされるプラットフォームを示します。
|
製品 |
バージョン |
このドキュメントで使用されるバージョン |
|---|---|---|
|
Cisco Secure Firewall Threat Defense(旧称 Firepower Threat Defense/FTD) |
6.3 以降 |
7.3 |
|
Cisco Secure Firewall Management Center(旧称 Firepower Management Center/FMC) |
6.7 以降 |
7.3 |
|
Cisco Secure Client(旧称 AnyConnect) |
4.0 以降 |
5.0 |
|
Cisco ISE |
2.0 以降 |
3.1 |
Prerequisites
Ensure that you have:
-
Access to a Cisco ISE server with admin privileges.
-
Downloaded the Secure Client package and the Secure Client profile editor from Cisco Software Download Center to your local host.
-
Installed the Secure Client profile editor to your local host.
-
Downloaded the ISE Compliance Module from Cisco Software Download Center to your local host.
-
Configured ISE server details in the managed threat defense. See Configure ISE in the Management Center.
-
Configured a remote access VPN in the management center.
Licenses
-
ISE Premier license.
-
One of the following Secure Client licenses:
Secure Client Premier, Secure Client Advantage, or Secure Client VPN Only.
-
Management center Essentials (formerly Base) license must allow export-controlled functionality.
Choose to verify this functionality in the management center.
Management Center での ISE の設定
Management Center で ISE サーバーを次のように設定する必要があります。
-
リモートアクセス VPN の Threat Defense からの AAA 要求を許可します。
-
ISE からポスチャ要件ポリシーを受信します。
-
評価結果を ISE に送信します。
RADIUS サーバーオブジェクトを作成し、ISEサーバーの詳細情報を使用して設定する必要があります。
手順
|
ステップ 1 |
の順に選択します。 |
|
ステップ 2 |
[RADIUSサーバーグループの追加(Add RADIUS Server Group)] をクリックします。 |
|
ステップ 3 |
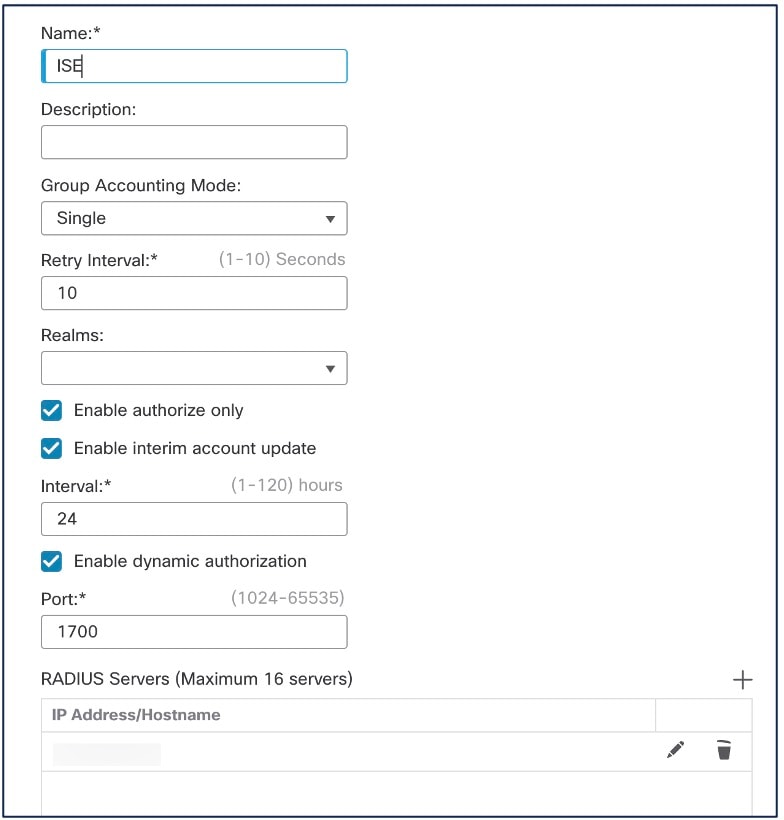
名前と再試行間隔を入力します。
|
|
ステップ 4 |
ポートを 1700 として設定します。 |
|
ステップ 5 |
[+] をクリックして ISE サーバーを追加します。 |
|
ステップ 6 |
ISE サーバーの IP アドレスを入力します。 |
|
ステップ 7 |
[認証ポート(Authentication Port)] は 1812 のままにします。 |
|
ステップ 8 |
キーを設定します。 管理対象デバイス(クライアント)と ISE サーバー間でデータを暗号化するための共有秘密を入力します。 |
|
ステップ 9 |
[キーの確認(Confirm Key)] フィールドでもう一度キーを入力します。 このキーは、ISE で Threat Defense を追加するときに必要です。 |
|
ステップ 10 |
残りのパラメータにはデフォルト値を使用します。 |
|
ステップ 11 |
[保存(Save)] をクリックします。 |
Management Center を使用して ISE ポスチャモジュールを設定するためのエンドツーエンドのプロセス
次のフローチャートは、Management Center を使用して Secure Client ISE ポスチャモジュールを設定するワークフローを示しています。
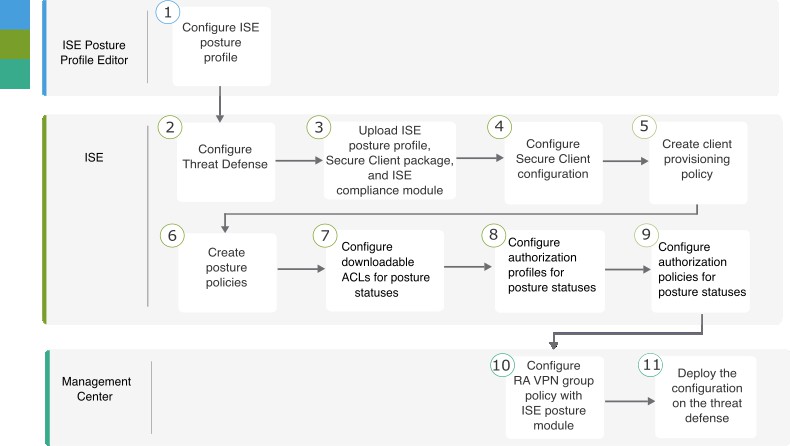
|
ステップ |
アプリケーション |
説明 |
|---|---|---|
|
|
ISE ポスチャ プロファイル エディタ |
Configure the Posture Profile using the ISE Posture Profile Editor |
|
|
ISE |
|
|
|
ISE |
Upload ISE Posture Profile, Secure Client Package, and ISE Compliance Module to ISE |
|
|
ISE |
|
|
|
ISE |
|
|
|
ISE |
|
|
|
ISE |
|
|
|
ISE |
|
|
|
ISE |
|
|
|
Management Center |
Management Center での ISE ポスチャモジュールを使用したリモートアクセス VPN グループポリシーの設定 |
|
|
Management Center |
Management Center メニューバーで、[展開(Deploy)] をクリックしてから、[展開(Deployment)] を選択します。 |
Configure the Posture Profile using the ISE Posture Profile Editor
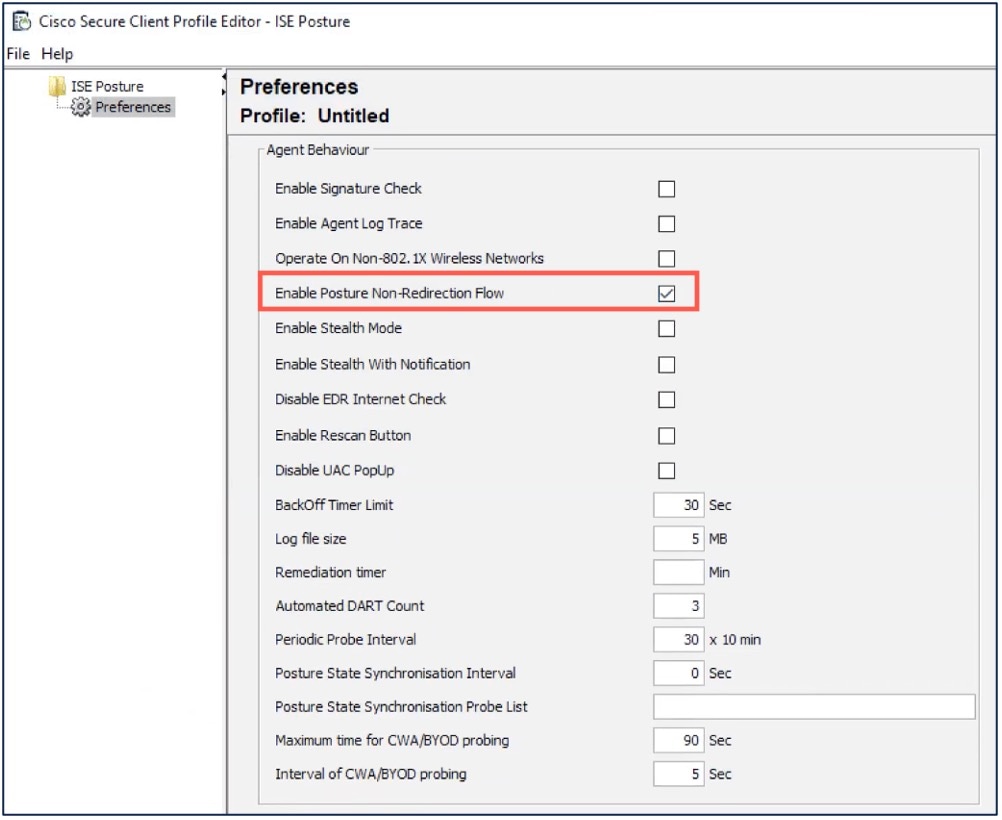
The standalone Secure Client profile editor package contains the ISE posture profile editor. Use this editor to create the ISE posture profile and then upload it to ISE and the management center.
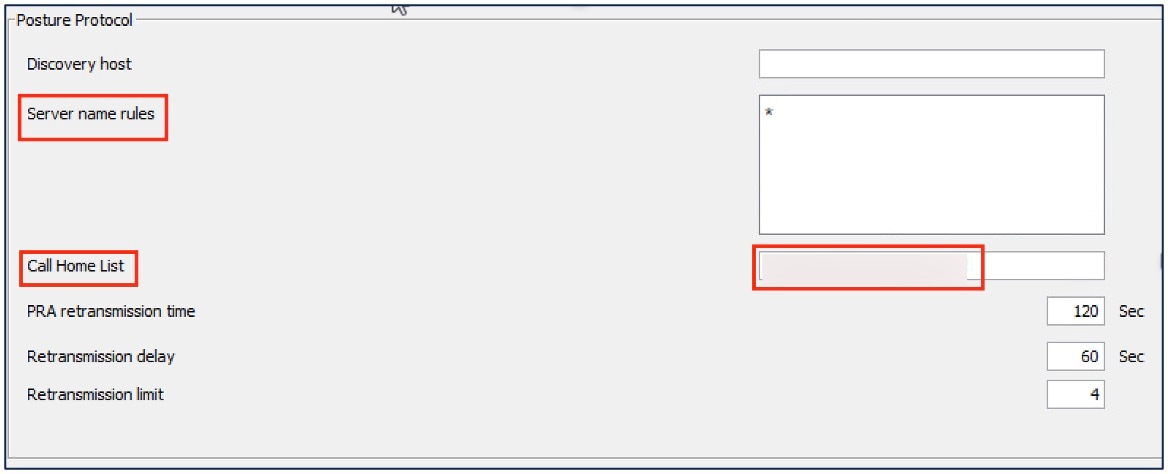
Configure the following parameters:
-
Check the Enable posture non-redirection flow check box.
-
Enter the Server name rules as *.
-
Configure Call Homes List with the FQDN or the IP address of the ISE.
ISE でのThreat Defense の設定
手順
|
ステップ 1 |
ISE にログインします。 |
|
ステップ 2 |
の順に選択します。 |
|
ステップ 3 |
[追加(Add)] をクリックします。 |
|
ステップ 4 |
Threat Defense の名前、説明、および IPアドレスを入力します。 |
|
ステップ 5 |
[デバイスプロファイル(Device Profile)] ドロップダウン リストから [Cisco] を選択します。 |
|
ステップ 6 |
[RADIUS認証設定(RADIUS Authentication Settings)] を展開します。 |
|
ステップ 7 |
[共有秘密(Shared Secret)] と [CoA ポート(CoA Port)] を設定します。 Threat Defense で ISE を設定する場合は、この秘密とポートが必要です。詳細については、「Management Center での ISE の設定」を参照してください。 |
|
ステップ 8 |
[保存(Save)] をクリックします。 |
Upload ISE Posture Profile, Secure Client Package, and ISE Compliance Module to ISE
手順
|
ステップ 1 |
Choose . |
|
ステップ 2 |
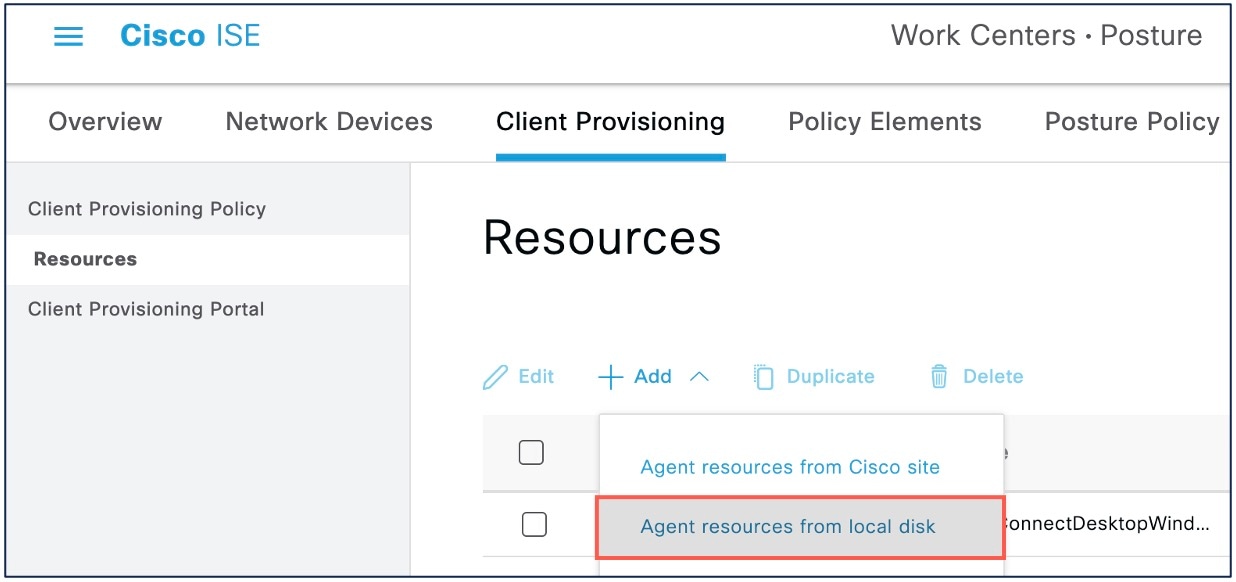
Click Add and choose Agent resources from local disk.
|
|
ステップ 3 |
Choose Cisco Provided Packages from the Category drop-down list. |
|
ステップ 4 |
Click Choose File and select one of the following from the local host:
|
|
ステップ 5 |
Click Submit. |
|
ステップ 6 |
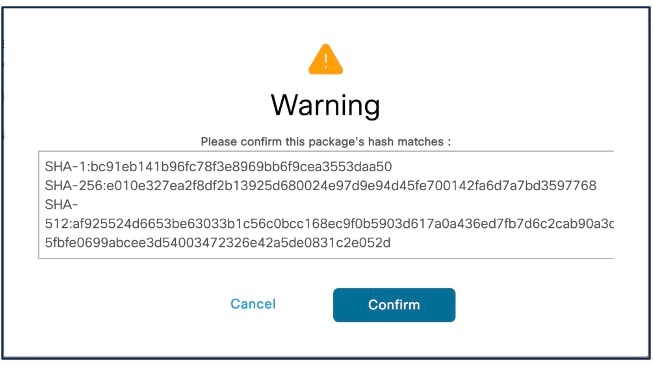
Click Confirm to validate the checksum.
|
|
ステップ 7 |
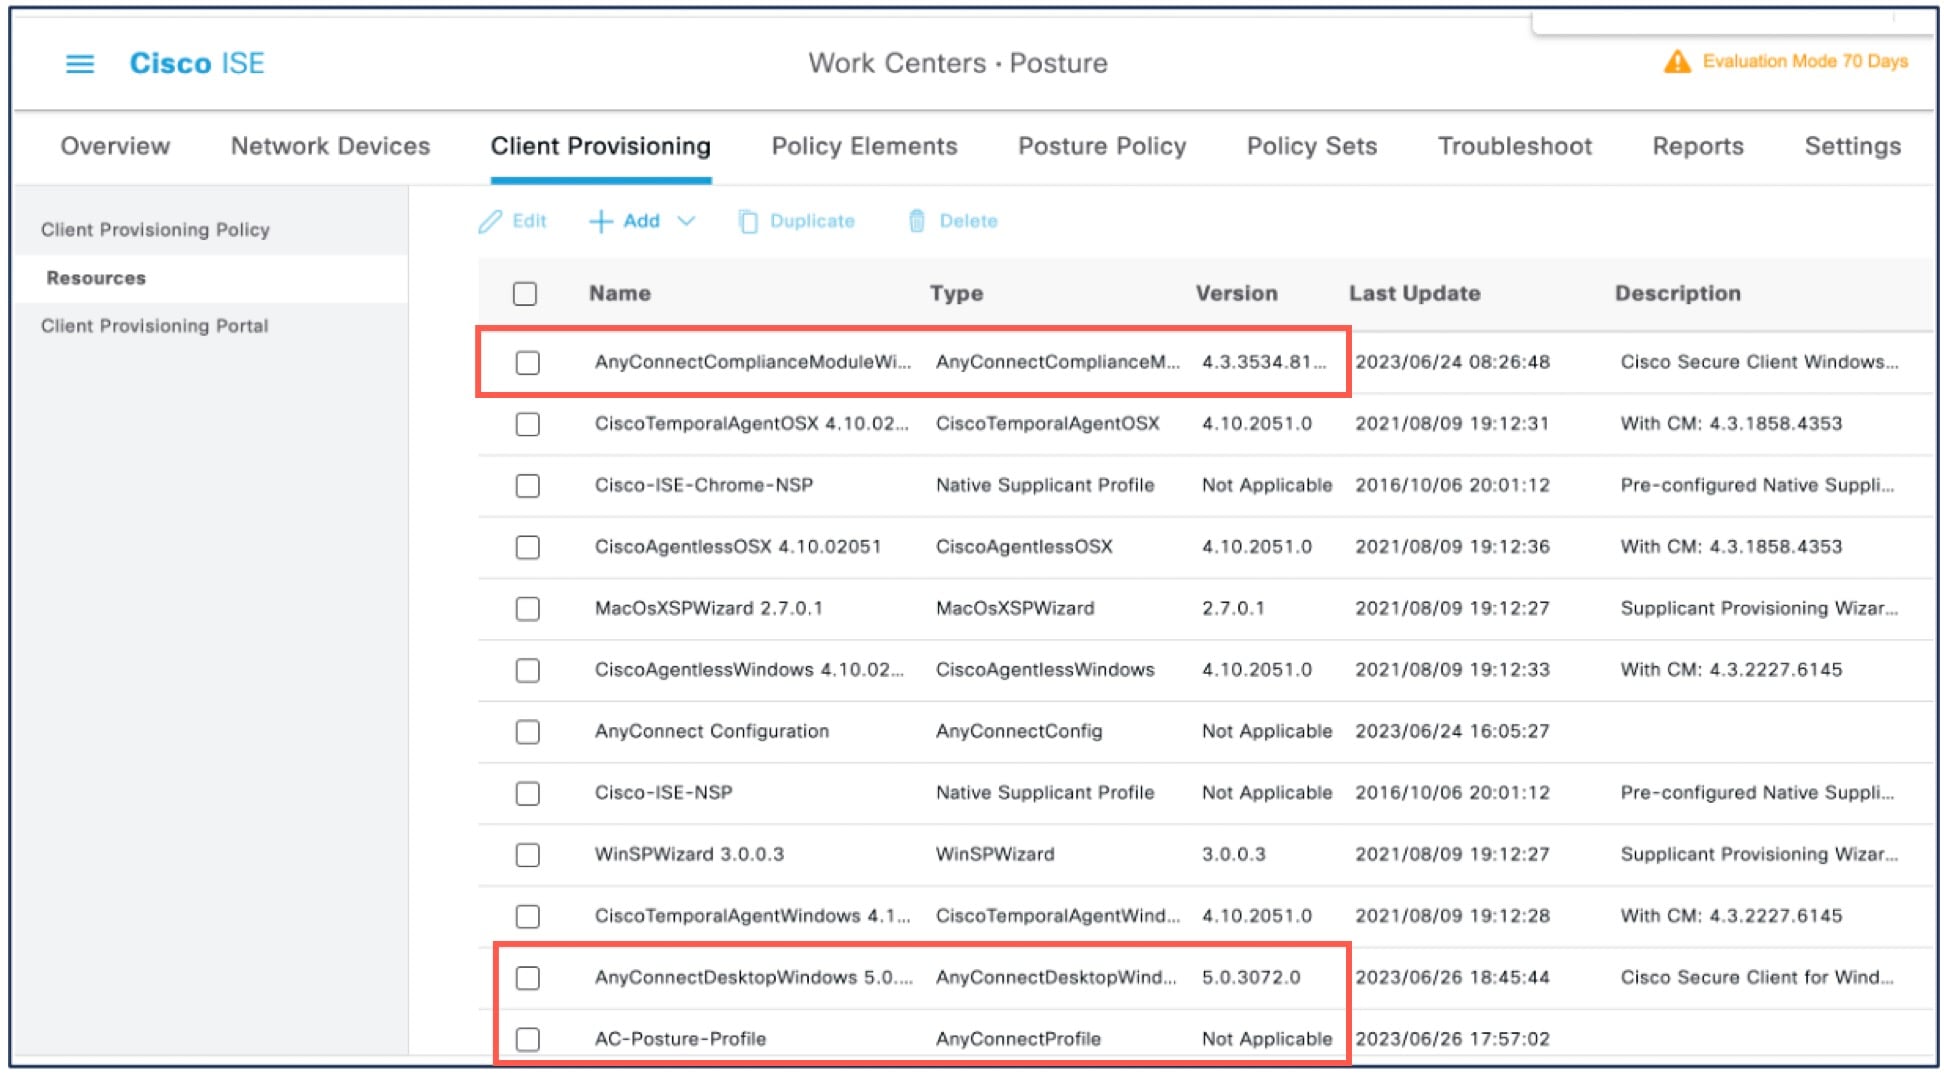
Repeat steps 2 to 6 to upload the remaining two files.
|
ISE での Secure Client Configuration の設定
Secure Client Configuration(ISE のAnyConnect Configuration)は、Secure Client ソフトウェアとその各種構成ファイルであり、クライアント用の Secure Client バイナリパッケージ、ISE コンプライアンスモジュール、ISE モジュールプロファイル、カスタマイズ、および AnyConnect の言語パッケージなどが含まれます。
手順
|
ステップ 1 |
の順に選択します。 |
|
ステップ 2 |
[追加(Add)] をクリックして、[AnyConnect Configuration] を作成します。 |
|
ステップ 3 |
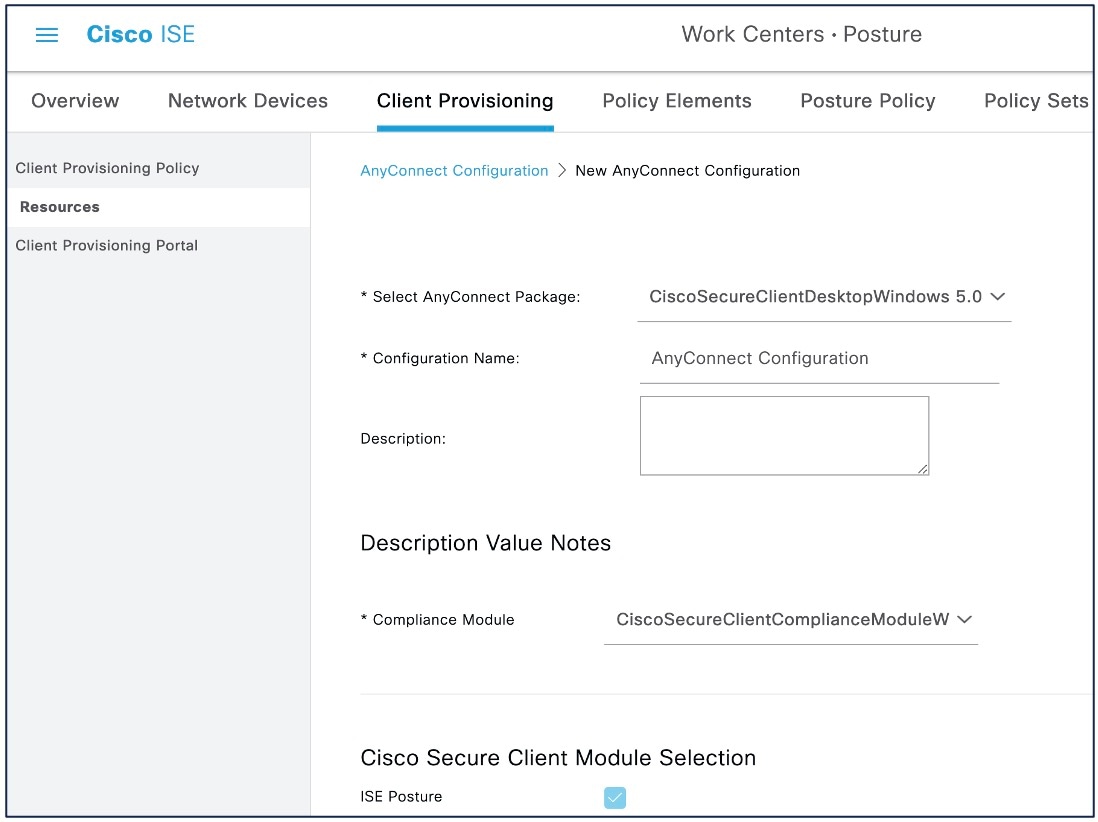
[AnyConnectパッケージの選択(Select AnyConnect Package)] ドロップダウンリストから Secure Client パッケージを選択します。 |
|
ステップ 4 |
[コンプライアンスモジュール(Compliance Module)] ドロップダウンリストから ISE コンプライアンスモジュールを選択します。
|
|
ステップ 5 |
[Cisco Secure Clientモジュールの選択(Cisco Secure Client Module Selection)] では、デフォルトで ISE ポスチャが有効になっています。 |
|
ステップ 6 |
[プロファイルの選択(Profile Selection)] で、[ISEポスチャ(ISE Posture)] ドロップダウンリストから ISE ポスチャファイルを選択します。 |
|
ステップ 7 |
[送信(Submit)] をクリックします。 |
Create a Client Provisioning Policy in ISE
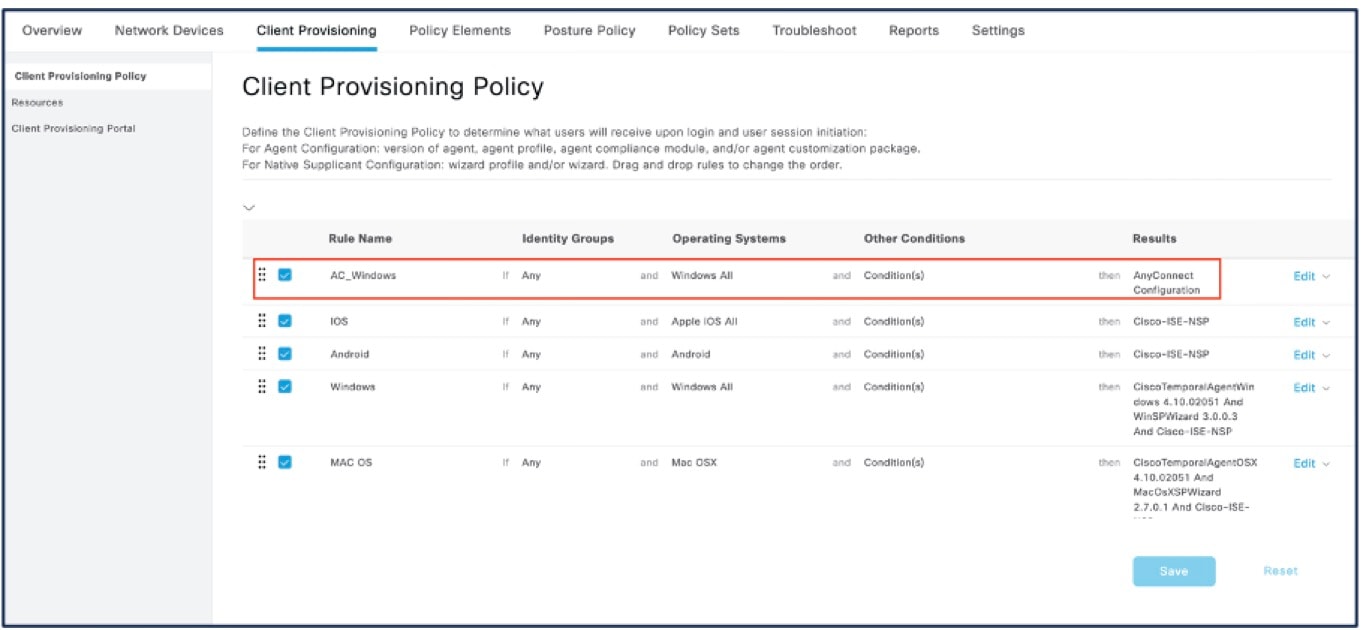
A user receives specific versions of resources such as agents, agent compliance modules, or agent customization profiles from ISE based on the client provisioning policy.
手順
|
ステップ 1 |
Choose . |
|
ステップ 2 |
Click Edit, and choose Insert new policy above. |
|
ステップ 3 |
Enter the policy name, and choose an operating system. |
|
ステップ 4 |
Click + under Results, and choose the AnyConnect Configuration from the Agent drop-down list.
|
|
ステップ 5 |
Click Save. |
Configure Posture Policy in ISE
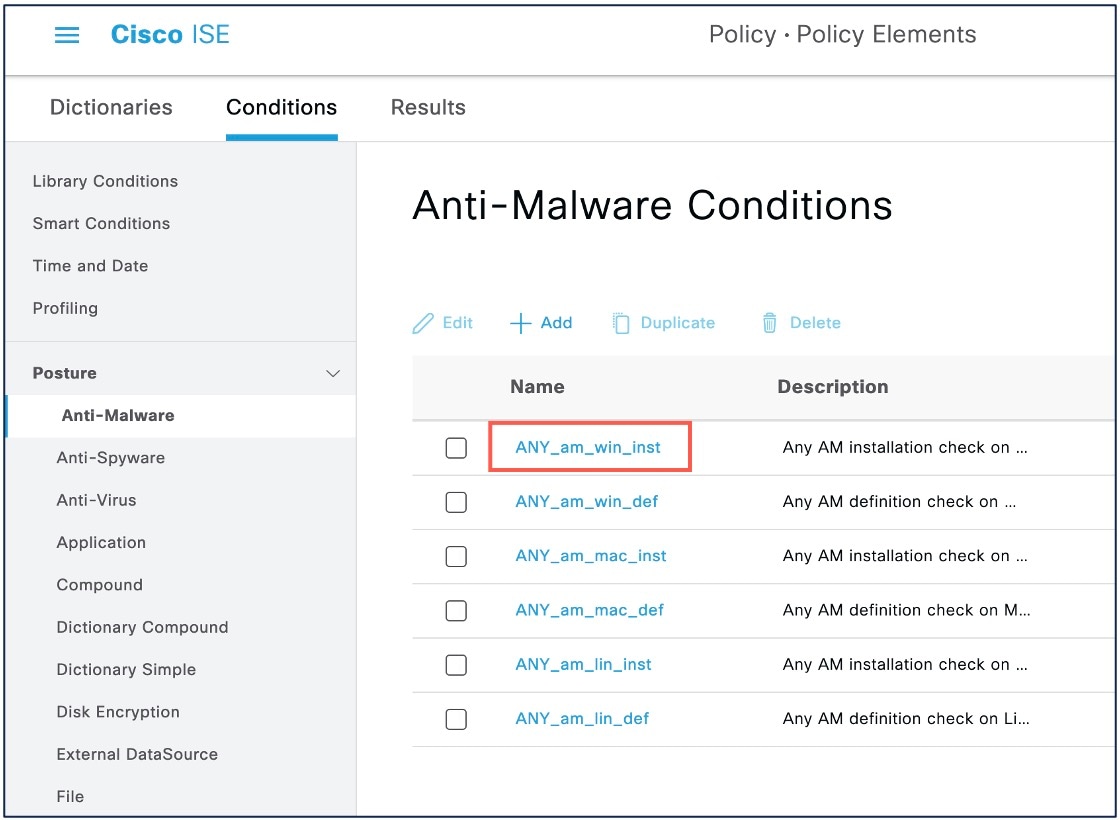
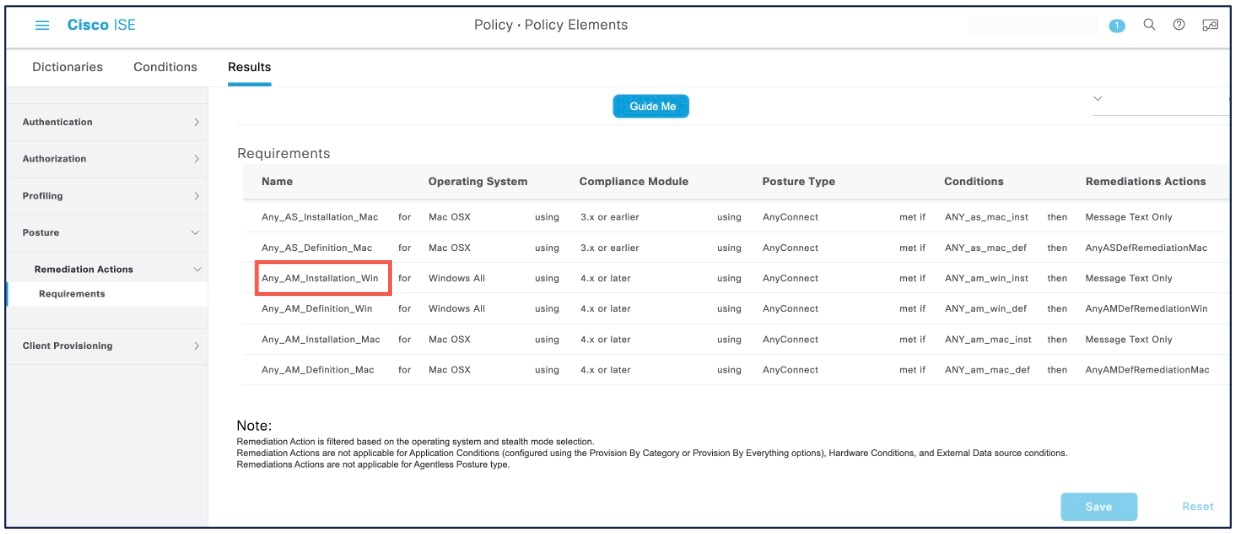
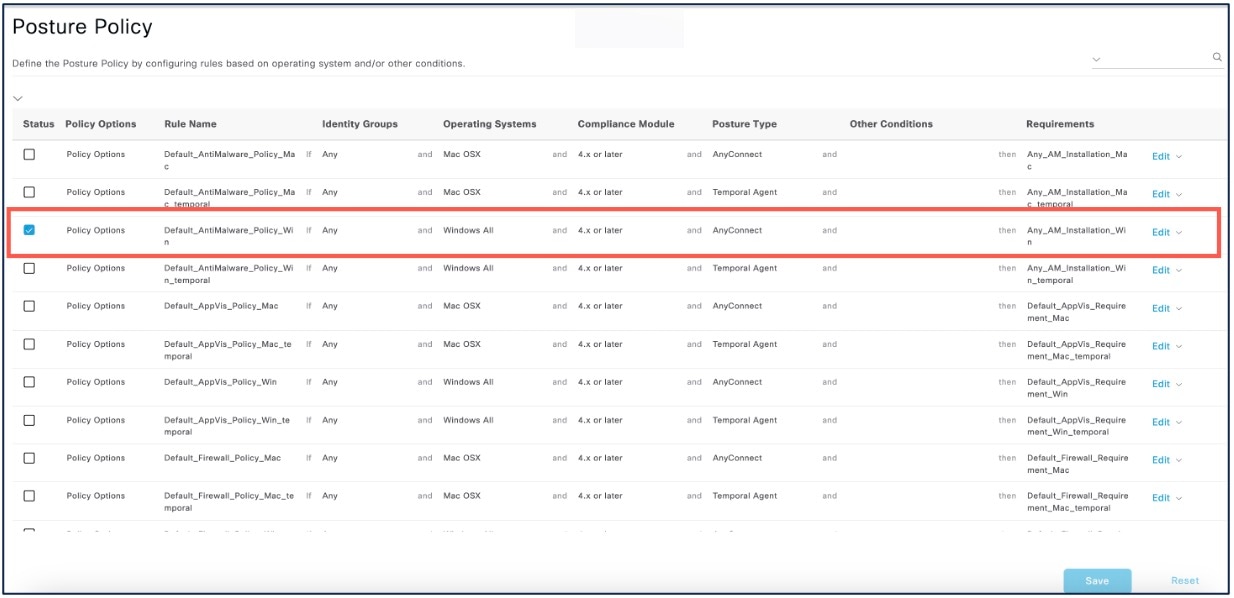
The posture policies, posture requirements, and the posture conditions determine the compliance status of the endpoint.
手順
|
ステップ 1 |
Configure posture conditions.
|
|
ステップ 2 |
Configure posture requirements. Choose . A posture requirement is a set of posture conditions associated with a remediation action. You can choose one of the multiple default or predefined posture requirements, or create a new one. For Windows, you can select the ‘Any_AM_Installation_Win’ anti-malware posture requirement.
|
|
ステップ 3 |
Configure posture policy.
|
ISE でのポスチャステータスに関するダウンロード可能な ACL の設定
不明、非準拠、および準拠ポスチャステータスのダウンロード可能な ACL(dACL)を設定する必要があります。デフォルトの許可 dACL も使用できます。
手順
|
ステップ 1 |
を選択します。 |
||||||||||||
|
ステップ 2 |
[追加(Add)] をクリックします。 |
||||||||||||
|
ステップ 3 |
名前と説明を入力します。 |
||||||||||||
|
ステップ 4 |
必要な IP バージョンのオプションボタンをクリックします。 |
||||||||||||
|
ステップ 5 |
dACL の値を入力します。
|
||||||||||||
|
ステップ 6 |
[送信(Submit)] をクリックします。 |
||||||||||||
|
ステップ 7 |
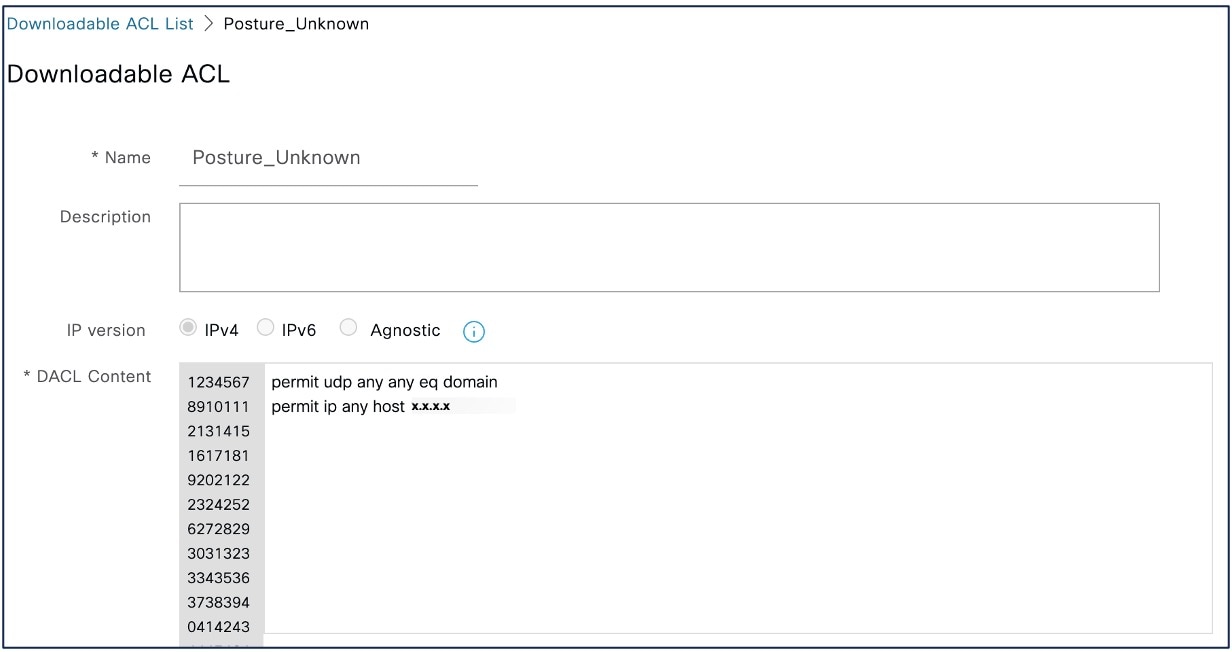
ステップ 2 ~ 6 を繰り返して、残りのポスチャステータスの dACL を作成します。 不明、非準拠、および準拠ポスチャステータスの dACL の例:
|
次のタスク
これらの dACL を使用して認証プロファイルを設定します。詳細については、「ISE でのポスチャステータスに関する認証プロファイルの設定」を参照してください。
ISE でのポスチャステータスに関する認証プロファイルの設定
不明、非準拠、および準拠のポスチャステータスに対応する 3 つの認証プロファイルを作成する必要があります。
手順
|
ステップ 1 |
を選択します。 |
|
ステップ 2 |
各ポスチャステータスの認証プロファイルを作成します。 |
|
ステップ 3 |
[追加(Add)] をクリックします。 |
|
ステップ 4 |
名前を入力します。 |
|
ステップ 5 |
[アクセスタイプ(Access Type)] ドロップダウンリストから、[ACCESS_ACCEPT] を選択します。 |
|
ステップ 6 |
[ネットワークデバイスプロファイル(Network Device Profile)] ドロップダウンリストから、[Cisco] を選択します。 |
|
ステップ 7 |
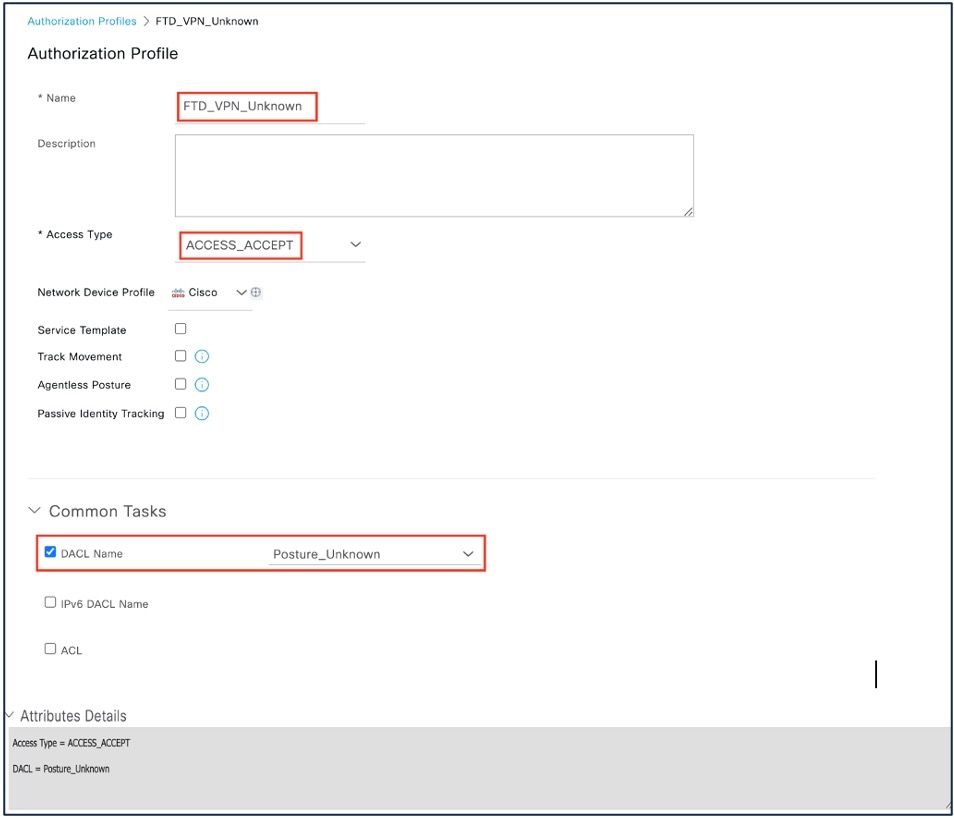
[共通タスク(Common Tasks)] で、[dACL名(dACL Name)] チェックボックスをオンにし、ドロップダウンリストからポスチャ状態の dACL を選択します。 設定された属性は、[属性の詳細(Attributes Details)] で確認できます。 次の例は、不明ステータスの認証プロファイルを示しています。
|
|
ステップ 8 |
[送信(Submit)] をクリックします。 |
|
ステップ 9 |
ステップ 3 ~ 8 を繰り返して、残りのポスチャステータスの認証プロファイルを作成します。 |
次のタスク
これらの認証プロファイルを使用して認証ポリシーを設定します。詳細については、『ISE でのポスチャステータスに関する認証ポリシーの設定』を参照してください。
ISE でのポスチャステータスに関する認証ポリシーの設定
ポスチャステータスごとに認証ポリシーを作成する必要があります。
手順
|
ステップ 1 |
を選択します。 |
|
ステップ 2 |
[ビュー(View)] 列で、デフォルトポリシーに隣接する矢印アイコンをクリックします。
|
|
ステップ 3 |
[認証ポリシー(Authorization Policy)] を展開します。 |
|
ステップ 4 |
[ステータス(Status)] 列に隣接する [+] をクリックします。 |
|
ステップ 5 |
[ポスチャステータス(Posture Status)] と [アイデンティティグループ(Identity Group)] をポリシーの条件として使用します。 |
|
ステップ 6 |
ポスチャステータスのドロップダウンリストから適切な認証プロファイルを選択します。 |
|
ステップ 7 |
[保存(Save)] をクリックします。 |
|
ステップ 8 |
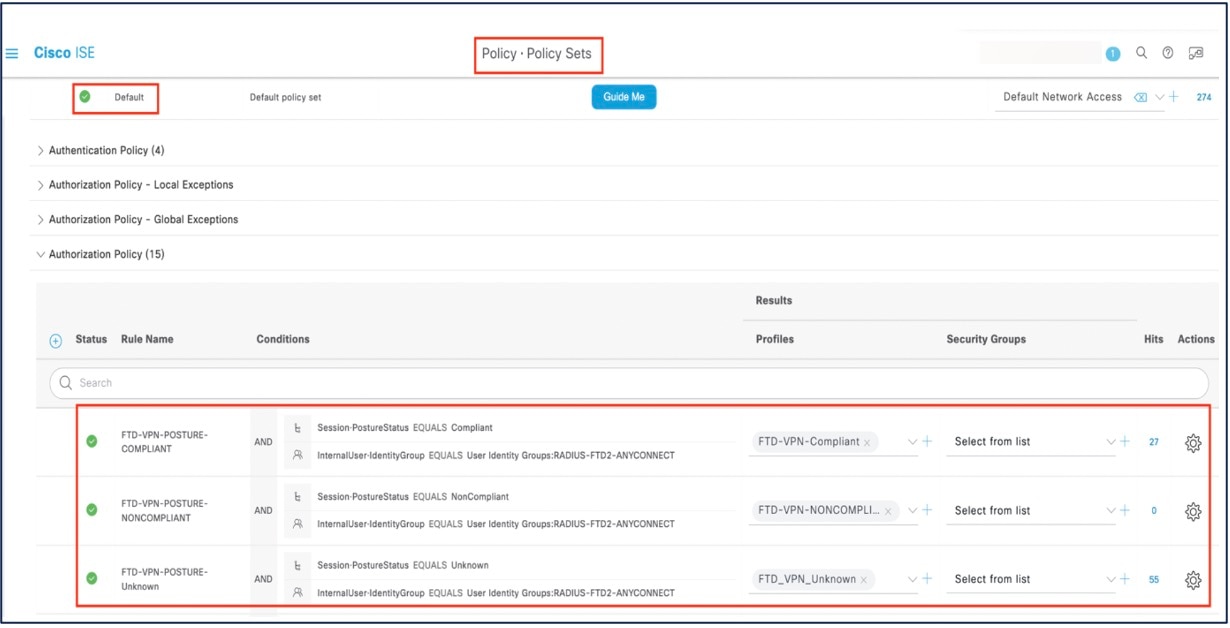
残りの認証ポリシーに関して、ステップ 4 ~ 7 を繰り返します。 次の画像は、ポスチャステータスの認証ポリシーを示しています。
|
Management Center での ISE ポスチャモジュールを使用したリモートアクセス VPN グループポリシーの設定
始める前に
Management Center でリモートアクセス VPN ポリシーを設定します。
手順
|
ステップ 1 |
Management Center の Web インターフェイスにログインします。 |
|
ステップ 2 |
を選択します。 |
|
ステップ 3 |
リモートアクセス VPN ポリシーを選択し、[編集(Edit)] をクリックします。 |
|
ステップ 4 |
接続プロファイルを選択し、[編集(Edit)] をクリックします。 |
|
ステップ 5 |
[グループポリシーの編集(Edit Group Policy)] をクリックします。 |
|
ステップ 6 |
[Secure Client] タブをクリックします。 |
|
ステップ 7 |
[クライアントモジュール(Client Module)] をクリックし、[+] をクリックします。 |
|
ステップ 8 |
[クライアントモジュール(Client Module)] ドロップダウンリストから ISE ポスチャモジュールを選択します。 |
|
ステップ 9 |
[ダウンロードするプロファイル(Profile to download)] ドロップダウンリストから ISE プロファイルを選択します。 |
|
ステップ 10 |
[モジュールダウンロードの有効化(Enable Module Download)] チェックボックスをオンにします。 |
|
ステップ 11 |
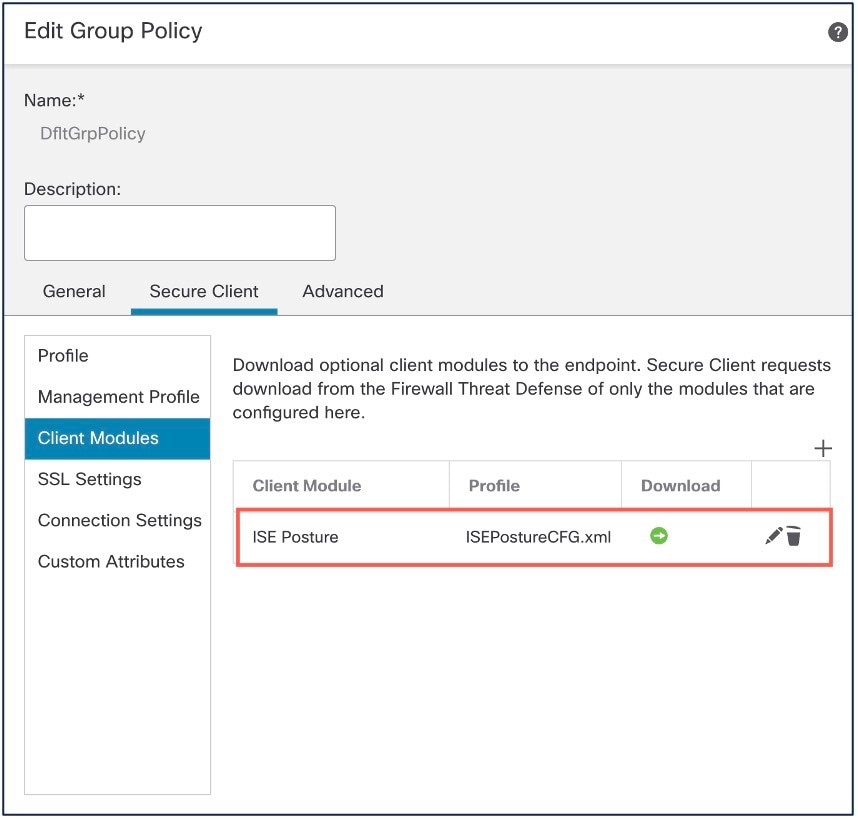
[追加(Add)] をクリックします。
|
|
ステップ 12 |
[保存(Save)] をクリックします。 |
次のタスク
-
設定を Threat Defense に展開します。Management Center メニューバーで、[展開(Deploy)] をクリックしてから、[展開(Deployment)] を選択します。
-
Secure Client を使用して、Threat Defense への VPN 接続を確立します。
-
ISE ポスチャモジュールの設定を確認します。
ISE ポスチャモジュールの設定の確認
Threat Defense で
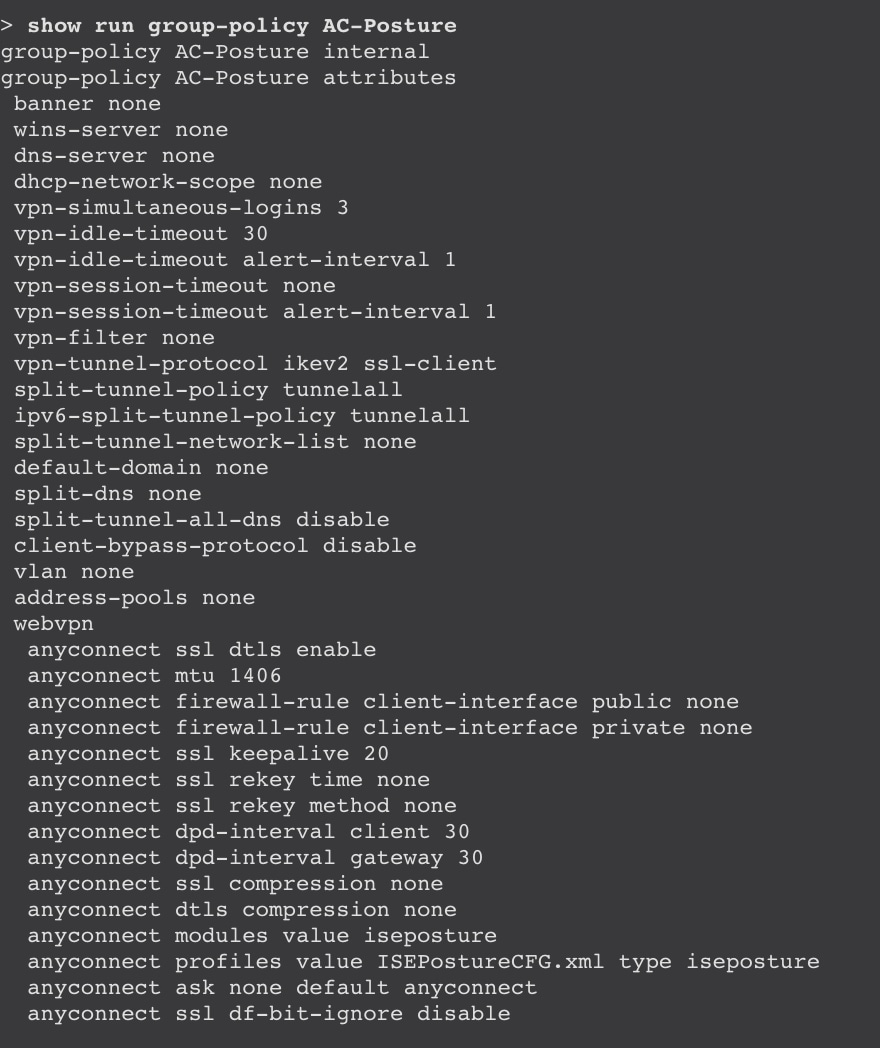
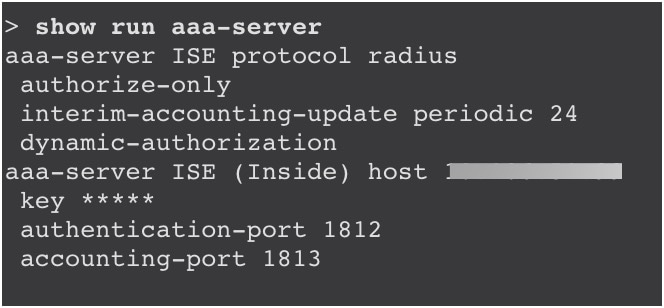
Threat Defense CLI で次のコマンドを使用して、ISE ポスチャモジュール設定を確認します。
show run webvpn:Secure Client 設定の詳細を表示します。
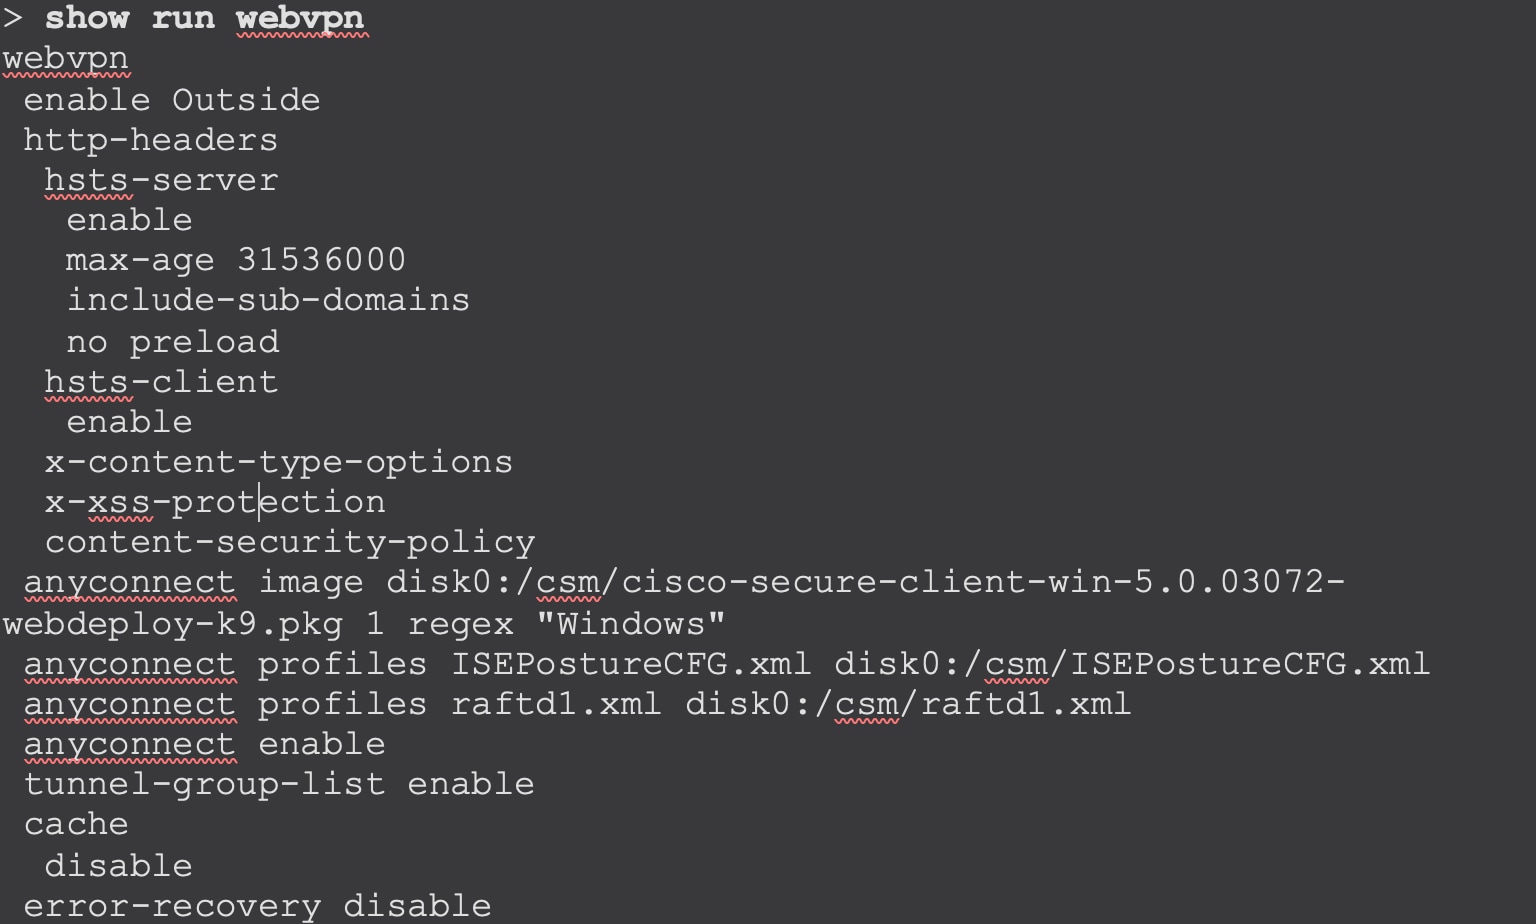
show run group-policy <ravpn_group_policy_name>:Secure Client の RA VPN グループポリシーの詳細を表示します。
show run aaa-server:ISE サーバーの詳細を表示します。
エンドポイントで
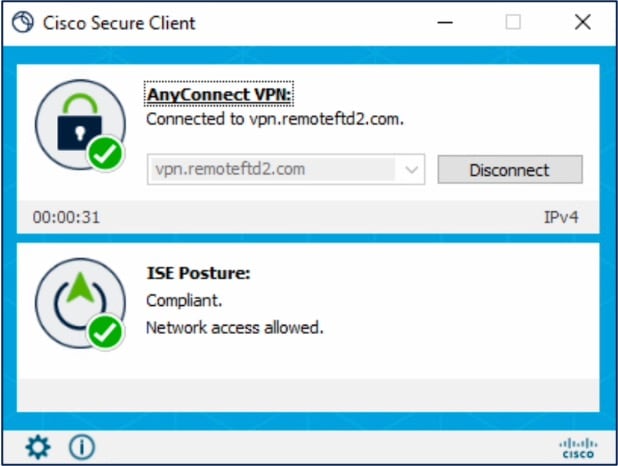
Secure Client を使用して Threat Defense への VPN 接続を確立し、ISE ポスチャモジュールのインストールを確認します。

 フィードバック