简介
本文档演示使用Python编程在服务提供商边缘(PE)路由器上使用REST API调配MPLS L3VPN。本示例使用Cisco CSR1000v(IOS-XE)路由器作为PE路由器。
作者:阿努拉达·佩雷拉
编辑者:Kumar Sridhar
先决条件
- 对CSR1000v路由器的REST API管理访问(请参阅本文档末尾的参考资料)。
- Python(版本2.x或3.x)和“请求” Python库安装在用于配置路由器的计算机上。
- Python编程的一些基础知识。
配置
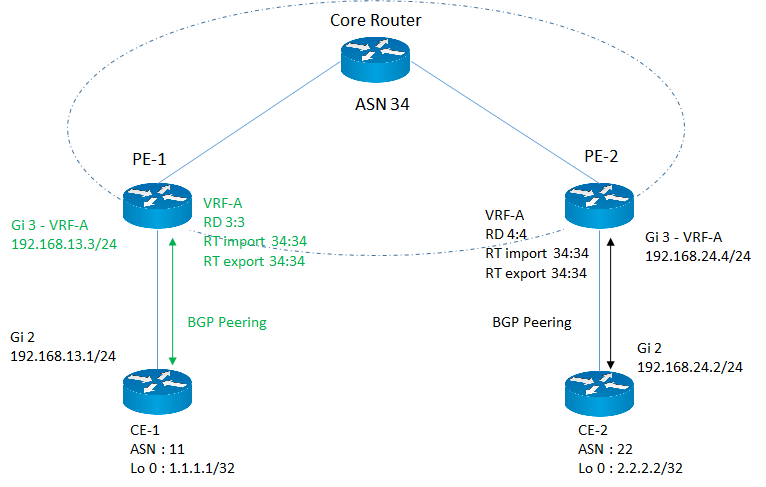
网络图

在本示例中,重点介绍如何在PE-1路由器上配置所需的MPLS L3VPN服务参数,这些参数以粉红色突出显示。
配置过程
配置任务被划分为多个子任务,每个子任务在用户定义的功能下实施。这样,在需要时可以重复使用功能。
所有函数都使用“请求”库来访问路由器上的REST API,数据格式为JSON。 在HTTP请求中,“verify”参数设置为“False”以忽略验证SSL证书。
1.检索令牌ID
在路由器上执行任何配置之前,您需要从路由器获取有效的令牌ID。此功能发起HTTP请求以验证和获取令牌ID,以便它可使用此令牌调用其他API。此请求的响应包括令牌ID。
#-----------------------------------
def getToken(ip、端口、用户名、密码):
导入请求
import base64
url = "https://" + ip + ":"+ port + "/api/v1/auth/token-services"
信头= {
'content-type': "application/json",
'authorization': "基本" + base64.b64encode((用户名+ ":" + password)。encode('UTF-8'))。decode('ascii'),
'cache-control': "no-cache"
}
response = requests.request("POST", url, headers=headers, verify=False)
如果response.status_code == 200:
return response.json()['token-id']
其他:
返回 "失败"
#-----------------------------------
2.创建VRF
此功能将在PE路由器上创建具有所需路由标识符(RD)和导入/导出路由目标(RT)的VRF
#-----------------------------------
def createVRF(ip、port、tokenID、vrfName、RD、importRT、exportRT):
导入请求
url = "https://" + ip + ":"+端口+"/api/v1/vrf"
信头= {
'content-type':"application/json",
'X-auth-token':tokenID,
'cache-control': "no-cache"
}
数据= {
'name':vrfName、
'rd':RD,
'route-target': [
{
'操作': "导入",
'社区':importRT
},
{
'操作': "导出",
'社区':exportRT
}
]
}
response = requests.request("POST", url, headers=headers, json=data, verify=False)
如果response.status_code == 201:
返回 "成功"
其他:
返回 "失败"
#-----------------------------------
3. 将接口移入VRF
此功能会将给定接口移动到VRF中。
#-----------------------------------
def addInterfacetoVRF(ip、端口、令牌ID、vrfName、接口名称、RD、importRT、exportRT):
导入请求
url = "https://" + ip + ":"+ port + "/api/v1/vrf/" + vrfName
信头= {
'content-type':“application/json”,
'X-auth-token': tokenID,
'cache-control': "no-cache"
}
数据= {
'rd':RD,
'forwarding': [ interfaceName ],
'route-target': [
{
'操作':"导入",
'社区':importRT
},
{
'操作':"导出",
'社区':exportRT
}
]
}
response = requests.request("PUT", url, headers=headers, json=data, verify=False)
如果response.status_code == 204:
返回 "成功"
其他:
返回 "失败"
#-----------------------------------
4.为接口分配IP地址
此功能将为接口分配ip地址。
#-----------------------------------
def assignInterfaceIP(ip、port、tokenID、interfaceName、interfaceIP、interfaceSubnet):
导入请求
url = "https://" + ip + ":"+ port + "/api/v1/interfaces/" + interfaceName
信头= {
'content-type':“application/json”,
'X-auth-token':tokenID,
'cache-control': "no-cache"
}
数据= {
'类型':"以太网",
'if-name':接口名称,
'ip-address':interfaceIP,
'subnet-mask':接口子网
}
response = requests.request("PUT", url, headers=headers, json=data, verify=False)
如果response.status_code == 204:
返回“成功”
其他:
返回“失败”
#-----------------------------------
5.创建VRF感知bgp
这将启用VRF地址系列ipv4。
#-----------------------------------
def createVrfBGP(ip、port、tokenID、vrfName、ASN):
导入请求
url = "https://" + ip + ":"+端口+ "/api/v1/vrf/" + vrfName + "/routing-svc/bgp"
信头= {
'content-type':"application/json",
'X-auth-token':tokenID,
'cache-control': "no-cache"
}
数据= {
'routing-protocol-id':ASN
}
response = requests.request("POST", url, headers=headers, json=data, verify=False)
如果response.status_code == 201:
返回 "成功"
其他:
返回 "失败"
#-----------------------------------
6.在VRF地址系列下定义BGP邻居
此功能将在VRF地址系列IPV4下定义BGP邻居。
#-----------------------------------
def defineVrfBGPNeighbor(ip、port、tokenID、vrfName、ASN、neighborIP、remoteAS):
导入请求
url = "https://" + ip + ":"+端口+ "/api/v1/vrf/" + vrfName +"/routing-svc/bgp/" + ASN +"/neighbors"
信头= {
'content-type':“application/json”,
'X-auth-token':tokenID,
'cache-control': "no-cache"
}
数据= {
'routing-protocol-id':ASN,
'address':neighborIP,
'remote-as': remoteAS
}
response = requests.request("POST", url, headers=headers, json=data, verify=False)
如果response.status_code == 201:
返回 "成功"
其他:
返回 "失败"
#-----------------------------------
输入参数的说明和值
ip = "10.0.0.1" # ip address of the router(路由器的ip地址)
端口 = “55443” 路由器上的REST API端口数量
用户名= " 思科" #要登录的用户名。这应该配置为权限级别15。
密码= " 思科" #与用户名关联的密码
tokenID = <返回值> #使用getToken函数从路由器获取的令牌ID
vrfName = "VRF-A" #VRF的名称
RD = "3:3"# VRF的路由标识符
importRT = "34:34" #导入路由目标
exportRT = "34:34" #导出路由目标
interfaceName = "GigabitEthernet3" #面向客户边缘(CE)的接口的名称
interfaceIP = "192.168.13.3" # CE面向接口的IP地址
interfaceSubnet = "255.255.255.0" #面向CE的接口的子网
ASN = "34" # BGP AS number of PE router
neighborIP = "192.168.13.1" # CE路由器的BGP对等IP
remoteAS = "11" # AS的CE路由器数量
在上述所有功能中,为每个配置步骤调用了专用API。以下示例演示如何在REST API调用的主体中通常传递IOS-XE CLI。如果特定API不可用,可以将此方法用作自动执行的一种解决方法。在上述函数中,“content-type”设置为“application/json”,但在以下示例中,“content-type”设置为“text/plain”,因为它正在解析标准CLI输入。
此示例定义接口GigabitEthernet3的接口描述。 可通过更改“cliInput”参数自定义配置。
#-----------------------------------
def passCLInput(ip、port、tokenID):
导入请求
url = "https://" + ip + ":"+ port + "/api/v1/global/running-config"
信头= {
'content-type':"text/plain",
'X-auth-token':tokenID,
'cache-control': "no-cache"
}
line1 = "Interface GigabitEthernet 3"
line2 = "description Customer Facing Interface"
cliInput = line1 + "\r\n" + line2
response = requests.request("PUT", url, headers=headers, data=cliInput, verify=False)
print(response.text)
如果response.status_code == 204:
返回 "成功"
其他:
返回 "失败"
#-----------------------------------
参考
- Cisco CSR 1000v系列云服务路由器软件配置指南
https://www.cisco.com/c/en/us/td/docs/routers/csr1000/software/configuration/b_CSR1000v_Configuration_Guide /b_CSR1000v_Configuration_Guide_chapter_01101.html
- Cisco IOS XE REST API管理参考指南
https://www.cisco.com/c/en/us/td/docs/routers/csr1000/software/restapi/restapi.html
使用的首字母缩略词:
MPLS — 多协议标签交换
L3 — 第3层
VPN — 虚拟专用网络
VRF — 虚拟路由转发
BGP — 边界网关协议
REST — 具象状态传输
API — 应用程序接口
JSON - Java脚本对象表示法
HTTP — 超文本传输协议