使用ISE 3.3配置Linux VPN终端安全评估
下载选项
非歧视性语言
此产品的文档集力求使用非歧视性语言。在本文档集中,非歧视性语言是指不隐含针对年龄、残障、性别、种族身份、族群身份、性取向、社会经济地位和交叉性的歧视的语言。由于产品软件的用户界面中使用的硬编码语言、基于 RFP 文档使用的语言或引用的第三方产品使用的语言,文档中可能无法确保完全使用非歧视性语言。 深入了解思科如何使用包容性语言。
关于此翻译
思科采用人工翻译与机器翻译相结合的方式将此文档翻译成不同语言,希望全球的用户都能通过各自的语言得到支持性的内容。 请注意:即使是最好的机器翻译,其准确度也不及专业翻译人员的水平。 Cisco Systems, Inc. 对于翻译的准确性不承担任何责任,并建议您总是参考英文原始文档(已提供链接)。
简介
本文档介绍如何使用身份服务引擎(ISE)和Firepower威胁防御(FTD)配置Linux VPN状态。
先决条件
要求
Cisco 建议您了解以下主题:
- 思科安全客户端
- 基于Firepower威胁防御(FTD)的远程访问VPN
- 身份服务引擎 (ISE)
使用的组件
本文档中的信息基于以下软件版本:
- Ubuntu 22.04
- 思科安全客户端5.1.3.62
- 思科Firepower威胁防御(FTD) 7.4.1
- 思科Firepower管理中心(FMC) 7.4.1
- 思科身份服务引擎(ISE) 3.3
本文档中的信息都是基于特定实验室环境中的设备编写的。本文档中使用的所有设备最初均采用原始(默认)配置。如果您的网络处于活动状态,请确保您了解所有命令的潜在影响。
配置
网络图
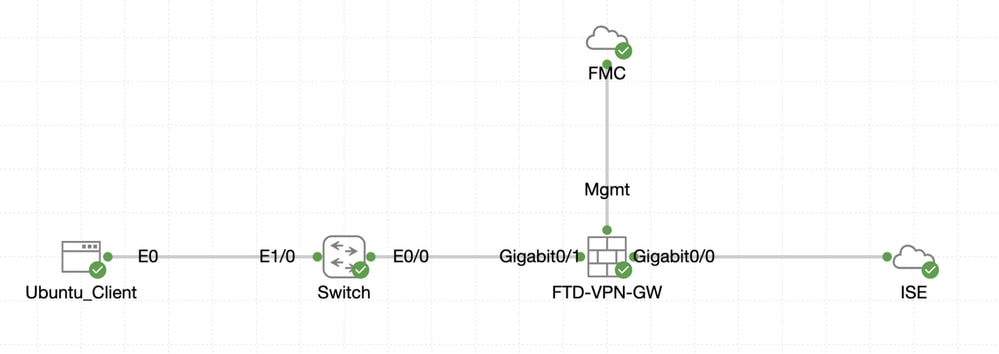 拓扑
拓扑
FMC/FTD上的配置
步骤1:客户端、FTD、FMC和ISE之间的连接已成功配置。因为enroll.cisco.com用于执行重定向探测的终端(有关详细信息,请参阅终端安全评估流量CCO 文档ISE终端安全评估样式比较以前版本和之后2.2)。确保正确配置了FTD上通往enroll.cisco.com的流量的路由。
第二步:从Cisco软件下载下载软件包名称cisco-secure-client-linux64-5.1.3.62-webdeploy-k9.pkg,通过确认下载文件的md5校验和与Cisco软件下载页相同,确保文件在下载后一切正常。
第三步: 导航到Objects > Object Management > VPN > Secure Client File。单击Add Secure Client File、提供名称、浏览File Name以选择cisco-secure-client-linux64-5.1.3.62-webdeploy-k9.pkg、在File Type下拉列表中选择Secure Client Image。??然后单击.Save
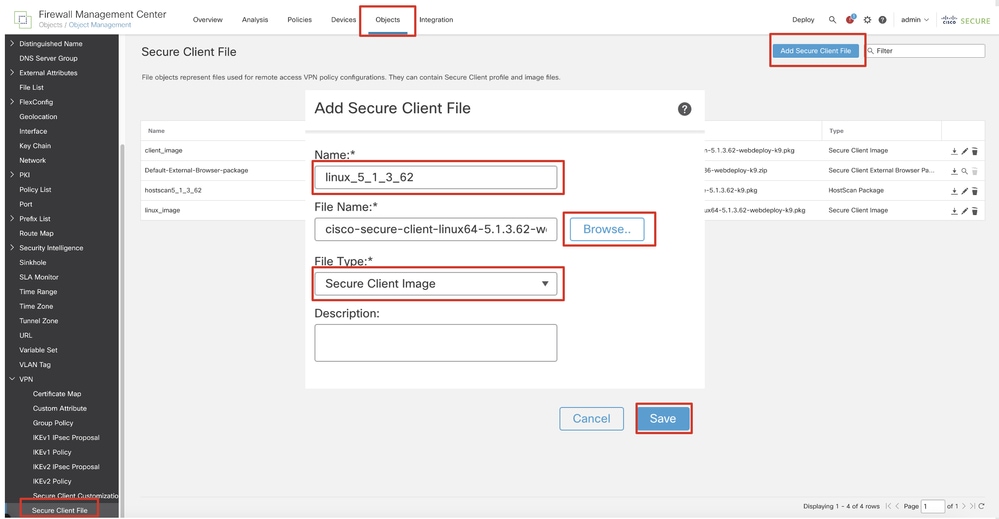 FMC_Upload_Secure_Client_Image
第四步: 导航到Objects > Object Management > Network。
步骤 4.1为DNS服务器创建对象。单击Add Object,提供名称和可用的DNS IP地址。单击。Save
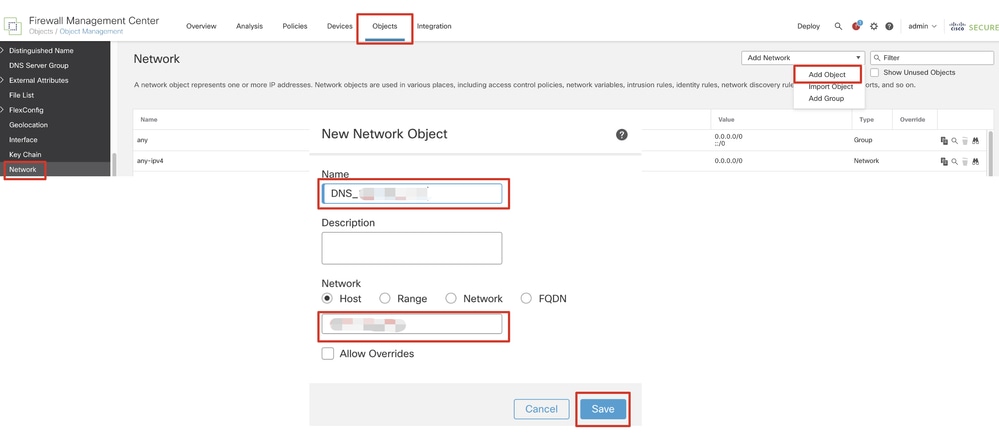 FMC_Add_Object_DNS

注意:此处配置的DNS服务器将用于VPN用户。
步骤 4.2为ISE PSN创建对象。单击Add Object,提供名称和可用的ISE PSN IP地址。单击。Save
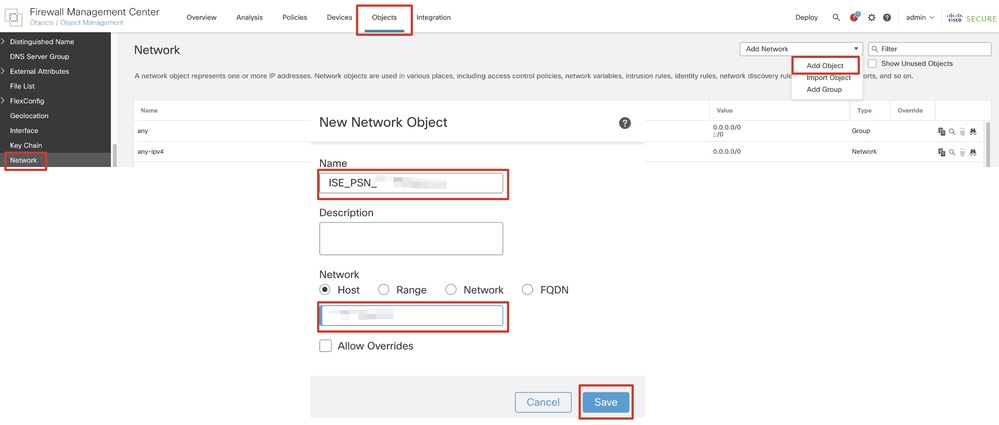 FMC_Add_Object_ISE
第五步:导航到Objects > Object Management > VPN > Group Policy。单击。Add Group Policy单击DNS/WINS,然后在Primary DNS Server中选择DNS服务器的对象。??然后单击.Save
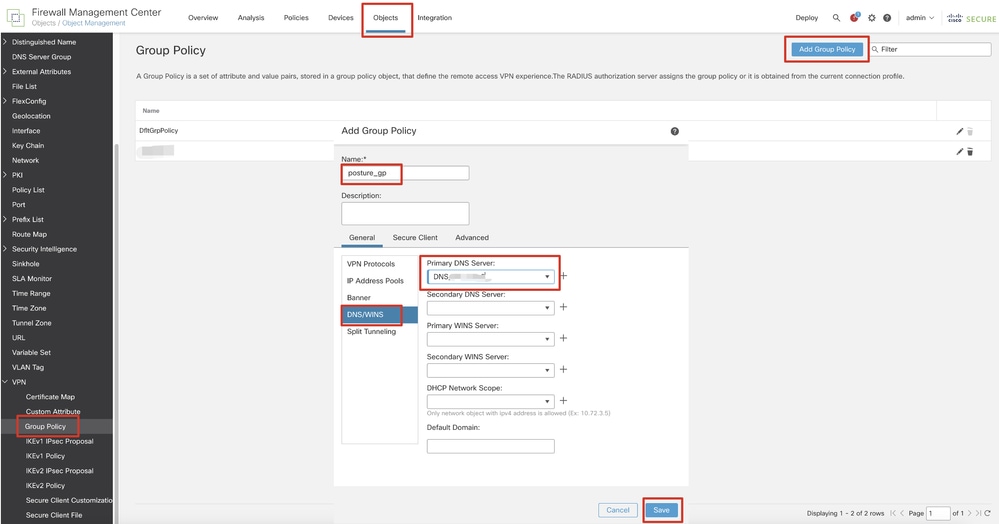 FMC_Add_Group_Policy

注意:确保VPN组策略中使用的DNS服务器可以解析ISE客户端调配门户FQDN和enroll.cisco.com。
第六步: 导航到Objects > Object Management > Access List > Extended。单击。Add Extended Access List
 FMC_Add_Redirect_ACL
步骤 6.1提供重定向ACL的名称。此名称必须与ISE授权配置文件中的名称相同。单击。Add
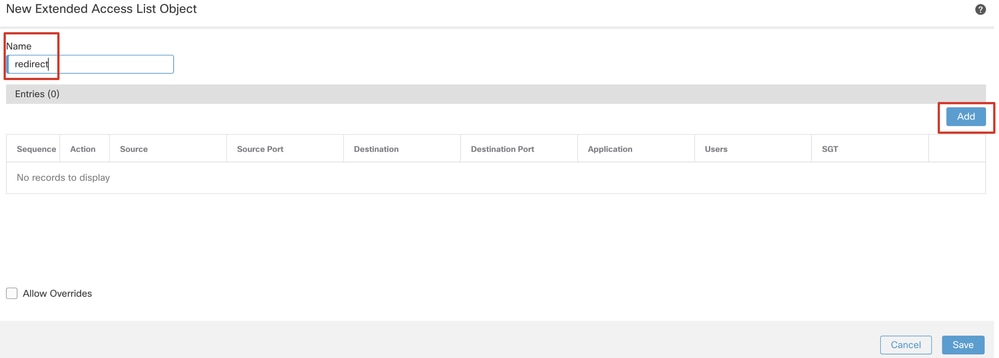 FMC_Add_Redirect_ACL_Part_1
步骤 6.2 阻止DNS流量、发往ISE PSN IP地址的流量以及补救服务器,以将其排除在重定向范围之外。允许其余流量。这将触发重定向。单击。Save
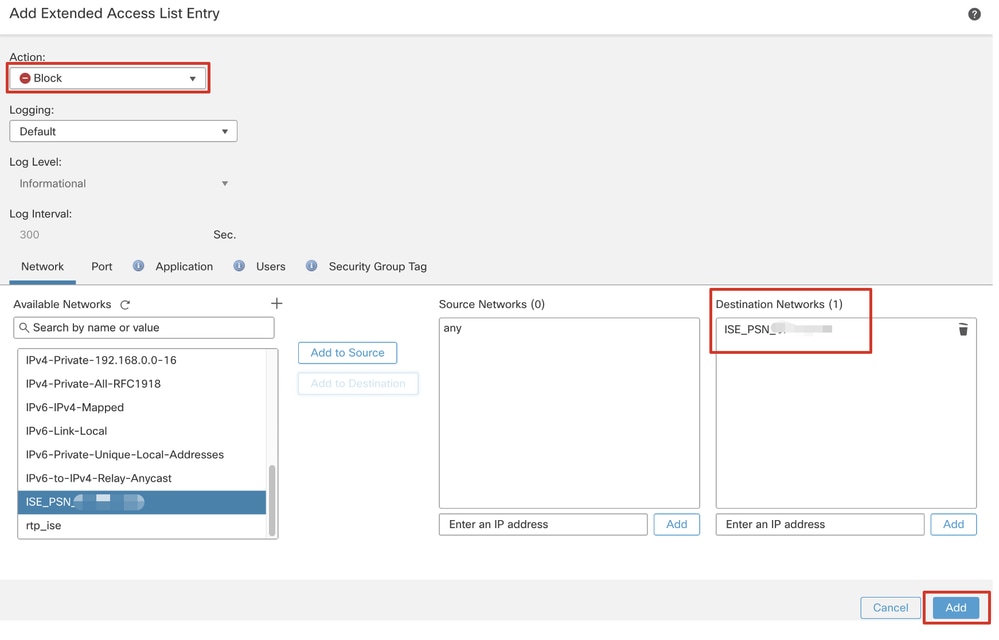 FMC_Add_Redirect_ACL_Part_2
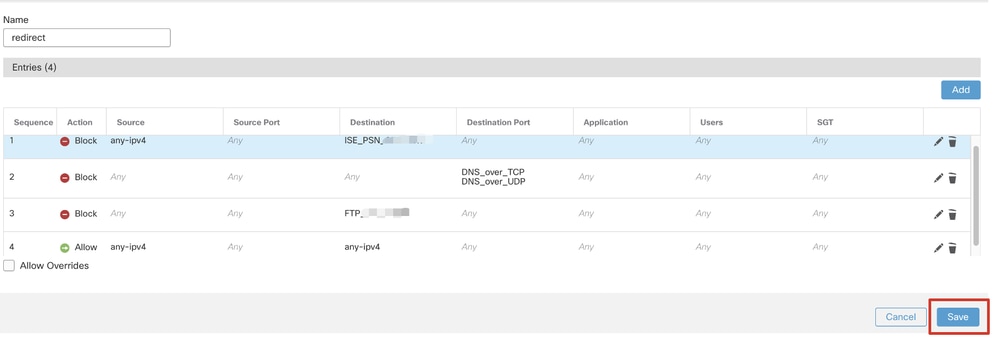 FMC_Add_Redirect_ACL_Part_3

注意:此重定向ACL示例中的目标FTP用作补救服务器示例。
步骤 7. 导航到Objects > Object Management > RADIUS Server Group。单击。Add RADIUS Server Group
 FMC_Add_New_Radius_Server_Group
步骤 7.1提供名称、检查Enable authorize only、检查Enable interim account update、检查Enable dynamic authorization。
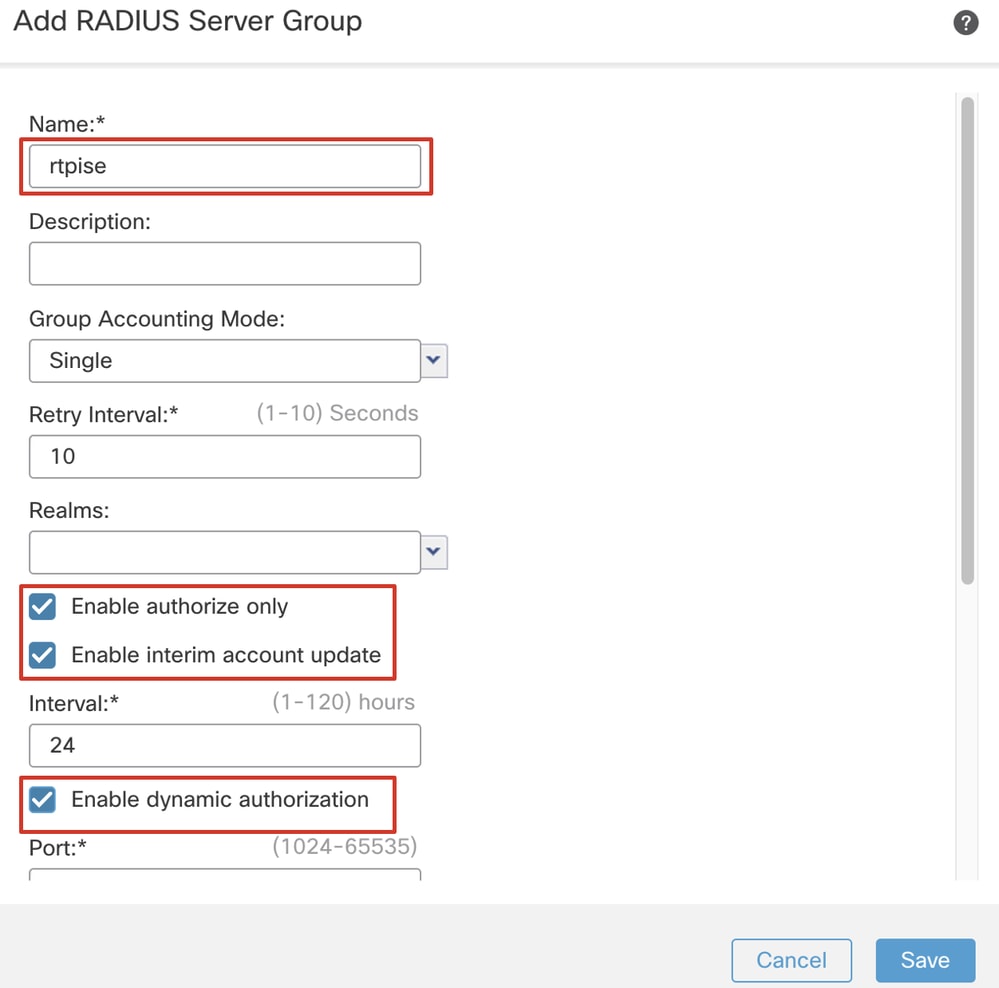 FMC_Add_New_Radius_Server_Group_Part_1
步骤 7.2单击Plus 图标添加新的radius服务器。提供ISE PSNIP Address/Hostname, Key。选择specific interface进行连接。选择Redirect ACL。然后,单击Save保存新的radius服务器。然后,再次单击Save,保存新的RADIUS服务器组。
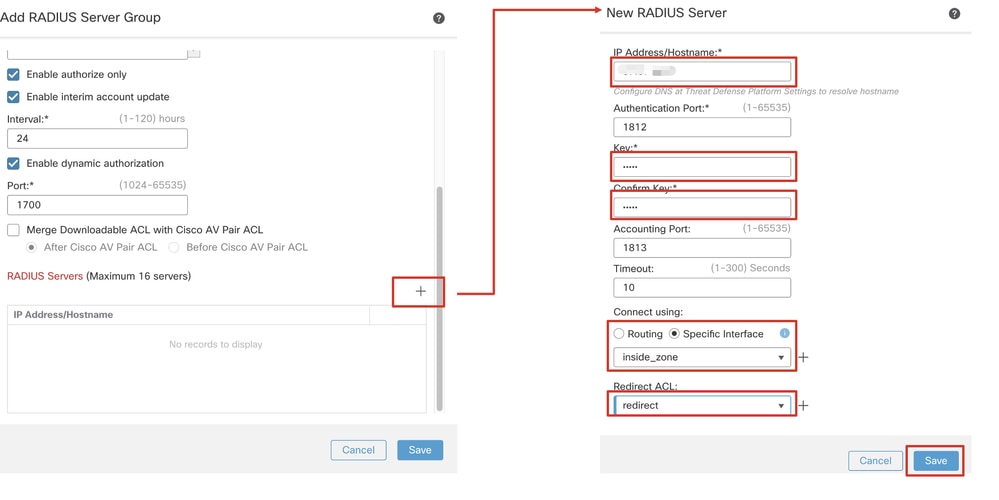 FMC_Add_New_Radius_Server_Group_Part_2
步骤 8 导航到Objects > Object Management > Address Pools > IPv4 Pools。单击Add IPv4 Pools并提供Name, IPv4 Address Range和Mask。??然后单击.Save
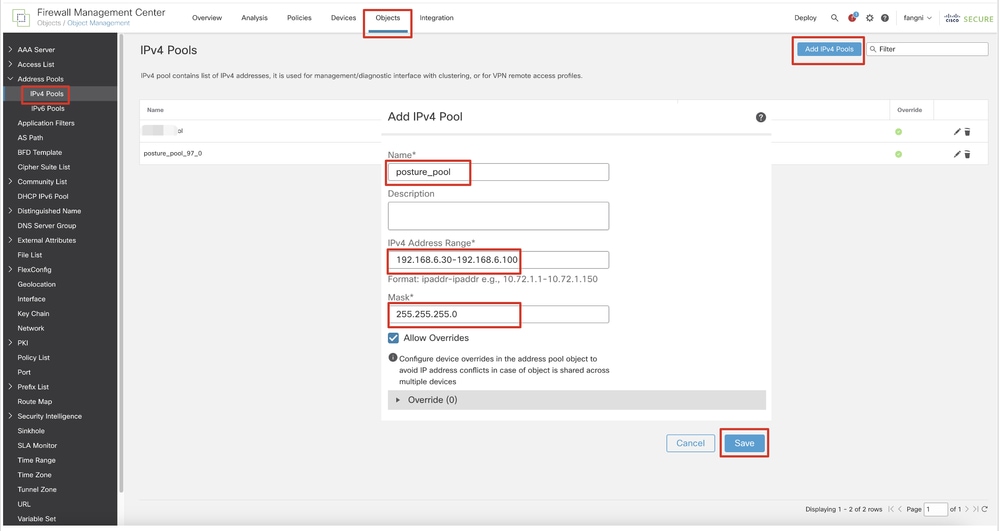 FMC_Add_Newpool
步骤 9 导航到Certificate Objects > Object Management > PKI > Cert Enrollment。单击Add Cert Enrollment、提供一个名称,然后在Enrollment Type中选择Self Signed Certificate。单击Certificate Parameters选项卡并提供Common Name和Country Code。??然后单击.Save
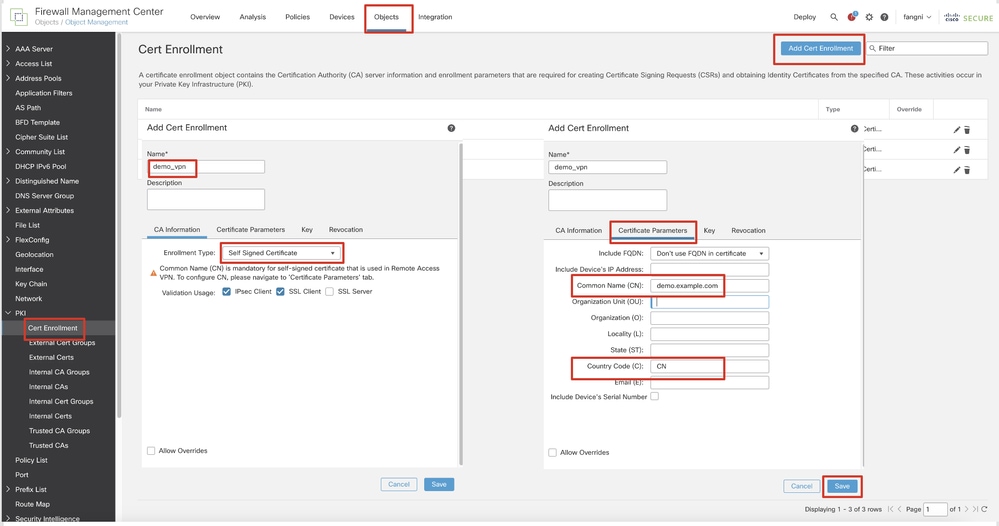 FMC_Add_New_Cert_Enroll
步骤 10 导航到Devices > Certificates。点击Add,在Device下选择FTD名称,在Cert Enrollment下选择以前配置的注册。单击。Add
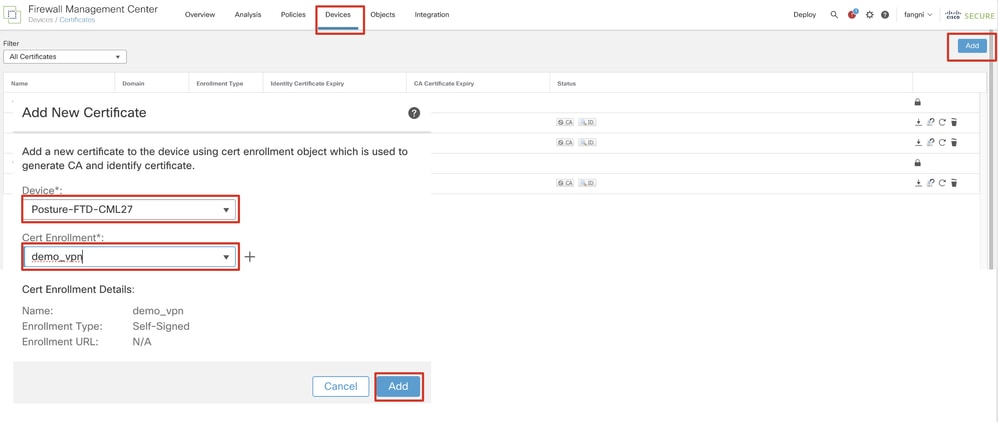 FMC_Add_New_Cert_To_FTD
步骤 11 导航到Devices > VPN > Remote Access。单击。Add
步骤 11.1提供名称,并将FTD添加到Selected Devices。单击。Next
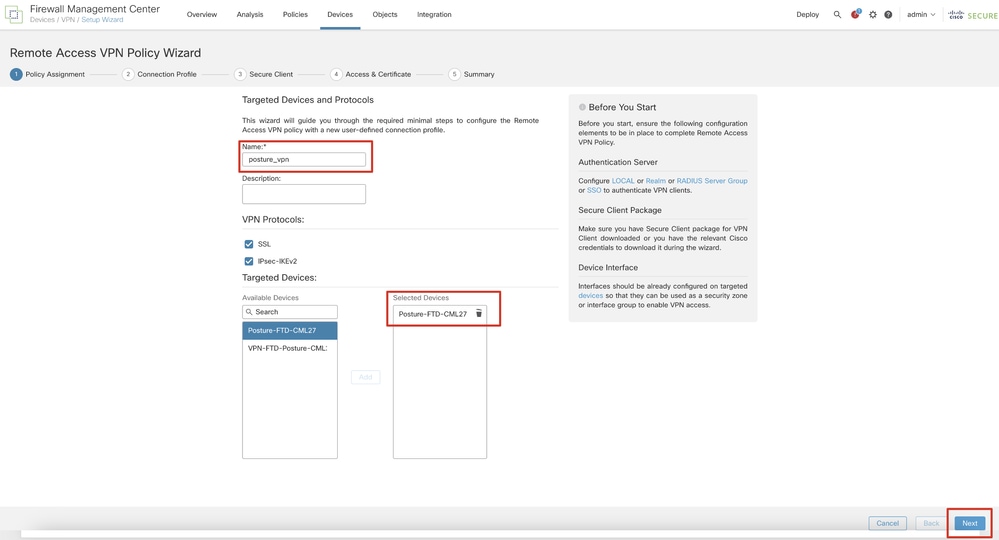 FMC_New_RAVPN_Wizard_1
步骤 11.2在Authentication Server, Authorization Server, Accounting Server中选择以前配置的radius服务器组。向下滚动页面。
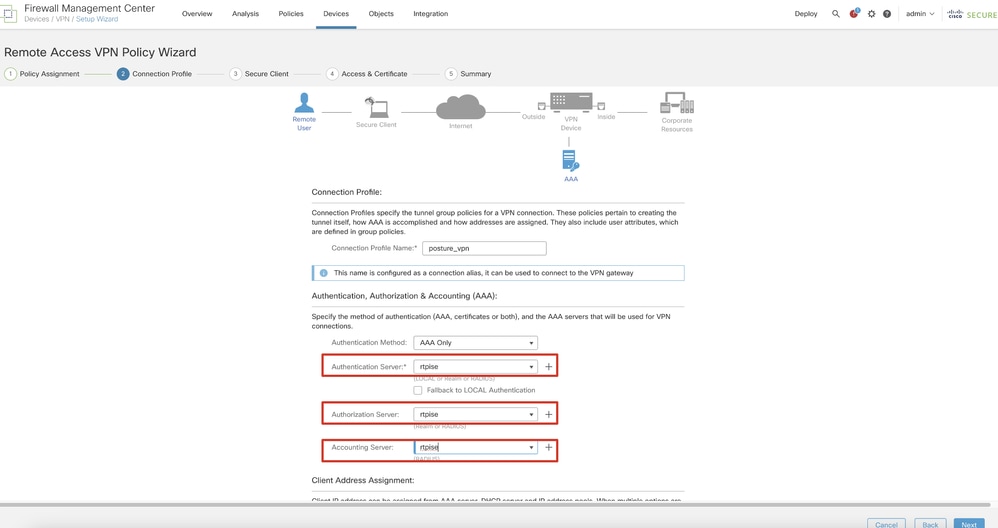 FMC_New_RAVPN_Wizard_2
步骤 11.3在IPv4 Address Pools中选择以前配置的池名称。在Group Policy中选择以前配置的组策略。单击Next。
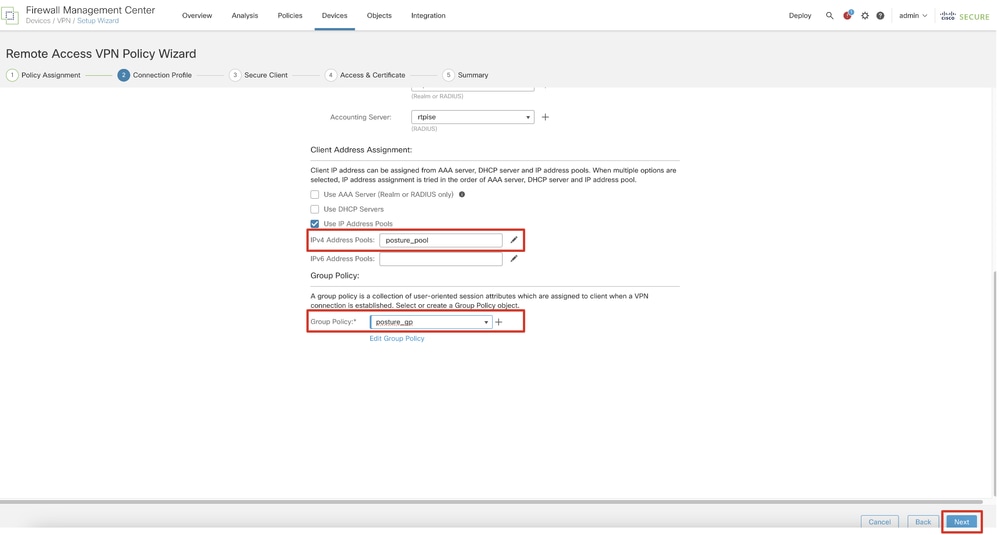 FMC_New_RAVPN_Wizard_3
步骤 11.4选中Linux映像的复选框。单击。Next
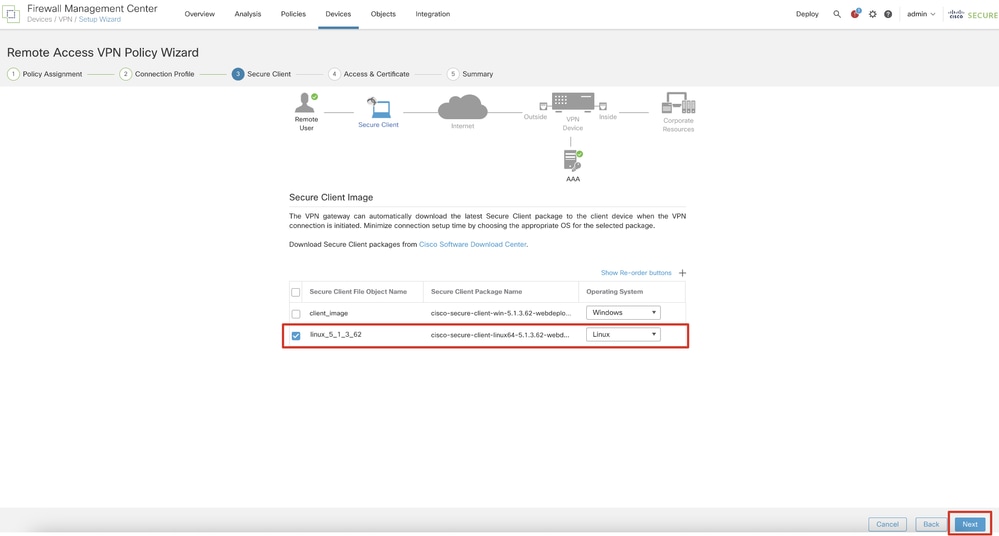 FMC_New_RAVPN_Wizard_4
步骤 11.5选择VPN接口的接口。选择在第9步中在FTD上注册的证书注册。单击。Next
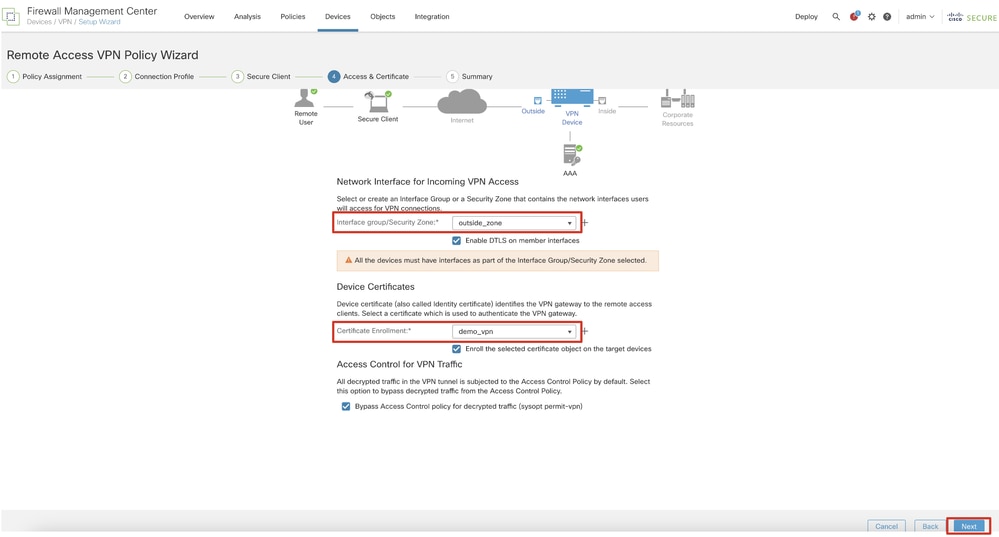 FMC_New_RAVPN_Wizard_5
步骤 11.6在摘要页面上再次确认相关信息。如果一切正常,请单击Finish。如果需要修改任何内容,请单击Back。
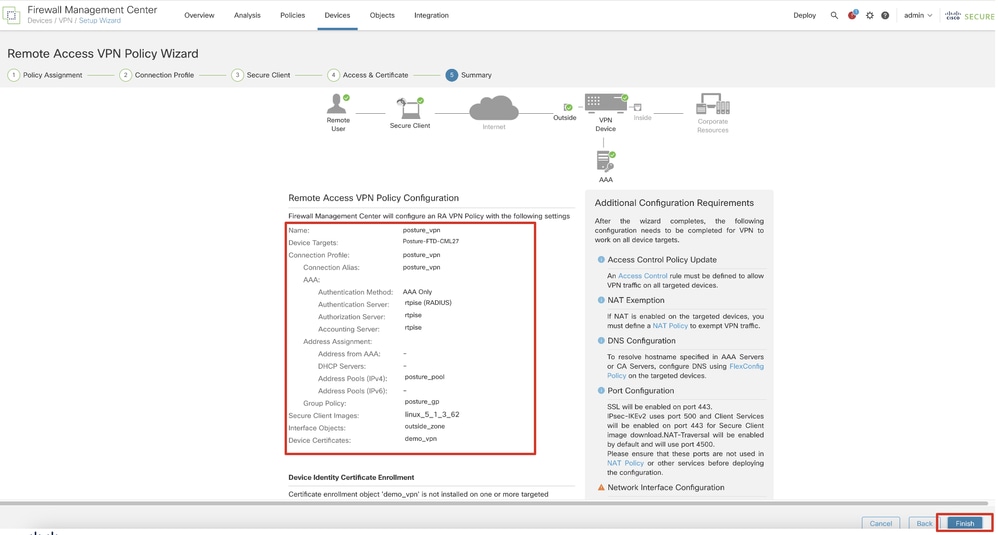 FMC_New_RAVPN_Wizard_6
步骤 12将新配置部署到FTD以完成远程访问VPN配置。
 FMC_Deploy_FTD
ISE上的配置
ISE上的配置步骤 13 导航到Work Centers > Posture > Network Devices。单击。Add
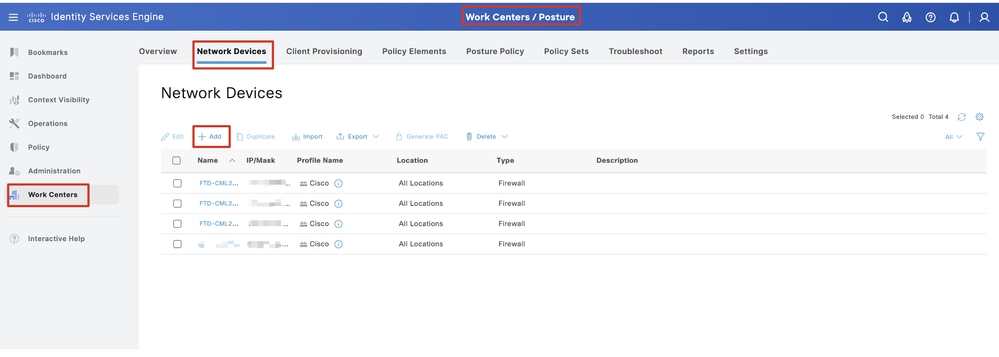 ISE_Add_New_Device
步骤 13.1提供Name, IP Address并向下滚动页面。
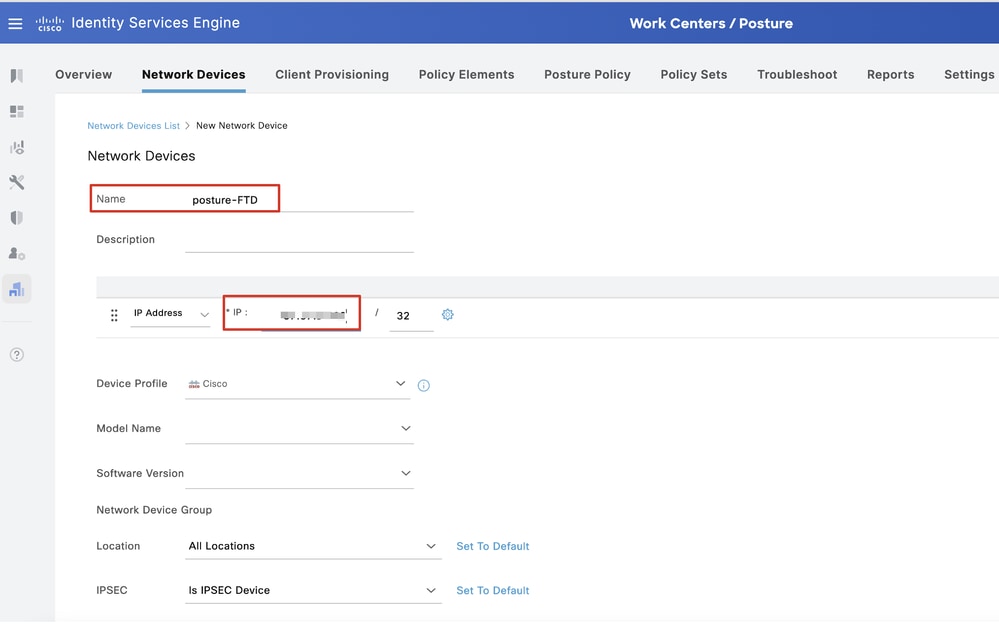 ISE_Add_New_Device_1
步骤 13.2选中RADIUS Authentication Settings复选框。提供Shared Secret。单击。Submit
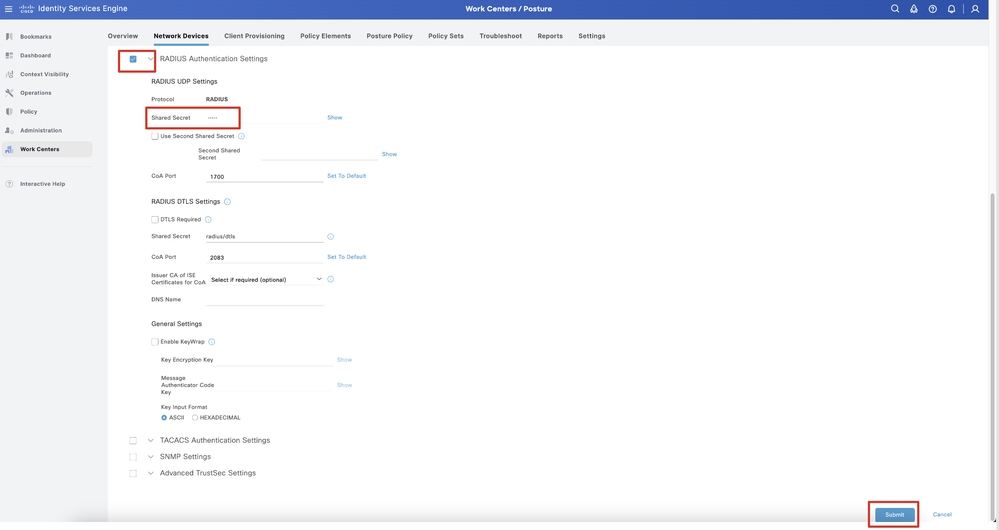 ISE_Add_New_Device_2
步骤 14 从Cisco软件下载下载软件包名称cisco-secure-client-linux64-4.3.3139.0-isecompliance-webdeploy-k9.pkg,通过确认下载文件的md5校验和与Cisco软件下载页相同,来确保文件完好。 已在步骤1中成功下载软件包名称cisco-secure-client-linux64-5.1.3.62-webdeploy-k9.pkg。
步骤 15 导航到Work Centers > Posture > Client Provisioning > Resources。单击。Add选择.Agent resources from local disk
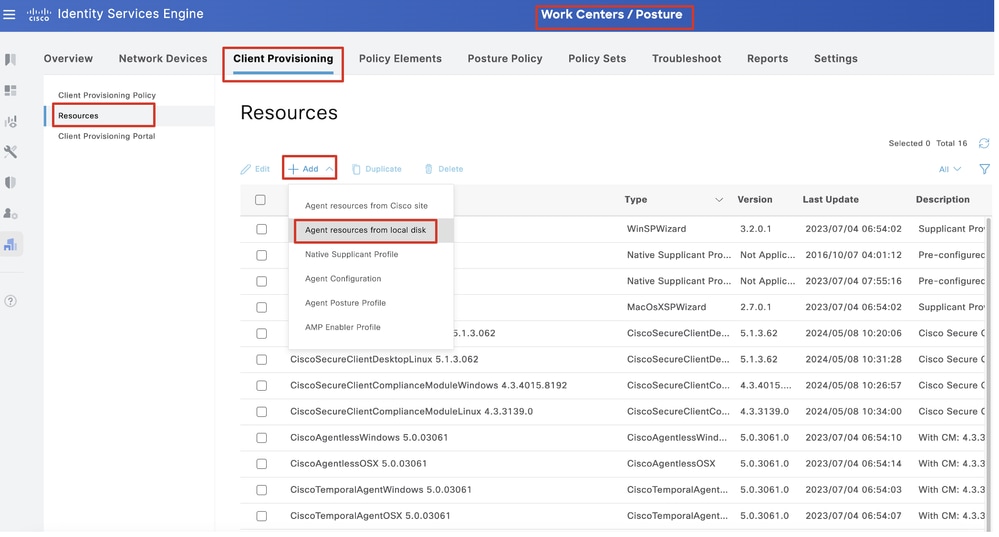 ISE_Upload_Resource
步骤 15.1选择.Cisco Provided Package点击Choose File上传cisco-secure-client-linux64-5.1.3.62-webdeploy-k9.pkg。单击。Submit
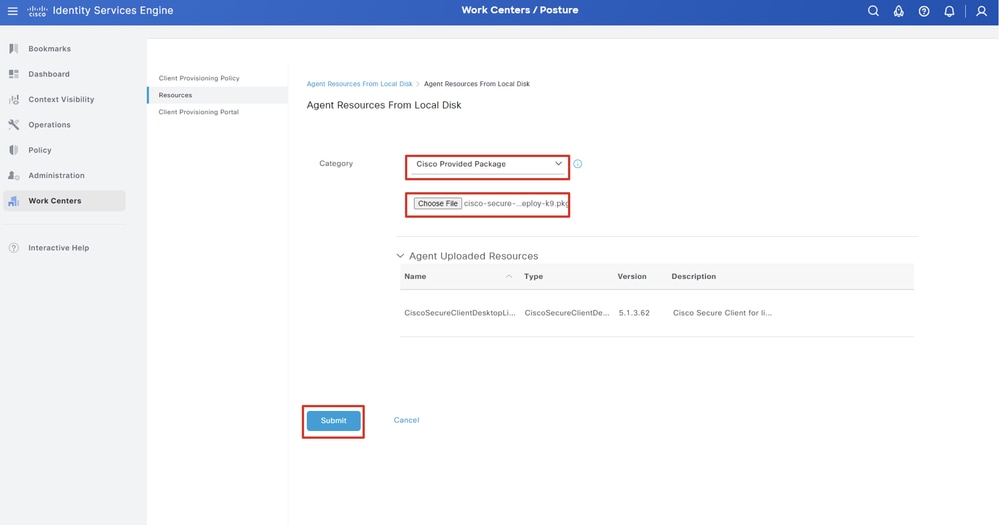 ISE_Upload_Resources_1

注意:重复步骤14.上传cisco-secure-client-linux64-4.3.3139.0-isecompliance-webdeploy-k9.pkg。
步骤 16 导航到Work Centers > Posture > Client Provisioning > Resources。单击。Add选择.Agent Posture Profile
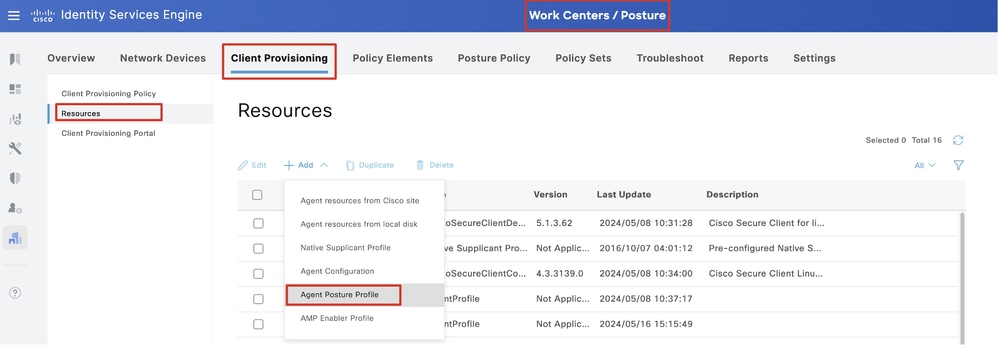 ISE_Add_Agent_Posture_Profile
步骤 16.1提供Name, Server name rules,并将剩余部分保留为默认值。单击。Save
名称:linux_agent_profile
服务器名称规则:*.example.com
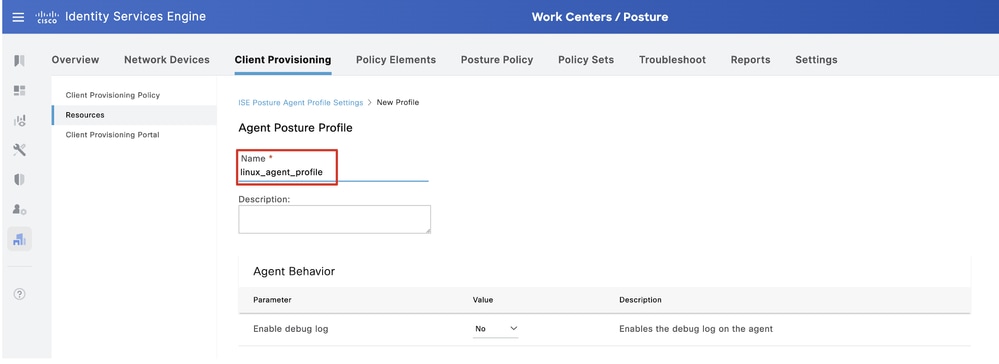 ISE_Add_Agent_Posture_Profile_1
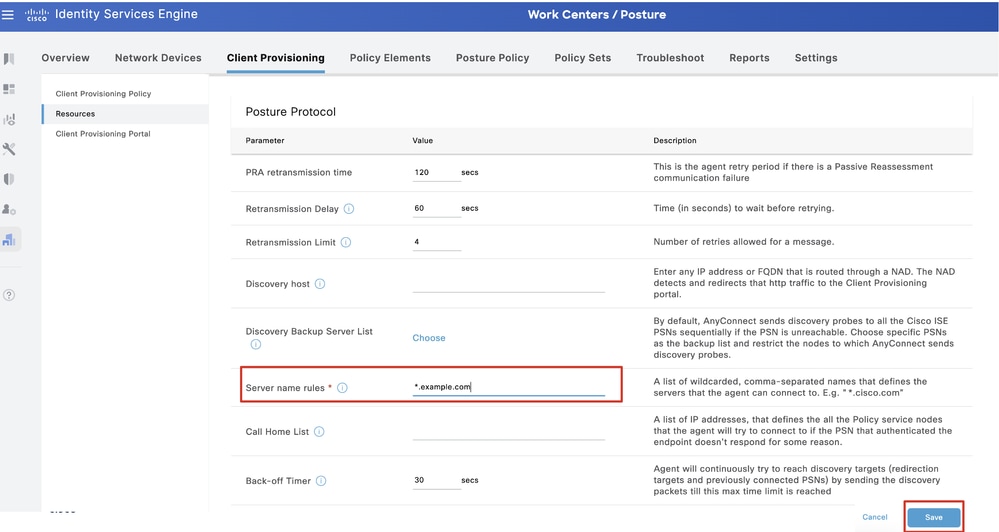 ISE_Add_Agent_Posture_Profile_2
步骤 17 导航到Work Centers > Posture > Client Provisioning > Resources。单击。Add选择.Agent Configuration
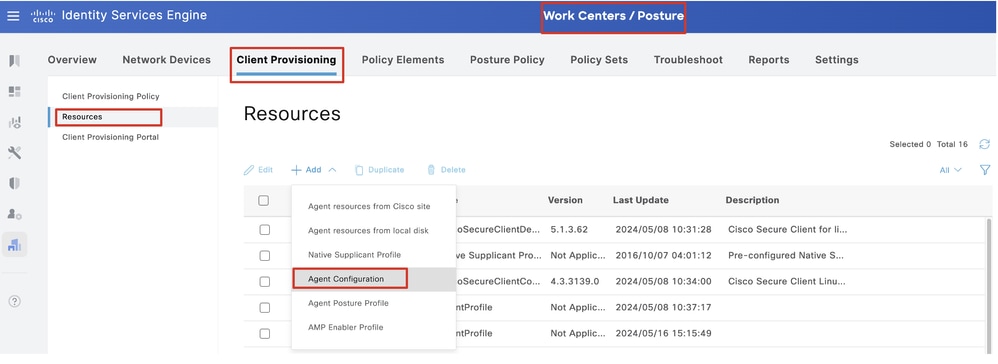 ISE_Add_Agent_Configuration
步骤 17.2配置详细信息:
选择代理包:CiscoSecureClientDesktopLinux 5.1.3.062
名称:linux_agent_config
合规性模块:CiscoSecureClientComplianceModuleLinux 4.3.3139.0
选中复选框 VPN, Diagnostic and Reporting Tool
配置文件选择ISE终端安全评估:linux_agent_profile
单击。Submit
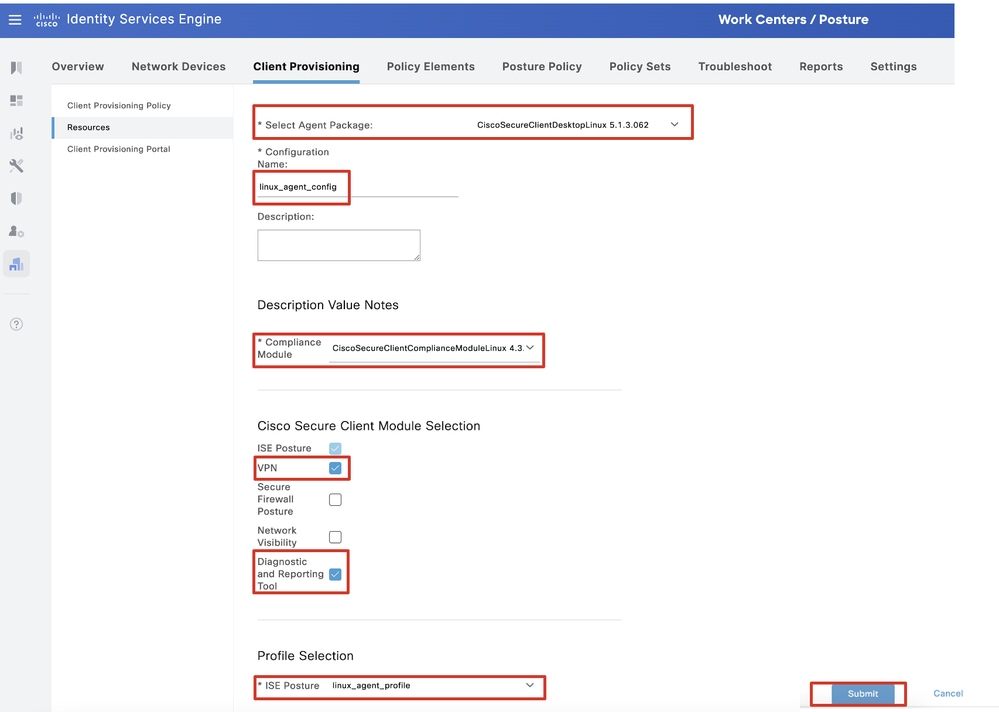 ISE_Add_Agent_Configuration_1
步骤 18. 导航到Work Centers > Posture > Client Provisioning > Client Provisioning Policy。在任何规则名称末尾点击Edit 。选择.Insert new policy below
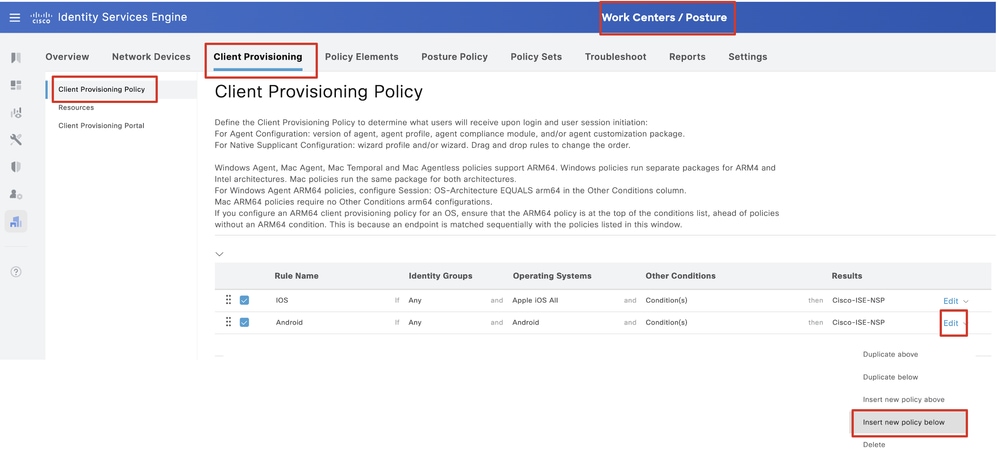 ISE_Add_New_Provisioning_Policy
步骤 18.1 配置详细信息:
规则名称:Linux
操作系统:Linux All
结果:linux_agent_config
单击Done 和Save。
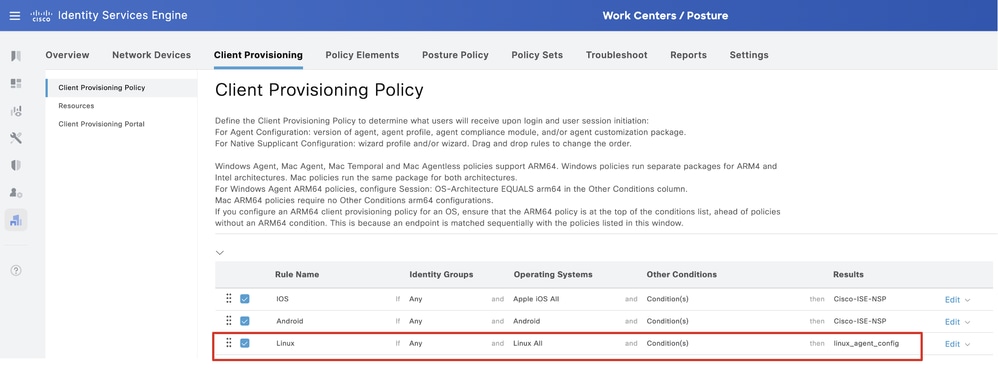 ISE_Add_New_Provisioning_Policy_1
步骤 19. 导航到Work Centers > Posture > Policy Elements > Conditions > File。单击。Add
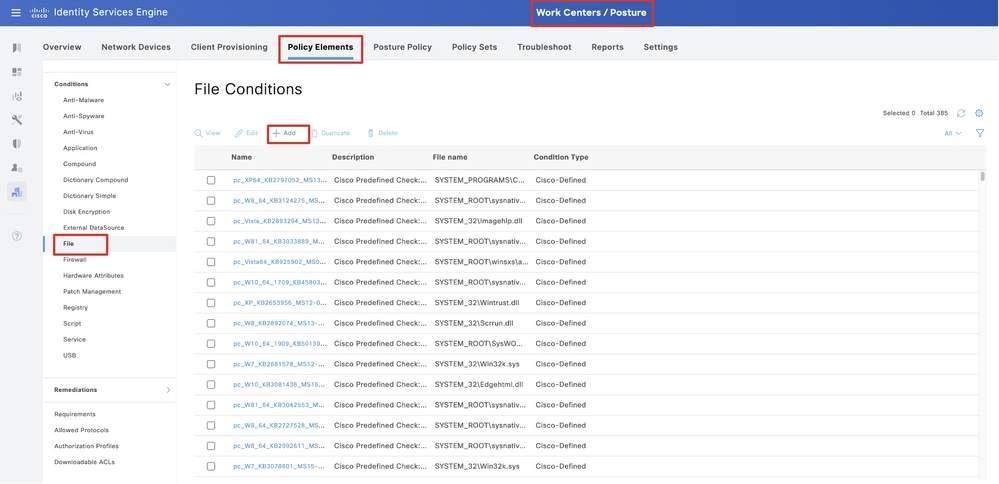 ISE_Add_New_File_Condition
步骤 19.1 配置详细信息:
名称:linux_demo_file_exist
操作系统:Linux All
文件类型:FileExist
文件路径:home、Desktop/test.txt
文件运算符:存在
单击。Submit
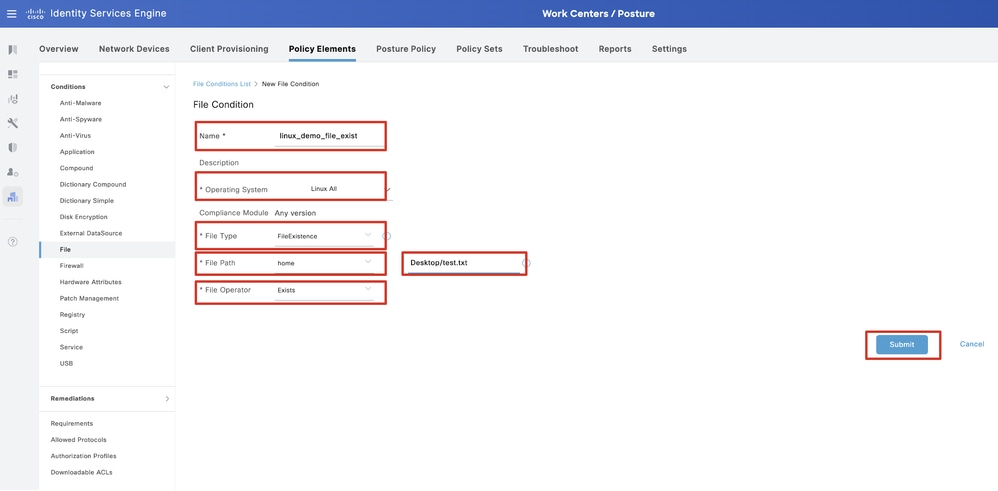 ISE_Add_New_File_Condition_1
步骤 20. 导航到Work Centers > Posture > Policy Elements > Requirements。在任何规则名称末尾点击Edit 。选择.Insert new Requirement
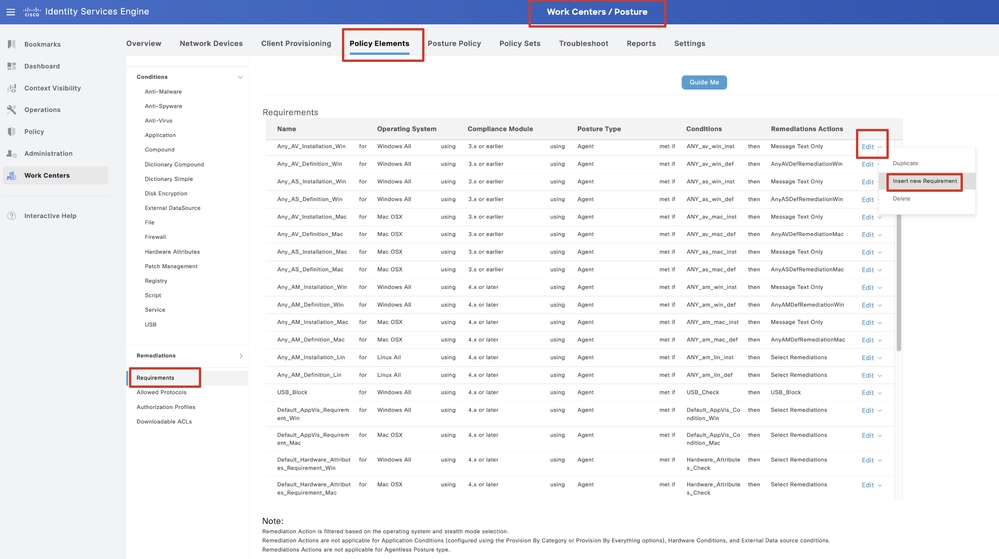 ISE_Add_New_Posture_Requirement
步骤 20.1 配置详细信息:
名称:Test_exist_linux
操作系统:Linux All
合规性模块:4.x或更高版本
状态类型:代理
条件:linux_demo_file_exist
单击Done 和Save。
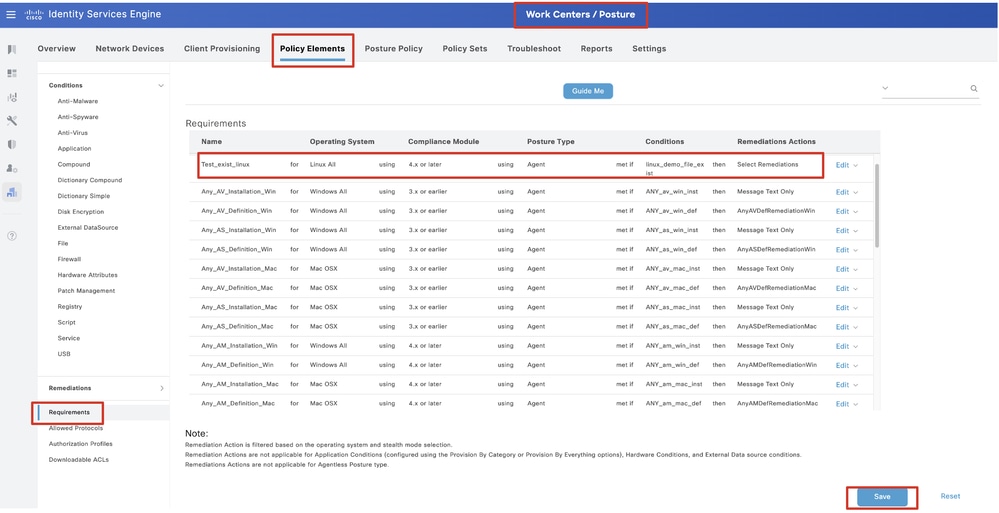 ISE_Add_New_Posture_Requirement_1

注意:到目前为止,Linux代理仅支持shell脚本作为补救。
步骤 21. 导航到Work Centers > Posture > Policy Elements > Authorization Profiles。单击。Add
步骤 21.1 配置详细信息:
名称:unknown_redirect
选中复选框 Web Redirection(CWA,MDM,NSP,CPP)
选择 Client Provisioning(Posture)
ACL:重定向
值:客户端调配门户(默认)
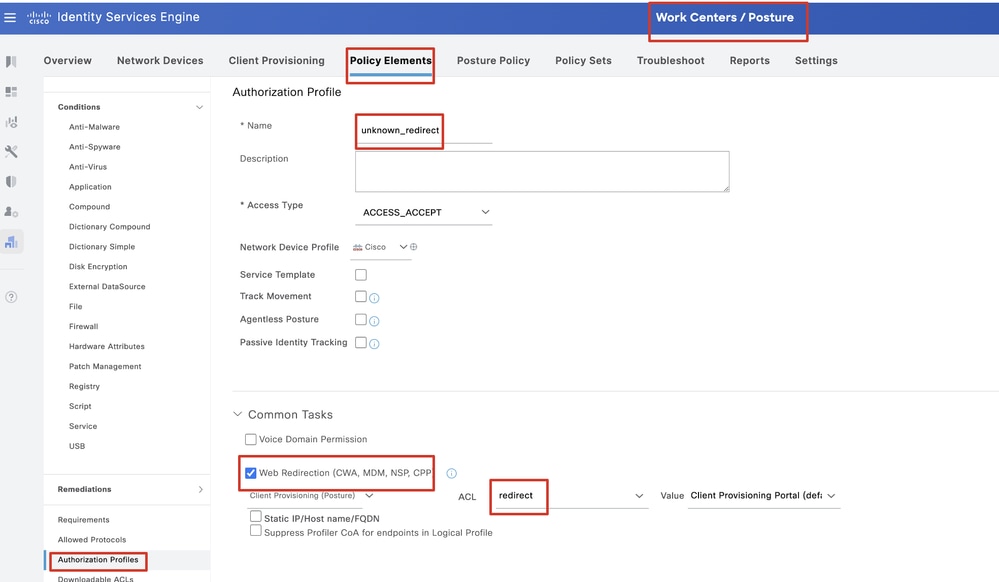 ISE_Add_New_Authorization_Profile_Redirect_1

注意:此ACL名称重定向必须与FTD上配置的相应ACL名称匹配。
步骤 21.2重复Add 以为不兼容和兼容的终端创建另外两个授权配置文件及详细信息。
名称:non_compliant_profile
DACL名称:DENY_ALL_IPv4_TRAFFIC
名称:compliant_profile
DACL名称:PERMIT_ALL_IPv4_TRAFFIC

注意:需要根据实际要求配置合规或不合规终端的DACL。
步骤 22. 导航到Work Centers > Posture > Posture Policy。在任何规则末尾单击Edit 。选择.Insert new policy
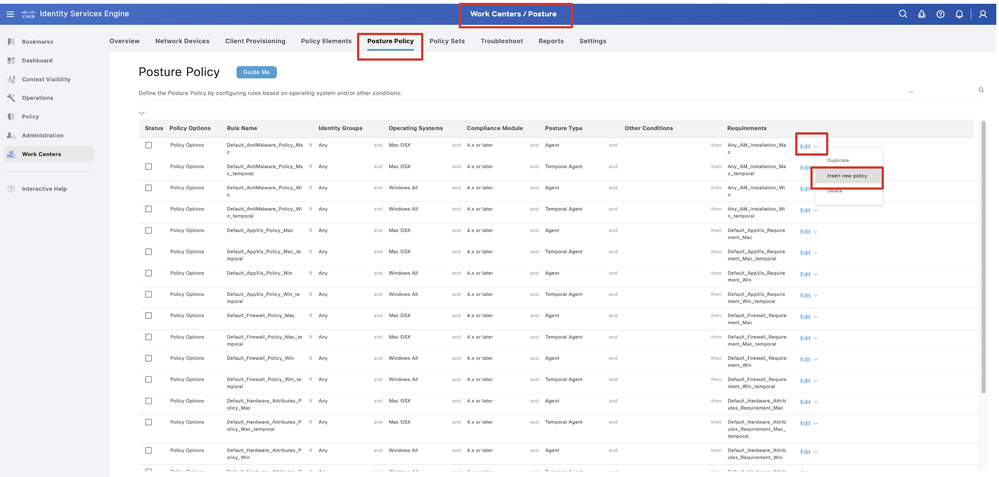 ISE_Add_New_Posture_Policy
步骤 22.1 配置详细信息:
规则名称:Demo_test_exist_linux
身份组:任意
操作系统:Linux All
合规性模块:4.x或更高版本
状态类型:代理
要求:Test_exist_linux
单击Done 和Save。
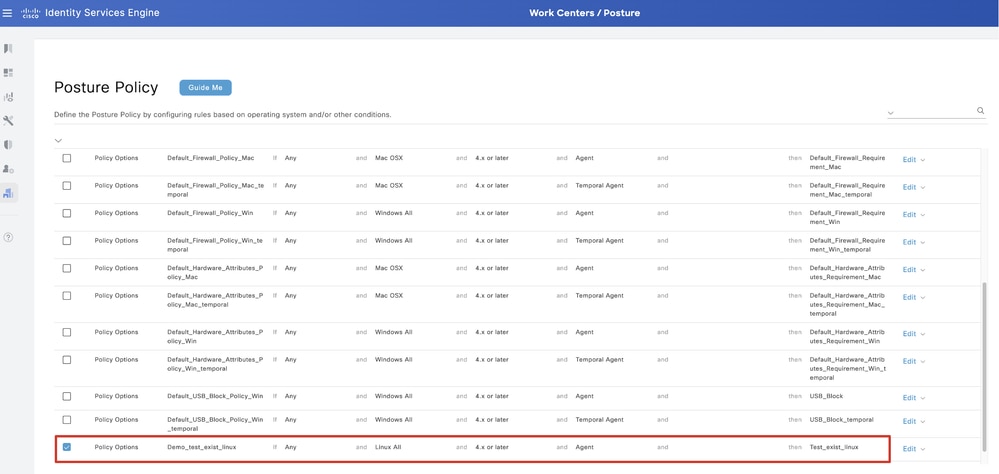 ISE_Add_New_Posture_Policy_1
步骤 23. 导航到Work Centers > Posture > Policy Sets。单击以Insert new row above。
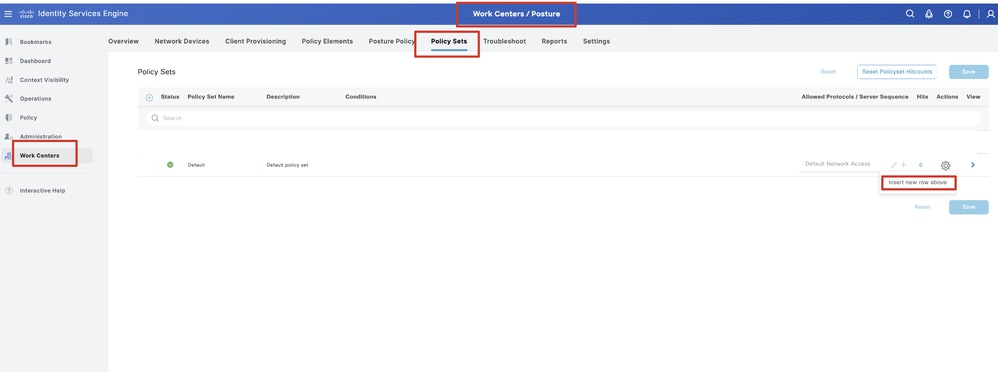 ISE_Add_New_Policy_Set
步骤 23.1 配置详细信息:
策略集名称:Firewall Posture
条件:网络接入设备IP地址等于[FTD IP地址]
单击。 Save
 ISE_Add_New_Policy_Set_1
步骤 23.2单击>以输入策略集。 为状态兼容、不兼容和未知状态创建新的授权规则。单击。Save
与compliant_profile兼容
与non_compliant_profile不兼容
Unknown_redirect未知
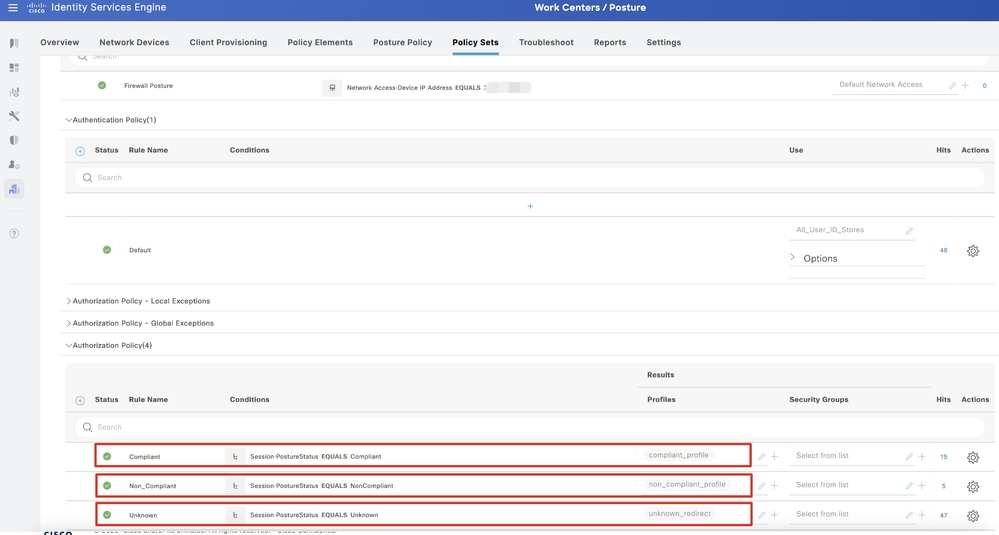 ISE_Add_New_Policy_Set_2
Ubuntu上的配置
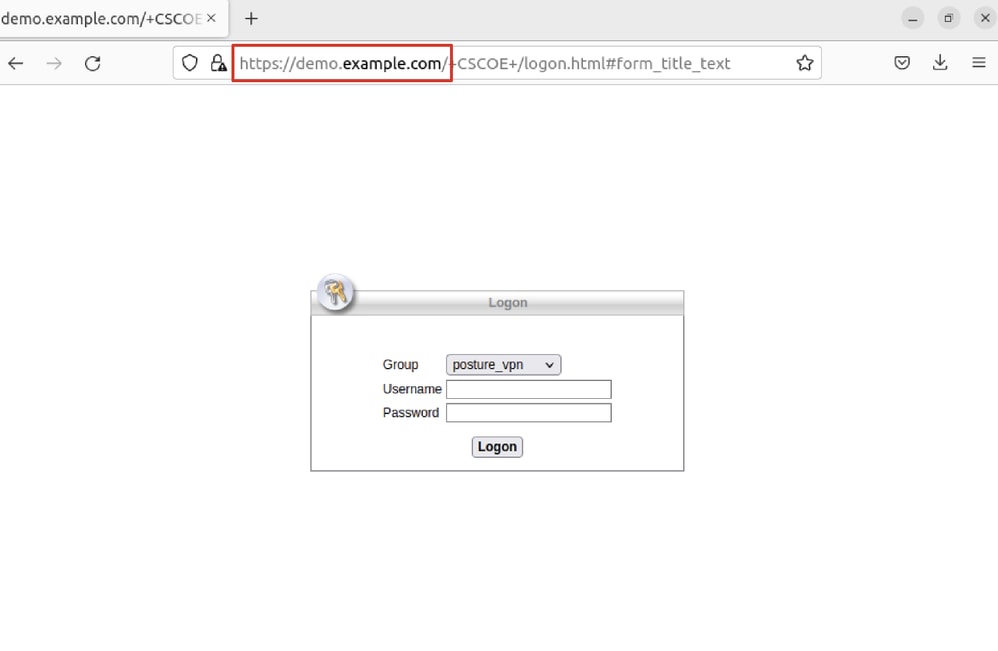
Ubuntu上的配置步骤 24通过GUI登录到Ubuntu客户端。打开浏览器以登录VPN门户。在本例中为demo.example.com。
 Ubuntu_Browser_VPN_Login
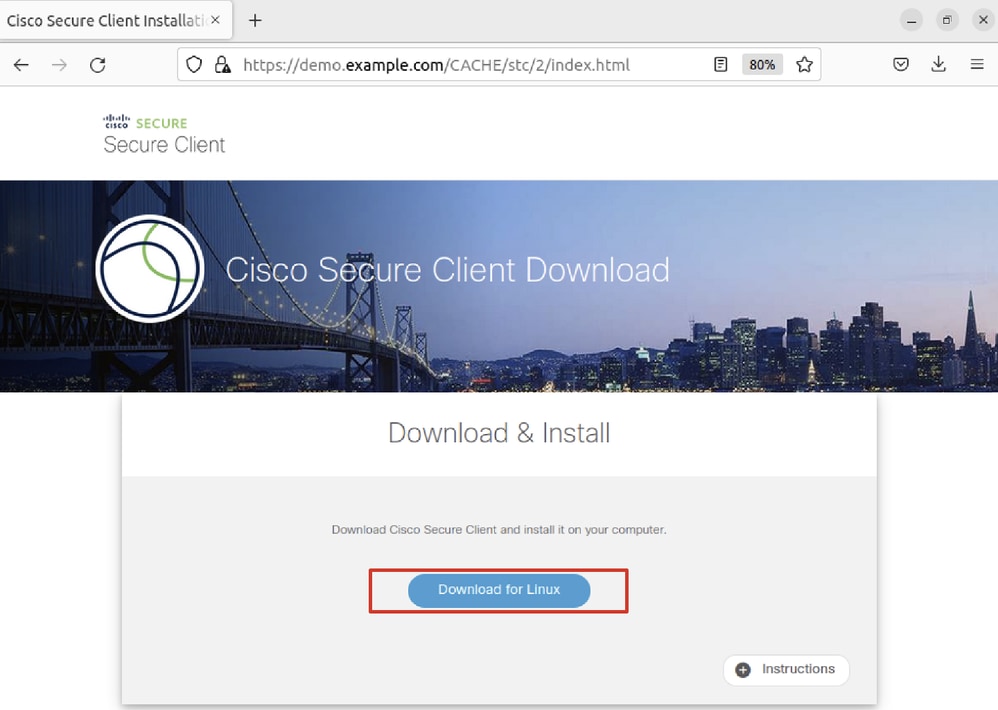
步骤 25单击。Download for Linux
 Ubuntu_Browser_VPN_Download_1
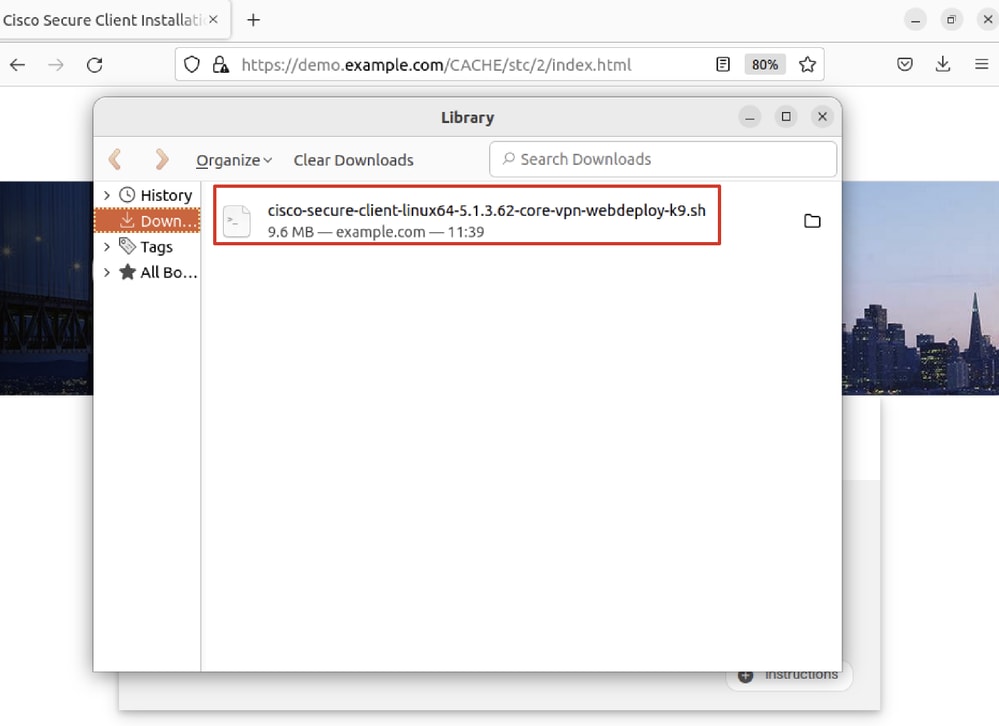
下载的文件名为cisco-secure-client-linux64-5.1.3.62-core-vpn-webdeploy-k9.sh。
 Ubuntu_Browser_VPN_Download_2
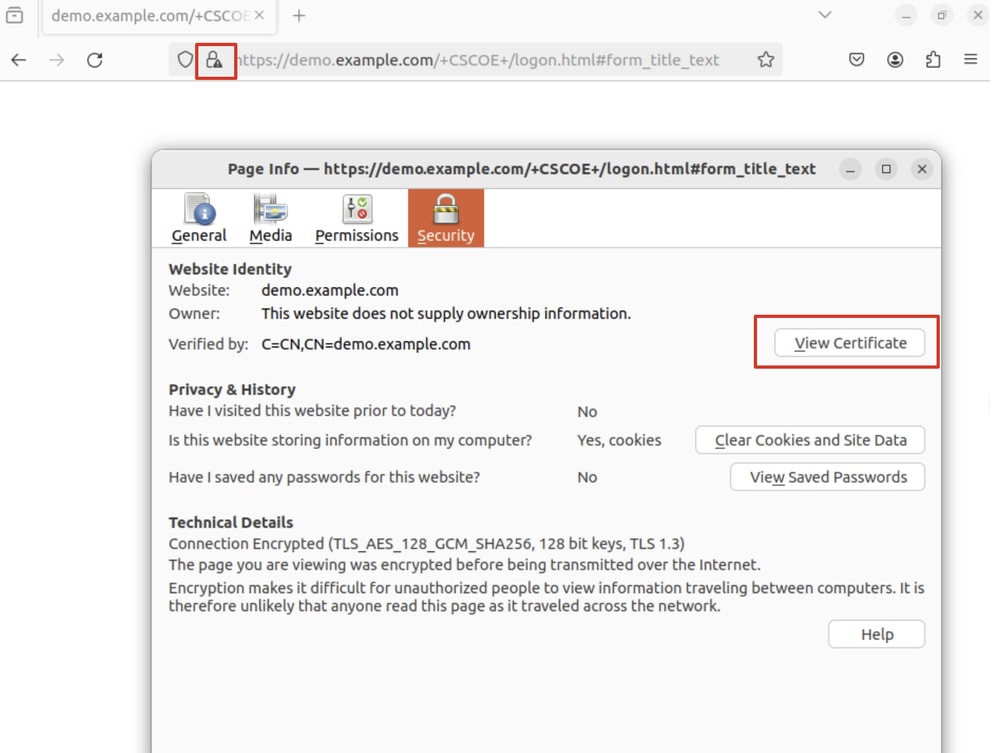
步骤 26通过浏览器下载VPN证书并将文件重命名为<certificate>.crt。这是使用firefox下载证书的示例。
 Ubuntu_Browser_VPN_Cert_Download
步骤 27在Ubuntu客户端上打开终端。导航到path home/user/Downloads/安装Cisco安全客户端。
user@ubuntu22-desktop:~$ cd Downloads/
user@ubuntu22-desktop:~/Downloads$ ls
cisco-secure-client-linux64-5.1.3.62-core-vpn-webdeploy-k9.sh    demo-example-com.crt

user@ubuntu22-desktop:~/Downloads$ chmod +x cisco-secure-client-linux64-5.1.3.62-core-vpn-webdeploy-k9.sh

user@ubuntu22-desktop:~/Downloads$ sudo ./cisco-secure-client-linux64-5.1.3.62-core-vpn-webdeploy-k9.sh
[sudo] password for user:
Installing Cisco Secure Client...
Migrating /opt/cisco/anyconnect directory to /opt/cisco/secureclient directory
Extracting installation files to /tmp/vpn.zaeAZd/vpninst959732303.tgz...
Unarchiving installation files to /tmp/vpn.zaeAZd...
Starting Cisco Secure Client Agent...
Done!
Exiting now.
user@ubuntu22-desktop:~/Downloads$
步骤 28信任Ubuntu客户端上的VPN门户证书。
user@ubuntu22-desktop:~$ cd Downloads/
user@ubuntu22-desktop:~/Downloads$ ls
cisco-secure-client-linux64-5.1.3.62-core-vpn-webdeploy-k9.sh   demo-example-com.crt

user@ubuntu22-desktop:~/Downloads$ openssl verify demo-example-com.crt
CN = demo.example.com, C = CN
error 18 at 0 depth lookup: self-signed certificate
Error demo-example-com.crt: verification failed

user@ubuntu22-desktop:~/Downloads$ sudo cp demo-example-com.crt /usr/local/share/ca-certificates/
user@ubuntu22-desktop:~/Downloads$ sudo update-ca-certificates
Updating certificates in /etc/ssl/certs...
rehash: warning: skipping ca-certificates.crt,it does not contain exactly one certificate or CRL
1 added, 0 removed; done.
Running hooks in /etc/ca-certificates/update.d...
done.

user@ubuntu22-desktop:~/Downloads$ openssl verify demo-example-com.crt
demo-example-com.crt: OK
步骤 29在Ubuntu客户端上打开Cisco Secure Client,然后将VPN成功连接到demo.example.com。
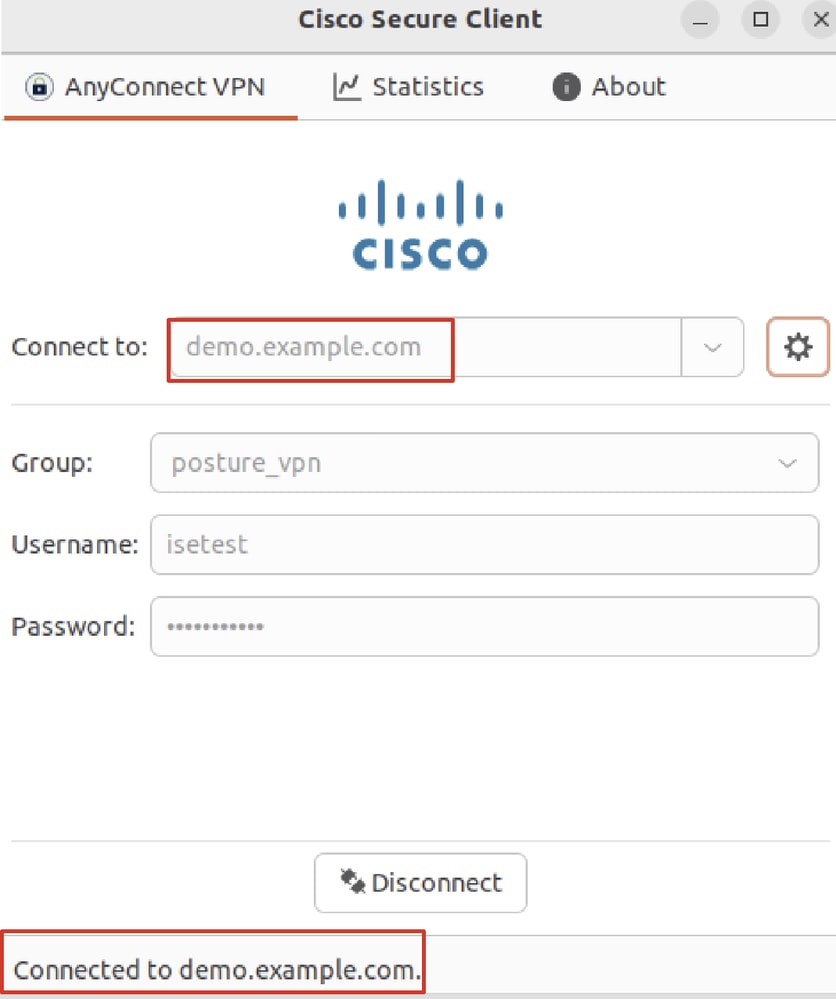 Ubuntu_Secure_Client_Connected
步骤 30打开浏览器以访问触发重定向至ISE CPP门户的任何网站。从ISE CPP门户下载证书并将文件重命名为<certificate>.crt。 这是使用Firefox进行下载的示例。
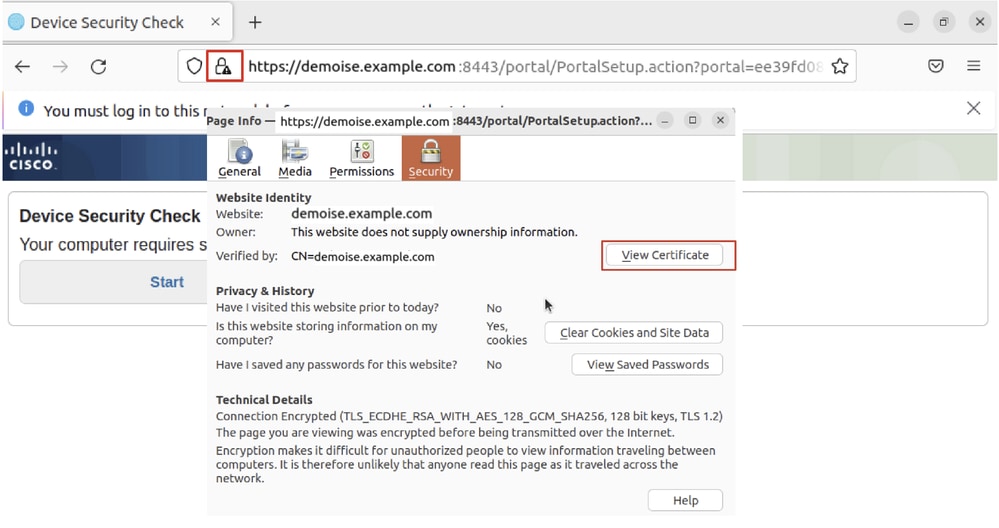 Ubuntu_Browser_CPP_Cert_Download
步骤 30.1信任Ubuntu客户端上的ISE CPP门户证书。
user@ubuntu22-desktop:~/Downloads$ ls
cisco-secure-client-linux64-5.1.3.62-core-vpn-webdeploy-k9.sh
demo-example-com.crt
ise-cert.crt

user@ubuntu22-desktop:~/Downloads$ sudo cp ise-cert.crt /usr/local/share/ca-certificates/
user@ubuntu22-desktop:~/Downloads$ sudo update-ca-certificates
Updating certificates in /etc/ssl/certs...
rehash: warning: skipping ca-certificates.crt,it does not contain exactly one certificate or CRL
1 added, 0 removed; done.
Running hooks in /etc/ca-certificates/update.d...
done.
步骤 31在ISE CPP门户上点击Start 。
 Ubuntu_Browser_CPP_Start
步骤32.Click here to download and install Agent.
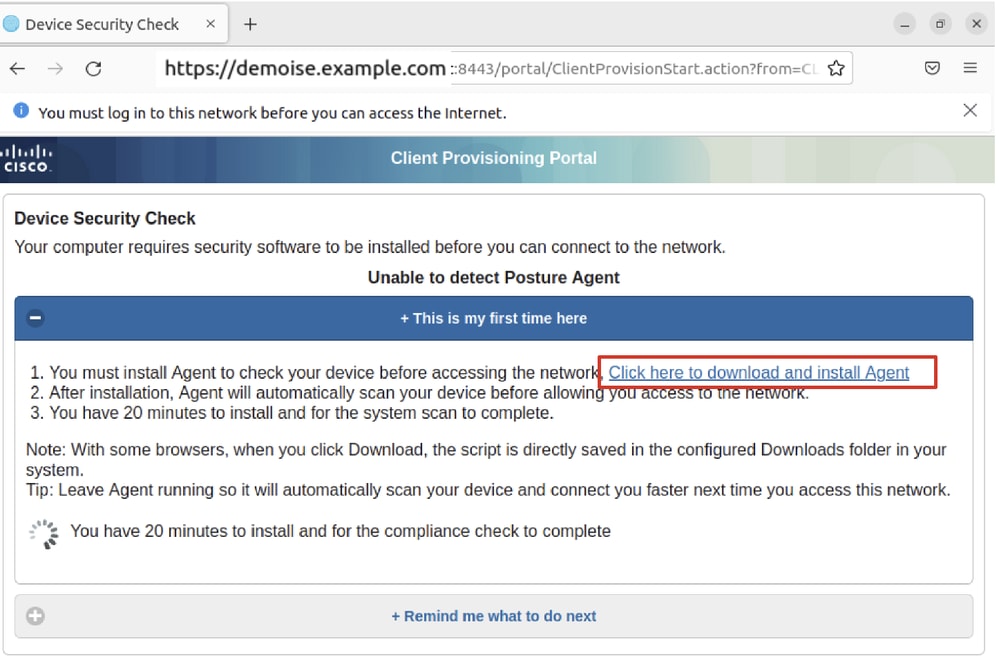 Ubuntu_Browser_CPP_Download_Posture
步骤 33在Ubuntu客户端上打开终端。导航到路径home/user/Downloads/,安装状态模块。
user@ubuntu22-desktop:~/Downloads$ ls
cisco-secure-client-ise-network-assistant-linux64-5.1.3.62_demoise.example.com_8443_0NcLgcMURfyZmR6HoLmLZg.sh
cisco-secure-client-linux64-5.1.3.62-core-vpn-webdeploy-k9.sh
demo-example-com.crt
ise-cert.crt

user@ubuntu22-desktop:~/Downloads$ chmod +x cisco-secure-client-ise-network-assistant-linux64-5.1.3.62_demoise.example.com_8443_0NcLgcMURfyZmR6HoLmLZg.sh
user@ubuntu22-desktop:~/Downloads$
user@ubuntu22-desktop:~/Downloads$
user@ubuntu22-desktop:~/Downloads$ ./cisco-secure-client-ise-network-assistant-linux64-5.1.3.62_demoise.example.com_8443_0NcLgcMURfyZmR6HoLmLZg.sh
Cisco Network Setup Assistant
(c) 2022-2024 Cisco Systems, Inc. Cisco, Cisco Systems and Cisco Systems logo are registered trademarks of Cisco Systems, Inc and/or its affiliates in the U.S. and certain other countries.
Cisco ISE Network Setup Assistant started. Version - 5.1.3.62
Trusted and Secure Connection
You are connected to

demoise.example.com

whose identity has been certified. Your connection to this website is encrypted.
Downloading Cisco Secure Client...
Downloading remote package...
Running Cisco Secure Client - Downloader...
Installation is completed.
步骤 34在Ubuntu客户端UI上,退出Cisco安全客户端并重新打开它。ISE终端安全评估模块安装成功并运行。
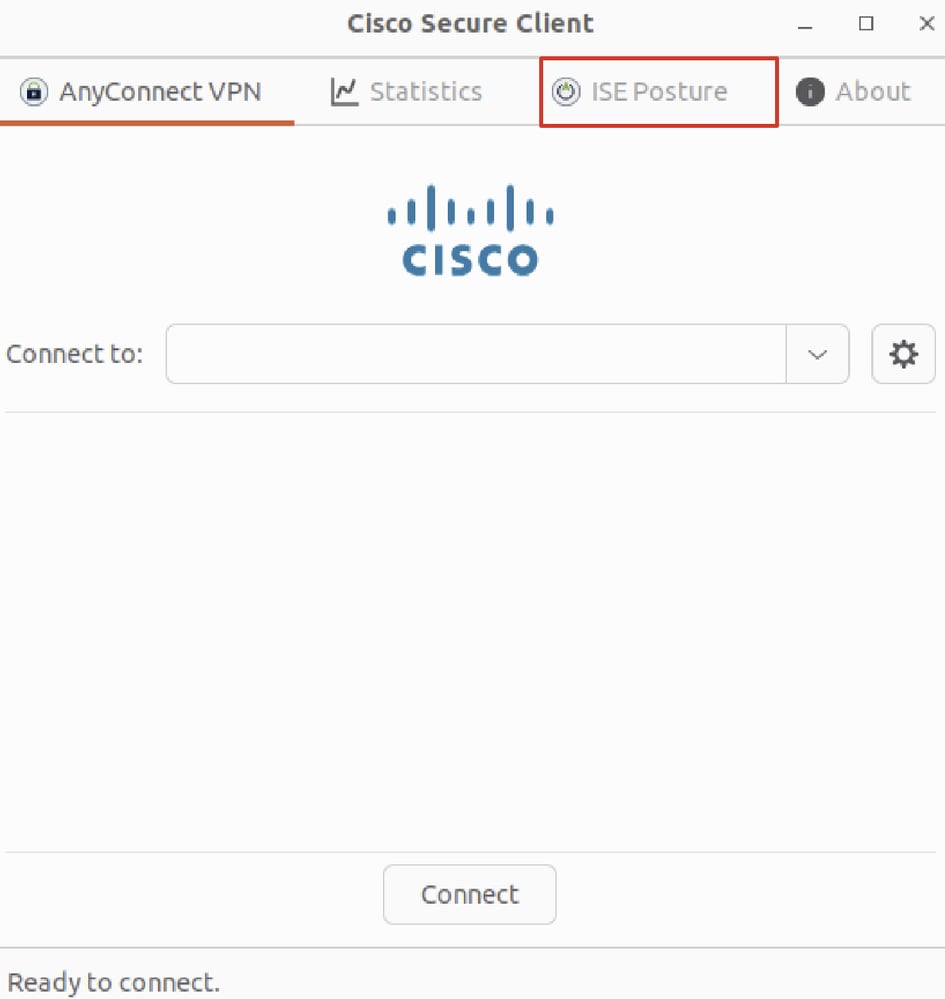 Ubuntu_Secure_Client_ISE_Posture_Installed
步骤 35在Ubuntu客户端上打开终端。导航到路径home/user/Desktop,创建test.txt一个文件以满足ISE上配置的文件条件。
user@ubuntu22-desktop:~$ cd Desktop/
user@ubuntu22-desktop:~/Desktop$ echo test > test.txt
验证
验证使用本部分可确认配置能否正常运行。
步骤1:在Ubuntu客户端上将VPN连接到demo.example.com。
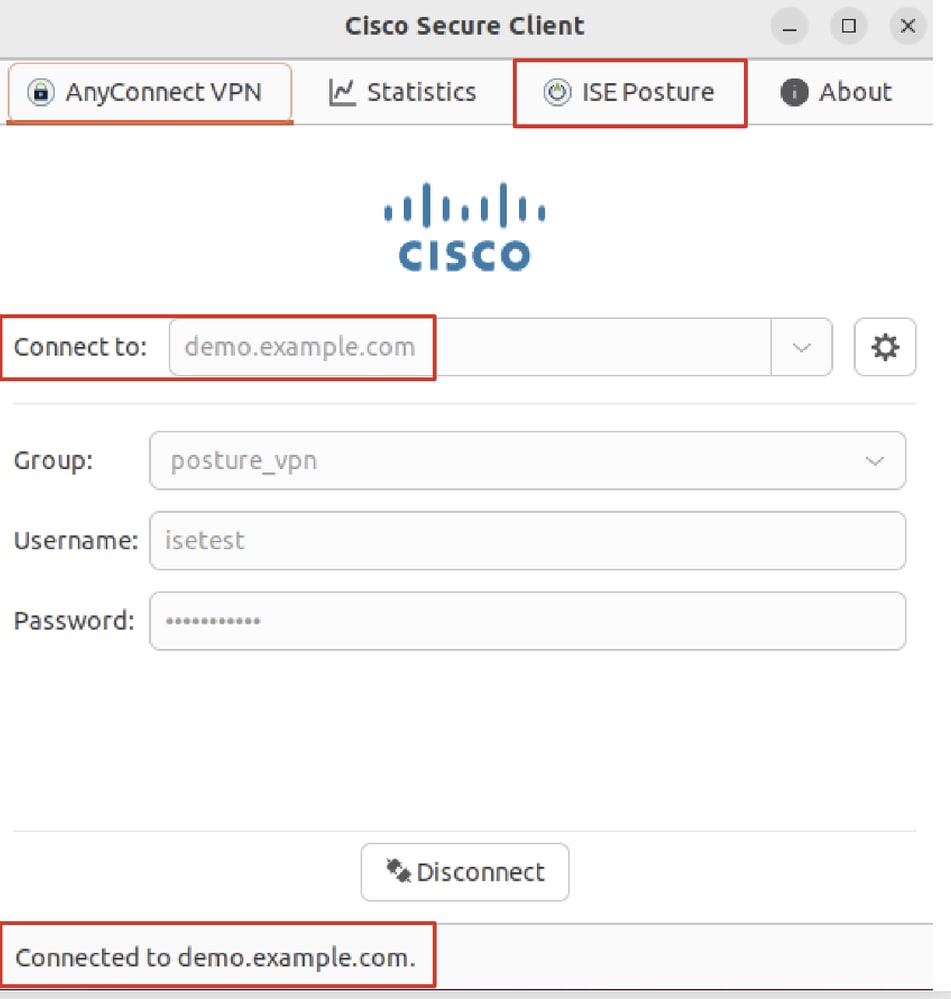 Verify_Ubuntu_Secure_Client_Connected
第二步:检查Ubuntu客户端上的ISE终端安全评估状态。
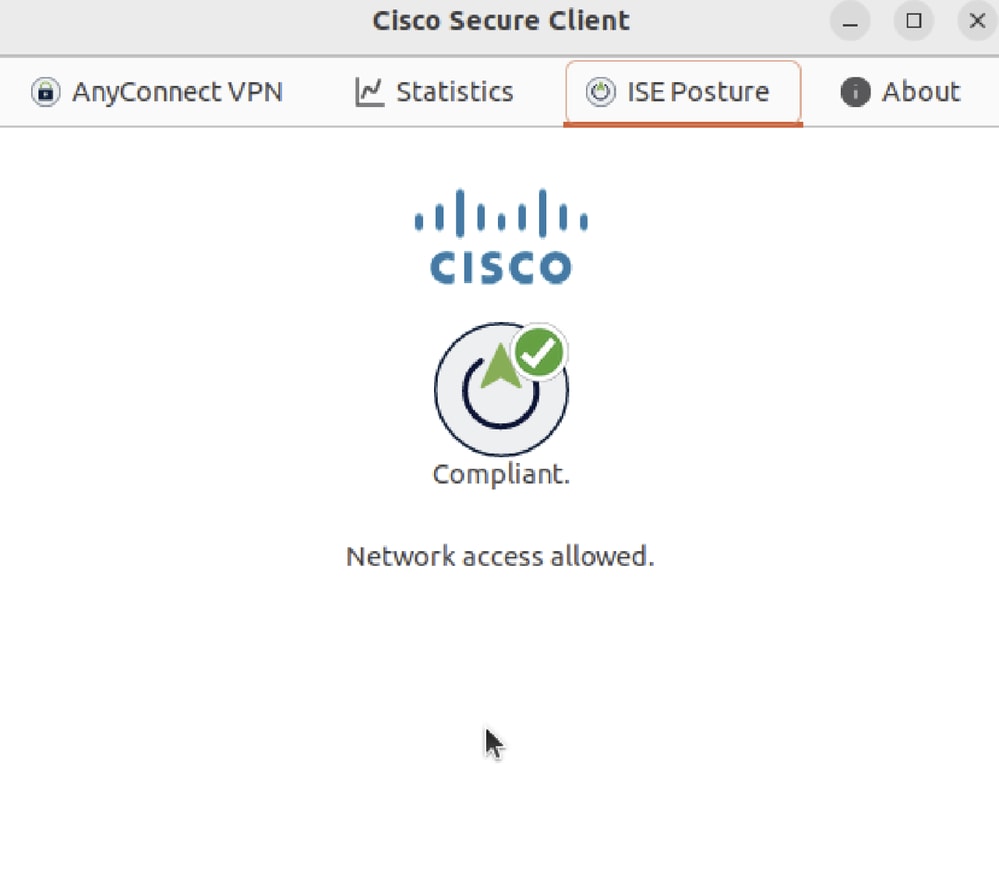 Verify_Ubuntu_Secure_Client_Compliance
第三步:检查ISE上的Radius实时日志。导航到Operations > RADIUS Live Log。
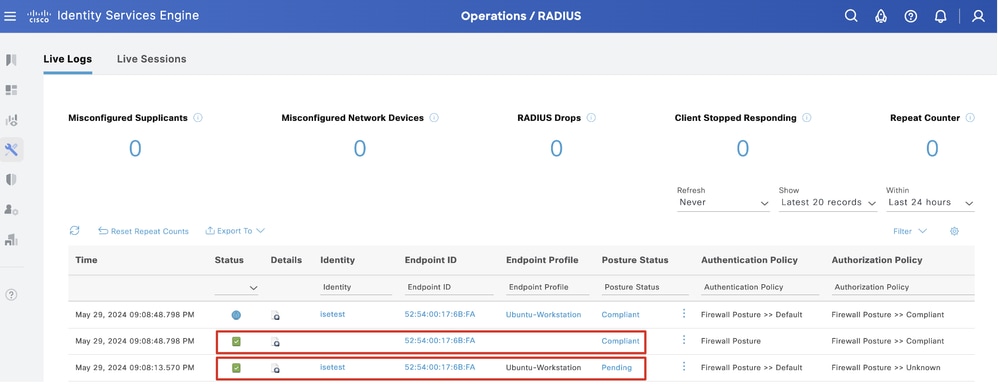 Verify_ISE_LiveLog
第四步:通过SSH或控制台导航至FTD CLI。
>
> system support diagnostic-cli
Attaching to Diagnostic CLI ... Press 'Ctrl+a then d' to detach.
Type help or '?' for a list of available commands.

ftdv741> enable
Password:
ftdv741#
ftdv741# show vpn-sessiondb detail anyconnect

Session Type: AnyConnect Detailed

Username : isetest Index : 33
Assigned IP : 192.168.6.30 Public IP : 192.168.10.13
Protocol : AnyConnect-Parent SSL-Tunnel DTLS-Tunnel
License : AnyConnect Premium
Encryption : AnyConnect-Parent: (1)none SSL-Tunnel: (1)AES-GCM-128 DTLS-Tunnel: (1)AES-GCM-256
Hashing : AnyConnect-Parent: (1)none SSL-Tunnel: (1)SHA256 DTLS-Tunnel: (1)SHA384
Bytes Tx : 51596 Bytes Rx : 17606
Pkts Tx : 107 Pkts Rx : 136
Pkts Tx Drop : 0 Pkts Rx Drop : 0
Group Policy : posture_gp Tunnel Group : posture_vpn
Login Time : 14:02:25 UTC Fri May 31 2024
Duration : 0h:00m:55s
Inactivity : 0h:00m:00s
VLAN Mapping : N/A VLAN : none
Audt Sess ID : cb007182000210006659d871
Security Grp : none Tunnel Zone : 0

AnyConnect-Parent Tunnels: 1
SSL-Tunnel Tunnels: 1
DTLS-Tunnel Tunnels: 1

AnyConnect-Parent:
Tunnel ID : 33.1
Public IP : 192.168.10.13
Encryption : none Hashing : none
TCP Src Port : 59180 TCP Dst Port : 443
Auth Mode : userPassword
Idle Time Out: 30 Minutes Idle TO Left : 29 Minutes
Client OS : linux-64
Client OS Ver: Ubuntu 22.04 LTS 22.04 (Jammy Jellyfish)
Client Type : AnyConnect
Client Ver : Cisco AnyConnect VPN Agent for Linux 5.1.3.62
Bytes Tx : 6364 Bytes Rx : 0
Pkts Tx : 1 Pkts Rx : 0
Pkts Tx Drop : 0 Pkts Rx Drop : 0

SSL-Tunnel:
Tunnel ID : 33.2
Assigned IP :192.168.6.30 Public IP : 192.168.10.13
Encryption : AES-GCM-128 Hashing : SHA256
Ciphersuite : TLS_AES_128_GCM_SHA256
Encapsulation: TLSv1.3 TCP Src Port : 59182
TCP Dst Port : 443 Auth Mode : userPassword
Idle Time Out: 30 Minutes Idle TO Left : 29 Minutes
Client OS : Linux_64
Client Type : SSL VPN Client
Client Ver : Cisco AnyConnect VPN Agent for Linux 5.1.3.62
Bytes Tx : 6364 Bytes Rx : 498
Pkts Tx : 1 Pkts Rx : 6
Pkts Tx Drop : 0 Pkts Rx Drop : 0
Filter Name : #ACSACL#-IP-PERMIT_ALL_IPV4_TRAFFIC-57f6b0d3

DTLS-Tunnel:
Tunnel ID : 33.3
Assigned IP :192.168.6.30 Public IP : 192.168.10.13
Encryption : AES-GCM-256 Hashing : SHA384
Ciphersuite : ECDHE-ECDSA-AES256-GCM-SHA384
Encapsulation: DTLSv1.2 UDP Src Port : 56078
UDP Dst Port : 443 Auth Mode : userPassword
Idle Time Out: 30 Minutes Idle TO Left : 29 Minutes
Client OS : Linux_64
Client Type : DTLS VPN Client
Client Ver : Cisco AnyConnect VPN Agent for Linux 5.1.3.62
Bytes Tx : 38868 Bytes Rx : 17108
Pkts Tx : 105 Pkts Rx : 130
Pkts Tx Drop : 0 Pkts Rx Drop : 0
Filter Name : #ACSACL#-IP-PERMIT_ALL_IPV4_TRAFFIC-57f6b0d3
故障排除
故障排除本部分提供了可用于对配置进行故障排除的信息。
对于终端安全评估流程和思科安全客户端和ISE故障排除,请检查CCO文档ISE终端安全评估样式比较高级版和2.2后版本以及ISE会话管理和终端安全评估故障排除。
相关信息
相关信息 修订历史记录
| 版本 | 发布日期 | 备注 |
|---|---|---|
1.0 |
01-Jul-2024 |
初始版本 |
由思科工程师提供
- 马克·尼思科技术领导者
- 晁峰思科技术领导者
 反馈
反馈