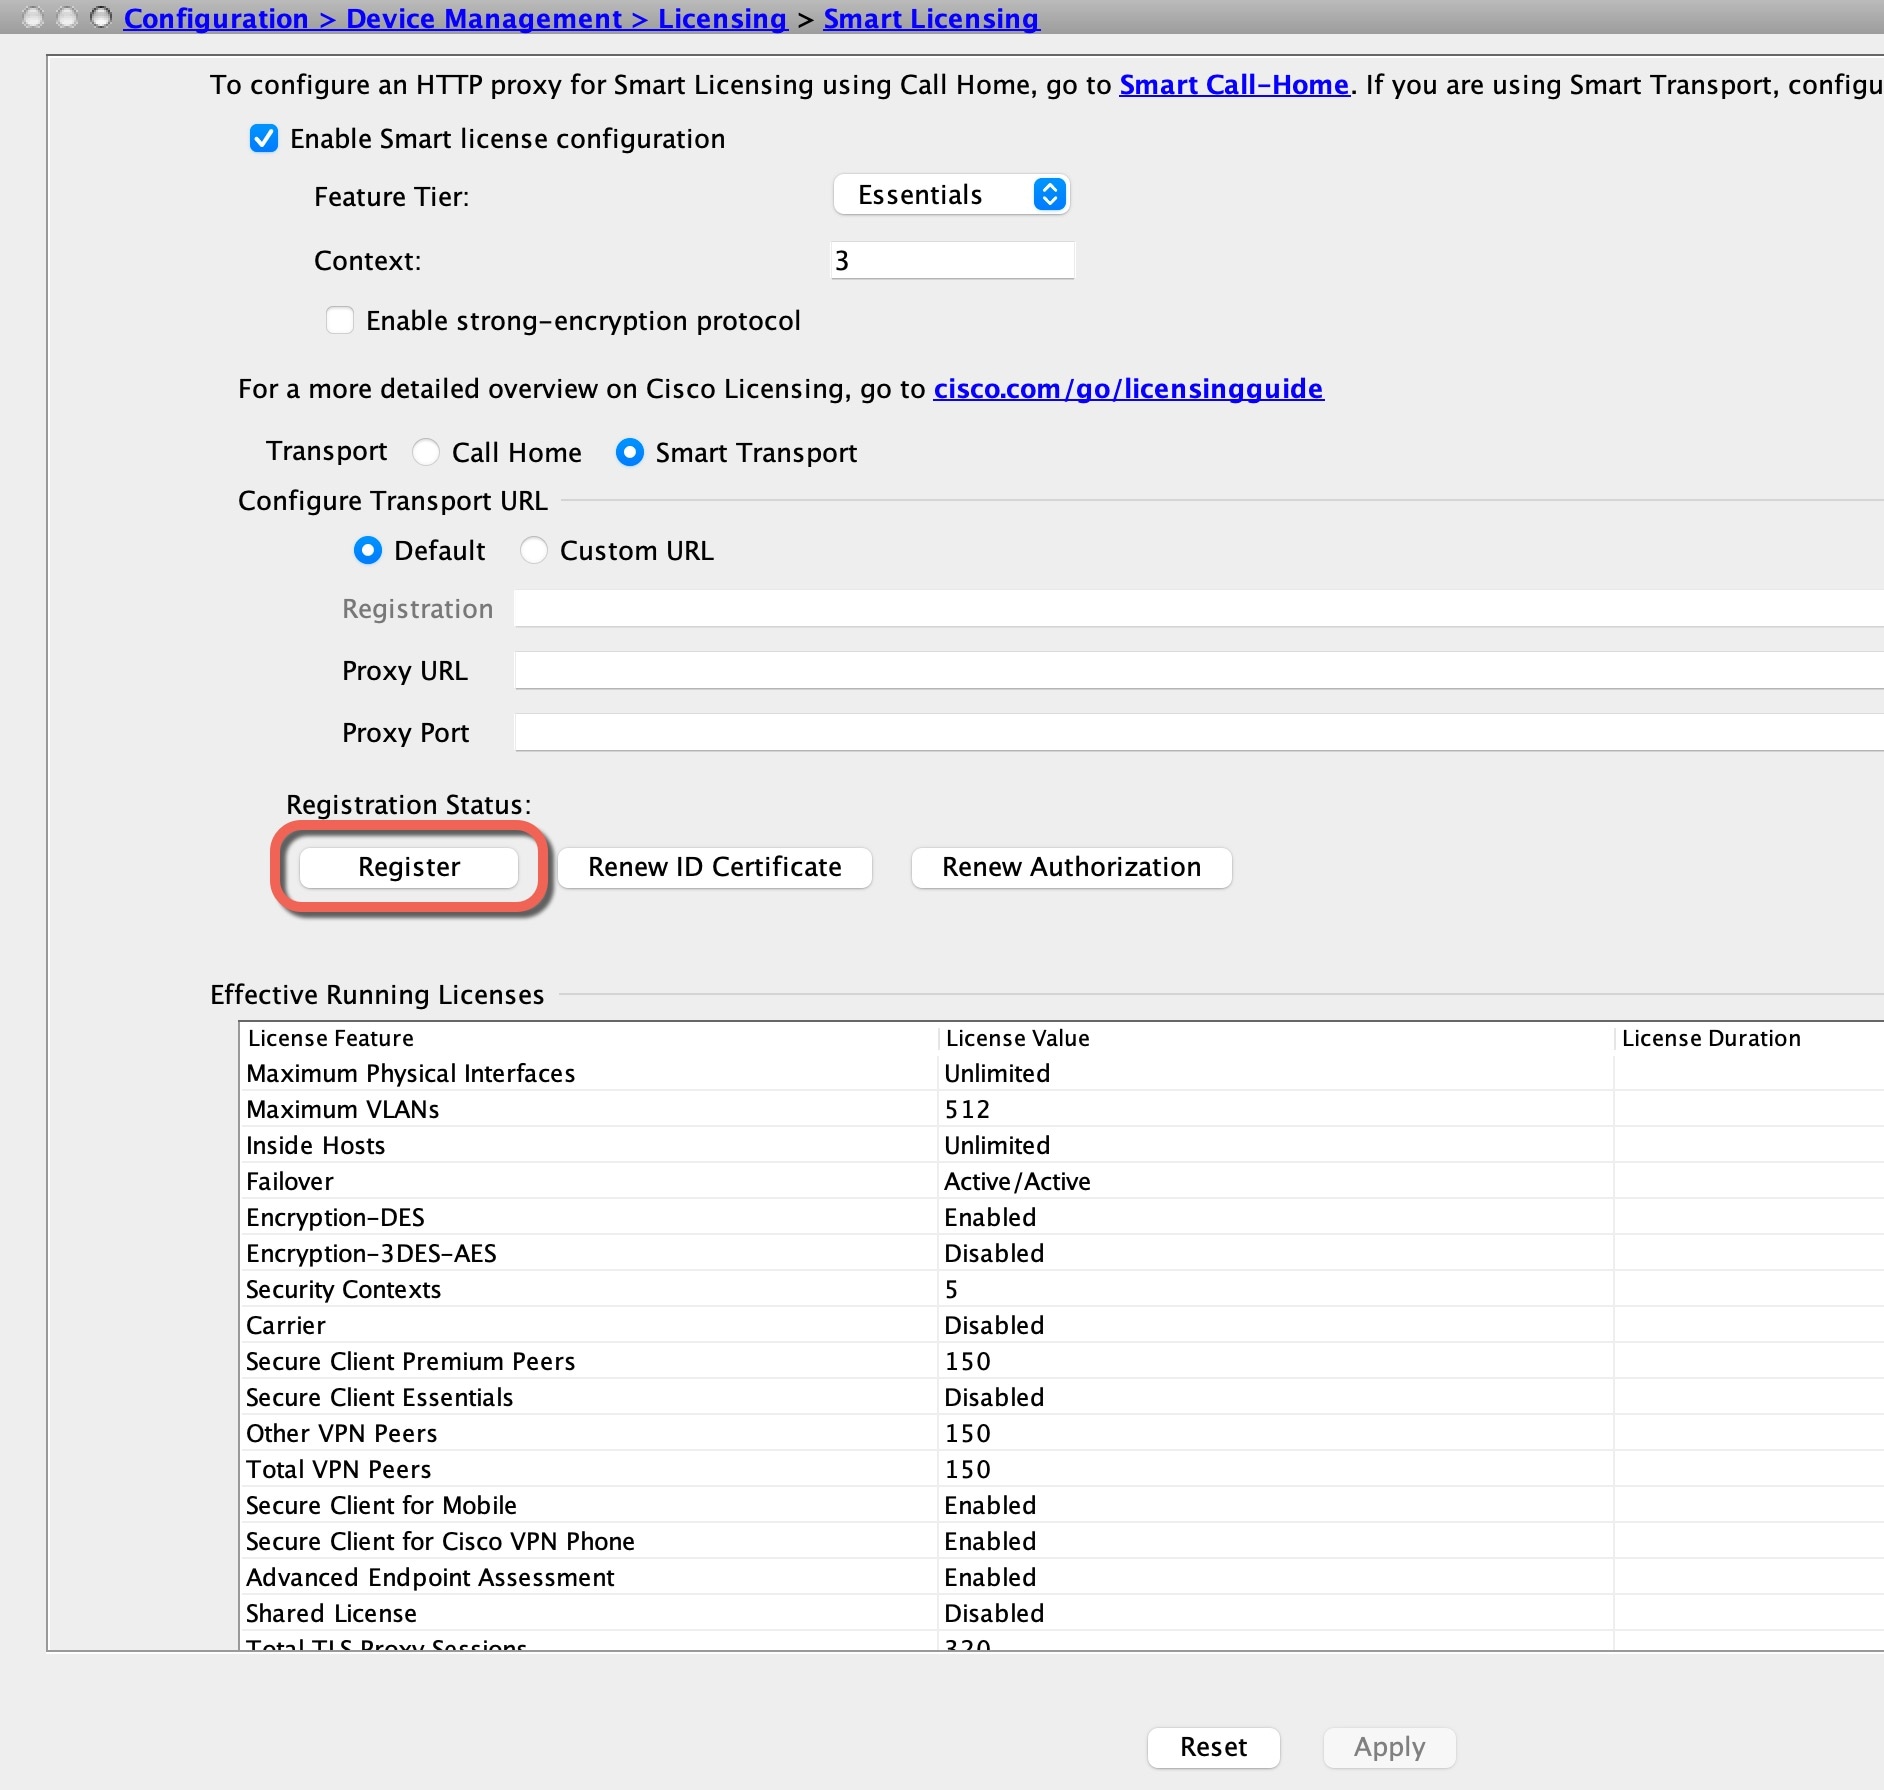
配置基本策略

使用 ASDM 向导来配置许可并添加到默认配置中。

(可选)更改 IP 地址

默认情况下,您可以从以下界面启动 ASDM:

  • 以太网 1/2 - 192.168.1.1

  • 管理 1/1 - DHCP 的 IP 地址

如果不能使用默认 IP 地址,则可以在 ASA CLI 上设置以太网 1/2 接口的 IP 地址。
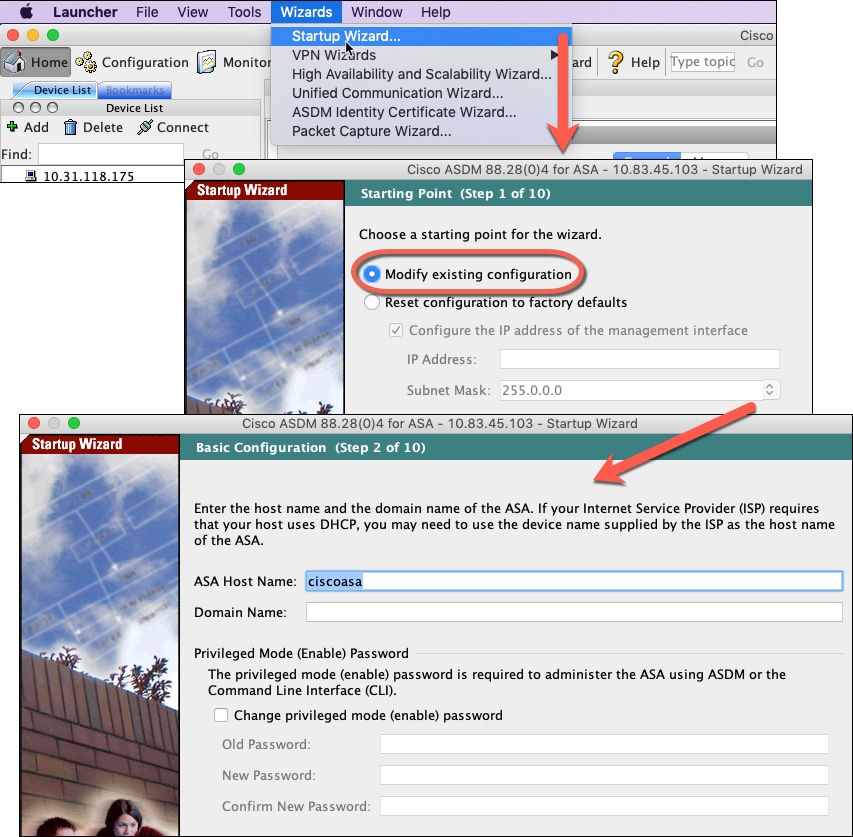
过程


步骤 1

连接到控制台端口并访问全局配置模式。请参阅访问ASA CLI

步骤 2

恢复默认配置和您选择的 IP 地址。

configure factory-default [ip_address [mask]]

示例:


ciscoasa(config)# configure factory-default 10.1.1.151 255.255.255.0
Based on the management IP address and mask, the DHCP address
pool size is reduced to 103 from the platform limit 256

WARNING: The boot system configuration will be cleared.
The first image found in disk0:/ will be used to boot the
system on the next reload.
Verify there is a valid image on disk0:/ or the system will
not boot.

Begin to apply factory-default configuration:
Clear all configuration
Executing command: interface ethernet1/2
Executing command: nameif inside
INFO: Security level for "inside" set to 100 by default.
Executing command: ip address 10.1.1.151 255.255.255.0
Executing command: security-level 100
Executing command: no shutdown
Executing command: exit
Executing command: http server enable
Executing command: http 10.1.1.0 255.255.255.0 management
Executing command: dhcpd address 10.1.1.152-10.1.1.254 management
Executing command: dhcpd enable management
Executing command: logging asdm informational
Factory-default configuration is completed
ciscoasa(config)# 

步骤 3

将默认配置保存到闪存。

write memory


登录 ASDM

启动 ASDM 以便配置 ASA。

过程


步骤 1

在浏览器中输入以下 URL 之一。

  • https://192.168.1.1 - 内部(以太网 1/2)接口 IP 地址。

  • https://management_ip - 从 DHCP 分配的管理 1/1 接口 IP 地址。


请务必指定 https://

此时将显示 Cisco ASDM 网页。您可能会看到浏览器安全警告,因为 ASA 没有安装证书;您可以安全地忽略这些警告并访问网页。

步骤 2

点击 安装 ASDM 启动程序

步骤 3

按照屏幕上的说明进启动 ASDM。

系统将显示 Cisco ASDM-IDM Launcher

步骤 4

将用户名和密码字段留空 时设置的启用密码,然后点击确定 (OK)

系统将显示 ASDM 主窗口。


配置许可

将防火墙注册到智能软件管理器。

开始之前

根据 获取许可证 为防火墙获取许可证。

过程


步骤 1

Cisco Smart Software Manager 中,为要将此设备添加到的虚拟帐户请求并复制注册令牌。

  1. 点击清单 (Inventory)

  2. General 选项卡上,点击 New Token

  3. Create Registration Token 对话框中,输入以下设置,然后点击 Create Token

    • Description

    • Expire After - 思科建议该时间为 30 天。

    • 最大使用次数

    • Allow export-controlled functionaility on the products registered with this token - 启用导出合规性标志。

    系统将令牌添加到您的清单中。

  4. 点击令牌右侧的箭头图标可以打开 Token 对话框,可以从中将令牌 ID 复制到剪贴板。当需要注册ASA时,请准备好此令牌,以在该程序后面的部分使用。

    图 1. 查看令牌
    图 2. 复制令牌

步骤 2

在 ASDM 中,依次选择配置 (Configuration) > 设备管理器 (Device Management) > 许可 (Licensing) > 智能许可 (Smart Licensing)

步骤 3

设置许可授权。

  1. 选中 Enable Smart license configuration

  2. 功能层 (Feature Tier) 下拉列表中,选择基础 (Essentials)

    仅基础层可用。

  3. (可选) 如果使用的是情景许可证,则输入情景的数量。

    您可以在没有许可证的情况下使用 2 种情景。情景的最大数目取决于您的型号:

    • Firepower 1120 - 5 种情景

    • Firepower 1140 - 10 种情景

    例如,对于 Firepower 1120 而言,要使用最大值 - 5 种情景,请为情景数输入 3;此值将与默认值 2 相加。

  4. 点击应用

  5. 点击工具栏中的 Save 图标。

步骤 4

点击 Register

步骤 5

思科智能软件管理器中的注册令牌输入 ID 令牌 (ID Token) 字段中。

步骤 6

点击 Register

当许可状态更新时,ASDM 会刷新页面。您还可以选择监控 (Monitoring) > 属性 (Properties) > 智能许可证 (Smart License)以检查许可证状态,尤其是注册失败时。

步骤 7

退出并重新启动 ASDM。

当您更改许可证时,您需要重新启动 ASDM 才能显示更新屏幕。


使用启动向导配置 ASA

利用 ASDM,您可以使用向导来配置基本功能和高级功能。“启动向导”以默认配置为基础:

  • 内部→外部流量

  • 从内部到外部所有流量的接口 PAT。

Startup Wizard 将引导您完成配置:

  • 启用密码

  • 接口,包括更改内部和外部接口 IP 地址以及启用接口。

  • 静态路由

  • DHCP 服务器

  • 其他...

过程


步骤 1

依次选择向导 (Wizards) > 启动向导 (Startup Wizard),然后点击修改现有配置 (Modify existing configuration) 单选按钮。

步骤 2

在每个页面上点击下一步 (Next) 以配置您需要的功能。

步骤 3

有关其他向导,请参阅《ASDM 一般操作配置指南》