- Flexible Netflow Overview
- Flexible NetFlow�IPv4 Unicast Flows
- Flexible NetFlow�IPv6 Unicast Flows
- Flexible NetFlow�MPLS Egress NetFlow
- Flexible NetFlow v9 Export Format
- Flexible NetFlow Output Features on Data Export
- Finding Feature Information
- Using Flexible NetFlow Flow Sampling
- Flexible NetFlow - Layer 2 Fields
- Flexible Netflow - Ingress VRF Support
- Flexible NetFlow NBAR Application Recognition Overview
- Support for ISSU and SSO
- Flexible NetFlow IPFIX Export Format
- Flexible Netflow Export to an IPv6 Address
- Flexible Netflow�Egress VRF Support
- Flexible NetFlow - MPLS Support
- Flexible NetFlow�Prevent Export Storms
Flexible NetFlow—MPLS Egress NetFlow
The Flexible NetFlow--MPLS Egress NetFlow feature allows you to capture IP flow information for packets undergoing MPLS label disposition; that is, packets that arrive on a router as MPLS packets and are transmitted as IP packets.
- Finding Feature Information
- Information About Flexible NetFlow MPLS Egress NetFlow
- How to Configure Flexible NetFlow MPLS Egress NetFlow
- Configuration Examples for Flexible NetFlow MPLS Egress NetFlow
- Additional References
- Feature Information for Flexible NetFlow - MPLS Egress NetFlow
Finding Feature Information
Your software release may not support all the features documented in this module. For the latest caveats and feature information, see Bug Search Tool and the release notes for your platform and software release. To find information about the features documented in this module, and to see a list of the releases in which each feature is supported, see the feature information table at the end of this module.
Use Cisco Feature Navigator to find information about platform support and Cisco software image support. To access Cisco Feature Navigator, go to www.cisco.com/go/cfn. An account on Cisco.com is not required.
Information About Flexible NetFlow MPLS Egress NetFlow
Flexible NetFlow MPLS Egress NetFlow
The Flexible NetFlow - MPLS Egress NetFlow feature allows you to capture IP flow information for packets that arrive on a router as Multiprotocol Label Switching (MPLS) packets and are transmitted as IP packets. This feature allows you to capture the MPLS VPN IP flows that are traveling through the service provider backbone from one site of a VPN to another site of the same VPN. The Flexible NetFlow - MPLS Egress NetFlow feature is enabled by applying a flow monitor in output (egress) mode on the provider edge (PE) to customer edge (CE) interface of the provider’s network.
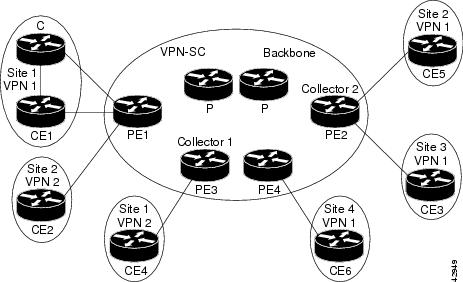
The figure below shows a sample MPLS VPN network topology that includes four VPN 1 sites and two VPN 2 sites. If the Flexible NetFlow - MPLS Egress NetFlow is enabled on an outgoing PE interface by applying a flow monitor in output mode, IP flow information for packets that arrive at the PE as MPLS packets (from an MPLS VPN) and that are transmitted as IP packets to the PE router is captured. For example:
- To capture the flow of traffic going to site 2 of VPN 1 from any remote VPN 1 sites, you enable a flow monitor in output mode on link PE2-CE5 of provider edge router PE2.
- To capture the flow of traffic going to site 1 of VPN 2 from any remote VPN 2 site, you enable a flow monitor in output mode on link PE3-CE4 of the provider edge router PE3.
The flow data is stored in the Flexible NetFlow cache. You can use the show flow monitor monitor-name cachecommand to display the flow data in the cache.
If you configure a Flexible NetFlow exporter for the flow monitors you use for the Flexible NetFlow - MPLS Egress NetFlow feature, the PE routers will export the captured flows to the configured collector devices in the provider network. Applications such as the Network Data Analyzer or the VPN Solution Center (VPN-SC) can gather information from the captured flows and compute and display site-to-site VPN traffic statistics.
Limitations
When using Flexible NetFlow to monitor outbound traffic on a router at the edge of an MPLS cloud, for IP traffic that leaves over a VRF, the following fields are not collected and have a value of 0:
How to Configure Flexible NetFlow MPLS Egress NetFlow
Configuring a Flow Exporter for the Flow Monitor
Perform this optional task to configure a flow exporter for the flow monitor in order to export the data that is collected by Flexible NetFlow to a remote system for further analysis and storage.
Flow exporters are used to send the data that you collect with Flexible NetFlow to a remote system such as a NetFlow Collection Engine. Exporters use UDP as the transport protocol and use the Version 9 export format.
 Note |
Each flow exporter supports only one destination. If you want to export the data to multiple destinations, you must configure multiple flow exporters and assign them to the flow monitor. You can export to a destination using either an IPv4 or IPv6 address. |
1. enable
2. configure terminal
3. flow exporter exporter-name
4. description description
5. destination {hostname | ip-address} [vrf vrf-name]
6. export-protocol {netflow-v5 | netflow-v9 | ipfix}
7. transport udp udp-port
8. exit
9. flow monitor flow-monitor-name
10. exporter exporter-name
11. end
12. show flow exporter exporter-name
13. show running-config flow exporter exporter-name
DETAILED STEPS
Creating a Customized Flow Monitor
Perform this required task to create a customized flow monitor.
Each flow monitor has a separate cache assigned to it. Each flow monitor requires a record to define the contents and layout of its cache entries.
If you want to use a customized record instead of using one of the Flexible NetFlow predefined records, you must create the customized record before you can perform this task.
If you want to add a flow exporter to the flow monitor for data export, you must create the exporter before you can complete this task.
Note |
You must use the no ip flow monitor command to remove a flow monitor from all of the interfaces to which you have applied it before you can modify the parameters for the record command on the flow monitor. For information about the ip flow monitor command, refer to the Cisco IOS Flexible NetFlow Command Reference. |
1. enable
2. configure terminal
3. flow monitor monitor-name
4. description description
5. record {record-name | netflow-original | netflow {ipv4 | ipv6} record [peer]}
6. cache {entries number | timeout {active | inactive | update} seconds | type {immediate | normal | permanent}}
7. Repeat Step 6 as required to finish modifying the cache parameters for this flow monitor.
8. statistics packet protocol
9. statistics packet size
10. exporter exporter-name
11. end
12. show flow monitor [[name] monitor-name [cache [format {csv | record | table}]] [statistics]]
13. show running-config flow monitor monitor-name
DETAILED STEPS
| Command or Action | Purpose | |
|---|---|---|
| Step 1 | enable Example: Device> enable |
Enables privileged EXEC mode.
|
| Step 2 | configure terminal Example: Device# configure terminal |
Enters global configuration mode. |
| Step 3 | flow monitor monitor-name Example: Device(config)# flow monitor FLOW-MONITOR-1 |
Creates a flow monitor and enters Flexible NetFlow flow monitor configuration mode.
|
| Step 4 | description description Example: Device(config-flow-monitor)# description Used for basic ipv4 traffic analysis |
(Optional) Creates a description for the flow monitor. |
| Step 5 | record {record-name | netflow-original | netflow {ipv4 | ipv6} record [peer]} Example: Device(config-flow-monitor)# record FLOW-RECORD-1 |
Specifies the record for the flow monitor. |
| Step 6 | cache {entries number | timeout {active | inactive | update} seconds | type {immediate | normal | permanent}} Example: Device(config-flow-monitor)# cache type normal |
(Optional) Modifies the flow monitor cache parameters such as timeout values, number of cache entries, and the cache type.
|
| Step 7 | Repeat Step 6 as required to finish modifying the cache parameters for this flow monitor. | — |
| Step 8 | statistics packet protocol Example: Device(config-flow-monitor)# statistics packet protocol |
(Optional) Enables the collection of protocol distribution statistics for Flexible NetFlow monitors. |
| Step 9 | statistics packet size Example: Device(config-flow-monitor)# statistics packet size |
(Optional) Enables the collection of size distribution statistics for Flexible NetFlow monitors. |
| Step 10 | exporter exporter-name Example: Device(config-flow-monitor)# exporter EXPORTER-1 |
(Optional) Specifies the name of an exporter that was created previously. |
| Step 11 | end Example: Device(config-flow-monitor)# end |
Exits Flexible NetFlow flow monitor configuration mode and returns to privileged EXEC mode. |
| Step 12 | show flow monitor [[name] monitor-name [cache [format {csv | record | table}]] [statistics]] Example: Device# show flow monitor FLOW-MONITOR-2 cache |
(Optional) Displays the status and statistics for a Flexible NetFlow flow monitor. |
| Step 13 | show running-config flow monitor monitor-name Example: Device# show running-config flow monitor FLOW_MONITOR-1 |
(Optional) Displays the configuration of the specified flow monitor. |
Applying a Flow Monitor to an Interface
Before it can be activated, a flow monitor must be applied to at least one interface. Perform this required task to activate a flow monitor.
1. enable
2. configure terminal
3. interface type number
4. {ip | ipv6} flow monitor monitor-name {input | output}
5. Repeat Steps 3 and 4 to activate a flow monitor on any other interfaces in the device over which you want to monitor traffic.
6. end
7. show flow interface type number
8. show flow monitor name monitor-name cache format record
DETAILED STEPS
| Command or Action | Purpose | |
|---|---|---|
| Step 1 | enable Example: Device> enable |
Enables privileged EXEC mode.
|
| Step 2 | configure terminal Example: Device# configure terminal |
Enters global configuration mode. |
| Step 3 | interface type number Example: Device(config)# interface GigabitEthernet 0/0/0 |
Specifies an interface and enters interface configuration mode. |
| Step 4 | {ip | ipv6} flow monitor monitor-name {input | output} Example: Device(config-if)# ip flow monitor FLOW-MONITOR-1 input |
Activates a flow monitor that was created previously by assigning it to the interface to analyze traffic. |
| Step 5 | Repeat Steps 3 and 4 to activate a flow monitor on any other interfaces in the device over which you want to monitor traffic. | — |
| Step 6 | end Example: Device(config-if)# end |
Exits interface configuration mode and returns to privileged EXEC mode. |
| Step 7 | show flow interface type number Example: Device# show flow interface GigabitEthernet 0/0/0 |
Displays the status of Flexible NetFlow (enabled or disabled) on the specified interface. |
| Step 8 | show flow monitor name monitor-name cache format record Example: Device# show flow monitor name FLOW_MONITOR-1 cache format record |
Displays the status, statistics, and flow data in the cache for the specified flow monitor. |
Configuration Examples for Flexible NetFlow MPLS Egress NetFlow
Example: Configuring Flexible NetFlow Egress Accounting for IPv4 and IPv6 Traffic
The following example shows how to configure Flexible NetFlow egress accounting for IPv4 and IPv6 traffic.
This example starts in global configuration mode.
!
flow record v4_r1
match ipv4 tos
match ipv4 protocol
match ipv4 source address
match ipv4 destination address
match transport source-port
match transport destination-port
collect counter bytes long
collect counter packets long
!
flow record v6_r1
match ipv6 traffic-class
match ipv6 protocol
match ipv6 source address
match ipv6 destination address
match transport source-port
match transport destination-port
collect counter bytes long
collect counter packets long
!
flow monitor FLOW-MONITOR-1
 record v4_r1
 exit
!
!
flow monitor FLOW-MONITOR-2
 record v6_r1
 exit
!
ip cef
ipv6 cef
!
interface GigabitEthernet0/0/0
 ip address 172.16.6.2 255.255.255.0
 ipv6 address 2001:DB8:2:ABCD::2/48
 ip flow monitor FLOW-MONITOR-1 output
 ipv6 flow monitor FLOW-MONITOR-2 output
!
Additional References
Related Documents
| Related Topic |
Document Title |
|---|---|
| Cisco IOS commands |
|
| Flexible NetFlow conceptual information and configuration tasks |
Flexible NetFlow Configuration Guide |
| Flexible NetFlow commands |
Cisco IOS Flexible NetFlow Command Reference |
Standards/RFCs
| Standard |
Title |
|---|---|
| No new or modified standards/RFCs are supported by this feature. |
— |
MIBs
| MIB |
MIBs Link |
|---|---|
| None |
To locate and download MIBs for selected platforms, Cisco software releases, and feature sets, use Cisco MIB Locator found at the following URL: |
Technical Assistance
| Description |
Link |
|---|---|
| The Cisco Support and Documentation website provides online resources to download documentation, software, and tools. Use these resources to install and configure the software and to troubleshoot and resolve technical issues with Cisco products and technologies. Access to most tools on the Cisco Support and Documentation website requires a Cisco.com user ID and password. |
Feature Information for Flexible NetFlow - MPLS Egress NetFlow
The following table provides release information about the feature or features described in this module. This table lists only the software release that introduced support for a given feature in a given software release train. Unless noted otherwise, subsequent releases of that software release train also support that feature.
Use Cisco Feature Navigator to find information about platform support and Cisco software image support. To access Cisco Feature Navigator, go to www.cisco.com/go/cfn. An account on Cisco.com is not required.
| Feature Name |
Releases |
Feature Information |
|---|---|---|
| Flexible NetFlow - MPLS Egress NetFlow |
12.2(33)SRE 12.2(50)SY 12.4(22)T 15.0(1)SY 15.0(1)SY1 Cisco IOS XE Release 3.1S |
The Flexible NetFlow--MPLS Egress NetFlow feature allows you to capture IP flow information for packets undergoing MPLS label disposition; that is, packets that arrive on a router as MPLS packets and are transmitted as IP packets. Support for this feature was added for Cisco 7200 and 7300 NPE series routers in Cisco IOS Release 12.2(33)SRE. No commands were introduced or modified by this feature. |
 Feedback