Cisco Unified Communications Manager Line-Side Support


Note


The Cisco Unified Communications Manager (Unified Communications Manager) Lineside feature is no longer supported. The feature is deprecated for Cisco Unified Border Element on Cisco IOS 15.5(2)T Release and later releases. To support this feature, you must configure Cisco Unified Border Element on Cisco IOS 15.4(2)T or prior releases.


Cisco Unified Communications Manager is an enterprise-class IP communications processing system. It extends enterprise telephony features and capabilities to IP phones, media processing devices, VoIP gateways, mobile devices, and multimedia applications. Cisco Unified Border Element (Cisco UBE) provides line-side support for Cisco Unified Communications Manager. This support enables communication between devices (such as phones) used by remote users on different logical networks, in both cloud-based and premise-based deployments.

Feature Information for Cisco Unified Communications Manager Line-Side Support

The following table provides release information about the feature or features described in this module. This table lists only the software release that introduced support for a given feature in a given software release train. Unless noted otherwise, subsequent releases of that software release train also support that feature.

Use Cisco Feature Navigator to find information about platform support and Cisco software image support. To access Cisco Feature Navigator, go to https://cfnng.cisco.com/. An account on Cisco.com is not required.
Table 1. Feature Information for Cisco Unified Communications Manager Line-Side Support

Feature Name

Releases

Feature Information

Cisco Unified Communications Manager Line-Side Support

15.5(2)T

The Cisco Unified Communications Manager (CUCM) Line-Side Support feature was supported until the release 15.4(2)T. This feature has been deprecated from 15.5(2)T release onwards.

Simplified Line-Side Support of CUCM on CUBE

15.4(2)T

Cisco IOS XE Release 3.12S

The Simplified Line-Side Support of CUCM on CUBE feature simplifies the complex CUBE configurations required for registering IP Phones on a CUCM through CUBE using a single CLI that automatically applies all the necessary configurations.

The following commands were modified by this feature: extension cucm and voice-class sip extension cucm .

Cisco Unified Communications Manager Line-Side Support

15.3(3)M

Cisco IOS XE Release 3.10S

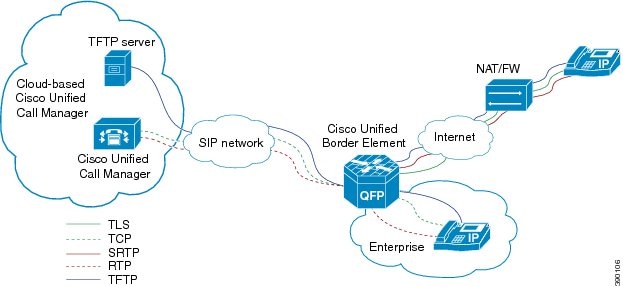
The Cisco Unified Communications Manager Line-Side Support feature provides line-side support for Cisco Unified Communications Manager and IP phones deployed on different logical networks, in both cloud-based and premise-based deployments.

The following commands were introduced or modified: access-secure , capf-address , clear voice phone-proxy all-sessions , complete (ctl file) , ctl-file (phone proxy) , debug voice phone-proxy , description (ctl file) , description (phone proxy) , disable service-settings , max-concurrent-sessions , phone-proxy (dial peer) , port-range , record-entry , show voice class ctl-file , show voice class phone-proxy , service-map , session-timeout , tftp-server address , voice-ctl-file , voice-phone-proxy .

Restrictions for Cisco Unified Communications Manager Line-Side Support

  • In Cisco Unified Communications Manager Line-Side Support deployments, Cisco Unified Border Element does not support TFTP encrypted configuration files.

Information About Cisco Unified Communications Manager Line-Side Support

Cisco UBE Line-Side Deployment

In a typical deployment Cisco Unified Border Element (Cisco UBE) is placed between the Cisco Unified Communications Manager and the endpoint. Before invoking a service the phone contacts the CUBE Trivial File Transfer Protocol (TFTP) server to get configuration information such as the Certificate Trust List (CTL) file and phone-specific configuration settings. The phone then registers with Cisco Unified Communications Manager. In the deployment shown below, Cisco Unified Communications Manager and the phone configuration operate in unsecured mode (TCP to Real-Time Transport Protocol). The phone configuration can be changed to operate in a secure mode (Transport Layer Security Secure to Real-Time Transport Protocol) if needed. When the phone registration is completed the phone can invoke all normal call services.

Figure 1. Cisco UBE Line-Side Deployment


Line-Side Deployment Scenarios

Cisco Unified Call Manager Line-Side support can be deployed in the following ways:

  • Line-Side Secure Deployment -

    CUCM line-side secure deployment, provides secure access between phone and CUBE. CUBE terminates the TLS connection from phone and initiates a TCP connection to CUCM to perform TLS-TCP inter-working. Refer to 'Example: Configuring CUCM Secure Line-Side' section for the steps involved in configuring secure deployment.

  • Line-Side Non-Secure Deployment -

    CUCM line-side non-secure deployment, provides a non-secure connection between phone and CUBE. Refer to 'Example: Configuring CUCM Non-Secure Line-Side' section for the steps involved in configuring non-secure deployment.

Line-Side Support for CUCM on CUBE

For an IP phone to register on a CUCM through CUBE, CUBE must be configured to do the following requirements.

  • TCP must be used for registration.
  • The MAC address of the device (device ID) and the device name, present in the CONTACT header of the REGISTER message, need to be copied to the outgoing messages and passed to the CUCM intact.
Table 2. Command for Line-Side Support for CUCM on CUBE

Dial-Peer Configuration Mode (config-dial-peer)

Global VoIP Configuration mode (config-voi-serv)

voice-class sip extension cucm

sip

extension cucm

When Line Side Support for CUCM on CUBE feature is configured, the following supported, nonmandatory headers are passed through automatically without the need for further configuration:

  • Call-Info
  • Content-ID
  • Allow-Events
  • Supported
  • Remote-Party-ID
  • Require
  • Referred-By
Figure 2. Predefined Supported NonMandatory Headers

When Line Side Support for CUCM on CUBE is configured, predefined SIP profiles automatically remove the Cisco-Guide header from the outgoing INVITE.

Figure 3. Predefined SIP Profile

Note


If a user explicitly configures the above configurations, ensure that the configurations are merged with the above automatic configurations.

Configuring a PKI Trustpoint

SUMMARY STEPS

  1. crypto key generate rsa [label key-label] [modulus modulus-size] general-keys
  2. crypto pki trustpoint name
  3. enrollment selfsigned
  4. subject-name [x.500-name]
  5. subject-alt-name sip-security-profile-name
  6. revocation-check method1[method2 [method3]]
  7. rsakeypair key-label

DETAILED STEPS

  Command or Action Purpose

Step 1

crypto key generate rsa [label key-label] [modulus modulus-size] general-keys

Example:


Device(config)# crypto key generate rsa label pp_rsa modulus 1024 general-keys 
Generates a RSA key pair.

Note


A self-signed key can only support a modulus-size value of 1024 bits.

Step 2

crypto pki trustpoint name

Example:


Device(config)# crypto pki trustpoint callmg23

Declares the trustpoint that the device should use and enters ca-trustpoint configuration mode.

Step 3

enrollment selfsigned

Example:


Device(config-ca-trustpoint)# enrollment selfsigned
 

Specifies self-signed enrollment for a trustpoint.

Step 4

subject-name [x.500-name]

Example:


Device(config-ca-trustpoint)# subject-name CN=ASR1006-CCN-4

Specifies the subject name in the certificate request.

Step 5

subject-alt-name sip-security-profile-name

Example:


Device(config-ca-trustpoint)# subject-alt-name 6961_SEC.cisco.com 8941_SEC.cisco.com 8945_SEC.cisco.com 7975_SEC.cisco.com 7970_SEC.cisco.com

Specifies the alternative subject name in the certificate request.

  • Use the subject-alt-name command only when Cisco UBE is interacting with CUCM in secure mode.
  • The value of subject-alt-name must be the SIP security profile name under CUCM.

Step 6

revocation-check method1[method2 [method3]]

Example:


Device(config-ca-trustpoint)# revocation-check crl
 

Checks the revocation status of a certificate.

Step 7

rsakeypair key-label

Example:


Device(config-ca-trustpoint)# rsakeypair pp1
 

Specifies which RSA keypair to associate with the certificate.

What to do next

Import the CUCM and CAPF key.

Importing the CUCM and CAPF Key

Before you begin

Download the CUCM key (the CallManager.pem file) from the Cisco Unified Communications Manager Operating System Administration web page.

Login to Cisco Unified OS Administration and Security and Certificate Management, download the CUCM key (the CallManager.pem file), and copy and paste the CUCM key to CUBE

SUMMARY STEPS

  1. crypto pki trustpoint name
  2. revocation-check method1[method2 [method3]]
  3. enrollment terminal
  4. crypto pki authenticate name

DETAILED STEPS

  Command or Action Purpose

Step 1

crypto pki trustpoint name

Example:


Device(config)# crypto pki trustpoint cucm_trustpoint

Creates a trustpoint for the CUCM key and enters ca-trustpoint configuration mode.

Step 2

revocation-check method1[method2 [method3]]

Example:


Device(config-ca-trustpoint)# revocation-check none
 

Checks the revocation status of a certificate.

Step 3

enrollment terminal

Example:


Device(config-ca-trustpoint)# enrollment terminal
 

Specifies manual cut-and-paste certificate enrollment.

Step 4

crypto pki authenticate name

Example:


Device(config-ca-trustpoint)# crypto pki authenticate cucm_trustpoint
Authenticates the trustpoint. At the prompt to enter the certificate, copy the contents of the CallManager.pem file that you downloaded above and paste it at the prompt. At the prompt to accept the file, enter “yes”.

Note


When you copy the certificate, ensure that you also copy the BEGIN and END lines.

What to do next

Repeat the above steps for the CAPF key (the CAPF.pem file).

Creating a CTL File

SUMMARY STEPS

  1. voice-ctl-file ctl-filename
  2. record-entry selfsigned trustpoint trustpoint-name
  3. record-entry capf trustpoint trustpoint-name
  4. record-entry cucm-tftp trustpoint trustpoint-name
  5. complete

DETAILED STEPS

  Command or Action Purpose

Step 1

voice-ctl-file ctl-filename

Example:


Device(config)#voice-ctl-file ct1

Creates a CTL file and enters CTL file configuration mode.

Step 2

record-entry selfsigned trustpoint trustpoint-name

Example:


Device(config-ctl-file)#record-entry selfsigned trustpoint self-trustpoint6s

Configures the trustpoints to be used for creating the CTL file.

Step 3

record-entry capf trustpoint trustpoint-name

Example:


Device(config-ctl-file)#record-entry capf trustpoint capf-trustpoint6s

Specifies that the trustpoint is created using the CAPF certificate imported from Cisco Unified Communications Manager to the device.

Step 4

record-entry cucm-tftp trustpoint trustpoint-name

Example:


Device(config-ctl-file)#record-entry cucm-tftp trustpoint cucm-trustpoint

Specifies that the trustpoint is created using the specified TFTP and Cisco Unified Communications Manager certificate imported to the device.

Step 5

complete

Example:


Device(config-ctl-file)# complete

Completes the CTL-file creation.

Configuring a Phone Proxy

SUMMARY STEPS

  1. voice-phone-proxy phone-proxy-name
  2. voice-phone-proxy file-buffer size
  3. tftp-server-address [ipv4 server-ip-address | domain-name]
  4. ctl-file ctl-filename
  5. access-secure
  6. complete

DETAILED STEPS

  Command or Action Purpose

Step 1

voice-phone-proxy phone-proxy-name

Example:


Device(config)# voice-phone-proxy pp

Configures a phone proxy and enters phone-proxy configuration mode.

Step 2

voice-phone-proxy file-buffer size

Example:


Device(config)# voice-phone-proxy file-buffer 30

Configures the phone-proxy file buffering parameter, in MB.

Step 3

tftp-server-address [ipv4 server-ip-address | domain-name]

Example:


Device(config-phone-proxy)# tftp-server-address ipv4 172.110.36.2

Configures the TFTP server address.

Step 4

ctl-file ctl-filename

Example:


Device(config-phone-proxy)# ctl-file ct1

Configures the CTL filename.

Step 5

access-secure

Example:


Device(config-phone-proxy)# access-secure

Specifies that the secure (encrypted) mode is to be used for access.

Step 6

complete

Example:


Device(config-phone-proxy)# complete

Completes the phone-proxy configuration.

Attaching a Phone Proxy to a Dial Peer

SUMMARY STEPS

  1. dial-peer voice tag voip
  2. phone-proxy phone-proxy-name signal-addr ipv4 ipv4-address cucm ipv4 ipv4-address
  3. session protocol sipv2
  4. session target registrar
  5. session transport {udp | tcp [tls]}
  6. incoming uri {from | request | to | via} tag
  7. destination uri tag
  8. voice-class sip call-route url
  9. voice-class sip profiles number
  10. voice-class sip registration passthrough [registrar-index index]
  11. voice-class sip pass-thru headers
  12. voice-class sip copy-list {tag | system}
  13. codec transparent

DETAILED STEPS

  Command or Action Purpose

Step 1

dial-peer voice tag voip

Example:


Device(config)# dial-peer voice 10 voip

Defines a particular dial peer, specifies the method of voice encapsulation, and enters dial peer configuration mode.

Step 2

phone-proxy phone-proxy-name signal-addr ipv4 ipv4-address cucm ipv4 ipv4-address

Example:


Device(config-dial-peer)# phone-proxy pp1 signal-addr ipv4 10.0.0.8 cucm ipv4 198.51.100.1

Configures the phone proxy for the related dial peer.

Step 3

session protocol sipv2

Example:


Device(config-dial-peer)# session protocol sipv2

Specifies a session protocol (SIPv2) for calls between local and remote devices.

Step 4

session target registrar

Example:


Device(config-dial-peer)# session target registrar

Specifies that a call from a VoIP dial peer is routed to the registrar end point.

Step 5

session transport {udp | tcp [tls]}

Example:


Device(config-dial-peer)# session transport tcp tls

Configures the underlying transport layer protocol for SIP messages to transport layer security over TCP (TLS over TCP).

Step 6

incoming uri {from | request | to | via} tag

Example:


Device(config-dial-peer)# incoming uri request 11

Specifies the voice class used to match the VoIP dial peer to the uniform resource identifier (URI) of an incoming call. Any request matching “uri 11” is destined to this dial peer.

Step 7

destination uri tag

Example:


Device(config-dial-peer)# destination uri 12

Specifies the voice class used to match a dial peer to the destination URI of an outgoing call. Any request matching “uri 12” is destined to this dial peer.

Step 8

voice-class sip call-route url

Example:


Device(config-dial-peer)# voice-class sip call-route url

Enables call routing based on the URL.

Step 9

voice-class sip profiles number

Example:


Device(config-dial-peer)# voice-class sip profiles 10

Configures a SIP profile for a voice class.

Step 10

voice-class sip registration passthrough [registrar-index index]

Example:


Device(config-dial-peer)# voice-class sip registration passthrough registrar-index 1

Configures the SIP registration pass-through options on the dial peer.

Step 11

voice-class sip pass-thru headers

Example:


Device(config-dial-peer)# voice-class sip pass-thru headers 10

Configures a list of headers for pass through by referring to a globally configured list.

Step 12

voice-class sip copy-list {tag | system}

Example:


Device(config-dial-peer)# voice-class sip copy-list 10

Configures the list of entities to be sent to the peer call leg.

Step 13

codec transparent

Example:


Device(config-dial-peer)# codec transparent

Enables codec capabilities to be passed transparently between endpoints in a Cisco Unified Border Element.

Verifying CUCM Lineside Support

The show commands can be entered in any order.

SUMMARY STEPS

  1. enable
  2. show dial-peer voice dial-peer-id | section voice class sip extension
  3. show dial-peer voice
  4. show voice class phone-proxy
  5. show voice class phone-proxy sessions

DETAILED STEPS


Step 1

enable

Enables privileged EXEC mode.

  • Enter your password if prompted.

Example:


Device> enable

Step 2

show dial-peer voice dial-peer-id | section voice class sip extension

Example:

CUBE# show dial-peer voice 5678 | section voice class sip extension
        
voice class sip extension = system,

Displays if extension cucm has not been configured for the dial peer.

Example:

CUBE# show dial-peer voice 5678 | section voice class sip extension
        
voice class sip extension = cucm,

Displays if extension cucm has been configured for the dial peer.

Example:

CUBE# show dial-peer voice 5678 | section voice class sip extension
        
voice class sip extension = none,

Displays if extension cucm has been removed for the dial peer using the no form of the command.

Step 3

show dial-peer voice

Example:


Device# show dial-peer voice 100

voice class sip extension = system,
voice class sip contact-passing = system,
voice class sip requri-passing = system,
voice class phone proxy name: phone_proxy_secure
voice class phone proxy config: complete

Step 4

show voice class phone-proxy

Example:


Device# show voice class phone-proxy

Phone-Proxy 'phone_proxy':
Description: 
 Access Secure: non-secure (default)
Tftp-server address: 20.21.27.146
Capf server address: 20.21.27.146
CUCM service settings: preserve (default)
CTL file name: ctl_file
Session-timeout: 180 seconds
Max-concurrent-sessions: 30
Current sessions: 0
TFTP sessions: 0
HTTP download sessions: 0
HTTP application sessions: 0
CAPF sessions: 0
Config status: complete
SIP dial-peers associated: 
   Name           
   ---------------
   1                         
-------------------------------------------------------------

Phone-Proxy 'phone_proxy_secure':
Description: 
 Access Secure: secure
Tftp-server address: 20.21.27.146
Capf server address: 20.21.27.146
CUCM service settings: preserve (default)
CTL file name: ctl_file
Session-timeout: 180 seconds
Max-concurrent-sessions: 30
Current sessions: 0
TFTP sessions: 0
HTTP download sessions: 0
HTTP application sessions: 0
CAPF sessions: 0
Config status: complete
SIP dial-peers associated: 
   Name           
   ---------------
   3     
   dialpeer4     
-------------------------------------------------------------

Step 5

show voice class phone-proxy sessions

Example:


Device# show voice class phone-proxy sessions

Phone-Proxy 'phone_proxy_ipad': 
                    Source                              Destination               
 ------------------------------ Sessions of Dial-peer 5              -------------------------------
|Access: 10.74.9.219         :45232          10.74.9.209         :6970                               |
|Core  :   20.21.29.209       :45300          20.21.27.146      :6970                               |
---------------------------------------------------------------------------------------------------


Example: Configuring a PKI Trustpoint


Device(config)# crypto key generate rsa label pp_rsa modulus 1024 general-keys
Device(config)# crypto pki trustpoint callmg23
Device(config-ca-trustpoint)# enrollment selfsigned
Device(config-ca-trustpoint)# subject-name CN=ASR1006-CCN-4
Device(config-ca-trustpoint)# subject-alt-name 6961_SEC.cisco.com 8941_SEC.cisco.com 8945_SEC.cisco.com 7975_SEC.cisco.com 7970_SEC.cisco.com
Device(config-ca-trustpoint)# revocation-check crl
Device(config-ca-trustpoint)# rsakeypair pp1

Example: Importing the CUCM and CAPF Key

The following example shows how to import the CUCM and CAPF key after you have downloaded the CUCM key (the CallManager.pem file) and the CAPF key (the CAPF.pem file) from the Cisco Unified Communications Manager Operating System Administration web page.


Device(config)# crypto pki trustpoint cucm_trustpoint
 Device(config-ca-trustpoint)# revocation-check none
 Device(config-ca-trustpoint)# enrollment terminal
 Device(config-ca-trustpoint)# crypto pki authenticate cucm_trustpoint

Example: Creating a CTL File

Device(config)# voice-ctl-file ct1
Device(config-ctl-file)# record-entry selfsigned trustpoint self-trustpoint6s
Device(config-ctl-file)# record-entry capf trustpoint capf-trustpoint6s
Device(config-ctl-file)# record-entry cucm-tftp trustpoint cucm-trustpoint
Device(config-ctl-file)# complete

Example: Configuring a Phone Proxy


Device(config)# voice-phone-proxy pp
Device(config-phone-proxy)# voice-phone-proxy pp
Device(config-phone-proxy)# voice-phone-proxy file-buffer size 30
Device(config-phone-proxy)# tftp-server address ipv4 172.110.36.2
Device(config-phone-proxy)# ctl-file ct1
Device(config-phone-proxy)# access-secure
Device(config-phone-proxy)# complete

Example: Attaching a Phone Proxy to a Dial Peer


Device(config)# dial-peer voice 10 voip
 Device(config-dial-peer)# phone-proxy pp1 signal-addr ipv4 10.0.0.8 cucm ipv4 198.51.100.1
 Device(config-dial-peer)# session-protocol sipv2
 Device(config-dial-peer)# session target registrar
 Device(config-dial-peer)# session transport tcp tls
 Device(config-dial-peer)# incoming uri request 11
 Device(config-dial-peer)# destination uri 12
 Device(config-dial-peer)# voice-class sip call-route url
 Device(config-dial-peer)# voice-class sip profiles 10
 Device(config-dial-peer)# voice-class sip registration passthrough registrar-index 1
 Device(config-dial-peer)# voice-class sip passthrough headers 10
 Device(config-dial-peer)# voice-class sip copy-list 10
 Device(config-dial-peer)# codec transparent


Example: Configuring CUCM Secure Line-Side

The details of the IP address used in the below example are as follows:
  • CUBE IP address facing phone : 172.18.110.120

  • CUBE IP address facing CUCM : 10.50.209.100

  • CUCM IP address : 10.50.209.215

Generate and Import Certificate on CUBE

Device(config)# crypto pki trustpoint selfsign
Device(config)# enrollment selfsigned
Device(config)# subject-name CN=CUBE, O=CISCO
Device(config)# revocation-check none
Device(config)# rsakeypair selfsign

Device(config)# crypto pki trustpoint ccm1
Device(config)# enrollment terminal
Device(config)# revocation-check none

Device(config)# crypto pki trustpoint Cisco_Manufacturing_CA
Device(config)# enrollment terminal
Device(config)# revocation-check none

Device(config)# crypto pki trustpoint selfsignx
Device(config)# enrollment terminal
Device(config)# subject-name cn=3925_pod5
Device(config)# revocation-check none
Device(config)# rsakeypair selfsignx

Device(config)# crypto pki certificate chain ccm1
Device(config)# certificate ca 55C2FCBFBAC552B7C6CED497D4AD33F8
[Certificate data omitted]

Device(config)# crypto pki certificate chain Cisco_Manufacturing_CA
Device(config)# certificate ca 6A6967B3000000000003
[Certificate data omitted]

Device(config)# crypto pki certificate chain selfsignx
Device(config)# certificate self-signed 01
[Certificate data omitted]

Add the Cube Service, Call Flow and Message manipulation configuration.

Device(config)# voice service voip
Device(config)# no ip address trusted authenticate
Device(config)# allow-connections sip to sip
Device(config)# fax protocol t38 version 0 ls-redundancy 0 hs-redundancy 0 fallback none
Device(config)# sip
Device(config-sip)# session transport tcp
Device(config-sip)# header-passing
Device(config-sip)# registrar server
Device(config-sip)# nat auto
Device(config-sip)# pass-thru headers unsupp
Device(config-sip)# pass-thru subscribe-notify-events all
Device(config-sip)# pass-thru content unsupp
Device(config-sip)# registration passthrough
Device(config-sip)# extension cucm

Device(config)# voice class uri 1 sip
Device(config)# host ipv4:172.18.110.120

Device(config)# voice class uri 2 sip
Device(config)# host ipv4:10.50.209.100

Device(config)# voice class uri 3 sip
Device(config)# host ipv4:10.50.209.215


Device(config)# interface GigabitEthernet0/0
Device(config-if)# ip address 10.50.209.100 255.255.255.0
Device(config-if)# duplex auto
Device(config-if)# speed auto

Device(config)# interface GigabitEthernet0/1
Device(config-if)# ip address 172.18.110.120 255.255.255.0
Device(config-if)# duplex auto
Device(config-if)# speed auto

Device(config)# dspfarm profile 1 transcode universal security
Device(config-dspfarm-profile)# codec g722-64
Device(config-dspfarm-profile)# codec g711ulaw
Device(config-dspfarm-profile)# codec g711alaw
Device(config-dspfarm-profile)# codec g729ar8
Device(config-dspfarm-profile)# codec g729abr8
Device(config-dspfarm-profile)# maximum sessions 24
Device(config-dspfarm-profile)# associate application CUBE

Configure CTL and Phone Proxy

Device(config)#voice-ctl-file ctl_secure
Device(config-ctl-file)# record-entry capf trustpoint Cisco_Manufacturing_CA
Device(config-ctl-file)# record-entry selfsigned trustpoint selfsignx
Device(config-ctl-file)# record-entry cucm-tftp trustpoint ccm1
Device(config-ctl-file)# complete

Device(config)# voice-phone-proxy phone_proxy
Device(config-phone-proxy)# tftp-server address ipv4 10.50.209.215 local-addr ipv4 10.50.209.100 acc-addr ipv4 172.18.110.120
Device(config-phone-proxy)# ctl-file ctl_secure
Device(config-phone-proxy)# access-secure
Device(config-phone-proxy)# service-map server-addr ipv4 10.50.209.215 port 8443 acc-addr ipv4 172.18.110.120 port 8443
Device(config-phone-proxy)# service-map server-addr ipv4 10.50.209.215 port 8080 acc-addr ipv4 172.18.110.120 port 8080
Device(config-phone-proxy)# service-map server-addr ipv4 10.50.209.215 port 3804 acc-addr ipv4 172.18.110.120 port 3804
Device(config-phone-proxy)# complete
 
Device(config)# voice-phone-proxy tftp-address ipv4 10.50.209.100
Device(config-phone-proxy)# port-range 40000 50000
Device (Config)# voice-phone-proxy tftp-address ipv4 172.18.110.120
Device(config-phone-proxy)# port-range 40000 50000
Device(config-phone-proxy)# voice-phone-proxy file-buffer size 60

Attaching Phone Proxy to dial Peers

Device(config)# dial-peer voice 1 voip
Device(config-dial-peer)# phone-proxy phone_proxy signal-addr ipv4 172.18.110.120 cucm ipv4 10.50.209.215
 *** Access Dialpeer Facing Outside ***
Device(config-dial-peer)# session protocol sipv2
Device(config-dial-peer)# session target registrar
Device(config-dial-peer)# session transport tcp tls
Device(config-dial-peer)# destination uri 2
Device(config-dial-peer)# incoming uri request 1
Device(config-dial-peer)# voice-class sip extension cucm
Device(config-dial-peer)# voice-class sip conn-reuse
Device(config-dial-peer)# voice-class sip call-route url
Device(config-dial-peer)# voice-class sip registration passthrough registrar-index 1
Device(config-dial-peer)# dtmf-relay rtp-nte
Device(config-dial-peer)# srtp
Device(config-dial-peer)# codec transparent

Device(config)# dial-peer voice 2 voip
*** Core Dialpeer Facing CUCM ***
Device(config-dial-peer)# session protocol sipv2
Device(config-dial-peer)# session target ipv4:10.50.209.215
Device(config-dial-peer)# session transport tcp
Device(config-dial-peer)# destination uri 1
Device(config-dial-peer)# incoming uri via 3
Device(config-dial-peer)# voice-class sip call-route url
Device(config-dial-peer)# dtmf-relay rtp-nte
Device(config-dial-peer)# codec transparent

Configuring SIP User Agent

Device(config)# sip-ua
Device(config-sip-ua)# timers connection aging 60
Device(config-sip-ua)# registrar 1 ipv4:10.50.209.215 expires 3600 refresh-ratio 100 tcp
Device(config-sip-ua)# crypto signaling default trustpoint selfsignx

Example: Configuring CUCM Non-Secure Line-Side

The details of the IP address used in the below example are as follows:
  • CUBE IP address facing phone : 172.18.110.120

  • CUBE IP address facing CUCM : 10.50.209.100

  • CUCM IP address : 10.50.209.215

Generate and Import Certificate on CUBE

Device(config)# crypto pki trustpoint selfsign
Device(config)# enrollment selfsigned
Device(config)# subject-name CN=CUBE, O=CISCO
Device(config)# revocation-check none
Device(config)# rsakeypair selfsign

Device(config)# crypto pki trustpoint ccm1
Device(config)# enrollment terminal
Device(config)# revocation-check none

Device(config)# crypto pki certificate chain selfsignx
Device(config)# certificate self-signed 01
[Certificate data omitted]

Device(config)# crypto pki certificate chain ccm1
Device(config)# certificate ca 55C2FCBFBAC552B7C6CED497D4AD33F8
[Certificate data omitted]

Add the Cube Service, Call Flow and Message manipulation configuration.

Device(config)# voice service voip
Device(config)# no ip address trusted authenticate
Device(config)# allow-connections sip to sip
Device(config)# fax protocol t38 version 0 ls-redundancy 0 hs-redundancy 0 fallback none
Device(config)# sip
Device(config-sip)# header-passing
Device(config-sip)# registrar server
Device(config-sip)# nat auto
Device(config-sip)# pass-thru headers unsupp
Device(config-sip)# pass-thru subscribe-notify-events all
Device(config-sip)# pass-thru content unsupp
Device(config-sip)# registration passthrough

Device(config)# voice class uri 1 sip
Device(config)# host ipv4:172.18.110.120

Device(config)# voice class uri 2 sip
Device(config)# host ipv4:10.50.209.100

Device(config)# voice class uri 3 sip
Device(config)# host ipv4:10.50.209.215


Device(config)# interface GigabitEthernet0/0
Device(config-if)# ip address 10.50.209.100 255.255.255.0
Device(config-if)# duplex auto
Device(config-if)# speed auto

Device(config)# interface GigabitEthernet0/1
Device(config-if)# ip address 172.18.110.120 255.255.255.0
Device(config-if)# duplex auto
Device(config-if)# speed auto

Configure CTL and Phone Proxy

Device(config)#voice-ctl-file ctl_secure
Device(config-ctl-file)# record-entry capf trustpoint Cisco_Manufacturing_CA
Device(config-ctl-file)# record-entry selfsigned trustpoint selfsignx
Device(config-ctl-file)# record-entry cucm-tftp trustpoint ccm1
Device(config-ctl-file)# complete

Device(config)# voice-phone-proxy phone_proxy
Device(config-phone-proxy)# tftp-server address ipv4 10.50.209.215 local-addr ipv4 10.50.209.100 acc-addr ipv4 172.18.110.120
Device(config-phone-proxy)# ctl-file ctl_secure
Device(config-phone-proxy)# access-secure
Device(config-phone-proxy)# service-map server-addr ipv4 10.50.209.215 port 8443 acc-addr ipv4 172.18.110.120 port 8443
Device(config-phone-proxy)# service-map server-addr ipv4 10.50.209.215 port 8080 acc-addr ipv4 172.18.110.120 port 8080
Device(config-phone-proxy)# service-map server-addr ipv4 10.50.209.215 port 3804 acc-addr ipv4 172.18.110.120 port 3804
Device(config-phone-proxy)# complete
 
Device(config)# voice-phone-proxy tftp-address ipv4 10.50.209.100
Device(config-phone-proxy)# port-range 40000 50000
Device (Config)# voice-phone-proxy tftp-address ipv4 172.18.110.120
Device(config-phone-proxy)# port-range 40000 50000
Device(config-phone-proxy)# voice-phone-proxy file-buffer size 60

Attaching Phone Proxy to dial Peers

Device(config)# dial-peer voice 1 voip
Device(config-dial-peer)# phone-proxy phone_proxy signal-addr ipv4 172.18.110.120 cucm ipv4 10.50.209.215
 *** Access Dialpeer Facing Outside ***
Device(config-dial-peer)# session protocol sipv2
Device(config-dial-peer)# session target registrar
Device(config-dial-peer)# session transport tcp tls
Device(config-dial-peer)# destination uri 2
Device(config-dial-peer)# incoming uri request 1
Device(config-dial-peer)# voice-class sip extension cucm
Device(config-dial-peer)# voice-class sip conn-reuse
Device(config-dial-peer)# voice-class sip call-route url
Device(config-dial-peer)# voice-class sip registration passthrough registrar-index 1
Device(config-dial-peer)# dtmf-relay rtp-nte
Device(config-dial-peer)# codec transparent

Device(config)# dial-peer voice 2 voip
*** Core Dialpeer Facing CUCM ***
Device(config-dial-peer)# session protocol sipv2
Device(config-dial-peer)# session target ipv4:10.50.209.215
Device(config-dial-peer)# session transport tcp
Device(config-dial-peer)# destination uri 1
Device(config-dial-peer)# incoming uri via 3
Device(config-dial-peer)# voice-class sip call-route url
Device(config-dial-peer)# dtmf-relay rtp-nte
Device(config-dial-peer)# codec transparent

Configuring SIP User Agent

Device(config)# sip-ua
Device(config-sip-ua)# timers connection aging 60
Device(config-sip-ua)# registrar 1 ipv4:10.50.209.215 expires 3600 refresh-ratio 100 tcp