- Preface
- Read Me First
- Software Packaging and Architecture
- Using Cisco IOS XE Software
- Console Port, Telnet, and SSH Handling
- Consolidated Packages and SubPackages Management
- Software Upgrade Processes Supported by Cisco ASR 1000 Series Routers
- High Availability Overview
- Broadband Scalability and Performance
- UniDirectional Link Detection (UDLD) Protocol
- Using the Management Ethernet Interface
- Network Synchronization Support
- IEEE 1588v2 PTP Support
- Configuring Bridge Domain Interfaces
- Enabling Support for Tunable DWDM-XFP-C
- Monitoring and Maintaining Multilink Frame Relay
- Configuring MPLS Layer 2 VPNs
- Enabling Management by REST API
- LSM-MLDP-based MVPN Support
- Tracing and Trace Management
- Packet Trace
- Configuring and Accessing the Web User Interface
- PPP Half-Bridge on the Cisco ASR 1000 Series Routers
- Cisco ASR 1000 Embedded Services Processor 10G Non Crypto Capable New Feature
- Ethernet Virtual Connections on Port Channels
- Configuring Traffic Storm Control
- Unsupported Commands
- Configuration Examples
Configuring and
Accessing the Web User Interface
The Cisco ASR 1000 Series Routers introduce a web user interface that expands on the functionality of web user interfaces available in other Cisco routers.
This chapter is about this web user interface and covers the following topics:
- Web User Interface Overview
- Configuring the Router for Web User Interface Access
- Authentication and the Web User Interface
- Domain Name System and the Web User Interface
- Clocks and the Web User Interface
- Accessing the Web User Interface
- Using Auto Refresh
- Web User Interface Tips and Tricks
Web User Interface Overview
This section covers the following topics:
- Web User Interface General Overview
- Legacy Web User Interface Overview
- Graphics-Based Web User Interface Overview
- Persistent Web User Interface Transport Maps Overview
Web User Interface General Overview
The web user interface is available on Cisco ASR 1000 Series Routers starting in Cisco IOS XE Release 2.1.1. The web user interface is not available in Cisco IOS XE Release 2.1.0.
The Cisco ASR 1000 Series Routers can be accessed using a web user interface. This web user interface allows users to monitor router performance using an easy-to-read graphical interface. Most aspects of a Cisco ASR 1000 Series Router can be monitored using the web user interface.
The web user interface has the following features:
- An interface that presents information in an easy-to-read graphical format.
- An interface that allows users to monitor most software processes, including processes related to the IOS and nonIOS subpackages within the Cisco IOS XE consolidated package.
- An interface that allows users to monitor most hardware components, including all RPs, ESPs, SIPs, and SPAs installed in the router.
- Access to the legacy web user interface in addition to the enhanced web user interface.
- The ability to gather the output of show commands from the web user interface.
Legacy Web User Interface Overview
Previous Cisco routers have a legacy web user interface that can be used to monitor the router. This legacy web user interface presents information in a straightforward manner without using any graphics. On the Cisco ASR 1000 Series Routers, this interface is part of the larger web user interface and can be accessed by clicking the “IOS Web UI” option in the left-hand menu.
On the Cisco ASR 1000 Series Routers, the legacy web user interface can only be used to configure and monitor the IOS subpackage. In some scenarios, most notably when an ip http command has been successfully entered to enable the HTTP or HTTPS server while a properly configured web user interface transport map has not yet been applied on the Cisco ASR 1000 Series Router, the legacy web user interface will be accessible while the graphics-based web user interface will be inaccessible.
See the following figure for an example of the legacy web user interface home page.
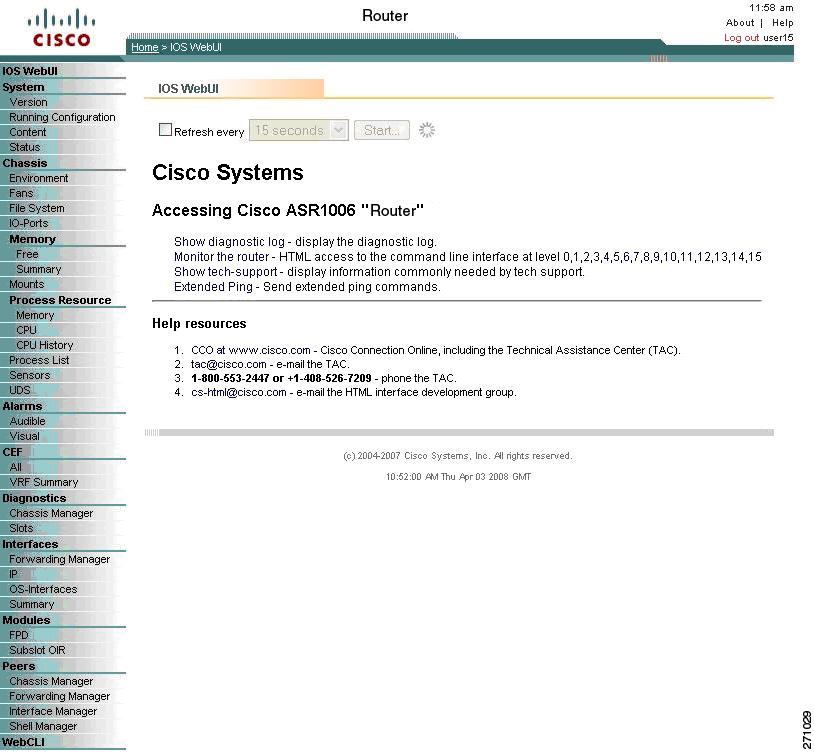
Graphics-Based Web User Interface Overview
The web user interface on the Cisco ASR 1000 Series Routers expands the legacy web user interface available on other platforms by presenting information in easy-to-read graphics-based tables, graphs, or charts, depending on the information presented. The web user interface on the Cisco ASR 1000 Series Routers is also able to present monitoring information stored in both the IOS and nonIOS subpackages, allowing for a complete view of the router using the web user interface.
See the following figure for an example of the graphics-based web user interface home page.

Persistent Web User Interface Transport Maps Overview
To enable the graphics-based web user interface, a persistent web user interface transport map must be configured. The persistent web user interface transport map, when successfully configured and applied to the router, defines how the router handles incoming web user interface requests. In the persistent web user interface transport map, users define whether the graphics-based web user interface can be accessed through HTTP, HTTPS, or both protocols. Only one persistent web user interface transport map can be applied to a Cisco ASR 1000 Series Router at a time.
The persistent web user interface transport map configuration must be performed in addition to the legacy web user interface configuration, which is configured using the ip http command set. The ip http command settings define which ports are used by HTTP or HTTPS for both the legacy and graphics-based web user interface.
Configuring the Router for Web User Interface Access
The ability to access either web user interface on the Cisco ASR 1000 Series Routers is disabled by default.
The legacy web user interface must be configured before the graphics-based web user interface can be enabled.
 Note | The web user interface will not work if the Management Ethernet interface has not been configured or is not working; specifically, the default route must be specified in the Management Ethernet VRF before the web user interface can be configured. |
To enable the entire web user interface, perform the following tasks:
1. (Optional) Ensure the clock setting on your router is accurate by entering the show clock command.
2. Connect to your router and enter the configure terminal command to enter global configuration mode.
3. Set the HTTP server authentication method to local by entering the ip http authentication local command.
4. Enable the legacy web user interface by entering one of the following global configuration commands:
5. Create and name a persistent web user interface transport map by entering the transport-map type persistent webui transport-map-name command.
6. Enable HTTP, HTTPS, or both by entering the following commands in transport map configuration mode:
7. (Optional) Enter the show transport-map name transport-map-name privileged EXEC command to verify that your transport map is properly configured.
8. Enable the transport map by entering the transport type persistent webui input transport-map-name global configuration command.
DETAILED STEPS
What to Do Next
Examples
In the following example, the HTTP server authentication method is set to local:
Router# configure terminal
Enter configuration commands, one per line.  End with CNTL/Z.
Router(config)# ip http authentication local
Router(config)# exit
In the following example, the web user interface using the default HTTP port is enabled:
Router# configure terminal
Enter configuration commands, one per line.  End with CNTL/Z.
Router(config)# ip http server
Router(config)# transport-map type persistent webui http-webui
Router(config-tmap)# server
Router(config-tmap)# exit
Router(config)# exit
Router# show transport-map name http-webui
Transport Map:
  Name: http-webui
  Type: Persistent Webui Transport
Webui:
  Server:        enabled
  Secure Server: disabled
Router# configure terminal
Router(config)# transport type persistent webui input http-webui
*Apr 22 02:43:55.798: %UICFGEXP-6-SERVER_NOTIFIED_START: R0/0: psd:  Server wui has been notified to start
In the following example, the web user interface using the default HTTPs port is enabled:
Router# configure terminal
Enter configuration commands, one per line.  End with CNTL/Z.
Router(config)# ip http secure-server
Router(config)# transport-map type persistent webui https-webui

Router(config-tmap)# secure-server
Router(config-tmap)# exit
Router(config)# transport type persistent webui input https-webui
*Apr 22 02:38:43.597: %UICFGEXP-6-SERVER_NOTIFIED_START: R0/0: psd:  Server wui has been notified to start
In the following example, the web user interface using the default HTTP and HTTPS ports is enabled:
Router# configure terminal
Enter configuration commands, one per line.  End with CNTL/Z.
Router(config)# ip http server
Router(config)# ip http secure-server
Router(config)# transport-map type persistent webui http-https-webui
Router(config-tmap)# server
Router(config-tmap)# secure-server
Router(config-tmap)# exit
Router(config)# transport type persistent webui input http-https-webui
*Apr 22 02:47:22.981: %UICFGEXP-6-SERVER_NOTIFIED_START: R0/0: psd:  Server wui has been notified to start
Authentication and the Web User Interface
Users attempting to access the web user interface for a router are subject to the same authentication requirements configured for that router. The web browser prompts all users for a name and password combination, and the web browser then looks to the router configuration to see if a user should or should not be granted access to the web user interface.
Only users with a privilege level of 15 can access the web user interface. Otherwise, authentication of web user interface traffic is governed by the authentication configuration for all other traffic.
To configure authentication on your router, see {start cross reference} Configuring Authentication {end cross reference}. {start hypertext} http://www.cisco.com/en/US/docs/ios/12_2/security/configuration/guide/scfathen.html {end hypertext}
Domain Name System and the Web User Interface
The Domain Name System (DNS) is a distributed database in which you can map hostnames to IP addresses through the DNS protocol from a DNS server.
If the router is configured to participate in the Domain Name System, users can access the web user interface by entering http://<dns-hostname> as the web browser address.
For information on configuring DNS, see {start cross reference}Configuring DNS{end cross reference}. {start hypertext}http://www.cisco.com/en/US/docs/ios/ipaddr/configuration/guide/iad_config_dns_ps6922_TSD_Products_Configuration_Guide_Chapter.html{end hypertext}
Clocks and the Web User Interface
Requests to view the web user interface can be rejected by certain web browsers if the time as seen by the web browser differs from the time as seen by the router by an hour or more.
For this reason, we recommend checking the router time using the show clock command before configuring the router and, if the router time is not properly set, use the clock set and clock timezone commands for setting the router clock.
Similarly, the web browser’s clock source, which is usually the personal computer, must also have an accurate time to properly access the web user interface.
The following message appears when the web browser and the router clocks are more than an hour apart:
Your access is being denied for one of the following reasons:. Your previous session has timed-out, or. You have been logged out from elsewhere, or. You have not yet logged in, or. The resource requires a higher privilege level login.
If you see this message and fixing the other possible causes of the issue still does not make the web user interface accessible, check both the router clock and the PC clock to ensure both clocks reflect the accurate day and time and then retry your connection to the web user interface.
Also note that if one clock changes at daylight savings time while another clock does not, clock-related issues can occur.
Accessing the Web User Interface
To access the web user interface, perform the following tasks:
1. Open your web browser. The web user interface supports the following web browsers:
2. Enter the address of the router in the address field of the web browser. The format for the address of the router in the address field is http://<routername or management-ethernet-ip-address>:http-port] or https://<routername or management-ethernet-ip-address>:https-port] , and the addresses that are acceptable depend upon your web browser user interface configurations and whether your router is participating in DNS.Following are some examples of acceptable address field web browser entries:
3. If prompted, enter your username and password. The username and password combination required to enter the web user interface is the same combination required to access the router.
4. The graphics-based web user interface similar to should appear in your web browser.
DETAILED STEPS
Using Auto Refresh
The web user interface does not refresh content automatically by default.
To set an auto-refresh interval, follow these steps:
1. Check the Refresh every check box on the graphical web user interface home page. A check mark appears in the check box.
2. Set the frequency of the auto-refresh interval using the drop-down menu.
3. Click the Start button to the right of the drop-down menu. After hitting this button, the Start button becomes the Stop button and a countdown timer placed to the right of the Stop button begins to increment.
DETAILED STEPS


Web User Interface Tips and Tricks
This section provides some useful information about using the web user interface once the interface has been accessed:
- If you know a Cisco IOS command-line interface command to gather information that you are unable to gather using the web user interface, you can click IOS Web UI followed by Monitor the Router to enter commands.
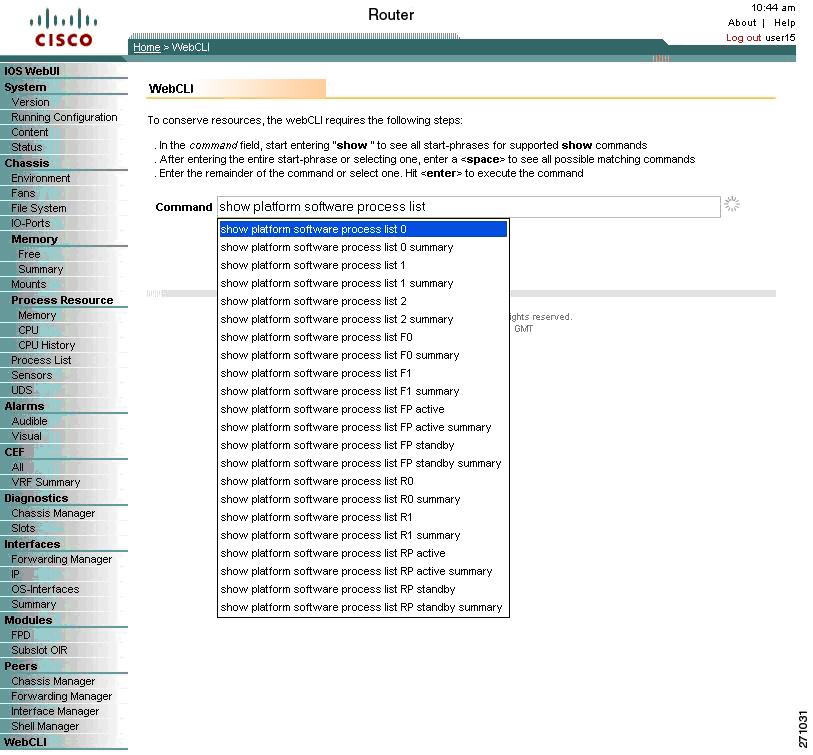
- If you know a diagnostic mode command to gather information that you are unable to gather using the web user interface, you can click WebCLI to enter show commands.
- The WebCLI command line has a context-sensitive help feature that shows the options available in a certain keyword sequence using a drop-down menu.The following figure shows an example of this drop-down menu context-sensitive help feature.
 Feedback