Managing Server Discovery, Rack Groups, and Rack Accounts

This chapter contains the following topics:

Overview

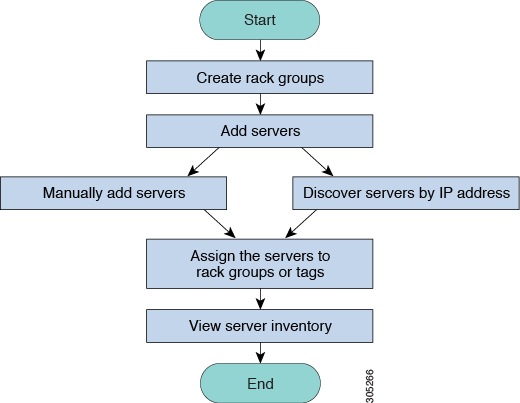
The following figure illustrates the workflow for managing groups, rack accounts and discovering servers in Cisco IMC Supervisor. Ideally you would create a rack group and add servers to these rack groups. You can either manually add the servers or discover the servers. You can view detailed inventory of these servers.

Use Case:When you install Cisco IMC Supervisor for the first time, you must set up the environment as there is nothing preconfigured. There may be hundreds of systems across the globe which you will need to manage. You can bring these servers into Cisco IMC Supervisor either by adding them manually or by discovering them by IP address. Before doing so, you can think of logically filtering these servers and tagging them based on your organization's requirement. For example, you can group them into regions, building numbers, operating systems and so on. With the help of tag management, finer granular grouping of servers coming into Cisco IMC Supervisor is possible. For example, you can add tags to servers which contain Windows, Linux, and so on and group them under the Operating Systems rack group. You also have the flexibility of adding tags on the fly for an existing server.

There is no set way of naming the rack groups or tags. You can be creative with coming up with names as per your requirement. Names of rack groups and tags can be interchanged. For example, you can have rack groups named Windows, Linux and so on and then tag them under the Operating System tag name.

Discovering and Importing a Server

You can automatically discover rack mount servers and import them into Cisco IMC Supervisor. The following sections cover topics such as configuring auto discovery profile, performing auto discovery, and importing auto discovered servers.

Configuring Auto Discovery Profile

You should configure the auto-discovery profile based on which Cisco IMC Supervisor can discover the devices. You can have any number of profiles in Cisco IMC Supervisor.

Perform this procedure when you want to add or edit an auto-discovery profile.

Procedure


Step 1

Choose Systems > Physical Accounts.

Step 2

Click Discovery Profiles.

Step 3

Click Add.

Step 4

On the Add Discovery Profile page, complete the following:

Field

Description

Profile Name Field

A descriptive name for the profile.

Search Criteria drop-down list

Select IP Address Range, Subnet Mask Range, IP Address CSV File, or IP Address List from the drop-down list.

Starting IP Field

Valid IP address

Ending IP Field

Valid IP address

If you check Use Credential Policy checkbox

Credential Policy drop-down list

Choose a policy from the drop-down list or click the + icon and create new policy. Refer to Creating a Credential Policy, to create a new policy.

If you uncheck Use Credential Policy checkbox

User Name field

The server login name.

Password field

The server login password

Important 

Do not include special characters such as + in the password.

Protocol drop-down list

Choose https or http from the list.

Port field

Enter a port number.

The following fields are available only if the Search Criteria you have chosen is IP Address Range, Subnet Mask Range, and IP Address List.

Note 
If you have chosen IP Address CSV File, these fields can be specified in the csv file in the following format. The sample csv file is available when you click File Template. You must add the entries from the first row of the csv file without any headings.
  • <ip>

  • (optional) <description>

  • (optional) <location>

  • (optional) <contact>

  • (optional) <rack group>

  • (optional) <tag name:tag value>;<tag name:tag value>

Note 
  • You can specify either an existing value or a new value for Rack Group and Tags. Specifying these fields is optional. If you do not specify a value for Rack Group in the csv file, the Default Group will be used.

  • When you upgrade to the current Cisco IMC Supervisor version, replace the existing csv file with the csv file you have created in the new format using the Select a File option.

  • The tag type will only be of type STRING.

Description field

Enter a description of the server.

Contact field

Enter the contact details of the server.

Location field

Enter the address of the server.

Select Rack Group drop-down list or + icon

Choose a rack group or create a rack group.

Step 5

Click Submit.

Note 

You can also modify, delete, and view profiles. Click Edit, Clear, Delete, or View to perform these tasks.


Performing Auto Discovery

Perform this procedure when you want the system to automatically discover rack-mounted servers and import them into Cisco IMC Supervisor.

Before you begin

You should configure a profile based on which Cisco IMC Supervisor can discover the devices.

Procedure


Step 1

Choose Systems > Physical Accounts.

Step 2

Click Discovered Devices.

Step 3

Click Discover.

Step 4

On the Discover Devices page, complete the following fields:

Field

Description

Select Profile drop-down list

Click Select to choose the profiles to discover. Check the check boxes of all the profiles you want to discover.

Schedule Later check box

Check this check box and select an existing schedule to auto discover servers at a later time or click on + to create a new schedule. For more information on creating schedules, see Creating Schedules. You can go to Policies > Manage Schedules, select a schedule and click View Scheduled Tasks to view the scheduled task or click Remove Scheduled Tasks to delete scheduled tasks.

Schedule(s) drop-down list

If you have chosen the Schedule Later check box, you can select a schedule you have created from the drop-down list.

Note 

You can also create a new schedule from this dialog box.

Step 5

Click Submit.


Importing a Server

Perform this procedure when you want to import a server using auto discovery.

Before you begin

  • You should configure a profile based on which Cisco IMC Supervisor can discover the devices.

  • You have already performed a auto discovery.

Procedure


Step 1

Choose Systems > Physical Accounts.

Step 2

Click Discovered Devices.

Step 3

Click Import.

Step 4

On the Import Discovered Devices page, complete the following:

Field

Description

Select Device(s) field

Click Select to choose the devices to import. Check the check boxes of all the servers you want to import.

Note 

If the Import Status of a particular rack account is imported then the status will be imported and will not show that rack account for import.

User Prefix

Enter a prefix for the user.

Step 5

Click Submit.

Note 

You can import discovered devices multiple times without having to wait for the previous import process to complete.


Setting Properties for Discovered Devices

Perform this procedure when you want to set the properties for discovered devices.

Before you begin

You should configure a profile based on which Cisco IMC Supervisor can discover the devices.

Procedure


Step 1

Choose Systems > Physical Accounts.

Step 2

Click Discovered Devices.

Step 3

Select the device in the Discovered Devices table.

Step 4

Click Set Properties.

Step 5

On the Set Properties page, complete the following fields:

Field

Description

Description field

Enter a description of the server.

Contact field

Enter the contact details of the server.

Location field

Enter the address of the server.

Select Rack Group drop-down list or + icon

Choose a rack group or create a rack group.

Step 6

Click Submit.


Adding a Rack Group

Perform this procedure when you want to add a new rack group in Cisco IMC Supervisor. By default, a system-defined group Default Group is available.

Before you begin

If you have logged in for the first time, ensure that the license is updated for Cisco IMC Supervisor. To upgrade the license, see Updating the License.

Procedure


Step 1

Choose Systems > Physical Accounts.

Step 2

Click Add.

Step 3

On the Create Rack Group page, complete the following fields:

Field

Description

Group Name field

A descriptive name for the rack group.

Description field

(Optional) A description of the rack froup.

Step 4

Click Create.


What to do next

Add one or more rack accounts to the rack group.

Adding a Rack Account

You can add a rack-mount server to any of the existing rack group you have already created or you can create a new rack group and add the rack-mount server. After the account is added, you can use Cisco IMC Supervisor to manage the server.

Perform this procedure when you want to add a new rack-mounted server to an existing rack group.

Before you begin

  • If you have logged in for the first time, ensure that the license is upgraded for Cisco IMC Supervisor. To upgrade the license, see Updating the License.

  • Ensure that a rack group exists.


    Note

    You can add a rack account under the system-provided default group or under a rack group that you have created.


  • Ensure that you have enabled XML API in Cisco IMC Supervisor. This ensures that you can add and manage the rack-mount servers from Cisco IMC Supervisor.

Procedure


Step 1

Choose Systems > Physical Accounts.

Step 2

Click Rack Accounts.

Step 3

Click Add.

Step 4

On the Create Account page, complete the following fields:

Field

Description

Account Name field

A descriptive name for the rack account.

Server IP or Hostname field

The IP address of the rack-mount server or the virtual management IP address for Cisco UCS S3260 Dense Storage Rack Server.

Note 

You can also enter a Fully Qualified Domain Name (FQDN) or hostname.

Description field

(Optional) A description of the rack account.

Use Credential Policy check box

(Optional) If you have already created credential policies, then check this check box to select the policy from the drop-down list.

If you check Use Credential Policy check box

Credential Policy drop-down list

Choose a policy from the drop-down list.

If you uncheck Use Credential Policy check box

User Name field

Login ID for the rack-mount server.

Password field

Password for the login ID for the rack-mount server.

Protocol drop-down list

Choose https or http from the list.

Port field

The port number associated with the selected protocol.

Rack Group drop-down list or + icon

Choose a rack group from the list or click + to create a rack group.

For more information on creating a rack group, see Adding a Rack Group.

Contact field

(Optional) The contact email address for the account.

Location field

(Optional) The location of the account.

Step 5

Click Submit.

Note 
  • You can create a rack account again without having to wait for the previous command of creating a rack account to complete.

  • You can edit, delete, collect inventory, assign rack accounts to a rack server and test the account connection.

  • You can select multiple rack accounts and delete them. You cannot delete an account if inventory collection, fault-health collection, firmware upgrade, applying policy or profile, server diagnostics tasks are running on any of the accounts.


What to do next

Test the rack server connection. Refer Testing an Account Connection.

Collecting Inventory for Rack Accounts or Rack Groups

Perform this procedure when you want to collect inventory for a rack account or a rack group.

Before you begin

The rack account or rack group is already created under rack accounts.

Procedure


Step 1

Choose Systems > Physical Accounts.

Step 2

Click Rack Accounts.

Step 3

A list of rack accounts is displayed.

Step 4

Click Inventory.

Step 5

On the Collect Inventory for Account(s) page, choose Rack Group or Rack Account to choose the servers from the drop-down list.

Step 6

Click Select to select the servers.

Step 7

In the Select dialog box, choose the servers and click Select.

Note 

You can use the search bar at the top of the report if you want to filter rack groups or rack accounts for selection.

Step 8

Click Submit.


Assigning Rack Accounts to a Rack Group

Perform this procedure when you want to assign servers to a rack group.

Before you begin

The rack account or server has already been created under Rack Accounts.

Procedure


Step 1

Choose Systems > Physical Accounts.

Step 2

Click Rack Accounts.

Step 3

A list of servers is displayed.

Step 4

Select a server or multiple servers and click Assign Rack Group.

Step 5

On the Assign Rack Groups page, select the rack group you want to assign the servers to.

Note 

Click on the + icon next to Assign Rack Group to selected server(s) drop-down list to create a rack group.

Step 6

Click Submit.


Testing an Account Connection

Perform this procedure when you want to test one or more rack account connections. We recommend you to perform this procedure for every new account added in Cisco IMC Supervisor.

Procedure


Step 1

Choose Systems > Physical Accounts.

Step 2

Click Rack Accounts.

Step 3

From the list of rack accounts, select the accounts for which you want to test the connection.

Step 4

Click Test Connection.

Note 
You cannot see the Test Connection button till you select at least one rack account from the list.
Step 5

In the Test Connection dialog box, click Submit.

Testing the connection may take several minutes.

The connection status and the reason for success or failure are displayed in the Rack Accounts page.