Configuring FlexConnect Groups

Information About FlexConnect Groups

To organize and manage your FlexConnect access points, you can create FlexConnect Groups and assign specific access points to them.

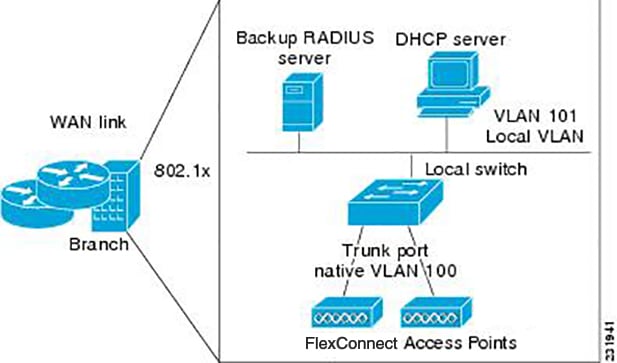
All of the FlexConnect APs in a group can share the same backup RADIUS server, fast secure roaming, local authentication configuration, and WLAN-VLAN mapping information. We recommend this feature if you have multiple FlexConnect APs in a remote office or on the floor of a building and you want to configure them all at once. For example, you can configure a backup RADIUS server for a FlexConnect group rather than having to configure the same server on each AP. A maximum of 100 APs is supported per FlexConnect group (other than the default FlexConnect group, which is limited only by the maximum APs supported by the controller).

Figure 1. FlexConnect Group Deployment. The following figure shows a typical FlexConnect deployment with a backup RADIUS server in the branch office.

FlexConnect Groups and Backup RADIUS Servers

You can configure the controller to allow a FlexConnect access point in standalone mode to perform full 802.1X authentication to a backup RADIUS server. You can configure a primary backup RADIUS server or both a primary and secondary backup RADIUS server. These servers can be used when the FlexConnect access point is in of these two modes: standalone or connected.

FlexConnect Groups and Fast Secure Roaming

Fast secure roaming among FlexConnect APs is supported only if the APs are in non-default FlexConnect groups. For OKC, fast roaming is supported between APs in different FlexConnect groups (because key caching is handled by the controller). For 802.11r and CCKM, fast roaming is supported only among APs in the same FlexConnect group. Sticky key caching is not supported with FlexConnect APs.


Note

Fast roaming among FlexConnect and non-FlexConnect APs is not supported.


Note

FlexConnect Groups is needed for fast roaming to work. Flex group needs to be created for fast roaming, 11r, and OKC , only then the caching can happen on an AP. The group name must be same between APs for a fast roaming to happen for 11r/fast roaming. The group can be different for OKC as final check is done at the controller.


FlexConnect Groups and Opportunistic Key Caching

Starting with the Cisco Wireless LAN Controller Release 7.0.116.0, FlexConnect groups accelerate Opportunistic Key Caching (OKC) to enable fast roaming of clients. OKC facilitates fast roaming by using PMK caching in access points that are in the same FlexConnect group.

OKC prevents the need to perform a full authentication as the client roams from one access point to another. FlexConnect groups store the cached key on the APs of the same group, accelerating the process. However, they are not required, as OKC will still happen between access points belonging to different FlexConnect groups and will use the cached key present on the Cisco WLC, provided that Cisco WLC is reachable and APs are in connected mode.

To see the PMK cache entries at the FlexConnect access point, use the show capwap reap pmk command. This feature is supported on Cisco FlexConnect access points only. The PMK cache entries cannot be viewed on Non-FlexConnect access points.


Note

The FlexConnect access point must be in connected mode when the PMK is derived during WPA2/802.1x authentication.


When using FlexConnect groups for OKC or CCKM, the PMK-cache is shared only across the access points that are part of the same FlexConnect group and are associated to the same controller. If the access points are in the same FlexConnect group but are associated to different controllers that are part of the same mobility group, the PMK cache is not updated and CCKM roaming will fail but OKC roaming will still work.


Note

Fast roaming works only if the APs are in the same FlexConnect group for APs in FlexConnect mode, 802.11r .


FlexConnect Groups and Local Authentication Server

You can configure the controller to allow a Cisco Wave 1 (IOS-based) FlexConnect AP in standalone mode to perform LEAP, EAP-FAST authentication for up to 100 statically configured users. The controller sends the static list of usernames and passwords to each FlexConnect access point when it joins the controller. Each access point in the group authenticates only its own associated clients.


Note

This feature is not supported on Wave 2 and 802.11ax APs.


Note

If you want to enable FlexConnect local authentication, you have to enable FlexConnect AP Local Authentication in the Local Authentication tab.

If the FlexConnect APs act as an 802.11X authenticator (RADIUS client), then configure the RADIUS servers in the General tab.


This feature is ideal for customers who are migrating from an autonomous access point network to a lightweight FlexConnect access point network and are not interested in maintaining a large user database or adding another hardware device to replace the RADIUS server functionality available in the autonomous access point.


Note

This feature can be used with the FlexConnect backup RADIUS server feature. If a FlexConnect is configured with both a backup RADIUS server and local authentication, the FlexConnect access point always attempts to authenticate clients using the primary backup RADIUS server first, followed by the secondary backup RADIUS server (if the primary is not reachable), and finally the FlexConnect access point itself (if the primary and secondary are not reachable).


For information about the number of FlexConnect groups and access point support for a Cisco WLC model, see the data sheet of the respective Cisco WLC model.

Configuring FlexConnect Groups

Configuring FlexConnect Groups (GUI)


Note

If the same IPv4 ACLs is mapped to a FlexConnect group and to an AP, then the controller uses the Flex group ACL. However, if the controller is downgraded to an older version, the AP reboots to the older version and pushes the AP specific ACL. This time the controller uses the AP specific ACL ignoring the FlexConnect Group ACL.


Procedure


Step 1

Choose Wireless > FlexConnect Groups to open the FlexConnect Groups page.

This page lists any FlexConnect groups that have already been created.

Note 
If you want to delete an existing group, hover your cursor over the blue drop-down arrow for that group and choose Remove.
Step 2

Click New to create a new FlexConnect Group.

Step 3

On the FlexConnect Groups > New page, enter the name of the new group in the Group Name text box. You can enter up to 32 alphanumeric characters.

Step 4

Click Apply. The new group appears on the FlexConnect Groups page.

Step 5

To edit the properties of a group, click the name of the desired group. The FlexConnect Groups > Edit page appears.

Step 6

If you want to configure a primary RADIUS server for this group (for example, the access points are using 802.1X authentication), choose the desired server from the Primary RADIUS Server drop-down list. Otherwise, leave the text box set to the default value of None.

Note 
IPv6 RADIUS Server is not configurable. Only IPv4 configuration is supported.
Step 7

If you want to configure a secondary RADIUS server for this group, choose the server from the Secondary RADIUS Server drop-down list. Otherwise, leave the field set to the default value of None.

Step 8

Configure the RADIUS server for the FlexConnect group by doing the following:

  1. Enter the RADIUS server IP address.

  2. Choose the server type as either Primary or Secondary.

  3. Enter a shared secret to log on to the RADIUS server and confirm it.

    The maximum number of characters allowed for the shared secret is 63.

  4. Enter the port number.

  5. Click Add.

Step 9

To add an access point to the group, click Add AP. Additional fields appear on the page under Add AP.

Step 10

Perform one of the following tasks:

  • To choose an access point that is connected to this controller, select the Select APs from Current Controller check box and choose the name of the access point from the AP Name drop-down list.

    Note 

    If you choose an access point on this controller, the MAC address of the access point is automatically entered in the Ethernet MAC text box to prevent any mismatches from occurring.

  • To choose an access point that is connected to a different controller, leave the Select APs from Current Controller check box unselected and enter its MAC address in the Ethernet MAC text box.

    Note 

    If the FlexConnect access points within a group are connected to different controllers, all of the controllers must belong to the same mobility group.

Step 11

Click Add to add the access point to this FlexConnect group. The access point’s MAC address, name, and status appear at the bottom of the page.

Note 

If you want to delete an access point, hover your cursor over the blue drop-down arrow for that access point and choose Remove.

Step 12

Click Apply.

Step 13

(Optional) To configure the FlexConnect APs as local authentication (RADIUS) servers, configure the FlexConnect Group as follows:

  1. Ensure that the Primary RADIUS Server and Secondary RADIUS Server parameters are set to None.

  2. Select the Enable AP Local Authentication check box to enable local authentication for this FlexConnect Group. The default value is unselected.

  3. Click Apply.

  4. Choose the Local Authentication tab to open the FlexConnect > Edit (Local Authentication > Local Users) page.

  5. To add clients that you want to be able to authenticate using LEAP, EAP-FAST, perform one of the following:

  6. Upload a comma-separated values (CSV) file by selecting the Upload CSV File check box, clicking the Browse button to browse to an CSV file that contains usernames and passwords (each line of the file needs to be in the following format: username, password), and clicking Add to upload the CSV file. The clients’ names appear on the left side of the page under the “User Name” heading.

  7. Add clients individually by entering the client’s username in the User Name text box and a password for the client in the Password and Confirm Password text boxes, and clicking Add to add this client to the list of supported local users. The client name appears on the left side of the page under the “User Name” heading.

    Note 
    You can add up to 100 clients.
  8. Click Apply.

  9. Choose the Protocols tab to open the FlexConnect > Edit (Local Authentication > Protocols) page.

  10. To allow a FlexConnect access point to authenticate clients using LEAP, select the Enable LEAP Authentication check box.

  11. To allow a FlexConnect access point to authenticate clients using EAP-FAST, select the Enable EAP-FAST Authentication check box. The default value is unselected.

  12. Perform one of the following, depending on how you want protected access credentials (PACs) to be provisioned:

    • To use manual PAC provisioning, enter the server key used to encrypt and decrypt PACs in the Server Key and Confirm Server Key text boxes. The key must be 32 hexadecimal characters.

    • To allow PACs to be sent automatically to clients that do not have one during PAC provisioning, select the Enable Auto Key Generation check box

  13. In the Authority ID text box, enter the authority identifier of the EAP-FAST server. The identifier must be 32 hexadecimal characters.

  14. In the Authority Info text box, enter the authority identifier of the EAP-FAST server in text format. You can enter up to 32 hexadecimal characters.

  15. To specify a PAC timeout value, select the PAC Timeout check box and enter the number of seconds for the PAC to remain viable in the text box. The default value is unselected, and the valid range is 2 to 4095 seconds when enabled.

  16. Click Apply.

Step 14

(Optional) To configure the FlexConnect APs as local 802.1X authenticators (RADIUS clients), configure the FlexConnect Group as follows:

  1. Under the General tab, check the Enable AP Local Authentication check box to enable local authentication for this FlexConnect Group. By default, it is unchecked.

  2. Click Apply.

  3. In the AAA section, enter the server IP address, server type primary, shared secret, and optionally port number.

  4. Click Add.

  5. (Optional) If you are using secondary RADIUS server, repeat these steps.

  6. Click Apply.

Step 15

In the WLAN-ACL Mapping tab, you can do the following:

  1. Under Web Auth ACL Mapping, enter the WLAN ID, choose the WebAuth ACL, and click Add to map the web authentication ACL and the WLAN.

  2. Under Local Split ACL Mapping, enter the WLAN ID, and choose the Local Split ACL, and click Add to map the Local Split ACL to the WLAN.

    Note 

    You can configure up to 16 WLAN-ACL combinations for local split tunneling. Local split tunneling does not work for clients with static IP address.

Step 16

In the Central DHCP tab, you can do the following:

  1. In the WLAN Id box, enter the WLAN ID with which you want to map Central DHCP.

  2. Select or unselect the Central DHCP check box to enable or disable Central DHCP for the mapping.

  3. Select or unselect the Override DNS check box to enable or disable overriding of DNS for the mapping.

  4. Select or unselect the NAT-PAT check box to enable or disable network address translation and port address translation for the mapping.

  5. Click Add to add the Central DHCP - WLAN mapping.

Note 

When the overridden interface is enabled for the FlexConnect Group DHCP, the DHCP broadcast to unicast is optional for locally switched clients.

Step 17

Click Save Configuration.

Step 18

Repeat this procedure if you want to add more FlexConnects.

Note 

To see if an individual access point belongs to a FlexConnect Group, you can choose Wireless > Access Points > All APs > the name of the desired access point in the FlexConnect tab. If the access point belongs to a FlexConnect, the name of the group appears in the FlexConnect Name text box.


Configuring FlexConnect Groups (CLI)


Note

If the same IPv4 ACLs is mapped to a FlexConnect group and to an AP, then the controller uses the Flex group ACL. However, if the controller is downgraded to an older version, the AP reboots to the older version and pushes the AP specific ACL. This time the controller uses the AP specific ACL ignoring the FlexConnect Group ACL.


Procedure


Step 1

Add add or delete a FlexConnect Group by entering this command:

config flexconnect group group_name {add | delete}

Step 2

Configure a primary or secondary RADIUS server for the FlexConnect group by entering this command:

config flexconect group group-name radius server auth {{add {primary | secondary} ip-addr auth-port secret} | {delete {primary | secondary}}}

The maximum number of characters allowed for the shared secret is 63.

Step 3

Add an access point to the FlexConnect Group by entering this command:

config flexconnect group_name ap {add | delete} ap_mac

Step 4

(Optional) To configure the FlexConnect APs as local authentication (RADIUS) servers, configure the FlexConnect Group as follows:

  1. Make sure that a primary and secondary RADIUS server are not configured for the FlexConnect Group.

  2. To enable or disable local authentication for this FlexConnect group, enter this command:

    config flexconnect group group_name radius ap {enable | disable}

  3. Enter the username and password of a client that you want to be able to authenticate using LEAP, EAP-FAST by entering this command:

    config flexconnect group group_name radius ap user add username password password

    Note 
    You can add up to 100 clients.
  4. Allow a FlexConnect access point group to authenticate clients using LEAP or to disable this behavior by entering this command:

    config flexconnect group group_name radius ap leap {enable | disable}

  5. Allow a FlexConnect access point group to authenticate clients using EAP-FAST or to disable this behavior by entering this command:

    config flexconnect group group_name radius ap eap-fast {enable | disable}

  6. To download EAP Root and Device certificate to AP, enter this command:

    config flexconnect group group_name radius ap eap-cert download

  7. Allow a FlexConnect access point group to authenticate clients using EAP-TLS or to disable this behavior by entering this command:

    config flexconnect group group_name radius ap eap-tls {enable | disable}

  8. Allow a FlexConnect access point group to authenticate clients using PEAP or to disable this behavior by entering this command:

    config flexconnect group group_name radius ap peap {enable | disable}

  9. Enter one of the following commands, depending on how you want PACs to be provisioned:

    • config flexconnect group group_name radius ap server-key key —Specifies the server key used to encrypt and decrypt PACs. The key must be 32 hexadecimal characters.

    • config flexconnect group group_name radius ap server-key auto —Allows PACs to be sent automatically to clients that do not have one during PAC provisioning.

  10. To specify the authority identifier of the EAP-FAST server, enter this command:

    config flexconnect group group_name radius ap authority id id

    where id is 32 hexadecimal characters.

  11. To specify the authority identifier of the EAP-FAST server in text format, enter this command:

    config flexconnect group group_name radius ap authority info info

    where info is up to 32 hexadecimal characters.

  12. To specify the number of seconds for the PAC to remain viable, enter this command:

    config flexconnect group group_name radius ap pac-timeout timeout

    where timeout is a value between 2 and 4095 seconds (inclusive) or 0. A value of 0, which is the default value, disables the PAC timeout.

Step 5

(Optional) To configure the FlexConnect APs as local 802.1X authenticators (RADIUS clients), configure the FlexConnect Group as follows:

  1. To enable or disable local authentication for this FlexConnect group, enter this command:

    config flexconnect group group_name radius ap {enable | disable}
Step 6

Configure a Policy ACL on a FlexConnect group by entering this command:

config flexconnect group group-name acl {add | delete} acl-name

Step 7

Configure local split tunneling on a per-FlexConnect group basis by entering this command:

config flexconnect group group_name local-split wlan wlan-id acl acl-name flexconnect-group-name {enable | disable}

Step 8

To set multicast/broadcast across L2 broadcast domain on overridden interface for locally switched clients, enter this command:

config flexconnect group group_name multicast overridden-interface {enable | disable}

Step 9

Configure central DHCP per WLAN by entering this command:

config flexconnect group group-name central-dhcp wlan-id {enable override dns | disable | delete}

Step 10

Configure the DHCP overridden interface for FlexConnect group, use the config flexconnect group flexgroup dhcp overridden-interface enable command.

Step 11

Configure policy acl on FlexConnect group by entering this command:

config flexconnect group group_name policy acl {add | delete} acl-name

Step 12

Configure web-auth acl on flexconnect group by entering this command:

config flexconnect group group_name web-auth wlan wlan-id acl acl-name {enable | disable}

Step 13

Configure wlan-vlan mapping on flexconnect group by entering this command:

config flexconnect group group_name wlan-vlan wlan wlan-id{add | delete}vlan vlan-id

Step 14

To set efficient upgrade for group, enter this command:

config flexconnect group group_name predownload {enable | disable | master | slave} ap-name retry-count maximum retry count ap-name ap-name

Step 15

Save your changes by entering this command:

save config
Step 16

See the current list of flexconnect groups by entering this command:

show flexconnect group summary

Step 17

See the details for a specific FlexConnect Groups by entering this command:

show flexconnect group detail group_name


FlexConnect AP Image Upgrades

Normally, when upgrading the image of an AP, you can use the preimage download feature to reduce the amount of time the AP is unavailable to serve clients. However, it also increases the downtime because the AP cannot serve clients during an upgrade. The preimage download feature can be used to reduce this downtime. However, in the case of a branch office set up, the upgrade images are still downloaded to each AP over the WAN link, which has a higher latency.

A more efficient way is to use the FlexConnect AP Image Upgrade feature. When this feature is enabled, one access point of each model in the local network first downloads the upgrade image over the WAN link. It works similarly to the primary-subordinate or client-server model. This access point then becomes the primary for the remaining access point of the similar model. The remaining access points then download the upgrade image from the primary access point using the pre-image download feature over the local network, which reduces the WAN latency.

Restrictions on FlexConnect AP Image Upgrades

  • The primary and secondary controllers in the network must have the same set of primary and backup images.

  • If you configured a FlexConnect group, all access points in that group must be within the same subnet or must be accessible through NAT.

  • A FlexConnect group can have a maximum of 100 APs on Cisco 7510 Controller, and 25 APs on Cisco 5508 Controller.

  • A FlexConnect group can have one primary AP per AP model. If a primary AP is not selected manually, the AP that has the least MAC address value is automatically chosen as the primary AP for that model.

  • A maximum of 3 subordinate APs of the same model can download the image from their primary AP (a maximum of 3 TFTP connections can serve at a time). The rest of the subordinate APs use the random back-off timer to retry for the primary AP to download the image. The random back-off value is more than 100 seconds. After a subordinate AP downloads the image, the AP informs the controller about the completion of the download. After random back-off, the waiting subordinate AP can occupy the empty TFTP slot at the primary AP.

    If a subordinate AP fails to download the image from its primary AP even after the subordinate retry count that you have configured is exhausted, the subordinate AP reaches out to the controller to fetch the new image.

  • This feature works only with CAPWAP APs.

  • This feature does not work if a primary AP is connected over CAPWAP over IPv6.

  • A Cisco Wave 2 AP working as the primary AP downloads the software image from the controller, even if the software image version is the same.

Configuring FlexConnect AP Upgrades (GUI)

Procedure


Step 1

Choose Wireless > FlexConnect Groups.

The FlexConnect Groups page appears. This page lists the FlexConnect Groups configured on the controller.

Step 2

Click the Group Name link on which you want to configure the image upgrade.

Step 3

Click the Image Upgrade tab.

Step 4

Check the FlexConnect AP Upgrade check box to enable a FlexConnect AP Upgrade.

Step 5

If you enabled the FlexConnect AP upgrade in the previous step, you must enable the following parameters:

  • Slave Maximum Retry Count—The number of attempts the subordinate access point must try to connect to the primary access point for downloading the upgrade image. If the image download does not occur for the configured retry attempts, the image is upgraded over the WAN. The default value is 44; the valid range is between 1 and 63.
  • Upgrade Image—Select the upgrade image. The options are Primary, Backup, and Abort.
Step 6

From the AP Name drop-down list, click Add Master to add the primary access point.

You can manually assign primary access points in the FlexConnect group by selecting the access points.

Step 7

Click Apply.

Step 8

Click FlexConnect Upgrade to upgrade.


Configuring FlexConnect AP Upgrades (CLI)

  • config flexconnect group group-name predownload {enable | disable} —Enables or disables the FlexConnect AP upgrade.

  • config flexconnect group group-name predownload master ap-name —Sets the AP as the primary AP for the model.

  • config flexconnect group group-name predownload slave ap-name ap-name —Sets the AP as a subordinate AP.

  • config flexconnect group group-name predownload slave retry-count max-retry-count —Sets the retry count for subordinate APs.

  • config flexconnect group group-name predownload start {abort | primary | backup} —Initiates the image (primary or backup) download on the access points in the FlexConnect group, or terminates an image download process.

  • show flexconnect group group-name —Displays the summary of the FlexConnect group configuration.

  • show ap image all —Displays the details of the images on the access point.

OfficeExtend Access Points

OfficeExtend Access Points

A Cisco OfficeExtend access point (Cisco OEAP) provides secure communications from a controller to a Cisco AP at a remote location, seamlessly extending the corporate WLAN over the Internet to an employee’s residence. The user’s experience at the home office is exactly the same as it would be at the corporate office. Datagram Transport Layer Security (DTLS) encryption between the access point and the controller ensures that all communications have the highest level of security.


Note

DTLS is permanently enabled on the Cisco OEAP. You cannot disable DTLS on this access point.


Figure 2. Typical OfficeExtend Access Point Setup.

The following figure shows a typical OfficeExtend access point setup.


Note

Cisco OEAPs are designed to work behind a router or other gateway device that is using network address translation (NAT). NAT allows a device, such as a router, to act as an agent between the Internet (public) and a personal network (private), enabling an entire group of computers to be represented by a single IP address. In Release 8.5, only one OEAP is supported behind a NAT device, but in Release 8.10, multiple OEAPs are supported behind a NAT device.


All the supported indoor AP models with integrated antenna can be configured as OEAP except the AP-700I, AP-700W, and AP802 series access points.


Note

All OfficeExtend access points should be in the same access point group, and that group should contain no more than 15 WLANs. A controller with OfficeExtend access points in an access point group publishes only up to 15 WLANs to each connected OfficeExtend access point because it reserves one WLAN for the personal SSID.


Additional References

OEAP 600 Series Access Points

This section details the requirements for configuring a Cisco wireless LAN controller for use with the Cisco 600 Series OfficeExtend Access Point. The 600 Series OfficeExtend Access Point supports split mode operation, and it requires configuration through the WLAN controller in local mode. This section describes the configurations necessary for proper connection and supported feature sets.


Note

IPv6 is not supported on Cisco 600 Series OfficeExtend Access Points.

Note

The CAPWAP UDP 5246 and 5247 ports must be open on the firewall between the WLAN controller and the 600 Series OfficeExtend Access Point.

Note

Multicast is not supported on Cisco 600 Series OfficeExtend Access Points.

OEAP in Local Mode

The Cisco OEAP connects to the Cisco WLC in local mode. You cannot alter these settings.


Note

Monitor mode, FlexConnect mode, Sniffer mode, Rogue Detector, Bridge, and SE-Connect are not supported on the Cisco OEAP and are not configurable.

Figure 3. OEAP Mode

Supported WLAN Settings for 600 Series OfficeExtend Access Point

The 600 Series OfficeExtend Access Point supports a maximum of three WLANs and one remote LAN. If your network deployment has more than three WLANs, you must place the 600 Series OfficeExtend Access Point in an AP group. If the 600 Series OfficeExtend Access Points are added to an AP group, the same limit of three WLANs and one remote LAN still applies for the configuration of the AP group.

If the 600 Series OfficeExtend Access Point is in the default group, which means that it is not in a defined AP group, the WLAN/remote LAN IDs must be set lower than ID 8.

If additional WLANs or remote LANs are created with the intent of changing the WLANs or remote LAN being used by the 600 Series OfficeExtend Access Point, you must disable the current WLANs or remote LAN that you are removing before enabling the new WLANs or remote LAN on the 600 Series OfficeExtend Access Point. If there are more than one remote LANs enabled for an AP group, disable all remote LANs and then enable only one of them.

If more than three WLANs are enabled for an AP group, disable all WLANs and then enable only three of them.

WLAN Security Settings for the 600 Series OfficeExtend Access Point

When configuring the security settings in the WLAN (see the following figure), note that there are specific elements that are not supported on the 600 Series OfficeExtend Access Point. CCX is not supported on the 600 Series OfficeExtend Access Point, and elements related to CCX are not supported.

For Layer 2 Security, the following options are supported for the 600 Series OfficeExtend Access Point:

  • None

  • WPA+WPA2

  • Static WEP

  • 802.1X (only for remote LANs)

    Figure 4. WLAN Layer 2 Security Settings

In the Security tab (see the following figure), do not select CCKM in WPA+WPA2 settings. Select only 802.1X or PSK.

Figure 5. WLAN Security Settings - Auth Key Management

Security encryption settings must be identical for WPA and WPA2 for TKIP and AES. The following are examples of incompatible settings for TKIP and AES.

Figure 6. Incompatible WPA and WPA2 Security Encryption Settings for OEAP 600 Series
Figure 7. Incompatible WPA and WPA2 Security Encryption Settings for OEAP 600 Series

The following are examples of compatible settings:

Figure 8. Compatible Security Settings for OEAP Series
Figure 9. Compatible Security Settings for OEAP Series

QoS settings are supported (see the following figure), but CAC is not supported and should not be enabled.


Note

Do not enable Coverage Hole Detection.


Note

Aironet IE should not be enabled. This option is not supported.

Figure 10. QoS Settings for OEAP 600

MFP is also not supported and should be disabled or set to optional.

Figure 11. MFP Settings for OEAP Series Access Points

Client Load Balancing and Client Band Select are not supported.

Authentication Settings

For authentication on the 600 Series OfficeExtend Access Point, LEAP is not supported. This configuration must be addressed on the clients and RADIUS servers to migrate them to EAP-Fast, EAP-TTLS, EAP-TLS, or PEAP.

If Local EAP is being utilized on the controller, the settings would also have to be modified not to use LEAP.

Supported User Count on 600 Series OfficeExtend Access Point

Only 15 users are allowed to connect on the WLANs provided on the Cisco 600 Series OEAP at any one time, a sixteenth user cannot authenticate until one of the first clients is deauthenticated or timeout on the controller occurs. This number is cumulative across the controller WLANs on the 600 Series OfficeExtend Access Point.

For example, if two controller WLANs are configured and there are 15 users on one of the WLANs, no other users can join the other WLAN on the 600 Series OfficeExtend Access Point at that time.

This limit does not apply to the local private WLANs that the end user configures on the 600 Series OfficeExtend Access Point for personal use. Clients connected on these private WLANs or on the wired ports do not affect these limits.


Note

This limit does not apply to other AP models that operate in the OfficeExtend mode.


Remote LAN Settings

Only four clients can connect through a remote LAN port on the 600 Series OfficeExtend Access Point. This number does not affect the fifteen user limit imposed for the Controller WLANs. The remote LAN client limit supports connecting a switch or hub to the remote LAN port for multiple devices or connecting directly to a Cisco IP phone that is connected to that port. Only the first four devices can connect until one of the devices is idle for more than one minute.

Remote LAN is configured in the same way that a WLAN or Guest LAN is configured on the controller:

Figure 12. Remote LAN Settings for OEAP 600 Series AP

Security settings can be left open, set for MAC filtering, or set for Web Authentication. The default is to use MAC filtering. Additionally, you can specify 802.1X Layer 2 security settings.

Figure 13. Layer 2 Security Settings for OEAP 600 Series APs in Remote LANs
Figure 14. Layer 3 Security Settings for OEAP 600 Series APs in Remote LANs

Channel Management and Settings

The radios for the 600 Series OfficeExtend Access Point are controlled through the Local GUI on the access point and not through the Wireless LAN Controller. The Tx power and channel settings can be set manually through the controller interface. RRM is not supported on the 600 Series OfficeExtend Access Point.

The 600 series scans and chooses channels for 2.4-GHz and 5-GHz during startup as long as the default settings on the local GUI are left as default in both spectrums.

Figure 15. Channel Selection for OEAP 600 Series APs

The channel bandwidth for 5.0 GHz is also configured on the 600 Series OfficeExtend Access Point Local GUI, for 20-MHz or 40-MHz wide channels. Setting the channel width to 40 MHz for 2.4 GHz is not supported and fixed at 20 MHz.

Figure 16. Channel Width for OEAP 600 APs

Firewall Settings

Firewall can be enabled on Cisco 600 Series OfficeExtend Access Point and filtering and forwarding rules can be applied. These ten pre-configured applications can be enabled or disabled:

  • FTP
  • Telnet
  • SMTP
  • DNS
  • TFTP
  • HTTP
  • POP3
  • NNTP
  • SNMP
  • HTTPS

These applications can be unblocked by providing the protocol (TCP/UDP), LAN client IP range and destination port range.


Note

The firewall is applicable only to the personal traffic on the OEAP 600 APs The data traffic between the controller and OEAP 600 APs is addressed by a firewall in the corporate network.


600 Series OfficeExtend Access Point supports a maximum of ten port forwarding rules. Every rule takes protocol (TCP/UDP), WAN port range, Local LAN client IP (where traffic will be forwarded), LAN port range, and enable or disable as a parameter.

The DMZ feature allows one network computer connected to local LAN or WLAN to be exposed to the Internet for use of a special-purpose service like Internet gaming. DMZ forwards all the ports terminating on WAN IP at the same time to one PC. The Port Range Forwarding feature opens only the required ports to be opened, while DMZ opens all the ports of one computer, exposing the computer to the Internet or WAN. This will forward all the incoming WAN packets to any port which has the port forwarding rule configured on it. CAPWAP control and data connection ports will not be forwarded to DMZ IP.

Additional Caveats

  • The Cisco 600 Series OfficeExtend Access Points (OEAPs) are designed for single AP deployments, therefore client roaming between Cisco 600 Series OEAPs is not supported.

    Disabling the 802.11a/n or 802.11b/g/n on the controller may not disable these spectrums on the Cisco 600 Series OEAP because local SSID may be still working.

  • Your firewall must be configured to allow traffic from access points using CAPWAP. Make sure that UDP ports 5246 and 5247 are enabled and are not blocked by an intermediate device that could prevent an access point from joining the controller.

  • Cisco Aironet APs other than 600 Series OEAPs that are converted to OEAP mode and mapped to locally switched WLAN forward the DHCP request to the local subnet on the AP connected switch. To avoid this condition, you must disable local switching and local authentication.

  • For Cisco 600 Series OEAP to associate with Cisco Virtual Wireless LAN Controller, follow these steps:

    1. Configure the OEAP to associate with a physical controller that is using 7.5 or a later release and download the corresponding AP image.
    2. Configure the OEAP so that the OEAP does not associate with the physical controller again; for example, you can implement an ACL in the network to block CAPWAP between the OEAP and the physical controller.
    3. Configure the OEAP to associate with the Cisco Virtual Wireless LAN Controller.
  • OEAP ACL is only supported for Cisco 600 Series OEAPs. For other AP models working as OEAP, you must use FlexConnect Split ACLs.

Configuring VLAN-ACL Mapping on FlexConnect Groups

Configuring VLAN-ACL Mapping on FlexConnect Groups (GUI)

Procedure


Step 1

Choose Wireless > FlexConnect Groups.

The FlexConnect Groups page appears. This page lists the access points associated with the controller.

Step 2

Click the Group Name link of the FlexConnect Group for which you want to configure VLAN-ACL mapping.

Step 3

Click the VLAN-ACL Mapping tab.

The VLAN-ACL Mapping page for that FlexConnect group appears.

Step 4

Enter the Native VLAN ID in the VLAN ID text box.

Step 5

From the Ingress ACL drop-down list, choose the Ingress ACL.

Step 6

From the Egress ACL drop-down list, choose the Egress ACL.

Step 7

Click Add to add this mapping to the FlexConnect Group.

The VLAN ID is mapped with the required ACLs. To remove the mapping, hover your mouse over the blue drop-down arrow and choose Remove.

Note 
The Access Points inherit the VLAN-ACL mapping on the FlexConnect groups if the WLAN VLAN mapping is also configured on the groups.

Configuring VLAN-ACL Mapping on FlexConnect Groups (CLI)

Procedure

  • config flexconnect group group-name vlan add vlan-id acl ingress-acl egress acl

    Add a VLAN to a FlexConnect group and map the ingress and egress ACLs by entering this command:

Viewing VLAN-ACL Mappings (CLI)

Procedure

  • show flexconnect group detail group-name

    View FlexConnect group details.
  • show ap config general ap-name

    View VLAN-ACL mappings on the AP.