Downloads |
 Feedback Feedback
|
Table Of Contents
CiscoView Device Packages and Applications
CiscoView and SNMP MIB Variables
Devices Supported by CiscoView
Applications Supported by CiscoView
Setup Requirements Before Displaying a Device
Starting CiscoView and Opening an Installed Device
Configuring and Monitoring with CiscoView
Using CiscoView Configuration and Monitoring Tables
Displaying Configuration Information
Displaying Performance Information
Setting CiscoView Operating Characteristics and Preferences
Help Window Menu and Button Bars
Introducing CiscoView
This chapter provides general information about CiscoView and contains the following sections:
•
Overview
•
•
•
•
•
•
•
•
•
•
•
Overview
CiscoView 4.2(1) is a graphical SNMP-based device management tool that provides powerful real-time views of your networked Cisco Systems devices. These views deliver a continuously updated physical picture of device configuration and performance conditions, with simultaneous views available for multiple device sessions. CiscoView is run from a centralized network management site from which you can review, reconfigure, and monitor essential device data from a simple GUI (that displays information such as dynamic status reports, performance statistics, and network inquiries) without having to physically check connections for each device, module, or port at every different or remote location.
CiscoView also contains device-specific applications, such as Threshold Manager, StackMaker, and Flash File System, that further enhance your network management, monitoring, and troubleshooting capabilities. Additionally, CiscoView is designed for integration with the following leading network management platforms to provide seamless and powerful methods of managing Cisco devices (such as routers, switches, hubs, concentrators, and adapters):
•
•
•
Note
CiscoView Device Packages and Applications
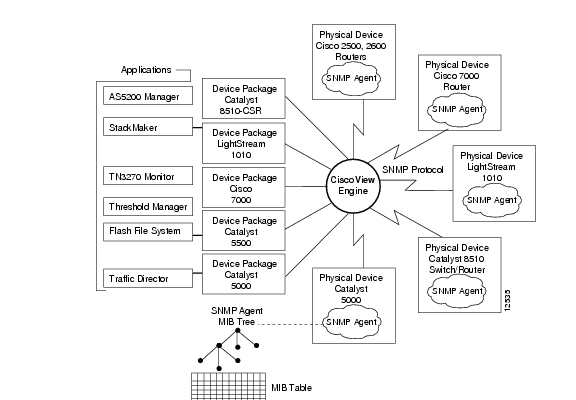
Cisco's routers and switches are referred to as network devices. Router and switch devices must be physically installed in the appropriate chassis and connected to your network (using each specific device's hardware installation guide). Device software is installed as a device package; for example, the LightStream 1010 software is installed as the LS1010.pkg. CiscoView uses the device package to display a dynamic panel view of the physical device and all its modules, submodules, ports, and the like.
Note
The CiscoView engine controls and manages physically connected devices via SNMP (Simple Network Management Protocol). The SNMP system consists of three parts: SNMP manager, SNMP agent, and Management Information Base (MIB). Each installed device's SNMP agent uses sets of MIB variables that you can configure, monitor, and modify (as necessary) using CiscoView and each installed device package's software.
CiscoView also provides the interface for a number of applications that supply additional configuration and monitoring functionality. Although CiscoView is designed expressly to manage all devices, in some cases, there are special management requirements that an application can streamline for you, as in the case of stacked devices. A separate application specifically for managing stacked devices, called StackMaker, is available for you to use in conjunction with CiscoView or as a standalone product.
Some applications are embedded in the CiscoView software; others, such as the AS5200 Manager, must be downloaded from CCO, like the devices, as a package. Each of these applications can be run as a standalone application or used collectively with CiscoView.
Figure 1-1 illustrates how CiscoView and its various devices and applications work together.
Figure 1-1 CiscoView, Device Packages, and Applications
CiscoView and SNMP MIB Variables
Networks typically are managed using standard SNMP, a request/response protocol that defines how information is passed between network management systems and their agents. SNMP contains all MIBs - collections of management information base variables.
Each network request is processed in the context of a MIB tree view. For example, CiscoView's relationship to a physical device, such as a LightStream 1010 Switch, is managed by the CiscoView engine as a function of both SNMP and the IP address assigned to the installed LS1010 device.
Sets of MIB variables are passed as requests/responses between device package software and the CiscoView engine. In fact, while you are opening a new device package to display its view for the very first time, the CiscoView engine is retrieving the system object ID from the physical device using the MIB variable sysObjectID. This ID is returned to the device-package software and all established configuration parameters are discovered and automatically displayed as read-only information in configuration tables for that device. When the device view is displayed, you can click on various configurable objects (ports, cards, etc.) and display the associated tables, in turn, that contain discovered configuration information.
MIBs operate as either single or multiple request instances. Multiple instances are processed by an SNMP agent on each device and responses are presented in the CiscoView GUI as a MIB table (which resides in the device software as part of the firmware structure). These tables contain system-discovered configuration information or user-defined configuration information. You enter user-defined configuration information into the pink fields in a table; gray fields contain all discovered read-only information.
CiscoView uses SNMP largely to replace the command driven MIB network configuration and management process. However, there are a few command line setup tasks to perform for certain devices before starting CiscoView. See the section "Setup Requirements Before Displaying a Device" later in this chapter.
Note
Devices Supported by CiscoView
CiscoView provides support for a considerable range of devices, installed as device packages. Additional devices can be added to CiscoView anytime after the initial product release or installation. When new device packages become available, they are placed on CCO, the Cisco Connection Online. Check this site to ensure that you have the latest device release. For more information on downloading devices packages from this Web site, see "Downloading Device Packages on a Windows NT Host" in Chapter 2, or "Downloading Device Packages on a UNIX Host" in Chapter 3. Be sure also to review the CiscoView Release Notes for each device package because they supply critical information, notes, and caveats about usage.
There is a list of currently available internetworking device packages supported by CiscoView in the Release Notes for CiscoView, Release 4.2(1). There is also a product list on CCO that provides a brief description of each device or its family of devices, and the package name (bearing a .pkg extension) with which it is downloaded.
Applications Supported by CiscoView
CiscoView runs a supplementary set of applications that supply additional device configuration and monitoring functionality. Although CiscoView is designed to manage all devices, there are special functions these applets can handle for you. Threshold Manager, for example, can be used to set thresholds on Cisco RMON-enabled devices to reduce management overhead and improve troubleshooting capabilities. Each of the following applications can be used as standalone products or as part of CiscoView.
is a list of the applications supported by CiscoView.
For additional information on CiscoView and specific devices, see the context-sensitive online help. This comprehensive online help provides procedures, overview material, and links to related information.
Note
Setup Requirements Before Displaying a Device
Before you can display a device's view for configuration and monitoring, you need to perform the following setup functions:
Step 1
Refer to the CiscoView Installation Guide for detailed installation instructions.When installing CiscoView, you can also choose the device package(s) (with the .pkg extension) you want to install at the same time. For incremental updates or new releases of device packages, you will also need to download device packages from CCO from time to time (see step 2).Step 2
•
•
cvinstall devicename.pkg command.Do not start CiscoView yet.
Step 3
•
•
•
•
•
•
Starting CiscoView and Opening an Installed Device
Follow these steps to Start CiscoView and display an installed device:
Step 1
Step 2
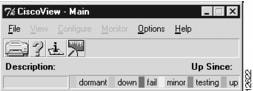
Figure 1-2 CiscoView Main Menu
Step 3
Step 4
CiscoView and Device Displays
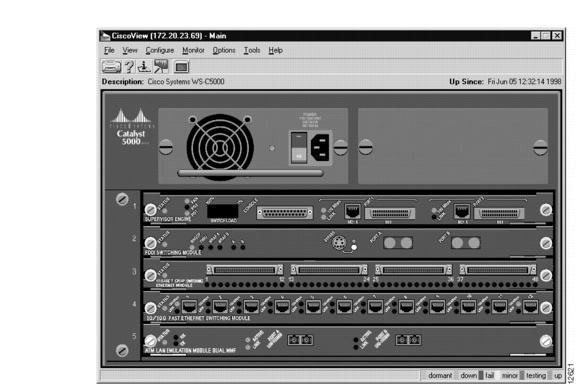
The display you see when you first open an installed device in CiscoView is a real-time graphical view of the front or rear panel of that device. You click on various parts and components of the represented device in the view to perform configuration and monitoring tasks. Figure 1-3 is an example of a device's rear-panel view.
Figure 1-3 Example of CiscoView, Rear-Panel View
Configuring and Monitoring with CiscoView
You use CiscoView to display and configure (or reconfigure) devices and their modules, submodules, ports, CPUs, channels, and network services, as represented by the graphical view. Configuration is a process that establishes the characteristics of the device and its connections and components on the network and records this information in appropriate files. After detailed aspects of the device are configured, the system can identify the device and dynamically monitor its performance. Using the same CiscoView GUI device displays, tables, and statistical/status windows, you can manage, monitor, and troubleshoot the device and each of its component's performance results on an ongoing and automatically updated basis.
CiscoView facilitates the configuration process by communicating with the SNMP agent residing on the device to discover established configuration parameters. Configuration information that is automatically discovered by CiscoView is displayed in a read-only format in CiscoView tables. Thus, some configuration information is presented in tables as read-write data (which requires your input and is subsequently modifiable), while other "discovered" configuration information is provided by the system as read-only data.
The Configuration information that you are required to provide (for device, card, and port configurations) is a straightforward selection process using the CiscoView Configure menu. The Configure menu options vary depending on the device you are using and the component you have selected (i.e., highlighted) to configure on the GUI device view: you can select the device, a card, subcard, CPU, power supply, or port (or set of ports).
For example, to display port configuration information, you first click directly on a specific port on the device's panel display, then select Port from the Configure menu. (All port types are selectable: modem port, port_tty, port_con, Ethernet_port, etc., depending on the type of device you are using and the types of ports available on that device.
See the online help for details about configuring specific devices.
Using CiscoView Configuration and Monitoring Tables
CiscoView tables enable users to more easily understand the tremendous volume of management data available for internetworking devices. CiscoView compiles the information and organizes it into clear and consistent graphical device representations.
CiscoView's device displays are dynamic GUI views that contain selectable modules, subcards, ports, and the like. To view CiscoView information tables, you first highlight the component in the view for which you want data, then select either Configuration or Monitoring options from the CiscoView main menu or from complementary popup menus.
Each selected component in the view displays secondary windows containing either configuration or performance data, as chosen by you. Configuration information is displayed in CiscoView Configuration windows. Performance information is displayed in CiscoView real-time Monitoring windows, which are sometimes referred to as dashboard monitors.
Displaying Configuration Information
Use the Configuration menu in the CiscoView main window to display or enter modifiable configuration information, or select Configure from a component popup menu. CiscoView displays configuration information in the Configuration windows that consist of either a list of fields for a single port or a table that includes fields for multiple ports.
Displaying Performance Information
Use the Monitor menu in the CiscoView main window to display performance information, or select the Monitor option from a component popup menu. CiscoView displays performance information in a dashboard monitor window. See "Using the Dashboard Monitor" in this chapter.
Note
For some devices, CiscoView allows you to select multiple ports. You can display configuration or performance information for multiple ports or port groups, in one window. The entries that can be modified are displayed in pink. Figure 1-4 shows the table for three of the ports on an AS5200 card.
Figure 1-4 CiscoView Tables
To display a CiscoView table, take the following steps:
Step 1
Step 2
A CiscoView table displays information in tabular format. The first column contains data for all the ports you selected in the device display.
You can add, delete, or modify entries in pink fields within a CiscoView table. describes how to make edits to CiscoView tables.
Setting CiscoView Operating Characteristics and Preferences
You can change some CiscoView operating characteristics, such as the polling frequency or the number of retries, from within the CiscoView application. To change operating characteristics, take the following steps:
Step 1
The CiscoView Properties window opens.
Step 2
The default polling frequency value varies by device. A typical value is every 60 seconds. To disable polling frequency, set the value to zero. If you set the polling frequency below 60 seconds for certain devices, it could slow down your network. It is advisable to use low polling frequencies in specific testing situations and increase them when you have finished testing. Do not poll faster than every 5 seconds.Step 3
The default Retries value is 3. The retries value indicates how many times CiscoView resends an SNMP request to the agent. In busy networks, SNMP datagrams can be discarded. The Retries value allows the application to continue operation during network problems. A setting of 3 is considered a reasonable value; increase the value if the network is slow.Step 4
A timeout indicates the amount of time it takes to reach a device. If it takes longer than the time specified, the device is considered to be either unreachable or down. The interval value is specified in seconds; the default is 3 seconds.As a guideline, the timeout value should be set to twice the average end-to-end delay in your network. If you have a network with several slow links, you might need to set the timeout to a higher value. If you have only LAN links in your network, a value of 2 seconds is reasonable to account for processing delays and timer accuracy.
In high traffic situations, you might experience timeouts. You should not reduce the polling frequency because this could cause a general error. Increase the timeout interval if you consistently experience timeouts.
Step 5
Text labels for MIB variables are the default. MIB descriptors are actual MIB variable names used to manage devices; for example, locIfOutBitsSec is output bits per second. MIB text labels are user-friendly aliases of the MIB descriptor.Step 6
This setting is useful, for example, when you want to make changes to a device or port setting but did not specify the write community string when you first opened the device display. You can enter the write community string in the Write Community field without exiting and reopening the window.
Step 7
Note
Step 8
You use the Options menu to change the presentation and operating characteristics of CiscoView. For example, if you want to display the toolbar or change the polling frequency, you do it through the Options menu. describes the Options menu.
Table 1-3 CiscoView Options Menu Items
Show Toolbar
Display or hide the toolbar to access shortcut commands.
Show Legend
Display or hide the legend.
Show System Information
Display or hide system information.
Properties
Set various operating characteristics, including polling frequency, the number of retries, the timeout interval, the read and write community string, MIB1 labels displayed as descriptors or an alias, and where to launch CiscoView—in the same window or a separate one.
Debug
Displays troubleshooting information. Debug should be used only in consultation with technical support. Writes the trace for device discovery and status polling to the /tmp/.cvlog.
Debug SNMP
Displays all SNMP2 traffic in encoded form to and from the device. Debug SNMP should be used only in consultation with technical support.
1 MIB=Management Information Base
2 SNMP=Simple Network Management Protocol
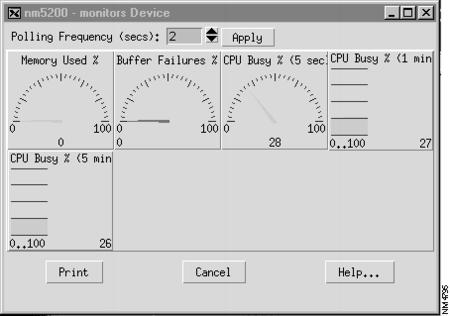
Using the Dashboard Monitor
The dashboard monitor displays various types of network performance information, such as poll utilization errors. The display varies, depending on the type of device or port in use, but it always consists of dials or stripcharts (Figure 1-5). Each display represents information provided by a MIB variable, with the common meaning indicated above the display.
Figure 1-5 Dashboard Monitor
Within the dashboard monitor, you can use a grapher tool to present performance in graph form. To start the graphing tool for the network management platform, select a graphical display in the dashboard and click the Grapher button. You can use all the features of the graphing tool when you are troubleshooting performance problems.
Note
Sorry, can't graph formulas.Using CiscoView's Online Help
Context-sensitive online help provides you with step-by-step instructions on how to use CiscoView applications. The online help system also provides a glossary and keyword search capability. provides a quick guideline to access help from different places.
Note
Jumps and Popups
The online help contains jumps and popups. Click on a highlighted underlined topic to jump to a help window specific to that topic. When you jump to another topic, you have to click Back on the menu bar to go back to the previous topic. Click on a dotted underlined term to open a popup window, which defines the term. When you go to a popup window, press Return to return to the previous help topic.
Help Contents Tab
The Help Contents tab has three functional tabs:
•
•
•
For information about using this table select Help>On Help.
Help Window Menu and Button Bars
Each help window has a menu bar and a button bar. The menu bar provides standard help functions for printing, copying, and pasting text from help topics, making online notes about particular help topics, and placing bookmarks.
The button bar has the following buttons:
•
•
•
•
OverView and See Also Links
Many help windows have Overview and See Also links. You can select the Overview link to obtain background information for the procedure. Select the See Also link to display a list of related topics and go directly to those topics.
Exit Help
Select File>Exit on the menu bar in the Help window to exit Help.