Downloads |
 Feedback Feedback
|
Table Of Contents
System Administration and Log Management
Creating New Permissions Groups
System Administration and Log Management
System Overview
Users must have sufficient access rights, or permission levels, to perform any operations on network elements (the devices, such as routers, that make up the network) or system-level resources (such as templates or log messages). In the GUI application developed by Cisco, these access rights are administered through the Permission Manager.
Permissions are granted to user groups, not individual users. Permission groups are created and managed by the SuperUser (login name:
admin), using the Permission Manager window. This window is opened when you click on the Permission Manager button in the Main Window. While any user can use this window to review current permissions for the group to which the user belongs, only the SuperUser can create, delete, or modify a permissions group. A user cannot belong to more than one permissions group at a time.
Note
This SuperUser is special to Cisco IP Manager, and should not be confused with the UNIX
superuser. The Cisco IP Manager SuperUser is an administrator that has access to all users and elements of the system.Users are added to the system (as well as removed, and their data managed) in the User Manager window, which opens when you click on the User Manager button in the Main Window. Only the SuperUser can add a user to the system.
Log messages are generated periodically by the various servers that make up the Cisco IP Manager software. These messages are stored in the database; access to them is through the Log Viewer window. To open this window, click on the Log Viewer button in the Main Window.
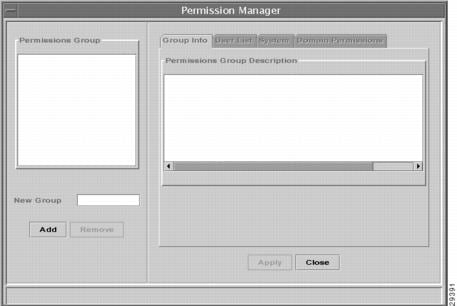
Permission Manager
Use the Permission Manager window to create and delete permissions groups and grant permission levels for various system resources. To open this window, click on the Permission Manager button on the Main Window.
Figure 7-1 Permission Manager window
Permissions groups are displayed in the pane on the left side of the window. The SuperUser (login:
admin) can see all permissions groups; individual users can see only the group to which they belong. Only the SuperUser can make changes to groups.Initially, no permissions groups appear in this pane. First you create a group, then add users to the group. You create the group with the Permission Manager. You must then separately open the User Manager and create users to add to the group.
Creating New Permissions Groups
Only the SuperUser can add a new permissions group.
Open the Permission Manager window and enter a name for the new permissions group in the New Group field in the pane on the left side of the window.
See the section "Name Restrictions" in Chapter 5, "Managing Network Elements" for limitations on characters in names.
Click the Add button to add the new group to the bottom of the Permissions Group list.
You must add the group before you can add users or define permissions.
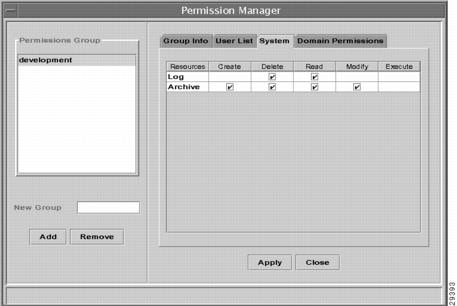
Setting Permissions
Select a group from the Permissions Group list in the pane on the left side of the Permission Manager window.
Use the tabs at the top of the pane on the right side of the window to add users and set permissions. Permissions are set per group, not per individual. All members in the group receive the same access rights.
Tabs are:
•
•
shows the Permission Manager window with the User List tab selected, and the New User Name drop-down list.
Figure 7-2 Permission Manager window, User List tab
Click the Add User button to add the user to the Member List pane. A dialog box appears to indicate you have successfully added the new user. Highlight a user in the Member List pane and click the Delete User button to remove the user from the list.
•
•
•
Note
Figure 7-3 Permission Manager window, System tab
•
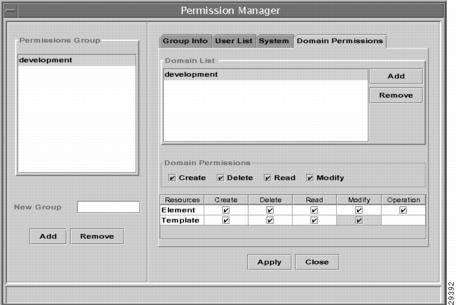
In addition, you can grant resource permissions for members of a group to operate on elements and templates. Set the permissions for the following resources:
•
•
Figure 7-4 Permission Manager window, Domain Permissions tab
Applying the Settings
When you have set permissions, click the Apply button to save the permissions, or the Close button to close the Permission Manager window.
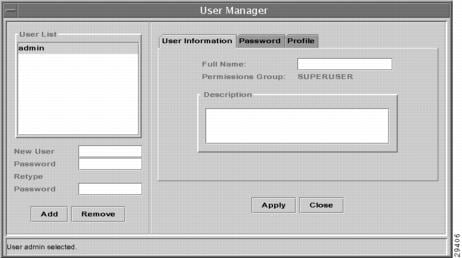
User Manager
Click the User Manager button on the Main Window to open the User Manager window. Use this window to add and remove individual users and modify their user profiles.
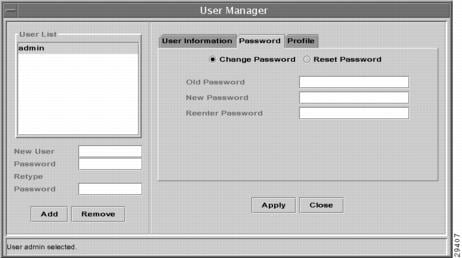
Figure 7-5 User Manager window
Changing admin Password
If this is the first time you have used the Cisco IP Manager software, only one entry—
admin— appears in the User List at the left side of the window. You should select this entry and change the password. How to do this is explained under "Password."Adding Users
To add a new user to the database, enter a user name in the New User field and a password in the Password field beneath the User List in the left pane of the window. Enter the password a second time in the Retype Password field, and click the Add button. You must supply a password when you first add a user. You can change that password later, including making it zero-length. The maximum length for a password is 64 characters.
Note
See the section "Name Restrictions" in Chapter 5, "Managing Network Elements" for limitations on characters in names.
After a user has been added to the database, you can use the tabs in the pane on the right side of the window to provide additional information.
User Information
Use the User Information tab to supply the Full Name and Description about this user. The Permissions Group field is for information only; this information is available if the user has been added to a Permissions Group in the Permission Manager. If not, the field reads "No Group Assigned."
Enter into the Full Name field the full name to associate with the user highlighted in the User List in the left pane of the window. The maximum length for Full Name is 64 characters.
Enter into the Description field a description to associate with the user highlighted in the User List in the left pane of the window. The maximum length for Description is 128 characters.
Password
The SuperUser (login:
admin) can modify all data for all users, including passwords.Individual users can see and modify only their own information.
To change passwords, click on the Password tab.The dialog shown in appears, with the Change Password radio button selected and your data displayed unless you are logged in as
admin. (If you are the SuperUser, select a user from the list to see that user's information.)Figure 7-6 User Manager window: Password tab
Enter the current password in the Old Password field. Enter the new password twice, once in the New Password field and again in the Reenter password field. The maximum length for a password is 64 characters.
Note
Clicking the Reset Password radio button resets the highlighted user's password to the system default (
password). The Reset Password radio button is available only to the SuperUser; it is grayed out for any other user. You must click the Change Password radio button again to make entries in any of the fields.The password change takes effect whenever you click the Apply or Close button, at which time a confirmation dialog is displayed.
Profile
Use the Profile tab to specify a Router User Name and Router Password. These fields can be up to 120 characters in length. If these two fields are set, this router user name and password will be used at the time of upload or download to log in to the router instead of the CIPM user name and password. Also refer to "VTY Tab" in Chapter 5, "Managing Network Elements."
You can also specify to change the router password by clicking the appropriate checkbox.
Note
Applying the Settings
When you have added users and modified their properties as you wish, click the Apply button to save the data, or the Close button to close the User Manager window.
Log Viewer
Users with log permissions can view or delete messages generated by the various servers that make up the Cisco IP Manager software, by clicking on the Log Viewer button on the Main Window.
The Log Viewer window opens.
Figure 7-7 Log Viewer window
The Log Viewer window displays all messages currently in the log (up to a maximum of 5000 records) when it opens. To view specific log messages, you can search the database for messages that meet criteria you specify, using the View menu options or the Search buttons.
The default time shown for each message is GMT, but you can also display it in local time.
The window is not refreshed automatically. Messages generated while the window is open are not displayed (nor are messages cleared when you purge the database) until you close and reopen the window, submit a new query, or click the Refresh button or Refresh item under the View menu.
The Log Viewer window contains three menus and eight buttons. The buttons correspond to some of the functions of the menus.
Log Viewer Menus
The Log Viewer window has the following menus:
File
The File menu has the following commands:
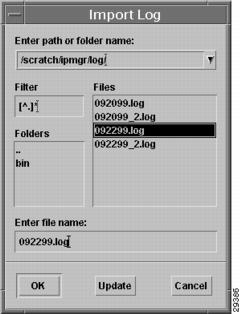
Import...
Returns previously exported data to the database. You can use this command to review information that was previously exported and then purged from the database (perhaps as a housekeeping measure). When you click on this menu item, a dialog (Import Log) appears in which you can navigate or directly specify a path or folder name, use a filter, or specify a file name.
Note
Figure 7-8 Log Viewer: Import Log Dialog
Highlight in the Files pane the file to import and click OK. You can change the Filter specification and click Update, and then the Files pane displays only those files that match the filtering criterion. If the file names have changed in the specified directory, use Update to display those files that match the filtering criterion. Navigate to different folders by highlighting the appropriate folder in the Folders pane; "
.." specifies the parent folder. Your choice then appears in the Enter path or folder name field.The Filter field default entry
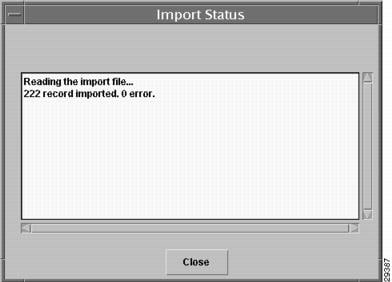
[^.]*is a regular expression that specifies displaying all files except those that begin with a dot, that is, all except hidden files. You can enter wildcard characters to display only the subset of files you wish to see. For example,*.loglists only those files with a.logextension.When you click OK, a dialog indicating number of records appears while the data is being read. Click Close to close the dialog. The new data appears at the end of the current data displayed in the Log Viewer window.
Figure 7-9 Log Viewer: Import Status dialog
Export...
Writes to a file the data currently displayed in the Log Viewer window. This might not be all the messages in the database if you have not refreshed the window, or if the database contains more than 5000 records. When you click on this menu item, a dialog (Export Log) appears in which you can navigate or directly specify a path or folder name, use a filter, or specify a file name. The controls of the Export Log dialog function the same as those of the Import Log described earlier under "Import..."
If the database contains fewer than 5000 records and no filters are in effect to limit the view, then all records in the database are present in the view. In such case, Export... and Export All produce the same result.
A dialog showing percentage progress and indicating number of records appears while the data is being written.
Click Close to close the dialog, or, before the export ends, Abort to terminate the process.
Export All
Writes to a file all log messages currently in the database. The difference between Export All and Export... is that the latter exports only those records currently displayed in the Log Viewer window. The functionality, including interaction with the Export Log, is the same as described under "Export..."
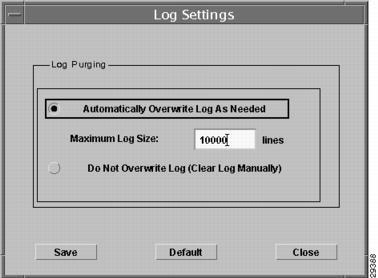
Log Settings
Sets a limit on how many messages can be stored in the database. When you select this command, the Log Settings window opens.
Figure 7-10 Log Viewer: Log Settings window
Select the Automatically Overwrite Log As Needed button, then enter the number of lines the log can contain (maximum size is 2,147,483,647; the default value is 10,000).
Or, choose the Do Not Overwrite Log (Clear Log Manually) button if you do not want to set a limit.
When you have entered your choices, click the Save button to save your settings, or click Close to dismiss the window without saving your changes.
The Default button resets the limit to 10,000 lines and selects the Automatically Overwrite... button.
The Log Server (LOGServer) automatically removes older messages from the database whenever this limit is reached. However, to enhance performance, the limit is checked only once for every 100 messages generated. So it is possible that the database could be 99 messages over the limit at any given time.
Purge By Date
Purges the database of messages that fall within a specified date range. Enter a start date in the From field, and an ending date in the To field. You must enter these dates in YYYY/MM/DD format. Click Clear to clear the fields of any ranges you might have entered; click Cancel to exit the dialog without performing the operation. Click OK to initiate the purge. A Confirm dialog appears. Click Yes to immediately remove all messages in the specified date range from the database; click No to cancel the operation.
Note
Purge All
Purges the database of all log messages. When you select the Purge All menu option, a message box asks if you want to save the log messages first. If you click the No button, all messages in the database are purged immediately; click Cancel to cancel the operation. If you click the Yes button, a dialog (Export Log) appears in which you can specify the name of a file to which to save the data in the database. This dialog functions exactly as described earlier under "Export..." When you click OK here, all messages in the database are first saved to the specified file, and then purged from the database.
Check Log Size
Counts the number of messages currently in the database and displays the result in a message box.
Close
Closes the Log Viewer window.
Exit
Closes all open Cisco IP Manager windows and exits the software.
View
The View menu has the following commands:
Search
Lets you specify criteria for messages, in the Search window. This window allows you to specify a range of dates, a specific server, message category, and specific message contents.
Figure 7-11 Log Viewer: Search window
The Server button produces a drop-down list of Cisco IP Manager servers within which to search; the default is (All).
The Source field identifies the location within the server software that caused the log message to be generated.
Use the Message field to specify a string of characters; if that string is contained in a message that also meets the other criteria, the message is displayed in the Log Viewer window.
You can enter data into any combination of these fields; messages meeting your specified criteria are displayed when you click the OK button. (Only the administrator can view messages generated by all users; non-administrator users can view only their own messages.)
Click the Cancel button to dismiss the Search window without generating a log request. Click the Clear button to remove text from all fields in the Search window.
More Search
Lets you specify different criteria for log messages—date range, domain, or network element—in the More Search window.
Figure 7-12 Log Viewer: More Search window
Enter data into any or all of the fields; messages that match the criteria specified are displayed in the Log Viewer window when you click the OK button.
If you enter only a Starting Date, all messages currently stored in the database that have been generated since the beginning of that day are displayed; if you enter only an End Date, all messages currently stored in the database that were generated before the end of the specified date are displayed. The same behavior is true for each of the other fields.
Click the Cancel button to close the window without generating a log request. Click the Clear button to clear text from all of the fields in the window.
Clear
Clears the Log Viewer window of all messages. Use this command before one of the search options if you want to display only those items found by the search option.
GMT
Specifies date display as Greenwich Mean Time. This is the default.
LocalTime
Specifies date display as local time (with respect to the GUI client).
Error Codes
Displays a list of Cisco IP Manager error codes, arranged by server.
Clear
Removes all data from the Log Viewer window. This has no effect on the database.
Refresh
Reads all records currently into the database into the Log Viewer window, up to a maximum of 5000.
Help
The Help menu has the following commands:
Sorting
Displays a message window that explains how to specify sorting order (click in a column header to sort log messages by that column in ascending order; hold the shift key down and click in a column header to sort messages by that column in descending order).
About
Displays information about the Cisco IP Manager software.
Log Viewer Buttons
The Log Viewer window has the following buttons:
Import
The Import button functions exactly the same as the "Import..." menu item of the File menu.
Export
The Export button functions exactly the same as the "Export All" menu item of the File menu.
Search
The Search button functions exactly the same as the "Search" menu item of the View menu.
More Search
The More Search button functions exactly the same as the "More Search" menu item of the View menu.
Settings
The Settings button functions exactly the same as the "Log Settings" menu item of the File menu.
Purge
The Purge button functions exactly the same as the "Purge By Date" menu item of the File menu.
Refresh
The Refresh button functions exactly the same as the "Refresh" menu item of the View menu.
About
The About button functions exactly the same as the "About" menu item of the Help menu.