Configuring Cisco Security Group Access Policies

Table Of Contents

Configuring Cisco Security Group Access Policies

Understanding the SGA Architecture

SGA Features and Terminology

SGA Requirements

Configuring ISE to Enable the SGA Solution

Configuring SGA Settings on the Switches

Configuring SGA Devices

Configuring Security Group Access Settings

Configuring Security Group Access AAA Servers

Adding and Editing Security Group Access AAA Servers

Configuring Security Groups

Adding and Editing Security Groups

Configuring Security Group Access Control Lists

Adding and Editing Security Group Access Control Lists

Assigning SGACLs to SGTs Through Egress Table

Mapping Security Groups to Devices

Adding and Editing Security Group Mappings

Configuring SGA Policy by Assigning SGTs to Devices

Assigning Security Groups to Users and End Points


Configuring Cisco Security Group Access Policies


This chapter describes how to configure a Cisco Identity Services Engine (ISE) node as an authentication server, using Cisco security group access policies (SGA). This requires a Cisco SGA solution enabled network.

This chapter covers the following topics:

Understanding the SGA Architecture

SGA Features and Terminology

SGA Requirements

Configuring ISE to Enable the SGA Solution

Configuring SGA Settings on the Switches

Configuring SGA Devices

Configuring Security Group Access Settings

Configuring Security Groups

Configuring Security Group Access Control Lists

Assigning SGACLs to SGTs Through Egress Table

Mapping Security Groups to Devices

Configuring SGA Policy by Assigning SGTs to Devices

Assigning Security Groups to Users and End Points

Understanding the SGA Architecture

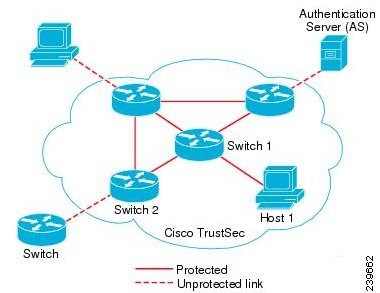
The Cisco Security Group Access (SGA) solution establishes clouds of trusted network devices to build secure networks. Each device in the Cisco SGA cloud is authenticated by its neighbors (peers). Communication between the devices in the SGA cloud is secured with a combination of encryption, message integrity checks, and data-path replay protection mechanisms. The SGA solution uses the device and user identity information that it obtains during authentication to classify, or color, the packets as they enter the network. This packet classification is maintained by tagging packets when they enter the SGA network so that they can be properly identified for the purpose of applying security and other policy criteria along the data path. The tag, also called the security group tag (SGT), allows ISE to enforce access control policies by enabling the endpoint device to act upon the SGT to filter traffic.


Note You need an Advanced License Package for ISE to enable SGA services.


For more information on the SGA solution, see http://www.cisco.com/en/US/netsol/ns1051/index.html.

Figure 21-1 shows an example of an SGA network cloud.

Figure 21-1 SGA Architecture

SGA Features and Terminology

The key features of the SGA solution include:

Network Device Admission Control (NDAC)—In a trusted network, during authentication, each network device (for example ethernet switch) in an SGA cloud is verified for its credential and trustworthiness by its peer device. NDAC uses the IEEE 802.1x port-based authentication and uses Extensible Authentication Protocol-Flexible Authentication via Secure Tunneling (EAP-FAST) as its Extensible Authentication Protocol (EAP) method. Successful authentication and authorization in the NDAC process results in Security Association Protocol negotiation for IEEE 802.1AE encryption.

Endpoint Admission Control (EAC)—An authentication process for an endpoint user or a device connecting to the SGA cloud. EAC typically happens at the access level switch. Successful authentication and authorization in EAC process results in SGT assignment to the user or device. EAC access methods for authentication and authorization includes:

802.1X port-based authentication

MAC authentication bypass (MAB)

Web authentication (WebAuth)

Security Group (SG)—A grouping of users, endpoint devices, and resources that share access control policies. SGs are defined by the administrator in Cisco ISE. As new users and devices are added to the SGA domain, Cisco ISE assigns these new entities to the appropriate security groups.

Security Group Tag (SGT)—SGA service assigns to each security group a unique 16-bit security group number whose scope is global within an SGA domain. The number of security groups in the switch is limited to the number of authenticated network entities. You do not have to manually configure security group numbers. They are automatically generated, but you have the option to reserve a range of SGTs for IP-to-SGT mapping.

Security Group Access Control List (SGACL)—SGACLs allow you to control the access and permissions based on the SGTs that are assigned. The grouping of permissions into a role simplifies the management of security policy. As you add devices, you simply assign one or more security groups, and they immediately receive the appropriate permissions. You can modify the security groups to introduce new privileges or restrict current permissions.

Security Exchange Protocol (SXP)—SGT Exchange Protocol (SXP) is a protocol developed for SGA service to propagate the IP-to-SGT binding table across network devices that do not have SGT-capable hardware support to hardware that supports SGT/SGACL.

Environment Data Download—The SGA device obtains its environment data from Cisco ISE when it first joins a trusted network. You can also manually configure some of the data on the device. The device must refresh the environment data before it expires. The SGA device obtains the following environment data from Cisco ISE:

Server lists—List of servers that the client can use for future RADIUS requests (for both authentication and authorization)

Device SG—Security group to which the device itself belongs

Expiry timeout—Interval that controls how often the SGA device should download or refresh its environment data

SGT Reservation—An enhancement in ISE to reserve a range of SGTs to enable IP to SGT mapping.

IP-to-SGT Mapping—An enhancement in ISE to bind an endpoint IP to an SGT and provision it to an SGA-capable device.

Identity-to-Port Mapping—A method for a switch to define the identity on a port to which an endpoint is connected, and to use this identity to look up a particular SGT value in the Cisco ISE server.

Table 21-1 lists some of the common terms that are used in the SGA solution and their meaning in an SGA environment.

Table 21-1 SGA Terminology 

Term
Meaning

Supplicant

A device that tries to join a trusted network.

Authentication

The process of verifying the identity of each device before allowing it to be part of the trusted network.

Authorization

The process of deciding the level of access to a device that requests access to a resource on a trusted network based on the authenticated identity of the device.

Access control

The process of applying access control on a per-packet basis based on the SGT that is assigned to each packet.

Secure communication

The process of encryption, integrity, and data-path replay protection for securing the packets that flow over each link in a trusted network.

SGA device

Any of the Cisco Catalyst 6000 Series or Cisco Nexus 7000 Series switches that support the SGA solution.

SGA-capable device

An SGA-capable device will have SGA-capable hardware and software. For example, the Nexus 7000 Series Switches with the Nexus operating system.

SGA seed device

The SGA device that authenticates directly against the ISE server. It acts as both the authenticator and supplicant.

Ingress

When packets first encounter an SGA-capable device that is part of a network where the Cisco SGA solution is enabled, they are tagged with an SGT. This point of entry into the trusted network is called the ingress.

Egress

When packets pass the last SGA-capable device that is part of a network where the Cisco SGA solution is enabled, they are untagged. This point of exit from the trusted network is called the egress.


SGA Requirements

To set up a Cisco ISE network that is enabled with the Cisco SGA solution, you need switches that support the SGA solution and other components. Table 21-2 lists the supported Cisco switch platforms.

Table 21-2 SGA Requirements 

Supported Cisco Switch Platforms
Platform
Operating System Version
Requirement

Cisco Nexus 7000 Series

Cisco Nexus operating system 5.0.2a.

Note You would need Advanced Service Package license for Cisco SGA.

Mandatory as enforcement point

Cisco Catalyst 6500E Switch with Supervisor Engine 32 or 720 or Virtual Switching System (VSS) 720

Cisco IOS Software 12.2(33) SXI3 or later

Optional as an access switch

Cisco Catalyst 4900 Series Switch

Cisco IOS Software 12.2(50) SG7 or later

Optional as an access switch

Cisco Catalyst 4500E Switch with Supervisor 6L-E or 6-E

Cisco IOS Software 12.2(50) SG7 or later

Optional as an access switch

Cisco Catalyst 3750-X or 3560-X Series Switches

Cisco IOS Software 12.2(53) SE1 or later

Optional as an access switch

Cisco Catalyst 3750 or 3560 Series Switches

Cisco IOS Software 12.2(53) SE1 or later

Optional as an access switch

Cisco Catalyst Blade Switch 3000 or 3100 Series

Cisco IOS Software 12.2(53) SE1 or later

Optional as an access switch


Apart from the switches listed in Table 21-2 above, you need other components for identity-based user access control using the IEEE 802.1X protocol. These include Microsoft Windows 2003 or 2008 Server running Microsoft Active Directory, Certificate Authority (CA) server, Domain Name System (DNS) server, and Dynamic Host Configuration Protocol (DHCP) server. An end host running the Microsoft Windows operating system can also be a part of this environment. Table 21-3 lists other components that may be required for your Cisco SGA environment.

Table 21-3 Other Components

Component
Description

User Identity Repository

Although you can use the ISE internal user database, we recommend that you use an external database for identity authentication. ISE supports connections to Microsoft Active Directory and Lightweight Directory Access Protocol (LDAP) service

DHCP Service

Any DHCP server that provides DHCP service. For example, Microsoft Windows Server 2008 DHCP server

DNS Service

Any DNS server that provides DNS service. For example, Microsoft Windows Server 2008 DNS server

Certificate Authority Server

Any Certificate Authority server that provides standalone CA service. For example, Microsoft Windows Server 2008 CA server

Target Servers

Servers that provide Internet services such as HTTP, FTP, Secure Shell (SSH), and even file sharing to test the SGACLs

Endpoint PC

SGA is a supplicant-agnostic solution and does not require any specific agent or IEEE 802.1X supplicant running on the endpoint PC. You can use the Cisco Secure Services Client supplicant, Microsoft Windows or another operating system-embedded supplicant, or other third-party supplicant


To enable Cisco ISE to interoperate with SGA deployments, you must configure SGA switch ports on your switches. See "Enable Cisco Security Group Access Switch Ports" section on page C-6 for more information.

Configuring ISE to Enable the SGA Solution

This section describes the tasks that you must perform to enable the SGA solution in your Cisco ISE network.


Note To enable the SGA solution, you need an advanced ISE license. For more information on licensing, see Chapter 11, "Managing Licenses."


This section covers the following tasks:

Configuring SGA Settings on the Switches

Configuring SGA Devices

Configuring Security Group Access Settings

Configuring Security Group Access AAA Servers

Configuring Security Groups

Configuring Security Group Access Control Lists

Assigning SGACLs to SGTs Through Egress Table

Mapping Security Groups to Devices

Configuring SGA Policy by Assigning SGTs to Devices

Configuring SGA Settings on the Switches

To enable Cisco ISE to interoperate with SGA deployments, you must configure SGA switch ports on your switches. See "Enable Cisco Security Group Access Switch Ports" section on page C-6 for more information.

In addition to configuring SGA settings on Cisco ISE, you must also configure some settings on the SGA devices. These configurations vary for the Catalyst and Nexus switches and are described in the Catalyst and Nexus switch configuration guides that are available at:

For Catalyst 6500 Series Switches: http://www.cisco.com/en/US/docs/switches/lan/trustsec/configuration/guide/trustsec.html

For Nexus 7000 Series Switches:

http://www.cisco.com/en/US/docs/switches/datacenter/sw/5_x/nx-os/security/configuration/guide/b_Cisco_Nexus_7000_NX-OS_Security_Configuration_Guide__Release_5.x.html

Configuration Example Using Nexus 7000 Series Switches:

http://www.cisco.com/en/US/docs/switches/datacenter/sw/5_x/nx-os/configuration_examples/
configuration/guide/Cisco_Nexus_7000_Series_NX-OS_Configuration_Examples_Release_5.x
_chapter4.html#con_1191129

Configuring SGA Devices

For Cisco ISE to process requests from SGA-enabled devices, you must define these SGA-enabled devices in Cisco ISE. This section describes how to define SGA-enabled devices in Cisco ISE.

Prerequisite:

Every Cisco ISE administrator account is assigned one or more administrative roles. To perform the operations described in the following procedure, you must have any one of the following roles assigned: Super Admin or Network Device Admin. See Cisco ISE Admin Group Roles and Responsibilities for more information on the various administrative roles and the privileges associated with each of them.

To configure an SGA device, complete the following steps:


Step 1 Follow the instructions in the "Adding and Editing Devices" section on page 6-3 to add a network device. Table 21-4 describes the SGA-specific settings.

Step 2 Click Submit to save the SGA device definition.


Next Step:

Configuring Security Group Access Settings

Network Devices: SGA Settings

Table 21-4 lists the SGA-specific fields in the Network Devices page and their descriptions.

Table 21-4 Network Devices: SGA Settings 

Field
Description

SGA Settings

(Required) Check this check box to configure settings that are specific to the SGA solution. SGA devices use these settings to communicate with ISE.

Use Device ID for SGA Identification

Check this check box if you want the Device Name to be listed as the device identifier in the Device ID field.

Device Id

(Required) Used for identifying the SGA device. By default, this field is empty. If you check the Use Device ID for SGA Identification check box, then the Device Name appears in this field. You can change this ID to a descriptive name of your choice.

Password

(Required) Password to authenticate the SGA device (same password that you have configured on the SGA device command-line interface [CLI]).

Download Environment Data Every

(Required) Specifies the expiry time for environment data. The SGA device downloads its environment information from ISE. You can configure the time interval in seconds, minutes, hours, or days between these downloads. For example, if you enter 60 sec, the device would download its environment data from ISE every minute. The default value is 86,400 seconds or 1 day. Valid range is from 1 to 24850.

Download Peer Authorization Policy Every

(Required) Specifies the expiry time for the peer authorization policy. The SGA device downloads its peer authorization policy from ISE. You can configure the time interval in seconds, minutes, hours, or days between these downloads. For example, if you enter 60 sec, the device would download its peer authorization policy from ISE every minute. The default value is 86,400 seconds or 1 day. Valid range is from 1 to 24850.

Reauthentication Every

(Required) Specifies the 802.1X reauthentication period. In a network that is configured with the SGA solution, after initial authentication, the SGA device reauthenticates itself against ISE. You can configure the time interval in seconds, minutes, hours, or days between these authentications. For example, if you enter 1000 sec, the device would authenticate itself against ISE every 1000 sec. The default value is 86,400 seconds or 1 day. Valid range is from 1 to 24850.

Download SGACL Lists Every

(Required) Specifies the expiry time for SGACL lists. The SGA device downloads the SGACLs from ISE. You can configure the time interval between these downloads. For example, if you enter 3600 sec, the device obtains the SGACL lists from ISE every 3600 sec. The default value is 86,400 seconds or 1 day. Valid range is from 1 to 24850.

Other SGA Devices to Trust This Device (SGA Trusted)

Check this check box if you want all the peer devices to trust this device. If you uncheck this device, the peer devices do not trust it, and all packets that arrive from this device will be colored or tagged accordingly. This option is enabled by default.

Include This Device When Deploying Security Group Tag Mapping Updates

Check this check box if you want this SGA device to obtain the IP-SGT mappings using the Device Configuration credentials.


Configuring Security Group Access Settings

For ISE to function as an SGA server and provide SGA services, you must define some global SGA settings. This section describes how to complete this task.

Prerequisites:

Before you configure global SGA settings, ensure that you have defined global EAP-FAST settings (choose Administration > System > Global Options > Protocol Settings > EAP-FAST > EAP-FAST Settings).

You must change the Authority Identity Info Description to your Cisco ISE server name. This description is a user-friendly string that describes the ISE server that sends credentials to an endpoint client. The client in a Cisco SGA architecture can be either the endpoint running EAP-FAST as its EAP method for IEEE 802.1X authentication or the supplicant network device performing NDAC. The client can discover this string in the protected access credentials (PAC) type-length-value (TLV) information. The default value is Cisco Identity Services Engine. You should change the value so that the ISE PAC information can be uniquely identified on network devices upon NDAC authentication.

Every ISE administrator account is assigned one or more administrative roles. To perform the operations described in the following procedure, you must have any one of the following roles assigned: Super Admin or Policy Admin. See Cisco ISE Admin Group Roles and Responsibilities for more information on the various administrative roles and the privileges associated with each of them.

To configure general SGA settings, complete the following steps:


Step 1 Choose Administration > System > Settings.

Step 2 From the Settings navigation pane on the left, click Security Group Access.

The Security Group Access page appears.

Step 3 Enter the values as described:

Tunnel PAC Time to Live—Specifies the expiry time for the PAC. The tunnel PAC generates a tunnel for the EAP-FAST protocol. You can specify the time in seconds, minutes, hours, days, or weeks. The default value is 90 days. Valid ranges are:

1 to 157680000 seconds

1 to 2628000 minutes

1 to 43800 hours

1 to 1825 days

1 to 260 weeks

Proactive PAC Update Will Occur After—The proactive PAC update time is configured in this field. ISE proactively provides a new PAC to the client after successful authentication when a configured percentage of the Tunnel PAC TTL remains. The tunnel PAC update is initiated by the server after the first successful authentication that is performed before the PAC expiration. This mechanism allows the client to be always updated with a valid PAC. The default value is 10%. Valid range is from 1 to 100.

All Tags Automatically Generated by System—Choose this option if you want all the SGTs to be automatically generated by Cisco ISE. See the "Mapping Security Groups to Devices" section for more information.


Note Cisco recommends that you use this option only if you plan to manually configure specific security groups and policies on the SGA device.


Reserve a Range—Choose this option if you want to reserve a range of security group tags (SGTs) to be configured on the device manually. If you choose this option, you must also specify a range from 1 to 65535.

Cisco ISE creates an SGT by default: Unknown, which has takes the value of 0.


Note If you configure a range of SGTs, Cisco ISE will not use the values in this range while generating SGT values.


Step 4 Click Save to save the general SGA settings.


Next Step:

Configuring Security Group Access AAA Servers

Configuring Security Group Access AAA Servers

You can configure a list of Cisco ISE servers in your deployment in the AAA server list to allow SGA devices to be authenticated against any of these servers. When you add ISE servers to this list, all these server details are downloaded to the SGA device. When an SGA device tries to authenticate, it would choose any ISE server from this list and, if the first server is down or busy, the SGA device can authenticate itself against any of the other servers from this list. By default, the primary ISE server is an SGA AAA server. We recommend that you configure additional ISE servers in this AAA server list (Administration > Network Resources > SGA AAA Servers) so that if one server is busy, another server from this list can handle the SGA request.

This page lists the ISE servers in your deployment that you have configured as your SGA AAA servers.

Adding and Editing Security Group Access AAA Servers

Prerequisite:

Every ISE administrator account is assigned one or more administrative roles. To perform the operations described in the following procedure, you must have any one of the following roles assigned: Super Admin or Network Device Admin. See Cisco ISE Admin Group Roles and Responsibilities for more information on the various administrative roles and the privileges associated with each of them.

To add or edit the AAA server list, complete the following steps:


Step 1 Choose Administration > Network Resources > SGA AAA Servers.

The AAA Servers page appears.

Step 2 Do one of the following:

Click Add to add an ISE server to this list.

Check the check box next to the ISE server that you want to edit, and then click Edit.

Step 3 Enter the values as described:

Name—(Required) Name that you want to assign to the ISE server in this AAA Server list. This name can be different from the hostname of the ISE server.

Description—An optional description.

IP—(Required) IP address of the ISE server that you are adding to the AAA Server list.

Port—(Required) Port over which communication between the SGA device and server should take place. The default is 1812.

Step 4 Click Submit to save the changes.


Next Step:

Configuring Security Groups

Configuring Security Groups

A security Group (SG) or Security Group Tag (SGT) is an element that is used in SGA policy configuration. SGTs are attached to packets when they move within a trusted network. These packets are tagged when they enter a trusted network (ingress) and untagged when they leave the trusted network (egress).

SGTs are automatically generated in a sequential manner, but you have the option to reserve a range of SGTs for IP to SGT mapping. ISE skips the reserved numbers while generating SGTs.

If you have deleted a particular security group, the SGT assigned to this security group does not get reused until all the succeeding SGTs are deleted.

For example, if you have SGTs 2, 3, and 4 defined and you delete SGT 2, the next SGT that is generated would be SGT 5. If you want SGT 2 to be generated next, you must delete SGTs 3 and 4.

SGA service uses these SGTs to enforce the SGA policy at egress. See the "Assigning SGACLs to SGTs Through Egress Table" section.

You can configure security groups from the ISE administrative user interface (Policy > Policy Elements > Results > Security Group Access > Security Groups). This page lists the security groups that you have configured.

See "Adding and Editing Security Groups" section for more information.

Adding and Editing Security Groups

Prerequisite:

Every ISE administrator account is assigned one or more administrative roles. To perform the operations described in the following procedure, you must have any one of the following roles assigned: Super Admin or Policy Admin. See Cisco ISE Admin Group Roles and Responsibilities for more information on the various administrative roles and the privileges associated with each of them.

To add or edit a security group, complete the following steps:


Step 1 Choose Policy > Policy Elements > Results.

Step 2 From the Results navigation pane on the left, click the > button next to Security Group Access and click Security Groups.

The Security Groups page appears. There is a default security group in ISE: Unknown. This page provides the name, the SGT in decimal and hexadecimal formats, and an optional description of the security groups.

Step 3 Do one of the following:

Click Add to add a new security group.

From the navigation pane, click the expand button next to Security Groups and select the security group that you want to edit, or check the check box next to the security group in the list page that you want to edit, and click Edit.


Note You cannot edit the predefined unknown security group.


Step 4 Enter the values as described:

Name—Name of the security group.

Description—An optional description of the security group.

Allow System to Automatically Generate Tag—(Visible only if you have chosen the Reserve a Range option in the Security Group Access Settings page) Choose this option if you want ISE to generate an SGT automatically. The tag value will be automatically populated if you choose this option. This option will be visible only if you reserve a range of SGTs while configuring the Global SGA settings. See the "Configuring Security Group Access Settings" section for more information.

Select Value from Reserved Range—(Visible only if you have chosen the Reserve a Range option in the Security Group Access Settings page) Choose this option if you want to assign an SGT from the reserved range to a specific IP address. This option will be visible only if you reserve a range of SGTs while configuring the Global SGA settings. See the "Configuring Security Group Access Settings" section for more information.

Security Group Tag (Dec/Hex)—ISE assigns this value automatically. This value is sequentially numbered from 0 to 65,535. You can reserve a range of tags for specific security groups and ensure that these numbers are not automatically generated. See the "Configuring Security Group Access Settings" section for more information.

Step 5 Click Submit to save the security group.


Note Each security group in your SGA solution should be assigned a unique SGT. Even though ISE supports 65,535 SGTs, having fewer number of SGTs would enable you to deploy and manage the SGA solution easily. We recommend a maximum of 4000 SGTs.


Next Steps:

Configuring Security Group Access Control Lists

Assigning SGACLs to SGTs Through Egress Table

Assigning Security Groups to Users and End Points

Configuring Security Group Access Control Lists

Security group access control lists (SGACLs) are permissions that will be assigned after the SGA policy evaluation. SGACLs restrict the operations that a user can perform based on the role of the user instead of the IP address or subnet mask alone. You can configure SGACLs from the ISE administrative user interface (Policy > Policy Elements > Results > Security Group Access > Security Group ACLs).

See "Adding and Editing Security Group Access Control Lists" section for more information.

Adding and Editing Security Group Access Control Lists

Prerequisite:

Every ISE administrator account is assigned one or more administrative roles. To perform the operations described in the following procedure, you must have any one of the following roles assigned: Super Admin or Policy Admin. See Cisco ISE Admin Group Roles and Responsibilities for more information on the various administrative roles and the privileges associated with each of them.

To create or edit an SGACL, complete the following steps:


Step 1 Choose Policy > Policy Elements > Results.

Step 2 From the Results navigation pane on the left, click the > button next to Security Group Access and click Security Group ACLs.

The Security Group ACLs page appears with a list of SGACLs and provides the following information:

Name—Name of the SGACL

Description—An optional description of the SGACL

IP Version—IP version that this SGACL supports:

IPv4—Supports IP version 4 (IPv4)

IPv6—Supports IP version 6 (IPv6)

Agnostic—Supports both IPv4 and IPv6

Step 3 Do one of the following:

Click Add to add an SGACL.

Check the check box next to the SGACL that you want to edit, and then click Edit or select the SGACL from the Security Group ACLs object selector.

Step 4 Enter the values as described:

Name(Required) Name of the SGACL.

Description—An optional description of the SGACL.

IP Version—Specifies which IP version this SGACL supports.

IPv4—Supports IPv4

IPv6—Supports IPv6

Agnostic—Supports both IPv4 and IPv6

Security Group ACL Content—(Required) Access control list (ACL) commands. For example:

permit icmp

deny all

Step 5 Click Submit to save the SGACL.


The Nexus 7000 Series with Cisco Nexus operating system 4.2 supports the following access control list entries:

deny all

deny icmp

deny igmp

deny ip

deny tcp [{dest | src} {{eq | gt | lt | neq} port-number | range port-number1 port-number2}]

deny udp[{dest | src} {{eq | gt | lt | neq} port-number | range port-number1 port-number2}]

permit all

permit icmp

permit igmp

permit ip

permit tcp [{dest | src} {{eq | gt | lt | neq} port-number | range port-number1 port-number2}]

permit udp[{dest | src} {{eq | gt | lt | neq} port-number | range port-number1 port-number2}]

For more information on syntax and usage, go to:

http://www.cisco.com/en/US/docs/switches/datacenter/sw/5_x/nx-os/security/command/reference/
sec_cmds_d.html#wp1057446

Next Step:

Assigning SGACLs to SGTs Through Egress Table

Assigning SGACLs to SGTs Through Egress Table

After you create the SGTs and SGACLs, which are the basic building blocks that are required to create an SGA policy, you can establish a relationship between them by assigning SGACLs to source and destination SGTs.

The egress table lists only the source and destination SGTs that have SGACLs assigned. This page also allows you to filter the egress table to view specific policies and also to save custom views.

When the source SGT tries to reach the destination SGT, the SGA-capable device will enforce the SGACLs based on the SGA policy as defined in the Egress Policy page in ISE. ISE creates and provisions the policy.


Tip Before you create the SGA policy, you can configure security groups and SGACLs. See the "Configuring Security Groups" section and "Configuring Security Group Access Control Lists" section for more information.


Prerequisite:

Every ISE administrator account is assigned one or more administrative roles. To perform the operations described in the following procedures, you must have any one of the following roles assigned: Super Admin or Policy Admin. See Cisco ISE Admin Group Roles and Responsibilities for more information on the various administrative roles and the privileges associated with each of them.

To assign SGACLs to SGTs, complete the following steps:


Step 1 Choose Policy > Security Group Access > Egress Policy.

The Egress Policy page appears.

You can also create new security groups from this page. To do this, click Create New Security Group. See the "Configuring Security Groups" section for more information.

Step 2 Click Add Security Group ACL Mapping.

Step 3 In the Create Security Group ACL Mapping page, select your source and destination security groups from the drop-down lists.

Step 4 Enter a description for the source and destination SGTs and the SGACLs that you have assigned for this row.

Step 5 In the Assigned Security Group ACLs area, do the following:

Select an SGACL from the drop-down list. If you have not defined SGACLs, you can click the action icon from the Security Group ACLs pop-up, and click Create New Security Groups ACL. See the "Configuring Security Group Access Control Lists" section for information on ACL content.

Click the drop-down menu from the action icon to insert additional SGACLs to this source and destination SGT pair above or below it.

Step 6 From the Final Catch All Rule dialog box, select any one of the following options as the default rule if none of the above SGACLs match the request:

Deny IP

None

Permit IP

Step 7 Click Save to save the configuration.

The Egress Policy table displays only the source and destination SGTs that have SGACLs assigned.


Next Step:

Configuring SGA Policy by Assigning SGTs to Devices

To filter the records that appear in the egress table, complete the following steps:


Step 1 Choose Policy > Security Group Access > Egress Policy.

Step 2 From the Egress Policy page, choose >> and then Filter, and click Quick Filter to set a simple filter condition or click Advanced Filter to set a compound filter condition.


Note The Egress Policy table displays only the source and destination SGTs that have SGACLs assigned.


Step 3 Using the Quick Filter option, you can view the records based on the source security group, destination security group, security group ACL, or description. In the filter table, you can enter the security group name or SGACL in the text boxes and press Enter. For example, if you enter SGT1 as the source security group, then all the policies with source security group as SGT1 will be displayed. You can enter a combination of source and destination security groups, SGACL, and description to narrow down your search criteria.

Step 4 Using the Advanced Filter option, you can set a filter based on the source and destination security groups, SGACL, and description and also use the following operators to enhance your search operations:

Contains

Does not contain

Does not equal

Ends with

Is empty

Is exactly (or equals)

Is not empty

Starts with

Step 5 From the Filter drop-down list box, select the field on which you want to set the filter condition. For example, Source Security Group (Dec/Hex).

Step 6 From the next drop-down list box, select the operator. For example Contains.

Step 7 In the next text box, enter the name of the source security group. For example, SGT1.

Step 8 You can click the + button to add additional conditions.

Step 9 After you add all the conditions, click Go to view the results of your search.

Step 10 Click the save button () to save this custom Egress table to be viewed later.


Note This custom view is saved in your computer's browser. For example, if you used Mozilla Firefox from a particular computer when you saved a custom view, then this view will be available only on that computer when you use the Mozilla Firefox browser. If you use Internet Explorer 8 on the same computer, the custom view will not be available.


Mapping Security Groups to Devices

Cisco ISE allows you to assign an SGT to an SGA device if you know the device hostname or IP address. When a device with the specific hostname or IP address joins the network, ISE will assign the SGT before authenticating it. You can create this mapping from the Security Group Mappings page. Before you perform this action, ensure that you have reserved a range of SGTs. See Reserve a Range option for more information. You can map the security groups to devices from the ISE administrative user interface (Policy > Policy Elements > Results > Security Group Access > Security Group Mappings). This page lists the security group mappings that you have configured.

See "Adding and Editing Security Group Mappings" section for more information.

Adding and Editing Security Group Mappings

Cisco ISE allows you to add and edit security group mappings from the Cisco ISE user interface. This section describes how to complete this task.

Prerequisite:

Every ISE administrator account is assigned one or more administrative roles. To perform the operations described in the following procedures, you must have any one of the following roles assigned: Super Admin or Policy Admin. See Cisco ISE Admin Group Roles and Responsibilities for more information on the various administrative roles and the privileges associated with each of them.

To create or edit a security group mapping, complete the following steps:


Step 1 Choose Policy > Policy Elements > Results.

Step 2 From the Results navigation pane on the left, click the > button next to Security Group Access and click Security Group Mappings.

The Security Group Mappings page appears.

Step 3 Do one of the following:

Click Add to add a new security group mapping.

Check the check box next to an existing security group mapping that you want to edit, and then click Edit.

Check the check box next to an existing security group mapping that you want to reassign, and then click Reassign Groups. See the "Reassigning SGTs to Devices" section for more information.

Check the check box next to an existing security group mapping that you want to deploy, and then click Deploy. See the "Deploying SGTs on SGA Devices" section for more information.

Check the check box next to an existing security group mapping whose status you want to check, then choose >> and click Check Status. See the "Checking the Status of Security Group Mapping on Devices" section for more information.

Step 4 Enter the values as described in Table 21-5.

Table 21-5 Security Group to Host Mappings

Field
Description

Security Group

Click Select to choose an SGT to be applied to this device.

Hostname

Enter the hostname of the SGA device.

IP Address

Enter the IP address of the SGA device.


Step 5 Click Submit to save the settings.

Step 6 Click the Security Group Mapping List link at the top of this screen to go back to the list page.

You can also set filters to view only certain records. You can set a Quick Filter based on a simple condition or an Advanced Filter for an enhanced search. You can also save the advanced custom view.


Deploying SGTs on SGA Devices

You can check the check box next to the security group mapping and click Deploy to download the SGT to the SGA device. This option connects to the device through SSH and runs the command to download the SGT on the device. Click OK to close this page.

Checking the Status of Security Group Mapping on Devices

You can check the check box next to the security group mapping and click Check Status to see if the SGTs have been downloaded on the device. This option allows you to check the status on the SGA device. Click OK to close this page.

Reassigning SGTs to Devices

You can check the check box next to the security group mappings and click Reassign Groups to assign a different SGT to a set of devices. The Reassign Security Groups page appears:

1. Click Select to select the new SGT.

2. Click OK to save the changes.


Note You can use the Edit option to edit the SGT mapping for a single device. To change the SGT mapping for multiple devices at the same time, you can use the Reassign Groups option.


Configuring SGA Policy by Assigning SGTs to Devices

Cisco ISE allows you to configure the SGA policy by assigning SGTs to devices. This section describes how to complete this task.

Prerequisites:

Before you configure an SGA policy, you must create the security groups for use in the policy. See the "Configuring Security Groups" section for more information.

You can assign security groups to devices by using the SGA device ID.

Every ISE administrator account is assigned one or more administrative roles. To perform the operations described in the following procedures, you must have any one of the following roles assigned: Super Admin or Policy Admin. See Cisco ISE Admin Group Roles and Responsibilities for more information on the various administrative roles and the privileges associated with each of them.

To configure an SGA policy, complete the following steps:


Step 1 Choose Policy > Security Group Access > Network Device Authorization.

The Network Device Authorization page appears. You can define an SGA device policy on this page based on conditions. Cisco ISE supports device attributes for use in policy conditions:

Step 2 Click the action icon in the Default Rule row and click Insert New Row Above.

Step 3 Click the drop-down list box to select the status of this rule. The Status can be any one of the following:

Enable—The policy rule is active.

Disable—The policy rule is inactive and will not be evaluated.

Monitor—The policy rule will be evaluated, but the result will not be enforced. You can use this option for testing purposes. You can view the results of this policy condition in the monitoring and report viewer. For example, you may want to add a new policy condition, but are not sure if the condition would provide you with the correct results. In this situation, you can create the policy condition in the monitored mode to view the results and then enable it if you are satisfied with the results.

Step 4 Enter the name for this rule in the first text box.

Step 5 Click the plus sign (+) next to Conditions to add a policy condition.

Step 6 Click Create New Condition (Advance Option).

a. From the Expression drop-down list box, choose any one of the following attributes to define the policy condition. For example, Device Type:

SGAdeviceID

Device Type

Location

Model Name

Software Version

b. Select the operator from the drop-down list box. You can select EQUALS (is equal to), NOT EQUALS (is not equal to), or MATCHES (is an exact match of).

c. Enter a value for the attribute. For example Nexus 7K.

You can create a compound condition by adding more conditions using the AND or OR operator.

d. To create a compound condition, from within the Conditions popup, click the action icon that appears in the same row as the condition that you have already created, and click Add Attribute/Value to add a new row. Repeat the process as described in Step 5a.


Note While creating a compound condition, you can only use AND or OR operator throughout. You cannot use both AND and OR operators in the same compound condition.


For example, you can create a compound condition that checks for all devices in New York and are of the Catalyst 6K model. Your compound condition would appear as follows:

DEVICE:Location EQUALS All Locations:New York

AND

DEVICE:Model Name EQUALS Catalyst 6K

Step 7 Click the minus sign (-) in the popup to close it.

Step 8 From the Security Group drop-down list, select the SGT that you want to assign if this condition evaluates to true.

Step 9 Click the action icon from this row to add additional rules based on device attributes either above or below the current rule. You can repeat this process to create all the rules that you need for the SGA policy. You can drag and drop the rules to reorder them by clicking the icon. You can also duplicate an existing condition, but ensure that you change the policy name.

The first rule that evaluates to true determines the result of the evaluation. If none of the rules match, the default rule will be applied; you can edit the default rule to specify the SGT that must be applied to the device if none of the rules match.

Step 10 Click Save to save your SGA policy.

If an SGA device tries to authenticate after you have configured the network device policy, the device will get its SGT and the SGT of its peers and will be able to download all the relevant details.


Assigning Security Groups to Users and End Points

ISE allows you to assign a security group as the result of an authorization policy evaluation. Using this option, you can assign a security group to users and end points.

Prerequisites:

Read the "Understanding Authorization Policies" section on page 16-1 for information on authorization policies.

Every ISE administrator account is assigned one or more administrative roles. To perform the operations described in the following procedures, you must have any one of the following roles assigned: Super Admin or Policy Admin. See Cisco ISE Admin Group Roles and Responsibilities for more information on the various administrative roles and the privileges associated with each of them.

To assign security groups to users and endpoints, complete the following steps:


Step 1 Create a new authorization policy as described in "Creating a New Authorization Policy" section on page 16-13.

Step 2 For Permissions, instead of selecting an authorization profile, select a security group.

If the conditions specified in this authorization policy is true for a user or endpoint, then this security group will be assigned to that user or endpoint and all data packets that are sent by this user or endpoint will be tagged with this particular SGT.