This section describes how to configure and
manage MAC address, IP, and Ethertype filters on the access point
using the web-browser interface.
Protocol filters (IP protocol, IP port, and Ethertype)
prevent or allow the use of specific protocols through the access
point’s Ethernet and radio ports. You can set up individual
protocol filters or sets of filters. You can filter protocols for
wireless client devices, users on the wired LAN, or both. For example,
an SNMP filter on the access point’s radio port prevents wireless
client devices from using SNMP with the access point but does not
block SNMP access from the wired LAN.
IP address and MAC address filters allow or disallow
the forwarding of unicast and multicast packets addressed to specific
IP or MAC addresses. You can create a filter that passes traffic
to all addresses except those you specify, or you can create a filter
that blocks traffic to all addresses except those you specify.
You complete two steps to configure and enable
a filter: 1) name and configure the filter using the filter setup
pages and 2) enable the filter.
Configuring and Enabling MAC
Address Filters
Configuring and Enabling IP Filters
Configuring and Enabling Ethertype Filters
MAC address filters allow or disallow the forwarding
of unicast and multicast packets addressed to specific MAC addresses.
You can create a filter that passes traffic to all MAC addresses
except those you specify, or you can create a filter that blocks
traffic to all MAC addresses except those you specify. You can apply
the filters you create to either or both the Ethernet and radio
ports and to either or both incoming and outgoing packets.
Follow these steps to create a MAC address filter.
- Click Services on
the navigation menu to move to the Services Summary window.
- On the expanded Services menu, click Filters
to move to the Services: Filters - Apply Filters page.
- On the Apply Filters page, click the MAC
Address Filters tab at the top of the page.
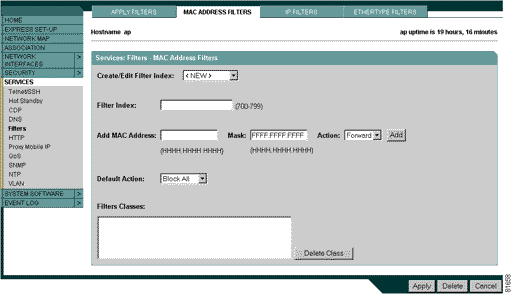
- If you are creating a new MAC address filter,
make sure <NEW> (the default)
is selected in the Create/Edit Filter Index menu. To edit a filter,
select the filter number from the Create/Edit Filter Index menu.
- In the Filter Index field, name the filter with
a number from 700 to 799. The number you assign creates an access
control list (ACL) for the filter.
- Enter a MAC address in the Add MAC Address
field. Enter the address with periods separating the three groups
of four characters (0040.9612.3456, for example).
Note: If
you plan to block traffic to all MAC addresses except those you
specify as allowed, put your own MAC address in the list of allowed
MAC addresses.
- Use the Mask entry field to indicate how many
bits, from left to right, the filter checks against the MAC address.
For example, to require an exact match with the MAC address (to
check all bits) enter FFFF.FFFF.FFFF.
To check only the first 4 bytes, enter FFFF.FFFF.0000.
- Select Forward or
Block from the Action menu.
- Click Add. The MAC
address appears in the Filters Classes field. To remove the MAC
address from the Filters Classes list, select it and click Delete
Class.
- Repeat Steps 6 through 9 to add addresses to
the filter.
- Select Forward All
or Block All from the Default Action
menu. The default action of the filter must be the opposite of
the action for at least one of the addresses in the filter. For
example, if you enter several addresses and you select Block
as the action for all of them, you must choose Forward
All as the filter’s default action.
- Click Apply. The
filter is saved on the access point, but it is not enabled until
you apply it on the Apply Filters page.
- Click the Apply Filters
tab to return to the Apply Filters page.

- Select the filter number from one of the MAC
drop-down menus. You can apply the filter to either or both the
Ethernet and radio ports, and to either or both incoming and outgoing
packets.
- Click Apply. The
filter is enabled on the selected ports.
IP filters (IP address, IP protocol, and IP port)
prevent or allow the use of specific protocols through the access
point’s Ethernet and radio ports, and IP address filters allow
or disallow the forwarding of unicast and multicast packets addressed
to specific IP addresses. You can create a filter that passes traffic
to all addresses except those you specify, or you can create a filter
that blocks traffic to all addresses except those you specify. You
can create filters that contain elements of one, two, or all three
IP filtering methods. You can apply the filters you create to either
or both the Ethernet and radio ports and to either or both incoming
and outgoing packets.
Follow these steps to create IP filters for the
access points.
- Click Services in
the navigation menu to go to the Services Summary window.
- In the expanded Services navigation menu, click
Filters to go to the Services: Filters
- Apply Filters window.
- On the Apply Filters page, click the IP
Filters tab at the top of the page.

- If you are creating a new filter, make sure
<NEW> (the default) is selected
in the Create/Edit Filter Index menu. To edit an existing filter,
select the name from the Create/Edit Filter Index menu.
- Enter a descriptive name for the new filter
in the Filter Name field.
- Select Forward all
or Block all as the filter’s default
action from the Default Action menu. The filter’s default
action must be the opposite of the action for at least one of
the addresses in the filter. For example, if you create a filter
containing an IP addresses, an IP protocol, and an IP port and
you select Block as the action for all of them, you must choose
Forward All as the filter’s default action.
- To filter an IP address, enter an address in
the Destination Address and Source Address fields.
Note: If you plan to block traffic
to all IP addresses except those you specify as allowed, put the
address of your own PC in the list of allowed addresses to avoid
losing connectivity to the access point.
- Type the mask for the destination and source
addresses in the Mask field. Enter the mask with periods separating
the three groups of four characters (1122.3344.5566, for example).
- Select Forward or
Block from the Action menu.
- Click Add. The address
appears in the Filters Classes field. To remove the address from
the Filters Classes list, select it and click Delete Class.
Repeat Step 7 through 10 to add addresses to the filter. If you
do not need to add IP protocol or IP port elements to the filter,
skip to Step 17 to save the filter on the access point.
- To filter an IP protocol, select one of the
common protocols from the IP Protocol drop-down menu, or select
the Custom radio button and enter the
number of an existing protocol in the Custom field. Enter a protocol
number from 0 to 255.
- Select Forward or
Block from the Action menu.
- Click Add. The protocol
appears in the Filters Classes field. To remove the protocol from
the Filters Classes list, select it and click Delete
Class. Repeat Step 11 to Step 13 to add protocols to the filter.
If you do not need to add IP port elements to the filter, skip
to Step 17 to save the filter on the access point.
- To filter a TCP or UDP port number, select one
of the common port protocols from the TCP Port or UDP Port drop-down
menus, or select the Custom radio button and enter the number
of an existing port in one of the Custom fields. Enter a port
number from 0 to 65535.
- Select Forward or
Block from the Action menu.
- Click Add. The port
appears in the Filters Classes field. To remove the port from
the Filters Classes list, select it and click Delete Class.
Repeat Step 14 to Step 16 to add ports to the filter.
- When the filter is complete, click Apply.
The filter is saved on the access point, but it is not enabled
until you apply it on the Apply Filters page.
- Click the Apply Filters
tab to return to the Apply Filters page.
- Select the filter name from one of the IP drop-down
menus. You can apply the filter to either or both the Ethernet
and radio ports, and to either or both incoming and outgoing packets.
- Click Apply. The
filter is enabled on the selected ports.
Ethertype filters prevent or allow the use
of specific protocols through the access point’s Ethernet
and radio ports. You can apply the filters you create to either
or both the Ethernet and radio ports and to either or both incoming
and outgoing packets.
Follow these steps to create Ethertype filters
for the access point.
- Click Services in
the navigation menu to go to the Services Summary window.
- In the expanded Services menu, click Filters
to go to the Services: Filters - Apply Filters window.
- On the Apply Filters page, click the Ethertype
Filters tab at the top of the page.
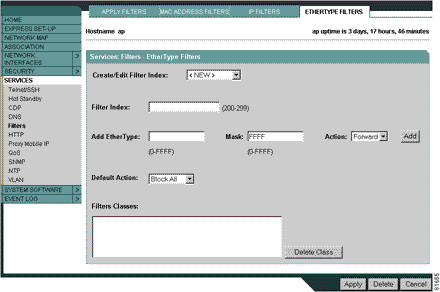
- If you are creating a new filter, make sure
<NEW> (the default) is selected
in the Create/Edit Filter Index menu. To edit an existing filter,
select the filter number from the Create/Edit Filter Index menu.
- In the Filter Index field, name the filter with
a number from 200 to 299. The number you assign creates an access
control list (ACL) for the filter.
- Enter an Ethertype number in the Add Ethertype
field.
- Enter the mask for the Ethertype in the Mask
field.
- Select Forward or
Block from the Action menu.
- Click Add. The Ethertype
appears in the Filters Classes field. To remove the Ethertype
from the Filters Classes list, select it and click Delete
Class. Repeat Step 6 through Step 9 to add Ethertypes to the
filter.
- Select Forward All
or Block All from the Default Action
menu. The filter’s default action must be the opposite of
the action for at least one of the Ethertypes in the filter. For
example, if you enter several Ethertypes and you select Block
as the action for all of them, you must choose Forward
All as the filter’s default action.
- Click Apply. The
filter is saved on the access point, but it is not enabled until
you apply it on the Apply Filters page.
- Click the Apply Filters
tab to return to the Apply Filters page.
- Select the filter number from one of the Ethertype
drop-down menus. You can apply the filter to either or both the
Ethernet and radio ports, and to either or both incoming and outgoing
packets.
- Click Apply. The
filter is enabled on the selected ports.
|