ASDM Book 1: Cisco ASA Series General Operations ASDM Configuration Guide, 7.2
Bias-Free Language
The documentation set for this product strives to use bias-free language. For the purposes of this documentation set, bias-free is defined as language that does not imply discrimination based on age, disability, gender, racial identity, ethnic identity, sexual orientation, socioeconomic status, and intersectionality. Exceptions may be present in the documentation due to language that is hardcoded in the user interfaces of the product software, language used based on RFP documentation, or language that is used by a referenced third-party product. Learn more about how Cisco is using Inclusive Language.
- Updated:
- March 18, 2014
Chapter: LDAP Servers for AAA
LDAP Servers for AAA
This chapter describes how to configure LDAP servers used in AAA and includes the following sections:
Information About LDAP and the ASA
The ASA is compatible with the most LDAPv3 directory servers, including:
- Sun Microsystems JAVA System Directory Server, now part of Oracle Directory Server Enterprise Edition, and formerly named the Sun ONE Directory Server
- Microsoft Active Directory
- Novell
- OpenLDAP
By default, the ASA autodetects whether it is connected to Microsoft Active Directory, Sun LDAP, Novell, OpenLDAP, or a generic LDAPv3 directory server. However, if autodetection fails to determine the LDAP server type, you can manually configure it.
LDAP Server Guidelines
When configuring the LDAP server, note the following guidelines:
- The DN configured on the ASA to access a Sun directory server must be able to access the default password policy on that server. We recommend using the directory administrator, or a user with directory administrator privileges, as the DN. Alternatively, you can place an ACL on the default password policy.
- You must configure LDAP over SSL to enable password management with Microsoft Active Directory and Sun servers.
- The ASA does not support password management with Novell, OpenLDAP, and other LDAPv3 directory servers.
- The VPN 3000 concentrator and the ASA/PIX 7.0 software required a Cisco LDAP schema for authorization operations. Beginning with Version 7.1.x, the ASA performs authentication and authorization using the native LDAP schema, and the Cisco schema is no longer needed.
How Authentication Works with LDAP
During authentication, the ASA acts as a client proxy to the LDAP server for the user, and authenticates to the LDAP server in either plain text or by using the SASL protocol. By default, the ASA passes authentication parameters, usually a username and password, to the LDAP server in plain text.
The ASA supports the following SASL mechanisms, listed in order of increasing strength:
- Digest-MD5—The ASA responds to the LDAP server with an MD5 value computed from the username and password.
- Kerberos—The ASA responds to the LDAP server by sending the username and realm using the GSSAPI Kerberos mechanism.
The ASA and LDAP server supports any combination of these SASL mechanisms. If you configure multiple mechanisms, the ASA retrieves the list of SASL mechanisms that are configured on the server, and sets the authentication mechanism to the strongest one configured on both the ASA and the server. For example, if both the LDAP server and the ASA support both mechanisms, the ASA selects Kerberos, the stronger of the two.
When user LDAP authentication has succeeded, the LDAP server returns the attributes for the authenticated user. For VPN authentication, these attributes generally include authorization data that is applied to the VPN session. In this case, using LDAP accomplishes authentication and authorization in a single step.

Note![]() For more information about the LDAP protocol, see RFCs 1777, 2251, and 2849.
For more information about the LDAP protocol, see RFCs 1777, 2251, and 2849.
About the LDAP Hierarchy
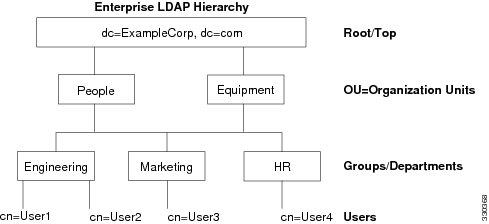
Your LDAP configuration should reflect the logical hierarchy of your organization. For example, suppose an employee at your company, Example Corporation, is named Employee1. Employee1 works in the Engineering group. Your LDAP hierarchy could have one or many levels. You might decide to set up a single-level hierarchy in which Employee1 is considered a member of Example Corporation. Or you could set up a multi-level hierarchy in which Employee1 is considered to be a member of the department Engineering, which is a member of an organizational unit called People, which is itself a member of Example Corporation. See Figure 37-1 for an example of a multi-level hierarchy.
A multi-level hierarchy has more detail, but searches return results more quickly in a single-level hierarchy.
Figure 37-1 A Multi-Level LDAP Hierarchy
Searching the LDAP Hierarchy
The ASA lets you tailor the search within the LDAP hierarchy. You configure the following three fields on the ASA to define where in the LDAP hierarchy that your search begins, the extent, and the type of information you are looking for. Together, these fields limit the search of the hierarchy to only the part that includes the user permissions.
- LDAP Base DN defines where in the LDAP hierarchy that the server should begin searching for user information when it receives an authorization request from the ASA.
- Search Scope defines the extent of the search in the LDAP hierarchy. The search proceeds this many levels in the hierarchy below the LDAP Base DN. You can choose to have the server search only the level immediately below it, or it can search the entire subtree. A single level search is quicker, but a subtree search is more extensive.
- Naming Attribute(s) defines the RDN that uniquely identifies an entry in the LDAP server. Common naming attributes can include cn (Common Name), sAMAccountName, and userPrincipalName.
Figure 37-1 shows a sample LDAP hierarchy for Example Corporation. Given this hierarchy, you could define your search in different ways. Table 37-1 shows two sample search configurations.
In the first example configuration, when Employee1 establishes the IPsec tunnel with LDAP authorization required, the ASA sends a search request to the LDAP server, indicating it should search for Employee1 in the Engineering group. This search is quick.
In the second example configuration, the ASA sends a search request indicating that the server should search for Employee1 within Example Corporation. This search takes longer.
|
|
|
|
|
|
|---|---|---|---|---|
About Binding to an LDAP Server
The ASA uses the login DN and login password to establish trust (bind) with an LDAP server. When performing a Microsoft Active Directory read-only operation (such as authentication, authorization, or group search), the ASA can bind using a login DN with fewer privileges. For example, the login DN can be a user whose AD “Member Of” designation is part of Domain Users. For VPN password management operations, the login DN needs elevated privileges, and must be part of the Account Operators AD group.
The following is an example of a login DN:
The ASA supports the following authentication methods:
- Simple LDAP authentication with an unencrypted password on port 389
- Secure LDAP (LDAP-S) on port 636
- Simple Authentication and Security Layer (SASL) MD5
- SASL Kerberos
The ASA does not support anonymous authentication.
Note![]() As an LDAP client, the ASA does not support the transmission of anonymous binds or requests.
As an LDAP client, the ASA does not support the transmission of anonymous binds or requests.
Licensing Requirements for LDAP Servers
|
|
|
|---|---|
Guidelines and Limitations
This section includes the guidelines and limitations for this feature.
Supported in single and multiple context mode.
Configuring LDAP Servers
This section includes the following topics:
- Task Flow for Configuring LDAP Servers
- Configuring LDAP Attribute Maps
- Configuring LDAP Server Groups
- Adding an LDAP Server to a Group
Task Flow for Configuring LDAP Servers
Step 1![]() Add an LDAP server group. See Configuring LDAP Server Groups.
Add an LDAP server group. See Configuring LDAP Server Groups.
Step 2![]() Add a server to the group, then configure server parameters. See Adding an LDAP Server to a Group.
Add a server to the group, then configure server parameters. See Adding an LDAP Server to a Group.
Step 3![]() Configure LDAP attribute maps. See Configuring LDAP Attribute Maps.
Configure LDAP attribute maps. See Configuring LDAP Attribute Maps.
You must add an attribute map before adding an LDAP server to an LDAP server group.
Configuring LDAP Attribute Maps
The ASA can use an LDAP directory for authenticating users for:
- VPN remote access users
- firewall network access/cut-through-proxy sessions
- setting policy permissions (also called authorization attributes), such as ACLs, bookmark lists, DNS or WINS settings, and session timers.
- setting the key attributes in a local group policy
The ASA uses LDAP attribute maps to translate native LDAP user attributes to Cisco ASA attributes. You can bind these attribute maps to LDAP servers or remove them. You can also show or clear attribute maps.
Guidelines
The LDAP attribute map does not support multi-valued attributes. For example, if a user is a member of several AD groups, and the LDAP attribute map matches more than one group, the value chosen is based on the alphabetization of the matched entries.
To use the attribute mapping features correctly, you need to understand LDAP attribute names and values, as well as the user-defined attribute names and values.
The names of frequently mapped LDAP attributes and the type of user-defined attributes that they would commonly be mapped to include the following:
- IETF-Radius-Class (Group_Policy in ASA version 8.2 and later)—Sets the group policy based on the directory department or user group (for example, Microsoft Active Directory memberOf) attribute value. The group policy attribute replaced the IETF-Radius-Class attribute with ASDM version 6.2/ASA version 8.2 or later.
- IETF-Radius-Filter-Id—Applies an access control list or ACL to VPN clients, IPsec, and SSL.
- IETF-Radius-Framed-IP-Address—Assigns a static IP address assigned to a VPN remote access client, IPsec, and SSL.
- Banner1—Displays a text banner when the VPN remote access user logs in.
- Tunneling-Protocols—Allows or denies the VPN remote access session based on the access type.
Note![]() A single LDAP attribute map may contain one or many attributes. You can only map one LDAP attribute from a specific LDAP server.
A single LDAP attribute map may contain one or many attributes. You can only map one LDAP attribute from a specific LDAP server.
Detailed Steps
Step 1![]() Choose Configuration > Remote Access VPN > AAA Local Users > LDAP Attribute Map (for local users), or Configuration > Device Management > Users/AAA > LDAP Attribute Map (for all other users), then click Add.
Choose Configuration > Remote Access VPN > AAA Local Users > LDAP Attribute Map (for local users), or Configuration > Device Management > Users/AAA > LDAP Attribute Map (for all other users), then click Add.
The Add LDAP Attribute Map dialog box appears with the Map Name tab active.
Step 2![]() In the Name field, create a name for this attribute map.
In the Name field, create a name for this attribute map.
Step 3![]() In the LDAP Attribute Name field, add the name of on of the LDAP attributes to be mapped.
In the LDAP Attribute Name field, add the name of on of the LDAP attributes to be mapped.
Step 4![]() From the Cisco Attribute Name drop-down list, choose a Cisco attribute.
From the Cisco Attribute Name drop-down list, choose a Cisco attribute.
Step 6![]() The attributes are mapped. To map more attributes, repeat Steps 1 through 5 .
The attributes are mapped. To map more attributes, repeat Steps 1 through 5 .
Step 7![]() If you want to map the value of any of the LDAP attributes to a new value in the mapped Cisco attribute, click the Map Value tab.
If you want to map the value of any of the LDAP attributes to a new value in the mapped Cisco attribute, click the Map Value tab.
The Add Mapping of Attribute Name dialog box appears.
Step 9![]() Choose an LDAP attribute from the drop-down list.
Choose an LDAP attribute from the drop-down list.
Step 10![]() In the LDAP Attribute Value field, enter the value for this LDAP attribute that you expect to be returned from the LDAP server.
In the LDAP Attribute Value field, enter the value for this LDAP attribute that you expect to be returned from the LDAP server.
Step 11![]() In the Cisco Attribute Value field, enter the value you want to use in the Cisco attribute when this LDAP attribute contains the previous LDAP Attribute Value.
In the Cisco Attribute Value field, enter the value you want to use in the Cisco attribute when this LDAP attribute contains the previous LDAP Attribute Value.
Step 13![]() To map more values, repeat Steps 8 through 12 .
To map more values, repeat Steps 8 through 12 .
Step 14![]() Click OK to return to the Map Value tab, and then click OK again to close the dialog box.
Click OK to return to the Map Value tab, and then click OK again to close the dialog box.
Step 15![]() In the LDAP Attribute Map pane, click Apply to save the value mappings to the running configuration.
In the LDAP Attribute Map pane, click Apply to save the value mappings to the running configuration.
Configuring LDAP Server Groups
To use an external LDAP server for authentication, authorization, and/or accounting, you must first create at least one LDAP server group, and add one or more servers to each group. You identify LDAP server groups by name. Each server group is specific to one type of server.
Guidelines
- You can have up to 100 LDAP server groups in single mode or 4 LDAP server groups per context in multiple mode.
- Each group can have up to 16 LDAP servers in single mode or 4 LDAP servers in multiple mode.
- When a user logs in, the LDAP servers are accessed one at a time, starting with the first server that you specify in the configuration, until a server responds. If all servers in the group are unavailable, the ASA tries the local database if you configured it as a fallback method (management authentication and authorization only). If you do not have a fallback method, the ASA continues to try the LDAP servers.
Detailed Steps
The following steps show how to create and configure an LDAP server group, and add an LDAP server to that group.
Step 1![]() Choose Configuration > Device Management > Users/AAA > AAA Server Groups, or Configuration > Remote Access VPN > AAA/Local Users > AAA Server Groups for VPN users.
Choose Configuration > Device Management > Users/AAA > AAA Server Groups, or Configuration > Remote Access VPN > AAA/Local Users > AAA Server Groups for VPN users.
Step 2![]() In the AAA Server Groups area, click Add.
In the AAA Server Groups area, click Add.
The Add AAA Server Group dialog box appears.
Step 3![]() In the AAA Server Group field, name this AAA server group.
In the AAA Server Group field, name this AAA server group.
Step 4![]() From the Protocol drop-down list, choose the LDAP server type.
From the Protocol drop-down list, choose the LDAP server type.
Step 5![]() In the Reactivation Mode field, click the radio button for the mode you want to use (Depletion or Timed).
In the Reactivation Mode field, click the radio button for the mode you want to use (Depletion or Timed).
In Depletion mode, failed servers are reactivated only after all of the servers in the group are inactive.
In Timed mode, failed servers are reactivated after 30 seconds of down time.
a.![]() If you chose the Depletion reactivation mode, enter a time interval in the Dead Time field.
If you chose the Depletion reactivation mode, enter a time interval in the Dead Time field.
The Dead Time is the duration of time, in minutes, that elapses between the disabling of the last server in a group and the subsequent re-enabling of all servers.
Step 6![]() In the Max Failed Attempts field, add the number of failed attempts to connect to the server to allow.
In the Max Failed Attempts field, add the number of failed attempts to connect to the server to allow.
This option sets the number of failed connection attempts allowed before declaring a nonresponsive server to be inactive.
The Add AAA Server Group dialog box closes, and the new server group is added to the AAA Server Groups table.
Step 8![]() In the AAA Server Groups dialog box, click Apply to save the changes.
In the AAA Server Groups dialog box, click Apply to save the changes.
The changes are saved to the running configuration.
Adding an LDAP Server to a Group
Step 1![]() Choose Configuration > Device Management > Users/AAA > AAA Server Groups, or Configuration > Remote Access VPN > AAA/Local Users > AAA Server Groups for VPN users, and in the AAA Server Groups area, select the server group to which you want to add a server.
Choose Configuration > Device Management > Users/AAA > AAA Server Groups, or Configuration > Remote Access VPN > AAA/Local Users > AAA Server Groups for VPN users, and in the AAA Server Groups area, select the server group to which you want to add a server.
Step 2![]() Next to the list of Servers in Selected Grous, click Add.
Next to the list of Servers in Selected Grous, click Add.
The Add AAA Server dialog box appears for the selected server group.
Step 3![]() From the Interface Name drop-down list, choose the name of the interface that connects to the LDAP server.
From the Interface Name drop-down list, choose the name of the interface that connects to the LDAP server.
Step 4![]() In the Server Name or IP Address field, add either the server name or IP address of the LDAP server.
In the Server Name or IP Address field, add either the server name or IP address of the LDAP server.
Step 5![]() In the Timeout field, either add a timeout value or keep the default. The timeout is the duration of time, in seconds, that the ASA waits for a response from the primary server before sending the request to the backup server.
In the Timeout field, either add a timeout value or keep the default. The timeout is the duration of time, in seconds, that the ASA waits for a response from the primary server before sending the request to the backup server.
Step 6![]() In the LDAP Parameters for authentication/authorization area, configure the following fields:
In the LDAP Parameters for authentication/authorization area, configure the following fields:
- Enable LDAP over SSL (also called secure LDAP or LDAP-S)—Check this if you want to use SSL to secure communications between the ASA and the LDAP server.
Note![]() If you do not configure the SASL protocol, we strongly recommend that you secure LDAP communications with SSL.
If you do not configure the SASL protocol, we strongly recommend that you secure LDAP communications with SSL.
- Server Port —Enter TCP port number 389, the port which the ASA uses to access the LDAP server for simple (non-secure) authentication, or TCP port 636 for secure authentication (LDAP-S). All LDAP servers support authentication and authorization. Only Microsoft AD and Sun LDAP servers additionally provide a VPN remote access password management capability, which requires LDAP-S.
- Server Type —Specify the LDAP server type from the drop-down list. The available options include the following:
–![]() Detect Automatically/Use Generic Type
Detect Automatically/Use Generic Type
–![]() Sun, now part of Oracle Directory Server Enterprise Edition
Sun, now part of Oracle Directory Server Enterprise Edition
- Base DN —Enter the Base Distinguished Name, or location in the LDAP hierarchy where the server should begin searching when it receives an LDAP request (for example, OU=people, dc=cisco, dc=com).
- Scope —Specify the extent of the search that the server should perform in the LDAP hierarchy when it receives an authorization request from the drop-down list. The following options are available:
–![]() One Level—Searches only one level beneath the Base DN. This option is quicker.
One Level—Searches only one level beneath the Base DN. This option is quicker.
–![]() All Levels—Searches all levels beneath the Base DN (that is, searches the entire subtree hierarchy). This option takes more time.
All Levels—Searches all levels beneath the Base DN (that is, searches the entire subtree hierarchy). This option takes more time.
- Naming Attribute(s) —Enter the Relative Distinguished Name attribute(s) that uniquely identify an entry on the LDAP server. Common naming attributes are Common Name (CN), sAMAccountName, userPrincipalName, and User ID (uid).
- Login DN and Login Password —The ASA uses the login DN and login password to establish trust (bind) with an LDAP server. Specify the login password, which is the password for the login DN user account. The characters that you type are replaced with asterisks.
- LDAP Attribute Map —Select one of the attribute maps that you created for this LDAP server to use. These attribute maps map LDAP attribute names to Cisco attribute names and values.
- SASL MD5 authentication This enables the MD5 mechanism of the SASL to authenticate communications between the ASA and the LDAP server.
- SASL Kerberos authentication —Enables the Kerberos mechanism of the SASL to secure authentication communications between the ASA and the LDAP server. You must have defined a Kerberos server in order to enable this option.
- LDAP Parameters for Group Search —The fields in this area configure how the ASA requests AD groups.
–![]() Group Base DN —Specifies the location in the LDAP hierarchy to begin searching for the AD groups (that is, the list of memberOf enumerations). If this field is not configured, the ASA uses the base DN for AD group retrieval. ASDM uses the list of retrieved AD groups to define AAA selection criteria for dynamic access policies. For more information, see the show ad-groups command.
Group Base DN —Specifies the location in the LDAP hierarchy to begin searching for the AD groups (that is, the list of memberOf enumerations). If this field is not configured, the ASA uses the base DN for AD group retrieval. ASDM uses the list of retrieved AD groups to define AAA selection criteria for dynamic access policies. For more information, see the show ad-groups command.
–![]() Group Search Timeout —Specifiy the maximum time to wait for a response from an AD server that was queried for available groups.
Group Search Timeout —Specifiy the maximum time to wait for a response from an AD server that was queried for available groups.
The Add AAA Server dialog box closes, and the AAA server is added to the AAA server group.
Step 8![]() In the AAA Server Groups pane, click Apply to save the changes to the running configuration.
In the AAA Server Groups pane, click Apply to save the changes to the running configuration.
Testing LDAP Server Authentication and Authorization
To determine whether the ASA can contact an LDAP server and authenticate or authorize a user, perform the following steps:
Step 1![]() In the Configuration > Device Management > Users/AAA > AAA Server Groups pane, select the server group in which the server resides.
In the Configuration > Device Management > Users/AAA > AAA Server Groups pane, select the server group in which the server resides.
Step 2![]() From the Servers in the Selected Group area, select the server that you want to test.
From the Servers in the Selected Group area, select the server that you want to test.
The Test AAA Server dialog box appears for the selected server.
Step 4![]() Click the type of test that you want to perform— Authentication or Authorization.
Click the type of test that you want to perform— Authentication or Authorization.
Step 6![]() If you are testing authentication, enter the password for the username.
If you are testing authentication, enter the password for the username.
The ASA sends either an authentication or authorization test message to the server. If the test fails, ASDM displays an error message.
Monitoring LDAP Servers
To monitor LDAP servers, perform the following steps:
Step 1![]() In ASDM, choose Monitoring > Properties > AAA Servers.
In ASDM, choose Monitoring > Properties > AAA Servers.
Step 2![]() To update an LDAP server status, select it then click Update Server Statistics.
To update an LDAP server status, select it then click Update Server Statistics.
The Update AAA Server Status dialog box appears with the LDAP server selected in the drop-down list.
Step 4![]() To update the currently displayed statistics, click Clear Server Statistics.
To update the currently displayed statistics, click Clear Server Statistics.
Feature History for LDAP Servers
Table 37-2 lists each feature change and the platform release in which it was implemented. ASDM is backward-compatible with multiple platform releases, so the specific ASDM release in which support was added is not listed.
 Feedback