ASDM Book 1: Cisco ASA Series General Operations ASDM Configuration Guide, 7.2
Bias-Free Language
The documentation set for this product strives to use bias-free language. For the purposes of this documentation set, bias-free is defined as language that does not imply discrimination based on age, disability, gender, racial identity, ethnic identity, sexual orientation, socioeconomic status, and intersectionality. Exceptions may be present in the documentation due to language that is hardcoded in the user interfaces of the product software, language used based on RFP documentation, or language that is used by a referenced third-party product. Learn more about how Cisco is using Inclusive Language.
- Updated:
- March 18, 2014
Chapter: IPv6 Neighbor Discovery
- Information About IPv6 Neighbor Discovery
- Licensing Requirements for IPv6 Neighbor Discovery
- Prerequisites for IPv6 Neighbor Discovery
- Guidelines and Limitations
- Default Settings for IPv6 Neighbor Discovery
- Configuring IPv6 Neighbor Discovery
- Configuring the Router Advertisement Transmission Interval
- Viewing and Clearing Dynamically Discovered Neighbors
- Additional References
- Feature History for IPv6 Neighbor Discovery
IPv6 Neighbor Discovery
- Information About IPv6 Neighbor Discovery
- Licensing Requirements for IPv6 Neighbor Discovery
- Prerequisites for IPv6 Neighbor Discovery
- Guidelines and Limitations
- Default Settings for IPv6 Neighbor Discovery
- Configuring IPv6 Neighbor Discovery
- Viewing and Clearing Dynamically Discovered Neighbors
- Additional References
- Feature History for IPv6 Neighbor Discovery
Information About IPv6 Neighbor Discovery
The IPv6 neighbor discovery process uses ICMPv6 messages and solicited-node multicast addresses to determine the link-layer address of a neighbor on the same network (local link), verify the readability of a neighbor, and keep track of neighboring routers.
Nodes (hosts) use neighbor discovery to determine the link-layer addresses for neighbors known to reside on attached links and to quickly purge cashed values that become invalid. Hosts also use neighbor discovery to find neighboring routers that are willing to forward packets on their behalf. In addition, nodes use the protocol to actively keep track of which neighbors are reachable and which are not, and to detect changed link-layer addresses. When a router or the path to a router fails, a host actively searches for functioning alternates.
This section includes the following topics:
- Neighbor Solicitation Messages
- Neighbor Reachable Time
- Duplicate Address Detection
- Router Advertisement Messages
- Static IPv6 Neighbors
Neighbor Solicitation Messages
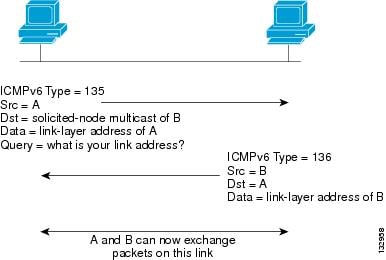
Neighbor solicitation messages (ICMPv6 Type 135) are sent on the local link by nodes attempting to discover the link-layer addresses of other nodes on the local link. The neighbor solicitation message is sent to the solicited-node multicast address. The source address in the neighbor solicitation message is the IPv6 address of the node sending the neighbor solicitation message. The neighbor solicitation message also includes the link-layer address of the source node.
After receiving a neighbor solicitation message, the destination node replies by sending a neighbor advertisement message (ICPMv6 Type 136) on the local link. The source address in the neighbor advertisement message is the IPv6 address of the node sending the neighbor advertisement message; the destination address is the IPv6 address of the node that sent the neighbor solicitation message. The data portion of the neighbor advertisement message includes the link-layer address of the node sending the neighbor advertisement message.
After the source node receives the neighbor advertisement, the source node and destination node can communicate. Figure 32-1 shows the neighbor solicitation and response process.
Figure 32-1 IPv6 Neighbor Discovery—Neighbor Solicitation Message
Neighbor solicitation messages are also used to verify the reachability of a neighbor after the link-layer address of a neighbor is identified. When a node wants to verifying the reachability of a neighbor, the destination address in a neighbor solicitation message is the unicast address of the neighbor.
Neighbor advertisement messages are also sent when there is a change in the link-layer address of a node on a local link. When there is such a change, the destination address for the neighbor advertisement is the all-nodes multicast address.
Neighbor Reachable Time
The neighbor reachable time enables detecting unavailable neighbors. Shorter configured times enable detecting unavailable neighbors more quickly, however, shorter times consume more IPv6 network bandwidth and processing resources in all IPv6 network devices. Very short configured times are not recommended in normal IPv6 operation.
Duplicate Address Detection
During the stateless autoconfiguration process, Duplicate Address Detection verifies the uniqueness of new unicast IPv6 addresses before the addresses are assigned to interfaces (the new addresses remain in a tentative state while Duplicate Address Detection is performed). Duplicate Address Detection is performed first on the new link-local address. When the link-local address is verified as unique, then Duplicate Address Detection is performed all the other IPv6 unicast addresses on the interface.
Duplicate Address Detection is suspended on interfaces that are administratively down. While an interface is administratively down, the unicast IPv6 addresses assigned to the interface are set to a pending state. An interface returning to an administratively up state restarts Duplicate Address Detection for all of the unicast IPv6 addresses on the interface.
When a duplicate address is identified, the state of the address is set to DUPLICATE, the address is not used, and the following error message is generated:
If the duplicate address is the link-local address of the interface, the processing of IPv6 packets is disabled on the interface. If the duplicate address is a global address, the address is not used. However, all configuration commands associated with the duplicate address remain as configured while the state of the address is set to DUPLICATE.
If the link-local address for an interface changes, Duplicate Address Detection is performed on the new link-local address and all of the other IPv6 address associated with the interface are regenerated (Duplicate Address Detection is performed only on the new link-local address).
The ASA uses neighbor solicitation messages to perform Duplicate Address Detection. By default, the number of times an interface performs Duplicate Address Detection is 1.
Router Advertisement Messages
An ASA can participate in router advertisements so that neighboring devices can dynamically learn a default router address. Router advertisement messages (ICMPv6 Type 134) are periodically sent out each IPv6 configured interface of the ASA. The router advertisement messages are sent to the all-nodes multicast address. Figure 32-2 shows an example of how to send router advertisement messages on an IPv6 configured interface.
Figure 32-2 IPv6 Neighbor Discovery—Router Advertisement Message
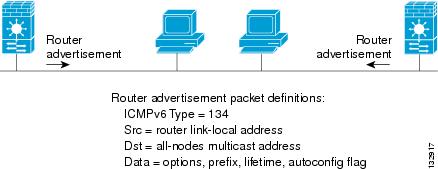
Router advertisement messages typically include the following information:
- One or more IPv6 prefix that nodes on the local link can use to automatically configure their IPv6 addresses.
- Lifetime information for each prefix included in the advertisement.
- Sets of flags that indicate the type of autoconfiguration (stateless or stateful) that can be completed.
- Default router information (whether the router sending the advertisement should be used as a default router and, if so, the amount of time (in seconds) the router should be used as a default router).
- Additional information for hosts, such as the hop limit and MTU a host should use in packets that it originates.
- The amount of time between neighbor solicitation message retransmissions on a given link.
- The amount of time a node considers a neighbor reachable.
Router advertisements are also sent in response to router solicitation messages (ICMPv6 Type 133). Router solicitation messages are sent by hosts at system startup so that the host can immediately autoconfigure without needing to wait for the next scheduled router advertisement message. Because router solicitation messages are usually sent by hosts at system startup, and the host does not have a configured unicast address, the source address in router solicitation messages is usually the unspecified IPv6 address (0:0:0:0:0:0:0:0). If the host has a configured unicast address, the unicast address of the interface sending the router solicitation message is used as the source address in the message. The destination address in router solicitation messages is the all-routers multicast address with a scope of the link. When a router advertisement is sent in response to a router solicitation, the destination address in the router advertisement message is the unicast address of the source of the router solicitation message.
You can configure the following settings for router advertisement messages:
- The time interval between periodic router advertisement messages.
- The router lifetime value, which indicates the amount of time IPv6 nodes should consider the ASA to be the default router.
- The IPv6 network prefixes in use on the link.
- Whether or not an interface transmits router advertisement messages.
Unless otherwise noted, the router advertisement message settings are specific to an interface and are entered in interface configuration mode.
Static IPv6 Neighbors
You can manually define a neighbor in the IPv6 neighbor cache. If an entry for the specified IPv6 address already exists in the neighbor discovery cache—learned through the IPv6 neighbor discovery process—the entry is automatically converted to a static entry. Static entries in the IPv6 neighbor discovery cache are not modified by the neighbor discovery process.
Licensing Requirements for IPv6 Neighbor Discovery
|
|
|
|---|---|
Prerequisites for IPv6 Neighbor Discovery
Configure IPv6 addressing according to the Configuring IPv6 Addressing.
Guidelines and Limitations
This section includes the guidelines and limitations for this feature.
Supported in single and multiple context mode.
Supported in routed mode only. Transparent mode is not supported.
Additional Guidelines and Limitations
- The interval value is included in all IPv6 router advertisements that are sent out of this interface.
- The configured time enables detecting unavailable neighbors. Shorter configured times enable detecting unavailable neighbors more quickly; however, shorter times consume more IPv6 network bandwidth and processing resources in all IPv6 network devices. Very short configured times are not recommended in normal IPv6 operation.
- The interval between transmissions should be less than or equal to the IPv6 router advertisement lifetime if the ASA is configured as a default router by using the ipv6 nd ra-lifetime command. To prevent synchronization with other IPv6 nodes, randomly adjust the actual value used to within 20 percent of the specified value.
- The ipv6 nd prefix command allows control over the individual parameters per prefix, including whether or not the prefix should be advertised.
- By default, prefixes configured as addresses on an interface using the ipv6 address command are advertised in router advertisements. If you configure prefixes for advertisement using the ipv6 nd prefix command, then only these prefixes are advertised.
- The default keyword can be used to set default parameters for all prefixes.
- A date can be set to specify the expiration of a prefix. The valid and preferred lifetimes are counted down in real time. When the expiration date is reached, the prefix will no longer be advertised.
- When onlink is on (by default), the specified prefix is assigned to the link. Nodes sending traffic to such addresses that contain the specified prefix consider the destination to be locally reachable on the link.
- When autoconfig is on (by default), it indicates to hosts on the local link that the specified prefix can be used for IPv6 autoconfiguration.
- For stateless autoconfiguration to work correctly, the advertised prefix length in router advertisement messages must always be 64 bits.
- The router lifetime value is included in all IPv6 router advertisements sent out of the interface. The value indicates the usefulness of the ASA as a default router on this interface.
- Setting the value to a non-zero value indicates that the ASA should be considered a default router on this interface. The non-zero value for the router lifetime value should not be less than the router advertisement interval.
The following guidelines and limitations apply for configuring a static IPv6 neighbor:
- The ipv6 neighbor command is similar to the arp command. If an entry for the specified IPv6 address already exists in the neighbor discovery cache—learned through the IPv6 neighbor discovery process—the entry is automatically converted to a static entry. These entries are stored in the configuration when the copy command is used to store the configuration.
- Use the show ipv6 neighbor command to view static entries in the IPv6 neighbor discovery cache.
- The clear ipv6 neighbor command deletes all entries in the IPv6 neighbor discovery cache except static entries. The no ipv6 neighbor command deletes a specified static entry from the neighbor discovery cache; the command does not remove dynamic entries—entries learned from the IPv6 neighbor discovery process—from the cache. Disabling IPv6 on an interface by using the no ipv6 enable command deletes all IPv6 neighbor discovery cache entries configured for that interface except static entries (the state of the entry changes to INCMP [Incomplete]).
- Static entries in the IPv6 neighbor discovery cache are not modified by the neighbor discovery process.
- The clear ipv6 neighbor command does not remove static entries from the IPv6 neighbor discovery cache; it only clears the dynamic entries.
- The ICMP syslogs generated are caused by a regular refresh of IPv6 neighbor entries. The ASA default timer for IPv6 neighbor entry is 30 seconds, so the ASA would generate ICMPv6 neighbor discovery and response packets about every 30 seconds. If the ASA has both failover LAN and state interfaces configured with IPv6 addresses, then every 30 seconds, ICMPv6 neighbor discovery and response packets will be generated by both ASAs for both configured and link-local IPv6 addresses. In addition, each packet will generate several syslogs (ICMP connection and local-host creation or teardown), so it may appear that constant ICMP syslogs are being generated. The refresh time for IPV6 neighbor entry is configurable on the regular data interface, but not configurable on the failover interface. However, the CPU impact for this ICMP neighbor discovery traffic is minimal.
Default Settings for IPv6 Neighbor Discovery
Table 32-1 lists the default settings for IPv6 Neighbor Discovery.
Configuring IPv6 Neighbor Discovery
- Configuring the Neighbor Solicitation Message Interval
- Configuring the Neighbor Reachable Time
- Configuring the Router Advertisement Transmission Interval
- Configuring the Router Lifetime Value
- Configuring DAD Settings
- Suppressing Router Advertisement Messages
- Configuring Address Config Flags for IPv6 DHCP Relay
- Configuring the IPv6 Prefix in Router Advertisements
- Configuring a Static IPv6 Neighbor
Configuring the Neighbor Solicitation Message Interval
To configure the interval between IPv6 neighbor solicitation retransmissions on an interface, perform the following steps.
Detailed Steps
Step 1![]() Choose Configuration > Device Setup > Interfaces.
Choose Configuration > Device Setup > Interfaces.
Step 2![]() Choose the interface on which to configure the neighbor solicitation interval. The interface must have been configured with an IPv6 address. see Configuring IPv6 Addressing for more information.
Choose the interface on which to configure the neighbor solicitation interval. The interface must have been configured with an IPv6 address. see Configuring IPv6 Addressing for more information.
Step 3![]() Click Edit. The Edit Interface dialog box appears with three tabs: General, Advanced, and IPv6.
Click Edit. The Edit Interface dialog box appears with three tabs: General, Advanced, and IPv6.
Step 5![]() In the NS Interval field, enter the time interval.
In the NS Interval field, enter the time interval.
Step 7![]() Click Apply to save the running configuration.
Click Apply to save the running configuration.
Configuring the Neighbor Reachable Time
To configure the amount of time that a remote IPv6 node is considered reachable after a reachability confirmation event has occurred, perform the following steps.
Detailed Steps
Step 1![]() Choose Configuration > Device Setup > Interfaces.
Choose Configuration > Device Setup > Interfaces.
Step 2![]() Choose the interface for which you want to configure the time. The interface must have been configured with an IPv6 address. For more information, see Configuring IPv6 Addressing.
Choose the interface for which you want to configure the time. The interface must have been configured with an IPv6 address. For more information, see Configuring IPv6 Addressing.
Step 3![]() Click Edit. The Edit Interface dialog box appears with three tabs: General, Advanced, and IPv6.
Click Edit. The Edit Interface dialog box appears with three tabs: General, Advanced, and IPv6.
Step 5![]() In the Reachable Time field, enter a valid value.
In the Reachable Time field, enter a valid value.
Step 7![]() Click Apply to save the running configuration.
Click Apply to save the running configuration.
Configuring the Router Advertisement Transmission Interval
To configure the interval between IPv6 router advertisement transmissions on an interface, perform the following steps.
Detailed Steps
Step 1![]() Choose Configuration > Device Setup > Interfaces.
Choose Configuration > Device Setup > Interfaces.
Step 2![]() Select the interface for which you want to configure the time.
Select the interface for which you want to configure the time.
The interface must have been configured with an IPv6 address. For more information, see Configuring IPv6 Addressing.
Step 3![]() Click Edit. The Edit Interface dialog box appears with three tabs: General, Advanced, and IPv6.
Click Edit. The Edit Interface dialog box appears with three tabs: General, Advanced, and IPv6.
Step 5![]() In the RA Interval field, enter a valid transmission interval value.
In the RA Interval field, enter a valid transmission interval value.

Note![]() (Optional) To add a router advertisement transmission interval value in milliseconds instead, check the RA Interval in Milliseconds check box, and enter a value from 500 to 1800000.
(Optional) To add a router advertisement transmission interval value in milliseconds instead, check the RA Interval in Milliseconds check box, and enter a value from 500 to 1800000.
Step 7![]() Click Apply to save the running configuration.
Click Apply to save the running configuration.
Configuring the Router Lifetime Value
To configure the router lifetime value in IPv6 router advertisements on an interface, perform the following steps.
Detailed Steps
Step 1![]() Choose Configuration > Device Setup > Interfaces.
Choose Configuration > Device Setup > Interfaces.
Step 2![]() Select the interface you want to configure.
Select the interface you want to configure.
The interface must have been configured with an IPv6 address. For more information see Configuring IPv6 Addressing.
The Edit Interface dialog box appears with three tabs: General, Advanced, and IPv6.
Step 5![]() In the RA Lifetime field, enter a valid lifetime value.
In the RA Lifetime field, enter a valid lifetime value.
Step 7![]() Click Apply to save the running configuration.
Click Apply to save the running configuration.
Configuring DAD Settings
To specify DAD settings on the interface, perform the following steps.
Detailed Steps
Step 1![]() Choose Configuration > Device Setup > Interfaces.
Choose Configuration > Device Setup > Interfaces.
Step 2![]() Select the interface you want to configure.
Select the interface you want to configure.
The interface must have been configured with an IPv6 address. For more information, see Configuring IPv6 Addressing.
The Edit Interface dialog box appears with three tabs: General, Advanced, and IPv6.
Step 5![]() Enter the number of allowed DAD attempts. This setting configures the number of consecutive neighbor solicitation messages that are sent on an interface while DAD is performed on IPv6 addresses. Valid values range from 0 to 600. A zero value disables DAD processing on the specified interface. The default is one message.
Enter the number of allowed DAD attempts. This setting configures the number of consecutive neighbor solicitation messages that are sent on an interface while DAD is performed on IPv6 addresses. Valid values range from 0 to 600. A zero value disables DAD processing on the specified interface. The default is one message.
Suppressing Router Advertisement Messages
Router advertisement messages are automatically sent in response to router solicitation messages. You may want to disable these messages on any interface for which you do not want the ASA to supply the IPv6 prefix (for example, the outside interface).
To suppress the router lifetime value in IPv6 router advertisements on an interface, perform the following steps.
Detailed Steps
Step 1![]() Choose Configuration > Device Setup > Interfaces.
Choose Configuration > Device Setup > Interfaces.
Step 2![]() Select the interface for which you want to suppress the router advertisement transmissions. The interface must have been configured with an IPv6 address.
Select the interface for which you want to suppress the router advertisement transmissions. The interface must have been configured with an IPv6 address.
The Edit Interface dialog box appears with three tabs: General, Advanced, and IPv6.
Step 5![]() Check the Suppress RA check box.
Check the Suppress RA check box.
Configuring Address Config Flags for IPv6 DHCP Relay
You can add a flag to IPv6 router advertisements to inform IPv6 autoconfiguration clients to use DHCPv6 to obtain an IPv6 address and/or additional information such as the DNS server address.
Detailed Steps
Step 1![]() Choose Configuration > Device Setup > Interfaces.
Choose Configuration > Device Setup > Interfaces.
Step 2![]() Select the interface that you want to configure.
Select the interface that you want to configure.
The Edit Interface dialog box appears with three tabs: General, Advanced, and IPv6.
Step 5![]() Check the Hosts should use DHCP for address config check box to set the Managed Address Config flag in the IPv6 router advertisement packet. This flag informs IPv6 autoconfiguration clients that they should use DHCPv6 to obtain addresses, in addition to the derived stateless autoconfiguration address.
Check the Hosts should use DHCP for address config check box to set the Managed Address Config flag in the IPv6 router advertisement packet. This flag informs IPv6 autoconfiguration clients that they should use DHCPv6 to obtain addresses, in addition to the derived stateless autoconfiguration address.
Check the Hosts should use DHCP for non-address config check box to set the Other Address Config flag in the IPv6 router advertisement packet. This flag informs IPv6 autoconfiguration clients that they should use DHCPv6 to obtain additional information from DHCPv6, such as the DNS server address.
Configuring the IPv6 Prefix in Router Advertisements
To configure the which IPv6 prefixes are included in IPv6 router advertisements, perform the following steps.
Detailed Steps
Step 1![]() Choose Configuration > Device Setup > Interfaces.
Choose Configuration > Device Setup > Interfaces.
Step 2![]() Select the interface for which you want to suppress the router advertisement transmissions. The interface must have been configured with an IPv6 address.
Select the interface for which you want to suppress the router advertisement transmissions. The interface must have been configured with an IPv6 address.
The Edit Interface dialog box appears with three tabs: General, Advanced, and IPv6.
Step 5![]() In the Interface IPv6 Prefixes area, click Add.
In the Interface IPv6 Prefixes area, click Add.
The Add IPv6 Prefix for Interface dialog box appears.
Step 6![]() Enter the IPv6 address with the prefix length.
Enter the IPv6 address with the prefix length.
Step 7![]() (Optional) To configure the IPv6 address manually, check the No Auto-Configuration check box. This setting indicates to hosts on the local link that the specified prefix cannot be used for IPv6 autoconfiguration.
(Optional) To configure the IPv6 address manually, check the No Auto-Configuration check box. This setting indicates to hosts on the local link that the specified prefix cannot be used for IPv6 autoconfiguration.
Step 8![]() (Optional) To indicate that the IPv6 prefix is not advertised, check the No Advertisements check box.
(Optional) To indicate that the IPv6 prefix is not advertised, check the No Advertisements check box.
Step 9![]() (Optional) The Off Link check box indicates that the specified prefix is assigned to the link. Nodes sending traffic to addresses that contain the specified prefix consider the destination to be locally reachable on the link. This prefix should not be used for on-link determination.
(Optional) The Off Link check box indicates that the specified prefix is assigned to the link. Nodes sending traffic to addresses that contain the specified prefix consider the destination to be locally reachable on the link. This prefix should not be used for on-link determination.
Step 10![]() In the Prefix Lifetime area, click the Lifetime Duration radio button, and specify the following:
In the Prefix Lifetime area, click the Lifetime Duration radio button, and specify the following:
a.![]() A valid lifetime for the prefix in seconds from the drop-down list. This setting is the amount of time that the specified IPv6 prefix is advertised as being valid. The maximum value represents infinity. Valid values are from 0 to 4294967295. The default is 2592000 (30 days).
A valid lifetime for the prefix in seconds from the drop-down list. This setting is the amount of time that the specified IPv6 prefix is advertised as being valid. The maximum value represents infinity. Valid values are from 0 to 4294967295. The default is 2592000 (30 days).
b.![]() A preferred lifetime for the prefix from the drop-down list. This setting is the amount of time that the specified IPv6 prefix is advertised as being preferred. The maximum value represents infinity. Valid values are from 0 to 4294967295. The default setting is 604800 (seven days).
A preferred lifetime for the prefix from the drop-down list. This setting is the amount of time that the specified IPv6 prefix is advertised as being preferred. The maximum value represents infinity. Valid values are from 0 to 4294967295. The default setting is 604800 (seven days).
Step 11![]() To define a prefix lifetime expiration date, click the Lifetime Expiration Date radio button, and specify the following:
To define a prefix lifetime expiration date, click the Lifetime Expiration Date radio button, and specify the following:
a.![]() Choose a valid month and day from the drop-down list, and then enter a time in hh:mm format.
Choose a valid month and day from the drop-down list, and then enter a time in hh:mm format.
b.![]() Choose a preferred month and day from the drop-down list, and then enter a time in hh:mm format.
Choose a preferred month and day from the drop-down list, and then enter a time in hh:mm format.
Step 12![]() Click OK to save your settings.
Click OK to save your settings.
The Interface IPv6 Prefixes Address field appears with the preferred and valid dates.
Configuring a Static IPv6 Neighbor
Make sure that IPv6 is enabled on at least one interface before trying to add a neighbor, or ASDM returns an error message indicating that the configuration failed.
For information about configuring IPv6 addresses, see Configuring IPv6 Addressing.
To add an IPv6 static neighbor, perform the following steps.
Detailed Steps
Step 1![]() Choose Configuration > Device Management > Advanced > IPv6 Neighbor Discovery Cache.
Choose Configuration > Device Management > Advanced > IPv6 Neighbor Discovery Cache.
The Add IPv6 Static Neighbor dialog box appears.
Step 3![]() From the Interface Name drop-down list, choose an interface on which to add the neighbor.
From the Interface Name drop-down list, choose an interface on which to add the neighbor.
Step 4![]() In the IP Address field, enter the IPv6 address that corresponds to the local data-link address, or click the ellipsis (...) to browse for an address.
In the IP Address field, enter the IPv6 address that corresponds to the local data-link address, or click the ellipsis (...) to browse for an address.
If an entry for the specified IPv6 address already exists in the neighbor discovery cache—learned through the IPv6 neighbor discovery process—the entry is automatically converted to a static entry.
Step 5![]() In the MAC address field, enter the local data-line (hardware) MAC address.
In the MAC address field, enter the local data-line (hardware) MAC address.
Note![]() Before you apply the changes and save the configuration, you can click Reset to cancel any changes and restore the original values.
Before you apply the changes and save the configuration, you can click Reset to cancel any changes and restore the original values.
Step 7![]() Click Apply to save the running configuration.
Click Apply to save the running configuration.
Viewing and Clearing Dynamically Discovered Neighbors
When a host or node communicates with a neighbor, the neighbor is added to the neighbor discovery cache. The neighbor is removed from the cache when there is no longer any communication with that neighbor.
To view dynamically discovered neighbors and clear these neighbors from the IPv6 neighbor discovery cache, perform the following steps:
Step 1![]() Choose Monitoring > Interfaces > IPv6 Neighbor Discovery Cache.
Choose Monitoring > Interfaces > IPv6 Neighbor Discovery Cache.
You can view all static and dynamically discovered neighbors from the IPv6 Neighbor Discovery Cache pane.
Step 2![]() To clear all dynamically discovered neighbors from the cache, click Clear Dynamic Neighbor Entries.
To clear all dynamically discovered neighbors from the cache, click Clear Dynamic Neighbor Entries.
The dynamically discovered neighbor is removed from the cache.
Note![]() This procedure clears only dynamically discovered neighbors from the cache; it does not clear static neighbors.
This procedure clears only dynamically discovered neighbors from the cache; it does not clear static neighbors.
Additional References
For additional information related to implementing IPv6 prefixes, see the following topics:
Related Documents for IPv6 Prefixes
|
|
|
|---|---|
RFCs for IPv6 Prefixes and Documentation
Feature History for IPv6 Neighbor Discovery
Table 32-2 lists each feature change and the platform release in which it was implemented. ASDM is backward-compatible with multiple platform releases, so the specific ASDM release in which support was added is not listed.
 Feedback