-
Cisco Unified Wireless IP Phone 7920 Administration Guide for Cisco Unified CallManager Releases 4.2 and 5.0 (SCCP)
-
Preface
-
An Overview of the Cisco Unified Wireless IP Phone 7920
-
An Overview of the Wireless Network
-
Setting Up Cisco Unified Wireless IP Phones
-
Using the Cisco 7920 Configuration Utility
-
Configuring Network Profiles on the Cisco Unified Wireless IP Phone 7920
-
Verifying the Wireless Network Configuration on the Cisco Unified Wireless IP Phone
-
Configuring Features, Templates, Services, and Users
-
Viewing Status, Statistics, and Firmware Information on the Cisco Unified Wireless IP Phone 7920
-
Monitoring the Cisco Unified Wireless IP Phone Remotely
-
Troubleshooting the Cisco Unified Wireless IP Phone 7920
-
Providing Information to Users By Using a Website
-
Supporting International Users
-
Physical and Operating Environment Specifications
-
Index
-
 Feedback
Table Of Contents
Configuring Network Profiles on the Cisco Unified Wireless IP Phone 7920
Accessing Network Profile Settings on the Phone
Displaying the Network Profile Menu
Configuring Network Profile Settings
Guidelines for Editing Settings in the Network Profile Menu
Configuring Wireless Settings for the Profile
Displaying the 802.11b Configuration Menu
Wireless Settings Options in the 802.11b Configuration Menu
Choosing Authentication and Encryption Settings
Entering or Verifying Wireless Settings
Setting Up the Service Set Identifier (SSID)
Selecting the Authentication Type
Setting the Extensible Authentication Protocol (EAP)
Selecting the Wireless Protected Access (WPA) Pre-Shared Key Type
Setting Up the Wired Equivalent Privacy (WEP) Keys
Applying Changes to Wireless Settings and Network Profiles
Configuring Network Profiles on the Cisco Unified Wireless IP Phone 7920
You can configure up to four network profiles for Cisco Unified Wireless IP Phone users. The network profiles include many configurable network and device settings. You can use the Profile menu on the phone or the 7920 Configuration Utility to set up network profiles.
Cisco Unified Wireless IP Phone users who travel between company locations can have separate network profiles for each wireless LAN (WLAN) location. The system administrator can set up profiles with the local SSID, WLAN settings, and authentication information for each location.
The following sections provide details about configuring these network settings in profiles:
•
Accessing Network Profile Settings on the Phone
•
•
Accessing Network Profile Settings on the Phone
You can view and set most network configuration options for the Cisco Unified Wireless IP Phone 7920 by using the Profiles menu and the Network Profile option.
Note
This section includes the following topics:
•
•
Displaying the Network Profile Menu
To display the Network Profile menu on a Cisco Unified Wireless IP Phone 7920, follow these steps:
Procedure
Step 1
Step 2
Step 3
Step 4
Figure 5-1 shows the setting options for a network profile.
Step 5
Figure 5-1 Setting Options in a Network Profile
Related Topic
•
Configuring Network Profile Settings
On Cisco Unified Wireless IP Phone 7920, you can configure a network profile for the wireless network settings for a specific WLAN. The Network Profile menu provides access to the network settings that are described in Table 5-1.
Table 5-1 Network Profile Settings
Apply Change
When you change a network profile, you must apply the changes to activate the profile.
See the "Applying Changes to Wireless Settings and Network Profiles" section
DHCP Enable/Disable
Set Enable to allow the Dynamic Host Configuration Protocol (DHCP) to obtain an IP address for the phone.
Note
TFTP Option
Set this option to assign an alternative TFTP server instead of the one assigned by DHCP.
See the "Configuring TFTP Option" section.
802.11b Configuration
Use this menu to configure wireless settings for the phone such as SSID.
See the "Configuring Wireless Settings for the Profile" section.
Change Profile Name
Choose a meaningful name for each profile that you configure.
Related Topics
•
Modifying DHCP Settings
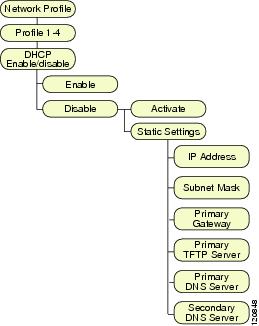
To automatically assign IP addresses to devices when you connect them to the network, you can use DHCP. If you do not use DHCP in your network, then you must disable DHCP and manually enter network configuration information. You can use the DHCP Enable/Disable menu, as shown in Figure 5-2, on the phone to configure DHCP.
This section provides information about enabling and disabling DHCP in the following topics:
Figure 5-2 DHCP Enable/Disable Menu Options
Enabling or Disabling DHCP
The Cisco Unified IP Phones enable DHCP by default, but you can disable the protocol if you do not use DHCP in your network. Use the following steps to enable or disable DHCP from the phone.
Note
Procedure
Step 1
Step 2
Step 3
Step 4
A check mark appears next to the selected option.
Step 5
Related Topic
Configuring Static Settings
When DHCP is disabled in the network, you must configure the following settings in the Static Settings menu:
•
•
•
•
•
Use these guidelines when manually configuring the IP settings:
•
•
Note
Procedure
Step 1
Step 2
Step 3
The Static Settings menu options display.
Step 4
See Table 5-2 for descriptions of the static setting fields.
Step 5
Note
arrow to enter a space between octets in the IP address.
For information about entering values, see the "Configuring Network Profile Settings" section.
Step 6
Guidelines for Editing Settings in the Network Profile Menu
When you edit the value of an option on the Network Profile menu, you can enter characters, numbers, and special characters from the phone keypad. Use the numeric keys on the keypad to enter the number or the assigned characters. Each press moves to another character choice. Use the following guidelines when entering values:
•
•
•
•
•
to switch between uppercase and lowercase.
or
appears on the right corner of the screen to indicate the case.
•
to enter a space between characters.
•
. Doing so displays the symbol screen, as shown in Figure 5-3. Use
,
, or
•
Figure 5-3 Symbol Screen
Related Topics
•
•
Configuring TFTP Option
If you use DHCP to direct the Cisco Unified IP Phones to a TFTP server, you can also assign an alternative TFTP server to some phones instead of the one assigned by DHCP. To assign a TFTP server to a phone, follow these steps:
Procedure
Step 1
Step 2
Step 3
Step 4
To use the TFTP server IP address assigned in the Static Settings options, scroll to Use Static.
Step 5
Step 6
Related Topics
•
Configuring Wireless Settings for the Profile
The 802.11b Configuration menu contains settings that the phone uses to authenticate with an access point. These settings include the SSIDs, authentication type, and encryption data that the phone uses.
This section includes the following topics:
•
•
•
Displaying the 802.11b Configuration Menu
To display the 802.11b Configuration menu options on a Cisco Unified Wireless IP Phone 7920, follow these steps:
Procedure
Step 1
Step 2
Step 3
Step 4
Figure 5-4 shows the menu options for the 802.11b Configuration menu.
Figure 5-4 802.11b Configuration Menu Options
Related Topics
•
•
•
Wireless Settings Options in the 802.11b Configuration Menu
On Cisco Unified Wireless IP Phone 7920, you can view settings information about the different network profiles on the phone. You can use this information to troubleshoot problems or to change settings. The 802.11b Configuration menu provides access to the wireless network settings that are described in Table 5-3.
Table 5-3 Wireless Network Settings
SSID
Unique identifier for accessing wireless access points.
Authentication
The type of security used to validate that phone requests to the access point are authorized. Four options are:
•
•
•
•
EAP
Cisco proprietary authentication and encryption method for securing wireless communications using a RADIUS server
"Setting the Extensible Authentication Protocol (EAP)" section
WPA Pre-shared Key
Authentication scheme that uses a key configured on both the access point and the phone. The password phrase format options are hexadecimal or ASCII.
Selecting the Wireless Protected Access (WPA) Pre-Shared Key Type
WEP Key
An encryption scheme for securing wireless communications by using an encryption key.
You can set up to four WEP Keys using 40-bit or 128-bit character strings.
"Setting Up the Wired Equivalent Privacy (WEP) Keys" section
Choosing Authentication and Encryption Settings
The type of authentication and encryption schemes that you are using with your WLAN determine how you set up the authentication and encryption options in the network profiles for the Cisco Unified Wireless IP Phones. Table 5-4 provides a list of supported authentication and encryption schemes that you can configure on the Cisco Unified Wireless IP Phone 7920.
Related Topics
•
•
•
Entering or Verifying Wireless Settings
This section provides information about the following wireless settings:
•
•
•
•
•
•
Setting Up the Service Set Identifier (SSID)
An SSID is a unique identifier that Cisco Unified Wireless IP Phone 7920s use to communicate with each other through one or more access points (APs). You must assign the same SSID to the phone that is also assigned to access points in the wireless network. Several access points can share the same SSID on a network or subnetwork.
To assign an SSID to a network profile, you can choose the "Any" option so the phone can access all access points. Or you can choose the "Specify" option and enter a specific SSID. An SSID can have any value but cannot exceed 32 alpha numeric characters.
To configure the SSID setting, follow these steps:
Procedure
Step 1
Step 2
Step 3
Step 4
The SSID options display.
Step 5
Step 6
Note
Step 7
Step 8
Related Topics
•
•
•
Selecting the Authentication Type
The Cisco Unified Wireless IP Phone 7920 supports four types of authentication:
•
•
•
•
To select the authentication type for the profile, follow these steps:
Procedure
Step 1
Step 2
Step 3
Step 4
The Authentication options display.
Step 5
•
•
•
•
A check appears by the selected authentication type.
Note
Related Topics
•
•
•
Setting the Extensible Authentication Protocol (EAP)
When your network uses Cisco EAP or AKM for user authentication, you must configure both the user name and a password on the Access Control Server (ACS) and the phone.
Note
To set up the EAP requirements on the phone, follow these steps:
Setting the EAP Username or Password
To enter or change the EAP username or password, you must use exactly the same username in the phone option or the same password string that is configured in the RADIUS server.
Note
To set up the EAP username and password on the phone, follow these steps:
Procedure
Step 1
Step 2
Step 3
The EAP options is displayed.
Step 4
Step 5
Step 6
For information about entering values, see the "Guidelines for Editing Settings in the Network Profile Menu" section.
Step 7
Step 8
Setting the EAP Mode
You can select the EAP mode used for configuration on your network. The default mode is EAP. If you select Auto, then EAP-FAST is given priority.
To change the EAP mode on the phone, follow these steps:
Procedure
Step 1
Step 2
Step 3
The EAP options is displayed.
Step 4
Step 5
Step 6
Switching the EAP Prompt Mode On and Off
When the EAP Prompt Mode is turned on, the phone displays a message requesting that you enter the EAP username and password whenever you power on the Cisco Unified Wireless IP Phone 7920.
To set the EAP prompt on the phone, follow these steps:
Procedure
Step 1
Step 2
Step 3
The EAP options display.
Step 4
Step 5
To turn on the prompt mode, scroll to On.
Step 6
A check mark appears next to the selected option.
Step 7
Related Topic
•
Selecting the Wireless Protected Access (WPA) Pre-Shared Key Type
When using the WPA Pre-shared Key for authentication, the Cisco Unified Wireless IP Phone 7920 supports two character formats:
•
•
To set the WPA Pre-shared Key, follow these steps:
Procedure
Step 1
Step 2
Step 3
Step 4
The options display.
Step 5
•
•
A check appears by the selected format.
Step 6
•
•
Setting Up the Wired Equivalent Privacy (WEP) Keys
The 802.11b standard provides an optional encryption scheme called Wired Equivalent Privacy (WEP). If your wireless network uses WEP encryption, you need to enter a hexadecimal key and then activate the WEP Key.
The WEP Keys for the phone must match the WEP Keys assigned to the access point. Cisco Unified Wireless IP Phone 7920 and Cisco Aironet Access Points support both 40-bit and 128-bit encryption keys. If you do not use WEP encryption in the WLAN, then choose None.
Configuring a WEP Key
You can choose one of the following types of encryption schemes:
•
•
•
To configure the WEP Key, follow these steps:
Procedure
Step 1
Step 2
Step 3
The WEP Key options display.
Step 4
Step 5
Step 6
•
•
•
Step 7
A check mark appears next to the selected option.
Activating a WEP Key
After you configure the WEP Key, you must activate it. Follow these steps to activate the key.
Procedure
Step 1
Step 2
Step 3
The WEP Key options display.
Step 4
Step 5
A check mark appears next to the activated key.
Step 6
Related Topics
•
•
•
Applying Changes to Wireless Settings and Network Profiles
Whenever you make changes to the settings in a network profile, you must apply the changes to the network profile. Use the following steps to activate the changes.
Procedure
Step 1
Step 2
Step 3
The Service Set Identifier (SSID), authentication type, or encryption data are activated.
Changing the Profile Name
You can change the default name of the network profile to one that is more meaningful to the user, such as, "Headquarters" or "Branch office." You can change the name before or after you have made changes to the network profile.
To rename the profile, follow these steps:
Procedure
Step 1
Step 2
Step 3
Step 4
Step 5
Related Topics
•